李宁离线订购系统用户手册
Ruckus r600 用户手册说明书

D-Link PDS-700 Series 用户手册说明书

English/ August 2011/ Version 1.2 For PDS-700 SeriesWhat’s in the shipping package? The package includes the following items:PDS-700 Series Quick Start Guide(This Document)Software CD CA-0910 Cable1.Power Supply: +10 ~ +30 V DC. (Ex: DP-665)2.Ethernet Hub. (Ex: NS-205)3.Make sure your PC has workable network settings.4.Disable or well configure your Windows firewall and Anti-Virusfirewall first, else the “Search Servers” on page 3 may not work. (Please contact with your system Administrator) Preparations for devicesConnecting the Power and Host PC1.Wire “RxD1” and “TxD1” of the PDS-700 for self-test.2.Connect both the PDS-700 and your computer to the samesub network or the same Ethernet Switch, and power the PDS-700 on.Installing software on your PCInstall VxComm Utility:The software is located at:CD: \NAPDOS\Driver\VxComm_Driver/pub/cd/8000cd/napdos/driver/vxcomm_driver/ ArrayConfiguring Ethernet Settings1.Double click the VxComm Utility shortcut on the desktop.2.Click “Search Servers” button to search your PDS-700.3.Double-Click the PDS-700 to configure the Ethernet Settings.Click “Search Servers” Double-Click your PDS-7004. Contact your Network Administrator to get correct network configuration. Modify the network settings and then click “OK ”. The PDS-700 will restart it-self immediately.Configuring Virtual COM Ports1. Wait 2 seconds and the click the “Search Servers” buttonagain to ensure the PDS-700 is working well with new configuration.Check your PDS-700 onthe list2.Click the “Add Server[s]” button. Assign a COM Port numberand click “OK” to save your settings.number3.Click on PDS-700 name and check the virtual COM portmappings on the PC.Check COM port4.Click “Tools” >> “Restart Driver”, and then click the“Restart Driver” button.Testing your PDS-7001.Right click Port 1 and then choose the “Open COM Port”item.2.Check that the configuration of the COM Port is correct andthen click the “Open COM” button.3.Type a string in the send field then click the “Send” button. Ifa response is received, it will be displayed in the received field.Response Message4.If the test is successful, then your COM port program shouldnow be able to work with this Virtual COM Port.Related InformationPDS-700 Series Product Page:/products/Industrial/pds/PDS-700_Series.htmPDS-700 Documentations:CD:\Napdos\PDS\PDS-700\document\/pub/cd/8000cd/napdos/pds/pds-700/document/PDS-700 firmware:CD:\Napdos\PDS\PDS-700\Demo\Firmware\/pub/cd/8000cd/napdos/pds/pds-700/demo/firmware/ NS-205 and DP-665 Product Page (optional):/products/Switch/industrial/ns-205.htm/products/Accessories/power_supply/dp-665.htm Note!!。
李宁员工手册

网络营销圈:互联网-渠道商 产品 信息交流平台
一切皆有可能!
二、人事相关流程
1、门店员工入职
新员工入职时,应向公司提供真实 的个人资料,其中包括: (1) 劳动手册(待业证明)与退工 单(原单位解除劳动合同证明);
网络营销圈:互联网-渠道商 产品 信息交流平台
一切皆有可能!
(2) 身份证、本人户口簿复印件各1 份(检查原件); (3) 本人学历证书及相关资格证书复 印件各1份(检查原件); (4) 最近三个月内一寸照片3张; (5) 其它必要的书面材料(非本市人 员提供居住证(暂住证)及婚育证等)。 (6) 填写员工登记表。
网络营销圈:互联网-渠道商 产品 信息交流平台
一切皆有可能!
B. 产假、流产假及计划生育假: (适用于已婚员工) 一、产假 (1)产假一般为90天,其中产前假15天,产后 假为75天; (2)经医院出具证明是难产者,在(1)规定的 基础上增加15天产假; (3)生育多胞胎时,每多生一个婴儿,增加15 天产假; (4)男性员工在配偶分娩日可获得3日产妇护理 假。
网络营销圈:互联网-渠道商 产品 信息交流平台
一切皆有可能!
2、门店员工转正 员工进入公司须经试用期考核,期限 为2个月(试用期内双方可解除劳动合同)。 试用期满工作表现符合公司要求,经培 训、评估合格者办理转正手续。(员工需 ( 写转正申请,交店长并由零售部/渠道部 审批,报公司人力资源行政部存档。)
一切皆有可能!
网络营销圈:互联网-渠道商 产品 信息交流平台
(2) 激情:
具备强烈的使命感和进取心,执着有为实 现公司使命、愿景面努力工作的持续冲动。积 极应对工作和生活中的挑战,不言气馁。
(3) 求胜
对公司未来的发展充满信心,有强烈的成 就动机,积极地面对市场挑战,对目标的实现 及成功执着地渴望和追求。
Navision使用手册1

查找.查找所需要的单据或记录. 区域筛选. 标签筛选. 筛选 显示所有记录. 排序. 第一条记录. 前一条记录. 下一条记录. 最后一条记录. 列表.显示所有记录.
快捷方式如下: 打印 ctrl +p 剪切 ctrl +x 复制 ctrl +c 粘贴 ctrl +v 撤消 ctrl +z 新建 F3 删除 delete 查找 ctrl +f 筛选 ctrl 或shift 与F7块有:销售和市场,PMC管理,制造管理(基本同PMC 管理),采购管理,仓库管理,财务管理, 人力资源(公司现暂未使用此模块). NAVISION的工具栏,如下:
工具栏图标: 打印.此处需设定打印端口,与所选择要打印的文档相联 预览所选文字区进行预览 剪切.将当前选定内容剪切至剪切板. 复制. 将当前选定内容复制至剪切板. 粘贴. 将当前选定内容复制至剪切板. 撤消.撤消当前最后一步操作. 新建.新建一张单据或记录. 删除.删除单据或记录.
<9
<=10 *ER* HA?D
小于9
小于等于10 包含所有ER 不确定一个字符,显示结果:HADN,HARD等等
@ 忽略大小字
@location
结果:LOATION,Loation,location
目录
1:销售管理 1.1客户卡的建立和维护 ........................... .9 1.2销售报价 ............................. 10 1.2.1建立一个报价 ............................. 10 1.2.2转换报价为订单.......................... 10 1.3销售订单 1.3.1建立一个订单 1.3.2销售订单过帐 1.3.3创建和过帐销售发票 1.4贷方通知单 1.4.1发布贷方通知单 1.4.2 过帐贷方通知单 1.5 退货管理 1.5.1建立一个退货单 1.5.2过帐退货单 2:PMC管理 2.1请购物料 2.2释放生产单 2.3消耗日记帐(发料单、补料单、退料单、报废单) 2.4输出日记帐(成品入库单) 2.5完成生产单
XULM(简体版)操作说明书(HK)

XULM(简体版)操作说明书(HK)第一章符号,说明,商标符号和标志本操作手册使用了下面的符号和标志:表示安全标志和对仪器或附件,也可能是操作员本人有潜在危险的警告标志。
表示特别重要的提示和注释。
·显示列表。
/ 1 / 参考“第九章中断联线(打开仪器): 1. 选择菜单条“一般-中断联线”。
2. X-RAY仪器与WinFTM软件联线中断。
不能再用WinFTM 软件进行测量。
选择合适的产品程式为了进行测量,仪器需要产品程式中的一些基本信息。
因此,在进行测量前必须选择适合样品的产品程式。
按下面的方法选择产品程式: ●按动计算机键盘上的功能键。
(每种产品程式必须已经指定了功能键)●点击图标“F5”“F12”。
●选择菜单“产品程式-选择”。
●点击图标。
●选择产品程式:1. 点击图标或选择菜单“产品程式-选择”,打开“选择产品程式”窗口, 其中显示有一系列已经设定好的产品程式。
2. 选择需要的产品程式。
3. 点击“确定”调用所选的产品程式。
输入操作员和订货号三个记录框用来输入与测量资料有关的特定使用者的信息。
每个读数都可以附加与测量有关的特定信息。
例如,进行测量的操作员名字或缩写输入“使用者”记录框。
进行测量的订货号或样品的部件号输入“订货号”记录框。
输入操作员和订货号:1.选择菜单“结果计算-标签编号/使用者”打开“标签号/操作员”窗口。
图: ”标签号/操作员”窗口112.输入特定使用者的信息。
3.选择[确认]证实输入的信息。
选择[取消]保留以前的信息。
4.关闭“标签号/操作员”窗口后, WinFTM软件的测量窗口重新出现。
调校检验测量在进行调校检验测量时,正确放置标样(参见“标样”,第21页),在同样的条件......下至少重复测量五次,计算出这些测量资料的平均值X1和标准偏差。
如果平均值X1与Xvp(标样的公称值)之差大于标准偏差s的四倍,即|X1-Xvp|>4s这时应进行归一化操作。
K3Cloud系统操作手册-分销业务
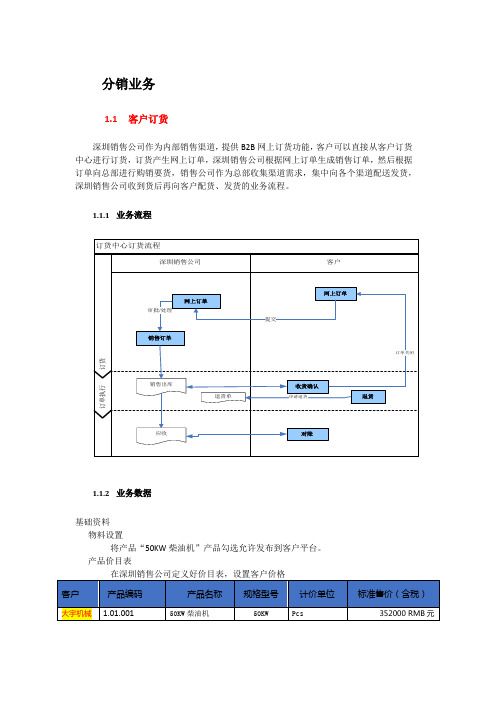
分销业务1.1客户订货深圳销售公司作为内部销售渠道,提供B2B网上订货功能,客户可以直接从客户订货中心进行订货,订货产生网上订单,深圳销售公司根据网上订单生成销售订单,然后根据订单向总部进行购销要货,销售公司作为总部收集渠道需求,集中向各个渠道配送发货,深圳销售公司收到货后再向客户配货、发货的业务流程。
1.1.1业务流程1.1.2业务数据基础资料物料设置将产品“50KW柴油机”产品勾选允许发布到客户平台。
产品价目表在深圳销售公司定义好价目表,设置客户价格客户资料在订货平台基础资料中客户资料中设置客户的默认订货组织为深圳销售公司,创建订货平台系统管理员。
产品发布将“50KW柴油机”发布给客户大宇机械。
发布标准价为“352000”元人民币。
1.客户下单:4月7日,客户大宇机械订货系统管理员在订货平台下达网上订单,要求2015-4-7交货,需求数量如下:客户:大宇机械;产品:50KW柴油机;数量:95 PCS 净价“352000”元RMB 期望交货日期2015-4-7,然后提交订单。
2.网上订单审核与下达销售订单:订单处理员看到网上订单后,将客户需求结合公司总体库存情况,确认能够按时发货,现有库存可以立即满足需求的直接向客户发货,如果库存不够,则向企业供货渠道进行要货申请(具体步骤参见下节分销要补货管理),由供货渠道进行配送补足库存后再发货,订单处理员将提交审核流程。
审核通过后,订单处理员将网上订单下推销售订单。
三、销售订单出库:4.7日仓管员根据以上订单进行出库作业:发货组织:深圳销售公司货主:深圳销售公司销售组织:深圳销售公司四、客户收货确认:1.2分销要补货在蓝海机械集团的组织架构中,销售总公司和各地区销售公司均为内部渠道,销售总公司为供货渠道,它通过柴油-总装事业部和变电器公司向各地区销售公司发货,各地区销售公司为要货渠道。
深圳销售公司向销售总公司要货,销售总公司汇总各地区销售公司的要货申请进行集中处理,向各地区渠道统一供货。
KIP Fold 1000 离线用户手册说明书

KIP Fold 1000 – OfflineUser ManualSafet In order to out by trainty Instru For your pr machine a precaution guarantee haz ned personnel. WARNING:CAUTION: NOTE: Indic WARNING:the power sw CAUTION: respective ma emitting unus authorized se WARNING:power cord an NOTE: Chec WARNING:Make sure tha on an unstabl Set the adjust uctions rotection, pleas nd keep this m s and instructio zard-free opera : Ignoring this w Ignoring this w cates additiona : Stop using th itch and discon Switch the ma achine. Materia ual sounds. Im ervice partner.: Move the mac nd other cables ck the docume :at the machine le or tilted benc table feet on thse read these s manual for future ons on the mac ations it is stron warning could warning could c l important info e machine if a nnect the supp chine off befor als not approve mmediately turn - Mov chine carefully s before you m ntation for the -e is placed on a ch. he ground when safety instructio e reference clo chine or the on ngly recommen - Symbols cause serious cause injury or ormation.- General cover was dam ly line. Then ca re opening any ed can cause fa n off the power ving the ma and slowly usi move the machi space requirem Installatio a level, horizont n the machine ons and the ma ose to the mach nes described in nded that any m s -injury or even damage to pro -maged or the m all an authorize cover. Always aults in your ma switch and dis achine -ing two person ne.ments before y on -tal surface of s is in the desire anual complete hine. Carefully n the operatingmaintenance or death.operty.machine was dr ed service partn s use materials achine. Do not sconnect the su ns. Make sure t you move the m sufficient streng ed position.ely before oper observe all wa g instructions.r repair work is ropped. Immed ner.recommended t use the mach upply line. Then that you discon machine.gth. Do not plac rating thearnings,only carrieddiately turn offd for theine when it is n call a nnected thece this machineNOTE: Do nWARNING:which could cavoid any riskCAUTION:mentioned inthe machine.WARNING:voltage netwothat is equippmachine. Donot use an exCAUTION:marking labelNOTE: If coWARNING:not place this m-: Do not removcause serious ink, only properlyDo not carry othe user manu: This machineork in which theed with a grounot use a damxtension lead toDo not connec.nnection to a d: Do not breakmachine in a locMaintenanve covers or panjury. Do not my qualified andut maintenanceual. Use mainte- Pe is not designee neutral wire isnding terminal.aged power coo connect the mct the machinedifferent mains-any mechanicacation that is sunce and manels which aremodify the machtrained servicee activities forenance materiaPower suped for connectios not connecte. Only use theord (e.g. exposemachine.to a mains voltvoltage is requ- Electricalal security inteubject to vibratodificatione fixed to the mhine, becausee technicians arother machineals for their inteply -on to an IT powed to ground. Omains connected core wire, btage that differuired, contact yls -rlock switch.tions and shockns -machine. The mthis could causre allowed to me components oended purposewer supply systOnly connect thetor cable that wbroken wire), thrs from the valuyour authorizedks.machine containse electrical shmodify the macor with other maonly. Do not ptem. An IT powe power cord towas supplied whis could lead inue stated on thd service partnens moving parthock or fire. Tohine.aterials thanlace liquids onwer system is ao a wall socketwith thento a fire. Doe powerer.atSet UpInstallationThe folder should be set up by an engineer, who has been trained.EnvironmentThe room in which the folder is to be placed should be dry and dust free. Humidity should be about 20-80% with room temperature of 15° C to 35° C (59°- 95°F). The folder must stand horizontally aligned and very stable without shaking. Make sure that the folder to place the folder in a way that does not block exits and allows an ergonomic workflow.Poweer & Sw w itch On P th D T T T T b b to In in T to A T T T T nPlease use only he mains suppl Do not use mu These cords wil The power supp The main switch The display sho briefly shown in beep signal will op of the displa n case an error n the display.The message c op of the displa After clearing th There are three The green LED The red LED is The yellow LED y the connectin ly voltage is ide ulti plug extens ll not stand the ply connection h is at the folde ows a short me the display. W sound. At the ay illuminate. Y r is detected du ontains error a ay will be blinki he jam press bu LEDs on top o indicates the f blinking in cas D indicates that ng cable deliver entical with you sion cords!e power consum is at the right b er’s front side.essage as indic When the folder same instance You will see the uring the self te and localization ng. Refer to th utton in ord of the folder's d folder being rea se of any error.the folder is bu red with the fol ur supply. mption of a prin bottom side of cated. The Firm r has completel e, you will notic e folding progra est phase, a me n code. Further e . der to restart th display:ady for safe an usy folding.der. Make sure nter and the fo the folder.mware versions ly started a dou ce the green LE am last used disessage will be more, a red LE e folder. nd normal opera e thatlder.areubleED onsplayed. shownED on ation.Displnext f previou press 1. Folding 2. Program3. Binding4. Panel siz5. Cross fo6. Status (m7. Status Lay Info folding program us folding prog s this button in stylem number marginze old panel size machine type) LEDrmation mgramcase the LED L123nis blinking red LED . green: rea . yellow: bus . red: erro in order to get adysy ordetailed inform m ation about th h e error.Media Fan Fo All docume copies will Cross All fan-fold Recom Best perfora & For olderents with length be folded in se Foldded sheets unt mmended rmance with 20rmatsh from 420 mm egments of 28 f il a length of 12d media0# or 75 - 90 gr NOTE: Film m up to 28 folds folds, to be fini 200mm can be r/m²s, plastics or m (20# / 80 gr. P shed manually e folded as cros materials with g Paper) and wid y.ss fold.glossy / shiny s th up to max. 9urfaces are no 930 mm. Longe t suitable.erProgr There are 8The selecte The center In Order to Buttons Selected ic Pressing b Press agai All folding p binding ma panel width Press t Selected ic Pressing b rams8 folding progra ed program nu r of the display o change the st and move t cons blink frequ uttons and n within thrprograms can argin: 0-50 mm h: 160-210 mm the cursor will s cons blink frequ uttons and ams available. mber will appe shows an imag atus of the cros the cursor from uently. edit the blin ree seconds to be edited in inc mstart to blink. B uently. edit the blin Through the k ear on the left h ge of the selec ss folder or the m icon to icon.king setting. save the chan crements of 1m Buttons and king settings.keys and hand side of the cted fold style.e rotation unit p nges mm within the fo move the cu Ex Pro with Sele Pre Pre pac Pre to 1Mov the you select the e display. press the cu ollowing range ursor from icon xample:ogram 1 should h a filing margin ect folding prog ess buttoness button u ckage icon blink ess buttons i 185 mm ve the cursor fo margin widthdesired folding ursor will start : n to icon. d process packa n of 25 mm. gram 1 with bu ntil the number ks in order to set orward to the f g program. to blink. ages 185 mm w utton or r below the fold the package w figure represen wided width ntingPlease not range of adtice that the adj djustment of th justable width o e margin is 0 - of the package 50 mm. There Wit Prestor e must be at lea efore a package Cha 420Pre Pre h buttons c ess button w re the new valu ast 160 mm up e of 155/65 is n ange the cross 0mm. ess or to esschange the valu within three sec uesp to a maximum not adjustable.s fold length fro change the va ue to 25 mmconds in order m of 230 mm. T om 200mm tolue to TheFoldi FoldingProgram 1-Folding Required s ng Styl g program -4 are presets g stylesstyleesms(noted below in Icon at n metric)t the displaySel Des Pac Pac mar Pac lect the progra scriptionckage folding w ckage folding w rginckage folding w m by pressingwith intermedia with intermedia without interme orte foldte fold and bind ediate folddingFree This new i layer comp size, so thi Explanatio "100 to 42"-" means:"<" means Examp Program A of 30 mm (Select fold Press butto Press butto Press butto Press butto Press butto Move the c With button Press butto The dynam Style P innovation ope pletely free. Thi s program will on of signs an 0" means: two : the folding en s: one more fold pleA should proces (for A1 sized pa ing program A onon until the f ons or in on until the s ons or in cursor forward ns or sele onwithin th mic icon on the rogram ns the potentia is program will not work for an nd numbers in o full panel of th ds here – the l d – the last pag ss packages of aper). with button first number be order to set th second numbe order to set th to the next figu ect < (last page hree secondsleft shows the ms A, B,al of the folder t not calculate t nother format. the display:he indicated siz ast page is to t ge is to the left In bl Seth f 135 mm and 1oreside the fold p e package wid er beside the fo e package wid ure e to the left) folding style.C & Dto nearly all po he folding, that ze are folded. the right upper lower exitOrder to chan ink. Buttonselected icons b e blinking setti 180mm wide –package icon bl th to 135 mm. old package ico th to 180 mm. ossible folding s t means: you d r exit nge values pres and move blink frequently ngs.the rest of pap links.on blinks. styles, since yo define a progra ss - the cur the cursor from y. Pressing butt per will determi ou can define e m for a given p rsor will start to m icon to icon.tons and ine a filing mar every paper oedit rginAdditional Exa a mplesFirst SSeconStepnd StepFeediing Prin n tsThe feed Plac the rail to th In a lead (on The then The It im flatt Fold e recommende ding the prints ce the left hand print into the fo guide. Long, she trailing edge any case the tit ding edge of th the right hand e fan folded cop n fed into the fo e folder will aut mproves the fol tened by hand ded copies will ed position is rig with the left ha d near to the ra older, force it a small prints nee e. tle block (legen he document en side of the lea py must be tur older again. tomatically swit lding quality if t before the cro l be laid out in ght from the tab and.ail guide and fe also slightly to t ed to be guided nd) has to be on ntering the fold ading edge).ned by 90° and tch to cross fol the copy is ss fold.the basket.ble,eed thed up n the der d d.Troub The LED a Clearing ableshoo above the disp a jam in the fan otingplay is blinking n folderg redPre Ref In c auto Res Tur ess in order fer to the or rep case of a jam in omatically by p start the folder rn rollers by ha r to get the erro port the code to n the fan unit: t pressingafter a jam has ndor codeo the support.try to clear the j s been cleaned jam dOverv Sensorviewr position n sDimeMetricnsionsInchError CodesCode Description21 Error on stepper control boards21:01 Error on starting stepper control board21:02 Error on stopping stepper control board22 Sensor errors on start-up22:00 Sensor LB0 cut22:01 Sensor LB1 cut22:02 Sensor LB2 cut22:03 Sensor LB3 cut22:04 Sensor LB4 cut23 Sensor sends high level permanentlyLB023:00 SensorLB123:01 SensorLB223:02 SensorLB323:03 SensorLB423:04 Sensor24 Processing errors on stepper control boards24:01 Error while calculating the step24:02 Error while counting the steps25 hardware errors25:01 Lack of 5 Volts external25:02 Lack of 38 Volts in FF or CF door openopen25:03 Cover26 Time out errors26:01 No ready signal after paper cut26:02 No paper at sensor LB1 after paper cut26:03 No paper at sensor LB1 without cut signal26:04 Jam between sensors LB0 and LB126:05 No trailing edge of the paper at sensor LB126:06 Too many folds, document is too long26:07 No trailing edge of the paper at sensor LB026:08 Unexpected paper at sensor LB4 in Online-Mode26:09 Unexpected paper at “no fold” switch LB5 in Online-ModeCode Description10 Communication errorscommunication 10:01 Noerror 10:02 Checksum10:03 Bad quality of the data stream 10:04 bad quality of bytes11 Communication errorscommunication 11:01 Noerror 11:02 Checksum11:03 Bad quality of the data stream 11:04 bad quality of bytes。
李宁运营手册【完整版】

1.5员工发展
1.5.1人员成长计划
1.5.2成长计划实施
店铺标准运营流程
2.1店铺标准作业流程
2.2店钱标准作业注意事项
2.3店铺自检表
2.4店铺日志表
2.4.1店铺管理表格
2.4.2每日交接本
2.4.3个人销售分析表(天)
2.4.4楼层区位分布图
2.4.5店(月日—月日)周报告
情报收集与反馈
留意所在商圈及竞争店铺情报、顾客情报的收集、并反馈给后勤支持部门,提出建设性建议
内、外关系管理
维护良好的顾客关系、公司内店与店关系、商圈内临近店与店关系、店内员工关系、 商场/楼层关系。
设备及形象管理
店内设备、商品的保全,店内购物环境维护、灾害防范、安全检查
帐务管理
店铺营业报告,资金出纳的报告,营业分析的报告,销售进帐,备用金的管理
1.1店铺组织架构
[1.1.1十人以内店铺]
店长(领班)
店员 店员 店员 店员 店员 收银员
[1.1.2十人以上店铺]
店长
副店(领班) 收银员
店员 店员 店员 店员
非自主收银的店中店不设置收银员
[1.1.3大型单层店铺(30人以上)]
店长
副店 库管 陈列 产品
A区组长 B区组长 C区组长 收银员
店员 店员 店员
情报收集与反馈
留意所在商圈有竞争店铺情报、顾客情报的收集,并反馈给后勤支持部门,提出建设性建议
内、外关系管理
维护良好的顾客关系、公司内店与店的关系、商圈内临近店与店关系、店内员工关系、商场/楼层关系
设备与形象管理
店内设备、商品的保全,店内购物环境维护、灾害防范、安全检查
帐务管理
- 1、下载文档前请自行甄别文档内容的完整性,平台不提供额外的编辑、内容补充、找答案等附加服务。
- 2、"仅部分预览"的文档,不可在线预览部分如存在完整性等问题,可反馈申请退款(可完整预览的文档不适用该条件!)。
- 3、如文档侵犯您的权益,请联系客服反馈,我们会尽快为您处理(人工客服工作时间:9:00-18:30)。
李宁订货系统离线订购版应用系统最终用户使用手册(产品订购功能部分)文档说明版本记录目录李宁订货系统离线订购版应用系统最终用户使用手册 1 文档说明 1版本记录 11. 订货会离线订购版系统描述 41.1. 功能描述 41.2. 用户范围及角色说明 42. 准备 52.1. 账户和权限申请 52.2. 客户端配置准备 52.3. 用户登录操作 53. 普通用户操作 63.1. 普通产品订购操作 63.1.1 列表订购 63.1.2 尺码分配 103.2. 分配款订购操作 123.2.1 套码订购 133.2.2 总量订购 143.3. 统计分析操作 153.4. 上传订单操作 163.5. 数据更新操作 174. 特殊用户操作 184.1. 分销商订单导入操作 184.2. 经销商汇总统计操作 185. 常见问题及处理 195.1. 常见问题清单 195.2. 系统不能运行 195.2.1. 现象描述 195.2.2. 处理方式 195.3. Access数据库不能访问 20 5.3.1. 现象描述 205.3.2. 处理方式 205.4. 上传在线订货系统不成功 20 5.4.1. 现象描述 205.4.2. 处理方式 216. 服务支持 221. 订货会离线订购版系统描述1.1. 功能描述离线订购系统使用户的订购过程可以在线下实现,系统包含以下功能:◆ 普通产品订购:包括模拟订单导入、列表订购、尺码分配等功能;◆ 分配款订购:包含套码订购、总量订购两种方式;◆ 导出订单:将用户的订购数据(包括普通产品、分配款产品的订购数据)导出为XML格式的订单文件,以便导入到在线订货会系统;也可以导出为Excel格式文件,以作为用户自分析或作为分销商订货数据导入到经销商系统中以便经销商进行汇总统计;◆ 统计分析:提供常用的统计分析功能;根据数据类型的不同,用户可以针对分销商或基础订货单位分别进行分析;◆ 数据更新:将订货会开始后新增产品的相关数据追加到离线订购系统中。
对于经销商用户,还有以下功能:◆ 分销商订单导入:将下属分销商的订单数据导入到离线系统中;◆ 经销商汇总统计:统计分析分销商的订购数据。
1.2. 用户范围及角色说明系统用户是在在线订货系统中报名并获得了相应账号、密码、权限的经销商、分销商或其他相关人员。
特殊账户:lntempuser(密码:lntempuser)专门用于追加临时客户资料。
登录用户可以依据相应的权限为多个经销商或分销商或店铺进行订购操作。
2. 准备2.1. 账户和权限申请账号、密码、权限由在线订货系统决定,离线系统使用的账号、密码、权限与在线订货系统中的相同。
注:账号是指登录离线系统的“用户名”。
2.2. 客户端配置准备用户执行离线订购系统的安装程序,然后按照安装提示进行一步一步操作即可轻松安装离线订购系统,安装成功后点击桌面快捷方式即可出现登录界面(图1)。
2.3. 用户登录操作图 1用户输入报名时获取的用户名、密码,在“请选择客户”的下拉选择项中选择客户编码,点击【进入】按钮就可进入离线订购系统(图2)。
图2中红圈部分在离线系统中称为“主菜单区”:该区域集成了系统的主功能,包括普通产品订购、分配款订购、统计分析、导出订单、数据更新、帮助、退出等功能。
图 2注:根据登陆用户的权限,可能某些按钮不可见。
注:当使用系统默认的用户名/密码(lntempuser/lntempuser)登录系统使,将会出现更新临时客户资料界面(图3):图 3系统提供联网更新方式:其中,联网更新方式需要用户机器与互联网连接(能访问在线订货系统),更新时系统会自动更新所需文件,成功后即可使用新的用户名、密码进入离线订购系统;“更新临时用户资料”功能是针对订货会开始后新增的用户,通过此功能可以使他们进行正常的产品订购。
3. 普通用户操作普通用户依据其权限可以进行普通产品订购、分配款订购、统计分析、导出订单、数据更新等功能。
3.1. 普通产品订购操作3.1.1 列表订购用户点击主菜单中的【普通产品订购】按钮后出现图4:图 4图中红圈部分为该登录用户所辖的基础订货单位名称列表,如上图表示的是单店订货规则定义到了A码客户或Z码客户(表示该账户下所有基础订货单位的订购都有单店订货规则的验证),下图表示单店订货规则定义到了店铺(表示只有一家店铺需要进行单店订货规则的验证):勾选基础订货单位,然后点击【列表订购】按钮进入列表订购功能界面,图5:图 5在图5的界面中,以页签的方式(图中蓝色圆圈)显示有订购数据的基础订货单位的订购信息(点击基础订货单位名进行切换),同时以不同的颜色显示A+款、推荐款、选定款产品。
用户可以进行如下操作:◆ 点击【精简模式/完整模式】按钮,显示产品的部分信息或全部信息(图5为精简模式);◆ 在灰色区域输入每款产品的总订量、分月订量,系统自动校验总订量与分月订量之和是否相等,若不等则变为红色显示;蓝色区域为系统自动根据订量和吊牌价计算并填写;白底区域为不可填写区(分月订量会根据上市月判断是否可以填写);◆ 数据查询:输入产品款号、大类、中类等查询条件,点击【查询】按钮即可执行查询功能;点击【清空条件】按钮将会各种查询条件置为空值;对于“大类”等下拉选择方式的查询条件的改变,系统将实时的依据用户选择的条件重新显示图5中的数据,对于“产品款号”条件,用户输入后可以用回车键来执行查询,支持模糊查询;◆ 产品明细:点击图5表格中每款产品的第一列(“产品款号”)或行头(红圈部分),将会出现产品明细信息显示窗口,包括产品的图片;◆ 进入尺码分配:用户可以不输入订购数量而直接进入尺码分配界面,该按钮不自动分配尺码数量;◆ 模拟订单:用户可以在列表订购界面中指定模拟订单或重新使用不同的模拟订单,点击【模拟订单】按钮出现图6:图 6在图6界面中同样可以查看模拟订单的明细信息和设置“订量调整系数”,需要特别注意的是,若用户确实需要使用选中的模拟订单将会将列表订购界面中的总量数据替换为模拟订单定义的订量数据,并同时清空分月订量。
◆ 复制订单:可以将已经下量的订购数据复制为未下量的订购数据,点击【订单复制】按钮,出现图7:图 7图7中,左边框内表示已经下量的基础订货单位,称为被复制的订购数据,右边为没有订购数据的基础订货单位,称为需要复制的订货单位;图中默认在复制的同时复制进行尺码分配后的订购数据(若存在);可以将一个基础单位的数据复制为多个基础订货单位的数据。
复制成功后用户可以点击主菜单的“普通产品订购”重新选择基础订货单位以进行新基础订货单位的订购。
◆ 清空订单:点击【清空订单】按钮,确定后将会把当前基础订货单位的总订量、分月订量、订购金额清为零;◆ 删除订单:点击【删除订单】按钮,两次确定后将会删除当前基础订货单位的所有订购数据,包括尺码数据、模拟订单对应关系,删除成功后将自动刷新图5——减少基础订货单位的页签;◆ 导出Excel(不含尺码):将当前基础订货单位的订购数据导出为Excel 格式的文件,以便用户使用Excel操作方式填写订购数据;◆ 导入Excel(不含尺码):将用户通过Excel文件填写的订购数据导入列表订购界面中,作为用户的输入数据;◆ 保存订购数据:点击【保存】按钮,此时系统将进行最小起订量的数据校验。
注:1)在切换基础订货单位时,系统自动进行保存并校验。
对于错误数据系统会提示,但可以保存并标红。
2)导出的Excel文件“产品款号”列不能修改,用户在填写分月订量时需要注意上市月;用户可以只填写总订量,系统在导入时会自动将该总订量也作为第一个可订购月的分月订量。
3)导出的Excel可以分人去做单,但需要保证各分开的文件中无重复的产品款号,导入时可以分批导入。
4)导入、导出操作必须在同一台机器中进行。
3.1.2 尺码分配用户可以不输入订购数量而直接进入尺码分配界面。
图 8进入尺码分配界面时(图8),系统不进行尺码分配,只列出可订购的各种尺码数据供用户下单。
用户可以进行如下操作:◆ 修改尺码数据:可以在图8中直接修改/调整自动分配后的各尺码的总订量、分月订量,系统自动计算并校验;若款号总订量和该款产品的各尺码总订量之和不等,则以绿色标注(如图8),若尺码总订量与该款产品的分月订量不等则以红色标注;◆ 尺码维护:点击【尺码维护】按钮,出现图9:图 9在图9中,用户可以参照系统的推荐比例,输入自己的比例值(默认为系统推荐比例),在这个界面中用户可以进行如下操作:● 【保存】,保存用户输入的尺码比例;● 【导出Excel】,将该尺码比例表导出为Excel文件,以便用户在系统外进行维护;注:系统不支持带条件的导出。
● 【导入Excel】,将用户在系统外维护的尺码比例值导入到系统中;● 【使用推荐比例分配】,将用户输入的款号总订量按照系统推荐的比例进行尺码分配;● 【使用用户比例分配】,将用户输入的款号总订量按照用户自己输入的比例进行尺码分配。
◆ 删除尺码:点击【删除尺码】按钮,将删除当前基础订货单位已有的各尺码的订购数据。
◆ 保存尺码数据:点击【保存】按钮,系统将用户输入的尺码订购数据保存到系统,以便进行统计分析或上传订单。
◆ 导出Excel(含尺码):将用户的尺码订购数据导出为Excel文件,以便用户在系统外进行输入。
◆ 导入Excel(含尺码):将用户在系统外输入的各尺码数据导入到系统中。
注: 1)导出的Excel文件的第三列“尺码”不能修改,否则会出现导入错误的现象。
2)导出的Excel可以分人去做单,但需要保证各分开的文件中无重复的产品款号(带尺码款号),导入时可以分批导入。
3)导入、导出操作必须在同一台机器中进行。
4)导入时会按照用户实际的订购数据修改图8中的款号总订量以及尺码比例。
3.2. 分配款订购操作分配款产品的订购细分为套码订购和总量订购,点击主菜单中的【分配款订购】按钮,出现图10:图 10选择“套码产品”进入套码订购,选择“总量产品”进入总量订购,这两种选择都会需要再次选择基础订货单位,如图11所示,选择完基础订货单位后点击【编制订单】按钮,系统自动根据订购方式分别进入套码订购界面或总量订购界面。
图 11注:根据用户订购权限,可能不显示“套码产品”或“总量产品”选择项,或者主菜单中【分配款订购】按钮也不显示;两种订购方式的基础订货单位也可能不同。
3.2.1 套码订购套码订购功能界面如图12:图 12在图12中,用户只需输入需要订购的分配款的套数(灰色区域),系统将自动根据该分配款定义中设定的各尺码的组成件数计算各尺码的实际订量和订货金额。
用户点击【保存】按钮或切换基础订货单位时,系统自动根据订购上下限对用户输入的“订购套数”进入校验,对不满足条件的做相应的提示。