极路由配置步骤
极路由地址的设置
设置极路由地址
设置好极路由地址是非常有必要的,辛辛苦苦弄好了路由器怎么能被别人盗去蹭网?让我们对这种可耻的行为坚决说不!通过设置极路由地址,这样就算密码被别人知道也没关系啦!因为地址不一样怎么可以一起愉快的玩耍!
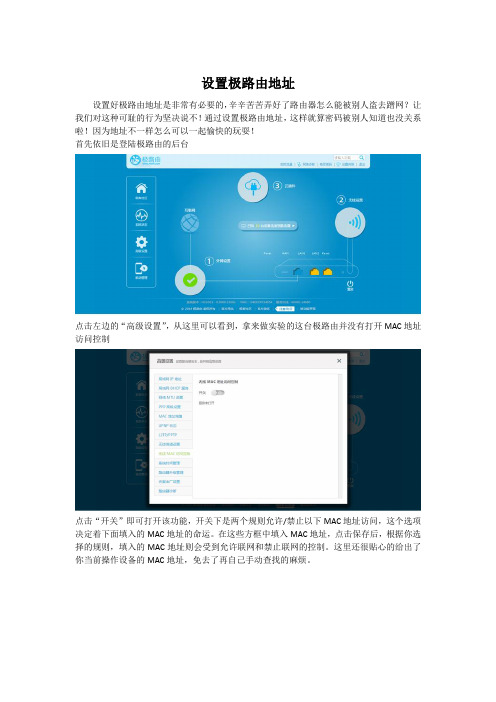
首先依旧是登陆极路由的后台
点击左边的“高级设置”,从这里可以看到,拿来做实验的这台极路由并没有打开MAC地址访问控制
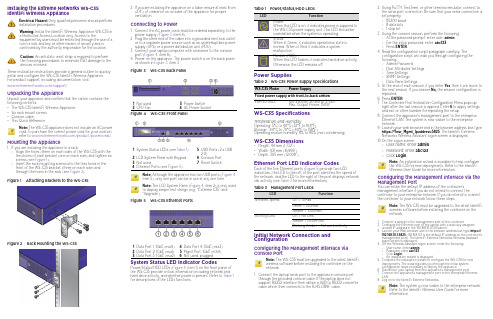
点击“开关”即可打开该功能,开关下是两个规则允许/禁止以下MAC地址访问,这个选项决定着下面填入的MAC地址的命运。
在这些方框中填入MAC地址,点击保存后,根据你选择的规则,填入的MAC地址则会受到允许联网和禁止联网的控制。
这里还很贴心的给出了你当前操作设备的MAC地址,免去了再自己手动查找的麻烦。
觉得这些框框不够用?点击“增加MAC地址”,想要多少个?自己加吧!
填入MAC地址,选好规则后,点击保存,弹出设置成功窗口,MAC地址访问控制则开始生效。
极路由地址设置好啦!就算别人知道了你的密码你也不用担心啦!从此以后你的无线想怎么用就怎么用,别人想蹭?没门!快来设置你的极路由地址吧,跟复杂的密码说拜拜!跟
蹭网的坏人说拜拜!。
极路由怎么设置

极路由怎么设置极路由的制作材质非常高端,不仅具有很好的散热效果,从外形看十分美观,它的外壳全部都是铝合金,是一款非常时尚的路由器。
它给人以一种不同于其他普通路由器的感觉,它跨越了时代的约束,为路由器以不同的表现形式。
下面店铺带你看看极路由是怎么进行设置的。
极路由的设置方法:第一步:极路由器的设置步骤当中也需要进入WEB设置界面,跟普通的路由器进入的WEB设置界面相同,然后再根据提示进行极路由的下一步设置。
第二步:在WEB设置页面的地址栏中输入极路由器的默认IP地址即192.168.199.1,然后按下回车按键,提示:设置的初始密码一般为空。
第三步:完成默认IP地址的输入以后,进入到极路由器的设置界面,在设置界面找到外网设置进入,进而实现极路由器的外网连接的设置,连接外网的方式可以是ADSL的方式也可以是固定IP上网的方式。
设置时要需要根据自己的网络环境的情况进行设置。
第四步:完成外网连接的设置以后,再找到无线设置的选项,点击进入,完成无线路由器的的名称和无线路由器的密码设置。
第五步:在极路由的设置页面,可以进行对连接无线的人数进行设置,然后进入这个设置,然后将在线的连接设备全部断开,也可以进行修改无线级路由器的名称进行设置,还可以将无线级路由器的网速进行限制操作第六步:在设置页面找到高级设置并进入,然后在里面可以找到一些直白的常用的选项。
极路由的一些功能参数:1.内置:可以2.防火墙功能:内部自带防火墙3.中继功能:可以进行无线中继4.无线安全性:可以进行MAC地址的过滤,带有无线安全功能的开关,具有WPA-PSK/WPA2-PSK的安全机制5.网络的管理:可以进行软件在线升级6.插件的安装:插件可以进行安装7.插件的更新:插件会进行自动的在线更新8系统的更新:可以在线自动更新系统9.远程的控制:手机可以进行远程的控制。
路由器的设置方法与步骤

路由器的设置方法与步骤路由器是我们家庭网络中不可或缺的设备,它可以帮助我们实现多台设备共享网络、无线上网等功能。
但是对于很多人来说,路由器的设置可能会比较复杂,不知道从何开始。
本文将为大家详细介绍路由器的设置方法与步骤,希望能够帮助大家更好地使用路由器。
首先,我们需要准备好以下工具和材料,一台已经连接好互联网的电脑、一台新的路由器、一个网线。
第一步,连接路由器。
首先,将路由器的电源线插入路由器的电源接口,然后将网线插入路由器的WAN口,另一端插入已经连接好互联网的电脑的网口。
接着,开启电脑,等待系统自动识别并安装好路由器的驱动程序。
第二步,登录路由器管理界面。
打开电脑上的浏览器,输入路由器的默认IP地址(一般是192.168.1.1或192.168.0.1),然后按下回车键,就会跳转到路由器的登录界面。
在弹出的登录框中输入默认的用户名和密码(一般是admin/admin或者admin/123456),然后点击登录按钮,就可以成功登录到路由器的管理界面了。
第三步,修改路由器的登录密码。
在成功登录到路由器管理界面后,我们首先要做的就是修改默认的登录密码,以确保路由器的安全性。
找到“系统设置”或“管理设置”选项,进入后找到“修改密码”选项,按照提示输入原始密码和新密码,然后点击保存即可完成密码修改。
第四步,设置无线网络。
在路由器管理界面中找到“无线设置”选项,进入后可以设置无线网络的名称(SSID)和密码。
建议将无线网络名称改为自己熟悉的名字,密码也要设置为复杂的组合,以增加网络的安全性。
第五步,设置网络类型。
在路由器管理界面中找到“网络设置”选项,根据自己的网络类型选择相应的连接方式,一般有PPPoE、DHCP、静态IP等选项,选择好后点击保存即可。
第六步,设置端口映射。
如果我们需要在局域网内搭建服务器或者进行P2P下载等操作,就需要进行端口映射。
在路由器管理界面中找到“端口映射”或“虚拟服务器”选项,按照提示添加需要映射的端口号和对应的IP地址即可完成设置。
极路由WS-C35 IdentiFi无线设备安装指南说明书
Installing the Extreme Networks WS-C35 IdentiFi Wireless Applianc eThese installation instructions provide a general outline to quickly install and configure the WS-C35 IdentiFi Wireless Appliance. For product support, including documentation, visit:/support/Unpacking the ApplianceUnpack your appliance and confirm that the carton contains the following contents:•The WS-C35 IdentiFi Wireless Appliance •Six rack mount screws •Console cable•This Quick ReferenceMounting the Appliance1If you are installing the appliance in a rack:–Align the holes (three on each side) of the WS-C35 with the thru holes of each bracket (one on each side) and tighten six screws (see Figure 1).–Insert the rack mounting screws into the thru holes in the front of the WS-C35 bracket (three on each side) and through the holes in the rack (see Figure 2).Figure 1 Attaching Brackets to the WS-C35Figure 2Rack Mounting the WS-C35Electrical Hazard: Only qualified personnel should performinstallation procedures.Warning: Install the IdentiFi Wireless Appliance WS-C35 in a Restricted Access Location only. Access to theequipment by users must be restricted through the use of a tool or lock and key or other means of security and iscontrolled by the authority responsible for the location. Caution: An antistatic wrist strap is required to perform the following procedures to minimize ESD damage to thedevices involved.Note: The WS-C35 appliance does not include an AC power cord. T o purchase the correct power cord for your location, refer to /product/powercords/.2If you are installing the appliance on a table, ensure at least 6 cm (2.4”) of clearance on all sides of the appliance for proper ventilation.Connecting to Power1Connect the AC power cord (must be ordered separately) to the power supply (Figure 3, item 4).2Plug the other end of the cable into a grounded electrical outlet or to a separate power source such as an uninterruptible power supply (UPS) or a power distribution unit (PDU).3Connect your laptop computer with a browser to the console port (Figure 4, item 6).4Power on the appliance. The power switch is on the back panel as shown in Figure 3, item 3.Figure 3 WS-C35 Back PanelFigure 4 WS-C35 Front PanelFigure 5 WS-C35 Ethernet PortsSystem Status LED Indicator CodesPower/Status/HDD LEDs (Figure 4, item 1) on the front panel of the WS-C35 provide critical information including network and hard drive activity, and whether power is present. Refer to T able 1 for descriptions of the LEDs functions.1Not used 3Power Switch 2CPU-Fan4AC Power Socket1System Status LEDs (see T able 1)5USB Ports (2 x USB 2.0)2LCD System Panel with Keypad 6Console Port 3Not used7Reset Switch4Ethernet Ports (see Figure 5)Note: Although the appliance has two USB ports (Figure 4,item 5), only one port can be in use at any one time.Note: The LCD System Panel (Figure 4, item 2) is only used to display simple text strings (e.g., “Extreme C35” and “Upgrade”).1Data Port 1: 1GbE (esa0)4Data Port 4: 1GbE (esa3)2Data Port 2: 1GbE (esa1)5Mgmt Port: 1GbE (eth0)3Data Port 3: 1GbE (esa2)6Not used, pluggedPower SuppliesWS-C35 SpecificationsTemperature and HumidityOperating: 5°C to 40°C (32°F to 104°F)Storage: -40°C to 70°C (-40°F to 158°F)Operating relative humidity: 8% to 90% (non-condensing)WS-C35 Dimensions•Height: 44 mm (1.732”)•Width: 431 mm (16.969”)•Depth: 305 mm (12.008”)Ethernet Port LED Indicator CodesEach of the five Ethernet ports (Figure 5) provide two LEDindicators—the LED to the left of the port identifies the speed of the network, and the LED to the right of the port displays network link activity (see T able 3 for more information).Initial Network Connection and ConfigurationConfiguring the Management Interface via Console Port1Connect the laptop serial port to the appliance console port through the provided console cable. If the laptop does notsupport RS232 interface then obtain a USB to RS232 converter cable which then connects to the RJ45-DB9F cable.Table 1Power/Status/HDD LEDsLEDFunctionPower:When this LED is on, it indicates power is supplied to the WS-C35 power supply unit. This LED should be illuminated when the system is operating.Status:When lit Green, it indicates operational state is normal. When lit Red, it indicates a system malfunction.Hardisk (HDD):When this LED flashes, it indicates hard drive activity.Otherwise, the LED remains off.Table 2WS-C35 Power Supply SpecificationsWS-C35 ModelPower SupplyFixed power supply with front-to-back airflow FSP150-50LE100-240Vac, 50-60Hz, 3-1.5A Max. Output Power: 150WTable 3Management Port LEDsLEDFunctionNetwork SpeedOff = 10Mbs Green = 100Mbs Amber = 1000MbsActivity/LinkOff = No Link Amber = Active linkBlinking Amber = Network activityNote: The WS-C35 must be upgraded to the latest IdentiFi wireless software before installing the controller on the network.2Using PuTTY , T eraT erm, or other terminal emulator, connect to the serial port connection. Be sure that your serial connection is set properly:–115200 baud –8 data bits –1 stop bit3Using the console session, perform the following:–At the password prompt, enter user: admin –For the initial password, enter: abc123–Press ENTER .4Read the configuration script paragraph carefully. The configuration script will walk you through configuring the following:–Admin Password–Host Attributes Settings –Time Settings –SNMP Settings–Data Plane Settings5At the end of each session, if you enter Yes , then it will move to the next session. If you answer No, the session configuration is repeated.6Press ENTER .7The Controller Post Installation Configuration Menu pops up right after the last session is applied. Enter 6 to apply settings and exit or other number for repeating the setup.8Connect the appliance's management port to the enterprise Ethernet LAN. The system is now visible to the enterprise network.9Launch your web browser and in the browser address bar, type: https://Your_Mgmt_Ipaddress:5825. The IdentiFi Extreme Networks Wireless Assistant logon screen is displayed.10On the logon screen:–User name: enter admin –Password: enter abc123–Click Login .Configuring the Management Interface via theManagement PortYou can retain the default IP address of the controller's management interface if you do not intend to connect thecontroller to your enterprise network. If you do intend to connect the controller to your network follow these steps:1Connect a laptop to the management port of the controller.2Configure the Ethernet port of the laptop with a statically assignedunused IP address in the 192.168.10.0/24 subnet.3Launch your Web browser and in the browser address bar, type https://192.168.10.1:5825 (192.168.10.1 is the default IP address on the controller's management port). The IdentiFi Extreme Networks Wireless Assistant logon screen is displayed.4On the Wireless Assistant logon screen, enter the following:–User name: enter admin –Password: enter abc123–Click Login .–An installation wizard is displayed.5Complete the installation wizard to configure the WS-C35 for newdeployments. The wizard guides you through the initial system configuration steps necessary to deploy the appliance.6Disconnect your laptop from the appliance’s management port.7Connect the appliance’s management port to the enterprise EthernetLAN.8Log on to the IdentiFi Extreme Networks.Note: An installation wizard is available to help configure the WS-C35 for new deployments. Refer to the IdentiFi Wireless User Guide for more information.Note: The WS-C35 must be upgraded to the latest IdentiFi wireless software before installing the controller on the network.Note: The system is now visible to the enterprise network. Refer to the IdentiFi Wireless User Guide for more information.Extreme NetworksIdentiFi™ Wireless Appliance WS-C35Quick ReferenceNoticeCopyright © 2015 Extreme Networks, Inc. All Rights Reserved.Legal NoticesExtreme Networks, Inc., on behalf of or through its wholly-owned subsidiary, Enterasys Networks, Inc., reserves the right to make changes in specifications and other information contained in this document and its website without prior notice. The reader should in all cases consult representatives of Extreme Networks to determine whether any such changes have been made.The hardware, firmware, software or any specifications described or referred to in this document are subject to change without notice.TrademarksExtreme Networks and the Extreme Networks logo are trademarks or registered trademarks of Extreme Networks, Inc. in the United States and/or other countries.All other names (including any product names) mentioned in this document are the property of their respective owners and may be trademarks or registered trademarks of their respective companies/owners.For additional information on Extreme Networks trademarks, please see: /company/legal/trademarks/WarrantyWarranty information for WS-C35 Appliance is located online at:/go/warrantySupportFor product support, including documentation, visit: /support/ContactExtreme Networks, Inc.145 Rio RoblesSan Jose, CA 95134 USA Tel: +1 408-579-2800Toll-free: +1 888-257-3000Regulatory and Compliance InformationFederal Communications Commission (FCC) NoticeThis device complies with Part 15 of the FCC rules. Operation is subject to the following two conditions: (1) this device may not cause harmful interference, and (2) this device must accept any interference received, including interference that may causeundesired operation.Note: This equipment has been tested and found to comply with the limits for a class A digital device, pursuant to Part 15 of the FCC rules. These limits are designed to provide reasonable protection against harmful interference when the equipment is operated in a commercial environment. This equipment uses, generates, and can radiate radiofrequency energy and if not installed in accordance with the operator’s manual, may cause harmful interference to radio communications. Operation of this equipment in aresidential area is likely to cause interference in which case the user will be required to correct the interference at hisown expense.Warning: Changes or modifications made to this devicewhich are not expressly approved by the party responsible for compliance could void the user’s authority to operate the equipment.Industry Canada NoticeThis digital apparatus does not exceed the class A limits for radio noise emissions from digital apparatus set out in the Radio Interference Regulations of the Canadian Department of Communications.Le présent appareil numérique n’émet pas de bruitsradioélectriques dépassant les limites applicables aux appareils numériques de la class A prescrites dans le Règlement sur le brouillage radioélectrique édicté par le ministère des Communications du Canada.Class A ITE NoticeWARNING:This is a Class A product. In a domestic environment this product may cause radio interference in which case the user may be required to take adequate measures.Klasse A ITE AnmerkungWARNHINWEIS : Dieses Produkt zählt zur Klasse A (Industriebereich ). In Wohnbereichen kann es hierdurch zu Funkstörungen kommen, daher sollten angemessene Vorkehrungen zum Schutz getroffen werden.Product SafetyThis product complies with the following: UL 60950-1, FDA 21 CFR 1040.10 and 1040.11, CAN/CSA-C22.2 No.60950-1, EN 60950-1, EN 60825-1, EN 60825-2, IEC 60950-1, 2006/95/EC.ProduktsicherheitDieses Produkt entspricht den folgenden Richtlinien: UL 60950-1, FDA 21 CFR 1040.10 and 1040.11, CAN/CSA-C22.2 No.60950-1, EN 60950-1, EN 60825-1, EN 60825-2, IEC 60950-1, 2006/95/EC.Korea EMC StatementElectromagnetic Compatibility (EMC)This product complies with the following: FCC 47 CFR Part 15 (Class A), ICES-003 (Class A), EN 55022 (Class A), EN 55024, EN 61000-3-2, EN 61000-3-3, AS/NZS CISPR 22 (Class A), VCCI V-3, 2004/108/EC (EMCDirective)Elektro-magnetische Kompatibilität (EMC)Dieses Produkt entspricht den folgenden Richtlinien: FCC 47 CFR Part 15 (Class A), ICES-003 (Class A), EN 55022 (Class A), EN 55024, EN 61000-3-2, EN 61000-3-3, AS/NZS CISPR 22 (Class A), VCCI V-3, 2004/108/EC (EMC Directive)VCCI NoticeThis is a class A product based on the standard of the VoluntaryControl Council for Interference by Information T echnology Equipment (VCCI). If this equipment is used in a domestic environment, radio disturbance may arise. When such trouble occurs, the user may be required to take corrective actions.BSMI EMC Statement — TaiwanThis is a class A product. In a domestic environment this product may cause radio interference in which case the user may be required to take adequate measures.Battery Warning — TaiwanBattery NoticeHazardous SubstancesThis product complies with the requirements of Directive 2011/65/EU of the European Parliament and of the Council of 8 June 2011 on the restriction of the use of certain hazardous substances in electrical and electronic equipment.European Waste Electrical and Electronic Equipment (WEEE)NoticeIn accordance with Directive 2012/19/EU of the EuropeanParliament on waste electrical and electronic equipment (WEEE):The symbol above indicates that separate collection of electrical and electronic equipment is required.When this product has reached the end of its serviceable life, it cannot be disposed of as unsorted municipal waste. It must be collected and treated separately.It has been determined by the European Parliament that there are potential negative effects on the environment and human health as a result of the presence of hazardous substances in electrical and electronic equipment.It is the users’ responsibility to utilize the available collection system to ensure WEEE is properly treated.For information about the available collection system, please contact Extreme Customer Support at +353 61 705500 (Ireland).SafetyCompliant with IEC 60950-1:2005 (Second Edition); Am1:2009 + Am2:2013, EN 60950-1:2006 + A1:2010 + A11:2009 + A12:2011 + A2:2013, UL 62950-1, 2nd Ed. 2011, CSA C22.2 No. 60950-1-07, 2nd Ed. 2011Warning: This product contains a battery used to maintain product information. If the battery should need replacement it must bereplaced by Service Personnel. Please contact T echnical Support for assistance.Risk of explosion if battery is replaced by an incorrect type. Dispose of expended battery in accordance with local disposal regulations. Avertissements: Ce produit renferme une pile servant à conserver les renseignements sur le produit. Le cas échéant, faites remplacer la pile par le personnel du service de réparation. Veuillez communiquer avec l’assistance technique pour du soutien.Il y a risque d’explosion si la pile est remplacée par un type de pile incorrect. Éliminez les piles usées en conformité aux règlements locaux d'élimination des piles.50P/N 9034839-02。
极路由ssh设置问题解答
极路由ssh设置问题真的很重要!如果你想多看看外面的世界(大雾)多学习不一样的知识,那今天你就来着啦,我来告诉你怎么将极路由ssh设置成功吧。让你的FB和推分分钟登录不掉线!
1.首先进入极路由设置界面
2.选择云插件
3.添加番茄加SSH功能
4.填写服务器地址IP和账户、密码
5.如下图显示证明极路由ssh设置成功
以上就是极路由ssh设置上的过程,很简单,大家都会操作。在这里推荐智能模式,在全局模式下访问国内站点会有一些影响,多次尝试不成功时可以试试更换ssh账号。
路由器设置步骤

路由器设置步骤一、选购适合的路由器在进行路由器设置之前,首先需要购买一台适合的路由器。
选择路由器时,需要根据自己的需求和网络环境进行合理的选择。
比如,如果你需要覆盖大面积的无线网络,可以选择具有较大覆盖范围的无线路由器。
如果你需要更高的网络速度和稳定性,可以选择支持更高传输速率的无线路由器。
购买适合自己需求的路由器是进行下一步设置的基础。
二、连接路由器将购买的路由器与电源适配器连接,并将电源插头插入电源插座,启动路由器。
然后,使用网线将路由器的LAN口与电脑的网卡口连接。
确保连接牢固,并检查灯光指示器是否亮起,以确定连接是否成功。
三、访问路由器管理界面打开电脑上的浏览器,输入默认的路由器管理IP地址(一般为192.168.1.1或192.168.0.1)并按下回车键。
此时,会弹出一个用户名和密码的登录界面。
四、输入用户名和密码输入默认的用户名和密码(通常是admin/admin或者admin/password),如果之前对路由器进行过设置并修改了登录凭证,需要输入修改后的用户名和密码。
五、创建新的管理密码进入路由器管理界面后,建议立即修改管理员密码。
选择“系统设置”或类似的选项,在相关设置中找到密码修改选项。
输入当前密码后,设置一个新的管理密码,并确认修改。
六、进行网络设置在路由器管理界面中,选择“基本设置”或类似的选项,进入网络设置界面。
在该界面中,可以选择动态IP地址或静态IP地址,在此建议选择动态IP地址,以方便自动获取。
七、设置无线网络在路由器管理界面的菜单中找到“无线设置”选项,进入无线网络设置界面。
在该界面中,可以设置无线名称(SSID)、无线加密方式(WPA2-PSK推荐)、密码等。
根据自己的需求和安全要求进行相关设置。
八、应用设置并重启路由器完成以上设置后,点击界面上的“应用”或“保存”按钮,将设置保存并应用到路由器上。
接着,选择“重启”或“重新启动”路由器,等待路由器重启完成。
无线路由器安装图解——极路由
无线路由器安装图解,帮你轻松搞定烦恼
下面是极路由的无线路由器安装图解,因为是我用过的所有路由器中最简单的,安装步骤和方法只有简短的几步,所以特别推荐给为此烦恼的人儿~哈哈,一起来看无线路由器安装图解吧!
1、将极路由器线路连接好,为电脑、极路由器、猫通电后,我们打开电脑即可进行极路由器设置了,初次使用极路由器就会自动弹出登录界面。
2、之后我们只要输入密码即可,这个默认密码在极路由器说明书以及极路由器表面上的铭牌上会有标注,初次使用后,建议大家修改密码。
进入极路由(HiWiFi )初始管理界面。
3、进入极无线路由器管理界面之后,我们再点击顶部右上角的“设置向导”即可将自己家的上网账号填写进去即可。
4、填写完上网账号与密码进入极路由器后,下一步会涉及到无线网络设置的问题。
在它的无线设置页面中,省略了好多艰涩难懂的设置问题,信道以及强度等等一律放在高级设置中,需要用户决定的只有寥寥几项,我们只要选择打开无线开关、填写上无线网络名称以及无线网络密码即可,win7怎样设置路由器这个问题轻松解决。
通过以上的四步无线路由器安装图解就可以把你的路由器设置完成了,然后你就可以轻松的上网了!。
极路由怎么设置
极路由怎么设置介绍极路由是一款智能路由器,具有强大的功能和配置项。
本文将介绍如何设置极路由,包括路由器的初始设置、无线网络的配置、设备的连接和管理以及其他常用设置。
目录1.初始设置2.无线网络设置3.设备连接和管理4.常用设置5.总结1. 初始设置在开始设置极路由之前,确保已将路由器正确连接到电源和电脑。
然后按照以下步骤进行初始设置:1.打开浏览器,在地址栏输入默认网关的IP地址,一般为192.168.1.1。
2.输入用户名和密码,一般默认为admin,直接点击登录按钮。
3.在登录成功后,会自动进入设置向导界面。
根据向导的指引,设置路由器的基本信息,如时区、语言和时间等。
4.在设置向导的最后一步,可以设置路由器的登录密码,建议设置一个强密码来保护路由器的安全。
2. 无线网络设置极路由支持同时提供2.4GHz和5GHz两个频段的无线网络。
以下是设置无线网络的步骤:1.在控制台页面,点击无线网络设置。
2.点击添加SSID按钮,输入无线网络的名称(即SSID)。
3.选择无线网络的加密方式,可以选择WPA/WPA2-PSK或WPA/WPA2-Enterprise。
4.输入无线网络的密码,确保密码足够复杂来保护网络安全。
5.点击保存按钮,保存设置并启用无线网络。
3. 设备连接和管理一旦无线网络设置完成,就可以连接设备到极路由了。
以下是设备连接和管理的步骤:1.在控制台页面,点击设备管理。
2.在设备管理页面,可以查看连接到极路由的设备列表。
3.如果需要管理设备,可以点击设备的名称进入设备详情页。
4.在设备详情页,可以查看设备的IP地址、MAC地址和连接状态等信息。
5.如果需要限制设备的访问或优先级,可以在设备详情页的设置中进行调整。
4. 常用设置除了上述的基本设置之外,极路由还提供了一些其他常用设置选项。
以下是一些常用设置的介绍:•宽带设置:在控制台页面,点击宽带设置,可以配置路由器的上网方式和相关参数。
•网络设置:在控制台页面,点击网络设置,可以配置路由器的局域网和广域网的网络参数。