热狗机使用方法
餐饮器械使用说明书
餐饮器械使用说明书使用说明书一、概述本使用说明书旨在详细介绍餐饮器械的正确使用方法和注意事项。
餐饮器械在餐饮业的日常运营中具有重要作用,合理操作能够提高工作效率,同时确保食品卫生安全。
用户在使用本器械之前,请仔细阅读本说明书,并按照指导操作,以确保使用的安全性和有效性。
二、机械器械1. 餐桌餐桌是餐厅或饭店不可或缺的设备之一。
使用时,请确保桌面平整稳固,避免将过重物体堆放在桌面上,以防桌面变形或破损。
2. 椅子椅子是供顾客就餐的座位设备。
请合理安排椅子的数量和摆放位置,确保顾客的餐饮环境舒适宜人。
使用时,请检查椅子的结构和稳定性,避免使用损坏的椅子。
3. 餐具餐具包括餐盘、碗、筷子、勺子等。
使用前,请将餐具进行清洗和消毒,确保卫生无菌。
用后请及时清洗,避免积累污垢和细菌。
餐具需要放置在干燥通风的地方储存,杜绝潮湿生锈的情况发生。
三、烹饪设备1. 炉灶炉灶是烹饪的核心设备。
在使用前,请确保炉灶的供气或供电正常,并进行安全检查。
使用时,请根据菜品的不同需求进行火力的调整,以避免过高的火力造成食材烧焦或油溅。
2. 烤箱烤箱是烘焙和烤制食品的常用设备。
使用前,请将烤箱清洗干净,并预热至适当温度。
使用时,要注意烤箱门的开关,避免热气外溢造成烫伤。
3. 蒸锅蒸锅是制作蒸菜的必备工具。
在使用前,请检查蒸锅的密封性能,确保蒸菜时蒸汽不外溢。
使用时,请及时添加适量的水,并谨防烫伤。
四、食品加工设备1. 切菜机切菜机是餐饮业中常见的加工设备之一。
使用时,请将食材切割成适当大小,避免过大的块状食材卡住刀片。
使用后请及时清洗和消毒,以避免残留食材滋生细菌。
2. 榨汁机榨汁机用于制作果汁和调制饮品。
使用前,请确保机器的零部件安装牢固,并将食材切割成小块以便榨汁。
使用后请及时清洗和维护,以保持机器的正常运作。
3. 搅拌机搅拌机常用于制作奶昔、沙冰等饮品。
使用前,请确保容器和刀片清洁干燥,并确保搅拌机底部的连接部件紧固。
使用过程中请勿将手指或其他物体伸入机器内部,以防止意外发生。
德国热缩机的使用方法

德国热缩机的使用方法
1.准备工作:将待缩管材与热缩管套进行匹配,确保管材和套管的尺寸相符。
同时,清洁管道表面,确保表面光洁、干燥无油污。
2. 填充管道:将待缩管材插入热缩管套中,注意将管道填充满,不留空隙,避免产生空气或水分泡在缩管内。
3. 加热缩管:使用热风枪或其他热源,对缩管进行加热,注意温度控制,不要过热,以免影响缩管效果。
4. 确保缩管成功:经过加热后,缩管套应紧密包裹在管材上,无松动或滑动现象。
同时,缩管表面应平滑、无皱褶。
5. 冷却:待缩管冷却后即可使用。
6. 清理:使用后应及时清理热缩机和热风枪等设备,保持设备干燥、清洁。
同时,应妥善保管热缩管材和套管,避免受潮受损。
- 1 -。
火腿烤机说明书

Infrared Smoker/Roaster OT be used on burner settings higher Place the radiant drip tray on top of the cooking grates, then hang the slotted rack directly above, hooking it to the back of the grill where the warming rack would hang.If you intend to smoke, place TEC’s chip corral in front of the smoker/roaster and ll it with wood chips or simply place wood chips along the front of the rack directly on the grates.Preheat on medium heat for 10 minutes with the hood closed.If you have preheated with wood chips, wait for the chips to begin smoking before placing food on the smoker/roaster.Turn the heat to low, and you’re ready to go.1.2.3.4.5.Instructions for UseA good meat thermometer is your best friend. As any competitive pitmaster knows, the internal temperature of the meat is the most crucial indicator of when your food is ready to come off the grill. You’ll consistently get great results if you cook to a targeted temperature, not a time.Keep in mind that when it comes to smoking and barbequing, there is no one right way to do it. People’s tastes vary by region and preference, so we encourage you to experiment with different cuts of meat, different types of wood, and different rubs and spices to nd what you like best.Notes & Tips ••PATENT PENDINGShare with us how adventurous you get with your new accessory by using the hashtag #TECGrills on all your grilling pictures. Follow us on Facebook (/TECInfraredGrills) or on Instagram (@tecgrills) for more cooking tips and recipes!Beef Brisket & Pork ButtSmoked Pork Ribs (05-16)IMPORTANT: TEC’s infrared smoker/roaster is designed to be used with the burner set on LOW and the hood closed for optimal results. Cooking with this accessory on settings above low will likely cause food drippings to ignite in the radiant drip tray.Preheat the grill with wood chips for 10 minutes on medium with the hood closed.TEC Tip: We love pairing cherry wood with ribs. To maximize the smoky avor, replenish the wood chips once while grilling.While the grill preheats, rub the ribs all over with your favorite seasoning.Place up to 3 racks of ribs on the smoker/roaster rack. Turn the heat down to low, and close the hood.Cook for 75-90 minutes until the meat pulls away from the bone easily.Preheat the grill with wood chips for 10 minutes on medium with the hood closed.While the grill preheats, rub the meat with your favorite seasoning.Place the brisket or butt on the smoker/roaster rack. Turn the heat down to low, and close the hood.Smoke until the internal temperature of the meat reaches 195°-200°F .TEC Tip: to maximize the smoky avor, replenish the wood chips while cooking. In our experience, pork pulls best when you remove it from the grill at 200°F .••••••••。
摆摊烤肠机烤热狗的正确方法
摆摊烤肠机烤热狗的正确方法
摆摊烤肠机烤热狗的正确方法如下:
1. 准备热狗和面包:选择新鲜的热狗,确保没有变质,同时准备好与热狗相配搭的面包或者热狗面包。
2. 预热烤肠机:先将烤肠机预热至适当的温度。
根据具体设备的使用说明调整温度控制器。
3. 准备热狗的包装:将热狗的包装撕开或割开一条缝,以便热狗在烤制过程中能够均匀受热。
4. 烤制热狗:将烤肠机上的热狗放在热狗夹中,确保夹紧。
将夹好的热狗放入烤肠机,关上机盖。
按下启动按钮开始烤制。
5. 翻转热狗:待热狗一面烤好后,根据需要烤制的程度轻轻翻转热狗,确保两面均匀受热。
6. 烤熟热狗:根据个人口味和要求,烤制热狗的时间会有所不同,一般需要烤制2-3分钟,或直到热狗看起来金黄色并熟透为止。
7. 热狗面包的烤制:如果需要烤制热狗面包,将面包放入热狗面包夹中放入烤
肠机中,进行短时间的烤制,直到面包变得金黄酥脆。
8. 服务与装饰:将烤好的热狗放入之前准备好的面包中,根据个人喜好加入沙拉酱、番茄酱、芥末酱等调料。
可以根据需要加入奶酪、洋葱、酸黄瓜等配料,最后将其装饰或包装好,以供食用。
注意事项:
- 使用烤肠机时,务必遵循使用说明和安全操作规程。
- 热狗和面包的配比要合理,面包不要过大,否则容易影响热狗的口感。
- 在烤制热狗的同时,时刻关注烤肠机的温度,以免过热或过度烤熟。
- 在烤制过程中,尽量避免频繁的开启烤肠机,以免影响热狗烤制的均匀性。
便利店清洁热狗机操作规程
24小时便利店清洁热狗机操作规程
一、操作程序:
(1)将热狗机的有机玻璃罩和热狗机内的铁制油托(用来装热狗烧烤时浸入出来的油)取出来,放到洗手盆里用洗洁精将表面的油渍清洗干净,再用干毛巾将其擦干,避免多余的水珠掉到热狗机里。
(2)用半干状态的湿毛巾将热狗机上的导热管轻轻擦拭干净,再用干毛巾擦一下即可。
(3)用半干状态的湿毛巾将热狗机的整个外围擦拭干净。
二、注意事项:
(1)清洁进程中必须先断开电源。
(2)在热狗机的清洁进程中切忌将热狗机整个拿到洗手盆或水龙头上清洗,这样会导致热狗机内电器因遇水而烧掉或发生的短路而不能正常运作。
(3)24小时门店每天凌晨2点清洁,非24小时门店下班前一个小时清洁。
(4)每周用螺丝刀将热狗机底座拆下来清洁。
喂食车说明书
毛皮动物喂食车说明书A.使用前要检查项目1、检查各轮胎气压是否充足,检查螺丝是否有松动,如果发现异常,要进行修理。
2、检查各种电线是否有磨损情况,如果发现异常,要进行修理。
B.电脑板的使用:1、左侧板上有个急停总开关,按下此开关,实现断电停车。
拉开此开关,整车实现通电,电脑板可以工作。
2、电脑板分2部分,上部为LCD显示屏,下部为按键。
3、LCD显示屏一共有4位数字,最左侧的1位数字,显示的是时间。
右侧的3位数字,显示的是喂食量。
4、时间数字的意思是:两次喂食之间的间隔时间,数字越小,说明间隔的时间越短,速度则越快。
例如:如果显示数字6,说明当前间隔时间为6毫秒。
显示数字4,说明当前间隔时间为 4毫秒,4毫秒比6毫秒速度更快一些。
5、喂食量的意思是:当前要选择的喂食数量,这个数字并不是真实的重量,仅仅是个便于记忆的数字,用户需要根据自己的实际情况,选择不同的数字来使用。
(原因:不同配方料、干料、稀料重量都不同)6、下方有10个按键,左侧8个数字是存储按键,代表可以存储8种喂食模式。
右侧2个按键为“+-”按键。
7、“+-”按键是设置喂食量和时间数字的,“+”代表数字增加,“-”代表数字减小。
按任意一个“+—”按键,显示屏的喂食量数字会首先闪烁,此时,“+—”按键控制的是喂食量数字。
如果5秒钟时间内,没有按任何一个“+-”按键,LCD显示屏会停止喂食量闪烁,自动转入时间闪烁,此时,“+—”按键控制的是时间数字。
如果5秒钟时间内,没有按任何一个“+-”按键,时间闪烁会停止。
再次按“+—”按键,重复上面的内容显示时间显示喂食量毛皮动物喂食车说明书8、在任何时间内(包括显示屏在闪烁的时候),手指按下1~8中的数字按键任何一个不放,默念时间超过5秒后,松开手指,显示屏上的数字会存储到相应的按键下。
9、如果按下的时间不足5秒,电脑会将存储的数字,显示在LCD屏上面。
10、如果时间设置为0,说明2次喂食之间没有间隔,此时为清洗模式或不定量模式。
使用与保养指南 - 凯撒狗狗咖啡机 K-Supreme Plus说明书
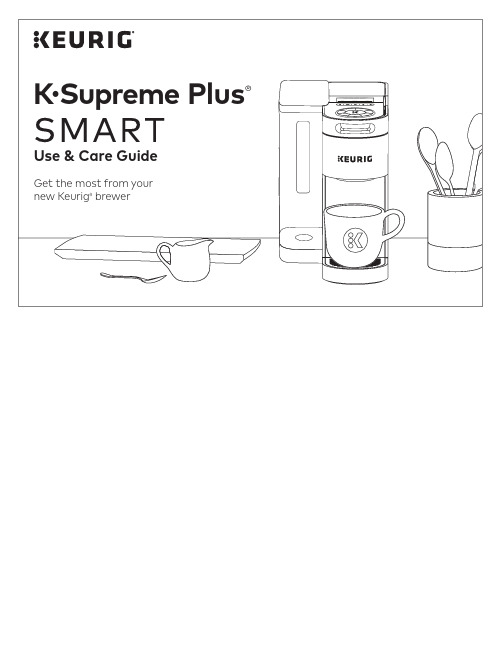
Get connected with the Keurig® app.You will need this to set up and control your brewer.The QR codeon the back of the brewer:Use the camera on your smartphone to scan the QR code to download the app and get started; or download the Keurig® appin the App Store.App Store® is a service mark of Apple Inc.Google Play and the Google Play logo are trademarks of Google LLC.Connect Your BrewerGET CONNECTEDOpen the Keurig® app and select Get Connected , then create an account. Once completed, press the right arrow on the brewerto Connect.Remove packing tape from brewer and plug into a grounded outlet. The brewer will automatically power on, you can also press any button on the brewer to power on. Make sure you have your home Wi-Fi® password ready .SET UPFollow the instructions in the appto link the brewer to your smart phone, then to connect to your home Wi-Fi®. You will see a message that says SUCCESS! Press OK . You will also see a message on the brewer that says Wi-Fi® Connected, press FINISH .Wi-Fi® is a registered trademark of Wi-Fi Alliance®Press any button to power on . Place a large mug (10oz minimum) on the drip tray.Follow the instruction on the brewer screen to perform a cleansing brew.The one-time setup process is now complete and you are ready to brew!5786Before You BrewRinse & FillCleansing BrewPlace Mug & Insert PodBrew & Enjoy!Brew Your First CupRinse reservoir with fresh water and fill to the max fill line.If you have a Keurig® Water Filter, install it now.Lift the handle and place a K-Cup® pod in the K-Cup® pod holder.Lower the handle completely to close the lid.Do not remove the foil lid on the K-Cup® pod.NOTE: Remove the drip tray to accommodate a travel mug up to 7” tall.Use the Recommended Brew setting or Customize your brew. Choose a size, then press the blinking BREW button. Once the brew is completeddispose of the used K-Cup® pod.Brewing is complete when theEnjoy screen is displayed.CAUTION: While brewing, there is extremely hot water in the K-Cup® pod holder. To avoid injury, do not lift the handle during the brewing process.MULTISTREAM TECHNOLOGY™Extracts more flavor and aroma* in every brew.*vs. Keurig® leading brewer K-Classic® with The Original Donut Shop® CoffeeGet To Know Your BrewerCaring For Your BrewerRegular cleaning keeps your brewer running smoothly. Always be sure to turn off and unplug your brewer before cleaning.The water reservoir should be cleaned periodically by wiping the inside of the reservoir and underside of the lid with a damp, non-abrasive, lint free cloth. Do not dry the inside of the water reservoir with a cloth as lint may remain. Allow the reservoir to dry completely.Brewer ExteriorKeep your Keurig® brewer looking its best by cleaning the exterior from time to time. Just clean the metal areas with a paper towel and a non-vinegar glass cleaner, and the plastic with a damp, soapy, lint-free, non-abrasive cloth. Never immerse the brewer in water or other liquids.Drip TrayThe drip tray can hold up to 8 ounces of overflow and should be emptied and cleaned occasionally. To remove, slide it toward you, keeping it level to avoid spilling. Rinse and clean with a damp, soapy, lint-free, non-abrasive cloth.Water ReservoirRegular MaintenanceFor great-tasting coffee, keep your brewer running at peak performance by following the recommended maintenance schedule:in the Use & Care GuideBrewer FeaturesCreate a Favorite: Favorites can be added while customizing your brew, press and hold the heart button above the temperature and strength settings, you can save up to 10 favorites. Favorites can be renamed in the Keurig® app by tapping settings, then select a favorite to rename. The Keurig® app can also be used to reorder favorites. In the app, tap settings, then favorites, then ↑↓ icon, and then drag the favorites into the preferred order. A favorite can be deleted via the brewer or the Keurig® app. To delete via the brewer, select the favorite you wish to delete, then press and hold the heart button, and then confirm deletion.Hot Water Brew: On the home screen with no K-Cup® pod inserted in to the brewer, press the K to access hot water. Then choose the size and press the blinking K to brew hot water.Power on/Auto off: to power your brewer on simply press any button or lift the brew handle. Your brewer will automatically turn off after 5 minutes. You can also press and hold the K button to turn the brewer off. Settings When the brewer is plugged in and powered on, press botharrows at the same time to open the Settings menu. Use the right arrow to scroll through the different features within the menu including: • Wi-Fi®: connect to your Wi-Fi® network, modify your password, and change the Wi-Fi® settings.• High Altitude: ensure your brewer works properly at higher altitudes (5,000 feet).• Language: choose your preferred language• Water Filter Reminder: set the water filter reminder to ensure you always have quality water for your coffee • Brewer Information: provides the latest software version installed on the coffee maker• Support: provides contact information to get help when you need it• Factory reset: resets to the original manufactured stateATTENTION!This brewer is only compatible with the newly designed Keurig® My K-Cup® Universal Reusable Coffee Filter.Do not attempt to use any other reusable filter or previous versions of Keurig® My K-Cup® Universal Reusable Coffee Filter; may cause damage to brewer.Voice Control (Alexa & Google Home): Open the Keurig® app, tapSettings, tap My Account, tap Voice Control. Follow the prompts in app.Alexa and all related logos are trademarks of , Inc. or its affiliates.Google Home and all related logos are trademarks of Google LLC.Remote Brew: First place a pod in the brewer and lower the handle.Then place a sufficiently-sized mug on the drip tray. This may be done at any point before a remote brew. When you are ready to brew remotely, open the Keurig® app, ensure you are on the Brew tab, select your brew settings, and then tap the app’s brew button. To override remote brew, you can cancel via the app or power off the brewer.Remote On & Off: In the Keurig® app on the Brew tab, tap to toggle the power on and off.Schedule a brew allows you to schedule a brew in advance. From the brew tap in the app, tap the calendar icon in the top right corner. Then choose the day and time you would like to schedule a brew. Make sure you have enough water in the reservoir, place a pod in the brewer and lower the handle, and place a sufficently sized mug on the drip tray. You will get a reminder before your next scheduled brew.Smart Auto-Delivery keeps tracks of how many cups you are using and automatically sends you an order when your remaining inventory is down to 10 days, so you won’t run out of pods.My Brew Style tracks your brewing activity within the app and provides recommendations on favorites we think you will enjoy based on what you’ve been brewing.Funnel Washing the funnel ensures a fresh beverage experience. The funnel should be washed regularly and can be removed from the K-Cup® pod holder by pulling on it until it pops off. To replace it, orient the snaps to the indent and just snap it back onto theK-Cup® pod holder.Exit NeedleRemove the pod holder assemblyand detach the funnel. Locate theexit needle on the inside bottomof the K-Cup® pod holder. Insert a straightened paper clip into the exit needle to loosen any coffee grounds.Entrance NeedlesL ift the brewer handle and locate the entrance needles on the underside of the lid. To clean the holes in the needles, hold the brewer handle in the upward position and with your other hand, carefully insert a straightened paper clip into all the holes. Gently move it around to loosen any coffee grounds. Lower the handle completely and run a cleansing brew two times. Do not insert a K-Cup® pod.CAUTION: There are sharp needles that puncture the K-Cup® pod above the K-Cup® pod holder and in the bottom of the K-Cup® pod holder. To avoid risk of injury, do not put your fingers in the K-Cup® pod holder.NOTE: Always remove and dispose of the used K-Cup® pod after brewing.You should descale your brewer every 3 months or when the descale notification turns on. Properly follow the descaling procedure in order to turn off the notification.Depending on the mineral content of your water, calcium depositsor scale may build up in your brewer. Scale is non-toxic but if left unattended can hinder brewer performance. Regularly descaling your brewer every 3 months helps maintain the heating element and other internal parts that come in contact with water. Calcium deposits may build up faster, making it necessary to descale more often. Descaling ProcedureBefore you begin, you will need a large ceramic mug, fresh water, Keurig® Descaling Solution, and access to a sink. Do not use apaper cup. Ensure that there is no beverage pod in the K-Cup® pod holder. Please allow approximately 15-20 minutes for the descaling procedure.STEP 1: Prepare the BrewerWhen the Descale notification appears on the screen, press theleft arrow, then choose CONTINUE. Select your descaling product2oz Pouch or 14oz Bottle. Next follow the prompts on the screen to complete the descale process. If you would like to descale your brewer but don’t see the descale notification on the display, press both arrows at the same time to open Settings, then select Descale Mode. Note: Make sure to remove the water filter from the water reservoir if applicable. STEP 2: Descale the BrewerEmpty the water reservoir and add the Keurig® descaling solution to the water reservoir. Pour the entire bottle of Keurig® Descale Solution into an empty water reservoir. If using the bottle, fill the empty bottle with water and pour into the water reservoir. If using the Pouch, add 3 cups of water (24oz) to the reservoir. Do not insert a K-Cup® pod. Place a large mug on the drip tray.Press the flashing BREW button to dispense 12oz of hot water. Discard the hot water and replace mug on the drip tray. Repeat until the water reservoir is empty and the screen says ADD WATER.STEP 3: Fresh Water RinseRinse the water reservoir and refill it to the max fill line with fresh water. Make sure the mug is on the drip tray. When the brew button flashes press to begin fresh water rinse. Once the brew is complete, pour the hot liquid into the sink. Repeat this step until the screen says DESCALE COMPLETE. Now the brewer is ready for use.NOTE: The cleaning action of Keurig® Descaling Solution may result in a “foam” dispensed from the brewer. This is natural, as the solution is reacting with the scale inside. For a brewer that is heavily scaled, the brewer may not fill properly after the descaler is added. If this occurs, you may see only a small or no output dispensed, followed by the sound of air blowing out. If this occurs:• Turn off and unplug the brewer.• I f there is Keurig® Descaling Solution in the water reservoir, discard the contents, rinse the water reservoir thoroughly and refill with water.• P lug the brewer back in, power on, and repeat the Step 3 Fresh Water Rinse cycle. The brewer should begin to function normally as the solution is rinsed out and the scale is removed. If problem persists, allow brewer to sit unplugged for at least 30 minutes before continuing with the rinse.Descaling Your BrewerTroubleshootingGrounds in Your CoffeeGrounds may have gathered in the exit or entrance needles and can be cleaned using a straightened paper clip or similar tool.• C lean the exit needle of the K-Cup® Pod Holder. Refer to theExit Needle care instructions.• C lean the brewer entrance needles. Refer to the Entrance Needle care instructions.For optimal enjoyment and to limit grounds in your cup during hot water brews or when transitioning from brewing a coffee pod toa non-coffee pod (i.e. tea or cocoa), clean the exit and entrance needle per the instructions provided and perform 2 cleansing brews. Excessive Grounds in the K-Cup® Pod Assembly HousingDo not use already-punctured pods. That may result ingrounds escaping through holes in the lid.Brewer Will Not Close or Brew with My K-Cup®Due to the number of entrance needles, older My K-Cup® Reusable Coffee Filters may not be compatible with the brewer.The compatible My K-Cup® filter will have five holes on its lid. Recommended Brew Settings Are Not Provided or a Keurig®K-Cup® Pod is Not RecognizedFirst, make sure your brewer is connected to Wi-Fi® to enable BrewID TM. Next, ensure the pod that was used was a Genuine Keurig® K-Cup® pod by finding the Keurig® logo on the pod’s lid. If a Keurig® pod’s lid is already punctured, it may not be recognized. Try again with an unpunctured pod.If the brewer continues not to recognize Keurig® pods, Contact Customer Service.How do I connect my brewer if I skipped connecting it out ofthe box?Make sure you have your home Wi-Fi® password ready.First, download the Keurig® app and select Get Connected to create an account.If you already have the Keurig® app, go to settings in the app, select Connect a Brewer, then Get Started. Scan the QR code on the back of the brewer.Next, press both arrows at the same time on the brewer to open Settings. Press the right arrow to continue to the Wi-Fi® settings. Press the K button followed by the right arrow to Connect. Tap LINK in the app. Follow the in app instructions.Brewer Will Not BrewIf you see the add water warning, add water to the water reservoir.• A minimum of 6oz of water is required to brew. Add an additional 2oz of water to the reservoir to ensure the minimum fill level has been met, then press the BREW button. Repeat until the brewer begins to dispense.Make sure the water reservoir is seated properly in its base. If the add water warning persists even after refilling, contact Customer Service. Brewing a Partial Cup• The exit needle may be clogged. Refer to the Exit Needlecare instructions.• Clean the K-Cup® Pod Holder, see K-Cup® Pod Holder careinstructions.• The brewer may need to be descaled. If you have repeated the descale procedure on your brewer two times and it is still only brewing a partial cup, contact Customer Service.Brewer Does Not Have Power or Shuts Off• P lug brewer into its own grounded outlet. If the electric circuit is overloaded with other appliances, your brewer may not function properly. The brewer should be operated on its own circuit, separate from other appliances.• For energy savings, the brewer automatically turns off 5 minutes after the last brew.• I f the brewer still doesn’t have power, contact Customer Service.Helpful HintsWater quality varies greatly. If you notice an undesirabletaste in your beverage (such as chlorine or mineral tastes),we recommend using a Keurig® Water Filter, bottled, or filtered water. Do not use distilled water. You can also install a Keurig® Water Filter to help remove water impurities and improve beverage taste.ServiceBeyond these recommended cleaning and maintenance procedures, this brewer is not user serviceable. For service, please refer to the Warranty section of this guide.StorageEmpty the water reservoir before storing or transporting andtake care to ensure that you store your brewer in a safe andfrost-free environment. When you prepare to use it after storage, we recommend rinsing the water reservoir with fresh water and descaling the brewer as detailed in the Descaling yourBrewer section.If you plan to move your brewer to a different location, turn the brewer off, unplug it, and empty the water reservoir. If your brewer has been in an environment below freezing, please be sure to let it warm to room temperature for at least 2 hours before using.Have Questions?We’re here to help. Visit forstep-by-step videos on cleaning, descaling, and more.Still Need Help?Give us a call at1-866-901-BREW (2739)Click or Call!LIMITED ONE-YEAR WARRANTYKeurig Green Mountain, Inc. (Keurig) warrants that your brewer will be free of defects in materials or workmanship under normal home use for one year from the date of purchase. It is recommended that you register your brewer on /new so that yourpurchase information will be stored in our system. Keurig will, at its option, repair or replace a defective brewer without charge upon its receipt of proof of the date of purchase. If a replacement brewer is necessary to service this warranty, the replacement brewer may be new or reconditioned. If a replacement brewer is sent, a new limited one-year warranty will be applied to the replacement brewer.This warranty only applies to brewers operated in the United States and Canada. This warranty gives you specific legal rights, and you may also have other rights that vary from state to state and, in the case of Canada, from province to province.Only the use of Keurig® K-Cup® brand pods and accessories will guarantee the proper functioning and lifetime of your Keurig® brewer. Any damage to or malfunction of your brewer resulting from the use of non-Keurig® pods and accessories may not becovered by this warranty or may result in a service fee if the damage or malfunction is determined to be caused by such use.WHAT IS NOT COVERED BY THE LIMITED WARRANTY?THIS WARRANTY DOES NOT COVER CONSEQUENTIAL OR INCIDENTAL DAMAGES SUCH AS PROPERTY DAMAGE AND DOES NOT COVER INCIDENTAL COSTS AND EXPENSESRESULTING FROM ANY BREACH OF THIS WARRANTY , EVEN IF FORESEEABLE. Some states or provinces do not allow the exclusion or limitations of incidental or consequential damages, so the above limitation or exclusion may not apply to you depending on the state or province of purchase.Nor does this warranty cover damages caused by use of non-Keurig® pods or accessories, services performed by anyone other than Keurig or its authorized service providers, use of parts other than genuine Keurig® parts, or external causes such as abuse, misuse, inappropriate power supply, or acts of God.OTHER LIMITATIONSTHIS WARRANTY IS EXCLUSIVE AND IS IN LIEU OF ANYOTHER EXPRESS WARRANTY , WHETHER WRITTEN OR ORAL. IN ADDITION, KEURIG HEREBY SPECIFICALLY DISCLAIMS ALL OTHER WARRANTIES WITH RESPECT TO YOURKEURIG® BREWER, INCLUDING ANY IMPLIED WARRANTY OF MERCHANTABILITY OR FITNESS FOR ANY PARTICULAR PURPOSE. Some states or provinces do not allow disclaimers of such implied warranties or limitations on how long an implied warranty lasts, so the above limitation may not apply to you depending on the state or the province of purchase.HOW DO YOU OBTAIN WARRANTY SERVICE?Keurig® brewers are high-quality appliances and, with proper care, are intended to provide years of satisfying performance. However, should the need arise for warranty servicing, simply call Keurig Customer Service at our toll-free phone number 1.866.901.BREW (2739). Please do not return your brewer for servicing without first speaking to Keurig Customer Service to obtain a Return Materials Authorization (RMA) number. Keurig® brewers returned without an RMA number will be returned to the sender without servicing.WarrantyEFHA.HandleB. K-Cup® Pod Holder (B and C are the K-Cup® Pod Holder Assembly)C.FunnelD. K-Cup® Pod Assembly HousingE. Drip Tray PlateF.D rip TrayG. Drip Tray BaseH. Water Reservoir LidI. Water ReservoirFor replacement parts, please visit SINGLE SERVE COFFEE MAKERK •Supreme Plus ®Coffeehouse tastein your own home.DC0000000000 REV A。
餐饮机械设备操作规程
餐饮机械设备操作规程餐饮机械设备是餐饮行业中不可或缺的一部分,餐厅的运作离不开这些设备的帮助。
为了保证设备的安全和正常运行,提高工作效率,需要制定一套科学合理的操作规程。
以下是餐饮机械设备操作规程的一些要点,供参考。
一、餐饮机械设备操作前的准备工作1. 检查设备的电源是否正常,是否有异常情况。
2. 检查设备的接地是否良好,以防电器漏电造成意外事故。
3. 检查设备的机械部件是否完好,如传动装置、刀具等,并进行润滑、调整等必要的维护工作。
4. 制定设备操作流程和安全规范,告知操作人员,确保操作规范、安全性。
二、餐饮机械设备的操作与使用1. 不得超负荷使用设备,以免造成设备过热、烧坏或者其他损坏。
2. 操作人员应熟悉设备的工作原理、结构和操作方法,并按照规定的操作流程进行操作。
3. 操作设备时应戴上合适的劳保用品,如手套、围裙等,以保护人身安全。
4. 操作人员应站在设备操作台或坐在稳固的椅子上操作,不得站在地上或使用不稳定的支撑物操作,以防跌倒及其他危险。
5. 使用机械设备过程中,严禁擅自加入或取出正在加工中的食材或者零件,以免造成伤害。
6. 当设备出现异常情况时,应立即停止使用,并及时联系维修人员进行检修和维护。
三、餐饮机械设备的维护保养1. 设备的日常清洁工作应定期进行,如铲除设备积尘、清理油污等。
2. 设备的润滑工作需要根据设备的使用频率和使用环境进行,制定相应的维护保养计划。
3. 定期对设备进行全面维护,如清洗水管、更换磨损的部件等,以保证设备的正常运行。
4. 维修期间,应将设备停止使用,并采取必要的安全措施,防止他人误操作或事故发生。
四、餐饮机械设备的安全使用提示1. 在使用设备时,应注意保持操作区域的干燥和整洁,以免造成滑倒或其他安全事故。
2. 设备操作人员应定期检查设备的线路、电源、开关等,确保设备的安全使用。
3. 设备的使用和维护记录应完整保存,以备查阅和参考。
4. 新员工上岗前,应进行必要的培训和指导,并确保其熟悉设备操作规程。
- 1、下载文档前请自行甄别文档内容的完整性,平台不提供额外的编辑、内容补充、找答案等附加服务。
- 2、"仅部分预览"的文档,不可在线预览部分如存在完整性等问题,可反馈申请退款(可完整预览的文档不适用该条件!)。
- 3、如文档侵犯您的权益,请联系客服反馈,我们会尽快为您处理(人工客服工作时间:9:00-18:30)。
热狗机使用方法
热狗(Hot dog)是香肠的一种吃法。
夹有热狗的整个面包三明治也可以直接称作热狗。
吃热狗的时候可以配上很多种类的配料,比如番茄酱、美乃滋、芥末、渍包心菜、渍白萝卜、洋葱屑,生菜屑、番茄(切片,切屑或切块)和辣椒等等。
穗华牌电烤香肠机又叫台湾热狗机、热狗机、香肠机、烤肠机等,适用于烘烤熟制香肠。
该机是各饮食店、食品商店、肉制品专卖店、快餐店等出售热香肠或配制快餐食品的理想设备。
热狗机使用方法
1、打开机器先检查外观,一切无误后,将烤肠机置于牢固平坦的工作台(桌面、柜台)上。
插上电源,先打开热狗机上电源开关,指示灯亮,再打开电机开关,滚轴开始平稳转动,然后把温控器的旋钮顺时针方向旋转,将烤肠机旋钮上的温度刻度与面板上的红色三角对准,加温指示灯亮,滚轴内电热管开始加温,旋钮继续顺时针转动约在150度处停下,当烤肠机器温度达到设定值时,加温指示灯熄灭,恒温指示灯亮,表示温度已到设定值。
2、把预先准备好的香肠,平行排放在相对两根滚轴中间,此时香肠以相反的方向开始受热转动,在排放香肠时不要过密并与滚轴二端错开约10mm的距离,当香肠烤至熟透时,可嗅到香肠味,色泽变深并发油亮,即可食用、出售。
3、通常烤肠机烤制温度应设定在120-160度为宜。
4、本机常有2组温控装置,分别控制,当生产量需求不大时,只需打开一组,前排几条管子加热进行烤制,如产量需要增加时,再把二组同时打开,这样可节约用电。
5、本机滚轴下面的底盘只用不承接香肠上滴落的油液之用,平时也可用香肠的预热,但不宜将已烤熟的香肠放在底盘内,以免成品变得干硬。
6、连续烤制时,每隔4-5小时就清洁烤肠机器滚轴一次。
7、滚轴上如有顽渍,可沾热水洗涤剂或用金属丝球洗净,并用毛巾擦干。
8、使用完毕后拔掉电源,将烤肠机清理干净,并加以防尘保护。