加热和通风-TOPIx
BiPAPSynchrony操作演示课件

• 小型、便携 • 5种通气模式 • 最大送气压力30cmH2O • 监测内容完善 • 报警内容丰富 • AVAPS功能 • 记忆功能 • 一体化加温湿化器
运行模式
• 该设备以以下模式运行: • • 持续正压通气(CPAP) • • 自主通气(S) • • 自主/定时(S/T) • • 定时(T) • • 压力调节(PC)
定时治疗模式(T)
• 定时治疗(T)模式提供强制压力辅助和双 水平压力。
• 所有呼吸都是机械触发和机械切换;患者 呼吸频率对机械频率或压力水平没有影响。 IPAP触发由呼吸频率调节确定,切换时间 由吸气时间控制确定。
PC模式
• 压力控制(PC)模式与S/T模式相似,但是 它的所有呼吸都是机械切换。
S模式
• 在自主(S)模式,设备提供双水平压力支持。 设备响应自主吸气努力时触发吸气气道正压 (IPAP),在呼气过程中又切换至呼吸气气道正 压(EPAP)。
• S模式下的触发和切换
在S模式中配置以下参数:
• • 治疗模式设置
– • AVAPS设置(激活/失效) – • 容量设置(当AVAPS激活时) – • IPAP最大值设置(当AVAPS激活时) – • IPAP最小值设置(当AVAPS激活时) – • IPAP设置(当AVAPS失效时) – • EPAP设置 – • Flex设置 – • 压力延迟上升设置 – • 延迟起始压力设置 – • 压力上升时间设置 – • 窒息警报(激活/失效) – • 患者断开连接警报(激活/失效) – • 每分钟低通气量警报设置 – • 低呼气潮气量警报设置(当AVAPS激活时) – • 清除治疗小时数 – • LED背光设置
S/T模式
• 自主/定时(S/T)模式与S模式相似,只是它还可 以在患者在设定时间内不能自主呼吸时输送机械 触发的呼吸。
TopTech TT-N-751恒温器操作手册说明书

Thermostat Quick Reference Thermostat Operation Filter Change ReminderContact Us and Warranty Registration2345Congratulations on purchasing a new thermostat. This thermostat was designed to the highest reliability and ease of use standards. Thank you for choosing TopTech.Table of ContentsPage1® U.S. Registered Trademark. Patents pending.Copyright © 2010 Pro1 IAQ, Inc. All rights reserved.Rev. 1019Need Help?For assistance with this productplease visit or call TopTech Customer Care toll-free at 888-776-1427 during normal business hours (Mon-Fri 9 AM - 6 PM Eastern).Una versión española de este manual puede ser descargada en Battery information2Open the battery door on the front of the thermostat and insert 2 AA Alkaline batteries (included).Getting to know your thermostat2Fan Button Light Button (Glow in the Dark)3System Button 4Menu Buttons5Temperature Setpoint Buttons 67Battery Door6712345LCD1+1 will appear in the display when second stage of heat or cool is on. +2 will appear for third stage of heat.System:Selects heat, offor cool as needed.Low Battery Indicator:Replace batteries when this indicator is shown.Menu Options:optionsIndicates the current room temperature.Displays the user selectable setpointThe COOL, HEAT or FAN icon will display when the COOL, HEAT or FAN is on.NOTE: The compressor delay feature is active if these icons are flashing. The compressor will not turn on until the 5 minute delay has elapsed.3Easy to use controlsLCD Display:See page 2 for details about this display read out and icons.12345Glow in the Dark Light Button:The glow in the dark light button will self illuminate for several hours after exposure to ambient light. This button turns on the display light when pressed.Temperature Setpoint Buttons:Press the + or - buttons to select the desired room temperature.6Menu Buttons:The menu buttons are only used by installing technicians to customize the thermostat for your heating and cooling systemFan Button:Select ON or AUTO . The ON key will run the fan continuously. The AUTO key will cycle the fan on only when the heating or cooling system is on.System Button:Selects the operation mode of your HVAC system. Selecting HEAT turns on the heat mode. Selecting COOL turns on the air conditioning mode. Selecting OFF turns both heating and cooling off. Selecting AUTO will turn the HEAT or COOL on as needed. (EM Heat will appear as an option if operating a heat pump. EM Heat setting will turn on Emergency Heat.)6712345Filter Change ReminderIf your installing contractor has configuredthe thermostat to remind you when the airfilter needs changed, you will see FILT inthe display when your air filter needschanged. FILT will be shown in thedisplay after your system has run longenough to require an air filter change.Resetting the filter change reminder:When FILT reminder is displayed, youshould change your air filter and reset thereminder by holding down the FAN buttonfor 3 seconds.45Name: ____________________________Address: ________________________________________________________City: ____________________________State: ____________________________Zip:_____________________Thermostat Model: _____________________Date Installed:_____________________Contact Us InformationTopTech Warranty Registration:TopTech by Pro11111 S. Glenstone Suite 2-100Spring eld, MO 65804Toll-free: 1-888-776-1427Toll Number (Outside the USA): 330-821-3600Web: Hours of Operation: Monday - Friday 9 AM - 6 PM EasternComplete form and mail to:TopTech by Pro11111 S. Glenstone Suite 2-100Spring eld, MO 65804。
施耐德ClimaSys热能解决方案之风扇系列
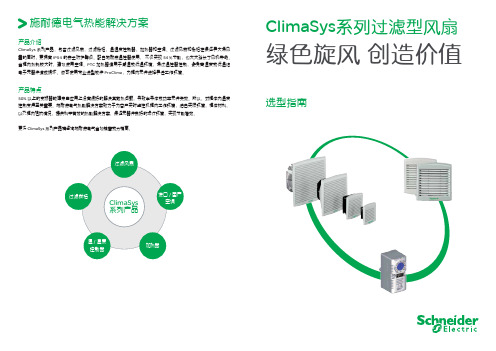
ClimaSys 系列过滤型风扇
绿色旋风 创造价值
选型指南
产品介绍
ClimaSys 系列产品,包含过滤风扇,过滤栅格,温湿度控制器,加热器和空调。
过滤风扇和栅格在保证最大通风量的同时,更拥有IP54的安全防护等级。
配合施耐德温控器使用, 不仅实现54%节能,也大大延长了风机寿命。
当柜内热耗较大时,建议使用空调。
PTC 加热器适用于潮湿或低温环境,通过温控器控制,避免高湿度或低温给电子元器件造成损坏。
您可使用专业选型软件ProClima ,为柜内元件选择最佳工作环境。
产品特点
50%以上的变频器故障来自应用上没有很好的解决其散热问题,导致半导体或功率元件失效。
所以,对柜体内温度控制变得至关重要。
施耐德电气热能解决方案致力于为客户实时监控机柜内工作环境,结合实际环境,柜体材料,以及柜内阻抗情况,提供科学有效的热能解决方案,保证元器件良好的运行环境,实现节能增效。
更多ClimaSys 系列产品请咨询施耐德电气当地销售或分销商。
施耐德电气热能解决方案
NSYCVF38M*
图1图3图5
图2
图4
更多热能产品
NSYCVF85M*
NSYCVF165M*
NSYCVF300M*
NSYCVF560/850M*
风扇尺寸一览图
过滤风扇选型表
一体化过滤风扇,选型更简单
独特卡式安装,安装维护更便捷
聚氨酯密封条,
IP54更放心
充足国内库存,交货更迅速
风扇选型软件
油污超薄防虫标准。
OSN550-产品概述

4.1 DCN 管理.......................................................................................................................................................4-2 4.2 设备维护.........................................................................................................................................................4-2 4.3 升级方式.........................................................................................................................................................4-4 4.4 License 控制...................................................................................................................................................4-5
欧特罗尼克 Spirit Z-Wave Plus 节能恒温器 使用手册说明书
ENMade in Germany1 Included in delivery 32 Adapters 43 Product Description4 Technical specifications 4 Contact information5 Warranty54 Buttons and Displays 6 4.1 Buttons 6 4.2 Boost-Buttons LEDs 7 4.3 LCD 7 Network behavior 8 4.4 Inclusion 9 4.5 Mounting the Spirit Z-Wave Plus 10 4.6 Plus Mechanical Installation 11 4.7 Exclusion 12 4.8 Unmounting the Spirit Z-Wave 13 4.9 Plus Factory Rese 13 5 Operating the device 14 5.1 Setpoint adjustment 14 5.2Child protection14Content5.3 Altering the operating states 14 5.4 Window open detection 15 5.5 Display NodeID 156 Z-Wave 166.1 Assoziation 17 6.2 Basic17 6.3 Configuration 18 6.4 Multilevel Sensor 18 6.5 Multilevel Switch 19 6.6 Notification 19 6.7 Protection 19 6.8 Thermostat Mode 19 6.9 Thermostat Setpoint 207 T roubleshooting201. Spirit Z-Wave Plus energy-saving thermostat2. Screw3. Adapters for Danfoss valves4. 2x AA batteries1. Included in deliveryRASpirit Z-Wave Plusenergy-saving thermostat2x AA batteries Screw for adapter* When using the RAV adapter, you need the RAV Pinfor the extension of the valve stem.WARNING - Remove the connecting pieces of the plastic adapter completely before you use one of the supplied adapters!Additional adapters are available for different valve manufacturers. Please consult the EUROtronic Website for all information about the different adapters at: /Service/FAQFor the following valves no adapter is required:Heimeier, Junkers Landy + Gyr, MNG, Honeywell, Braukmann, as these have a thread of M30 x 1.5mm. The adapters for Danfoss RAV (pin must be plugged on the valve tappet) Danfoss RA and Danfoss RAVL are included.For the following valves an adapter is required:Herz M28 x 1,5 mm, Comap M28 x 1,5 mm, Vaillant 30,5 mm, Oventrop M30 x 1,0 mm, Meges M38 x 1,5 mm, Ondal M38 x 1,5 mm, Giacomini 22,6 mm, Rossweiner M33 x 2,0 mm, Markaryd M28 x 1,0 mm,, Ista M32 x 1,0 mm, Vama M28 x 1,0 mm, Pettinaroli M28 x 1,5 mm, T+A M28 x 1,5 mm, Gampper 1/2/6.If you are not sure which valve you are using, please visit: /Produkte/Adapter for fur-ther Information. Here you will find a list of various valves and adapters.2. AdaptersSpirit Z-Wave Plus is a Z-Wave radio standard compatible energy-saving radiator thermostat. FLiRS (Frequently Listening Receiver Slave):Spirit Z-Wave uses FLiRS to provide short latency and short responding times.3. Product DescriptionIf you wish to receive further technical Support or information about other EUROtronic products, please contact us via E-Mail or telephone.Customer Service:Eurotronic Technology GmbH Südweg 136396 Steinau-Ulmbach GermanyContact informationTelefon: 0 66 67 / 9 18 47-0Servicehotline: 0 66 67 / 9 18 47-17 eMail:*******************Internet: WarrantyThe 24-months warranty period begins at the day of purchase. Please keep the receipt as evidence of pur-chase. During the warranty period, defective radiator thermostats may be sent to your dealer or the address below. Please ensure sufficient postage is paid. A new or repaired device will then be sent to you free of charge.Please note that EUROtronic only grants warranty on the function of the device. EUROtronic will not grant war-ranty for the interaction between the thermostat and the bottom part of the valve. The technical data is only valid for the use of the following valves: Heimeier, Junkers Landys + Gyr, MNG, Honeywell, Braukmann (mea-sure of thread M30 x 1,5), Oventrop (M30 x 1,5) Danfoss RA, RAV and RAVL. Please refer to the combinations of the devices on our website (https:///produkte/adapter-information.html) EUROtronic does not issue a guarantee when using the thermostat with valves which are not mentioned above.Declaration of Conformity:Eurotronic Technology GmbH hereby declares that this device is compliant with the essential require-ments and other relevant provisions. The declaration of conformity is provided at . Advice on environmental protection:From the date of implementation of European guidelines 2002/96/EC and 2006/66/EC, into national law, the following applies: Electric and electronic devices and batteries may not be disposed of in household waste. The consumer is obliged to return electric and electronic devices and batteries to the public col-lection points established for them or to the point of sale. The particulars of this are regulated by the applicable state laws. The symbol on the product, operation instructions or packaging points to these provisions. You make an important contribution to the protection of the environment by reusing or recycling old equipment/bat-teries or making use of them in other ways.WarningDo not use rechargeable batteries!Never recharge batteries, do not short circuit them, do not take them apart - Risk of explosion! Remove dead batteries from the device immediately. Do not use old and new batteries together. Clean battery and device contacts before inserting if necessary.Keep batteries away from children. Avoid contact with skin, eyes and mucous membranes. In case ofcontact with battery acid, rinse the affected areas immediately with plenty of water, and seek medical atten-tion immediately. Do not expose batteries to direct sunlight.Safety Instructions: Spirit Z-Wave Plus is designed for use in buildings. Operate Spirit Z-Wave Plus only as described in the user manual. Spirit Z-Wave Plus should only be put to use in a dry and dust-free place, away from direct sunlight. Do not keep using the device when there is obvious damage. Spirit Z-Wave Plus may not be rebuilt, modified or opened.4.1 Buttons4. Buttons and Display&Minus PlusBoostTechnical specificationsDevice short description Spirit Z-Wave Plus EAN4260012711301Article Number 701003Supply Voltage 2 x 1,5V LR6/Mignon/AA Radio Frequency 868,42 MHz ConnectionM30 x 1,5mmMethod of operation Type 1Dimensions (W x H x D): 56 x 68 x 89 mm Weight176g (incl. batteries)Degree of protection IP20Degree of pollution24.3 LCDColorState MeaningBlinkingOver the Air update of the actuator software in progress. Temperature regulation is not possible during this process. Lights constantly A task has failed.Boost – green Boost – redWrench:Lights up if mechanical tasks are ongoing.Antenna:Displays the Spirit Z-Wave Plus network state. Segment visible: rf-link established Segment turned off: rf-link lostID: Lights up if the Display shows the Z-Wave NodeID.Battery: Lights up if less than 15% battery is remaining Lock: Lights up if child protection is set.Celsius: Displayed if the LCD shows a setpoint temperaturePercent: Displayed instead of °C Icon if the Comet Z Plus is set to direct. control mode.On factory default the device does not belong to any Z-Wave network Spirit Z-Wave Plus needs to be added to an existing wireless network to communicate with the devices of this network. This process is called Inclusion.Spirit Z-Wave Plus can also be removed from a network. This process is called Exclusion. Both processes are initiated by the primary controller of the Z-Wave network. This control-ler is turned into exclusion respective inclusion mode. Please consult the manual of your Z-Wave Controller how to activate Inclusion or Exclusion mode.If Spirit Z-Wave Plus has been added to anetwork, it has to be removed prior to be added to another wireless network.Network behaviorInteroperabilityThis device and every other certified Z-Wave device can be used together with any other certified Z-Wave device regardless of brand and origin as long as both are suited for the same frequency range.SecuritySpirit Z-Wave Plus supports secure communi-cation. Spirit Z-Wave Plus will communicate with other devices secure as long as this device provides the same or a higher level of security. Otherwise Spirit Z-Wave Plus will automatically turn into a lower level of security.Inserting batteriesRemove the battery cover by simply pulling it off. Now insert the batteries. Pay attention to the correctpolarity! At a later battery change, the configuration of your Spirit Z-Wave Plus is maintained.4.4 InclusionStart Inclusion mode of your primary Z-Wave Controller. Press the Boost-Button.Spirit Z-Wave Plus will show the assigned NodeID.After adding the Spirit Z-Wave Plus to a network it is ready to be installed on the radiator. The LCD shows INS. Do not press the boost button yet.4.5 Mounting the Spirit Z-Wave Plus4.6 Mechanical InstallationPress the boost button to start mechanical installation.4.7 ExclusionStart Exclusion mode of your primary Z-Wave Controller.Now press and hold the boost button of the Spirit Z-Wave Plus for at least 5 seconds.Remove the Spirit Z-Wave Plus from the Z-Wave network before unmounting it. Follow the process described in Exclusion and wait until the LCD shows INC. You can now uninstall Spirit Z-Wave Plus from the radiator.Remove batteries.Press and hold boost button.While still holding boost button insert batteries. The LCD shows RES. Release boost button. To perform the factory reset press boost button.2.1.Please use this procedure only when the network primary controller is missing or otherwise inoperable.DEFRES Press Boost button to perform reset.Defaults restoredNode XXX removed4.8 Unmounting the Spirit Z-Wave Plus4.9 Factory Reset5 Operating the deviceThe LCD shows the configured set point or the valve opening percentage if the device is in manufacturer specific mode.5.1 Setpoint adjustmentThe setpoint is adjusted via plus and minus button.Altering the setpoint locally will set the Spirit Z-Wave Plus in heating mode.The energy saving setpoint can only be adjusted via Z-Wave.The configurable setpoint range is 8°C to 28°C.If the setpoint is increased/decreased above/below the set point limits theSpirit Z-Wave Plus will change into boost / off –mode.5.2 Child protectionPress and hold plus and minus button simultaneously for 3 secondsto enable/disable the child protection.If the Spirit Z-Wave Plus is set into the highest protection level it is nolonger possible to operate the device locally.5.3 Altering the operating statesOff-ModePress minus button until OFF is displayed.Boost-ModePush the boost button.Alternatively press the plus button until ON is displayed.Heating-ModeIf the operating state is not heating mode, pressing the plus orminus button will bring the device in heating mode.5.4 Window open detectionIf the roomtemperature drops the window open detection will trigger.Spirit Z-Wave Plus will change temporarily in off mode for 15 minutes.Window open detection will end automatically after 15 minutes and the previously active operating mode will be restored.Window open detection can also be canceled by a button press.The window open detection is disabled during manufacturer specific mode.The sensitivity oft he window open detection can be configured5.5 Display NodeIDPress and hold the boost button for 3 seconds to display the NodeID.6 Z-WaveCommand Class Description Version Control (C)Security *Support (S) Association Allows to associate with other Z-Wave devices.2S U, S0, S2 Allows to group associations. 1S U, S0, S2 Association GroupInformationBasic Provides access to basic functionality.1S U, S0, S2 Battery Returns the current battery level of the device.1S U, S0, S2 Configuration Allows to configure the device settings.1S U, S0, S2 Device Reset Locally Informs the Z-Wave Controller that the device was factory reset. 1S U, S0, S2 Firmware UpdateAllows Over the Air Update of the device.3S U, S0, S2 Meta DataManufacturer Specific Provides information about Manufacturer and Product.1S U, S0, S2 Multilevel Sensor Provides the measured room temperature.5S U, S0, S2 Multilevel Switch Provides or sets the valve opening degree of the valve Controlling1S U, S0, S2 the valve opening degree requires manufacturer specific mode.Notification Informs the controller about critical system events/errors.8S U, S0, S2 Power Level Used to alter the rf-power(required by Z-Wave). 1S U, S0, S2 Protection Allows to lock the device(child protection).1S U, S0, S2 Security Allows encrypted Z-Wave Communication.2S U Thermostat Mode Configures the operation mode. 3S U, S0, S2 Thermostat Setpoint Allows to configure the desired room temperature. 3S U, S0, S2 Transport Service Handles the transmission of large telegrams.2S U Version Returns information about the Firmware.2S U, S0, S2 Z-Wave Plus Info Identifies the device as a Z-Wave Plus Device.1S U*Availability of the Command Class after adding the Spirit Z-Wave Plus to your Z-Wave network.U UnsecureS0 Z-Wave Security standard S0S2 Z-Wave Security standard S26.2 BasicSpirit Z-Wave Plus can only be associated with the Z-Wave controller.Control basic functions of the Spirit Z-Wave Plus via basic command class.Group No Description CommandsMax supported Nodes1LifelineBATTERY_REPORT,DEVICE_RESET_LOCALLY_NOTIFICATION,THERMOSTAT_MODE_REPORT,THERMOSTAT_SETPOINT_REPORT,NOTIFICATION_REPORT,PROTECTION_REPORT,SENSOR_MULTILEVEL_REPORT,SWITCH_MULTILEVEL_REPORT1Value Description Function0x00Energy Save Heating Switches into energy save heating mode. The room temperature will be lowered to the configured setpoint in order to save. energy. 0x0F OFF No Heating. Only Frost-protection.0xF0Full Power HeatingSwitches into Boost mode(Quick heat).0xFE Manufacturer Specific Switches into direct Valve control mode. 0xFFHeatingSwitches into comfort heating mode.The room temperature will be kept at the configured comfortable level.6.4 Multilevel SensorSpirit Z-Wave Plus can be configured during runtime.Spirit Z-Wave Plus measured the room temperature and automatically reports sensor readings to associated devices. Per default the reporting threshold is ±0.5°C. This parameter can be altered via configuration command class.Parameter number Size in Byte Name Description11LCD Invert0x00 LCD-content normal0x01 LCD-content inverted (UK Edition)default: 0x0021LCD Timeout0x00 No Timeout LCD always on0x05-0x1E LCD will turn off after 5 to 30 seconds. default: 0x0031Backlight0x00 Backlight disabled 0x01 Backlight enabled default: 0x0141Battery report0x00 Battery status is only reported as a system notification (Notification CC) 0x01 Send battery status unsolicited once a day. default: 0x0151Measured Temperature report 0x00 Unsolicited Temperature reporting disabled.0x01 – 0x32 report if temperature changed by delta = 0,1°C … 5,0 °Cdefault 0x05 (report on delta T = 0,5°C)61Valve opening percentage report 0x00 Unsolicited valve opening percentage reporting disabled. 0x01-0x64 report if valve opening changed by delta = 1% … 100% default 0x0071Window open detection0x00 Disabled0x01 Sensitivity low 0x02 Sensitivity medium 0x03 Sensitivity high default: 0x02 medium81Measured Temperature offset 0xCE-0x32 Offsets the measured temperature by-5,0°C – (+)5,0°C 0x80 External temperature sensor will be used for regulation.default: 0x00 0,0°C OffsetThe measured room temperature can be adjusted with an offset. Spirit Z-Wave Plus can receive temperature readings from other Z-Wave devices (wall thermostat for example) The external tempera-ture can be used for temperature regulation. This feature has to be enabled via configuration parameter. The Spirit Z-Wave Plus can handle Multilevel Sensor Reports in the following format:Report outgoing:Sensor type: …Air Temperature“Scale: Celsius Precision:2Report incoming:Sensor type: …Air Temperature“Scale: Celsius and Fahrenheit Precision:0, 1 and 26.5 Multilevel Switch6.6 NotificationAllows to request the valve opening in percent. 0% represents a fully shut valve. 100 % a fully open valve. The valve opening can be reported on change. If the configuration parameter is set. Spirit Z-Wave Plus will send notifications on certain events.Notification type ReasonDescriptionPowerManagement Replace battery soonNotification is sent if less than 25% battery remainingPowerManagement Replace battery now Notification is sent if less than 15% battery remainingSystemSystem Hardware failure with manufacturer proprietary failure code Provides manufacturer specific error codes for mechanical problems 0x01 Motor movement not possible 0x02 Not mounted on a valve0x03 Valve closing point could not be detected 0x04 Piston positioning failed6.7 ProtectionSpirit Z-Wave Plus can be locked remotely.Protection level Description0x00Unprotected regular operation possible0x01Restricted: device can be unlocked using a button pattern.0x02No local operation possible.6.8Thermostat ModeSpirit Z-Wave Plus offers the following modes.Mode Name Description0x00Off No heating. Only frost protection.0x01Heat Switches into comfort heating mode. The room temperature will be kept at the configured comfortable level.0x0B Energy Heat Switches into energy save heating mode. The room temperature will be lowe-red to the configured setpoint in order to save energy.0x0FFull PowerSwitches into Boost mode (Quick heat). Spirit Z-Wave Plus heats the room up as fast as possible. The mode is left automatically after 5 minutes or earlier if requested by the user(via Z-Wave or locally on the device).0x1F Manufacturer SpecificSwitches into direct valve control mode. The valve opening percentage can be controlled using the Switch multilevel command class.6.9 Thermostat SetpointThe following setpoints of the Spirit Z-Wave Plus can be altered.Modus Name Precision Scale Temp. Range 0x01Heat0,1 and 2Celsius and Fahrenheit8°C-28°C0x0B Energy Heat0,1 and 2Celsius and Fahrenheit8°C-28°C 7 T roubleshootingProblem Reason SolutionBatterie Icon Batteries do not haveenough power.Replace batteries.Heating element does not warm up.Is the boiler water temperature O.K.?Valve does not open, is it calcifiedafter the summer pause/heatingpause.Adjust the temperature of the boiler water.Remove the Comet Blue, move the valve back and forthper hand or with a tool.Heating element does not cool down.Valve does not close completely.It may be that the closing pointof your valve seat has shifted.Unmount Spirit Z-Wave Plus. Move the valve stem severaltimes by hand, it may be that adaptation is impossiblebecause your valve is calcified or the seat no longerperforms its function.Pressure piece falls out (This can also cause an E1-error)Due to an endless thread thepressure piece, which is situatedat the bottom, can fall out if thedevice has not been affixed on thevalve.Remove batteries. Put in the pressure piece.Insert the batteries. The endless thread is rotatingnow and fixes the pressure piece again.ER1-3 and ERR The error code can be cleared bypressing the boost button.Err Inclusion failed Z-Wave Controller out of range.ER1Valve positioning not possible Check if the valve is jammed.ER2Valve not detected Check if the Spirit Z-Wave Plus is correctly mounted. ER3Valves closing point not detected Check if the Spirit Z-Wave Plus is correctly mounted.。
简明通风设计参考手册

简明通风设计参考手册中兴不锈钢配套工程有限公司一、全面通风方法1、按照通风的动力不同,全面通风可分为自然通风和机械通风。
2、按照对有害物控制机理不同,全面通风可分为稀释通风、单向流通风、均匀流通风和置换通风。
(1)、稀释通风对整个车间进行通风换气,用新鲜空气把整个车间有害物质稀释到最高允许浓度以下。
该方法所需的全面通风量大,但是控制效果差。
(2)单向流通风通过有组织的气流运动,控制有害物的扩散和转移。
特点是通风量小,控制效果好。
(3)、均匀流通风速度和方向完全一致的宽大气流称为均匀流,用它进行的通风称为均匀流通风。
气流速度原则上要控制在0.2~0.5M/S之间。
这种方法能有效排出室内污染空气。
目前主要用于汽车喷漆室等对气流、温度、湿度控制要求高的场所。
(4)、置换通风置换通风的概念和均匀流通风是基本相同的。
有余热的房间,由于在高度方向上有稳定的温度梯度,如果以较低的风送速(V<0.2~0.5m/s),将送温差较小(2~4)的新鲜空气直接送入室内工作区。
低温的新风在重力的作用小首先下沉,随后慢慢扩散,在地面上形成一层薄薄的空气层。
而室内热源产生的热气流,由于浮力作用而上升,并不断卷吸周围空气。
这样由热气流上升时的卷吸作用、后续新风的推动作用和排风口的抽吸作用,地板上方的新鲜空气缓慢向上移动,形成类似于向上的均匀流的流动,于是工作区的污浊空气为后续的新风所代替。
当达到稳定时,室内空气在温度、浓度上便形成两个区域:上部的混合区和下部单向流动的清洁区,这种通风方式就叫置换通风。
置换通风的效果和送风条件有关,与传统的稀释通风方式相比,具有节能、通风效率高等优点。
二、全面通风设计(一)设置条件1、防止热、蒸气或有害物质的建筑物,当不能采用局部通风或者采用局部通风后达不到卫生标准要求时,应辅以全面通风或者是采用全面通风。
2、设计全面通风时,要尽量采用自然通风,以节约能源和投资。
当自然通风达不到卫生或者是生产要求时,应采用机械通风,或自然与机械的联合通风。
国外改进普雷克斯流程的进展

国外改进普雷克斯流程的进展普雷克斯(PUREX)流程是现今最有效、最成功的乏燃料后处理流程,采用磷酸三丁酯(TBP)和碳氢化合物(稀释剂)的混合物作为萃取剂,通过溶剂萃取分离出铀钚,包括首端处理过程(机械剪切和化学溶解)、溶剂萃取过程(铀钚共去污、铀钚分离及铀钚纯化)和铀钚尾端过程等部分,如图1所示。
为进一步简化后处理流程,降低成本,减少放射性废物产生量,并降低核扩散风险,许多国家正在对普雷克斯流程进行首端、溶剂萃取和镎锝分离等方面的工艺改进研究,或开展基于普雷克斯流程的新溶剂萃取流程研发工作。
图1普雷克斯流程示意图1工艺改进普雷克斯流程的优化改进,主要是针对首端处理工艺、萃取工艺、无盐试剂的使用以及镎锝的分离。
1.1首端处理工艺高温氧化挥发技术是一种首端处理工艺:在空气、氧气或氮氧化物等含氧气氛下,对乏燃料进行煅烧(〉480C),将UO2陶瓷芯块氧化为易被硝酸溶解的U3O8或者UO3细微粉末。
能够简化燃料与包壳分离工艺,实现高燃料回收率(>99%),加快乏燃料溶解,并有效去除挥发性裂变产物(如氚)。
俄罗斯在建的后处理示范中心已采用该技术,美国也开展了相关研究。
1.1.1俄罗斯氧化挥发法处理技术为验证其研发的简化普雷克斯流程,俄罗斯正在建设一座后处理示范中心(将于2021年建成)。
该中心采用热化学脱壳(1000C的氮气-氧气环境中)和氧化挥发法(500C)进行乏燃料首端处理,取替了原来的机械剪切过程,将致密的乏燃料芯块转化为疏松的细粉状态,使99%以上的氚从芯块释放出来,避免了后续工艺的含氚废水问题,并使设备布置更紧凑,降低了首端处理成本。
22细粉状高价铀氧化物更易溶解,在硝酸浓度较低(1.5〜1.8moSL)的情况下,料液的铀浓度可达到较高水平(超过500y/L)o1.1.2美国干法预处理工艺美国研究了用于除氚的干法高温化学技术。
该工艺段位于剪切工艺段和溶解工艺段之间,一般是在480-800C的空气或氧气中将乏燃料煅烧4小时,使U02发生氧化反应,生成细粉状:。
D0075667 WC1-101-000352_DES6401 R-Functional Description控制功能描述
Contract Name: MIDONG米东Contract Number: WC1-101-000352Document Title: FUNCTIONAL DESCRIPTION FOR AIR COOLED CONDENSERAIR COOLED CONDENSERFUNCTIONAL DESCRIPTION FORAIR COOLED CONDENSER空冷凝汽器功能描述SPX Ref. Nr. : WC1-101-000352_DES6401 CBA- 15/12/08 TBU/MPO MC TBU Preliminary First issueRev Date BEM-Issued BEM-Approved BEM-Released Status RemarksProduct Group : Statistical Commodity No.: SPX Cooling TechnologiesContract Number: WC1-101-000352Document Title: FUNCTIONAL DESCRIPTION FOR AIR COOLED CONDENSER空冷凝汽器控制描述TABLE OF CONTENT目录1.0.RELATED DOCUMENTS相关文件42.0.GENERAL DESCRIPTION OF THE SYSTEM系统总体描述52.1.MAIN COMPONENTS OF ACC 空冷系统主要组成52.2.PHILOSOPHY OF THE SYSTEM 系统原理62.3.GENERAL DEFINITION一般定义72.4.NUMBERING OF VALVES, PIPES AND MEASURING CIRCUITS93.0.ACC FUNCTIONAL GROUPS空冷功能组103.1.STEAM DUCT排汽管113.1.1.Description描述113.1.2.Instrumentation仪表113.1.3.Philosophy of the system系统原理123.1.4.Alarms and trips报警和跳闸133.2.STEAM CONDENSER WITH FAN UNITS带有风机组的凝汽器143.2.1.Description描述143.2.2.Instrumentation仪表153.2.3.Philosophy 原理153.2.4.Alarms and trips报警和跳闸153.2.5.Start-up and shut down recommendations启动和停机建议163.3.CONDENSATE SYSTEM 凝结水系统163.4.DRAIN POT DRAINING SYSTEM疏水坑疏水系统173.5.AIR EXTRACTION SYSTEM (TO BE CONFIRMED BY CLIENT)抽真空系统 (由业主确认)183.5.1Description描述183.5.2Instrumentation仪器193.5.3Philosophy原理193.5.4Alarms and trips报警和跳闸234.0.START-UP AND SHUT DOWN SEQUENCE启动和停车次序274.1.Start-up Sequence启动次序274.2.Shut down sequence停机顺序304.3.Plant in stand by condition315.OPERATION MODE (PRELIMINARY - 操作模式(初步) 325.1.AUTOMATIC MODE自动操作模式325.2.MANUAL OPERATION FROM CONTROL ROOM 来自控制间的手动操作325.3.LOCAL MODE就地模式 (by Client)336.ACC CONTROL SYSTEM空冷控制系统34Contract Number: WC1-101-000352Document Title: FUNCTIONAL DESCRIPTION FOR AIR COOLED CONDENSER空冷凝汽器控制描述6.1.TURBINE BACK PRESSURE CONTROL汽机背压控制346.1.1.Description描述346.1.2.Instrumentation仪表346.1.3.Philosophy 原理346.1.4.The rules of the step-switching 开关步骤规则376.2.FREEZING PROTECTION防冻保护397.ABNORMAL PLANT OPERATIONS - PLANT TRIPS SUMMARY反常的工厂操作-工厂跳闸摘要42 8.MAINTENANCE OF THE SYSTEM系统维护438.1 GENERAL COMMENT概论438.2 DAILY MAINTENANCE每日维护438.3 WEEKLY MAINTENANCE每周维护438.4 MONTHLY MAINTENANCE每月维护448.5 HALF YEAR MAINTENANCE半年维护44 ANNEX 1 : ACC PRESSURE CONTROL PRINCIPLE附件1:空冷压力控制原理45 ANNEX 2 : ACC FANS CONTROL STEPS 风机控制步骤46 ANNEX 3 : ACC VALVES CONTROL STEPS空冷阀门控制步骤46 ANNEX 4 : INSTRUMENTATION LIST仪表清单46Contract Number: WC1-101-000352Document Title: FUNCTIONAL DESCRIPTION FOR AIR COOLED CONDENSER空冷凝汽器控制描述1.0. RELATED DOCUMENTS相关文件SPX ref.斯必克文件号Rev版号Description描述WC1-101-000352_DES6403 - Fan Control stepWC1-101-000352_DES6404 - Valve Control step 阀门控制步骤WC1-101-000352_DWG0001 - General arrangement 总体布置WC1-101-000352_DWG0030 A P&ID – Steam system PID-蒸汽系统WC1-101-000352_DWG0032 A P&ID – Vacuum system PID-真空系统WC1-101-000352_LIS6402 - Instrumentation list per functional group 按照功能组划分的仪表清单WC1-101-000352_DES5700 - High pressure water cleaning procedure 高压水清洗程序WC1-101-000352_DNO4730 - Design note for rupture discs 爆破膜设计说明Important notes重要说明1) This functional description is made for the two Units. For the second Unit, the firstdigit “10” has to be replaced by “20”. 此功能描述用于2台机组。
- 1、下载文档前请自行甄别文档内容的完整性,平台不提供额外的编辑、内容补充、找答案等附加服务。
- 2、"仅部分预览"的文档,不可在线预览部分如存在完整性等问题,可反馈申请退款(可完整预览的文档不适用该条件!)。
- 3、如文档侵犯您的权益,请联系客服反馈,我们会尽快为您处理(人工客服工作时间:9:00-18:30)。
再循环
• 短暂按下可启用定时再循环。当再循 环打开时,按钮指示灯将亮起。
• 按住此按钮可启动连续再循环。按钮 指示灯将闪烁,然后持续亮起。
• 要取消再循环,请短暂按此按钮。 选定后,空气将在车内进行再循环。这有 助于维持一个较高或较低温度,在防止烟 气进入车内时非常有用。
加热通风:
• 触按适当座椅图标上方的红色箭头可 选择加热通风的最高档设置(3 个红色 条)。
• 触按座椅图标下方的蓝色箭头一次或 两次可减小通风设置(2 个和 1 个红色 条)。
• 第三次触按蓝色箭头可关闭座椅通 风。
制冷通风:
• 触按适当座椅图标下方的蓝色箭头可 选择制冷通风的最高档设置(3 个蓝色 条)。
14. 短暂按下可选择定时再循环。按住可 选 择 连 续 再 循 环。再 次 按 下 将 关 闭 再 循环。请参阅 56,再循环。
15. 按下可打开/关闭后挡风玻璃加热功 能。请参阅 56,加热型挡风玻璃。
16. 按下可打开/关闭前挡风玻璃加热功 能。请参阅 56,加热型挡风玻璃。
17. 除霜:按下除去挡风玻璃上的霜或浓 雾。此设置启动鼓风机、空调、前后挡 风 玻 璃 加 热 器 并 禁 止 再 循 环,以 实 现 快速除霜。
当空气质量传感器开启时,触摸 屏顶部将出现此图标。
56
加热和通风
外部温度
外部温度显示在气候菜单顶部和仪表板 中。 当外部温度过低而导致路面结冰时,仪表 板中的琥珀色雪花报警灯将亮起。
自动模式
应将自动模式用作正常操作模式。空调、 加热和通风控制系统会自动提供选定温度 下的最佳环境。 注意:挡风玻璃加热和定时空气再循环可 在自动模式下进行选择。任何其他手动调 节将取消自动操作。 注意:车 辆 停 驻 下 来 时,空 调 排 出 的 水 可 能会在车辆下面积聚。不必为此担心。
控制钮 加热和通风
加热和通风
要在触摸屏上访问气候菜单,请从主菜单 中选择 Climate (气候)。
1. 触摸可选择自动气候控制。请参阅 57, 自动模式。
2. 触摸可选择挡风玻璃空气配送。
3. 触摸可选择面部空气配送。
4. 触摸可选择脚部空气配送。
5. 触摸可将乘客气候区域与驾驶者设置 同步。
6. 触摸可提高或降低鼓风机转速。
注意:左侧 和右 侧温 度设置 之间 的最 大可能温差为 3°C (5.4°F)。
55
加热和通风
12. 右侧温度控制:按下可调节车辆右侧的 温度。温度显示在触摸屏上 (选择最 大或最小设置时将显示 HI(高)或 LO (低))。
13. AUTO (自动)控制:按下打开/关闭 自动操作。
按住 AUTO 按钮数秒钟可将温度设置 为 22°C (72°F)的中等温度。
温度控制
驾驶者和前排乘客区域温度可独立调节。 每个区域的温度显示在触摸屏的相关侧。 注意:驾驶者与乘客设置之间的最大可能 温差为 3°C (5.4°F)。
加热型座椅
注意:只 有 在 发 动 机 运 转 的 情 况 下,座 椅 加热器才会运行。 加热型座椅通过触摸屏上的 Home (主) 或 Climate (气候)菜单来控制。 • 触按适当的座椅图标可选择座椅加热
定时再循环:再循环会在设定的时间后自 动关闭 (取决于环境温度)。
锁闭再循环:再循环一直进行,直到再次 按下该按钮。
注意:长时间于较低温度下使用可能会造 成车窗起雾。
如果气候控制系统探测到车外大气中污染 程度高 (如果安装了空气质量传感器) , 处于 AUTO 模式下也可能会选择再循环。 手动操作再循环控制钮将会超控自动设 置。
除了可选择的控制钮外,气候菜单还显示 某些表示加热和通风功能状态的符号。
注意:如果关闭气候控制系统,按 AUTO 按钮或除霜按钮将会打开气候系统。
加热型挡风玻璃
在发动机运转的情况下,前(F)、后(R) 挡风玻璃加热器可在任何模式Biblioteka 开启和关 闭,包括气候控制系统关闭时。
前挡风玻璃加热器会在 5 分钟后自动关 闭,后挡风玻璃加热器会在 21 分钟后自动 关闭。
空气质量传感器
如果空气质量传感器检测到污染,则会自 动选择空气再循环以减少进入车辆的污 染。
传感器的敏感性可使用触摸屏进行调节:
1. 从 Climate(气候)菜单中选择 Settings (设置)。
2. 触摸屏幕上的 +/– 按钮以提高/降低敏 感性。
要 关 闭 此 功 能,请 将敏 感 性 降 至 最 小 设 置。
7. 触摸可关闭气候控制。
8. 空调开/关。当空调关闭时,将选择经 济 模 式,这 可 降 低 气 候 系 统 的 电 能 消 耗。
注意:长时 间处 于经 济模式 下运 行可 能会造成车窗起雾。
9. Settings (设置):触摸可更改个人气 候 区 域 设 置,设 置 风 口 旋 转 模 式 和 自 动空气再循环传感器控制设置。
器最高档温度设置 (3 个红色条)。 • 第二次和第三次触摸图标可降低温度
设置 (2 个和 1 个红色条)。 • 第四次触按图标可关闭座椅加热器。
气候座椅
注意:只 有 在 发 动 机 运 转 的 情 况 下,气 候 座椅才会运行。
座 椅 通 风 功 能通 过 触 摸 屏 上 的 Home 或 Climate 菜单来控制。
10. 鼓风机转速:转动调节鼓风机转速。
在 Auto (自动)模式下,鼓风机转速 会 自 动 设 定。调 节 鼓 风 机 转 速 将 取 消 自动模式。
按下此控制钮可打开/关闭气候系 统。
11. 左侧温度控制:按下可调节车辆左侧的 温度。温度显示在触摸屏上 (选择最 大或最小设置时将显示 HI(高)或 LO (低))。
• 触按座椅图标上方的红色箭头一次或 两次可减小通风设置(2 个和 1 个蓝色 条)。
• 第三次触按红色箭头可关闭座椅通 风。
选择仅靠背通风:
• 从 Climate 菜单中选择 Settings(设置)。 • 选择适当的图标设定整个座椅通风或
仅靠背通风。
57