RedHat Linux 配置 Xmanager
远程桌面连结linux(Xmanager)
远程桌面连结linux(Xmanager)首先有三个比较好的帖子写道运用Xmanager远程访问操作Linux系统是一个很不错的工具,具有图形化界面。
在使用之前得配置linux,相关操作如下:服务器:Red hat Enterprise Linux 5终端:Xmanager 3.0服务器配置:------------------------1. 配置 XDM(1). Change runlevel to 5id:5:initdefault:修改 /etc/inittab,将运行级别设置为5,即:id:5:initdefault:(2). Enable XDMCP修改 /etc/gdm/custom.conf,将 [xdmcp] 部分的 Enable 设置为 1,即:[xdmcp]Enable=1Post=177将 [security] 部分的 DisallowTCP 设置为 false,即:[security]DisallowTCP=false2. 配置防火墙 (TCP/UDP Ports) / 若已经关闭防火墙,则忽略这一步Open UDP port 177 from the PC to the remote host direction.Open incoming TCP ports 6000~6010 from the remote host to your PC.3. 重新启动服务器,即输入下面的命令即可:# init 3; init 5终端配置------------------------1、点击 Xmanager 图标,打开 Xbrowser这时 Xbrowser 窗口中会显示局域网中所有的可用服务器写道. XDMCP connection fails for Linux. How do I configure my Linux box?How to configure Linux XDMCP(KDE/GNOME) settings for XmanagerAffected FilesFor runlevel:/etc/inittabFor GDM:/etc/X11/gdm/gdm.confFor KDM:/etc/X11/xdm/xdm-config/etc/X11/xdm/Xaccess/etc/X11/xdm/kdmrc/usr/share/kdm/kdmrc/usr/share/config/kdm/kdmrc/etc/opt/kde2/share/config/kdm/kdmrcFor Firewall:/etc/sysconfig/ipchainsStep 1. Change runlevel to enable gdm or kdm.1. Open /etc/inittab file.2. Change the runlevel to 5 as following:id:5:initdefault:Step 2. GDM configuration (When the Linux is using gdm)1. Open /etc/X11/gdm/gdm.conf file.2. Go to the [xdmcp]section.3. Set the value of "Enable" option to "1".Step 3. KDM configuration (When the Linux is using kdm)1. Open /etc/X11/xdm/xdm-config file.2. Comment out "requestPort" option as following:DisplayManager.requestPort: 0==>!DisplayManager.requestPort: 03. Open /etc/X11/xdm/Xaccess file.4. Remove the initial "#" character for the following line:#* #any host can get a login window==>* #any host can get a login window5. Open /etc/X11/xdm/kdmrc,/usr/share/config/kdm/kdmrc or/etc/opt/kde2/share/config/kdm/kdmrc file.6. Change the value of "Enable" option to "true".Step 4. Firewall configuration (If the firewall has been configured)1. Open /etc/sysconfig/iptables file.2. Add the following lines at the top of the file:-A input -p udp -s 0/0 -d 0/0 177 -j ACCEPT-A input -p tcp -s 0/0 -d 0/0 telnet -j ACCEPT-A input -p tcp -s 0/0 -d 0/0 ssh -j ACCEPT-A input -p tcp -s 0/0 -d 0/0 login -j ACCEPT-A input -p tcp -s 0/0 -d 0/0 exec -j ACCEPT-A input -p tcp -s 0/0 -d 0/0 shell -j ACCEPT-A input -p tcp -s 0/0 -d 0/0 7100 -j ACCEPTStep 5. Restart your Linux to activate the changes.此处是设置由于ip限制访问不了x的问题Setup 3的第5和Setup 4的第二步都比较重要,一般教程上都没有提及,这里要特别关注。
Linux操作系统远程图形化管理的几种途径
Linux操作系统远程图形化管理的几种途径1,利用Xmanager,linux启用XDMCP协议(可直接修改配置文件,也可以采用在Xshell 中运行gdmconfig或gdmsetup,选择XDMCP选项卡,勾选启动XDMCP即可),Xbrowser 即可发现linux主机,以图形化方式访问linux。
2,linux启用VNC服务,客户端即可用浏览器(通过自动加载的JA V A Applet插件)或VNC的windows版本的客户端VNC Viewer 以图形化方式来访问linux。
3,利用Xmanager的Xshell工具,SSH远程连接至Linux主机,在linux命令提示符下直接运行gnome-session或startkde,Xmanager会自动运行Xmanager-Passive来接收由SSH 转发至本地的图形界面信息。
以上提供的方法都是通过相关工具实现linux桌面远程转发至本地(XDMCP协议实现)来实现本地的图形化管理。
Linux还有个WEB方式的管理工具webmin(用Perl写成,采用Apache服务器,可实现web方式管理linux主机)。
要把Linux下xmanager开启总共分几步第一步我们在Linux系统下,修改/etc/X11/xdm/X access文件,找到下面的语句:# * #any host can get a login window去掉最前面的#号,成为* #any host can get a login window第二步我们修改/etc/X11/gdm/gdm.conf文件,找到下面的语句:[xdmcp]Enable=false将其中的Enable=false 改为Enable=true 或Enable=1.同时我们要确保存在下面的语句,因为177端口是我们要配置的xdmcp服务的监听端口,我们在后面配置xmanager将看。
Port=177第三步我们要修改/etc/inittab文件,将下面的语句id:3:initdefault改为如下,如果原来就是id:5:initdefault就不用更改。
Xmanager使用方法
xmanager使用方法哦,我试过,好像找到主机了,但是还是进不去进不去,是因为你那台SUN机器的权限没有打开啊。
你把/etc/default/login 中的"console"行注销"#",重新启动就OK了XManager 配置说明XManager是一个简单易用的高性能的运行在Windows平台上的X Server软件。
它能把远端Unix/Linux的桌面无缝地带到你的Windows上,甚至当你的电脑是在内网或防火墙后,你也能通过SSH协议安全的运行远端的X应用程序。
特点包括:-可通过Xcongfig工具设置多个Xmanager设置;-支持多用户的Windows终端环境;-支持多个IP地址;-支持本地资源数据库;-通过热键转换键盘映射;-支持多窗口下的Windows打印功能等。
如果使用的是gnome1。
vi /etc/inittab修改id:5:initdefault:x:5:respawn:/usr/bin/gdm2.修改/etc/X11/gdm/gdm.conf,找到下面的信息:[xdmcp]Enable=0 或Enable=false修改为:[xdmcp]Enable=1 或Enable=true并确保以下信息存在:Port=1773.配置iptables打开UDP 177端口,确保/etc/X11/xdm/Xservers的属性为444,FeedBack:#1楼2006-08-10 13:48 | isher [未注册用户] 这里确实可以把xfree86打开,应用端口是6000和177,不过这个方法是我2年以前用的,原因是,当我知道了xmanager可以也可以和x32一样使用putty方式连接,然后gnome连接桌面时,我便测试了一下,用xmanager直接连接22端口,并gnome start 依然可以XManager是一个简单易用的高性能的运行在Windows平台上的X Server软件。
xmanager连接redhat5设置
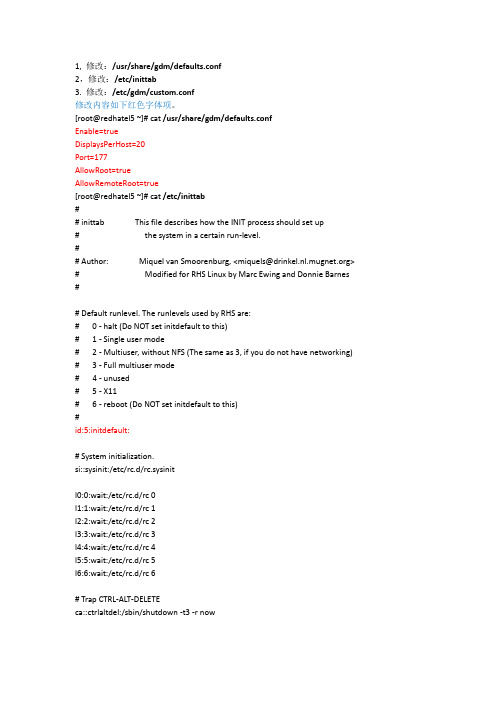
1,修改:/usr/share/gdm/defaults.conf2,修改:/etc/inittab3.修改:/etc/gdm/custom.conf修改内容如下红色字体项。
[root@redhatel5 ~]# cat /usr/share/gdm/defaults.confEnable=trueDisplaysPerHost=20Port=177AllowRoot=trueAllowRemoteRoot=true[root@redhatel5 ~]# cat/etc/inittab## inittab This file describes how the INIT process should set up# the system in a certain run-level.## Author: Miquel van Smoorenburg, <miquels@> # Modified for RHS Linux by Marc Ewing and Donnie Barnes ## Default runlevel. The runlevels used by RHS are:# 0 - halt (Do NOT set initdefault to this)# 1 - Single user mode# 2 - Multiuser, without NFS (The same as 3, if you do not have networking) # 3 - Full multiuser mode# 4 - unused# 5 - X11# 6 - reboot (Do NOT set initdefault to this)#id:5:initdefault:# System initialization.si::sysinit:/etc/rc.d/rc.sysinitl0:0:wait:/etc/rc.d/rc 0l1:1:wait:/etc/rc.d/rc 1l2:2:wait:/etc/rc.d/rc 2l3:3:wait:/etc/rc.d/rc 3l4:4:wait:/etc/rc.d/rc 4l5:5:wait:/etc/rc.d/rc 5l6:6:wait:/etc/rc.d/rc 6# Trap CTRL-ALT-DELETEca::ctrlaltdel:/sbin/shutdown -t3 -r now# When our UPS tells us power has failed, assume we have a few minutes# of power left. Schedule a shutdown for 2 minutes from now.# This does, of course, assume you have powerd installed and your# UPS connected and working correctly.pf::powerfail:/sbin/shutdown -f -h +2 "Power Failure; System Shutting Down"# If power was restored before the shutdown kicked in, cancel it.pr:12345:powerokwait:/sbin/shutdown -c "Power Restored; Shutdown Cancelled"# Run gettys in standard runlevels1:2345:respawn:/sbin/mingetty tty12:2345:respawn:/sbin/mingetty tty23:2345:respawn:/sbin/mingetty tty34:2345:respawn:/sbin/mingetty tty45:2345:respawn:/sbin/mingetty tty56:2345:respawn:/sbin/mingetty tty6# Run xdm in runlevel 5x:5:respawn:/etc/X11/prefdm -nodaemon[root@redhatel5 ~]# cat/etc/gdm/custom.conf# GDM Configuration Customization file.## This file is the appropriate place for specifying your customizations to the# GDM configuration. If you run gdmsetup, it will automatically edit this# file for you and will cause the daemon and any running GDM GUI programs to# automatically update with the new configuration. Not all configuration# options are supported by gdmsetup, so to modify some values it may be# necessary to modify this file directly by hand.## Older versions of GDM used the "gdm.conf" file for configuration. If your# system has an old gdm.conf file on the system, it will be used instead of# this file - so changes made to this file will not take effect. Consider# migrating your configuration to this file and removing the gdm.conf file.## To hand-edit this file, simply add or modify the key=value combination in# the appropriate section in the template below. Refer to the comments in the# /usr/share/gdm/defaults.conffile for information about each option. Also# refer to the reference documentation.## If you hand edit a GDM configuration file, you should run the following# command to get the GDM daemon to notice the change. Any running GDM GUI # programs will also be notified to update with the new configuration.## gdmflexiserver --command="UPDATE_CONFIG <configuration key>"## e.g, the "Enable" key in the "[debug]" section would be "debug/Enable".## You can also run gdm-restart or gdm-safe-restart to cause GDM to restart and# re-read the new configuration settings. You can also restart GDM by sending# a HUP or USR1 signal to the daemon. HUP behaves like gdm-restart and causes # any user session started by GDM to exit immediately while USR1 behaves like# gdm-safe-restart and will wait until all users log out before restarting GDM.## For full reference documentation see the gnome help browser under# GNOME|System category. You can also find the docs in HTML form on# /projects/gdm/## NOTE: Lines that begin with "#" are considered comments.## Have fun![daemon][security]AllowRemoteRoot=yes[xdmcp]Enable=true[gui][greeter][chooser][debug]# Note that to disable servers defined in the defaults.conf file (such as# 0=Standard, you must put a line in this file that says 0=inactive, as# described in the Configuration section of the GDM documentation.#[servers]# Also note, that if you redefine a [server-foo] section, then GDM will# use the definition in this file, not the defaults.conf file. It is# currently not possible to disable a [server-foo] section defined# in the defaults.conf file.#。
Windows下使用xmanager远程访问管理redhat linux
Wind ows下使用xmanager远程访问管理redhat linuxWindows下有远程桌面对计算机进行远程管理,在Linux下常用的管理方法有ssh连接管理,因为linux很多操作都可以通过命令行来完成,在图形界面方面有vnc的支持,但是图形效果不是很好,效果最好的就是通过X-Manager对Linux进行图形界面的原创管理。
Xmanager是Windows 95/98/ME和Windows NT/2000/XP /2003平台下一个性能优秀的X11R6 PC X服务器。
就像运行在PC上的任何Windows应用程序一样,它可以无缝拼接到UNIX 应用程序中。
在UNIX/Linux和Windows网络环境中,Xmanager 是最好的连通解决方案。
方法一:命令行行修改修改/etc/gdm/custom.conf[security]DisallowTCP=false[xdmcp]Enable=truePort=177为了root能登录.修改/usr/share/gdm/defaults.confAllowRoot=trueAllowRemoteRoot=true确保以上2条语句存在并处于激活状态.(未被#注释)gdm-restart 重启服务netstat -an | grep 177 查看177端口状态,确保服务正常开启,至此X-MANAGER连接配置成功方法二:图形界面配置在图形界面上输入gdmsetup配置监听端口号位177在安全标签中选择运行本地管理员登录及运行远程管理员登录。
使用X-MANAGER登录Redhat Linux 在连接向导中选择“XDMCP”接下来选择XDM Query接下来选择使用默认选项即可。
Xmanager的设置及使用指南
Xmanager的设置及使⽤指南
Xmanager的设置及使⽤指南
⼀、背景
⽬前VPN接⼊使⽤Xmanager进⾏图形界⾯访问⽹管系统,采⽤SSH协议通信。
SSH协议的使⽤提供了访问的安全性,但是牺牲了速度。
特别是使⽤图形⼯具时,对速度感觉⾮常敏感,打开⼀个窗⼝⾮常慢,严重影响了⼯作效率。
鉴于VPN本⾝的安全机制以及安全域双重防⽕墙的安全防护,将采⽤Xmanager XDMP协议,采⽤XDMP协议后,速度将提升3~5倍。
已经与IT 中⼼协商,向所有登记的⽹络⼝的同事开放XDMP通信端⼝,同时也将全⾯的启⽤动态⼝令的认证机制,保障系统安全。
⼆、Xmanager启⽤XDMP协议的设置
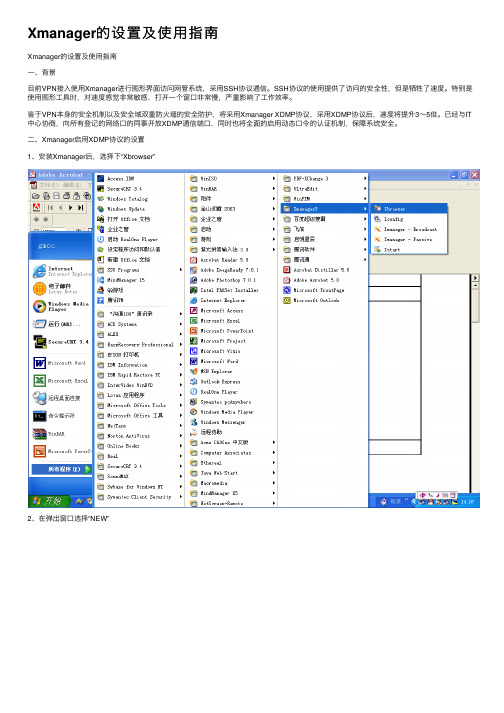
1、安装Xmanager后,选择下“Xbrowser”
2、在弹出窗⼝选择“NEW”
3、选择“XDMP”
4、在“host”中键⼊需要访问的IP地址:OSS系统可⽤IP:
132.108.19.9
132.108.19.11
132.108.19.28
132.108.19.40 132.108.19.69 GPRS系统可⽤IP:10.245.107.1
5、按缺省配置完成后,“Xbrowser”窗⼝中将新⽣成⼀个⼩图标,如下所⽰:
三、Xmanager的使⽤
1、双击⼩图标后,弹出⼀个选择窗⼝,请选择“172.16.1.0/25”⽹段的IP地址:
2、然后进⼊认证窗⼝:
3、输⼊⽤户名后,⼤约等待10~15秒的时间,进⼊动态⼝令认证:
四、如有问题,请及时与数据及增值⽹络维护室联系(135********)。
xmanager的详细使用方法
xmanager的详细使用方法x终端的详细使用方法•09/30•2007xwindow | Linux 10746 次查看•上一条:引导linux的3种方法•下一条:桌面不见了有很多人问怎么用x终端,大家可以到这里下载xmanager的详细使用方法/admin/cc/network/matlab/Xmanager.doc用过windows 2000 终端仿真客户端的朋友们都知道,通过mstsc(终端客户端)连至win2000server的终端服务器上,可以像在window2000server本机一样工作,用图形界面来操作和控制计算机。
linux通过XDMCP来提供这种支持,我们只要用一个终端仿真软件(如xmanager)并在linux服务进行简单的配置就可以轻松实现像win2000图开终端仿真一样的功能,那种感觉真是“爽”啊!下面我以red hat linux 7.2为例,来讲述配置和连接过程:1、准备工作:安装red hat linux 7.2安装时一定要选上xwindow,这是基本东东,不安装它,哪来的图形界面。
呵呵在自己的机器上(客户机)装上终端仿真软件xmanager,安装方法(略),跟安装其它windows下的软件没什么区别。
2、开始配置工作:开始配置之前,先讲解几个基本概念和相关命令信息:(1)XDMCP是(X Display Manager Control Protocol),X显示监控协议(2)xdm 是(manages a collection of X displays),显示管理集路径在:/etc/X11/xdm下几个文件:Xaccess 访问控制文件Xservices本地显示或远程显示配置文件xdm-config xdm的主要配置文件(3)我们要做的是在Xservices文件中做一处改动原内容基本为如下形式:0 local /usr/X11R6/bin/X我们加入如下两条:192.168.3.68:0 foreign192.168.3.63:1 foreign表示可以有两台外部主机请求Xserver(4)在xdm-config中必须做出如下改动:DisplayManager.requestPort: 0此项设置未被注释(最前面没有!字符),如果注释将XDMCP将不侦听,另外:此文件中还应加入以下两条:DisplayManager*startup: /etc/X11/xdm/StartupDisplayManager*reset: /etc/X11/xdm/Reset表示启动和重置是执行的文件。
利用Xmanager_在RedHat5.4下实现Linux远程桌面
利用Xmanager 在RedHat5.4下实现Linux远程桌面前言:Linux服务器的Xwindow界面的,需要对Linux进行相应的配置,详细步骤如下。
前提:安装linux时一定要选上xwindow,这是最基本的前提,不安装它,是绝对没有图形界面的。
**********************************************************基本概念和相关命令说明:XDMCP(X Display Manager Control Protocol),X显示监控协议;xdm(manages a collection of X displays),显示管理集。
路径在:/etc/X11/xdm下几个文件:Xaccess 访问控制文件;Xservices 本地显示或远程显示配置文件;xdm-config xdm的主要配置文件。
**********************************************************一、准备环境:Xmanager Enterprise 4RedHat 5.4开启Xdmcp协议安装Xdm如果开启防火墙需开启177端口二、开启Xdmcp协议首先我们要修改3个配置文件1./usr/share/gdm/defaults.conf GNOME管理默认的配置文件2./etc /inittab init进程的主配置文件3./etc /gdm/custom.conf GNOME的自定义配置文件编辑1文件263 Enable=true279 DisplaysPerHost=20 去掉#号284 Port=177 去掉#号209 AllowRoot=true214 AllowRemoteRoot=true前面的数字是所在的行数修改2文件确保默认启动级别是5,最后一行修改为x:5:respawn:/usr/sbin/gdm修改3文件在[xdmcp]下面添加Enable=true三、安装Xdm需要从yum中安装Xdm 因此先配置yum1)RHEL5 配置YUM源cd /etc/yum.repos.d/编辑rhel-debuginfo.repo文件,然后添加以下内容[base]name=CentOS-5 - Base#mirrorlist=/?release=$releasever5&arch=$basearch&repo=os#baseurl=/centos/$releasever/os/$basearch/baseurl=/centos/5/os/$basearch/gpgcheck=1gpgkey=/centos/RPM-GPG-KEY-centos5#released updates[update]name=CentOS-5 - Updates#mirrorlist=/?release=4&arch=$basearch&repo=updates baseurl=/centos/5/updates/$basearch/gpgcheck=1gpgkey=/centos/RPM-GPG-KEY-centos5#packages used/produced in the build but not released[addons]name=CentOS-5 - Addons#mirrorlist=/?release=4&arch=$basearch&repo=addonsbaseurl=/centos/5/addons/$basearch/gpgcheck=1gpgkey=/centos/RPM-GPG-KEY-centos5#additional packages that may be useful[extras]name=CentOS-5 - Extras#mirrorlist=/?release=4&arch=$basearch&repo=extrasbaseurl=/centos/5/extras/$basearch/gpgcheck=1gpgkey=/centos/RPM-GPG-KEY-centos5#additional packages that extend functionality of existing packages[centosplus]name=CentOS-5 - Plus#mirrorlist=/?release=4&arch=$basearch&repo=centosplus baseurl=/centos/5/centosplus/$basearch/gpgcheck=1enabled=0gpgkey=/centos/RPM-GPG-KEY-centos5#contrib - packages by Centos Users[contrib]name=CentOS-5 - Contrib#mirrorlist=/?release=4&arch=$basearch&repo=contrib baseurl=/centos/5/contrib/$basearch/gpgcheck=1enabled=0gpgkey=/centos/RPM-GPG-KEY-centos5# vi dag.repo[dag]name=Dag RPM Repository for RHEL5baseurl=http://ftp.riken.jp/Linux/dag/redhat/el5/en/$basearch/dag/enabled=1gpgcheck=1gpgkey=http://ftp.riken.jp/Linux/dag/packages/RPM-GPG-KEY.dag.txt2)导入Key在终端下运行:#rpm—import /centos/5/os/i386/RPM-GPG-KEY-CentOS-5 3)更新yumyum update4)安装Xdm#Yum –y install xorg*四、修改Xdm相关文件Step1:编辑/etc/X11/xdm/Xaccess,将下面的行:#* # any host can get a login window 的第一个"#"号去掉改为:* # any host can get a login windowStep2:#vi /etc/X11/xdm/Xservers在最后一行::0 local /usr/X11R6/bin/X 前面加#号注释掉这一行Step3:#vi /etc/X11/xdm/xdm-config在最后一行:DisplayManager.requestPort: 0 前面加!号注释掉此行。
- 1、下载文档前请自行甄别文档内容的完整性,平台不提供额外的编辑、内容补充、找答案等附加服务。
- 2、"仅部分预览"的文档,不可在线预览部分如存在完整性等问题,可反馈申请退款(可完整预览的文档不适用该条件!)。
- 3、如文档侵犯您的权益,请联系客服反馈,我们会尽快为您处理(人工客服工作时间:9:00-18:30)。
Xmanager是一个远程连接工具,里面最常用的有Xbrowser、Xftp、Xshell等工具。
由于近来经常要用到linux虚拟机,虚实之间切换非常的麻烦而且还不方便,一般情况下我都用SecureCRT进行远程连接,来处理一些任务,可是有时后需要图形界面,这就用到了Xmanager,不过默认情况下RedHat不允许它连接,还需要一些配置。
关于这个的文档网上很多,大部分都是转载的,我按照网上的文档做了一遍,发现距离成功只有一步之遥。
这个实验我做了2遍,以验证正确性。
方式一:
在 /etc/inittab -- init进程的主配置文件
把默认级别改為 5 : id:5:initdefault:
在/etc/gdm/custom.conf--GNOME的自定义配置文件
在[xdmcp] 一项中加入
Enable=true
在[security] 一项中加入
AllowRemoteRoot=true #允许root登录
重启linux 服务器
# init 3;init 5
方式二:
netstat -an | grep 177 查看177端口是否可用。
如以上设置不成功,可进行以下设置
/usr/share/gdm/defaults.conf—— GNOME管理默认的配置文件
编辑文件
263 Enable =true
279 DisplaysPerHost=10
284 Port=177
209 AllowRoot=true
214 AllowRemoteRoot=true #此设置允许root用户连接
前面的数字是所在的行数
在 /etc/inittab -- init进程的主配置文件
把默认级别改為 5 :
id:5:initdefault:
再在这个文件裡加一句:
x:5:respawn:/usr/sbin/gdm
在/etc/gdm/custom.conf--GNOME的自定义配置文件
在[xdmcp] 一项中加入
Enable=true
在[security] 一项中加入
AllowRemoteRoot=true #允许root登录
重启linux 服务器
# init 3;init 5
关闭防火墙:
service iptables stop
临时关闭防火墙后,进入Linux系统后在系统-管理-安全级别和防火墙中添加相应端口。