21天学会APAP4的基础 Day18
无线电遥控模型飞机戴氏教学法―基础飞行训练(上册)

本节内容 油门的初步应用
改善模型飞机的性能
A-1 A-2 A-3 A-4 A-5
A-6
A-7 A-8 A-9 A-10 A-11
A-12
A-13 A-14
B-16
飞行操纵简介:
本节内容、飞行训练的经验之谈 □ 点碰动作
程序转弯 操纵副翼压坡度 程序转弯 升降舵 程序转弯 升降舵的调整 程序转弯的改出 □ 全套程序转弯动作 □ 程序转弯复入 □ 点碰与程序转弯练习
本节内容 反向偏航 联动转弯 □ 联动的联接方法 □ 混控的设置方法 为了未来的顺利发展而采用联动 关于联动的常见问题
B-17
第一阶段:着陆航线
ቤተ መጻሕፍቲ ባይዱ
B-18 B-19 B-20 B-21 B-22 B-23
本节内容 □ 沿跑道中线飞行 □ 观察是否对准跑道的方法 □ 第四边(基边)转弯的参照物 □ 第四边(基边)转弯的改出 □ 关于着陆航线与对准跑道的小结
戴氏教学法 II:对一名新手而言,一定要去了解为什么一位有经验的飞行员在飞行时能 那么轻松,以及他们是如何做到这一点的,并把这些铭记在脑海里,落实在行动中。
第一:“清楚地了解应该怎么飞”。这样才能产生自信,才能使训练最有成效。 第二:要使转弯和直线飞行的操纵动作程式化。 第三:定点转弯并将航线的位置固定下来就能使航线在整个单飞过程中保持前后一致。
零起点大学英语基础教程4(李桂兰)_整理教(学)案

Unit 1 personal QualitiesI. Teaching aims and demands1. Understand the background knowledge2. Learn about the new words and phrases3. Grasp the main idea and structure of the text4. Conduct a series of reading, listening, speaking and writing activitiesII. Teaching importance and difficulties1.Background information2.The usage of some new words and phrases3.Some sentence patterns difficult to understandIII. Teaching methodsA combination of traditional teaching methods with the communicative approach will be adopted. Special attention should be paid to classroom interaction. More encouragement is needed and more guidance will be given to them in their extracurricular study. Use the multimedia device where necessary.IV. Teaching procedurea. Warming-up Activities1.Duty ReportHave a brainstorming about words to describe personal qualitiesrmation related to the text1> Cross-cultural communicationThe key to effective cross-cultural communication is knowledge. First, it is essentialthat people understand the potential problems of cross-cultural communication, and make a conscious effort to overcome these problems. Second, it is important to assume that one’s efforts will not always be successful, and adjust one’s behavior appropriately.For example, one should always assume that there is a significant possibility that cultural differences are causing communication problems, and be willing to be patient and forgiving, rather than hostile and aggressive, if problems develop. One should respond slowly and carefully in cross-cultural exchanges, not jumping to the conclusion that you know what is being thought and said.Active listening can sometimes be used to check this out–by repeating what one thinks he or she heard, one can confirm that one understands the communication accurately. If words are used differently between languages or cultural groups, however, even active listening can overlook misunderstandings.2> Personal qualitiesPersonal qualities are personal characteristics of an individual. They are what make up one's personality. They help a person get along in a new situation. For example, dependability and patience are qualities that employers would like a good worker to have. Other qualities employers value are: honesty, assertiveness, flexibility, problem solving, friendliness, intelligence, leadership, enthusiasm, and a good sense of humor.Most employers want people who are dependable and who get along with others. Though skills are important, an employer will select new employees based on their personal qualities as well.b. Language points1. Personal qualities generally have either positive or negative connotations.一般来说,一个人的品质包括两个方面:积极的和消极的。
鼎新软件教育训练 (1)

5.6.1 GL預算底稿產生作業(abgp300)............................................................................62
5.6.2 科目預算維護作業(agli602)................................................................................64
6.1 預計聘用人員明細表(abgr050).......................................................................................71
6.2 用人計劃(abgr020)...........................................................................................................73
3.1 預算管理系統參數設定作業(abgs010)...........................................................................13 3.2 用人費用預算參數設定作業(abgs100)...........................................................................15 3.3 加班時薪設定作業(abgs101)...........................................................................................17 第 4 單元 基本資料..........................................................................................................................19 4.1 材料預計漲幅維護作業(abgi002)...................................................................................21 4.2 材料單價維護作業(abgi003)...........................................................................................23 4.3 預算BOM資料維護作業(abgi010).....................................................................................25 4.4 費用項目資料維護作業(abgi007)...................................................................................27 4.5 職等職級底薪資料維護作業(abgi004)...........................................................................29 4.6 勞健保費率維護作業(abgi008).......................................................................................31 4.7 費用項目提撥作業(abgi009)...........................................................................................33 4.8 薪資部門會計科目維護作業(abgi130)...........................................................................35 第 5 單元 異動作業..........................................................................................................................37 5.1 銷售生產預算流程.................................................................................................abgr030)...............................................................................75
painter教程
接触Painter快2年,真正开始使用也就几个月,其间看过许多的Painter教程,其实很多写手都有所保留。
每每提到笔触的关键部分都避而不谈,莫非是害怕别人取了经抢自己的饭碗?今天自己做了一个Painter教程,虽然我还算是个菜鸟,举例Painter设计师路途尚远。
不过套用愤青们唱挂着的座右铭——“在路上”。
只要还在进步,前途就未可得知。
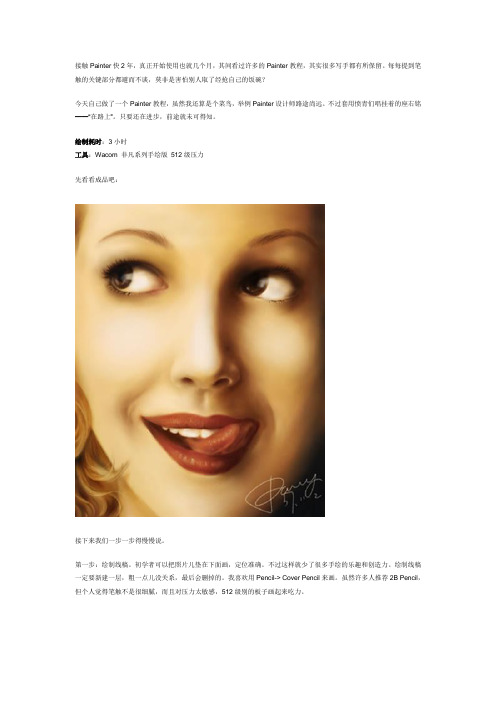
绘制耗时:3小时工具:Wacom 非凡系列手绘版512级压力先看看成品吧:接下来我们一步一步得慢慢说。
第一步:绘制线稿。
初学者可以把照片儿垫在下面画,定位准确。
不过这样就少了很多手绘的乐趣和创造力。
绘制线稿一定要新建一层,粗一点儿没关系,最后会删掉的。
我喜欢用Pencil-> Cover Pencil来画。
虽然许多人推荐2B Pencil,但个人觉得笔触不是很细腻,而且对压力太敏感,512级别的板子画起来吃力。
第二步:在画布,也就背景层上,用Airbrush -> Digital Airbrush 来铺大色块。
主要是让色彩循序渐进,基本的阴影关系一定要出来。
深浅可以后面再调整。
第三步:现在把上面的线稿层透明度降低,我用的40%,别让它遮盖住了下面的细节。
然后结合Digital Airbrush和Blender->Soft Blender Stump 增加一些更深的颜色,Blender的好处就是让色彩融合得更平滑。
这幅画难点在嘴唇上,先别急着处理。
给点儿主要色就够了。
选择颜色的时候尽量用吸管吸取画布上已有的颜色,一幅画色彩太多了容易出错。
第四步:现在增加一个新色进去,嘴唇的红色,我还是用的Digital Airbrush,键盘快捷键[ ],可以快速调整笔刷大小,比如牙齿的轮廓,就用2pixel的Airbrush绘制。
第五步:鼻子位于画面正中,是表现的重点,所以一定要细致。
鼻孔千万别一下子就用黑色,最好是用吸管选择背景的深棕色,涂一个区域后,再用Blender晕开,让色彩接壤的地方平滑湿润。
《21天学会C++》笔记-推荐下载

对全部高中资料试卷电气设备,在安装过程中以及安装结束后进行高中资料试卷调整试验;通电检查所有设备高中资料电试力卷保相护互装作置用调与试相技互术关,系电通,力1根保过据护管生高线0产中不工资仅艺料可高试以中卷解资配决料置吊试技顶卷术层要是配求指置,机不对组规电在范气进高设行中备继资进电料行保试空护卷载高问与中题带资22负料,荷试而下卷且高总可中体保资配障料置23试时23卷,各调需类控要管试在路验最习;大题对限到设度位备内。进来在行确管调保路整机敷使组设其高过在中程正资1常料中工试,况卷要下安加与全强过,看2度并55工且22作尽2下可护1都能关可地于以缩管正小路常故高工障中作高资;中料对资试于料卷继试连电卷接保破管护坏口进范处行围理整,高核或中对者资定对料值某试,些卷审异弯核常扁与高度校中固对资定图料盒纸试位,卷置编工.写况保复进护杂行层设自防备动腐与处跨装理接置,地高尤线中其弯资要曲料避半试免径卷错标调误高试高等方中,案资要,料求编5试技写、卷术重电保交要气护底设设装。备备4置管高调、动线中试电作敷资高气,设料中课并3技试资件且、术卷料拒管中试试调绝路包验卷试动敷含方技作设线案术,技槽以来术、及避管系免架统不等启必多动要项方高方案中式;资,对料为整试解套卷决启突高动然中过停语程机文中。电高因气中此课资,件料电中试力管卷高壁电中薄气资、设料接备试口进卷不行保严调护等试装问工置题作调,并试合且技理进术利行,用过要管关求线运电敷行力设高保技中护术资装。料置线试做缆卷到敷技准设术确原指灵则导活:。。在对对分于于线调差盒试动处过保,程护当中装不高置同中高电资中压料资回试料路卷试交技卷叉术调时问试,题技应,术采作是用为指金调发属试电隔人机板员一进,变行需压隔要器开在组处事在理前发;掌生同握内一图部线纸故槽资障内料时,、,强设需电备要回制进路造行须厂外同家部时出电切具源断高高习中中题资资电料料源试试,卷卷线试切缆验除敷报从设告而完与采毕相用,关高要技中进术资行资料检料试查,卷和并主检且要测了保处解护理现装。场置设。备高中资料试卷布置情况与有关高中资料试卷电气系统接线等情况,然后根据规范与规程规定,制定设备调试高中资料试卷方案。
pep小学英语全英教案
pep小学英语全英教案【篇一:pep小学英语四年级上册_全英教案】pep小学英语四年级上册_全英教案目录unit 1myclassroom ......................................................................................... .. (2)lesson1 ......................................................................................................... (3)lesson2 ......................................................................................................... (4)lesson3 ......................................................................................................... (5)lesson4 ......................................................................................................... (6)lesson5 ......................................................................................................... (7)lesson6 ......................................................................................................... (8)unit 2 myschoolbag ......................................................................................... . (9)lesson1 ......................................................................................................... . (10)lesson2 ......................................................................................................... .. (11)lesson3 ......................................................................................................... . (12)lesson4 ......................................................................................................... . (13)lesson5 ......................................................................................................... . (14)lesson6 ......................................................................................................... . (15)unit 3 myfriends ............................................................................................... (17)lesson1 ......................................................................................................... . (18)lesson2 ......................................................................................................... . (19)lesson3 ......................................................................................................... . (21)lesson4 ......................................................................................................... . (22)lesson5 ......................................................................................................... . (23)lesson6 ......................................................................................................... . (24)recycle1 ......................................................................................................... .. (26)partone .................................................................................................... . (26)parttwo ..................................................................................................... (27)partthree .................................................................................................. . (28)unit 4myhome ................................................................................................. .. (29)lesson1 ......................................................................................................... . (30)lesson2 ......................................................................................................... . (31)lesson3 ......................................................................................................... . (32)lesson4 ......................................................................................................... . (33)lesson5 ......................................................................................................... . (35)lesson6 ......................................................................................................... . (36)unit 5what would youlike? ................................................................................................... (37)lesson1 ......................................................................................................... . (38)lesson2 ......................................................................................................... . (39)lesson3 ......................................................................................................... . (40)lesson4 ......................................................................................................... . (41)lesson5 ......................................................................................................... . (42)lesson6 ......................................................................................................... . (43)unit 6 meet myfamily! ............................................................................................... (44)lesson1 ......................................................................................................... . (45)lesson2 ......................................................................................................... . (46)lesson3 ......................................................................................................... . (47)lesson4 ......................................................................................................... . (48)lesson5 ......................................................................................................... . (49)lesson6 ......................................................................................................... . (50)recycletwo ..................................................................................................... .. (51)partone .................................................................................................... . (51)parttwo ..................................................................................................... (53)partthree .................................................................................................. ........................... (54)unit 1my classroom单元分析一、教学内容1、本单元要求会听,说,认读的单词:window,board,light,picture,door,floor,classroom,computer,wall,teacher’s desk,fan,what,in,the,we,have,new,go,where2、本单元要求会听,说的单词和词组:many our seat near classmate cleanhave a look good ideaall right good job3、帮助学生在掌握单词的基础上造出句子,编出对话,学以致用。
Python学习手册(第4版)中文版.pdf全文免费

Python学习⼿册(第4版)中⽂版.pdf全⽂免费第⼋部分⾼级话题第36章 Unicode和字节字符串在本书的核⼼类型部分关于字符串的⼀章中(第章),我有意地限制了⼤多数 7 P y t h o n程序员需要了解的字符串话题的⼦集的范围。
因为⼤多数程序员只是处理像A S C I I这样的⽂本的简单形式,他们快乐地使⽤着Python 的基本的字符串类型及其相关的操作, str并且不需要掌握更加⾼级的字符串概念。
实际上,这样的程序员很⼤程度上可以忽略Python 3.0 中的字符串的变化,并且继续使⽤他们过去所使⽤的字符串。
另⼀⽅⾯,⼀些程序员处理更加专业的数据类型:⾮A S C I I 的字符串集、图像⽂件内容,等等。
对于这些程序员(以及其他可能某⼀天加⼊这⼀队伍的程序员),在本章中,我们将介绍P y t h on字符串的其他内容,并且探讨P y t h on字符串模型中⼀些较为⾼级的话题。
特别是,我们将介绍Python⽀持的Unicode⽂本的基础知识——在国际化应⽤程序中使⽤的宽字符字符串,以及⼆进制数据——表⽰绝对的字节值的字符串。
我们将看到,⾼级的字符串表⽰法在Python 当前版本中已经产⽣了分歧:· Python 3.0为⼆进制数据提供了⼀种替代字符串类型,并且在其常规的字符串类型中⽀持⽂本(看作的⼀种简单类型)。
Unicode ASCII Unicode· Python 2.6为⾮ASCII Unicode⽂本提供了⼀种替代字符串类型,并且在其常规的字符串类型中⽀持简单⽂本和⼆进制数据。
此外,由于P y t h o n 的字符串模式对于如何处理⾮A SC I I⽂件有着直接的影响,我们还将在这⾥介绍相关话题的基础知识。
最后,我们还将简单地看看⼀些⾼级字符串和⼆进制⼯具,例如模式匹配、对象pickle化、⼆进制数据包装和XML解析,以及Python 3.。
青少年python编程课程体系四阶63节

青少年Python编程课程体系四阶63节1. 前言在当今数字化的时代,编程已经成为一种必备的技能。
而Python作为一种易学易用的编程语言,受到了越来越多青少年的青睐。
为了满足青少年对编程学习的需求,针对青少年的Python编程课程也应运而生。
本文将介绍一套完整的青少年Python编程课程体系,包含四阶共63节课程,帮助青少年系统地学习和掌握Python编程技能。
2. 第一阶段:基础入门(共16节课)1)课程一:Python编程入门- 介绍Python编程语言的基本概念和特点- 学习Python的基本语法和数据类型- 编写并执行简单的Python程序2)课程二:Python数据结构- 学习Python中常用的数据结构,如列表、元组、字典- 熟悉数据结构的操作和应用3)课程三:条件与循环- 掌握Python中的条件语句和循环语句- 学习如何利用条件和循环解决问题4)课程四:函数与模块- 理解函数的概念和作用- 学习如何定义和调用函数- 掌握使用模块扩展Python的功能5)课程五:文件操作- 学习如何读写文件- 掌握文件对象的操作方法- 编写文件操作相关的Python程序6)课程六:简单项目实践- 运用前面所学知识,完成简单的项目实践 - 提高学生的动手能力和解决问题的能力7)课程七:期末考核- 对第一阶段所学内容进行综合测试- 评估学生对Python基础知识的掌握情况3. 第二阶段:进阶深化(共18节课)1)课程一:面向对象编程- 理解面向对象编程的概念和特点- 学习如何定义类和对象- 掌握面向对象编程的基本方法2)课程二:异常处理- 学习如何捕获和处理程序中的异常- 掌握异常处理的基本方法- 提高程序的健壮性和稳定性3)课程三:GUI编程- 介绍图形用户界面(GUI)编程的基本概念 - 学习使用Python的Tkinter库进行GUI编程 - 编写简单的GUI应用程序4)课程四:网络编程- 了解网络编程的基本原理和方法- 学习使用Python进行网络编程- 编写简单的网络应用程序5)课程五:数据库操作- 掌握Python操作数据库的基本方法- 学习使用Python进行数据库的增删改查操作 - 编写简单的数据库应用程序6)课程六:高级项目实践- 运用前面所学知识,完成较为复杂的项目实践- 提高学生的综合应用能力和创新能力7)课程七:期末考核- 对第二阶段所学内容进行综合测试- 评估学生对Python进阶知识的掌握情况4. 第三阶段:实战项目开发(共16节课)1)课程一:Web开发基础- 介绍Web开发的基本概念和技术- 学习使用Python进行简单的Web开发2)课程二:数据分析与可视化- 掌握使用Python进行数据分析和可视化的基本方法 - 学习常用的数据分析和可视化工具3)课程三:机器学习入门- 了解机器学习的基本原理和常用算法- 学习使用Python进行简单的机器学习应用4)课程四:人工智能基础- 了解人工智能的基本概念和发展趋势- 学习使用Python进行简单的人工智能应用5)课程五:大作业策划- 研究并确定一项合适的大作业项目- 分析项目需求和可行性6)课程六:大作业开发- 学生分组进行大作业项目的开发- 老师指导和辅导学生进行大作业的实施7)课程七:期末答辩- 学生团队在课堂上进行大作业的答辩- 老师和同学们进行评审和点评5. 第四阶段:实践拓展(共13节课)1)课程一:互联网+创新创业- 介绍互联网+创新创业的基本理念和方法 - 激发学生的创新创业意识和能力2)课程二:移动应用开发- 介绍移动应用开发的基本知识和技能- 学习使用Python进行移动应用开发3)课程三:物联网技术- 了解物联网技术的基本原理和应用场景- 学习使用Python进行物联网应用的开发4)课程四:区块链技术- 介绍区块链技术的基本概念和发展趋势- 学习使用Python进行区块链应用的开发5)课程五:高级项目实践- 运用前面所学知识,完成高级的项目实践- 提高学生的综合应用能力和创新能力6)课程六:毕业设计策划- 学生自主确定毕业设计项目的方向和内容- 老师进行指导和审阅7)课程七:毕业设计答辩- 学生在学校进行毕业设计的答辩- 老师和同学们进行评审和点评6. 总结通过四阶63节的Python编程课程学习,青少年将能够系统地掌握Python编程的基础知识和进阶知识,具备较强的动手能力和创新能力,为将来的学习和工作奠定良好的基础。
- 1、下载文档前请自行甄别文档内容的完整性,平台不提供额外的编辑、内容补充、找答案等附加服务。
- 2、"仅部分预览"的文档,不可在线预览部分如存在完整性等问题,可反馈申请退款(可完整预览的文档不适用该条件!)。
- 3、如文档侵犯您的权益,请联系客服反馈,我们会尽快为您处理(人工客服工作时间:9:00-18:30)。
Day 18Modularization: Passing Parameters to Subroutines∙Passing Parameterso Creating Typed Parameterso Controlling how Parameters are Passedo Using the Methods by Which you Pass Parameterso Passing Internal Tables as Parameters∙Defining and Calling External Subroutines∙Summary∙Q&A∙Workshopo Quizo Exercise 1After you have completed this chapter, you will be able to∙Pass typed and untyped parameters to subroutines∙Pass parameters three ways: by reference, by value, and by value and result∙Pass field strings and internal tables to a subroutine∙Understand how variables are shared between internal and external subroutines Passing ParametersIn addition to defining variables by using tables, local, data, and statics, variables can also be defined on the form statement itself. These are known as parameters. Parameters can be either local or references to global variables. The memory for local parameters is allocated when the subroutine is called and freed when it ends.If you define variables on the form statement, the perform statement must pass a value to each of these variables.Parameter names that appear on the form statement are called formal parameters. This term is easy to remember because "formal" starts with "form." For example, in the statement form s1 using p1 changing p2 p3, the parameters p1, p2, and p3 are called formal parameters.Parameter names that appear on the perform statement are called actual parameters. For example, in the statement perform s1 using f1 changing f2 f3, the parameters f1, f2, and f3 are called actual parameters.Defining variables as parameters is illustrated in Listing 18.1.Listing 18.1 Passing Parameters to a Subroutine3961 report ztx1801.2 data: f1 value 'A',3 f2 value 'B',4 f3 value 'C'.56 perform: s1 using f1 f2 f3,7 s2 using f1 f2 f3.89 form s1 using p1 p2 p3.10 write: / f1, f2, f3,11 / p1, p2, p3.12 endform.1314 form s2 using f1 f2 f3.15 skip.16 write: / f1, f2, f3.17 endform.The code in Listing 18.1 produces the following output:A B CA B CA B C∙Line 6 transfers control to line 9.∙Line 9 defines three variables: p1, p2, and p3. It assigns the value of f1 to p1, the value of f2 to p2, and the value of f3 to p3.∙Line 10 writes the values of the variables p1, p2, and p3 and the global variables f1, f2, and f3.∙Line 12 returns control to line 6.∙Line 7 transfers control to line 14.∙Line 14 defines three variables: f1, f2, and f3. It assigns the value of f1 to f1, the value of f2 to f2, and the value of f3 to f3.∙Line 16 writes the values of the variables defined on line 14 on the form statement: f1, f2, and f3.∙Line 17 returns control to line 7.Please review the syntax for the form and perform statements before continuing.397Creating Typed ParametersFormal parameters can be either typed or untyped. A typed parameter is a formal parameter that has a data type following its name on the form statement. An untyped parameter is a formal parameter that doesn't have a data type following its definition on the form statement. In Listing 18.1, all parameters were untyped.Untyped formal parameters allow you to pass a variable of any data type or length to it. The formal parameter uses the attributes of the actual parameter. For example, if you pass a four-byte integer to an untyped formal parameter p1, p1 becomes a four-byte integer. If you pass a character string length 3 to the same parameter, it will become character 3.Syntax for Typed Parametersform s1 using u1 type t value(u2) type tchanging c1 type t value(c2) type t.where:∙s1 is a subroutine name.∙u1,u2,c1,andc2 are formal parameters.∙t is either an ABAP/4 data type or a user-defined data type.The following points apply:∙Only a data type can be specified on the form statement. A length cannot be specified.∙If you define a formal parameter using a fixed-length data type (those are types d, t, i, and f), the length of the actual parameter must match the data type of the formal parameter. This is usually the case, since you will usually design your program such that the data types of the actual and formal parameters will match. You usually do not pass one data type to a different data type.Passing a variable of the wrong data type or length to a typed parameter causes a syntax error. Listing 18.2 shows how to use typed parameters.Listing 18.2 Using Typed Parameters1 report ztx1802.2 data: f1 value 'A',3 f2 type i value 4,4 f3 like sy-datum,5 f4 like sy-uzeit.67 f3 = sy-datum.8 f4 = sy-uzeit.398910 perform s1 using f1 f2 f3 f4.1112 form s1 using p1 type c13 p2 type i14 p3 type d15 p4 type t.16 write: / p1,17 / p2,18 / p3,19 / p4.20 endform.The code in Listing 18.2 produces the following output:AAA419980510164836∙Lines 2 through 5 define four variables having various data types. F3is type c length 8, with an output length of 10 (defined in the domain for syst-datum). F4 is type c length 6 with an output length of 8 (defined in the domain for sy-uzeit).∙Line 10 transfers control to line 12.∙On line 12, p1 accepts only actual parameters of type c. f1 is type c length 3, so a length of 3 is assigned to p1. If f1 had not been type c a syntax error would have occurred.p2is a fixed-length data type; type i is always length 4; f2is also, so the parameters match fully. p3 and p4 are also fixed-length data types, as are their actual parameters.∙Lines 16 through 19 write out the values of p1 through p4. Notice the output length is not passed from the actual to the formal parameter. The output length of the formal parameters is set to the default for each data type. This causes the date and time to be output without separators.Typed parameters have three advantages:∙They are more efficient. Less CPU is needed to allocate memory for a typed parameter than an untyped one.∙They help prevent coding errors. Because you cannot pass a parameter of an incompatible type, the syntax checker will point out the error to you if you try to pass an incompatible parameter.∙They help prevent runtime errors. For example, if your program accepts an untyped variable and performs an arithmetic operation on it, it is possible to pass character data to that subroutine. If this happens at runtime, a short dump will result.Passing Field Strings399You can pass a field string the same way as any other parameter. However, if you want to access the components of the field string within the subroutine, you must make the structure of the field string known to the subroutine via one of two additions to the form statement:∙like x∙structure xHere, x can be a field string or a DDIC structure or table. For example, form s1 using fs1 structure ztxlfa1 defines fs1 as having the structure of DDIC table ztxlfa1.Controlling how Parameters are PassedThere are three ways of passing parameters to a subroutine:∙Pass by reference∙Pass by value∙Pass by value and resultThe syntax on the form statement determines how variables are passed. The syntax on perform does not. What this means will be explained in the next section. The first thing needed is to learn how to code each method.Table 18.2 shows the relationship between syntax and passing methods.Although the syntax on form and perform can differ, for the sake of program clarity they should be the same.Listing 18.3 illustrates how to code these additions.Listing 18.3 How to Code Parameter Additions1 report ztx1803.2 data: f1 value 'A',3 f2 value 'B',4 f3 value 'C',5 f4 value 'D',6 f5 value 'E',7 f6 value 'F'.89 perform s1 using f1 f210 changing f3 f4.1112 perform s2 using f1 f2 f3 f440013 changing f5 f6.1415 perform s3 using f1 f2 f3.1617 form s1 using p1 value(p2)18 changing p3 value(p4).19 write: / p1, p2, p3, p4.20 endform.2122 form s2 using p1 value(p2) value(p3) p423 changing value(p5) p6.24 write: / p1, p2, p3, p4, p5, p6.25 endform.2627 form s3 using value(p1)28 changing p2 value(p3).29 write: / p1, p2, p3.30 endform.The code in Listing 18.3 produces the following output:A B C DA B C D E FA B C∙Line 9 passes four parameters to subroutine s1. The syntax on line 17 determines how they are passed. f1and f3are passed by reference; f2is passed by value; f4is passed by value and result.∙Line 9 passes six parameters to subroutine s2. f1, f4, and f6are passed by reference; f2 and f3 are passed by value. f5 is passed by value and result.∙Line 12 passes three parameters to subroutine s2. f3is passed by value, f3is passed by reference, and f5is passed by value and result. Although the perform statement only specifies using, the form statement is allowed to differ. It specifies both using and changing. The syntax on the form statement takes precedence and determines the method by which the parameters are passed.Remember to keep the following things in mind:∙perform and form must contain the same number of parameters.∙The syntax on the perform and form statements can differ.∙The syntax on the form statement alone determines the method by which a param-eter is passed.∙The value() addition cannot be used on the perform statement.∙using must come before changing.401The addition using can only occur once in a statement. The same rule applies to changing.Using the Methods by Which you Pass ParametersTable 18.3 briefly describes the three methods of passing parameters.Passing Parameters by ReferenceWhen you pass a parameter by reference, new memory is not allocated for the value. Instead, a pointer to the original memory location is passed. All references to the parameter are references to the original memory location. Changes to the variable within the subroutine update the original memory location immediately. Figure 18.1 and Listing 18.4 illustrate how this works.Figure 18.1 :How a parameter passed by reference affects the original memory location.Listing 18.4 Effect of Pass by Reference1 report ztx1804.2 data f1 value 'A'.34 perform s1 using f1.5 write / f1.67 form s1 using p1.8 p1 = 'X'.9 endform.402The code in Listing 18.4 produces the following output:X∙Line 2 allocates memory for variable f1. For the sake of this example, let's assume the memory location is 1000.∙Line 4 transfers control to line 7.∙Line 7 causes f1 to be passed by reference. Therefore, p1 is a pointer to memory location 1000.∙Line 8 modifies memory location 1000, causing the memory for f1 to change to X.∙Line 9 returns control to line 5.∙Line 5 writes out the value X.With internal subroutines, there is little difference between passing parameters by reference and accessing global variables from within the subroutine. Both allow you to change the value of a global variable directly. In external subroutines and function modules (see Chapter 19, "Modularization: Function Modules, Part 1") the pass by reference is more useful. Even so, passing parameters to a subroutine-be it internal or external-is good programming style. It makes maintenance easier and improves the readability of your program.The additions using f1 and changing f1 both pass f1 by reference-they are identical in function. The reason they both exist is that-used properly-they can document whether the subroutine will change a parameter or not.Code changing with parameters, the subroutine changes. You should code using with parameters that are not changed by the subroutine. Listing 18.5 illustrates this point.Listing 18.5 using and changing Are Identical in Function1 report ztx1805.2 data: f1 value 'A',3 f2 value 'B'.45 write: / f1, f2.6 perform s1 using f17 changing f2.8 write: / f1, f2.910 form s1 using p111 changing p2.12 p1 = p2 = 'X'.40313 endform.The code in Listing 18.5 produces the following output:A BX Xf1 and f2 are both passed by reference to s1. Therefore, p1 and p2 are pointers to f1and f2. Changes to p1and p2are immediately reflected in f1and f2. This example only illustrates that it is possible to change any parameter that is passed by reference. You should code your parameters so that using and changing properly document your usage of those parameters.Passing Parameters by ValueWhen you pass a parameter by value, new memory is allocated for the value. This memory is allocated when the subroutine is called and is freed when the subroutine returns. Therefore, references to the parameter are thus references to a unique memory area that is known only within the subroutine; the original memory location is separate. The original is unchanged if you change the value of the parameter. Figure 18.2 and Listing 18.6 illustrate how this works.Figure 18.2 :How a parameter passed by value allocates a new storage location independent of the original.Listing 18.6 Effect of Pass by Value1 report ztx1806.2 data: f1 value 'A'.34 perform s1 using f1.5 write / f1.67 form s1 using value(p1).8 p1 = 'X'.9 write / p1.10 endform.404The code in Listing 18.6 produces the following output:XA∙Line 2 allocates memory for variable f1.∙Line 4 transfers control to line 7.∙Line 7 causes f1to be passed by value. Therefore, p1refers to a new memory location that is independent of f1. The value of f1is automatically copied into thememory for p1.∙Line 8 modifies the memory for p1. f1 is unchanged.∙Line 9 writes out the value X.∙Line 10 returns control to line 5.∙Line 5 writes out the value A.Use pass by value when you need a local copy of a variable that you can change without affecting the original. Pass by reference is more efficient than pass by value. Use pass by reference unless you need an independent local copy of the variable.Passing Parameters by Value and ResultPass by value and result is very similar to pass by value. Like pass by value, a new memory area is allocated and it holds an independent copy of the variable. It is freed when the subroutine ends, and that is also when the difference occurs.When the endform statement executes, it copies the value of the local memory area back into the original memory area. Changes to the parameter within the subroutine are reflected in the original, but not until the subroutine returns.This may seem like a small difference, but the difference become greater. You can change whether the copy takes place or not.The copy always takes place unless you leave the subroutine by using one of two statements:∙stop∙message e nnnThe stop statement terminates the subroutine and goes directly to theend-of-selection event. If p1 was passed by value and result, changes to p1 are discarded before end-of-selection is triggered. In a sense, stop behaves like a mini-rollback for value and result parameters. When it is used inside of a subroutine, the stop statement is usually preceded by a test for an abnormal condition within the program. If the abnormal condition arises, stop is executed. It discards the changes to value and result variables, and triggers end-of-selection, where cleanup procedures are then executed.Use pass by value and result for parameters you want to change, but there may be a possibility that you will want to discard the changes if an abnormal condition should arise in your subroutine.405Figure 18.3 and Listing 18.7 illustrate parameters passed by value and result.Figure 18.3 :How a parameter passed by value and result allocates a new storage location independent of the original and copies the value back in again.Listing 18.7 Effect of Pass by Value and Result1 report ztx1807.2 data: f1 value 'A'.34 perform: s1 changing f1,5 s2 changing f1.67 end-of-selection.8 write: / 'Stopped. f1 =', f1.910 form s1 changing value(p1).11 p1 = 'B'.12 endform.1314 form s2 changing value(p1).15 p1 = 'X'.16 stop.17 endform.The code in Listing 18.7 produces the following output:Stopped. f1 = B∙Line 2 allocates memory for variable f1.∙Line 4 transfers control to line 9.∙Line 10 causes f1 to be passed by value and result. Therefore, p1 refers to a new memory location that is independent of f1. The value of f1 is automatically copied into406the memory for p1.∙Line 11 modifies the memory for p1. f1 is unchanged.∙Line 12 copies the value of p1 back into f1, frees p1, and transfers control to line 5.∙Line 5 passes control to line 14.∙Line 14 causes f1 to be passed by value and result. A new memory area is allocated for p1 and the value of f1 is copied into it.∙Line 15 changes the value of p1 to B.∙Line 16 issues the stop statement. It frees the memory for p1, and the changed value is lost. Control transfers to line 7.∙Line 8 writes out the value B.Passing Internal Tables as ParametersIt may be a good idea to review internal tables now, especially the it[]syntax.You can use one of two methods to pass an internal table to a subroutine:1.Pass with header line2.Pass body onlyIf the internal table has a header line, method 1 passes both the header line and the body to the subroutine. Method 2 passes only the body to the subroutine.If the internal table doesn't have a header line, you can also use both methods. However, method 1 will behave a little differently-it will automatically create a header line for the internal table within the subroutine.At this point, you may be asking yourself, "Why would I want to pass an internal table without a header line?" Most of the time, you wouldn't. However, if you have a special case that requires an internal table without a header line, you will need to pass it without a header line. You will need to do this if you use nested internal tables-a nested internal table cannot have a header line. Nested internal tables are used more often in release 4, so this technique will be needed more often on newer systems.Table 18.4 summarizes the effect of each of these methods on internal tables with and without header lines.Table 18.5 shows the syntax for each method of passing an internal table to a subroutine.407If the internal table has a header line, the first method in Table 18.4 passes both the header and body to the subroutine. The rest of the methods pass the body only.If the internal table doesn't have a header line, the first method in Table 18.4 passes the body and creates a header line within the subroutine. The rest pass the body only.Making the Components of an Internal Table Known Within the SubroutineMerely passing an internal table is usually not enough-you must also describe the structure of the internal table to the subroutine. If you don't describe the structure of the internal table on the form statement, the components of the internal table will be unknown within the subroutine. Accessing any component within the subroutine will then result in a syntax error.The syntax you need depends on the method you use to pass the internal table. Table 18.6 shows the appropriate syntax for each method.The structure addition expects a field string name after it. Here, code the name of any field string, DDIC structure or table, or the name of an internal table that has a header line.The like addition expects a table body after it. Here, code a reference to the body of an internal table. If the internal table you wish to name here doesn't have a header line, either it or it[] refers to the body of it. If it has a header line, only the syntax it[] can be used to refer to the body of it.If you pass the body only, you will usually need a work area within the subroutine to add records to and retrieve records from the internal table. To define it, you can use local, data, or statics. If a global work area is already available, you might use that one, although it is less desirable because accessing global variables from within a subroutine makes program maintenance more difficult. If you elect to use the data statement to define your work area, the like line of itabbody addition is available. It defines a field string using only the body of an internal table. The resulting field string is exactly like a line of the internal table body itabbody.408For example, data fs like line of it[] defines a field string named fs. It has the same structure as a single row of it.Passing an Internal Table with Header LineIf an internal table has a header line and you want to pass both the header line and the body to a subroutine, use the syntax shown in the first row of Table 18.5. This passes both the header line and the body, and they are both passed by reference. Therefore, changes made to either the header line or body of the internal table within the subroutine are immediately reflected in the original.Listing 18.8 illustrates this syntax.Listing 18.8 How to Pass an Internal Table That Has a Header Line with Its Header Line1 report ztx1808.2 * Here, IT is an internal table that has a header line3 * This program shows how to pass both the header line and body.4 tables ztxlfa1.5 data it like ztxlfa1 occurs 5 with header line.67 select * up to 5 rows from ztxlfa1 into table it order by lifnr.8 perform s1 tables it.9 loop at it.10 write / it-lifnr.11 endloop.1213 form s1 tables pt structure ztxlfa1. "uses the field stringztxlfa114 "here, you can use:15 "structure fs "a field string16 "structure ddicst "a ddic structure or table17 "structure it "any internal table withheader line18 "like it. "ok if itab doesn't haveheader line19 "like it[]. "any internal table20 read table pt index 3.21 pt-lifnr = 'XXX'.22 modify pt index 3.23 endform.The code in Listing 18.8 produces the following output:40910001010XXX10301040∙Line 4 defines a global work area ztxlfa1. This work area is a field string having the same structure as the DDIC table ztxlfa1.∙Line 5 defines internal table it with a header line.∙Line 7 populates the internal table with 5 rows from table ztxlfa1.∙Line 8 transfers control to line 13.∙Line 13 causes the internal table to be passed together with its header line. It is passed by reference, so pt is a pointer to the original. structure is needed to make the structure of the internal table known to the subroutine. Without it, any access to a component of the internal table would cause a syntax error.∙Lines 15 through 19 show the choices available for making the structure it known within the subroutine.∙Line 20 reads row 3 from pt and places it into the header line. Without the structure addition on line 13, this line would have caused a syntax error.∙Line 21 changes the value of lifnr in the header line. Since the internal table was passed with header line by reference, this modifies the contents of the original header line.∙Line 22 overwrites row 3 from the header line. Since the internal table was passed by reference, this modifies the contents of the original internal table.∙Line 23 returns control to line 8.∙Lines 9 through 11 write out the contents of the internal table. The output shows that the contents have changed.If an internal table doesn't have a header line and you want to pass the body and create a header line in the subroutine, you can also use the syntax shown in the first row of Table 18.5. This passes the body by reference, and creates a header line locally in the subroutine. Changes made to the body of the internal table within the subroutine are immediately reflected in the original.Listing 18.9 illustrates this syntax.Listing 18.9 How to Pass an Internal Table Without a Header Line to a Subroutine and Automatically Create a Header Line1 report ztx1809.2 * Here, an internal table that doesn't have a header line3 * is passed with header line4 tables ztxlfa1.4105 data: it like ztxlfa1 occurs 5. "doesn't have a headerline67 select * up to 5 rows from ztxlfa1 into table it order by lifnr.8 perform s1 tables it.9 loop at it into ztxlfa1. "need to use a work areabecause it10 write / ztxlfa1-lifnr. "doesn't have a headerline11 endloop.1213 form s1 tables pt structure ztxlfa1. "or you can use:14 " like it15 " like it[]16 read table pt index 3.17 pt-lifnr = 'XXX'.18 modify pt index 3.19 endform.The code in Listing 18.9 produces the following output:10001010XXX10301040∙Line 4 defines a global work area ztxlfa1. This work area is a field string having the same structure as the DDIC table ztxlfa1.∙Line 5 defines internal table it without a header line.∙Line 7 populates the internal table with 5 rows from table ztxlfa1.∙Line 8 transfers control to line 13.∙Line 13 causes the body of the internal table to be passed and automatically createsa header line for it. The body is passed by reference, so pt is a pointer to the original bodyand to the local header line. structure is used to make the structure of the internal table known to the subroutine. Without it, any access to a component of the internal table would cause a syntax error.∙Lines 14 and 15 show the other choices available for making the structure it known within the subroutine.∙Line 16 reads row 3 from pt and places it into the local header line. Without the structure addition on line 13, this line would have caused a syntax error.∙Line 17 changes the value of lifnr in the header line. Because the original internal411table doesn't have a header line, this doesn't modify anything outside of the subroutine.∙Line 18 overwrites row 3 from the local header line. Because the internal table was passed by reference, this modifies the contents of the original internal table.∙Line 19 returns control to line 8. The memory for the local header line is freed.∙Lines 9 through 11 write out the contents of the internal table. Because it doesn't have a header line, the field string ztxlfa1 is used as an explicit work area. The output shows that the contents have changed.If an internal table doesn't have a header line and you want to pass the body without automatically creating a header line in the subroutine, you can use the syntax shown in rows two through five of Table 18.5. By using this syntax, you can pass the body by reference, by value, or by value and result. If you pass it by reference, changes made to the body of the internal table within the subroutine are immediately reflected in the original. If you pass it by value, a local copy of it is created-changes are discarded at the end of the subroutine when the local memory for it is freed. If you pass it by value and result, changes are copied back into the original when endform is executed. A stop statement within the subroutine will discard all changes to it and transfer control directly to end-of-selection.Listing 18.10 illustrates these methods.Listing 18.10 How to Pass an Internal Table Without a Header Line to a Subroutine1 report ztx1810.2 * Here, an internal table that doesn't have a header line3 * is passed without creating a header line automatically4 tables ztxlfa1.5 data: it like ztxlfa1 occurs 5. "doesn't have a headerline67 select * up to 5 rows from ztxlfa1 into table it order by lifnr.8 perform: s1 using it,9 s2 using it,10 s3 using it,11 writeitout tables it.1213 end-of-selection.14 write: / 'In End-Of-Selection'.15 perform writeitout tables it.1617 form s1 using value(pt) like it. "pass by value18 * you can also use: like it[].19 data wa like line of pt.20 * you can also use:21 * data wa like ztxlfa1.412。