IP Office Overview ROW v12
SharePoint Online 基础指南说明书

Guida introduttivaSe si vuole usufruire di una posizione sicura in cui condividere e archiviare i file ovunque ci si trovi, accedere al proprio abbonamento a Office 365 e selezionareSharePoint nell'icona di avvio delle app.Scoprire i contenuti in primo piano •Notizie dai siti mette in evidenza gliaggiornamenti dei siti seguiti o visitati spesso.•Siti frequenti mostra i siti a cui siaccede più spesso e le attività recenti al loro interno.•Siti suggeriti*(non visualizzato)cambia in base alle ricerche eseguite e ai suggerimenti di Microsoft Graph.•Microsoft Graph deve essereabilitato dall'amministratore affinché sia possibile visualizzareCollegamenti in primo piano eSiti suggeriti nella home page di SharePoint.Trovare i siti•Seguiti mostra tutti i siti seguitidall'utente, ad esempio il sito delteam o un sito di un altro gruppo con cui si collabora.•Recenti mostra i siti visitati direcente.•Collegamenti in primo piano*mostra i siti che l'azienda vuole mettere in evidenza.CercaConsente di eseguire ricerche per Siti , Persone o File .Creare un sito o un post di notizieUsare i fileSelezionare un sito nella home page di SharePoint o immettere il relativo URL nel browser. Quindi selezionare Documenti nel riquadro di spostamento sinistro.ApriAprire e modificare un file online o in un'app desktop.Stato condivisione Vedere quali file sono condivisi e con chi.Cronologia versioniVisualizzare la cronologia delle versioni di un file e ripristinare una versione precedente di un file.CondividiCondividere filedirettamente da SharePoint. I file rimangono privati finché non li si condivide.Copia collegamentoOttenere un collegamento al file selezionato da inserire in un messaggio istantaneo o di posta elettronica o in un sito.Sposta in/Copia inSpostare o copiare un file in un'altra destinazione nel proprio OneDrive o inqualsiasi sito di SharePoint.Riquadro dettagliVisualizzare le informazioni sui file e le attività recenti, gestire le autorizzazioni di accesso e modificare le proprietà dei file.Attività recentiVisualizzare le attività di condivisione, visualizzazione e modifica di un file.DocumentoVisualizzare e modificare i file archiviati in un sito di SharePoint.Aggiungi in altoAggiungere cartelle o documenti importanti all'inizio dell'elenco per visualizzarli facilmente.FlowAutomatizzare le attività comuni tra SharePoint e altri servizi di Office 365 e di terze parti.ScaricaScaricare una copia di un file per lavorarci offline occupando spazio sul dispositivo locale.Creare o caricare file e cartelle È possibile creare nuovi file e cartelle e caricare file e cartelle esistenti dal dispositivo in uso. In SharePoint selezionare Carica >File . Oppure selezionare una posizione inSharePoint e trascinarvi file o cartelle dal dispositivo.Copia collegamentoÈ possibile condividere un file anche copiando il collegamento e incollandolo in unmessaggio di posta elettronica, un messaggio istantaneo, una pagina Web o una pagina di OneNote. In SharePoint selezionare un file e quindi scegliere Copia collegamento . Copiareil collegamento e quindi incollarlo nella destinazione.Sincronizzare file e cartelle di SharePoint con OneDriveSincronizzare i file e le cartelle in SharePoint con il computer, in modo da potervi accedere anche quando si è offline. In una raccolta documenti nel sito di SharePoint da cui si vogliono sincronizzare i file selezionare Sincronizza e accedere con il proprio account aziendale o dell'istituto di istruzione.Condividere fileSelezionare un file e quindi scegliere Condividi . È possibile concedere ai destinatari le autorizzazioni di modifica o visualizzazione e impostare limiti di tempo su un file perspecificare quando non sarà più accessibile.In base alle impostazioni dell'amministratore,i tre livelli di condivisione disponibili sono:Tutti -le persone interne ed esterne all'organizzazione possono accedere.Collegamenti ricevuti direttamente o inoltrati.Persone di <nome organizzazione>-tutte le persone interne all'organizzazione possono accedere.Persone specifiche -specificare gli indirizzi di posta elettronica delle persone a cui si vuole concedere l'accesso.Creare un sitoSelezionare + Crea sito nella home page di SharePoint per creare un nuovo sito diSharePoint. Selezionare un sito del team o di comunicazione e immettere un titolo, una descrizione, i proprietari e i membri. È anche possibile impostare il gruppo comeprivato e cambiare il nome di posta elettronica del gruppo. Se si seleziona un sito del team, viene creato anche un gruppo di Office 365.Aggiungere una paginaSelezionare + Nuovo > Pagina nel nuovo sito, assegnare un nome alla pagina e quindi selezionare Pubblica.Aggiungere una raccolta documenti o un elencoSelezionare + Nuovonel nuovo sito Web per aggiungere una raccolta o un elenco.Aggiungere web partNel post di notizie o nella pagina selezionare il segno più. È possibile aggiungere testo, immagini, file, video, contenuto dinamico e altro usando le web partcorrispondenti.Accesso a SharePoint per dispositivi mobiliL'app SharePoint per dispositivi mobili consente di accedere ai contenuti della Intranet aziendale dal telefono o dal tablet ed è disponibile nell'app store per iOS, Android e Windows. È possibile cercare siti, persone e file, esplorare i contenuti di SharePoint, mantenersi aggiornati sulle ultime notizie, visualizzare i propri contenuti e altro ancora.Le schermate riportate sopra rappresentano account di SharePoint in iOS. Per gli utenti di Android le schermate saranno analoghead eccezione delle funzionalità relative alle attività.Usare la casella di ricerca per trovare contenuti importanti.Toccare un utente per aprire la sua scheda contatto e vedere con chi lavora e a cosa sta lavorando.Accedere alla visualizzazionepersonalizzata dei siti del team, i siti dicomunicazione e i post di notizie.Esplorare siti, file, persone e altro per tornare a ciò a cui si stava lavorando.Visualizzare i post di notizie ovunque e condividere aggiornamenti, report, il proprio stato e le proprie esperienze con il team.File su richiestaFile su richiesta consente di accedere a tutti i file di SharePoint tramite OneDrive senza doverli scaricare tutti e usare spazio di archiviazione nel computer.Nella barra delleapplicazioni selezionare l'icona di OneDrive e quindi selezionare Altro >Impostazioni .Nella scheda Impostazioni selezionare la casella Risparmia spazio e scarica i file quando li usi .Approfondimenti su SharePointTrovare assistenzaEsplorare la Guida e le risorse di formazione per SharePoint e altre app di Office.Per altre informazioni, visitare https:///fwlink/?linkid=871131.Risorse di formazione, esercitazioni e video gratuiti su OfficePronti per approfondire le funzionalità messe a disposizione da SharePoint?Visitare https:///fwlink/?linkid=871134 ed esplorare le risorse di formazione gratuite.Ottenere l'app SharePoint per dispositivi mobiliScaricare l'app per dispositivi mobili per accedere ai contenuti della Intranet dal telefono o dal tablet.Visitare https://aka.ms/getspmobile .Selezionare i file e le cartelle da sincronizzareÈpossibile scegliere le cartelle e i file da sincronizzare con il computer. Nella barra delle applicazioni selezionare l'icona di OneDrive e quindi selezionare Altro >Impostazioni >Scegli cartelle.File e cartelle online per risparmiarespazio nel computer.Facendo doppio clic sull'icona della nuvola, i file e le cartelle possono essere resi disponibili nel computer.Rendere file e cartelle accessibili senza una connessione Internet.Riportare online i file e le cartelle.Altre guide introduttivePer scaricare le Guide introduttive gratuite di altre app di Office, visitare https:///fwlink/?linkid=2008317.。
v12digitalengine说明书

v12digitalengine说明书
摘要:
1.V12DigitalEngine 简介
2.V12DigitalEngine 的功能
3.V12DigitalEngine 的使用方法
4.V12DigitalEngine 的优点和局限性
5.总结
正文:
V12DigitalEngine 是一款强大的数字引擎,适用于各种数字处理任务。
它具有强大的数据处理能力,可以轻松地执行大规模数据分析和计算。
V12DigitalEngine 的功能包括数据分析、数据挖掘、机器学习、人工智能等。
它可以处理各种类型的数据,包括结构化数据、非结构化数据、时空数据等。
此外,V12DigitalEngine 还具有可视化分析功能,可以直观地呈现数据分析结果。
使用V12DigitalEngine 非常简单。
用户只需要将数据输入到引擎中,然后选择需要的功能,就可以开始分析和计算了。
对于机器学习和人工智能任务,用户还可以通过V12DigitalEngine 的API 接口调用各种机器学习和深度学习算法。
V12DigitalEngine 的优点在于其强大的数据处理能力和高效的分析效率。
它可以大大提高数据分析和决策的效率,帮助用户更好地理解和利用数据。
然而,V12DigitalEngine 也存在一些局限性,例如它需要大量的计算资
源和存储空间,对于小规模的数据处理任务可能会显得过于庞大和复杂。
总的来说,V12DigitalEngine 是一款功能强大的数字引擎,适用于各种数字处理任务。
它的使用简单,效率高,可以帮助用户更好地理解和利用数据。
AvayaIPOffice产品介绍-R9版
功能: - 语音通话 - 即时消息 - 查看其它用户状态 - 企业通讯录检索 - 视频通话(点到点) - 呼叫历史 - 发送、接收电子邮件
支持系统: - IPAD - Windows
视频软件电话
视频软件电话是一个全功能的电话客户端,使电脑支持标准的电话功能。 除了支持语音通话外,还支持点到点视频通话。
Avaya话机
可选终端
桌面数字话机
移动终端
1400 系列
9500系列
桌面IP话机
Flare Experience
One-X Mobile Prefer 智能手机 (SIP软件)
会议终端
1600系列
9600系列
第三方SIP电话
B100系列
PC客户端软件
专业WIFI手机
Flare Experience
呼叫保留键将当前呼叫保留,对方听到保留音乐
会议键通过点击此按键可以召集最多6方会议
转接键将当前呼叫转接至其他号码
挂断键挂断当前的呼叫
免提键激活双工免提
静音键将当前呼叫静音, 对方无法听到声音
音量键在对应的状态下调 节,耳机、听筒、 免提的音量
耳机键当连接耳机时,点 击此按键将话路接 到耳机
96X1 IP话机
AVAYA 菜单键点击A键进入AVAYA菜 单,您可以对自己的话 机进行设置
电话本接入键点击此按键可以接入话 机上设置的电话本
呼叫日志键点击此按键可以查看呼 出/呼入/未接日志;当 有未接来电时,这个按 键上的灯会亮
重拨键可以通过设置选择直接 拨打上一个号码或在拨 打过的六个号码中进行 选择
留言提示灯1、当红灯亮常亮时,提示有 语音留言;
One-X Portal
PushPro v1.2 用户指南说明书
Revised on August 5th 2019PushPro v1.2PushPro Usage GuideIn this guide you can read how to best make use of PushPro.Table of contentsCreate your PushPro accountRegister a new accountSubscribe to a planConfigure your domainsCustomize the notification imageCustomize the opt-in requestDownload the PushPro file and code snippetInstall PushPro on your websiteManual InstallationEnable HTTPSUpload the PushPro fileUpload the PushPro codeVerify your setupCreate a push notificationSchedule a notificationDraft a notificationSegment your subscribersAnalyze your message performanceUsing your dashboardAccount ManagementUpgrade your PushPro planEmail settingsCredit card detailsBilling informationGETTING STARTEDCreate an accountThe first thing to do is to register an account.You can do so by navigating to the PushPro p ortal and clicking“Register”.You will land on our application portal,where you can register a new account.You can either register using one of our social login options -we currently support Google-or create an account with your email address and a password.If you created your account using an email address and password,you will receive a verification email shortly after clicking“sign up”.We want to verify your email address to make sure that it was actually you who registered for an account.Click the link in the email to make sure your registration is successful.If you created your account using a social login, verification is not necessary.On the p ortal login,enter your credentials or use the social login option.This will log you in to your personal PushPro environment.You have now successfully created your PushPro account!Subscribe to a planOnce you have an account,you can choose a plan.Based on your business needs- which features and how many subscribers and domains-you can choose a free plan or one of our four paid plans.We have two billing options,monthly and yearly payments.Yearly plans are25%cheaper than monthly plans,the features are however the same. Select one of our plans and click “start now”.You will now need to fill out some details about you and your company.We collect this data so that we can get to know you and contact you when necessary.On this page,you can also opt to use a different email address to receive billing receipts on,for example aspecific finance email address your company uses.Moreover,you can opt-in for our newsletters and product updates.If you have selected our free plan,hit“confirm and proceed”once you filled out all the fields.If you selected a paid plan,hit“proceed”and enter your payment details.For now we only accept credit cards.Our payment service provider will check the validity of your card.If its valid,you will be redirected to your personal dashboard.Should you receive an error,please check your card details and make sure they are correct.Add a domainTo enable push notifications on your website,you should first register a domain.In your PushPro portal,navigate to Domains and click“add domain”.You can now input a name to recognize your domain and the URL of your domain.Click save to confirm your domain. You can now further configure your domain.CONFIGURE YOUR DOMAINSCustomize the notification imageIf you are on a paid plan,you can customize the image which will be shown for each notification you send from the selected domain.Upload your logo or any other engaging image!Customize the opt-in requestUsing a custom opt-in request will significantly improve your subscriber numbers.Instead of only showing the browser prompt,the PushPro custom opt-in will show an opt-in request with customizable text.Fill out a title and body text,which will determine the message your audience will see and hit “save”.Enable trackingIf you are on the PushPro Booming plan,you will have access to user segmentation.For segmentation to work,PushPro will collect various anonymous data from your subscribers,such as their browser type,timezone and visited page URLs.If you want to use segmentation, make sure to have this setting e nabled.If you are not(yet)on the Booming plan,you can still enable this feature.This will let you already gather subscriber data,which you can use as soon as you upgrade to theBooming plan.You’ll be off to a great start with already a lot of subscriber data at your disposal!Note that enabling subscriber tracking will update your code snippet to include a line tracking: true,so make sure to update the snippet on your website.INSTALL PUSHPRO ON YOUR WEBSITEManual InstallationNavigate to your domain settings to download the javascript file and copy the generated code snippet.Please note that if you change the notification image or custom opt-in,the snippet will change.So,after each change you make,upload the updated snippet to your website. How you can install this on your website will be covered in the next step.Enable HTTPSTo use PushPro,your website needs to be HTTPS-enabled.HTTPS makes your website more secure by encrypting the traffic between your server and your visitors.If your website is already HTTPS-enabled,great!If not,keep reading.You have two options to add HTTPS to your website.The first option is that you ask your hosting provider to activate it for you.The second option is that you obtain an SSL certificate yourself, which can be done for free via L et’s Encrypt.Check if everything works by clicking the lock next to your website URL. It should say ‘Connection is secure’.Upload the PushPro fileNext up,add the Javascript file to the root directory of your website’s source code.If you manage the content of your website yourself,you can insert the files into the root folder.If you use a third party CMS,you can add the files via the CMS portal.In the domain settings,enable‘Use an extension for this domain’and copy your newly generated API key in your CMS extension:Upload the PushPro codeThe last step is including the code snippet we generated for you in the<head>of your website.Similar to the Javascript file,you can either add this yourself in the index.html, or input it via your CMS.Verify your setupYou can verify if you set everything up correctly by navigating tohttps:///.If you see a push notification opt-in request,everything is working! That’s all, your website is now ready to send push notifications!If you do n ot s ee an opt-in request,you can check whether the code snippet and javascript file were correctly added.Navigate to h ttps:///sw.js. Here you should find the following text:importScripts('h ttps:///push-pro-java-scripts/ pushpro-sw.js');Next up,you can verify whether you correctly added the code snippet.Onhttps:///,right-click anywhere on the website and select“Page Source”. Here, you should find the following text:<script>window.__pushpro = {site_uuid: "your-unique-identifier",}</script><script src="h ttps:///push-pro-java-scripts/ pushpro-lib.js"></script>Use the Magento 2 extensionTo use the PushPro extension for Magento,your store needs to be HTTPS-enabled.HTTPS makes your website more secure by encrypting the traffic between your server and your visitors.If your website is already HTTPS-enabled, great! If not, keep reading.You must first acquire an SSL certificate.You can either ask your hosting provider to activate it for you,or obtain an SSL certificate yourself.You can get one for free via L et’s Encrypt. Check out their g uideto get started.Once you acquired and activated your SSL certificate,you must enable HTTPS for your Magento store. Walk through the following steps:1.Navigate to your Magento Admin dashboard2.On the menu, click on stores3.In the square ‘General’, click on ‘Web’ and then click on ‘Base URLs’4.Make sure that your Base URL starts with “https://”5.Click on ‘Base URLs (Secure)’6.Make sure that your Secure Base URL starts with “https://”7.Change the settings to'Use Secure URLs on Storefront'and'Use SecureURLs in Admin' to 'Yes'.8.Click on ‘Save Config’9.Go to ‘Cache Management’ and empty all caches.10.Done, navigate to your website to check if it starts with https!Once you have enabled HTTPS,include the code snippet we generated for you in the PushPro portal in the extension panel in Magento.You can verify if you set everything up correctly by following the steps as described h ere.Use the BigCommerce extensionTo use the PushPro extension for BigCommerce,your store needs to be HTTPS-enabled.HTTPS makes your website more secure by encrypting the traffic between your server and your visitors.If your website is already HTTPS-enabled,great! If not, keep reading.You must first acquire an SSL certificate.If your store is already operational, BigCommerce enabled a free SSL certificate on your domain.You should now check if sitewide-HTTPSis enabled.1.Go to S tore Setup › Store Settingsand scroll down to HTTPS.2.Select Use HTTPS for entire site from the HTTPS Pages drop-down menu.3.Save your changesOnce you have enabled sitewide-HTTPS,you’re ready to install PushPro.Download the PushPro app from the BigCommerce marketplace and install it. Once it’s successfully installed, reload the page.In the PushPro portal, generate an API key for the domain you wish to use withBigCommerce.Copy the API key in the PushPro app in BigCommerce and submit.That’s it,PushPro is now enabled on your store!You can verify if you set everything up correctly by navigating to the homepage of your store.If you receive an opt-in request for push notifications,everything is working!That’s all, your website is now ready to send push notifications!Use the WordPress extensionLog in to your WordPress admin panel and go to “Plugins” → “Add New”. In the top right, search for PushPro. Hit “Install Now” and “Activate” it when the installation is done. PushPro is now added to your admin panel menu:Click on the PushPro icon to get started.You will now see a screen where you can enter your API key.In the PushPro portal,generate an API key for the domain you wish to use with WordPress.Copy the API key in the PushPro plugin in WordPress and click“Save”.That’s it,PushPro is now installed on your WordPress website!Use the Shopify extensionComing soon!PUSH NOTIFICATIONSCreate a push notificationNavigate to the“Push Notifications”section in your portal to start creating yourmessages.On the left side of the screen you can edit various fields,which will be previewed on the right side of the screen.First,select to which of your domains you want to send the push notification.If you areon the correct plan,you can also select to which user segments you want thisnotification sent to.Next up,you can edit the title and message text.Make sure to add some emoji to increase your click through rates!Configure the destination URL,which will determine to which web page your audience will be redirected if they click on the notification.Make sure to start your URL with “h ttps://”.Optionally,you can also create a button on the notification by adding button text. If you’re sure that your push notification is set up correctly, hit “s end now”!Schedule a notificationWith PushPro,you can easily send schedulednotifications.Navigate to the Push Notifications tabin your portal and create a new notification likeyou're used to.Below the destination URL you canflip the'scheduled sending'switch to on.You cannow select an exact date and time to send your notification.Mind the time zone you're in,which is listed above the date/time selector,and make sure you correctly select AM or PM time. Select Save Notification when you're done!Draft a notificationWhen creating a new push notification,instead of send now,hit'save notification'.The notification will be saved as a draft,which you can see in the draft notifications overview. If you want to edit your draft, or push it to your subscribers, click the edit icon.AUDIENCE SEGMENTATIONCreate a segmentSegmentation is a powerful feature to send your push notifications to a specific group of people.It enables you to send notifications to subscribers who for example speak Spanish, visited a specific page on your website, or use a specific device or browser.To set up segments,navigate to the segmentation menu in the PushPro portal.If you’ve configured segments before,you will see an overview of them.For every segment youcan see on which domain it’s active.If you want to edit a segment,click the edit icon on the right-hand side. To create a new segment, click “Create Segment” on the top-right.Note that you must have t racking enabled in your domain configuration to be able to use segmentation!Configuring segmentsYou can modify various settings of the segment.Start by selecting the domain you want this segment to be active on.Next up,input a recognizable name for your segment, such as A ndroid users,G erman residents or H igh value customers.Now you can add the segmentation rules.Each row in the interface represents a segmentation rule.For each rule you can configure the following:●And/Or: determines whether all rules should be met, or one of the rules.●Attribute: select the attribute you want to match against.●Comparison: how the value will be compared to the rule.●Value: your custom value.When you add a rule,you have the option to add another rule by clicking the“Add new rule”button.You can configure as many rules for a segment as you’d like.Do notehowever,that the more rules you add,the smaller your segment will be.The image below displays a possible segment configuration for European Android users who have last visited your checkout page:Segmentation attributesSegmentation attributes are the data types which you can use to segment subscribers. We have the following attributes available for segmentation:Attribute DescriptionNotesBrowserThe browser the user subscribed onCan be Chrome, Firefox, Edge, Opera, or any Chromium browser such as BraveBrowser Language The language of the browser at the time of subscription Languages can have multiple codes, such as en-GB, en-NZ oren-US Browser TimezoneThe timezone of the browser at the time of subscription Recorded as Continent/City, for example Europe/Amsterdam orAmerica/PhoenixDevice Type The device type of the browserat the time of subscription Can be mobile, tablet, or desktopLast Visit The most recent date and timea subscriber has visited anypage on your domain You can select a date in the future, so that you can schedule messages for laterLast Visited Page The most recent page visitedduring the last session of asubscriber. Select a specific URL to target users who left your website on it# Notifications Clicked The total amount ofnotifications a subscriber hasclicked on from the moment heor she subscribedIf for some reason the sameuser unsubscribes and at alater point in timere-subscribes, this attribute willbe reset to 0.# Notifications Received The total amount ofnotifications a subscriber hasreceived from the moment heor she subscribedIf for some reason the sameuser unsubscribes and at alater point in timere-subscribes, this attribute willbe reset to 0.Operating System The operating system of thebrowser at the point ofsubscription Can be Android, Windows Phone, Windows, macOS, or LinuxSubscription Date The date and time the browsersubscribed for pushnotifications Recorded once every time a browser accepts the opt-in requestSubscription Page The specific URL where thebrowser subscribed for pushnotifications Recorded once every time a browser accepts the opt-in requestVisited Page Title The HTML title of the page asubscriber has visited It does not matter at which point in time the subscriber has visited this pageVisited Page URL The URL of the page asubscriber has visited It does not matter at which point in time the subscriber has visited this page# Visited Pages The amount of unique pagesvisited across your domain Since we record unique page visits, a hundred visits to your home page will count as 1 page visitYou can define how every value should be compared with the attribute to determine whether a subscriber belongs to a segment.We have the following comparison options available:Comparison Can be used with the attributesStarts with Browser TimezoneVisited Page TitleVisited Page URLSubscription PageLast Visited PageEnds with Browser TimezoneVisited Page TitleVisited Page URLSubscription PageLast Visited PageEquals All available attributesDoes not equal All available attributesEqual or greater Last Visit# Notifications Clicked# Notifications ReceivedSubscription Date# Visited PagesEqual or less Last Visit# Notifications Clicked# Notifications ReceivedSubscription Date# Visited PagesWildcard Browser TimezoneVisited Page TitleVisited Page URLSubscription PageLast Visited PageDASHBOARDUsing the dashboardYour dashboard consists of two main sections.The red statistics on top show your performance across all active domains.You can quickly glance over your totalsubscribers,the amount of push notifications you’ve sent and the average click-through rate of all your messages.Below your overall statistics,you will find your performance per active domain.You will see the same statistics as before;the number of subscribers,the amount of push notifications you’ve sent and the average click-through rate.Analyze and compare your performance per domain to see where you’re performing best!ANALYTICSAnalyze your message performanceYou can analyze the performance of each individual push notification you have sent.Each row in the table represents one of your messages.You are able to see the title of your message,to which domain it was pushed,how many subscribers received the message,how many of them opened the message and finally what the click-through rate is. You can use these statistics to improve your notification performance.ACCOUNT MANAGEMENTUpgrade your PushPro planOn the right-hand side,you will find your current plan.Youcan upgrade your plan by clicking‘Upgrade’.This will takeyou to a new page where you can compare and select a newplan.If you are upgrading from a paid plan,you will see abilling summary,so you know exactly how you will be billedafter your upgrade.Note that if you are currently paying on amonthly basis,you can upgrade to the same plan with yearlypayments.However,if you are currently paying on a yearlybasis, you can only upgrade to higher plans.Email settingsUpdate your email address if you want to receive the various emails we send on a different email. You can also opt in or out of our promotional emails.Credit card detailsAdd a new credit card by clicking‘Change credit card’.Input your name,credit card number,cvc and postal code.No need to worry about safety measures,your financial information never touches the PushPro servers.It goes straight to our DCI PSS compliance payment provider.Billing informationIn the billing settings,you can change the data we will show on your subscription receipts.For example,change your address or the email address you will receive your receipts on. Note that you cannot change your country due to tax reasons.。
Avaya IP Office快速安装说明V1.0

AVAYA IP OFFICE快速安装说明Avaya:WangYi注:1.Avaya IP Office 在本文中简称:IPO;2.在本文中尤其要注意“注:……”的蓝色字体内容。
1 IPO的加电IPO为24VDC供电,电源模块为一个220VAC转24VDC的电源转换器,注意:在IPO上并无任何开关设置,正常的流程是:o将电源线的24VDC插头插入IPO机箱上;o将电源线的220VDC插头插入插线板中;o需要断电重启时,断开电源转换器的线即可,不要直接插把24VDC的电源插头,否则容易产生火花并烧坏机器。
理想状态为:所有的IPO机箱的电源均插入同一个插线板中,断电加电通过插线板的开关来控制。
IPO的扩展模块先加电,然后主机模块在加电,这样IPO才能正常识别扩展模块。
(主机模块与扩展模块同时加电也可,因为扩展模块的启动速度要快于主机模块)IPO的每个模块的额定功率为24VDC×2A即50W。
注意无论主机模块还是扩展模块,IPO均没有风扇装置,这可是IPO的一大优点。
2 系统软件介绍IPO FirmwareIPO 硬件核心软件,即通常所说的IPO的发行版本:IPO 1.4、IPO 2.0等等,该软件为IP4XX.bin文件,一般为IP403.bin,IP406.bin,IP412.bin 文件,文件大小一般为2M左右,IP412要大些,4M。
当然以上的IP4XX.bin 文件是针对主机模块的,各种扩展模块也有不同的Firmware,如16模拟中继扩展模块的Firmware文件为:naatm16.bin。
IPO的升级也是指对将新的.bin文件download到IPO的主机模块或扩展模块。
当然通过下面的IPO Manager管理软件的下载。
IPO ManagerIPO的管理软件,是一个基于Windows界面的应用程序,用于管理配置IPO。
实际上该软件根据不同的管理对象,提供一堆Form(界面),当你完成这些界面的配置时,该软件会保存你的配置为一个xxxxx.cfg文件。
Dyson V12 SV12 无线吸尘器用户手册说明书
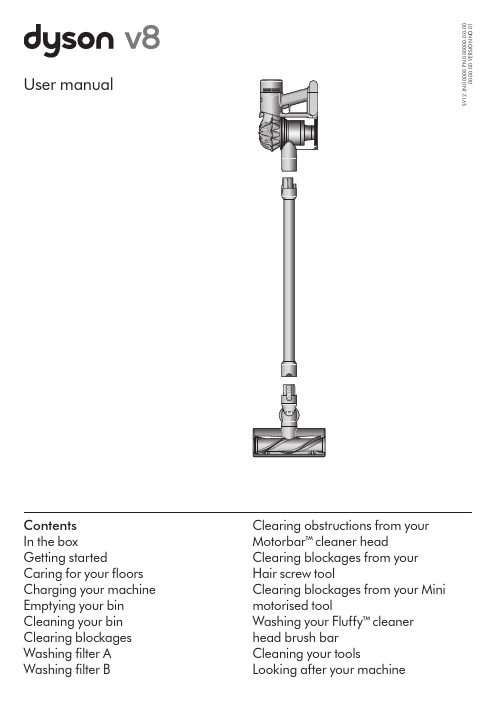
Clearing blockages Washing filter A Washing filter B head brush bar Cleaning your tools Looking after your machineMotorbar™ c leaner head De-tangling vanes automatically clearwrapped hair from thebrush bar as you clean.In the boxYour machine will come with one or more of these cleaner heads – not all will be included.Vacuum cleaner ChargerCharges your vacuum with or without a dock.Wall dockThe Dyson cordless vacuum drops into the wall-mounted charging dock, ready for your next clean.WandCrevice toolEngineered for precise cleaning around tricky edges and into hard-to-reach narrow spaces.Two tools in one – wide nozzle and brush, for quick switching between cleaning and dusting tasks around your home or car.Combination toolHair screw tool Anti-tangle conical brush bar spirals hair off and into the bin. Motor-driven cleaning for smaller spaces.Some tools may not be included.You can buy additional tools at .au or Fluffy™ c leaner headSoft woven nylon removes large debris, while anti-static carbon fibre filaments extract fine dust from hard floors.Soft dusting brush Enclosed in a skirt of soft nylon bristles for gentle, vacuum-assisted dusting of delicate objects and surfaces.Fabric and mattress toolRemoves dust, dirt and allergens from mattresses and upholstery.Mini motorised tool Motorised brush bar, concentrated in asmaller head to remove stubborn dirt from mattresses, upholstery and stairs.Stubborn dirt brush Stiff nylon bristlesdislodge ground-in dirt from coarse carpets, high traffic areas and car interiors.Extension hose Adds up to 61cm offlexible reach to any tool attachment, to clean up high or down low in your home or car.Main body showing the handle and bin attached.A brush bar located inside the cleaner head and asuction control slider located on the front.A rectangular dock that needs to be fixed to a wall with screws.The charger is a onepiece unit with the plug,connector end and cable.The narrow connector end at the top, this connects to the bin and the wider end at the bottom that connects to the cleaner head or tool.A long tool with an angled end.This tool has a combination of brush head and crevice tool together in one unit. The brush head slides down the crevice tool when needed.A small cleaner head with an angled body housing the motor and an electrical connector to attach to the wand or directly to the machine.A soft fluffy brush bar housed within the cleaner head. There is an electrical connecter end that can attach to the end of the wand or directly to the machine.Pliable bristles and felt bumper strip on a narrow, tapered tool.A wide, triangular shaped nozzle.A small cleaner head with a body housing the motor and an electrical connector to attach to the wand or directly to the machine.A short nozzle with stiff bristles on the underside.A flexible hose engineered from tough wire and durable plastic.Bends and locks at different angles. Fits any compatible tool for effective cleaning in hard-to-reach high areas of your home.Up-top adaptorGetting startedPull trigger to start cleaningTwo power modesToggle between Powerful mode – for longer suction – and MAX mode, for stronger suction. Just hold down the trigger and slide the control back and forth.Switch accessories quicklyThe quick-release tools click into place, and release in moments by simply depressing the release switch.Clean awkward spacesRemove the wand and connect yourchosen tool directly to the inlet pipeto use the vacuum as a handheld.clickclickMotorbar™ c leaner headDe-tangling vanesautomatically clearwrapped hair from thebrush bar as you clean.Pointers to demonstratethat the tools can beconnected directly to themain body or to the endof the wand.Diagram showing theconnection of the wandonto the main body,with the wand releasebutton aligned with thetop of the main body.The power mode button is located on the top of the machine between the bin and filter. Slide to the left for powerful cleaning and to the right for max mode.A brush bar located inside thecleaner head and a suctioncontrol slider located on the front.Caring for your floorsCheck that the underside of the cleaner head or tool is clean and free from any objects that may cause damage.Before vacuuming your flooring, rugs, and carpets, check the manufacturer’s recommended cleaning instructions.The brush bar on your machine can damage certain flooring. Some rug materials may fuzz if a rotating brush bar is used when vacuuming. If this happens, we recommend vacuuming without the motorised floor tool and consulting with your flooring manufacturer.Battery LEDsCharging LEDsDuring use, high charge.Charging, low charge.Charging, medium charge.Charging, nearly full.Fully charged.Battery fault.Charger fault.During use, medium charge.During use, low charge.Empty.5 hrs125 hrsclickCharging your machineFully charge your machine before your first use. Connect to charger either directly or in the dock.A full charge will take approximately 5 hours. While your battery is charging, the LEDs will flash with the current level of charge. These lights will turn off once your machine is fully charged.clikclik1clikclickOne light flashing alter-nately red and blue.Two flashing blue lights on the side of the battery. No lights illuminated on the side of the battery.Three flashing blue lights on the side of the battery. One flashing blue light on the side of the battery.One flashing red LED.All LEDs lit with a solid blue light Two LEDs lit with a solid blue light One LED lit with a solid blue light One blue LED flashing.The LED lights are located on the side of the battery unit.The charger connected from the power supply using the wall dock.Insert the charging cable into the charging point at the back of the vacuum, at the bottom of the handle. Plug the cable into a wall socket to begin charging.clikclikclikclikEmpty as soon as the dirt reaches the MAX level – don’t overfill. Using your machine when the dirt is above the MAX line may affect the performance and require more frequent filter washing.Close the binPush down on the cyclone until it slides into position.Push the bin base upwards until it closes securely.Cover your bin tightly in a dustproof bag while you empty. Remove the bin carefully, seal the bag tightly and dispose.Remove the wand from your machine.Hold your machine over the bin and pull the bin release catch upwards. The cyclone will slide up and the bin base will open.Release the dirtMinimise dust contactclikclik clickThe bin release catch is located on the top of the cyclone where it joins the main body of your machine.The MAX mark on the bin of the machine, showing that the dirt should not be filled over the Max mark when the machine is at the angle of normal use.Empty your bin as soon as the dirt reaches the MAX mark.You may need to clean the filter more often if you use your machine with a full bin.Remove the wand from your machine.Hold your machine over a bin and pull the bin release catch upwards. The cyclone will slide up and the bin base will open.Empty your binPull the bin release catch upwards. The cyclone will slide up and the bin base will open.Locate the cyclone release button behind the cyclone and push to remove the cyclone from your machine.Remove the cyclonePull back on the red catch located on the base, slide the bin down and pull it off your machine.Remove the binWipe your bin with a damp, lint-free cloth. Don’t put the bin in a dishwasher or use detergents, polishes or air fresheners.Make sure the bin is completely dry before replacing.Clean the binAlign the tabs on the bin with the grooves on the main body and slide it upwards until it clicks into place.Replace the binSlide the cyclone into the grooves of the main body and push down until it is in position.Push the bin base up until it clicks firmly shut.Replace the cycloneClearing blockagesDisconnect your machine from the charger before looking for blockages. Be careful not to touch the trigger and be aware of sharp objects.Leave your machine to cool down before looking for blockages.Don't use your machine when looking for blockages as this could cause injury.Your machine is fitted with an automatic cut-out. If any part of it is blocked, your machine’s motor will pulse and won’t function until the blockage has been cleared.Lift the filter out of the top of the cyclone.Tap to remove excess dust and debris.Align the arrow on the top of the filter with the bin release button.Push down to fit securely in place.Wash your filterDry your filterRefit your filterRemove your filterLeave your filter to dry for at least 24 hours in a well-ventilated, warm place. Do not dry your filter in a tumble-dryer or near a naked flame.Important: your filter must be completely dry before you put it back into the machine. Your machine could be damaged if used with a damp filter.Hold the open end of the filter under a running tap, until the water runs clear.Turn the filter upside down and tap it to remove excess water.Run water over the outside of the filter until the water runs clear.Squeeze and twist with both hands to make sure the excess water is removed.Twist off your filterWash your filterShake out the waterTwist your filter anti-clockwise and pull it away from your machine.Place your filter on your machine, aligned in the open position. Twist clockwise until it clicks securely into position.Dry your filterLeave your filter to dry for at least 24 hours in a well-ventilated, warm place. Do not dry your filter in a tumble-dryer or near a naked flame.Important: your filter must be completely dry before you put it back into the machine. Your machine could be damaged if used with a damp filter.Replace your filterWash the inside of the filter under cold, running water, rotating the filter to make sure all the inside is clean.Repeat until the water runs clear.Empty the filter and shake firmly to remove excess water.Keep shaking it until there’s no water coming from the filter.Place your filter, with the open end facing up, to dry.The filter is placed under the tap with theMotorbar TM cleaner head may not be included in box.Clearing obstructions from your Motorbar™ c leaner headRemove the cover and brush barLook for obstructionsRe–assemble Hair screw toolHair screw tool tool may not be included in box.Your Hair screw tool doesn't have a washable brush bar. To maintain optimum performance, check your brush bar regularly and clear any obstructions.Make sure your machine is disconnected from the charger and take care not to touch the trigger.head cover.Hair screw tool.polishes or air fresheners.position.position.plate back into place.Replace your brush barLook for obstructionsRemove your brush barPush the end cap back on to your brush bar and slide it back into the cleaner head.Turn the end cap into the locked position.Your cleaner head isn't washable and should only be wiped over with a damp lint-free cloth.Don’t put any part of your machine in a dishwasher or use detergents, polishes or air e a coin to unlock the end cap.Twist the end cap and remove it from your brush bar. Don’t wash the end cap.Slide your brush bar out of the cleaner head.11232123312Clear any debris from your brush bar.Check inside the cleaner head and remove any debris or blockages.Your Mini motorised tool and brush bar aren’t washable. Wipe over with a damp lint-free cloth.Mini Motorised tool may not be included in box.Your Mini motorised tool doesn’t have a washable brush bar. To maintain optimum performance, check your brush bar regularly and clear any obstructions.Make sure your machine is disconnected from the charger and take care not to touch the trigger.Replace your brush barRemove your brush barWash and dry your brush barDon’t put any part of your machine in a dishwasher or use detergents, polishes or air fresheners.Press the cleaner head release button on the end of the wand. Place the cleaner head upside down.Push the end cap up fully and pull the brush bar out of the cleaner head.Remove the end cap from the brush bar. Don't wash the end cap.Before replacing, check that your brush bar is completely dry.Reattach the end cap to your brush bar.the closed position.Washing your Fluffy™ cleaner head brush barFluffy TM cleaner head may not be included in box.Your Fluffy™ c performance, check and wash your brush bar regularly.to touch the trigger.or dirt.of the brush bar to squeeze out the water.Stand your brush bar upright, with the closed end at the top. Leave to dry completely for at least 24 hours.Cleaning your toolsDon’t put any part of your machine in a dishwasher or use detergents, polishes or air fresheners.Wipe with a damp, lint-free cloth, without touching the connector end.Make sure your tools are completely dry before using.Looking after your machineTo always get the best performance from your machine, it’s important to clean it regularly and check for blockages.Look after your machineLook after your batteryYour serial numbersYou can register your machine using the serial number found on the bottom of your machine.If your machine is dusty, wipe with a damp lint-free cloth.Check for blockages in the cleaner head, tools and main body of your machine.Wash your filter regularly and leave to dry completely.Don’t use detergents or polishes to clean your machine.You can find your serial numbers on your machine, battery and charger. Use your serial number to register.For more information and support videos for your machine go online: .au or To get the best performance and life from your battery, use Powerful suction mode.Your machine won’t operate or charge if the ambient temperature is below 5°C (41°F). This is designed to protect both the motor and battery.。
HP Color LaserJet Pro M252 用户指南说明书

此处包含的信息如有更改,恕不另行通 知。
HP 产品及服务的保修仅以随该产品及 服务提供的书面保修声明为准。本文所 述任何内容不应被视为附加保修。对任 何技术或编辑错误或者本文所述内容的 遗漏,HP 不承担任何责任。
Edition 3, 8/2019
2 纸盘 .......................................................................................................................................................................................................... 15 将纸张装入单页进纸槽(纸盘 1) ................................................................................................................................ 16 简介 ..................................................................................................................................................................... 16 将纸张装入单页优先进纸槽 ........................................................................................................................ 16 在单页优先进纸槽中装入信封(纸盘 1) .............................................................................................. 17 纸盘 1 纸张方向 ............................................................................................................................................... 19 在纸盘 2 中装入纸张 .......................................................................................................................................................... 20 简介 ..................................................................................................................................................................... 20 在纸盘 2 中装入纸张 ...................................................................................................................................... 20 在纸盘 2 中装入信封 ...................................................................................................................................... 22 纸盘 2 纸张方向 ............................................................................................................................................... 25
HP LaserJet Pro 400 M451 色彩打印机说明书

LASERJET PRO 400COLOR M451 printer seriesProduce professional-quality color documents with ease and fast speed.Seamlessly integrate into your office or wireless home network. HP features help you save paper and energy, and print from virtually anywhere with HP ePrint.3Print Speed 1: Up to 21 ppm black (letter), Up to 21 ppm color (letter) Print Resolution: Up to 600 x 600 dpiPrint Technology Resolution: HP ImageREt 3600 Display: 2-line LCD (text)Monthly Volume (Duty Cycle): Up to 40,000 pagesPaper Handling: 50-sheet multipurpose tray, 250-sheet input tray 2, 150-sheet output bin, 250-sheet input tray 3 (optional)Measured using ISO/IEC 24734, excludes first set of test documents. For more information see /go/printerclaims . Exact speed varies depending on the system configuration,software application, driver, and document complexity. Wireless performance is dependent upon physical environment and distance from access point, and may be limited during active VPN connections. Requires an Internet connection to the printer. Feature works with any Internet- and e-mail-capable device. Print times may vary. For a list of supported documents and image types, see/go/eprintcenter . Compared with HP LaserJet Pro P1566/ P1606dn printer. Assuming customer is printing at least 30% of total pages in color with content similar to the color ISO/IEC 19798 test suite (/jtc1/sc28) and overall average job length of three pages. Yields established using ISO/IEC test standards. Actual yields and costs vary considerably depending on images printed, number of color pages printed, and other factors. HP Auto-On/Auto-Off capabilities subject to printer and settings. Actual results may vary. HP Smart Install works with Windows only. Compared with traditional fusing. Program features and availability may vary by country. For more information, visit /learn/suresupply . Program availabilityvaries. HP print cartridge return and recycling is currently available in more than 50 countries and territories around the world through the HP Planet Partners program. For more information, or to request return envelopes and bulk collection boxes, visit /recycle . Automatic two-sided printing is avaliable on the HP LaserJet Pro M451dn and M451dw only. Built-in wireless is available on the HP LaserJet Pro 400 Color M451nw and M451dw only.Professional-grade speed and color•Boost productivity and save time with print speeds up to 21 ppm letter.1•Produce bold text and smooth color with HP ImageREt 3600 and Original HP LaserJet toner cartridges.•Produce color marketing materials in-house on a range of media sizes by using tips and templates from HP.•Print documents affordably. Get the same black cost per page as a black-and-white HP LaserJet printer.4Manageability, productivity, and mobility•Conserve resources and save paper, using automatic two-sided printing.10•Proactively manage office printing with HP Web Jetadmin.•Conveniently locate the printer anywhere in the office, using built-in wireless connectivity.2, 11 Share printing resources, using built-in Ethernet.•Print from virtually anywhere with HP ePrint.3Easy-to-use and resource-conserving•Reduce energy use with HP Auto-On/Auto-Off Technology.5 Also save with Instant-on Technology.7•Start right away with HP Smart Install.6 Use HP Auto Wireless Connect to autoconfigure networking.2•Receive consistent results with Original HP cartridges and easily reorder with HP SureSupply.8•Take advantage of free, easy recycling—cartridges returned through HP Planet Partners are recycled responsibly.9LASERJET PRO 400COLOR M451 printer seriesHP LASERJET PRO 400 COLOR M451 printer series Product Number: CE956A, CE957A and CE958A ENERGY STAR qualified models; see /go/energystar Measured using ISO/IEC 24734, excludes first set of test documents. For more information see /go/printerclaims . Exact speed varies depending on the system configuration, software application, driver, and document complexity. Exact speed varies depending on the system configuration, software application, driver and document complexity. HP SureSupply alerts you when your print cartridge is running low and helps you purchase online or locally through HP or a participating retailer. Only available with Original HP supplies; Internet access required. To learn more, visit /go/SureSupply .Duty cycle is defined as the maximum number of pages per month of imaged output. This value provides a comparison of product robustness in relation to other HP LaserJet or HP Color LaserJet devices, and enables appropriate deployment of printers and MFPs to satisfy the demands of connected individuals or groups. HP recommends that the number of printed pages per month be within the stated range for optimum device performance, based on factors including supplies replacement intervals and device life over an extended warranty period. Values are subject to change. For current information see Product Support page at /support . Configuration tested: simplex, mono. Powerrequirements are based on the country/region where the printer is sold. Do not convert operating voltages. This will damage the printer and void the product warranty. Introductory cartridges included; yields ~ 1,400 color composite (C/Y/M) and black pages. Actual yields vary considerably based on images printed and other factors. For details see /go/learnaboutsupplies . Ships with preinstalled introductory print cartridges (yield ~ 1,400 pages). Wireless direct print is available on the HP LaserJet Pro 400 Color M451nw and M451dw only.©2011 Hewlett-Packard Development Company, L.P. HP is a registered trademark of the Hewlett Packard Company. ENERGY STAR and the ENERGY STAR logo are registered U.S. marks. All other trademarks are the property of their respective owners. Microsoft and Windows are registered trademarks of Microsoft Corporation. Adobe and Acrobat are trademarks of Adobe Systems Incorporated. This listing of non HP products does not constitute an endorsement by Hewlett Packard Company. The information contained herein is subjectto change without notice and is provides "as is" without warranty of any kind. HP shall not be liable for technical or editorial errors or omissions contained herein.J FOR MORE INFORMATION VISIT OUR WEBSITE AT TECHNICAL SPECIFICATIONSPRODUCT NUMBERCE956A: LaserJet Pro 400 Color M451nw CE957A: LaserJet Pro 400 Color M451dn CE958A: LaserJet Pro 400 Color M451dw PRINT TECHNOLOGY LaserPRINT SPEED 1Black (Normal, letter): Up to 21 ppm; Color (Normal, letter): Up to 21 ppmFirst Page Out 2: As fast as 17 sec Color (letter, ready), As fast as 17 sec black (letter, ready)PRINT RESOLUTION Black (Best): Up to 600 x 600 dpi; Black (Normal): Up to 600 x 600 dpi Color (Best): Up to 600 dpi PRINT TECHNOLOGY RESOLUTIONHP ImageREt 3600DUPLEX PRINT OPTIONS •M451dn & M451dw: Automatic (standard)•M451nw: Manual (driver support provided)HP ePrint CAPABILITY YesMOBILE PRINTING CAPABILITY HP ePrint, Apple AirPrint™, Wireless Direct Print 10STANDARD PRINT LANGUAGES HP PCL 6, HP PCL 5c, HP postscript level 3 emulation NUMBER OF PRINT CARTRIDGES4 (1 each black, cyan, magenta, yellow)SURESUPPLY SUPPORTED 3YesPRINTER MANAGEMENT Windows: HP Device Toolbox (default install), SNP Alerts (minimum network install), HP Web Jetadmin (download); Mac: HP UtilityPRINTER SMARTSOFTWARE FEATURESHP ePrint, Apple AirPrint™, Smart Install, HP Auto-On/Auto-Off technologyM451nw & M451dw: Plus Wireless Direct PrintM451dn & M451dw: Plus Automatic two-sided printingSTANDARD CONNECTIVITY •M451dn: 1 Hi-Speed USB 2.0 port, 1 Fast Ethernet 10/100Base-TX network port•M451nw & M451dw:1 Hi-Speed USB 2.0 port, 1 Fast Ethernet 10/100Base-TX network port, 1 WiFi 802.11 b/g/n WIRELESS CAPABILITY •M451dn: No•M451nw & M451dw: Yes, built-in WiFi 802.11 b/g/nNETWORK CAPABILITIES •M451dn: Via built-in 10/100 Fast Ethernet•M451nw & M451dw: Via built-in 10/100 Fast Ethernet, Wireless 802.11 b/g/n CONTROL PANEL 2-line, 16-character backlit LCD display, 5 buttons (Cancel job, Left arrow, Right arrow, Select, Back), 2 LED lights (Attention, Ready)FONTS AND TYPEFACES 84 scalable TrueType fontsMEDIA TYPES SUPPORTED Paper (bond, brochure, colored, glossy, letterhead, photo, plain, preprinted, prepunched, recycled, rough), postcards, transparencies, labels, envelopesMEDIA SIZES SUPPORTED•M451nw: Tray 1: Letter, legal, executive, 8.5 x 13 in, 3 x 5 in, 4 x 6 in, 5 x 8 in, envelopes (No 10, Monarch); Tray 2, optional Tray 3: Letter, legal, executive, 8.5 x 13 in, 4 x 6 in, 5 x 8 in, envelopes (No 10, Monarch)•M451dn & M451dw: Tray 1: Letter, legal, executive, 8.5 x 13 in, 3 x 5 in, 4 x 6 in, 5 x 8 in, envelopes (No 10, Monarch); Tray 2, optional Tray 3: Letter, legal,executive, 8.5 x 13 in, 4 x 6 in, 5 x 8 in, envelopes (No 10, Monarch); Automatic duplexer: Letter, legal, executive, 8.5 x 13 inMEDIA WEIGHTS SUPPORTEDTray 1: 60 to 176 g/m² (up to 220 g/m² with postcards and HP Color laser glossy photo papers); Tray 2, Tray 3 (optional): 60 to 163 g/m² (up to 176 g/m² with postcards); Automatic duplexer: 60 to 163 g/m²RECOMMENDED MEDIA WEIGHT16 to 43 lb (60 to 163 g/m²)DUTY CYCLE (MONTHLY, LETTER)4Up to 40,000 pagesRECOMMENDED MONTHLY PAGE VOLUME 5Up to 750 to 2,000 pages DISPLAY2-line LCD (text)MAXIMUM/STANDARAD MEMORY 384 MB/128 MBPAPER HANDLING50-sheet multipurpose tray, 250-sheet input tray 2, 150-sheet output binInput Capacity (standard): Up to 300 Sheets, Up to 50 transparencies, Up to 10 envelopesInput Capacity (maximum): Up to 550 Sheets (with optional tray 3)Ouput Capacity: Up to 50 Sheets, Up to 50 transparencies, Up to 20 envelopesPROCESSOR SPEED 600 MHzSOFTWARE INCLUDEDWindows: HP Installer/Uninstaller, HP PCL 6 print driver, Status Alerts, HP Update, DXP; Mac: HP Installer/Uninstaller, HP Postscript driver, HP Setup Assistant, HP Utility, HP Alerts, HP Firmware UpdaterMINIMUM SYSTEM REQUIREMENTSPC: Microsoft ® Windows ® 7 (32-bit/64-bit), Windows Vista ® (32-bit/64-bit): 1 GHz 32-bit (x86) or 64-bit (x64) processor, 1 GB RAM (32-bit) or 2 GB RAM (64-bit), 400 MB free hard disk space, CD/DVD-ROM or Internet, USB or Network port; Windows ® XP (32-bit) SP2: Pentium ® 233 MHz processor, 512 MB RAM 400 MB free hard disk space, CD/DVD-ROM or Internet, USB or Network port;Mac: Mac OSX v 10.5, v 10.6, PowerPC G4, G5, or Intel ® Core™ Processor, 500 MB hard disk, CD-ROM/DVD-ROM or Internet, USB or Network portCOMPATIBLE OPERATING SYSTEMS Full software installs supported on: Microsoft ® Windows ® 7 32-bit and 64-bit, Windows Vista ® 32-bit and 64-bit, Windows ® XP 32-bit (SP2 or higher); Driver onlyinstalls supported on: Microsoft ® Windows ® Server 2008 32-bit and 64-bit, Windows ® Server 2003 32-bit (SP3 or higher); Mac OS X v 10.5, v 10.6; Linpus Linux (9.4, 9.5), Red Hat Enterprise Linux 5.0 (supported with a pre-built package); SUSE Linux (10.3, 11.0, 11, 11.1, 11.2), Fedora (9, 9.0, 10, 10.0, 11.0, 11, 12, 12.0), Ubuntu (8.04, 8.04.1, 8.04.2, 8.10, 9.04, 9.10, 10.04), Debian (5.0, 5.0.1, 5.0.2, 5.0.3) (supported by the automatic installer); HPUX 11 and Solaris 8/9OPERATING ENVIRONMENTOperating Humidity Range: 10 to 80% RH (non-condensing)Recommended Humidity Operating Range: 20 to 70% RH (non-condensing) Operating Temperature Range: 59 to 86º F (15 to 30ºC)Recommended Operating Temperature Range: 59 to 80.6º F (15 to 27º C) Storage Temperature Range: -4 to 104º F (-20 to 40º C) Non-Operating Humidity: 10 to 95% RH (non-condensing)ACOUSTIC 6Acoustic Power Emissions: 6.5 B(A);Acoustic Power Emissions (Ready): 4.1 B(A);Acoustic Pressure Emissions Bystander (Active, Printing): 51 dB(A); Acoustic Pressure Emissions Bystander (Ready): 27 dB(A)POWERPower Requirements: Input voltage: 110 to 127 VAC (+/- 10%), 60 Hz (+/- 3 Hz) Power Supply Type: Internal (Built-in) power supply;Power Consumption 7: 425 watts (Active), 15.2 watts (Ready), 4.0 watts (Sleep), 0.5 watts (Off);Typical Electricity Consumption (TEC) Number: 1.509 kWh/Week PRODUCT DIMENSIONSM451nw:W x D x H: 15.9 x 17.9 x 12.7 in (405 x 454 x 322 mm) Maximum: 15.9 x 25.9 x 12.7 in (405 x 659 x 322 mm)M451dn & M451dw:W x D x H: 15.9 x 19.1 x 12.7 in (405 x 484 x 322 mm) Maximum: 15.9 x 27.1 x 12.7 in (405 x 689 x 322 mm)PRODUCT WEIGHT M451nw: 50.1 lb (22.74 kg)M451dn & M451dw: 52.1 lb (23.64 kg)SECURITY MANAGEMENTWireless: WEP (128 bit), WPA/WPA2 - Personal (AES, TKIP); Embedded WebServer: password-protection, secure browsing via SSL/TLS; Network: enable/disable network ports and features, SNMPv1 community password change; HP ePrint: HTTPS with certificate validation, HTTP Basic Access Authentication, SASL authentication WHAT’S IN THE BOX 8Printer, Four preinstalled introductory HP LaserJet toner cartridges (yield ~ 1,400 pages), In-box documentation (Hardware installation guide), Software drivers and documentation on CD-ROMs, Power cord, Built-in Automatic duplexer for two-sided printing (M451dn & M451dw models only), Built-in Wireless Card (M451nw & M451dw models only), USB cable (M451nw & M451dw models only)WARRANTY One-year limited warranty, return to HP or authorized service provider HP SERVICES AND SUPPORT OPTIONS HP 3y Nbd Exch Color LaserJt M451 HW SVC, U1H88E HP 1yPW Nbd Exch Color LaserJet M451 SVC, U1H98PE HP NtwkInstall Inkjet/prsnl LaserJet SVC, H3110EREPLACEMENT CARTRIDGES 9HP 305A Black LaserJet Toner Cartridge (~ 2,200 pages), CE410A HP 305X Black LaserJet Toner Cartridge (~ 4,000 pages), CE410X HP 305A Cyan LaserJet Toner Cartridge (~ 2,600 pages) CE411A HP 305A Yellow LaserJet Toner Cartridge (~ 2,600 pages) CE412A HP 305A Magenta LaserJet Toner Cartridge (~ 2,600 pages) CE413AACCESSORIESHP LaserJet 250-sheet Paper Feeder, CF106A HP 256 MB DDR2 144-pin DIMM, CB423A HP BarCodes and More DIMM HG281DJ,HP Scalable BarCodes HG282DJ, HP MICR Font HG283DJ, HP Jetdirect ew2500 802.11b/g Wireless Print Server J8021AJune 2013 R3 2013。
- 1、下载文档前请自行甄别文档内容的完整性,平台不提供额外的编辑、内容补充、找答案等附加服务。
- 2、"仅部分预览"的文档,不可在线预览部分如存在完整性等问题,可反馈申请退款(可完整预览的文档不适用该条件!)。
- 3、如文档侵犯您的权益,请联系客服反馈,我们会尽快为您处理(人工客服工作时间:9:00-18:30)。
Proprietary Restricted & Draft
It's a Voice communication solution
Full PBX with keysystem features T1, PRI, 2- 180 Extensions IP Telephony, Caller Display or Digital Handsets VoiceMail & auto Attendant Hunt Groups Advanced Call Distribution Alternate Call Routing Q.Sig Networking
analogue ISDN T1 E1 J1 Voicemail
Proprietary Restricted & Draft
Converged Networks
202
203
204
205
10
It's a Data Communication Solution
Internet Access
Internet ISP
Proprietary Restricted & Draft
The Emergence of IP Solutions
The Analysts agree : both Evolutionary & Revolutionary approaches are required
IP Systems Portion of Total Global Key/PBX Line Shipments (000s)
Proprietary Restricted & Draft
Avaya - No Compromise Solution
Drivers
Lower TCO
LAN-Based Telephony
Distributed Networking Applications Any Media, Any Device
2003 $5.0 .07 2% -
$5.07 2.%
1
Small
Low
$71 48% $125 49%
4
High
5
Networking Intensity
Includes all Communication Services associated with those products. Not Network Services or Minutes
ENTERPRISE CLASS CLASS IP SOLUTIONS
Price/Value
IP-Enabled PBX
Reliability Features Quality
7
Proprietary Restricted & Draft
IP Office
The Newest Member of the ECLIPS Family!
Source "Top Networking Opportunities GartnerGroup" 4 October 2000
Low Cost Of Ownership Protecting Existing Investment
Value Added Applications Scalable & Modular Channel Friendly Easy To Install
Providing Simplicity
IP Office
builds onto ECLIPS Value Proposition
Reliability
Voice Quality
Cost
Key Effectiveness Benefits
Key Benefits
Full Feature / Functionality
Performance
Optimized for the
Application Richness
SME
8
Proprietary Restricted & Draft
Optimised for SME Customer Needs
"Networking for small and midsize enterprises is not simply scaled-down large enterprise networking; SMEs have new and unique opportunities to help them meet the daunting challenges they face in the e-business era.
Size of Enterprise
2
1999
North America EMEA Asia Pacific CALA $35 19 12 5 24% 13% 8% 3%
3
2003
$64 25% 31 13% 20 7% 10 4%
1999 North America Rest of World $ .04 $4 2% 2.3%
Complimentary to Cajun Switches & VPNet
11
Proprietary Restricted & Draft
Its an Applications platform
Voice Mail/ AA CD or Rack Integrated & Unified Messaging Interaction Manager E Console for Attendants CTI Phone Manager & SoftAgent IP Phone Manager & IP SoftAgent Open CTI interfaces It's a powerful Voice Mail/ AA Its your Integrated Messaging system It Offers Multi Media Collaboration It's a PBX It delivers powerful CTI Soft phones It delivers powerful IP Soft phones It's the developers platform of choice And its all easy to manage Its an informal Contact Centre It's a Formal Contact Centre Powerful Voice Apps for Contact Centre
Introducing IP Office
Overview Presentation
Communication Solutions that Enable Businesses to Excel
Version 8 - 17th July 01
Meet Avaya
In 90 countries
75% of the Fortune 500
Emerging Products
Advanced business telephony
Multimedia Call Center, CRM, eCRM Unified Messaging eCommunications Fabric Portal-based Applications VPN Policy Management eBusiness Ready Infrastructure Web Center Optical Cabling Wireless
Almost 1 million businesses and organizations
Mission Statement Our mission is to provide the world's best communication solutions that enable businesses to excel.
3
Proprietary Restricted & Draft
Avaya Market Segmentation and Analysis
Mature Products Large
Basic to mid telephony
Call Center Voice Messaging IVR Access Products VPN QoS, Directory Data Switching
Unified Communication
Customer Relationship Management (CRM)
IP Office Manager CCC Lite Compact Contact Centre Queue Manager Campaign Manager
12
Proprietary Restricted & Draft
2003
$19 15 10 8 7% 6% 4% 3% North America EMEA Asia Pacific CALA
1999
$18 13% 4 3% 4 2% - -% $26 18%
2003
$41 16.25% 15 6.25% 12 5% 2 1.25% $70 29%
$52 20%
Small
1
4
Low
Networking Intensity
High
4
Proprietary Restricted & Draft
Major Market Opportunity in Segment 1 (SME)
Large 1999