surface pro 4 M3版测评
微软SurfaceBook3值得入手吗微软SurfaceBook3详细评测

微软SurfaceBook3值得⼊⼿吗微软SurfaceBook3详细评测⼤家都知道,2020年6⽉,微软正式在中国市场开始销售SurfaceBook 3。
作为Surface家族的旗舰笔记本产品,SurfaceBook 3起价为12888元,是名副其实的⾼端产品。
但是在⾼价位上,SurfaceBook3也提供了⼏乎没有竞争对⼿的形态变化能⼒、⾼⽔准设计和做⼯以及⾼性能配置。
在讨论它是不是⼀个好产品之前,我们先回顾⼀下Surface家族的历史,或许能更好地理解这款最新⼀代的产品。
PC新形态的探索微软在2012年10⽉发布了第⼀代Surface电脑,这个⼀向与PC⼚商合作的操作系统巨头当年切⼊PC硬件市场可是引起了相当⼤的波澜。
如今8年时间过去,Surface已经成为微软公司⼀个成功的⽣意,站稳了脚跟。
但我不认为Surface是传统PC的对⼿,它并没有在市场份额上显著侵蚀原来的PC品牌,⽽是在电脑形态、功能和创新层⾯,做出了深远的影响。
现在回头看,2010年代正是智能⼿机全⾯起步的时期,微软已经察觉到移动设备对传统PC的挑战,迫切希望PC产品能够有所突破。
看到传统PC因为低利润⽆⼒创新的实际情况,这个软件公司只好⾃⼰卷起袖⼦下场,亲⾃尝试PC的新形态,换句话说——我给你们打个样。
微软Surface电脑全家福:⽀持触摸的优秀屏幕是它们的共同基因Surface家族共有的特点是触摸屏,这也是Windows10核⼼的新功能之⼀,显然微软认为⼿指触摸是PC交互的重要⽅向。
然⽽在PC⼗⼏英⼨屏幕的尺度,触摸操作相⽐⼿机需要更复杂的结构设计,微软在不同尺⼨、结构的产品上进⾏了多种尝试。
传统笔记本加触摸屏是SurfaceLaptop,SurfacePro/Surface Go是平板+轻薄键盘形态,SurfaceBook是可拆卸平板+键盘底座,还有桌⾯触摸⼀体机SurfaceStudio以及商⽤触摸⼤屏SurfaceHub。
办公用笔记本电脑推荐

ENTER TITLE
技嘉AORUS X3 13.9 英寸QHD游戏本(i7-6700HQ,16G,GTX970M 6G独显,512GB M.2 SSD )价格:14999
今年T3网选的游戏笔记本品牌让人有些意外,技嘉Aorus X3 Plus v5主要是因为这台笔记本拥有和其他笔记本一样强大的性能,而在轻薄上则下了很大功夫,号称游戏本里最轻薄的笔记本。并且屏幕分辨率为3200x1800,显示效果极佳!也很适合设计师使用。
戴尔搭载了全新的Intel 酷睿i5 6200U处理器,主频2.3GHz,最高睿频2.8GHz,拥有英特尔 HD 显卡 520集成显卡,可提供流畅的视频游戏体验。拥有4GB内存,128GB固态硬盘,搭载Windows 10,日常操控可谓相当的顺畅。
2017年你可以买得到的最好的十款笔记本电脑
惠普Spectre 13幽灵超轻薄笔记本
考虑到用户对移动办公的需求,联想ideapad 700S将续航能力提升至一个新高度。即在200尼特屏幕亮度下,本地播放1080P视频时间长达8小时,在普通办公环境中也能支持11个小时不间断使用。同时,1920 x 1080高分辨率让视觉享受最真实的效果,而300尼特最高的屏幕亮度让画面在强光下保证可以清晰呈现。
适合办公的笔记本推荐:
推荐一:出众续航 苹果MacBook Pro
13.3英寸MacBook Pro(MJLT2CH/A)充电一次可运行长达10小时,而且还拥有6小时的视频播放时间。对任何笔记本电脑而言,这样的电池使用时间都令人赞叹。但对于配备了超高分辨率显示屏、先进处理器和图形处理器,以及超薄设计的高性能笔记本电脑而言,这绝对是超乎想象的。内置电池还拥有多达1000次的完全充电和放电循环。
SurfacePro54两机对比评测

SurfacePro54两机对比评测2019-03-24 11:04:5822号新购的翻新SP5到手,本想着第一次发一篇文章玩玩,结果被各种吐槽。
其实当时只是有些兴奋,想着先随便拍几张照片,后面再接着编辑,可是无论电脑手机都找不到编辑的位置,只好再补一篇文章啦。
首先三张照片镇楼:SP5,接着原来SP4的键盘SP4,还是99新的状态Surface 3 LTE乱入,外出+接电视放电影神器1. 外观和显示SP5和SP4没啥好说的,12.3寸3:2屏幕,加上键盘1公斤不到,极度适合重度办公使用。
S3当年拿到手后真的是是惊艳啊,太轻巧了,而且可以插联通/电信的4G卡直接上网使用,非常方便。
但说起办公,10.8寸屏幕略小了点,而且分辨率和尺寸的比例来说,150%缩放让显示面积优先小,125%缩放的话,字体又太小了。
因此现在基本上就接电视使用,偶尔带出门浪一下。
这次拿到的SP5和SP4,两者用起来感觉色彩有不小的差异,亮度调到最大后对比详见下图(手机拍好后上传,和实际效果有差异):左SP5,右SP4左SP5,右SP4左SP5,右SP4为什么会有区别呢?查了一下Aida 64,SP5的显示器是LG的,SP4是三星的,不过最主要的区别点在于,SP5的设置里多了一个功能:颜色配置文件画框处,SP4无此显示如果把“增强”成SRGB的话,二者的色彩风格就非常接近了。
左SP5,右SP4,SP5改为SRGB颜色配置后但我可能习惯于SP4的屏幕了,因此SP5的默认风格会让我觉得有些不适应。
当然,二者比起Surface 3来说都好了不少,如果把Surface 3加上,那比起Thinkpad T460s的那块45%NTSC的IPS屏都好的太多。
(真的不想吐槽TP)2. 性能(1)CPU和发热从两者使用感觉上说,7代U比起6代U感觉有些提升,主要提升点还是在频率上,7300U在SP5上满载可以跑在3.5G频率上,而SP4的6300U最高在2.9G不到。
Polaris
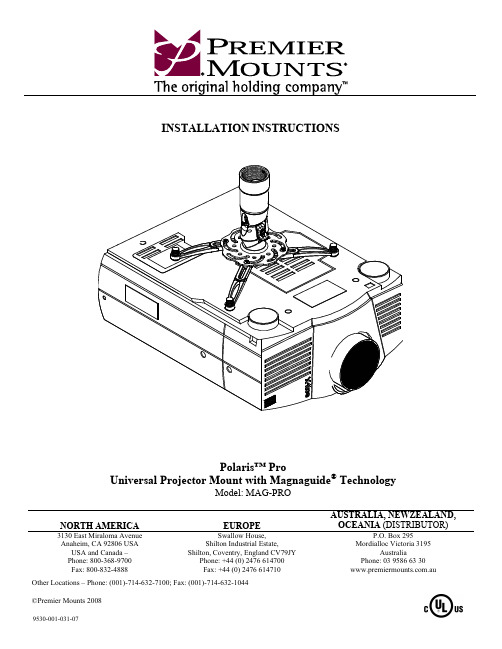
INSTALLATION INSTRUCTIONSPolaris™ ProUniversal Projector Mount with Magnaguide® TechnologyModel: MAG-PRONORTH AMERICA EUROPE AUSTRALIA, NEWZEALAND, OCEANIA (DISTRIBUTOR)3130 East Miraloma Avenue Anaheim, CA 92806 USA USA and Canada –Phone: 800-368-9700Fax: 800-832-4888Swallow House,Shilton Industrial Estate,Shilton, Coventry, England CV79JYPhone: +44 (0) 2476 614700Fax: +44 (0) 2476 614710P.O. Box 295Mordialloc Victoria 3195AustraliaPhone: 03 9586 63 30.auOther Locations – Phone: (001)-714-632-7100; Fax: (001)-714-632-1044 ©Premier Mounts 2008Table of ContentsWarning Statements............................................................................................................................................- 2 - Parts List.............................................................................................................................................................- 3 - Installation Tools................................................................................................................................................- 3 - Features...............................................................................................................................................................- 4 - Selecting The Proper Mounting Hardware.........................................................................................................- 4 - Attaching The Mount..........................................................................................................................................- 5 - Single Mounting Point Installation.....................................................................................................................- 5 - Ceiling Installation..............................................................................................................................................- 6 - Attaching The Projector......................................................................................................................................- 6 - Adjusting The Projector......................................................................................................................................- 6 - Technical Specifications.....................................................................................................................................- 7 - Warranty.............................................................................................................................................................- 8 -Warning StatementsTHE MAXIMUM WEIGHT PROJECTOR THAT CAN BE USED WITH THIS MOUNT IS 25LBS. EXCEEDING THIS WEIGHTLIMIT COULD CAUSE DAMAGE TO THE MOUNT, TO THE PROJECTOR AND TO YOURSELF.THE CEILING STRUCTURE MUST BE CAPABLE OF SUPPORTING 150LBS. IF NOT, THE CEILING STRUCTURE MUST BE REINFORCED. PROPER INSTALLATION PROCEDURE BY A QUALIFIED SERVICE TECHNICIAN, AS OUTLINED IN THE INSTALLATION INSTRUCTIONS, MUST BE ADHERED TO. FAILURE TO DO SO COULD RESULT IN SERIOUSPERSONAL INJURY, OR EVEN DEATH.SAFETY MEASURES MUST BE PRACTICED AT ALL TIMES DURING THE INSTALLATION OF THIS PRODUCT. USE PROPER SAFETY GEAR AND TOOLS FOR THE INSTALLATION PROCEDURE TO PREVENT PERSONAL INJURY.PRIOR TO THE INSTALLATION OF THIS PRODUCT, THE INSTALLATION INSTRUCTIONS SHOULD BE READ AND COMPLETELY UNDERSTOOD. THE INSTALLATION INSTRUCTIONS MUST BE READ TO PREVENT PERSONAL INJURY AND PROPERTY DAMAGE. KEEP THESE INSTALLATION INSTRUCTIONS IN AN EASILY ACCESSIBLELOCATION FOR FUTURE REFERENCE. Indicates that the power plug is to be disconnected from thepower outlet.Contact Premier Mounts with any questions – Customer Service – (800) 368-9700Technical Support – **********************Safety precautions must be taken at all times..s t n e m e t a t s n o i t u a C d n a g n i n r aW Do not install on a structure that is prone to vibration, movement or chance of impact. Failure to do so could result in damage to the projectorand/or damage to the mounting surface.Do not install near heater, fireplace, direct sunlight, air conditioning or any other source of direct heat energy. Failure to do so may result indamage to the projector and could increase the risk of fire.A qualified person should perform the installation procedure. Injury and/or damage can result from dropping or mishandling the projectorParts ListThis mount is shipped with all proper installation hardware and components. Make sure that none of these parts are missing and/or damaged before beginning installation. If there are parts missing and/or damaged, please stop the installation and contact Premier Mounts (800-368-9700).Please review all WARNING and CAUTION statements (see Page 8) before beginning the installation of the MAG-PRO.MAG Mount (Qty 1) Mounting Legs (Qty 4)M3 Flat Washers (Qty 4)CLS (Qty 1)Star Washers (Qty 2) M5 x 12mm Security Screw (Qty 4)¼ – 20 x 5/16” Security Screw (Qty 1)M4 x 12mm Security Screw (Qty 6) Plastic Barrel Caps (Qty 4) M3 x 16mm Security Screw (Qty 4) M6 x 12mm Security Screw (Qty 8)M2.5 x 8mm Security Screw (Qty 4)Installation Toolst e k n a l B /l a i r e t a M t f o S l l i r D e l b a t r o Pe r u s a e M e p a T l i c n e P )d e i l p p u S ( h c n e r W n e l l A y t i r u c e S 5Mr e d d a L Masonry Bit (Commercially Available)M3 Security Allen Wrench (Supplied)FeaturesCongratulations on the purchase of your new Premier Mounts Polaris™ Pro Universal Projector Mount. The Polaris™ Pro features our exclusive MagnaGuide® Technology which will assist the installer for quicker installation times and peace of mind. A Security Set Screw B 1-1/2” NPTC MagnaGuide® Upper AssemblyD M4 x 12mm Security Screw and Star WasherE Locking TabF Barrel CapG MagnetsH Mounting Hardware I Radial Glide™ Set ScrewJ Leveling BarrelK MagnaGuide™ Lower Assembly L M NProjector Plate M6 Square NutMounting LegSelecting the Proper Mounting Hardware1.Invert the projector and locate the mounting points.2.Test each size of the screws provided.3.The correct screws should thread easily into the mounting point and not pull out when pressure is applied.DO NOT OVERTIGHTEN YOUR MOUNTING SCREWS TO THE PROJECTOR CHASIS. USING THEINCORRECT SCREW DEPTH MAY CAUSE DAMAGE TO YOUR PROJECTOR.MAG-PROAttaching the MountOnly attach to the projector manufacturer’s specified mounting points on the projector chassis with a minimum of three mounting legs. Please follow all safety instructions specified by the projector manufacturer as well as the safety instructions outlined in this manual.Unpack the MAG-PROand review any WARNING statements that apply to the installation. Select the desired location for the MAG-PRO.1. Locate the mounting points on the bottom of the projector (see arrows above for mounting point recognition).Projector mounting points will vary. The projector used in this manual is an example, and may not match yours exactly.2. Attach the appropriate number of mounting legs to the projector using the appropriate mounting hardware(see Page 4, Selecting the Proper Mounting Hardware).3.Do not tighten these screws completely at this time.4. Align the projector plate to the mounting legs.5. Position the legs accordingly for best configuration. You may raise or lower each leg independently by turning the leveling barrels.6. Secure the legs to the projector plate by screwingM6 x 12mm security screws into the M6 square nut (do not overtighten) on the mounting legs. 7. Tighten all security screws at this time.8. Once the security screws have been tightened, place the plastic cap over each leveling barrel and firmly push the plastic cap into place.Single Mounting Point InstallationIf your projector has a ¼-20 x 5/16” mounting point, please refer to the following three steps: 1. Determine where the mounting point is located.2. Place the projector plate over the mounting point.3. Insert the ¼-20 x 5/16” security screw.This screw will use a standard hole when mounting.Mounting PointStandard HoleCeiling InstallationThe Polaris™ Pro may be attached to 1-1/2” standard threaded pipe (NPT), or one of Premier Mounts adjustable-height ceiling adapters (Models AST-2446 and APP-2446). If the user purchases an AST-2446 or an APP-2446, please refer to the installation instructions that come with these adapters.1. Thread the MAG-PRO onto the length of 1-1/2” NPT, or anyof Premier Mounts compatible adapters.When attaching the MAG-PRO to the pipe, please ensure that the MAG-PRO is threaded on at least four(4) complete turns.2. Secure the MAG-PRO by tightening the set screw with theM3 security Allen wrench (supplied).3. Route any cables up through the 1-1/2” NPT and into theceiling structure.THE MAGNETS ARE USED FOR GUIDING THE UNIT ONLY! PLEASE MAKE SURE THE TWO (2) M4 X 12MM SCREWS ARE USED TO SECURE THE PROJECTOR.If the PP-FCTA Ceiling Mount is to be used, the CLS must first be threaded into the MAG-PRO. For further installation instructions, please refer to thePP-FCTA installation manual.Attaching the Projector1. Once the coupler is tightened and secure, raise the projector,allowing MagnaGuide® Technology to “guide” the lower assembly into the upper assembly.2. Once attached, secure on each side of the Magnaguide®locking assembly using two (2) M4 x 12mm security screws and star washers.Do not release your hold on the projector until the upper and lower assemblies are secured with thetwo (2) M4 x 12mm security screws and star washers.Adjusting the Projector1. Loosen the M5 set screw using the M5 Allen wrench (both sides).2. Adjust the projector to the correct position. Firmly grasp the projector in both hands, and tilt either forward or backward to adjust the level. -OR- Firmly grasp the projector in both hands and rotate side to side for orientation adjustment.3. Tighten the M5 set screw on both sides using the M5 Allenwrench.1-1/2” NPT PipeMAG-PROM3 Security Allen WrenchCable AccessM4 x 12mmSecurity Screwand WasherM5 SecurityAllen WrenchM4 x 12mmSecurity Screws and Star WasherM4 x 12mm Security Screw and WasherTechnical SpecificationsAll measurements are inches (mm).MAG-PROWarrantyPREMIER MOUNTSLIMITED LIFETIME WARRANTYWhat and Who is Covered by this Limited Warranty and for How LongPremier Mounts warrants this product to be free from defects in material and workmanship for the lifetime of the original installation of this product. The limited warranty is valid only for the original purchaser of the product.What Premier Mounts Will DoAt the sole option of Premier Mounts, Premier Mounts will repair or replace any product or product part that is defective. If Premier Mounts chooses to replace a defective product or part, a replacement product or part will be shipped to you at no charge, but you must pay any labor costs.What is Not Covered; LimitationsPREMIER MOUNTS DISCLAIMS ANY LIABILITY FOR DAMAGE TO MOUNTS, ADAPTERS, DISPLAYS, PROJECTORS, OTHER PROPERTY, OR PERSONAL INJURY RESULTING, IN WHOLE OR IN PART, FROM IMPROPER INSTALLATION, MODIFICATION, USE OR MISUSE OF ITS PRODUCTS.PREMIER MOUNTS DISCLAIMS ALL OTHER WARRANTIES, EXPRESS OR IMPLIED, INCLUDING WARRANTIES OF MERCHANTABILITY AND FITNESS FOR A PARTICULAR PURPOSE. PREMIER MOUNTS IS NOT RESPONSIBLE FOR INCIDENTAL OR CONSEQUENTIAL DAMAGES, INCLUDING BUT NOT LIMITED TO, INABILITY TO USE ITS PRODUCTS OR LABOR COSTS FOR REMOVING AND REPLACING DEFECTIVE PRODUCTS OR PARTS. SOME STATES DO NOT ALLOW THE EXCLUSION OR LIMITATION OF INCIDENTAL OR CONSEQUENTIAL DAMAGES, SO THE ABOVE LIMITATION OR EXCLUSION MAY NOT APPLY TO YOU.What Customers Must Do for Limited Warranty ServiceIf you discover a problem that you think may be covered by the warranty you MUST REPORT it in writing to the address below within thirty (30) days. Proof of purchase (an original sales receipt) from the original consumer purchaser must accompany all warranty claims. Warranty claims must also include a description of the problem, the purchaser’s name, address, and telephone number. General inquiries can be addressed to Premier Mounts Customer Service at 1-800-368-9700. Warranty claims will not be accepted over the phone or by fax.MountsPremierAttn: Warranty Claim3130 E. Miraloma AvenueAnaheim, CA 92806How State Law AppliesTHIS WARRANTY GIVES YOU SPECIFIC LEGAL RIGHTS, AND YOU MAY ALSO HAVE OTHER RIGHTS WHICH VARY FROM STATE TO STATE.。
微软全新Surface Pro拆解:SSD焊死 拆机不可取 易报废

微软全新Surface Pro拆解:SSD焊死拆机不可取易报废今年 5 月底,微软为了表示对中国客户的诚意,特别在上海召开了一场新品发布会。
在这波新品当中,最受瞩目的自然是全新 Surface Pro。
这是微软全新一代 Surface Pro 产品,不过并没有以 Surface Pro 5 命名。
不过,在该设备身上还是有诸多全新的亮点,例如 Surface 产品线中最出色的显示屏幕,还有可以变身成“创意画板”的 165 度新铰链设计等。
当然了,全新 Surface Pro 的内部已经升级到了英特尔第七代 Kaby Lake 微架构的酷睿处理器,其中内置酷睿 m3 处理器和 i5 处理器的版本可实现了“无风扇设计”,因此全新 Surface Pro 也成为了全球首款无风扇设计的内置 i5 处理器的设备。
微软还认为,得益于内部的改进,Surface Pro 5 成为了有史以来最轻便的 Surface 设备。
那么全新 Surface Pro 内部到底改进了些什么呢?唯有拆解方知!最近,知名拆解网站 iFixit 正好拆解了全新的 Surface Pro 5,我们来一探究竟。
iFixit 称,从外形表面上来看,全新 Surface Pro 看起来与去年的 Surface Pro 4 非常的相似,但内部规格和设计肯定有所不同。
在拆解之前,先来了解全新 Surface Pro 的一些公布的主要硬件,如下:- 12.3 英寸 PixelSense 显示屏,IPS 面板,分辨率为 2736 x 1824 (267 PPI)像素,3:2 屏幕比例,支持 10 点多点触控。
- 英特尔 Kaby Lake 架构处理器,最低 Core M3(4M 缓存、2.7GHz),最高 Core i7 (4M缓存、4.0GHz)- 4GB/8GB/16GB 三档容量的 1600MHz DDR3L 内存- 128GB/256GB/512GB/1TB 高速固态硬盘- 800 万像素自动对焦后置摄像头,500 万像素前置摄像头- 1 个全尺寸 USB 3.0 接口、microSDXC 读卡器、Surface Connect 接口、3.5mm 耳机插孔、。
巨硬fans剁手成功Surface Pro 3

前言:作为一个微软的巨型小fans,自从微软出了Surface系列平板后,一直想撸一个玩。
可惜囊中羞涩,一直等到Surface Pro 3出来的时候,终于痛下决心,犹如壮士断腕一样(反正剁了手还会长出来),顺便借了同事买车买房剩下来的钱,买了一个中等配置的Surface Pro 3版(别问我为什么不买最高级的版本,因为。
买车买房剩下的钱不多啊,多了我也还不起。
)配置为:Intel Core i5 4300U+256G SSD+8G内存。
本来考虑买个128G的,但一想128G估计不够用,就买了一个256G的版本,装点日常游戏也没什么问题了。
正面的SurfacePro 3 为一块12寸的2K分辨率屏幕,一个win徽标的虚拟按键还有光线感应器和摄像头。
总之正脸和的我的钱包一样干净。
Surface Pro 3的屁屁也很干净,就只有后置摄像头。
所有的信息标识认证都在支架的后面,就算是处女座也不会挑剔。
只有一个Surface的LOGO存在,和干净的前脸保持一致。
Surface Pro 3 整个外壳采用是VaporMg镁合金材质,反正手感很好很好。
对于这个VaporMg镁合金,我反正是不知道啥玩意,官方说比常见的铝镁合金牛X,手感非常非常,摸上去不会有金属冰凉的感觉。
亲肤的感觉不像摸到金属而是塑料。
总而言之就是吊打Macbook Air的外壳工艺。
Surface Pro 3的后支撑也非常强大,角度可以达到150度,二段式的结构。
前面约40度阻尼感不强(常用站立角度),Surface Pro 3的后支撑还隐藏了一个TF接口(嗯,神一样的工业设计),我为了这个还买了一张64G的TF卡,放放音乐,小电影什么的还是可以的。
Surface Pro 3的屈指可数的物理接口,一个DP接口(我根本用不到啊!!!为什么不是HDMI),一个的USB3.0接口(根本不够用啊!不过看到新MacBook后,释然了。
)当然周围还有一圈小孔是Surface Pro 3的风扇散热口,满载的时候可以感觉到热风从里面出来哦!Surface Pro 3的充电接口,磁力吸附的设计,还带指示灯,绝对好评。
微软Surface 3平板电脑专题测试

微软Surface 3平板电脑专题测试作者:来源:《CHIP新电脑》2015年第07期抛弃了RT品牌,新生的Surface 3不再有硬件、系统及应用等方面的局限。
借助自身轻薄特性,它能很好地和高端产品形成搭配组合,成为微软上攻PC下守移动终端的关键产品。
接近3年前,微软宣布将推出自有品牌的平板电脑Surface Pro和Surface RT时,业界无不高喊“狼来了”。
在当时以笔记本电脑为基础的平板电脑占据市场主流的情况下,Surface独有的平板造型,为它和OEM伙伴的产品都赢得了生存空间。
特别是Surface RT这个全新定位的产品,可以平滑使用微软杀手级的Windows版Office应用,这种兼容Windows的轻应用结合基于ARM的轻硬件组合,令人耳目一新。
不过,承袭微软硬件的“惯例”,Surface的发展并不顺利,特别是Wintel联盟在平板电脑产品上的发展思路并不一致,以至于强调轻薄特性的Surface RT并未采用x86架构,直接导致了其最擅长的Windows应用难以移植,形成应用匮乏、支持硬件减少的恶性循环。
在晚于Surface Pro 3发布半年多后,甩弃RT品牌的Surface 3卷土重来,带来令人耳目一新的产品,并与Surface Pro 3形成从硬件到软件再到应用的无缝衔接。
Surface回归正常的主流和高性能产品组合后,Surface 3的设计和功能更接近Surface Pro 3了,或者说它变成了小一号的Surface Pro 3。
Surface 3沿用了Surface Pro 3上就十分少见的3:2分辨率屏幕,只是尺寸从12英寸改为10.8英寸,而分辨率从3200×2400也下降为1920×1280。
对于这么小的屏幕来说,这个分辨率依然非常清晰,消费者完全无需在此细节上纠结。
与常见的1920×1080分辨率相比,多出来的1920×200空间仍是为吸附式两级角度可调键盘做的准备。
surfacepro4怎么样surfacepro4评测大全

surfacepro4怎么样surfacepro4评测⼤全 surface pro4评测 1、硬件和⼯艺设计 硬件⼯艺 ⾸先,Surface Pro 4与Pro 3在外观上没有明显区别,不论机⾝尺⼨还是机⾝重量都相差⽆⼏——Pro 3厚度9.1mm,Pro 4厚度8.45mm,重量均为800克左右。
相⽐其他平板⽽⾔,它们要更厚重⼀些。
机⾝采⽤了相同的镁⾦属外壳和可调节⽀架,其倾斜⾓度可从0°调⾄150°,更加⽅便阅读。
虽然与最近发布的⼀些平板或超极本电脑相⽐,它们略显笨重,但是你要考虑到的是,微软为它们配备了桌⾯级的系统硬件,普通的平板电脑完全没有可⽐性。
当你近距离观察时,就会发现Surface Pro 4的屏幕变⼤了——在框架不变的情况下,微软在Pro 4上塞进了更⼤的12.3 英⼨屏幕,屏占⽐更⾼,这点让⼈感到惊喜。
同时去除了位于右侧边框上的Windows徽标,⾳量键也从机⾝左侧移到了机⾝顶部,在调节⾳量时可能会感觉有些不习惯。
让⼈略感遗憾的微软并没有增加扩展接⼝,Pro 4还是保持了1个USB 3.0接⼝和1个Mini DisplayPort接⼝,想连接多个周边设备时可能会有点⿇烦。
在⽀架下⽅有⼀个microSD卡槽,⽀持最⼤128G的存储扩展。
让⼈⽆语的是,微软依然坚持让⽤户使⽤专⽤电源,根本没什么实际意义,我更希望微软能在下⼀代Surface上使⽤USB Type-C接⼝。
Surface Pro 4配备500万像素前置摄像头,并⽀持微软推出的“Windows Hello”——就是俗称的“刷脸登陆”功能,可以使⽤⾃带的前置摄像头进⾏⾯部识别。
遗憾的是在本次测评中还不能测试这个功能,微软宣称在系统升级之后才能使⽤。
Pro 4的后置摄像头为800万像素,并⽀持1080P视频录制。
作为平板电脑,Surface Pro 4可能算是⼤块头,但是拿在⼿上进⾏⽹页浏览或观看视频时,并不会感觉很累。
- 1、下载文档前请自行甄别文档内容的完整性,平台不提供额外的编辑、内容补充、找答案等附加服务。
- 2、"仅部分预览"的文档,不可在线预览部分如存在完整性等问题,可反馈申请退款(可完整预览的文档不适用该条件!)。
- 3、如文档侵犯您的权益,请联系客服反馈,我们会尽快为您处理(人工客服工作时间:9:00-18:30)。
Surface pro4M34g128g版测评
从立项购买超极本到收货surface一共纠结了半个月,最终入了M3版本的Surface pro4。
一、背景
先说明为何要买超极本,本人今年刚毕业已进入一家地产公司,由于要经常驻守工地现
场因此需要一个方便沟通、便于拍照、能够运行PS及LR、快速查看CAD及SKETCH UP 的设备。
虽然有一个笔记本电脑,但是接近3公斤的重量让我很难带着到处跑,所以需要添置一台超极本来提高生产力。
我开始选择了几款比较主流的机器来做对比,分别是戴尔
XPS13、苹果Macbook Air13、Surface pro4i54g。
然后根据我的需求就很容易选择出surface了,XPS13无法手写输入而且不能变形手持不便,Air配置落后系统局限性太大且本人是果黑。
而当时Surface最吸引我的就是它的二合一设计以及触控笔。
然后决定买i5版的surface,后来才发现我的资金有限,而京东白条和蚂蚁花呗的额度都没法买到i5版的,无奈只好研究M3版。
这是很不爽的。
但是作为非主力机来说M3版所提供的
性能也已经满足我的需求了,因此趁着十一假期的最后一天果断下单之。
二、购买
我是分了两部分买的surface,主机在天猫键盘在京东,总的来说是不便宜的。
但是十一节后发现店里的价格又调高了几百块,暗自窃喜。
特此提一下天猫店送的赠品很有诚意,除了主机外还送了USB分线器、钢化膜、内胆包、微软Sculpt舒适滑控鼠标!京东购入
的键盘盖,颜色、手感极佳,还送了主机的背贴。
三、使用
先交代下使用背景,本人本科专业城市规划,现在在地产公司项目部见习,因此办公软件可想而知。
CAD、SU、PS、office、google earth、天正建筑、湘源控规等等都是家常便饭,另外本人喜爱摄影,lr也是经常使用。
1.办公场景
1办公室
以上提及的所以软件都可流畅运行,不管是几十兆的CAD图纸还是几十公顷规模的城市设计SU模型统统超出预想,性能表现非常理想,我的CAD
和SU都是2014版的。
Office只是使用了excel和word,用起来也是流畅。
谷歌地球的加载时间稍微长点,但是得益于屏幕分辨率的优点,地图显示非常
细腻,拖动也没有卡顿。
PS打开645兆的图纸时就显得略微吃力,不过也可
以接受。
关于网页浏览和网络聊天就不再提及了。
2工地
在工地的表现是我最为期待的,我本打算利用onenote来拍摄照片并加以标
注来汇总工地上出现的问题以及向领导汇报工程进度。
事实上也是这么做的,
但是效果却没有在办公室那么出乎我的意料。
触控笔很方便,点按一下橡皮擦
就可唤出onenote,随时写字记笔记,但是插入照片或者是拍照却很慢,笔
记的加载速度也是很慢,机器拍摄的照片应该都是800万像素的,没法选择
其他的相片尺寸,只能选择长宽比……另外笔记的加载速度也是挺慢,这些体
验非常不好,算是surface的减分项,不知道其他高配版本的笔记表现如何,
或许是软件的优化问题。
不过当我带着这个平板用手缩放CAD及excel表格
给乙方沟通时让乙方羡慕不已,可以装个满分逼。
的确方便直观。
更重要的是,
我可以很轻松的带着去工地了,加上键盘才1公斤,轻便很多。
2.娱乐场景
不论是中午在公司休息也好,假期窝在宿舍里也好,看电影一直是我最好的选择。
我个人比较挑剔,单部电影大小在10g以下的不爱看,偏爱动辄30~40g的蓝光原盘,追求细节,喜欢看画面中的头发丝……这些要求也是在surface中可以从容实现的,再加上2k分辨率的屏幕,电影效果非常好。
编辑照片也是一种消遣的方式,不管是PS拼接全景照片还是在lr中找细节,这些和笔记本没有区别。
另外,微软应用fresh paint也是个好用的软件,水彩表达效果非常真实,作为方案的草图工具也是很合适,我就用此设计过一个安置区的立面。
3.游戏
本没打算来玩游戏,但是忍不住试了试。
Cs1.6流畅运行,而且机器发热不大;
关键来了,古墓丽影9也带的起来!尽管是低特效低分辨率的,但是玩的挺轻松,这个最重要,但是发热非常严重。
不玩了。