G12显示器使用说明10.1
G12 使用技巧

G12 使用技巧G12 使用技巧G12 是一款功能強大的相機,但對於第一次使用的人來說可能會感到有些困惑。
下面是一些 G12 使用技巧,以幫助你更好地利用這款相機拍攝出出色的照片。
1. 學習手動控制:G12 具有豐富的手動控制功能,熟練掌握這些功能可以讓你在不同的拍攝環境中靈活運用,達到更好的效果。
學習如何手動調整快門速度、光圈和ISO 值,可以讓你更好地掌握光線和景深,為你的照片增添更多的創意。
2. 學習使用 RAW 格式:G12 支持拍攝 RAW 格式的照片,這樣可以保留更多的圖像細節和色彩信息,在後期處理時有更大的發揮空間。
學習如何處理 RAW 格式的照片可以提高你的照片質量,讓你的作品更加出色。
3. 使用取景器:儘管 G12 也配備了液晶屏幕供你檢視和拍攝照片,但在特定的拍攝情景中,使用取景器可以提供更好的穩定性和觀察角度。
特別是在強烈的陽光下,取景器可以幫助你更好地觀察和拍攝。
4. 適當使用閃光燈:G12 具有一個內建閃光燈,可以在低光環境下提供足夠的光線。
但是,必須注意的是,閃光燈不適合所有的場景和拍攝對象。
在某些情況下,使用閃光燈可能會導致過曝或過度陰影。
在您需要使用閃光燈時,可以考慮使用外接閃光燈,以提供更加柔和和均勻的光線。
5. 使用適當的對焦模式:G12 提供了多種不同的對焦模式選擇,包括單點對焦、多點對焦和追踪對焦。
您可以根據拍攝對象和場景選擇最合適的對焦模式,以確保照片清晰度和準確度。
6. 試用不同的拍攝模式:G12 提供了多種不同的拍攝模式,包括風景、人像、運動等。
您可以嘗試不同的拍攝模式,以適應不同的拍攝環境和對象,並發掘出最適合您作品風格的模式。
7. 熟練掌握相機設定:G12 的設置非常豐富,您可以根據自己的需要進行個性化設置。
建議您在使用之前仔細閱讀使用手冊,熟悉相機的各種設定和功能,並根據您的拍攝需求進行相機設置。
總之,熟練掌握 G12 的各種功能和技巧,相信您可以更好地使用這款相機,拍攝出出色的照片。
佳能g12使用说明书

佳能g12使用说明书篇一:佳能G12说明书文本部分数码相机相机使用者指南使用说明书.在使用本产品之前,请务必先仔细阅读本使用说明书。
.请务必妥善保管好本书,以便日后能随时查阅。
.请在充分理解内容的基础上,正确使用。
中文检查包装内物品请检查您的相机包装中是否包含下列物件。
如有任何物件缺失,请与您购买相机的零售商联系。
相机电池 NB-7L 电池充电器(含端子盖)CB-2LZE界面连接线立体声 AV 连接线背带IFC-400PCUAVC-DC400STNS-DC9入门指南DIGITAL CAMERA Solution Disk保修卡/数码相机解决方案光盘产品合格证参阅PDF手册同样地,您也可参阅CD-ROM内的PDF手册。
软件安装完成后,桌面上会出现快捷图标。
如果软件安装失败,可在CD-ROM的Readme文件夹中找到以下手册。
.相机使用者指南(本指南)一旦掌握了基本知识,便可使用相机的许多功能拍摄更具挑战性的照片。
.个人专用打印指南要将相机连接到打印机(选购)进行打印时,请阅读该指南。
.软件说明书使用附送的软件时,请阅读该指南。
.本包装内不含存储卡。
.要浏览PDF手册,需使用Adobe Reader。
请先阅读本文请先阅读本文试拍及机件故障的赔偿责任请先试拍几张图像并播放这些图像,确认图像是否已经正确地记录下来。
请注意,若因相机或附件(包括存储卡)的故障,导致不能拍摄图像或机器无法读取拍摄的图像而造成的任何损失,佳能公司、其子公司和分支机构、以及经销商皆不负赔偿责任。
侵犯版权警告.液晶显示屏以非常精密的制造技术生产而成。
99.99%以上的像素均符合规格,但偶尔有些不良像素可能会显示为亮点或暗点。
这不是故障。
也不影响本相机的保修服务范围仅限于在原出售国家/地区。
如果本相机在国外出现问题,请把它送回原出售国家,再向佳能热线中心求助。
有关联系佳能热线中心.液晶显示屏上可能贴有保护用塑料膜,以免运送期间遭刮伤,请在使用前除去该塑料膜。
G12显示器使用说明10.2
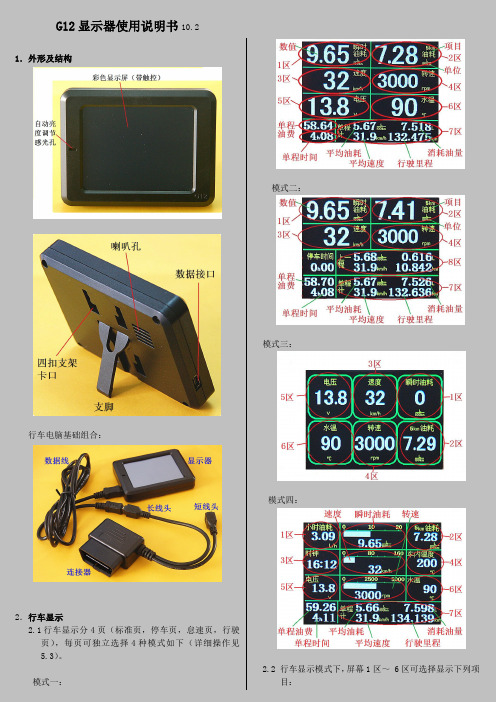
G12显示器使用说明书10.21.外形及结构行车电脑基础组合:2.行车显示2.1行车显示分4页(标准页,停车页,怠速页,行驶页),每页可独立选择4种模式如下(详细操作见5.3)。
模式一:模式二:模式三:模式四:2.2行车显示模式下,屏幕1区~6区可选择显示下列项目:1.转速2.速度3.瞬时小时油耗4.瞬时油耗5.预设油耗6.水温7.车外温度8.进气温度9.机油温度10.车内温度11.外接温度12.电压13.喷油脉宽14.点火提前角15.负荷16.节气门17.进气量18.进气压力19.油箱油量20.可行驶里程21.单程里程22.单程油量23.单程油耗24.单程速度25.单程时间26.单程极速27.时钟28.单程油费29.上一程油费30.油量计油费31.里程2油费注1:第14项,部分柴油车显示油轨压力。
注2:显示项目数值是否有效,由车型和配置决定。
2.3行车显示模式下,屏幕7区、8区可选择显示下列项目:1.里程计12.里程计23.油量计4.单程计5.上一程2.3.1里程计1:通常作总里程计用(注:和原车的总里程不是一个概念,是从行车电脑接入或清零后开始算起)。
里程计1清零需要执行全部数据清零操作才能实现。
2.3.2里程计2、油量计:可以单独清零。
油量计同时还用于油耗校准和剩余油量显示,进行油耗校准时(详细请看连接器说明内容2.4),不要使用手动剩余油量显示功能(请看5.5.9)。
2.3.3单程计:从打着车开始自动计算本次行程的行驶里程、消耗油量、时间、平均速度、平均百公里油耗及最高速度。
停车断电时间超过20秒,判定本次行程结束。
2.3.4上一程:保存单程计上一次行程记录的数据。
2.4行车显示模式下,触摸显示屏,屏幕弹出标准页,停车页,怠速页,行驶页提示窗,轻触提示窗可选择对应的显示页面。
A.选择停车页,怠速页,行驶页时,页面自动跟随车辆行驶状态改变。
如选择时,页面和行驶状态不一致,则显示10秒再改变。
显示器操作说明
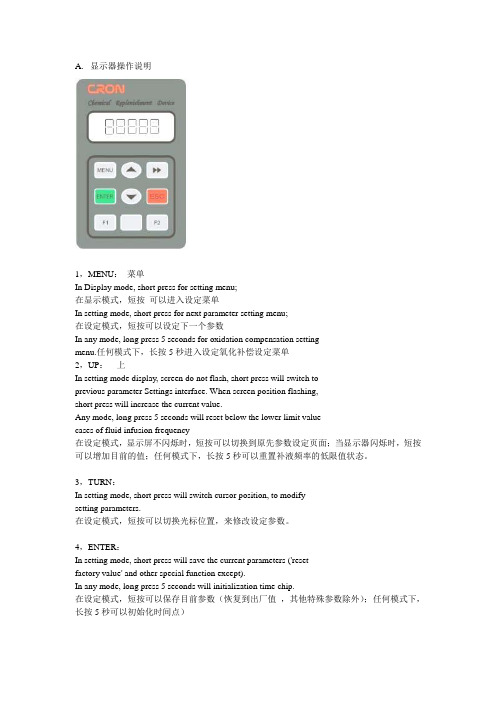
A.显示器操作说明1,MENU:菜单In Display mode, short press for setting menu;在显示模式,短按可以进入设定菜单In setting mode, short press for next parameter setting menu;在设定模式,短按可以设定下一个参数In any mode, long press 5 seconds for oxidation compensation settingmenu.任何模式下,长按5秒进入设定氧化补偿设定菜单2,UP:上In setting mode display, screen do not flash, short press will switch toprevious parameter Settings interface. When screen position flashing,short press will increase the current value.Any mode, long press 5 seconds will reset below the lower limit valuecases of fluid infusion frequency在设定模式,显示屏不闪烁时,短按可以切换到原先参数设定页面;当显示器闪烁时,短按可以增加目前的值;任何模式下,长按5秒可以重置补液频率的低限值状态。
3,TURN:In setting mode, short press will switch cursor position, to modifysetting parameters.在设定模式,短按可以切换光标位置,来修改设定参数。
4,ENTER:In setting mode, short press will save the current parameters ('resetfactory value' and other special function except).In any mode, long press 5 seconds will initialization time chip.在设定模式,短按可以保存目前参数(恢复到出厂值,其他特殊参数除外);任何模式下,长按5秒可以初始化时间点)5,DOWN:In setting mode, this position does not flash, short press will switchto the next parameter Settings interface. If flashes, short press willreduce the current value.In any mode, long press 5 seconds will switch alarm function launchor disable .在设定模式,这个键不闪烁,短按可以切换到下一个参数设定页面;如果闪烁时,短按,可以减少目前的值。
广州广日G12系统按键说明)

14141414005/16/2012编 号:SJG11-013版本号:01G12电梯控制系统主板键盘说明编 制 潘 政校 对 李吴达标准化 黄展鹏审 定 夏嘉乐批 准 张 研广州广日电梯工业有限公司2012年4 月修改12-0285更改文件号 签字 日期 更改文件号 签字 日期本资料是针对G12电梯控制系统主板按键部分的操作方法进行说明,是现场操作指引的一部分。
1、主板键盘组成说明1.1、由LED+按键组成的主板键盘包括3个数码管及3个按键:表1-1 主板键盘功能说明类型 排列示意图 功能说明显示部分(LED)LED0 LED1 LED2 运行状态LED可部分循环或全部循环显示10种信号量:上下方向灯、轿厢位置、微机故障灯操作部分(KEY)MODE INC SET 实现5种功能:MODE、INC/ST、SET1.2、显示部分(LED)表1-2 LED显示部分说明含义 指示灯颜色 标志LED0 方向灯 红 箭头表示上下方向LED1+LED2 轿厢位置 红 用两位10进制数表示LED0+LED1+LED2 故障码 红 用三位10进制数表示1.3、按键部分(KEY)表1-3 按键部分说明含义 按键颜色 标志模式切换键 黑 MODE递增键/出发 黑 INC/ST设置键 黑 SET1.4、一般操作方法在任何状态下,按下MODE键,显示的是当前的状态号。
调节状态时,先按下MODE键,然后用INC/ST键调节要进入的状态号,INC键的显示按照0、1、2、3、4、5、6、7、8、9、a、0、1、2…依次向后变化(各个状态号对应的功能参考表1-4),然后按下SET键就可以进入状态。
同时按下三个按钮或者任意两个按钮,操作无效,操作人员在完成一次小键盘操作后,一定要调回到MODE 0 SET状态才能离开。
表1-4键盘功能表模式功能LED0的显示内容 LED1的显示内容LED2的显示内容缺省模式,设为此模式可以清除其他模式的设定方向显示上行 下行当前层的十位数当前层的个位数1电梯状态显示模式,右面说明的是缺省显示的状态,在此状态下可以按INC键进入I/O口查看模式,I/O口查看模式见附表的详细说明a段为上方向 b段为2号梯群控状态 c段为4号梯群控状态 d段为下方向 e段为3号梯群控状态 f段为1号梯群控状态 g段为平层信号有效 a段为机房检修状态 b段为轿顶检修 c段为轿门开关 d段为安全回路状态 e段为故障状态 f段为轿内检修开关 g段为层高测定状态 a段为自救状态 b段为专用状态 c段为泊梯开关 d段为超载检测禁止 e段为门止动 f段为自发电状态 g段为消防专用状态 2 层高测定模式设定后的显示模式同模式0设定后的显示模式同模式0设定后的显示模式同模式03 机房检修模式 设定后的显示模式同模式0设定后的显示模式同模式0设定后的显示模式同模式04故障记录清除,此模式在1.5秒后会自动清除 设定后的显示模式同模式0设定后的显示模式同模式0设定后的显示模式同模式05禁止超载检测模式 设定后的显示模式同模式0 设定后的显示模式同模式0 设定后的显示模式同模式0 6查看主微机故障记录模式故障码组号故障码十位故障码个位 7工程人员专用状态设定后的显示模式同模式0设定后的显示模式同模式0设定后的显示模式同模式08 电梯停靠楼层随机给出 设定后的显示模式同模式0设定后的显示模式同模式0设定后的显示模式同模式09禁止电机抱闸辅助开关短接故障设定后的显示模式同模式0设定后的显示模式同模式00为允许故障判断 1为禁止故障判断 a钢丝绳打滑时间设定 默认时间为45S设定后的显示模式同模式0设定后的显示模式同模式00=45S、1=10S、2=20S、3=30S、4=40S、5=50S表示第7位,亮灯表示输入接通。
广州广日G12系统按键说明

14141414005/16/2012编 号:SJG11-013版本号:01G12电梯控制系统主板键盘说明编 制 潘 政校 对 李吴达标准化 黄展鹏审 定 夏嘉乐批 准 张 研广州广日电梯工业有限公司2012年4 月修改12-0285更改文件号 签字 日期 更改文件号 签字 日期本资料是针对G12电梯控制系统主板按键部分的操作方法进行说明,是现场操作指引的一部分。
1、主板键盘组成说明1.1、由LED+按键组成的主板键盘包括3个数码管及3个按键:表1-1 主板键盘功能说明类型 排列示意图 功能说明显示部分(LED)LED0 LED1 LED2 运行状态LED可部分循环或全部循环显示10种信号量:上下方向灯、轿厢位置、微机故障灯操作部分(KEY)MODE INC SET 实现5种功能:MODE、INC/ST、SET1.2、显示部分(LED)表1-2 LED显示部分说明含义 指示灯颜色 标志LED0 方向灯 红 箭头表示上下方向LED1+LED2 轿厢位置 红 用两位10进制数表示LED0+LED1+LED2 故障码 红 用三位10进制数表示1.3、按键部分(KEY)表1-3 按键部分说明含义 按键颜色 标志模式切换键 黑 MODE递增键/出发 黑 INC/ST设置键 黑 SET1.4、一般操作方法在任何状态下,按下MODE键,显示的是当前的状态号。
调节状态时,先按下MODE键,然后用INC/ST键调节要进入的状态号,INC键的显示按照0、1、2、3、4、5、6、7、8、9、a、0、1、2…依次向后变化(各个状态号对应的功能参考表1-4),然后按下SET键就可以进入状态。
同时按下三个按钮或者任意两个按钮,操作无效,操作人员在完成一次小键盘操作后,一定要调回到MODE 0 SET状态才能离开。
表1-4键盘功能表模式功能LED0的显示内容 LED1的显示内容LED2的显示内容缺省模式,设为此模式可以清除其他模式的设定方向显示上行 下行当前层的十位数当前层的个位数1电梯状态显示模式,右面说明的是缺省显示的状态,在此状态下可以按INC键进入I/O口查看模式,I/O口查看模式见附表的详细说明a段为上方向 b段为2号梯群控状态 c段为4号梯群控状态 d段为下方向 e段为3号梯群控状态 f段为1号梯群控状态 g段为平层信号有效 a段为机房检修状态 b段为轿顶检修 c段为轿门开关 d段为安全回路状态 e段为故障状态 f段为轿内检修开关 g段为层高测定状态 a段为自救状态 b段为专用状态 c段为泊梯开关 d段为超载检测禁止 e段为门止动 f段为自发电状态 g段为消防专用状态 2 层高测定模式设定后的显示模式同模式0设定后的显示模式同模式0设定后的显示模式同模式03 机房检修模式 设定后的显示模式同模式0设定后的显示模式同模式0设定后的显示模式同模式04故障记录清除,此模式在1.5秒后会自动清除 设定后的显示模式同模式0设定后的显示模式同模式0设定后的显示模式同模式05禁止超载检测模式 设定后的显示模式同模式0 设定后的显示模式同模式0 设定后的显示模式同模式0 6查看主微机故障记录模式故障码组号故障码十位故障码个位 7工程人员专用状态设定后的显示模式同模式0设定后的显示模式同模式0设定后的显示模式同模式08 电梯停靠楼层随机给出 设定后的显示模式同模式0设定后的显示模式同模式0设定后的显示模式同模式09禁止电机抱闸辅助开关短接故障设定后的显示模式同模式0设定后的显示模式同模式00为允许故障判断 1为禁止故障判断 a钢丝绳打滑时间设定 默认时间为45S设定后的显示模式同模式0设定后的显示模式同模式00=45S、1=10S、2=20S、3=30S、4=40S、5=50S表示第7位,亮灯表示输入接通。
g12使用说明书
一.手机刚到,如何验机,?需要注意哪些方面,?答:快递刚到,不要急于签收,验完再签字.(鉴于个别快递公司的霸道,可以先签字,但要求快递员等验完再走)这样做是为了如果手机有外观及无法开机等问题找店家协商的时候证据充分.查验的时候需要确定包裹内各配件是否齐全,手机外观是否有划伤,手机是否能开机.查看手机外观主要观察摄像头,后盖,螺丝部位.如果这些都没有问题,让快递小伙子走吧.然后,打开电池仓,记录下电池仓内的IMEI码及其S/N码,然后装上电池开机,在手机原厂的拨号界面输入"*#06#",把显示的IMEI码记录,再把电池仓内,手机屏幕显示,手机包装盒上的IMEI码及S/N码进行比对.如果比对的结果一致,然后在网站上()通过IMEI码或者S/N 码查询该手机的出厂地及生产日期.在这里希望大家都能购买到自己心仪的手机,祝福大家.!二.手机上屏幕下方的四个键各有什么作用,?答:第一个、主页键.它的作用是当你处于任何程序界面都能直接返回到主页面,相当于大退.但程序并未真正退出.第二个、MENU.它的作用是设置. 它的功能相当强大, 在很多页面按它都能得到意想不到的惊喜.第三个、返回键.顾名思义,它的作用是返回.第四个、搜索键.它的作用是快捷打开网页搜索页面.三.手机初次使用,为什么会扣掉大量流量呢,?答:在这里提醒各位朋友,初次使用先不要装入Sim.卡.先设置---账户与同步---取消掉同步更新.然后再装入Sim.卡.等自己对手机有了一些了解,再对同步更新方面进行设置,避免不必要的损失.四.手机怎样才能连接电脑呢?答:首先在电脑上下载安装HTC Sync及91,手机助手/豌豆荚手机精灵.HTC Sync能自动且全面的安装需要的驱动,而且是刷机必备的.91,及豌豆都能帮助你下载,安装你所需要的各类软件、能备份你的手机资料等..功能强大.手机连接电脑的时候记得在设置---应用程序---开发中,把USB调试勾选. 五.手机如何安装软件?请点击查看详细的教程六.手机如何设置上网呢?答:推荐大家安装上网管家.七.为什么在手机上找不到闹钟?答:在全部应用程序中找到时钟.在时钟的下方有5.个小图标,分别是:桌面时钟、世界时钟、闹钟、秒表、计时器.八.为什么来电话时响铃,拿到手里铃声就消失了?答:这是因为HTC的人性化设置,在设置---声音---拿起电话时铃声减弱勾选了,可以根据个人喜好决定.九.为什么放在内存卡中的音乐无法在铃声设置选项中显示呢?答:来电铃声:在SD卡上任意位置创建新文件夹命名为"ringtones",把音频文件(MP3、wav 等格式)复制进去.通知铃声:在SD卡上任意位置创建新文件夹命名为"notifications",把音频文件(MP3、wav等格式)复制进去.闹钟铃声:在SD卡上任意位置创建新文件夹命名为"alarms",把音频文件(MP3、wav 等格式)复制进去.在设置里就能看到自己想要的铃声了.十.为什么我的手机屏幕长亮?答:首先,你需要确定你设置的待机时间.在设置---显示---屏幕待机中选择.其次,设置---应用程序---开发---保持唤醒状态是否有勾选.十一.安装了第三方输入法,如何使用呢?答:首先,在设置---语言和键盘中勾选你所安装的输入法.然后在短信或者其他文字编辑界面,长按空白区域大概三秒,就会有输入法修改对话框弹出.十二.如何取消照相闪光灯呢?答:进入拍照界面.在屏幕右下方有一个闪电标志旁边有一个A,点击它.有A的时候是自动状态,没A的时候是完全闪光状态,暗了还有条斜杠的话就关闭闪光灯了.十三.如何设置我的日期与时间呢?答:设置---日期与时间---勾选自动.手机会自动与网络时间同步.十四.如何查看手机的版本呢?答:设置---关于手机---软件信息.就能看到手机的Android版本,内部版本号等等.十五.手机如何恢复出厂设置呢?答:设置---存储卡和手机储存---恢复出厂设置.十六.手机更换连接模式必须要拔下数据线重新连接吗?答:在给客户远程**帮助的时候,我经常会发现客户在更换连接模式的时候习惯性的拔下数据线重连.其实不需要的.只需用手指从手机屏幕上方往下滑动.就会看到通知栏.然后点击当前的连接模式,就会弹出其他的连接选项.十七.什么是S-OFF,Rom,Ruu,REC,Root?答:S-OFF相当于手机的安全锁,手机出厂时是S-ON的,也就是安全锁是打开的.Rom是系统包,是Zip,文件.Ruu是官方系统.REC我们理解为刷机工具,刷Ruu,时不需要REC.Root是获得手机最高权限.十八.如何为联系人增加照片?答:首先该联系人必须储存在手机,而不是Sim.然后.进入联系人---长按你要增加照片的联系人大概3秒---编辑联系人,在屏幕左上方有一个相机的图标,点击就可以了.十九.如何将Sim.卡中的联系人导入到手机,?答:进入联系人.然后按下设置. 屏幕下方会有导入/导出.二十.为什么手机连接电脑,整个屏幕失控?答:这是因为USB.电压不稳定.改为电源充电就好了.二十一.如何修改漂亮的解锁?推荐几款软件:二十二.手机如何使用数据线连接电脑上网呢?答:首先,你必须准备的东西为:数据线一根.电脑必须安装HTC Sync.1.下载,并安装好HTC Sync.2.将手机通过数据线连接电脑,并选择Internet传输连接模式.3.这时你会发现电脑正在安装相关驱动.这是HTC调制解调器的驱动.安装完成以后你可以查看一下.我的电脑右击-管理-设备管理器-网络适配器.里面多了一个HTC Remote NDIS based Device.4.查看你的本地连接.网上邻居右击-属性.你会发现又多了一个本地连接3.多出来的本地连接3就是我们手机的连接了.5.下面的一步比较重要.千万别漏了....首先打开你电脑的本地连接-右击属性--高级,把internet连接共享的两个钩打上,确定.打上勾以后原来的本地连接下面就多只共享的手.然后打开HTC的本地连接3.右击属性-TCP/IP协议里面将IP改成自动获取的...这样就大功告成了...通知栏会有一对小箭头显示(Internet传输已连接).二十三.晚上看书,手机上的灯很刺眼,如何关闭掉呢.?答:在电话里输入*#*#3424#*#* 手机会进入HTC Function(手机自带的测试软件)选中LED test点RUN就不亮了退出程序关闭屏幕在开恢复如初。
HP顯示器使用指南说明书
摘要本指南提供顯示器功能、設定顯示器和使用顯示器的相關技術規格和資訊。
©Copyright 2021 HP Development Company, L.P.HDMI、HDMI 標誌和 High-Definition Multimedia Interface 是 HDMI Licensing LLC 的商標或註冊商標。
Windows 是 Microsoft Corporation 在美國和/或其他國家/地區的註冊商標或商標。
DisplayPort™、DisplayPort™ 標誌和 VESA® 是視訊電子標準協會 (VESA) 在美國及其他國家/地區所擁有的商標或註冊商標。
本文件包含的資訊如有變更,恕不另行通知。
HP 產品和服務的保固僅列於此類產品和服務隨附的明示保固聲明。
不可將本文件的任何部分解釋為構成額外保固。
HP 對本文件中的技術或編輯錯誤或疏失概不負責。
產品通知本指南說明大部分機型共有的功能。
您可能無法在產品上使用某些功能。
若要存取最新的使用指南,請前往 /support,並依照指示尋找您的產品,然後選取使用手冊。
第一版:2021 年 3 月文件編號:M48143-AB1關於本指南本指南提供顯示器功能、設定顯示器和使用軟體的相關技術規格和資訊。
視機型而定,您的顯示器可能沒有本指南中包括的所有功能。
表示如果不避免則可能會導致輕微或中度傷害的危險情況。
重要:表示與危險(例如與財產損失相關的訊息)無關的重要資訊。
警告使用者如果無法完全依照所述程序執行,則可能會導致資料遺失或是硬體或軟體損壞。
其中也包含說明概念或完成工作的基本資訊。
附註:包含要強調或補充本文重點的其他資訊。
提示:提供完成工作的實用提示。
本產品採用 HDMI 技術。
iiiiv 關於本指南目錄1 快速入門 (1)重要安全資訊 (1)其他 HP 資源 (1)準備致電技術支援 (2)瞭解您的顯示器 (2)功能 (2)68.6 公分(27 吋)機型背面元件 (3)80.1 公分(31.5 吋)機型背面元件 (4)86.7 公分(34 吋)機型背面元件 (5)尋找序號和產品編號 (6)設定顯示器 (6)連接顯示器機座 (6)掛載顯示器本體 (7)拆下顯示器機座 (7)將顯示器本體連接至壁掛裝置 (8)連接纜線 (9)調整顯示器(僅限特定產品) (10)安裝安全纜線 (11)開啟顯示器 (12)HP 浮水印及影像殘留政策 (12)2 使用顯示器 (14)下載軟體和公用程式 (14)資訊檔案 (14)影像色彩對應檔案 (14)使用 OSD 功能表 (14)使用 OSD 功能按鈕 (15)重新指定功能按鈕 (16)顯示模式狀態 (16)變更電源模式設定(僅限特定產品) (16)使用自動睡眠模式(僅限特定產品) (17)3 支援和疑難排解 (18)解決常見問題 (18)v按鈕鎖定 (18)4 維護顯示器 (19)維護準則 (19)清潔顯示器 (19)運送顯示器 (20)附錄 A 技術規格 (21)68.6 公分(27 吋)機型規格 (21)80.1 公分(31.5 吋)機型規格 (22)86.7 公分(34 吋)機型規格 (22)預設顯示解析度 (23)68.6 公分(27 吋)機型 (23)80.1 公分(31.5 吋)機型 (25)86.7 公分(34 吋)機型 (26)節能功能 (27)附錄 B 無障礙 (28)HP 與無障礙 (28)尋找您需要的技術工具 (28)HP 的承諾 (28)國際無障礙專業人員協會 (IAAP) (28)尋找最佳輔助技術 (29)評估您的需要 (29)HP 產品的無障礙功能 (29)標準及法規 (29)標準 (29)Mandate 376 – EN 301 549 (30)網頁內容可及性指引 (WCAG) (30)立法與規範 (30)實用無障礙資源和連結 (30)組織 (30)教育機構 (31)其他身心障礙資源 (31)HP 連結 (31)聯絡支援中心 (31)索引 (32)vi1快速入門請閱讀本章以瞭解安全資訊,以及可在何處找到其他 HP 資源。
LG LED显示屏使用说明说明书
* L G LED Monitor applies LCD screen with LED backlights. Please read this manual carefully before operating your set and retain it for future reference.22BL450Y24BL450Y 27BL450Y Copyright © 2018 LG Electronics Inc. all rights reserved.2LICENSEEach model has different licenses. Visit for more information on the license.The terms HDMI and HDMI High-Definition Multimedia Interface, and the HDMI Logo are trademarks or registered trademarks of HDMI Licensing administrator, Inc. in the united states and other countries.TabLE of CoNTENTSLICEnsE ......................................................2OPEn sOurCE sOfTwarE nOTICEInfOrMaTIOn ............................................3assEMBLInG anD PrEParInG ..................3usInG THE MOnITOr ................................10usEr sETTInGs ........................................12TrOuBLEsHOOTInG .................................19PrODuCT sPECIfICaTIOn . (21)opEN SourCE SofTwarE NoTICE INformaTIoNTo obtain the source code under GPL, LGPL, MPL, and other open source licenses, that is contained in this product, please visit .In addition to the source code, all referred license terms, warranty disclaimers and copyright notices are available for download.LG Electronics will also provide open source code to you on CD-rOM for a charge covering the cost of performing such distribution (such as the cost of media, shipping, and handling) upon email request to ******************. This offer is valid for a period of three years after our last shipment of this product. This offer is valid to anyone in receipt of this information.aSSEmbLING aND prEparINGCauTIoN•always use genuine LG components to ensure safety and product performance.•The product warranty will not cover damage or injury caused by the use of unauthorized components.•It is recommended to use the supplied components.•If you use generic cables not certified by LG, the screen may not display or there may be image problems.•Illustrations in this document represent typical procedures, so they may look different from the actual product.•Do not apply foreign substances (oils, lubricants, etc.) to the screw parts when assembling the product. (Doing so may damage the product.)•applying excessive force when tightening screws may cause damage to the monitor. Damage caused in this way will not be covered by the product warranty.•Do not carry the monitor upside down by just holding the base. This may cause the monitor to fall off the stand and could result in personal injury.•when lifting or moving the monitor, do not touch the monitor screen. The force applied to the monitor screen may cause damage to it.NoTE•The components may look different from those illustrated here.•without prior notice, all product information and specifications contained in this manual are subject to changeto improve the performance of the product.•To purchase optional accessories, visit an electronics store or an online shopping site, or contact the retailerfrom which you purchased the product.•The power cord provided may differ depending upon the region.Supported Drivers and SoftwareYou can download and install the latest version from the LGE website ().34How to use the Joystick buttonYou can easily control the functions of the monitor by pressing the joystick button or moving it left/right/up/down with your finger.basic functionsNoTE•The joystick button is located at the bottom of the monitor.moving and Lifting the monitorwhen moving or lifting the monitor, follow these instructions to prevent the monitor from being scratched or damaged and to ensure safe transportation, regardless of its shape or size.•Place the monitor in the original box or packing material before attempting to move it. •Before moving or lifting the monitor, disconnect the power cord and all other cables. •Hold the bottom and side of the monitor frame firmly. Do not hold the panel itself.•when holding the monitor, the screen should face away from you to prevent it from being scratched. •when transporting the monitor, do not expose the monitor to shock or excessive vibration.•when moving the monitor, keep it upright and never turn the monitor on its side or tilt it sideways.CauTIoN•avoid touching the monitor screen as much as possible.-This may result in damage to the screen or some of the pixels used to create images.•If you use the monitor panel without the stand base, its joystick button may cause the monitor to become unstable and fall, resulting in damage to the monitor or human injury. In addition, this may cause the joystick button to malfunction.5ENGLISHInstalling on a Table•Lift the monitor and place it on the table in an upright position. Place the monitor at least 100 mm (3.94 inches) away from the wall to ensure sufficient ventilation.CauTIoN•unplug the power cord before moving or installing the monitor. There is risk of electric shock.•Make sure to use the power cord that is provided in the product package and connect it to a grounded power outlet.•If you need another power cord, please contact your local dealer or the nearest retail store.adjusting the Stand Height12warNING•adjusting the angle1 2 adjust the angle of the screen.experience. warNING•To avoid injury to the fingers when adjusting the screen, do not hold the lower part of the monitor’s frame as illustrated below.•Be careful not to touch or press the screen area when adjusting the angle of the monitor.67Swivel stand•Image shown may differ from your Monitor set.1swivel 355 degrees and adjust the angle of the Monitor set to suit your view.using the cable holderarrange the cables using the cable holder as shown in the illustration.orusing the Kensington LockThe Kensington security system connector is located at the back of the Monitor set.for more information on installation and usage, refer to the Kensington lock owner’s manual or visit the website at .Connect the monitor to a table using the Kensington security system cable.NoTE•The Kensington security system is optional. You can obtain optional accessories from most electronics stores.•The left or right side of the monitor head can be slightly rotated up or down (up to 3°). adjust the horizontal level of the monitor head.Installing the wall mount plateThis monitor meets the specifications for the wall mount plate or other compatible devices.NoTE•The wall mount plate is sold separately.•for more information on installation, refer to the wall mount plate’s installation guide.•Be careful not to apply too much force while mounting the wall mount plate as it may cause damage to the screen.•remove the stand before installing the monitor on a wall mount by performing the stand attachment in reverse.Installing on the wallInstall the monitor at least 100 mm (3.94 inches) away from the wall and leave about 100 mm (3.94 inches) of space at each side of the monitor to ensure sufficient ventilation. Detailed installation instructions can be obtained from your local retail store. alternatively, please refer to the manual for how to install and set up a tilting wall mounting bracket.89CauTIoN•unplug the power cord before moving or installing the monitor to avoid electric shock.•Installing the monitor on the ceiling or on a slanted wall may result in the monitor falling off, which could lead to injury. use an authorized LG wall mount and contact the local dealer or qualified personnel.•applying excessive force when tightening screws may cause damage to the monitor. Damage caused in this way will not be covered by the product warranty.•use the wall mounting bracket and screws that conform to VEsa standards. Damage caused by the use or misuse of inappropriate components will not be covered by the product warranty.•when measured from the back of the monitor, the length of each installed screw must be 8 mm(0.3 inches) or less.To install the monitor to a wall, attach a wall mounting bracket (optional) to the back of the monitor.Make sure that the wall mounting bracket is securely fixed to the monitor and to the wall.wall mount (mm)100 x 100Standard screw M4 x L10Number of screws4wall mount plate (optional)Lsw 149NoTE•a non-VEsa standard screw may damage the product and cause the monitor to fall. LG Electronics is not liable for any accidents relating to the use of non-standard screws.•The wall mount kit includes the installation guide and all necessary parts.•The wall mounting bracket is optional. You can obtain optional accessories from your local dealer.•The length of the screw may differ for each wall mounting bracket. If you use screws longer than the standard length, it may damage the inside of the product.•for more information, please refer to the user manual for the wall mounting bracket.uSING THE moNITor•Illustrations in this manual may differ from the actual product.CauTIoN•Do not press the screen for a prolonged time. This may cause image distortion.•Do not display a still image on the screen for a prolonged time. This may cause image retention. use a PC screensaver if possible.•when connecting the power cord to the outlet, use a grounded (3-hole) power strip or a grounded power outlet.•The monitor may flicker when turned on in an area where the temperature is low. This is normal.•sometimes red, green, or blue spots may appear on the screen. This is normal. Connecting to a pC•This monitor supports the *Plug and Play feature.* Plug and Play: a feature that allows you to add a device to your computer without having to reconfigure anything or install any manual drivers.HDmI ConnectionTransmits digital video and audio signals from your PC to the monitor.CauTIoN•using a DVI to HDMI / DP (DisplayPort) to HDMI cable may cause compatibility issues.•use a certified cable with the HDMI logo attached. If you do not use a certified HDMI cable, the screen may not display or a connection error may occur.•recommended HDMI cable types-High-speed HDMI®/TM cable-High-speed HDMI®/TM cable with EthernetDisplayport ConnectionTransmits digital video and audio signals from your PC to the monitor.NoTE•There may be no video or audio output depending on the DP (DisplayPort) version of the PC.•Make sure to use the supplied DisplayPort cable of the product. Otherwise, this may cause the device to malfunction.•If you are using a Mini DisplayPort output graphics card, use a Mini DP to DP (Mini DisplayPort to DisplayPort) cable or gender that supports DisplayPort1.2. (sold separately)10Connecting aV DevicesHDmI ConnectionHDMI transmits digital video and audio signals from your aV device to the monitor.NoTE•using a DVI to HDMI / DP (DisplayPort) to HDMI cable may cause compatibility issues.•use a certified cable with the HDMI logo attached. If you do not use a certified HDMI cable, the screen may not display or a connection error may occur.•recommended HDMI cable types-High-speed HDMI®/TM cable-High-speed HDMI®/TM cable with EthernetConnecting peripheralsuSb Device connectionThe usB port on the product functions as a usB hub.NoTE•It is recommended you install all windows updates to keep your windows up-to-date before connecting to the product for use.•Peripheral devices are sold separately.•a keyboard, mouse, or usB device can be connected to the usB port.•The charging speed may vary depending on the device.CauTIoN•Cautions when using a usB Device-a usB device with an automatic recognition program installed, or that uses its own driver, may not berecognized.-some usB devices may not be supported or may not work properly.-It is recommended to use a usB hub or hard disk drive with power supplied. (If the power supply is not adequate, the usB device may not be recognized properly.)Headphones ConnectionConnect peripherals to the monitor via the headphones port.NoTE•Peripheral devices are sold separately.•Depending on the audio settings of the PC and external device, headphones and speaker functions may be limited.•If you use angled earphones, it may cause a problem with connecting another external device to the monitor.Therefore, it is recommended to use straight earphones.111213ENGLISHCustomizing settingsQuick SettingsInputpictureNoTE•If the picture mode is changed, the screen may flicker or the resolution of your PC screen may be affected. 14ENGLISH1516ENGLISH NoTE•This is subsidiary for color weakness user. Therefore if you feel uncomfortable with the screen, please turn off this function.•This function can’t distinguish some colors in some images.Sound17GeneralNoTE•saving Data depends on the Panel. so,those values should be different from each panel and panel vendor.If option of sMarT EnErGY saVInG is High or Low, monitor luminance become higher or lower depend on source. 18TroubLESHooTINGCheck the following before calling for service.CauTIoN•Check Control panel►Display►Settings and see if the frequency or the resolution were changed. If yes, readjust the video card to the recommend resolution.•If the recommended resolution (optimal resolution) is not selected, letters may be blurred and the screen may be dimmed, truncated or biased. Make sure to select the recommend resolution.•The setting method can differ by computer and O/s (Operation system), and resolution mentioned above may not be supported by the video card performance. In this case, please ask to the computer or the video card manufacturer.192021ENGLISHproDuCT SpECIfICaTIoN22BL450YThe specifications are subject to change without notice.* The power consumption level can be different by operating condition and monitor setting.* The On mode power consumption is measured with EnErGY sTar® test standard.** The On mode power consumption is measured with LGE test standard (full white pattern , Maximum resolution). 2223ENGLISHproDuCT SpECIfICaTIoN24BL450YThe specifications are subject to change without notice.* The power consumption level can be different by operating condition and monitor setting.* The On mode power consumption is measured with EnErGY sTar® test standard.** The On mode power consumption is measured with LGE test standard (full white pattern , Maximum resolution). 2425ENGLISHproDuCT SpECIfICaTIoN27BL450YThe specifications are subject to change without notice.* The power consumption level can be different by operating condition and monitor setting.* The On mode power consumption is measured with EnErGY sTar® test standard.** The On mode power consumption is measured with LGE test standard (full white pattern , Maximum resolution). 26factory Support mode (preset mode, pC)HDmI/Dp(Displayport)27HDmI Timing (Video)28This device meets the EMC requirements for home appliances (Class B) and is intended for home usage.The model and serial number of the product are located on the back and on one side of the product. record them below in case you ever need service.Modelserial no.EnErGY sTar is a set of power-saving guidelines issued by the u.s.Environmental Protection agency(EPa).refer to EnErGY for more information on the EnErGY sTar program.as an EnErGY sTar Partner LGE u. s. a.,Inc. has determinedthat this product meets the EnErGY sTar guidelines for energyefficiency.Supplier’s Declaration of Conformity Trade name LGresponsible Party LG Electronics usa, Inc. address 1000 sylvan ave Englewood Cliffs, nJ 07632Telephone (201)266-2215。
LG LED显示器使用说明说明书
* L G LED Monitor applies LCD screen with LED backlights.Please read this manual carefully before operating your set andretain it for future reference.34GK950GCopyright © 2018 LG Electronics Inc. All Rights Reserved.TABLE OF CONTENTS LICENSE (2)ASSEMBLING AND PREPARING (3)USING THE MONITOR (10)USER SETTINGS (12)TROUBLESHOOTING (18)PRODUCT SPECIFICATION .........................20LICENSEEach model has different licenses. Visit for more information on the license.The terms HDMI and HDMI High-Definition Multimedia Interface,and the HDMI Logo are trademarks or registered trademarks ofHDMI Licensing Administrator, Inc. in the United States and othercountries.The SuperSpeed USB Trident logo is a registered trademark of USBImplementers Forum, Inc.© 2017 NVIDIA Corporation. All rights reserved. NVIDIA G-SYNC areregistered trademarks of NVIDIA Corporation in the U.S and othercountries.23ENGLISHASSEMBLING AND PREPARINGCAUTION•Always use genuine LG components to ensure safety and product performance.•The product warranty will not cover damage or injury caused by the use of unauthorized components. •It is recommended that use the supplied components.•If you use generic cables not certified by LG, the screen may not display or there may be image noises.•Illustrations in this document represent typical procedures, so they may look different from the actual product. •Do not apply foreign substances (oils, lubricants, etc.) to the screw parts when assembling the product. (Doing so may damage the product.)•Applying excessive force when tightening screws may cause damage to the monitor. Damage caused in this way will not be covered by the product warranty.•Do not carry the monitor upside down by just holding the base. This may cause the monitor to fall off the stand and could result in personal injury.•When lifting or moving the monitor, do not touch the monitor screen. The force applied to the monitor screen may cause damage to it. NOTE•The components may look different from those illustrated here.•Without prior notice, all product information and specifications contained in this manual are subject to change to improve the performance of the product.•To purchase optional accessories, visit an electronics store or an online shopping site, or contact the retailer from which you purchased the product.•The power cord provided may differ depending upon the region.Supported Drivers and SoftwareYou can download and install the latest version from the enclosed CD or from the LGE website ().Product and Button Description•On: Power on •Off: Power offLighting Button45How to Use the Joystick ButtonYou can easily control the functions of the monitor by pressing the joystick button or moving it left/right/up/down with your finger.Basic FunctionsHow to Use the Lighting ButtonYou can easily control the functions of the monitor by pressing the lighting button or moving it left/right with your finger.Basic FunctionsNOTE•The joystick and lighting button are located at the bottom of the monitor.•The Lighting function for the back of the monitor is available even when the monitor is in power saving mode or when its screen is off.Moving and Lifting the MonitorWhen moving or lifting the monitor, follow these instructions to prevent the monitor from being scratched or damaged and to ensure safe transportation, regardless of its shape or size.•Place the monitor in the original box or packing material before attempting to move it.•Before moving or lifting the monitor, disconnect the power cord and all other cables.•Hold the bottom and side of the monitor frame firmly. Do not hold the panel itself.•When holding the monitor, the screen should face away from you to prevent it from being scratched.•When transporting the monitor, do not expose the monitor to shock or excessive vibration.•When moving the monitor, keep it upright and never turn the monitor on its side or tilt it sideways.CAUTION•Avoid touching the monitor screen as much as possible.-This may result in damage to the screen or some of the pixels used to create images.•If you use the monitor panel without the stand base, its joystick button may cause the monitor to become unstable and fall, resulting in damage to the monitor or human injury. In addition, this may cause the joystick button to malfunction.Installing on a Table•Lift the monitor and place it on the table in an upright position. Place the monitor at least 100 mm (3.9 inches) away from the wall to ensure sufficient ventilation.(3.9 inches)(3.9 inches)100 mm(3.9 inches)100 mm(3.9 inches)CAUTION•Unplug the power cord before moving or installing the monitor. There is risk of electric shock.•Make sure to use the power cord that is provided in the product package and connect it to a grounded power outlet.•If you need another power cord, please contact your local dealer or the nearest retail store.67Adjusting the Stand Height1 Place the monitor mounted on the stand base in an upright position.2 Handle the monitor with both hands for safety.WARNING•Adjusting the Angle1 2 Adjust the angle of the screen.experience.WARNING•To avoid injury to the fingers when adjusting the screen, do not hold the lower part of the monitor’s frame as illustrated below.•Be careful not to touch or press the screen area when adjusting the angle of the monitor.208Installing the Wall Mount PlateThis monitor meets the specifications for the wall mount plate or other compatible ing the Kensington LockThe connector for the Kensington security system is located at the bottom of the monitor.To install the monitor to a wall, attach a wall mounting bracket (optional) to the back of the monitor.Make sure that the wall mounting bracket is securely fixed to the monitor and to the wall.Wall Mount (mm)100 x 100Standard screw M4 x L10Number of screws4Wall Mount Plate (Optional)RW120NOTE•A non-VESA standard screw may damage the product and cause the monitor to fall. LG Electronics is not liable for any accidents relating to the use of non-standard screws.•The wall mount kit includes the installation guide and all necessary parts.•The wall mounting bracket is optional. You can obtain optional accessories from your local dealer.•The length of the screw may differ for each wall mounting bracket. If you use screws longer than the standard length, it may damage the inside of the product.•For more information, please refer to the user manual for the wall mounting bracket.CAUTION•Unplug the power cord before moving or installing the monitor to avoid electric shock.•Installing the monitor on the ceiling or on a slanted wall may result in the monitor falling off, which could leadto injury. Use an authorized LG wall mount and contact the local dealer or qualified personnel.•To prevent injury, this apparatus must be securely attached to the wall in accordance with the installation instructions.•Applying excessive force when tightening screws may cause damage to the monitor. Damage caused in thisway will not be covered by the product warranty.•Use the wall mounting bracket and screws that conform to VESA standards. Damage caused by the use or misuse of inappropriate components will not be covered by the product warranty.•When measured from the back of the monitor, the length of each installed screw must be 8 mm (0.3 inches)or less.9USING THE MONITOR•Illustrations in this manual may differ from the actual product.Press the joystick button, go to Settings Input, and then select the input option.CAUTION•Do not press the screen for a prolonged time. This may cause image distortion.•Do not display a still image on the screen for a prolonged time. This may cause image retention.Use a PC screensaver if possible.•When connecting the power cord to the outlet, use a grounded (3-hole) power strip or a grounded power outlet.•The monitor may flicker when turned on in an area where the temperature is low. This is normal.•Sometimes red, green, or blue spots may appear on the screen. This is normal. Connecting to a PC•This monitor supports the *Plug and Play feature.* Plug and Play: A feature that allows you to add a device to your computer without having to reconfigure anything or install any manual drivers.HDMI ConnectionTransmits digital video and audio signals from your PC to the monitor.CAUTION•In HDMI input, only the RGB 4:4:4 Color Format is supported. YCbCr (YUV) is not supported.•Using a DVI to HDMI / DP (DisplayPort) to HDMI cable may cause compatibility issues.•Use a certified cable with the HDMI logo attached. If you do not use a certified HDMI cable, the screen may not display or a connection error may occur.•Recommended HDMI cable types-High-Speed HDMI®/TM cable-High-Speed HDMI®/TM cable with Ethernet DisplayPort ConnectionTransmits digital video and audio signals from your PC to the monitor.NOTE•There may be no video or audio output depending on the DP (DisplayPort) version of the PC.•Make sure to use the supplied DisplayPort cable of the product. Otherwise, this may cause the device to malfunction.•If you are using a Mini DisplayPort output graphics card, use a Mini DP to DP (Mini DisplayPort to DisplayPort) cable or gender that supports DisplayPort1.2. (Sold separately)Connecting AV DevicesHDMI ConnectionHDMI transmits digital video and audio signals from your AV device to the monitor.NOTE•In HDMI input, only the RGB 4:4:4 Color Format is supported. YCbCr (YUV) is not supported.•Using a DVI to HDMI / DP (DisplayPort) to HDMI cable may cause compatibility issues.•Use a certified cable with the HDMI logo attached. If you do not use a certified HDMI cable, the screen may not display or a connection error may occur.•Recommended HDMI cable types-High-Speed HDMI®/TM cable-High-Speed HDMI®/TM cable with Ethernet10Connecting PeripheralsUSB Device ConnectionThe USB port on the product functions as a USB hub.To use USB 3.0, connect the A-B type USB 3.0 cable of the product to the PC.Peripheral devices connected to the USB IN port can be controlled from the PC. NOTE•It is recommended you install all Windows Updates to keep your Windows up-to-date before connecting to the product for use.•Peripheral devices are sold separately.•A keyboard, mouse, or USB device can be connected to the USB port. •The charging speed may vary depending on the device.CAUTION•Cautions when using a USB device-A USB device with an automatic recognition program installed, or that uses its own driver, may not be recognized.-Some USB devices may not be supported or may not work properly.-It is recommended to use a USB hub or hard disk drive with power supplied. (If the power supply is not adequate, the USB device may not be recognized properly.)Headphones ConnectionConnect peripherals to the monitor via the headphones port. NOTE•Peripheral devices are sold separately.•Depending on the audio settings of the PC and external device, headphones and speaker functions may be limited.•If you use angled earphones, it may cause a problem with connecting another external device to the monitor.Therefore, it is recommended to use straight earphones.Service only portThis port is used only for 'Service'.ENGLISHMain Menu FeaturesMenu Settings1 To view the OSD menu, press the joystick button at the bottom of the monitor and then enter the Settings .2 Move the joystick up/down and left/right to set the options.3 To return to the upper menu or set other menu items, move the joystick to or pressing () it.4If you want to exit the OSD menu, move the joystick tountil you exit.Game Mode Game Adjust Picture Adjust Input GeneralGame ModeGame AdjustENGLISHPicture AdjustInputGeneralENGLISHTROUBLESHOOTINGENGLISHPRODUCT SPECIFICATIONENGLISH Specifications are subject to change without notice.* The Operating Mode of Power Consumption is measured with LGE test standard. (Full White pattern, Maximum resolution)* The Power Consumption level can be different by operating condition and monitor setting.**T he Overclock function's features/performance may vary depending on the graphics card or gaming content.We do not guarantee the performance of the function and are not responsible for any side effects that may occur from its activation.21Factory Support Mode(Preset Mode, HDMI/ DisplayPort PC)HDMI Timing (Video)22G-SYNC Monitor•The monitor is purposely supporting the NVIDIA G-SYNC technology and targeting NVIDIA GPU.•R equirement for using G-SYNC-S upported Interface: DisplayPort (System must support DisplayPort 1.2 directly from the GPU.)-Supported Graphic Card: A graphic card that supports NVIDIA’s G-SYNC is necessary.-Supported Version: Make sure to update the graphic card to the latest driver.•For more information and requirement, refer to NVIDIA website at /hardware/technology/g-sync.23This device can be used in all regions. Read the owner's manual (CD) carefully and keep it at hand. Please note that the label attached to the product provides information for technical support.ModelSerial No.Supplier's Declaration of Conformity Trade Name LGResponsible Party LG Electronics USA, Inc. Address 1000 Sylvan Ave Englewood Cliffs,NJ 07632Telephone(201)266-2215。
- 1、下载文档前请自行甄别文档内容的完整性,平台不提供额外的编辑、内容补充、找答案等附加服务。
- 2、"仅部分预览"的文档,不可在线预览部分如存在完整性等问题,可反馈申请退款(可完整预览的文档不适用该条件!)。
- 3、如文档侵犯您的权益,请联系客服反馈,我们会尽快为您处理(人工客服工作时间:9:00-18:30)。
G12显示器使用说明书10.11.外形及结构行车电脑基础组合:2.行车显示2.1行车显示分4页(标准页,停车页,怠速页,行驶页),每页可独立选择4种模式如下(详细操作见5.3)。
模式一:模式二:模式三:模式四:2.2行车显示模式下,屏幕1区~6区可选择显示下列项目:1.转速2.速度3.瞬时小时油耗4.瞬时油耗5.预设油耗6.水温7.车外温度8.进气温度9.机油温度10.车内温度11.外接温度12.电压13.喷油脉宽14.点火提前角15.负荷16.节气门17.进气量18.进气压力19.油箱油量20.可行驶里程21.单程里程22.单程油量23.单程油耗24.单程速度25.单程时间26.单程极速27.时钟28.单程油费29.上一程油费30.油量计油费31.里程2油费注1:第14项,部分柴油车显示油轨压力。
注2:显示项目数值是否有效,由车型和配置决定。
2.3行车显示模式下,屏幕7区、8区可选择显示下列项目:1.里程计12.里程计23.油量计4.单程计5.上一程2.3.1里程计1:通常作总里程计用(注:和原车的总里程不是一个概念,是从行车电脑接入或清零后开始算起)。
里程计1清零需要执行全部数据清零操作才能实现。
2.3.2里程计2、油量计:可以单独清零。
油量计同时还用于油耗校准和剩余油量显示,进行油耗校准时(详细请看连接器说明内容2.4),不要使用手动剩余油量显示功能(请看5.5.9)。
2.3.3单程计:从打着车开始自动计算本次行程的行驶里程、消耗油量、时间、平均速度、平均百公里油耗及最高速度。
停车断电时间超过20秒,判定本次行程结束。
2.3.4上一程:保存单程计上一次行程记录的数据。
2.4行车显示模式下,触摸显示屏,屏幕弹出标准页,停车页,怠速页,行驶页提示窗,轻触提示窗可选择对应的显示页面。
A.选择停车页,怠速页,行驶页时,页面自动跟随车辆行驶状态改变。
如选择时,页面和行驶状态不一致,则显示10秒再改变。
B.选择标准页,页面不跟随车辆行驶状态改变。
3.快捷键功能(需配置线控器)3.1正常行车显示模式下,轻按“-”键,可顺序改变屏幕4区显示项目。
轻按“+”键,可顺序改变屏幕7区显示项目。
3.2正常行车显示模式下,车速>10公里/小时,按“O”键启动临时限速功能。
临时限速速度=当前车速(个位为0)+10。
当车速>临时限速速度,显示器发出超出提示。
临时限速功能启动时,喇叭发出“滴”1声,屏幕弹出临时限速提示窗。
屏幕显示临时限速提示窗或车速≦10km/h时,按“O”键,或停车熄火,临时限速功能取消。
3.3里程计2清零:行车显示模式下,长按“+”键2秒。
同时显示屏幕模式1或2或4下,如无里程计2显示,则屏幕7区跳转显示里程计2五秒(清零成功时,里程为0)。
喇叭发出“滴”1声。
3.4油量计清零:行车显示模式下,长按“-”键2秒。
同时显示屏幕模式1或2或4下,如无油量计显示,则屏幕7区跳转显示油量计五秒(清零成功时,油量为0)。
喇叭发出“滴”1声。
4.触摸屏4.1轻触点击目标位置即可。
请勿大力敲打,勿用硬物刮擦。
触摸屏肮脏后,可用软布喷上液晶屏清洁剂擦拭。
4.2如触摸响应位置误差大,可进行触摸屏校正。
方法:将显示器断电重启,出现开机触摸屏校正提示时,3秒内点击触摸屏,然后按屏幕提示操作。
5.菜单及功能5.1进入菜单:正常行车显示模式下,触摸屏幕任意位置,屏幕弹出提示窗,点击“进菜单”提示窗框进入主菜单。
5.2范例:ECU设置值由000改099。
该项目在“菜单”中的“参数设置”子菜单的“ECU选择”项。
简单表示为:菜单--参数设置—ECU选择,下同。
1.进入菜单(见5.1)。
2.点击“参数设置”图标。
3.点击“ECU选择”图标。
4.点击数字个位“0”位置,点击“+”图标9次,个位数值由0改为9。
5.点击数字十位“0”位置,点击“+”图标9次,十位数值由0改为9。
6.点击“返回”,“返回”,“退出”图标退出菜单。
5.3菜单—项目选择:选择行车显示屏幕1区~8区的显示项目。
5.4.1菜单—油耗系数—油耗系数:用来校正油耗。
将系数值改大(或小),油耗显示会按比例变小(或大)。
如当前油耗系数9300,里程1平均油耗显示12.0L/100km,将油耗系数改11160,平均油耗显示会变成10.0L/100km(=12*(9300/11160)。
5.4.2菜单—油耗系数—油价:设置当前燃油价格,单位元/升。
用于计算行程油费。
5.4.3菜单—油耗系数—油量:用来校准油耗,最大可设值655.35升。
设置时,发动机应熄火。
注意,油量是从燃油计清零开始算起的总油量。
5.4.4菜单—油耗系数—计算油耗:油量项输入后才出现的显示项,用来计算更新油耗系数。
5.5.1菜单—参数设置--ECU 选择:设置ECU 对应的驱动程序。
例:ECU 设置值000,适用联合电子ECU 型号M7、M797。
ECU 设置099,适用支持ISO-14230协议的OBD2车型。
适用ECU 在不断增加,询问经销商获取最新资料。
5.5.2菜单—参数设置--里程校正:100.00%表示显示里程使用ECU 的数据。
如显示里程比实际里程大(或小),将校正值按相应比例改大(或小),使显示里程与实际相符。
例,实际行驶100公里,显示106公里,校正值设106.00%。
注:里程和速度是同步校正的,一般原车速度表偏快。
5.5.3菜单—参数设置—限速速度:可设范围为10~255km/h。
当汽车行驶速度超过设定值时,喇叭间断发出“滴”声,正常行车显示模式下同时弹出超速提示窗。
5.5.4菜单—参数设置--喷油提示声:设0,禁止喷油提示声。
设1,允许喷油提示声。
允许时,当发动机开始喷油做功,喇叭发出“滴”声;当发动机停止喷油,喇叭发出“滴”声。
5.5.5菜单—参数设置--预设距离:可设范围1~255公里.此预设距离用于计算预设距离平均油耗(简称预设油耗)。
如预设距离项为005,则计算最后5公里路程的平均百公里油耗。
5.5.6菜单—参数设置--保养1(2、3)里程:设置保养提示里程。
保养1(2、3)里程可设范围00.0~25.5×1000km(千公里),00.0表示关闭保养提示。
例:保养1设“05.0”,表示保养1里程为5000公里。
当保养里程计计数到5000公里时,正常行车显示模式下,弹出保养1提示窗。
任意点击触摸屏或按任意键,可清除提示窗,并复位相应保养里程计。
5.5.7菜单—参数设置--换挡转速:设置升挡提示转速。
当发动机转速从低到高,超过预设值时(并速度小于屏蔽速度),喇叭发出“滴、滴”两声,正常行车显示模式下同时弹出换挡提示窗。
5.5.8菜单—参数设置--换挡屏蔽:设0,换挡提示功能关闭。
设置一个合适的换挡屏蔽速度值,可屏蔽最高挡的换挡提示声。
例:某辆车挂5挡、转速2200时速度是70公里/小时。
设换挡屏蔽65,换挡转速2200,5挡时,转速跨越2200转,不会发出换挡提示声,小于5挡的换挡提示正常。
5.5.8菜单—参数设置--油箱容量:设置汽车油箱容量大小,最大255升。
此项用于计算油箱剩余油量及可行驶里程。
5.5.9菜单—参数设置--剩余油量:默认设0。
表示在加满油时,须手动将油量计清零,或者在“油量计清零”窗口中输入加油量,剩余油量才能正确显示。
部分车型提供自动油量显示功能,可将该项设1。
注:该项设1后,剩余油量显示不正确,则表示不支持自动功能。
5.5.10菜单—参数设置--报警水温:设置报警水温值,单位℃。
当水温>报警水温值,喇叭发出“滴、滴”声10秒,正常行车显示模式下同时弹出水温高提示窗。
同时如屏幕无水温显示项,则屏幕3区自动跳转显示水温项。
5.5.11菜单—参数设置--电压上限(下限):设置报警电压上限(下限)值。
当电压>上限值(或<下限值)时间超过10秒,喇叭发出“滴、滴”声10秒,正常行车显示模式下同时弹出电压异常提示窗。
同时如屏幕无电压显示项,则屏幕4区自动跳转显示电压项。
5.5.12菜单—参数设置--防冲突:正常情况下,该项值为1。
如安装行车电脑后,出现打不着车现象,将该项值改为2。
如待机耗电大(蓄电池易没电),可将该项设1,或2。
注:“防冲突”项在“参数设置”菜单的第4页,触摸“+”“-”图标换页。
设置通讯启动待机耗电0快部分车型耗电大1一般小2部分车型稍慢小,抗干扰强5.6菜单—数据处理:子菜单里可分别进行里程计2清零,油量计清零,保养1(2、3)里程计清零(含保养里程计里程显示),全部数据清零。
注意:数据清零后不能恢复,请谨慎操作。
5.7.1菜单—时钟设置--时钟:时钟为24小时制,可设置小时和分钟。
时间设定完成后,秒计时从0开始。
5.7.2菜单—时钟设置--时钟校正:用于校正时钟误差,校正以10天为单位,偏快输入+秒数,偏慢输入-秒数。
例1,时钟10天慢了20秒,则时钟校正项设-20。
例2,时钟30天快了120秒,则时钟校正项设40(=120/(30/10))。
5.8.1菜单—显示设置--亮度:设置无光线(夜晚)情况下的显示亮度(共9级)。
注意:白天调整亮度,由于亮度自动调节功能影响,亮度变化可能不明显。
5.8.2菜单—显示设置--灵敏度:设置自动亮度调节的灵敏度。
灵敏度值9,灵敏度最高;等于0,关闭亮度自动调节功能。
亮度调节的范围是设定的亮度级到9的范围。
如亮度选择3,则亮度自动调节范围是3—9级。
注:如亮度选择9级,灵敏度调节失效。
5.8.3菜单—显示设置—颜色:选择显示颜色方案。
5.8.4菜单—显示设置—方向:选择横屏或竖屏显示。
5.9菜单—故障码:子菜单里可进行读取故障码和清除故障码操作。
最多可显示10个故障码。
标准OBD2故障码显示如下:(ECU 设置099,或100、141时)注1:请联系经销商获取故障码注释升级数据文件。
注2:ECU 设置其它数值时,读故障码如无注释,可按如下方法读取OBD2故障码(车型须支持OBD2)如“ECU 选择”设置0--97,临时改99;如“ECU 选择”设置101--139,临时改100;如“ECU 选择”设置142--255,临时改141。
部分车型需关闭钥匙,等显示熄灭,再打开钥匙,ECU 才能退出专用程序。
然后读故障码。
读完后“ECU 选择”再改回原数值。
部分车型需关闭钥匙,等显示熄灭。
6.其它功能6.1行车显示标准页模式1或2、4下,停车熄火3秒钟后,屏幕7区自动跳转显示单程计。
重新启动,退出自动显示单程计功能,仍显示原来的项目。
按线控器“+”键或进菜单--项目选择子菜单,自动功能取消。
6.2行车显示标准页下,启动汽车、车没开动时,如屏幕无水温显示项,则屏幕3区自动跳转显示水温项,如屏幕无电压显示项,则屏幕4区自动跳转显示电压项。