Trupulse200B中文简易操作说明
卓越E200快速使用指南

在卓越E200上启动轻松传送
7.10选择“否,我需要使用CD、DVD或其他可移动介质”
七.轻松传送使用说明
在卓越E200上启动轻松传送
一.电脑接口及简要说明 二.电脑与键鼠连接 三.电脑与音箱连接 四.电脑与手机连接
五.手机与音箱连接
六.手柄与电脑连接 七.轻松传送使用说明 八.VISTA改装XP指导
五.手机与音箱连接
5.1打开手机蓝牙功能
部分型号手机不支持蓝牙立体声(A2DP),可能会造成连接失败或 音质不良等问题。具体支持情况请参考手机说明书。
若超过60秒下一步操作没有完成,电源指示灯恢复慢速闪烁。 此时持续按住音箱电源开关6秒关机后重试。
三.电脑与音箱连接
3.3在方正蓝牙设备管理中心里搜索音箱
a
双击“方正蓝牙设备 管理中心”打开软件
b
自动搜索发 现音箱后出现 此图标 择“配对”
C 右键选
三.电脑与音箱连接
3.4输入配对口令
请在30秒内输入默认 口令:8888
三.电脑与音箱连接
3.5连接音箱蓝牙服务 a 双击“方正多功能蓝牙音箱”图标
打开,打开自动搜索蓝牙服务窗口
选择“蓝牙高质量音 频”右键选择“连接”
b自动搜索服务后,
警告: 请勿连接“蓝牙单声道耳机”!
三.电脑与音箱连接
3.6连接成功
连接成功发出短音 “嘟”,指示灯常亮, 表示连接成功
此时您可以使用无线音箱欣赏电脑中的音乐 重要提示:配对过程只需一次,以后只需打开音箱即可自动连接,如果 遇到音箱无声音现象,请参考3.7和3.9进行相关设置。
“8888” 点击“确认”
b点击“更新”
蓝牙口令可以任意设置,PC与手机输入相同即可。
EUROPORT PPA200 快速启动向导说明书

EUROPORT PPA200Ultra-Compact 200-Watt 5-Channel Powered Mixer with Wireless Microphone Option, Klark Teknik Multi-FX Processor and FBQ Feedback DetectionV 5.02EUROPORT PPA200快速启动向导3带有此标志的终端设备具有强大的电流, 存在触电危险。
仅限使用带有 ¼'' TS 或扭锁式插头的高品质专业扬声器线。
所有的安装或调整均须由合格的专业人员进行。
此标志提醒您, 产品内存在未绝缘的危险电压, 有触电危险。
此标志提醒您查阅所附的重要的使用及维修说明。
请阅读有关手册。
小心为避免触电危险, 请勿打开机顶盖 (或背面挡板)。
设备内没有可供用户维修使用的部件。
请将维修事项交由合格的专业人员进行。
小心为避免着火或触电危险, 请勿将此设备置于雨淋或潮湿中。
此设备也不可受液体滴溅, 盛有液体的容器也不可置于其上, 如花瓶等。
小心维修说明仅是给合格的专业维修人员使用的。
为避免触电危险, 除了使用说明书提到的以外, 请勿进行任何其它维修。
所有维修均须由合格的专业人员进行。
1. 请阅读这些说明。
2. 请妥善保存这些说明。
3. 请注意所有的警示。
4. 请遵守所有的说明。
5. 请勿在靠近水的地方使用本产品。
6. 请用干布清洁本产品。
7.请勿堵塞通风口。
安装本产品时请遵照厂家的说明。
8. 请勿将本产品安装在热源附近,如 暖 气 片, 炉子或其它产生热量的设备 ( 包 括功放器)。
9. 请勿移除极性插头或接地插头的安全装置。
接地插头是由两个插塞接点及一个接地头构成。
若随货提供的插头不适合您的插座, 请找电工更换一个合适的插座。
10. 妥善保护电源线, 使其不被践踏或刺破, 尤其注意电源插头、多用途插座及设备连接处。
Blaupunkt CEM200车内音频系统遥控器简文说明书
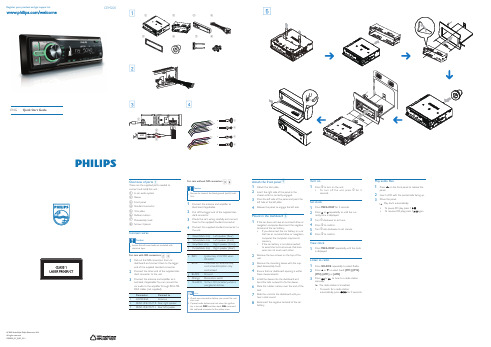
Register your product and get support atCEM200ENGQuick Start Guide3421a b c e f g hdb acda dbc d Overview of parts 1These are the supplied parts needed to connect and install this unit.a In-car audio system b Sleeve c Front panel d Standard connectore Trim platef Rubber cushiong Disassembly toolsh Screws 4 piecesConnect wiresFor cars with ISO connectors 2 31 Pull out the ISO connectors from cardashboard and connect them to the bigger end of the supplied standard connector.2 Connect the other end of the supplied stan-dard connector to the unit.3Connect the antenna and amplifier as il -lustrated,if applicable. Y ou can connect the car audio to the amplifier through RCA-TO-RCA cables (not supplied).For cars without ISO connectors 3 41 Connect the antenna and amplifier as illustrated, if applicable.2 Cut off the bigger end of the supplied stan-dard connector.3 Check the car’s wiring carefully andc onnect them to the supplied standard connector.4Connect the supplied standard connector to the unit.Attach the front panel 51 Attach the trim plate.2 Insert the right side of the panel in the chassis until it is correctly engaged.3 Press the left side of the panel and point the left hole at the left pillar.4 Release the panel to engage the left side.Mount in the dashboard 51If the car does not have an on-board drive or navigation computer, disconnect the negative terminal of the car battery.If you disconnect the car battery in a car• that has an on-board drive or navigation computer, the computer may lose its memory.If the car battery is not disconnected,• to avoid short-circuit, ensure that bare wires do not touch each other.2 Remove the two screws on the top of the unit.3 Remove the mounting sleeve with the sup-plied disassembly tools.4 Ensure that car dashboard opening is within these measurements:5 Install the sleeve into the dashboard and bend the tabs outward to fix the sleeve.6 Place the rubber cushion over the end of the bolt.7 Slide the unit into the dashboard until you hear a click sound.8Reconnect the negative terminal of the car battery.T urn on 1Press z to turn on the unit.• To turn off the unit, press z for 3seconds.Set clock1 Press MENU/DISP for 3 seconds.2 Press or repeatedly to until the cur-3 Turn z clockwise to set hour.4 Press z to confirm.5 Turn z anti-clockwise to set minute.6 Press z to confirm.View clock1Press MENU/DISP repeatedly until the clock is displayed.Listen to radio1 Press SOURCE repeatedly to select Radio.2 Press3 or4 to select band: [FM1], [FM2], [FM3], [AM1], or [AM2] .3Press or to tune to a radio station manually.The radio station is broadcast. »T • automatically, press for 3 seconds.5Play audio files1 Press on the front panel to release thepanel.2 Insert a CD with the printed side facing up.3Close the panel.P lay starts automatically. »T o pause CD play, press 1 • .T o resume CD play, press •1 again.© 2009 Koninklijke Philips Electronics N.V .All rights reserved.CEM200_51_QSG_V1.1。
Soltec PHP-200B Series产品说明书

U C ontinuous Stroke-LengthAdjustment MeasuredU D irect Calibration and Built-In Warning U Adjustable Backpressure ControlU T otalized Output in U.S. Gallons or LitersU Bleed Valve StandardU Control Options: Manual or Analog U Relay Output OptionU A vailable in Polypropylene, PTFE, or Stainless Steel Liquid Ends The PHP-200B Series consists of diaphragm-type, solenoid-driven, microprocessor-based metering pumps with maximum capacities to 4.5 gPH and maximum backpressures to 253 psig. The housing is constructed of fiberglass-reinforced PPE plastic, with a NEMA 4X (IP66) enclosure rating to protect against corrosion, dust, and water. A removable hood covers the faceplate. The drive unit houses a short-stroke solenoid with a maximum stroke length of1.25 mm (0.05"). It is equipped with a noise- suppressing mechanism for quiet operation and has only one moving part, the armature. The diaphragm is constructed of fabric-reinforced EPDM elastomer with a plastic core and PTFE facing. It is chemically resistant against virtually all process fluids and can be used over a wide temperature range. Suction and discharge ports are equipped with double-ball check valves for maximum repeatability. Feed rate is determined by stroke length and stroke rate. Stroke length is manually adjustable from 1 to 100% in increments of 1% via the stroke length knob. Two control modes are available for the PHP-200B Series: manual or analog control.The PHP-210B Series has all the features of the PHP-200B Series, as well as current input. This allows the stroking rate to be controlled by standard process signals.ChemiCal metering PumPs microprocessor Based,high PerformancePHP-200B SeriesPHP-202B-P complete with included foot and injection valves, 1.8 m (6') contact cable for pulse input, level connector, andoperator’s manual, shown smaller than actual size.PHP-202B-P with includedfoot and injection valves shownsmaller than actual size.LSPECIFICATIOnSMaximum Stroke Length: 1.25 mm (0.05")Materials of Construction: Housing: Fiberglass-reinforced PPE D iaphragm: PTFE-faced EPDM with plastic coreL iquid-End Options: Polypropylene (P), PTFE (T), 316 SS (S)S eal: FKM for P models, PTFE for T and S modelsEnclosure Rating: NEMA 4X (IP66)Power Supply: 100 to 230 Vac, 1 phase, 50/60 Hz ±10%Repeatability of Metering: ±2% under constant conditions and at minimum 30% stroke lengthAmbient Temperature Range: -10 to 45°C (14 to 113°F)Maximum Fluid Operating Temperature: 50°C (122°F)Power Cord: 2 m (6')Comes complete with foot and injection valves, 1.8 m (6') contact cable for pulse input, level connector, and operator’s manual.Ordering Examples: PHP-211B-P , frequency/current input, 0.19 GPH max polypropylene pump.PHP-202B-P, frequency input, 0.19 GPH max polypropylene pump.Polypropylene models are supplied with 3 m (10') or 1.5 m (5') of polyethylene tubing.† Capacities and suction lifts are for waterlike fluids. Higher-specific-gravity fluids reduce suction lift, while higher-viscosity fluids reduce capacity.* “-S ” pumps have 1⁄4 FNPT connections. See ordering information above.。
优创(湖南)收款机-ER200使用说明书

优创(湖南)收款机-ER200使用说明书前言您好!欢迎使用优创ER-200收款机,感谢您对优创产品的信任。
本手册将详细介绍优创ER-200收款机的操作和使用,让收款机尽可能地满足您的使用需要。
同时,也提出一些收款机使用过程中的注意事项,以减少收款机的使用故障,延长使用寿命。
请在使用收款机之前,仔细阅读手册的第一章,了解ER-200收款机的基本功能和注意事项;然后,根据自己的实际情况,选择性地阅读手册中的相关内容,并按步骤对收款机进行操作。
收款机在实际使用前,依使用场所的要求需要对收款机进行相应的设置,如设置商品、部类、票头语等。
在使用过程中,请您不要随便更改收款机的设置,以免因设置错误而导致收款机无法正常工作。
事实上,有很多的功能并没有在本手册中详细描述或提及。
因此当您要使用一些特别的功能时,请与当地销售商或者我公司技术支持部门联系,在他们的指导下进行设置。
当收款机在使用中出现故障时,首先在本手册查找相关的处理方法,或者直接从当地经销商得到帮助。
不要擅自对收款机进行维修,而要尽快联系授权代理商或直接与优创技术服务部联系,以快速排除故障。
致谢!优创(湖南)信息设备有限公司I前言 (I)第1章收款机简介...........11.1.收款机的作用 ...................... 11.2.收款机基本性能................... 21.3.注意事项.............................. 21.4.本手册图示解释................... 31.5.名词解释.............................. 3第2章收款机的组成.........52.1.收款机外形图 ...................... 52.2.收款机部件.......................... 6§2.2.1 显示屏....................................................................................................................... 6I目录II §2.2.2 打印机....................................................................................................................... 7§2.2.3 键盘........................................................................................................................... 72.3.收款机工作档位................... 8第3章商品销售...........103.1.收款员和营业员登录 ....... 10§3.1.1 收款员登录......................................................................................................... 10§3.1.2 营业员登录......................................................................................................... 113.2.非销售操作...................... 11§3.2.1 入金操作 ............................................................................................................. 12§3.2.2 出金操作 ............................................................................................................. 123.3.部类销售操作 .................. 12§3.3.1 直接部类销售 .................................................................................................... 13§3.3.2 间接部类销售 .................................................................................................... 13§3.3.3 部类的变价销售................................................................................................ 14§3.3.4 同一部类的多个销售 ....................................................................................... 153.4.商品(PLU)销售操作......... 17§3.4.1 键盘录入商品 .................................................................................................... 17§3.4.2 商品的变价销售................................................................................................ 18§3.4.3 同一商品多次销售............................................................................................ 18§3.4.4 条码阅读器读入商品 ....................................................................................... 203.5.付款操作.......................... 21§3.5.1 现金付款 ............................................................................................................. 21§3.5.2 信用卡付款......................................................................................................... 22§3.5.3 购物券付款......................................................................................................... 23§3.5.4 支票付款 ............................................................................................................. 24§3.5.5 混合付款 ............................................................................................................. 243.6.折扣/加成操作 ................. 25§3.6.1 单品折扣操作 .................................................................................................... 26§3.6.2 小计折扣操作 .................................................................................................... 26§3.6.3 金额折扣操作 .................................................................................................... 273.7.更改操作.......................... 27§3.7.1 取消操作 ............................................................................................................. 27§3.7.2 更改操作 ............................................................................................................. 28§3.7.3 交易取消操作 .................................................................................................... 28§3.7.4 退货操作 ............................................................................................................. 293.8.其它操作.......................... 30§3.8.1 复制收据 ............................................................................................................. 30§3.8.2 非销售开钱箱 .................................................................................................... 30§3.8.3 显示日期和时间................................................................................................ 30§3.8.4 开关背景灯......................................................................................................... 30§3.8.5 PLU商品信息查询 ........................................................................................... 30III第4章挂帐销售...........314.1.挂帐销售.......................... 31§4.1.1 开台并开始销售................................................................................................ 31§4.1.2 已开台的桌台增加销售................................................................................... 32§4.1.3 转帐操作 ............................................................................................................. 32§4.1.4 打印消费清单 .................................................................................................... 334.2.结帐操作.......................... 33§4.2.1 结帐不打印消费明细 ....................................................................................... 33§4.2.2 结帐并打印消费明细 ....................................................................................... 34§4.2.3 合并付帐操作 .................................................................................................... 34§4.2.4 中止结帐操作 .................................................................................................... 35§4.2.5 分开付帐 ............................................................................................................. 354.3.其它操作.......................... 36§4.3.1 转换收款员......................................................................................................... 36§4.3.2 备注说明的使用................................................................................................ 36§4.3.3 人数注明 ............................................................................................................. 37第5章经理档操作.........385.1.单机库存管理 .................. 38§5.1.1 增加库存 ............................................................................................................. 38IV§5.1.2 减少库存 ............................................................................................................. 395.2.更改商品价格 .................. 39第6章收款机报表.........416.1.收款机报表介绍............... 41§6.1.1 报表清单 ............................................................................................................. 42第7章附录...............457.1.收款机默认图形一览 ....... 457.2.收款机常见错误信息 ....... 47V第1章收款机简介ER-200收款机一款汉显机型,与其它收款机的主要区别在显示屏,ER-200的收款员显示屏采用的是4行×16字符(8汉字)液晶显示屏,顾客显示屏采用的是8段LED荧光数码显示屏。
激光测距仪使用方法
激光测距仪使用方法激光测距仪的使用方法其实不复杂,只要选择好模式即可,一般都是一键操作。
让我们举例说明,以TruPulse 200和欧尼卡2000B为例,方便我们理解具体操作。
新发布的TruPulse 200型号测量的不仅仅是距离和角度。
这款激光器配备了全新的改进型增强功能,为用户提供先进的尖端技术以及LTI激光器所熟知的易于操作和准确性。
外观颜色也有变化,新款图帕斯200外观是以黑色为主,搭配黄色线条。
一、图帕斯200升级版优势在于:TruPulse图帕斯200激光测距仪,相比以前老款,精度提升到0.2米,且带有蓝牙,外观颜色也有变化,黑黄相间。
1、主要功能和增强功能:精确度提高33%目标收购率提高25%无线通信晶莹剔透的7倍光学镜片可调节的眼睛屈光度TruTargeting技术2、所有TruPulse激光测距仪的主要特点:以度或百分比度量斜率距离(SD)+倾角(INC)计算水平距离(HD)+垂直距离(VD)+高度(HT)+ 2D缺失线(ML)使用***近+***远+连续+过滤器模式区分所需目标与周围障碍物安装在三脚架上,并具有优质光学元件,可增强视野二、产品参数:二、五种测量方式:1、SD模式点到点直线距离(斜距)十字光丝直接瞄准被测物体按FIRE键2、VD模式垂直高度(相对高度)即:单点定高目镜内部十字光丝直接瞄准被测物体的最高点适合测量悬空物体的相对高度(如:高架线缆)3、HD模式水平距离十字光丝瞄准被测物体仪器内置的倾斜补偿器会进行自动角度补偿计算离被测物体的水平距离4、HT模式绝对高度即:三点定高,目镜内部十字光丝直接瞄准被测物测量顺序:瞄准被测中部,先测HD水平距离瞄准被测物体的顶部,按FIRE键瞄准被测物体的底部,按FIRE键适合测量建筑物实体的绝对高度——如:建筑物高度,树木高度,塔台高度;5、INC模式倾斜角度(俯仰角度)十字光丝直接瞄准被测物体,按FIRE键。
图帕斯测距仪系列产品质量是测绘行业公认的,但其价格也同样是测绘行业顶尖的。
火灾报警控制器GST200 操作步骤
火灾报警控制器GST200 操作步骤: 一、消音操作1、消除本机声音在报警状态下,按下“ACK/MUTE ”按键,出现下面输入密码的提示输入密码操作密码‘12345678’,然后按‘ENTER ’键,消除本机声音操作完成。
2、消除现场声光报警器声音在报警状态下,按下“SILENCE ”按键,出现上面输入密码的提示 输入密码操作密码‘12345678’,然后按‘ENTER ’键,消除现场声光报警器声音操作完成。
二、复位操作复位‘RESET ’按键,是复位控制器的火警或故障状态,使控制器返回正常监控状态 操作时,按下‘RESET ’按键,输入操作密码‘12345678’,然后按‘ENTER ’按键,复位完成。
同样需要输入操作密码‘12345678’三、火警界面意义▪ 001 0f 006 !FIRE! 05:25 // 代表当前系统中有6个设备报火警,该条火警是第一条火警▪ Z001-L1-N030MCP //发生火警的分区号、回路号以及发生火警的设备地址和设备类型 此条代表意义为:1区、1回路、地址为30号的手报。
▪Device-30 //发生火警设备的注释信息四、火警信息处理当发生火警时,首先根据控制器的报警信息检查发生火警的部位,确认是否有火灾发生。
001 0f 006 !FIRE! 05:25 Z001-L1-N030MCP Device-30------------------------------------- Last !Fire! Zone:003 Z-003 Device-066若确认有火灾发生,应根据火情采取相应措施: 第一步:通知现场人员撤离; 第二步:拨打消防报警电话报警; 第三步:启动消防灭火设备; 若为误报警,应采取如下措施:第一步:应按“SILENCE ”键中止警报声。
第二步:排除误报火警因素;第三步:按“RESET ”键使控制器恢复正常状态,观察是否还会误报;如果仍然发生误报可将其禁止,并尽快通知维护单位进行维修。
海湾设备简单操作说明
1)出现火警信息时:按“消音”键,然后确认现场是否有火情,如有火情按预定方案灭火,如无火情确认误报原因(手钮报警可用吸盘吸起,光电感烟探测器误报的处理参见附录二)并记录。
如不能独立处理,可暂时隔离设备,并及时与安装公司或海湾公司联系。
设备屏蔽:按下“屏蔽”键,然后输入需要隔离设备的用户编码,按“TAB”键,输入其设备类型,按“确认”键存储。
设备处理正常后,必须及时释放该设备,以使系统对该设备恢复正常监控。
取消屏蔽:按“取消屏蔽”键,操作同设备屏蔽。
当系统显示信息过多时,不易查看,可进行如下操作:查看信息显示:当系统中有报警、故障、动作、和屏蔽中的任意一种信息存在时,系统将全屏显示此信息;若系统中存在的信息多于一种时,系统将自动分屏,同时显示系统中存在的各类信息,红色指示条指向的窗口为当前窗口。
用“分屏/全屏”键可以实现当前信息窗口的分屏和全屏显示转换。
2)联动设备的启动当确认火情后,可启动联动设备。
首先查看控制器是否处于手动允许状态,否则把控制器转为手动允许状态。
手动方式是指通过手动盘对联动设备进行启动和停动的操作。
手动允许的设置:按下“用户设置”键,调出启动方式菜单,可按“手动设置”键选择相应方式,按“确认”键存储,系统即工作在所选的状态下。
当控制器处于手动允许状态,可通过手动盘启动相应设备。
当系统较大时,确认火情后,可把控制器转为自动状态,控制器将根据预设的逻辑程序执行,相应联动设备自动启动。
自动允许的设置:按下“用户设置”键,调出启动方式菜单,可按“自动设置”键选择相应方式,按“确认”键存储,系统即工作在所选的状态下。
3)日常操作当时间、日期与实际不符时,可进行修改。
修改时间、日期:在监控状态下,按下“用户设置”键,可按“时间.日期设置”键,可进行编辑修改,确认后存入修改内容便得到了新的系统时间。
当想了解整个系统注册、配置信息,每个回路设备的具体信息,可进行详细查询。
系统信息检查:按下“设备信息检查”键,屏幕显示当前系统所有配置。
B-200 High Output Bubble Machine 用户手册说明书
B-200High Output Bubble MachineUser Manual- English-中文© 2023 Antari Lighting and Effects Ltd.1.Introduction (1)2.Safety Information (1)3.Package Contents & Inspection (2)4.Machine Details (3)5.Technical Label Information (3)6.Bubble Fluid (3)7.Setting and Manual Operation (3)8.Filling Bubble Fluid (4)9.Control Settings (4)10.DMX Connection (4)11.BCT-1 Timer Cable Remote (Optional) (6)12.BCR-1 Wireless Remote (Optional) (6)13.Service and Maintenance (6)14.Technical Specifications (7)15.Warranty Disclaimer (7)16.Machine Dimension (8)1.前言 (9)2.安全注意事項 (9)3.包裝內容與檢查 (10)4.機器訊息 (11)5.技術標籤資訊 (11)6.泡泡水 (11)7.設定與手動操作說明 (12)8.填充泡泡水 (12)9.控制設定 (12)10.DMX說明 (13)11.BCT-1 有線定時控制器(選配) (14)12.BCR-1無線控制器(選配) (14)13.維護和保養 (14)14.技術規格 (15)15.保固聲明 (15)16.機器尺寸圖 (16)Appendix I - Grounding Instruction (17)User Manual1. IntroductionPlease read all the user manual before operating the machine, and place the manual where the user can refer to it at all time. The manual includes how to install and operate the machine under safe condition and explain all the labels printed on the machine. If you encounter any problem, contact your local Antari dealer for assistant immediately. 2. Safety InformationDANGER If the danger is not avoided, it will cause death or serious injuryWARNING If the warning is not heeded, it can cause death or serious injury.CAUTION If the precaution is not taken, it may cause minor or moderate injury.DANGER●Must connect the machine to the correct rated voltage or it might lead to an electrical shock or a burn and maycause serious consequences.●Must connect the machine to a protected circuit and ensure it is properly grounded to avoid the risk ofelectrocution. For grounding instruction, please refer to Appendix I on page 17.●Do not operate the machine with a bundled power cord, it could lead to a fire hazard.●When operating the machine, do not point at people, animals, or fire.WARNING●Please operate the machine on a flat, level hard and well ventilated surface area, reserve at least 50cm spacearound the machine and make sure there is no flammable gas or material nearby.●Do not disassemble, repair or modify the machine, it may cause damages, malfunction, risk of electrical shockor result in fire.●The machine can only be operated by adults or professionals, is not intended for use by person with reducedphysical sensory, mental capabilities, or lack of experience and knowledge including children.●Do not leave the machine running unattended, make sure all powers are off when leaving.●Children should be supervised to ensure that they do not play with the machine.●Do not use the machine upside down or tilt it, it might cause damages or malfunction.●Please store the fluid inside in a well ventilated area without direct sunlight and keep out of reach of children.In case of eye contact or accidentally swallow the fluid, please seek medical attention immediately.●Do not leave unused fluid in the machine for an extended period.●Do not stop the bubble wheel by force, it will damage the motor.●Surface will be slippery after use a period of time.CAUTION●Keep the machine dry at all time. The machine is not waterproof, do not expose the machine to water, rain, ormoisture environment.●Please make sure the power outlet is not damaged or loose before plug in the power cord.●If the power cord is damaged, it must be replaced by Antari or its local dealers, otherwise the warranty will bevoid.●Before operating the machine, please sure the bubble fluid is filled in the fluid box to avoid the pump in idlingstate which could lead to overheat and malfunction.●Before transporting or moving the machine, please make sure the fluid is drained and fluid box is empty.(Recommend using original package)●The machine is for indoor use only.●Do not operate the machine in any area with unstable voltage.●If you experience strange sound or malfunction, turn off the power and unplug the power cord immediatelyand contact your local Antari dealer for assistant.●Do not contact any moving part.●Only use accessories recommended or sold by Antari.●Please make sure the power is off when not using the machine and unplug the power cord if not intend to usefor a long period of time.●To disconnect, turn all controls to the off position, then remove plug from outlet.●Do not unplug by pulling on cord. To unplug, grasp the plug, not the cord.●Unplug from outlet before servicing or cleaning.●When finished, disconnect power and remove all bubble fluid from the machine.●Do not overfill your bubble machine, overfilling will cause the leakage.●Do not operate the machine with a damaged cord or plug, or after the machine malfunctions or is dropped ordamaged in any manner. Return machine to the nearest authorized service facility for examination, repair, or electrical or mechanical adjustment.Before operating the machine, please read all warning labels on the machine, description as below: Top Cover PrintingWARNING!DISCONNECT POWER BEFORE CHANGING FUSENO USER SERVICEABLE PARTS INSIDEUSE ONLY WITH ADULT SUPERVISIONFOR INDOOR USE ONLY. KEEP DRY3. Package Contents & InspectionImmediately upon receiving the machine, carefully unpack the carton, check the content to ensure it is the correct model and all parts are included. If any part appears to be damaged or missing during transportation, please contact your local dealer and return with original package for inspection.3.1Package Contents1 x B-200 High Output Bubble Machine1 x IEC Power Cable1 x Hanging Bracket1 x User Manual or Scan QR Code on the Machine3.2Optional Accessories4. Machine Details01. Adjusting Knob07. Dip Switch5. Technical Label InformationPlease read the technical label information on the back of the machine before operating it.1. Model Name 5. Breaker/Fuse6. Bubble FluidCAUTION!Always turn off the power before filling the fluid box. Do not add flammable liquid to the fluid box. If fluid gets inside the machine, please contact your local Antari dealer for assistant.●Only the bubble fluid manufactured by Antari can be used, do not mix or dilute the bubble fluid. Due toimproper storage or using other fluid might cause malfunction.●The machine is tested and calibrated with the specific bubble fluid to get the best performance.●The warranty on your bubble machine will be void if you use bubble fluid not manufactured by Antari.7. Setting and Manual OperationWARNING Machine falling off might cause serious injury, please make sure it is secure and firm on the overhead.Step 1.Place the machine on a flat, level hard and well ventilated surface area and reserve at least 50cm open space around the machine, and make sure there is no flammable gas or material nearby;Step 2.Fill the machine with Antari approved bubble fluid;Step 3.Plug the machine to the power outlet. Please read the technical label on the back of the machine and make sure the power outlet has the correct rated voltage for the machine;Step 4.Turn on the power, the internal bubble wheel and fan will active and start to produce bubble. Turn off the power to stop.Step 5.To turn off the power, please make sure the machine is not operating. If you will not use the machine a long period of time, please unplug the power cord.8. Filling Bubble FluidEnsure your bubble machine is unplugged from the main electrical supply before filling bubble fluid.Please pour the bubble fluid as shown above.***Always check bubble fluid level.***Please make sure that the bubble wands are completely covered with bubble fluid.***Do not overfill the bubble fluid – stop 5cm below the top edge to avoid overflow and internal damage.***Only use Antari Bubble Fluid – the machine cannot run on water only or other uncertified fluid.9. Control SettingsB-200 High Output Bubble Machine can be operated in the following modes. The machine can only accept 1 type of signal at a time. When using different control modes at the same time, the machine will work according to built-in control priority:●Manual●Timer●DMX512●Wireless10. DMX Connection10.1DMX Connector Pin AssignmentThe machine has a XLR 5-Pin for DMX connection. The diagram below indicates pin assignment information.** There is a protection cap on DMX IN, pleaseremove it with your finger before operation.Pin Function1Ground2Data-3Data+4N/A5N/A10.2DMX Setting10.3AddressingEach device occupies 1 channel. To ensure that the control signals are properly directed to each device, they require addressing. This is to be adjusted for every single device by changing the DIP-switches as set out in the table below. The starting address is defined as the first channel from which the device will respond to the controller. Please make sure that you do not have any overlapping channels in order to control each device correctly and independently from any other fixture on the DMX data link. If two, three or more devices are addressed similarly, they will work similarly.Occupation of the DIP-Switches:11. B CT-1 Timer Cable Remote (Optional)BCT-1 Timer Cable Remote is an optional accessory for B-200 High Output Bubble Machine, please see instruction below;Note:** You must turn on the power of the remote in order to use it.** If the TIMER function is off, you can still press the Green button to start bubbling.** The “DURATION” and “INTERV AL” knob are using analog signal, therefore can’t define a specific time range. ** If you encounter any problem, please contact your local Antari dealer for assistant.12. B CR-1 Wireless Remote (Optional)BCR-1 Wireless Remote is an optional accessory for B-200 High Output Bubble Machine, it included a wireless remote control and a receiver. It’s ready to use, no pairing necessary, please see instruction below;1.Plug the receiver to the connector on the back of the machine;2.Press BLUE button to start bubbling and press RED button to stop bubbling.** Signal range is approximately 50m in open area, it may vary depending on actual situation on site.** If you encounter any problem, please contact your local Antari dealer for assistant.13. S ervice and MaintenanceDANGER Disconnect the power cord before starting maintenance operation!Always keep the machine clean.●Can use an air compressor, a vacuum or a soft brush to remove the dust on the machine.●Can use a slightly damp cloth to clean the casing.●Before store the machine or after use the machine, please make sure the fluid is empty and dry.●It is recommended to run the machine at least once a month in order to maintain its best performance andoutput condition.●Excessive dust and build up liquid residue will reduce the performance and cause overheat.14. T echnical Specifications15. Warranty DisclaimerWe guarantee the merchandise manufactured by us to be free from defect in material and workmanship for a period of one year. Our obligation and liability under this warranty shall be restricted to repair or replacement at our factory or local authorized dealer. We assume no liability of the products that are improperly used or used for any purpose other than that for which they are specially designed. This warranty shall not apply to any merchandise which has been repaired, altered or assembled outside our factory in any way so as in our judgment to affect its performance, nor which has been subjected to misuse, negligence, or accident nor to any merchandise operated contrary to our printed instructions. We will not allow or be liable of any loss or any damages of any kind in connection with the use, sale, or repair of any merchandise purchased from us.16. M achine Dimension中文使用說明書1. 前言在操作本機器之前,請務必仔細詳閱本說明書然後請將本說明書放置在機器使用者可隨時查閱之處存放。
森兰SB200系列变频器使用手册V1.4
FC 键盘操作及显示设置................................................................................... 2 FF 通讯参数 ....................................................................................................... 2 Fn 厂家参数 ....................................................................................................... 2 FP 故障记录 ....................................................................................................... 2 FU 数据监视....................................................................................................... 2
目录
序言.......................................................................................................................... 2
1 安全及注意事项.................................................................................................. 2
- 1、下载文档前请自行甄别文档内容的完整性,平台不提供额外的编辑、内容补充、找答案等附加服务。
- 2、"仅部分预览"的文档,不可在线预览部分如存在完整性等问题,可反馈申请退款(可完整预览的文档不适用该条件!)。
- 3、如文档侵犯您的权益,请联系客服反馈,我们会尽快为您处理(人工客服工作时间:9:00-18:30)。
产品使用操作简介
———Trupulse200型手持激光测距测高仪
一、产品产品简介简介简介::
美国激光技术公司(Laser Technology, Inc. )全新推出的图帕斯200(TruPulse200型)手持激光测距测高仪, 是最新推出的一款性价比高的专业激光测距仪。
具有以下特点:
(1)操作简单,三键操作,利用三个按键的操作即可轻松完成测量;
(2)紧凑轻便的外观和“测量瞄准一体化”的设计使激光和视线处于同一直线上,所发射的激光沿着您的视线行进,消除了视差问题,使测量的结果更加精确。
(3)可调目镜可为眼睛或者佩戴眼镜者提供舒适的观测条件。
仪器配备的屈光度调节器能够使您在工作的时候提供更好,更舒服,更加清晰的视野。
(4) 仪器具备的透明清晰显示数据的光学系统能够在您在眼睛瞄准目标的同时可以读出测量数据。
(5)通过激光传感器和集成倾角传感器, 可测量斜距/水平距/垂直距/倾角,内置三点测高程序可即可算出任何两点之间的高差。
(6)您可以通过标准的串口 RS232 (标准) 或者无线蓝牙®技术进行数据传输。
您还可在不同的环境条件下选择近距模式,远距模式或连续等目标模式进行测量工作。
二、机身结结构简介构简介::
三
,液晶显示液晶显示观测观测
观测器器界面
界面简介简介简介::
四、简单简单操作操作操作步骤步骤步骤指引指引指引::
1.安装电池: 按压并向内向下滑动即可取下电池盒盖,安装两节AA 电池;
2.开机: 按下FIRE 键,开机;
3.选取目标: 选取一个目标,透过目镜观测并用十字准线瞄准目标;
4.测量目标: 按住FIRE 键,一旦显示测量数据,即可松开按键;
5.关机: 同时按住上下方向键4秒钟,可关闭仪器电源;
五、基本操作项目指引基本操作项目指引::
1.测量单位的选择:
您可以选择Yards(码)/Meters(米)/Feet(英尺)为测距测量单位;
选择Degree(度)或者%(百分比斜率)为测倾斜角测量单位; 可按住▽ 下向键4秒钟以进入系统设置模式,当显示“Units ”选项时即可按上下方向键进行单位的选择. 2.蓝牙功能的打开:
可按住▽ 下向键4秒钟以进入系统设置模式,当显示“Units ”选项时再按▽ 下向键可显示“Bt ”选项(适用于Trupulse200B),再按下FIRE 发射键就可通过上下方向键选择打开或关闭蓝牙功能.
3.测量模式的选择:
开机后,通过上下方向键,您可随意选择斜距(SD)/倾斜角(INC)/水平距(HD)/垂直距(VD)/高度(HT)/ 垂直向两点间测跨距(ML)六种测量模式.
4.目标模式的选择:
Trupulse200(B)有五种目标模式,分别是:标准模式(Std)/连续模式(Con)/近距模式(Clo)/远距模式(Far)/过滤模式(Flt)(在数据显示区前部显示"F"字样).
可按住△ 上向键4秒钟以进入目标模式设置,通过上下键可选择目标模式,以Fire 键确认选择.
5.简单故障排除方法:
(1)无法开机: 请检查电池并确定按下FIRE 开机键.
(2)无法获取目标: 请确保已开机/镜头无遮挡/仪器稳固/按住FIRE 激光发射键.
六、维护保养提示维护保养提示::
1.电池:
电池是仪器唯一可由用户更换和拆卸的零部件,仪器长期不使用,请取出电池.
2.保修事项:
除电池外,请不要拆卸仪器任何螺丝及部件,厂家有限担保的保修将受影响或失效.
3.做好防潮/防尘/防震工作:
请勿将仪器置于-20~60摄氏度之外的环境温度下工作;
仪器密封良好,可免受可预见野外条件的影响;
仪器防尘防雨,但不能经受水浸;
仪器能承受适度震动,以防坠落或其他严重震动;
4.运输和其他事项:
运输时请使用原厂配置的携带箱;
野外工作,请使用颈带;
仪器不使用时,请装回目镜护罩.
附:其他请详细参阅产品说明书.。