12路智能自动混音器操作说明V3.4
ClearOne Converge SR 1212 12x12 自动数字混音器说明书
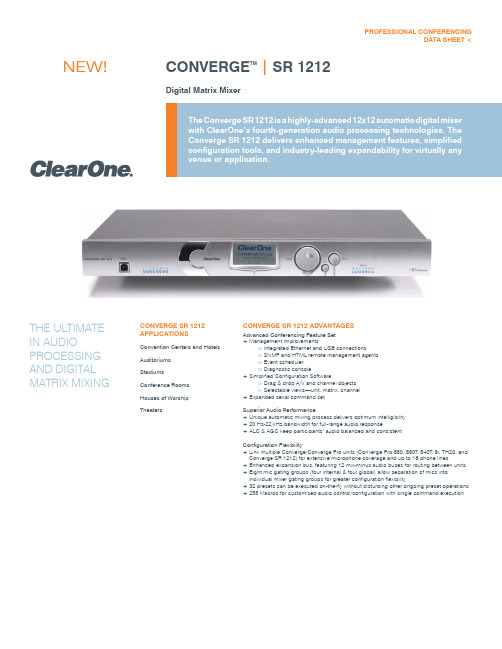
CONVERGE TM| SR 1212 Digital Matrix Mixer PROFESSIONAL CONFERENCINGDATA SHEET <THE ULTIMATE IN AUDIO PROCESSING AND DIGITAL MATRIX MIXING CONVERGE SR 1212APPLICATIONSConvention Centers and HotelsAuditoriumsStadiumsConference RoomsHouses of WorshipTheatersCONVERGE SR 1212 ADVANTAGESAdvanced Conferencing Feature Set+ Management Improvements> Integrated Ethernet and USB connections> SNMP and HTML remote management agents> Event scheduler> Diagnostic console+ Simplified Configuration Software> Drag & drop A/V and channel objects> Selectable views—unit, matrix, channel+ Expanded serial command setSuperior Audio Performance+ Unique automatic mixing process delivers optimum intelligibility+ 20 Hz-22 kHz bandwidth for full-range audio response+ ALC & AGC keep participants’ audio balanced and consistentConfiguration Flexibility+ Link multiple Converge/Converge Pro units (Converge Pro 880, 880T, 840T, 8i, TH20, andConverge SR 1212) for extensive microphone coverage and up to 16 phone lines+ Enhanced expansion bus, featuring 12 mix-minus audio buses for routing between units+ Eight mic gating groups (four internal & four global) allow separation of mics intoindividual mixer gating groups for greater configuration flexibility+ 32 presets can be executed on-the-fly without disturbing other ongoing preset operations+255 Macros for customized audio control/configuration with single command execution NEW!Audio PerformanceConditions: Unless otherwisespecified, all measurements areperformed with a 20 Hz to 22 kHzBW limit (no weighting)Frequency Response: 20 Hz to 22kHz ±1dBNoise (EIN): -126 dBu, 22 kHz BW,max gain,Rs=150 ΩTHD+N: <0.02%Dynamic Range: 100 dB (non A-weighted)Crosstalk <-91 dB re 20 dBu @ 20kHz channel to channelAuto Mixer ParametersNumber of Open Microphones (NOM) PA Adaptive ModeFirst Mic Priority ModeLast Mic ModeMaximum # of Mics ModeAmbient LevelGate Threshold AdjustOff Attenuation AdjustHold TimeDecay RateMatrix Mixing Parameters12 analog inputs/outputs12 expansion bus in/out8 assignable processing blocks in/out4 assignable fader blocks in/out Assignable Processing BlocksFiltersAll passLow passHigh passLow shelvingHigh shelvingParametric EQNotchCD HornCrossoversBesselButterworthLinkwitz-RileyCompressorDelay–adjustable up to 250 ms Assignable Fader BlocksGain/MuteMicrophone Input ConfigurationInput Gain AdjustMic or Line LevelPhantom Power on/offFiltersAll PassLow PassHigh PassNotchPEQMute on/offChairman Override on/offAGC on/offAutomatic Level Control on/offAuto Gate/Manual gateAdaptive Ambient on/offMic/Line Inputs 1-8Push-on mini-terminal block,balanced, bridgingImpedance: < 5 KΩNominal Level: adjustable -56 dBu to0 dBu (7 dB stepcoarse gain adjustment)Maximum Level: -65 dBu to +20 dBuLine Inputs 9-12Push-on mini-terminal block,balanced, bridgingImpedance: < 5 KΩNominal Level: 0 dBuMaximum Level: 20 dBuOutputs 1-12Push-on mini-terminal block, balancedImpedance: < 50 ΩNominal Level: 0 dBuMaximum Level: 20 dBuExpansion Bus In/OutProprietary NetworkRJ-45 (2), 1.9 MbpsCAT-5 twisted-pair cable, 200’maximum cable length between unitsEthernetAutoswitching with Quality ofConnection (QoC)10/100 Mbps Ethernet Network Port10/100 Mbps Ethernet PC PortRJ-45 ConnectorsRS-232Serial Command Protocol Only(Console software notsupported on RS- 232 port)DB-9 female9,600/19,200/38,400/57,600/115,200baud rate; 8 bits,1 stop bit, no parityHardware flow control on (default)/offControl/Status PortsDB-25 female A/B (2)Inputs A/B: active low (pull to ground)Outputs A/B: open collector, 40 VDCmax, 40 mA each+3.3 VDC pins (2) (300 mA over-current protected)USBVersion 2.0 compatibleT ype: B-connectorConfiguration & AdministrationSoftwareConverge™ ConsolePower Input RangeAuto-Adjusting100–240 VAC; 50/60 HzPower Consumption30 W T ypicalDimensions (L x D x H)17.25” x 10.25” x 1.75”43.8 x 26 x 4.5 cmWeight7.5 lbs/3.3375 kg unit weight12 lbs/5.4kg shipping weightOperating T emperature14° F/-10° C to 122° F/50° Cambient unit temperatureApprovalsSee the Installation & OperationManual for complete detailsAES48-2005: AES standard oninterconnections —Grounding and EMC practices— Shields of connectorsin audio equipment containingactive circuitry (self certified)Optional AccessoriesConverge Pro 880Converge Pro 880TConverge Pro 840TConverge Pro 8iConverge Pro TH20Tabletop ControllerPart Number910-151-900 Converge SR 121212x12 Digital Matrix MixerCONVERGE SR 1212 DATA SHEET <> CONVERGE SR 1212 BACK PANEL > SPECIFICATIONS> CLEARONE LOCATIONSHeadquarters:Salt Lake City, UT USA 5225 Wiley Post Way Suite 500Salt Lake City, UT 84116 Tel: 801-975-7200T oll Free: 800-945-7730 Fax: 801-977-0087******************Latin AmericaTel: 801-974-3621*******************EMEATel: 44 (0) 1189 036 053*******************APACTel: 801-303-3388*******************Other product names may be registered trademarks of their respective owners who do not necessarily endorse ClearOne or ClearOne’s products. All rights reserved. Information in this document subject to change without notice.© 2007 ClearOne Communications Inc. 802-151-900 Revision 1.1 January 2008.。
12路调音台湖山说明书
DM0804BDM1204BDM1604B---用户手册警告标志:机箱上的警告标志告诉用户不能擅自打开机箱,否则可能造成人身伤害阳插头立体声/耳机插头TRS单声通道耳机插头阴插头前置(Pre)后置(Post)“前置衰减器”信号取自通道衰减器之前的某点,因此发送的电平仅受AUX发送电平控制的影响,而不受通道衰减器的影响。
前置衰减器发送信号在监控混音中最常用。
“后置衰减器”信号取自通道衰减器之后的某点,因此其电平同时受AUX发送电平控制和通道衰减器的影响。
后置衰减器发送信号经常与调音台AUX或外接效果处理的效应器返回信号一起使用。
频率带类型基础频率最大削弱/增强HIGH(高)斜坡10KHzMID(中)峰值250Hz-5KHz (可变)LOW(低)斜坡100Hz+15dB频率带类型基础频率最大削弱/增强HIGH(高)斜坡10KHzHI-MID(高-中)峰值3KHzLO-MID(低-中)峰值800HzLOW(低)斜坡100Hz+15dB效果模式英文名中文名1Small Hall A小厅堂A2Small Hall B小厅堂B3Large Hall A大厅堂A4Large Hall B大厅堂B5Short RoomA小房间A6Short Room B小房间B7RoomA房间A8Room B房间B9Church A教堂A10Church B教堂B11Cathedral A大教堂A12Cathedral B大教堂B13Forward Gate前转门14Reverse Gate A反相门A15Reverse Gate B反相门B16Left to Right Gate左转右门17Mono Echo单声道回声18Stereo Echo立体声回声19Mono Triplet Echo单声道三重回声20Stereo Triplet Echo立体声三重回声21Chorus Light1轻度合唱22Chorus Medium1中度合唱123Chorus Mdeium2中度合唱224Chorus Deep1深度合唱25.Chorus Fast1快速合唱26.Long Time Chorus长时间合唱27.Leslie Slow慢速丽丝28.Leslie Fast快速丽丝29.Flange Light1轻度法兰30.Flange Medium1中度法兰31.Slow Flange慢速法兰32.Flange Deep深度法兰33Short Delay Stereo立体声短延时34Short Delay Feedback Mono单声道短延时35Metal金属36Sharp锐利37Heavy沉重38Down Oct向下变调39Light Detune轻度失谐40Deep Detune深度失谐41Chorus+Room合唱+房间42Chorus+Hall合唱+大厅43Leslie+Hall丽丝+大厅44Leslie+Room丽丝+房间45Flange+Room法兰+房间46Flange+Hall法兰+大厅47Chorus+Delay合唱+延时48Short Delay+Reverb延时+混响27■安装.1将两个金属安装支架支撑用螺丝固定在本装置上。
FORCE 12 Powered Mixer 操作手册和用户指南说明书
FORCE 12 Powered Mixer OPERATING MANUAL AND USER GUIDEFORCE 12Powered MixerTABLE OF CONTENTSTABLE OF CONTENTS (1)IMPORTANT WARNINGS & SAFETY INFORMATIONS (2)INTRODUCTION (3)ABOUT THE FORCE 12 (3)FORCE 12 FEATURES (3)CHANNEL CH1-6 (4)CHANNEL CH7-8 (5)CHANNEL CH9/10 (6)CHANNEL CH11/12 (7)FORCE 12 MASTER SECTION (8)FORCE 12 MASTER SECTION (9)FORCE 12 REAR PANEL (10)DIMENSIONS (11)USB INTERFACE (12)QUICK START GUIDE (12)WIRING DIAGRAMS (13)BLOCK DIAGRAM (14)SPECIFICATIONS (15)WHARFEDALE PRO LIMITED WARRANTY (16)1FORCE 12Powered Mixer INTRODUCTIONCongratulations on your purchase of the FORCE 12 portable powered mixer. The Wharfedale Pro FORCE 12is the result of many years of experience in the use, design and manufacture of professional audio equipment.We take great pride in engineering and building every Wharfedale Pro product and wish to thank you forentrusting us with your sound solutions.From the time Gilbert Briggs built his first loudspeaker in 1932, to the present day, Wharfedale have maintained the same standard of quality in components, workmanship and performance.Please take the time to read this manual completely in order to ensure that you get the most from your FORCE12 portable powered mixer.ABOUT THE FORCE 12Designed to be a perfect balance of portability and power the FORCE 12 is suitable for use in a wide rangeof portable sound applications. Everything you need to mix and amplify microphones and line level sources isincluded in one box, with an ergonomic carry handle to aid transportation.The one box concept speeds up your setup time and allows you to start your performance quicker than everbefore.All models feature built in digital FX processing, expanding your creativity and improving your sound qualitywithout the need for additional expensive and often cumbersome processors. A graphic EQ allows fine tuningof the overall mix.FORCE 12 FEATURES• 500W*2@4Ohms(RMS), 300W*2@8Ohms(RMS), 1300W*2@4Ohms(Peak)• 12 channels (8 mono & 2 stereo, play & record)• 10 Line inputs (6 Line, 2 Hi-z, 2 stereo)• 8 Mic inputs with switchable global +48V phantom power• Optional RCA&USB connections for 1 stereo channel• Parallel RCA& Line connections for 1 stereo channel• 3-band EQ control for each mono channel• 2-band EQ control for each stereo channel• Dual 7-band Graphic EQs with routing switch• 10 channel peak LED indicators and 1 Effects peak LED indicator• Dual 7-band Master Level LED indicators and 2 Limit LED indicators• Mute button for all the Mic channels• FX bypass button and FX Foot Switch to mute FX function• 56 sorts of stereo effects with LED digital display• Insert balanced/unbalanced 1/4” TRS jacks for the built-in stereo amplifiers• 5 low level outputs (Main L/R, Mon Send, FX Send, and Sub Out-80Hz LPF with 1/4” TRS jacks,and Record Output with RCA jacks)• Thermal protect, over current protect, DC protect, and output short protect• Speakon outputs for speakers• Light weight with 11kg31415-----Illuminates when the Effects clippingLED Digital Display -----56 sorts of stereo effects can be displayed via LED digital display -----Allows for master adjustment of the FX send bus.-----Selects the effect type.13579OPERATING MANUAL AND USER GUIDE12The USB connector enables computers with USB connectivity to interface directly with the FORCE 12 mixer for full duplex recording and playback. In recent years the introduction of USB connectivity has ushered a new appreciation of the capabilities of computer audio, helping to fuse both digital and analogue and open up endless possibilities for the recording musician.The internal AD (Analogue to Digital) and DA (Digital to Analogue) converters are 16-bit/48KHz enabling recording and playback above CD quality, ensuring that recordings that you make with a FORCE 12 have outstanding quality.The FORCE 12 is fully class compliant and requires no drivers when used with modern operating systems. Mac OSX, Windows XP, Vista and 7 will require no additional driver software.Windows XP InstallationSimply choose the device in the following location: Start/Settings/Control Panel/Sounds and Audio Devices/AudioMac OSX InstallationSimply select as an input and output device using the "Audio MIDI Setup" page, you can find this easily using the spotlight function.USB INTERFACEIn order to get up and running with your FORCE 12 follow the steps below:1.Zero the mixer. This involves setting all level and send controls to minimum and all EQ controls to 0dB.2.Make all connections for audio and power as per the wiring diagrams:• Ensure that the power switch is on the off position before connecting the AC supply.3.If your microphones require phantom power, use the rear panel switch to activate +48V supply.4.Turn the power switch on.5.Raise the level control for each of your connected sources, ensure that the Peak LED does not constantly illuminate.6.Raise the Mix Level control until you achieve the desired Sound Pressure Level (SPL).NOTEIf the sound becomes distorted at higher volumes you may need to add extra equipment to achieve the desired SPL, otherwise you may cause permanent damage to your system by overloading it. QUICK START GUIDEFORCE 12Powered Mixer15Model FORCE 12Power Output500W*2 RMS into 4 ohms(THD=1%@ 1KHz)550W*2 RMS into 4 ohms(THD=5%@ 1KHz)260W*2 RMS into 8 ohms(THD=1%@ 1KHz)290W*2 RMS into 8 ohms(THD=5%@ 1KHz)1300W*2 Peak into 4 ohms700W*2 Peak into 8 ohmsMaximum output levelMain L/R Mon Send +25dBu (14V) @THD=0.12%Sub Out(60Hz)+25dBu (14V) @THD=0.12%Fx Send +10dBu (2.5V) @THD=0.12%REC OUTPUT(Unbal out)+5dBu (1.4V) @THD=0.12%THD+NSpeakon out <0.13% @ 40Hz-20KHz 300W/4ohmMix/monitor out <0.005% @ 20Hz-30KHz MIC/LINE monoMix/monitor out <0.01% @ 20Hz-30KHz LINE stereoHum & NoiseSpeakon out -61dBu (All channel level 0dB, Main level 0dB)Mix/monitor out -87dBu (All channel level 0dB, Main level 0dB)MON-SEND out -95dBu (All channel level 0dB, Main level 0dB)Fx Send out -98dBu (All channel level 0dB, Main level 0dB)Frequency Response 20Hz-40kHz +1dB/-3dB (Mic/Line mono, Line stereo)Maximum voltage gain 97dB input mic to Speakon out67dB input mic to Mix/Mon47dB input mic to Rec out67dB input line to Speakon out59dB input tape/USB to speakon outInput channel equalisations High 12KHz shelvingMid 2KHz shelvingLow 100Hz shelvingMaximum: +/-15dB "Graphic equaliser Dual 7-band (60Hz, 120Hz, 480Hz, 1KHz, 4KHz,8KHz, 16KHz)Maximum: +/-12dB"Digital effects 56 EffectsROOM: r1 Closet; r2 Small ambient room;r3 Small bathroom; r4 Medium bathroom;r5 Large bathroom; r6 Small empty room;r7 Medium empty room ;r8 Large empty roomPLATE: P1 - P5HALL: h1 Medium hall 1; h2 Medium hall 2h3 Medium hall 3; h4 Large hall 1h5 Large hall 2; h6 Large hall 3h7 Church; h8 CathedralGATED REVERB: g1 - g3CHORUS: c1 - c4 Chorus 1-4c5 - c8 Chorus with reverb 1-4FLANGER: F1 - F6 Flanger 1-6F7 - F9 Flanger with reverb 1-2ROTARY SPEAKER: S1 - S7DELAY: D1 - D9Protection Power ON/OFF Mute; DC detection; Overload andshort detection; Temperature detectionPower AC100-120V~ 50/60Hz or AC220-240V~ 50/60Hz Product dimension(H*W*D)540*330*330mm (22*13*13 in)Net weight 11Kg (24lbs)SPECIFICATIONSWharfedale ProfessionalIAG House, 13/14 Glebe Road, Huntingdon, Cambridgeshire, PE29 7DL, UKWharfedale Professional reserves the right to alter or improve specifications without notice. All rights reserved © 2011 Wharfedale Pro. Wharfedale Pro is a member of the IAG Group.。
3YAMAHA_12路_MG124CX调音台_使用说明

17、ST 开关 如果打开此开关信号将通过 GROUP1-2 衰减器 16 发送到 STEREO L/R 总线。GROUP 1 信
号进入 STEREO L,GROUP2 信号进入 STEREO R。 18、STEREO OUT 主衰减器
6、 GAIN 控制旋钮 调节输入信号电平 为了获得信噪比和动态范围的最佳平衡,调节电平使 PEAK 指示灯(9)仅在最高输入瞬 间峰值时偶尔短暂地亮起。
7、 开关(高通滤波器)
此开关使 HPF 打开或者关闭。要打开 HPF,请按下此开关,HPF 将削去 80HZ 以下的频 率(HPF 不使用于立体声输入通道 3、4 的线性输入)。 8、 COPMP 控制按钮
10、均衡器(HIGH、MID、LOW) 该三频段均衡器可在高、中和低三个频率带调节通道。通道 9/10 和 11/12 有两个频率带: 高和低。将旋钮设定在下箭头位置可以在相应的频率带产生平坦的响应。将旋钮转向右 侧可增强相应的频率段,而转向左侧可削弱该频率段。下表为三个频率带的 EQ 类型、 频率和强大削弱/增强。
11、AUX 控制旋钮 调节从通道发送到 AUX 总线的信号电平。此旋钮通常应设在靠近下箭头的位置。 在立体声通道上,L(奇)和 R(偶)通道的信号被混合后发送到 AUX 总线。
12、AUX PRE 开关 选择是否将前置衰减器或者后置衰减器的信号发送到 AUX 总线。如果将此开关设定为
开,调音台将前置衰减器信号(通道衰减器 19 前的信号)发送到 AUX 总线,使 AUX 输出不 受衰减器的影响。如果将此开关设定为关,调音台将后置衰减器信号发送到 AUX 总线。
12、POWER 指示灯 调音台电源打开后,此指示灯亮。
迈卡尔多X12i 12英寸高效专业扬音器说明书
124514CONTENTSFEATURES ACOUSTIC CHARTS INSTALLATION DIMENSIONS SPECIFICATION LIMITED WARRANTY45Hz-18kHz95dB1.8kHz 300W 8Ω<3%NL4×2,1+ 1- 27.5kg 30.0kg402×440×650mm 550×510×770mmSPECIFICATIONTransducerSensitivity(1W/1m)Frequency response(-3dB)THDNet Weight Gross Weight Dimension(W ×D ×H)Packing Dimension(W ×D ×H)Crossover Point Rated Power (RMS )Rated Impedance Input Connectors Dispersion (H ×V )◇ 12" high efficient professional speaker with unique LF extension technology, the LF can be lower to 35Hz(SPL-10dB).◇ Computer optimized simulation design make sure the good frequency response and excellent phase feature.◇ Two transducers two way full range speaker with Hi-Fi level performance ◇ One 12 professional woofer."◇ One compression driver with 3" magnalium diaphragm. ◇ 60°X60° wide dispersion horn.◇ Independent crossover circuit for woofer and tweeter, low distortion and interferer.◇ Single Amplifier driving mode.◇ Suitable for the application in rock bar, night club, living performance and portable sound system.FEATUREB3 X series speaker is mainly designed for all kinds of rock bar, entertainment bar, club, all kinds of living performance, and portable sound reinforcement applications.12 inch full range and 15 inch full range speakers are trapeziform design; it will be very convenient tomake an array. Selected highintensity plywood has enough strength and can absorb the noise of resonance. Standard mounting&flying system and SPK socket are very easy for the installation and connection. X Series products are developed and produced by combination of the latest computer stimulation design technology, the latest loudspeaker material and manufacturing technology. All transducers adopt the optimized magnetic circuit having high magnetic energy, low distortion and excellent ventilation/cooling system. LF uses nonlinear thickness long fabric paper cone with waterproof feature and special damping Glue treated, and high power sandwich type voice coil. HF adopts high temperature treated magnalium diaphragm, voice coil with copper cladding aluminum wire and compression cavity designed with linear phase technology. Wide dispersion horn makes sure the excellent sound coverage. The patented HF protection circuit grantee the high reliability and low distortion.INTRODUCTIONHF: 3" x 1, LF: 12" x 1119/125dB(Peak)Max. SPL 60° x 60°2 501 002 005 001k2k5k1 0k2 0k20Hz1 1 0d B 1 8 0°D eg1 0 0 1 0 8°9 0 3 6°8 0 - 3 6°7 0 - 1 08°6 0- 1 80°C L20 Hz501002005001K 2K 5K 10K 20KOhm678910203040506070Impedance vs FreqFREQUENCY/RESPONSEPHASE IMPEDANCE RESPONSE-LFFREQUENCY RESPONSEPHASE RESPONSE650m m402mm440mm300m m321mmBack viewSide view Front viewTop viewDIMENSIONSINSTALLATIONLIMITED WARRANTYIf malfunction occurs during the specified warranty period from the date of original purchase,the product will be repaired or replaced without charge by Elder Audio.The Limited Warranty does not apply to:(a)exterior finish or appearance;(b)certain specific items described in the individual product data sheet or owner's manual;(c)malfunction resulting from use or operation of the product other than as specified in theindividual product data sheet or owner's manual;(d)malfunction resulting from misuse or abuse of the product;(e)malfunction occurring at any time after repairs have been made to the product by anyoneother than Elder Audio Service or any of its authorized service representatives.To obtain warranty service, customer must deliver proof of purchase of the product in the form of a bill of sale or receipt invoice.X12i Speakers and Speaker Systems are guaranteed against malfunction due to defects inmaterials or workmanship for a period of three (3) years from the date of original purchase. The Limited Warranty does not apply to burned voice coils or malfunctions such as cone and/or coil damage resulting from improperly designed enclosures. Additional details are included in theLimited Warranty statement.X12i Accessories are guaranteed against malfunction due to defects in materials or workmanship for a period of one (1) year from the date of original purchase. Additional details are included in the Limited Warranty statement. .X12i Flying Hardware (including enclosure-mounted hardware and rigging accessories) isguaranteed against malfunction due to defects in materials or workmanship for a period of one(1) year from the date of original purchase. Additional details are included in the Limited Warrantystatement.Specifications are subject to change without notice.。
CDM12普及型数字调音台说明书
CDM12是第一款普及型数字调音台,其将填补扩声领域中低端数字核心产品空白,引领专业音响数字化革命浪潮。
全数字化处理引擎专业的音频DSP处理内核及算法24bit AD/DA确保高品质声音丰富的模拟和数字输入输出接口,数字支持光纤、同轴及AES/EBU3段全参数EQ输入及9段图形化EQ输出12个混音通道,支持输出、辅助输出、编组输出、预听和监听输出内置数码效果器优秀的人机界面和易操作性5寸TFT真彩LCD显示屏中英文菜单按键和旋钮的设计更具直观和人性化虚拟界面显示及输入电平指示简洁易学的操控方式适合任何专业和业余人员数字功能实现全新体验20个场景设置和调出,推子追踪模式内含丰富的EQ库及音效库供用户选择*USB存储器接口,支持实时录音到U盘,包括线性及MP3格式内置数字播放器,可一键播放内外存乐曲,如国歌、进行曲等IEEE802.3网络接口,连接局域网或WIFI网,通过TCP/IP实现远程控制*无以伦比的性能价格比安装调试方便,可直接替换传统模拟调音台便携式,时尚外观设计良好的售后服务,用户零维护意想不到的价格可广泛应用于演出会议场所、学校、智能大厦及个人演播室上面板和后面板介绍上面板后面板1. 单声道输入通道部分此区域为8路单声道输入,包括MIC输入、LINE输入、INSERT插入以及输入增益控制和削波指示等。
2. 立体声输入通道及辅助输入输出部分和主输出部分此区域包括两组立体声输入通道,两组立体声返回通道,两路辅助输出通道,数字输出通道,以及主输出通道、编组输出通道和监听耳机接口等。
3. 通道控制部分及功能设置部分通道控制部分包括输入通道的高、中、低音EQ调节,辅助输出控制以及声像调节等;功能设置部分主要是设置相关参数。
4. LCD显示屏配合功能键部分设置相关参数。
5. 辅助控制部分此区域包括辅助输入输出控制,内置效果器参数设置,监听耳机电平调节,+48V幻像供电开关和USB接口。
6. 功能设置部分结合其它功能键一起设置相关参数。
YAMAHA mg12_4f小型模拟调音台中文说明书
YAMAHA mg12_4f小型模拟调音台中文说明书MIXING CONSOLEZHMG12/4FX2请在操作使用前首先仔细阅读下述内容请将本说明书存放在安全的地方以便将来随时参阅。
警告为了避免因触电、短路、损伤、火灾或其它危险可能导致的严重受伤甚至死亡请务必遵守下列基本注意事项。
这些注意事项包括但不限于下列情况 G只能使用本设备所规定的额定电压。
所要求的电压被印在本设备的铭牌上。
G只能使用规定的AC电源适配器PA-20或YAMAHA推荐的相应产品。
G请勿将电源线放在热源如加热器或散热器附近不要过分弯折或损伤电源线不要在其上加压重物不要将其放在可能被踩踏引起绊倒或可能被碾压的地方。
G请勿打开本设备并试图拆卸其内部零件或进行任何方式的改造。
本设备不含任何用户可自行修理的零件。
若出现异常请立即停止使用并请有资格的YAMAHA维修人员进行检修。
G请勿让本设备淋雨或在水附近?俺笔肪持惺褂锚蠡蚪 ?幸禾宓娜萜鞣旁谄渖溪蠓裨蚩赡芑岬贾乱禾褰θ肴魏慰凇?G切勿用湿手插拔电源线插头。
G若电源线出现磨损或损坏使用设备过程中声音突然中断或因此而发出异常气味或冒烟请立即关闭电源开关从电源插座中拔出电源线插头并请有资格的YAMAHA维修人员对设备进行检修。
G若本设备或AC电源适配器发生摔落或损坏请立即关闭电源开关从电源插座中拔出电源线插头并请有资格的YAMAHA维修人员对设备进行检修。
注意为了避免您或周围他人可能发生的人身伤害、设备或财产损失请务必遵守下列基本注意事项。
这些注意事项包括但不限于下列情况 G当准备长期不使用本设备或发生雷电时请从电源插座中拔出电源线请务必抓住插头而不是电源插头。
G当从本设备或电源插座中拔出电源线插头时线。
直接拽拉电源线可能会导致损坏。
G为了避免产生不必要的噪音请在AC 电源适配器和本设备之间预留50cm或更多空间。
G请勿用布或毯子盖住或包裹AC电源适配器。
G移动设备之前请务必拔出所有的连接电缆。
- 1、下载文档前请自行甄别文档内容的完整性,平台不提供额外的编辑、内容补充、找答案等附加服务。
- 2、"仅部分预览"的文档,不可在线预览部分如存在完整性等问题,可反馈申请退款(可完整预览的文档不适用该条件!)。
- 3、如文档侵犯您的权益,请联系客服反馈,我们会尽快为您处理(人工客服工作时间:9:00-18:30)。
数字音频处理器操作手册V2.012路智能自动混音器序言本手册以全功能音频处理器矩阵的使用方法作为示例,并可作为其它型号处理器的使用参考。
本手册只作为用户操作指示,不作为维修服务用途。
本手册为本公司生产商版权所有,未经许可,任何单位或个人不得将本手册之部分或其全部内容作为商业用途。
目录安全操作指南 (3)一、产品概述 (4)1.1功能介绍 (4)1.2产品参数 (4)二、前后面板接口说明 (5)2.1 前面板说明 (5)2.2 背板接口说明 (5)2.3 GPIO说明 (6)三、软件操作说明 (6)3.1网页控制和软件下载 (6)3.2 系统流程 (9)3.3 软件特色 (9)3.4 菜单栏和状态栏 (14)3.4.1文件 (14)3.4.2设备设置 (14)3.5 处理器模块 (20)3.5.1输入设置 (20)3.5.2扩展器 (21)3.5.3均衡器 (21)3.5.4压缩器 (23)3.5.5自动增益 (23)3.4.6自动混音器 (24)3.5.7反馈/回声/噪声消除 (25)3.5.8延时器 (27)3.5.9分频器 (28)3.5.10 限幅器 (28)3.5.11 输出设置 (29)附1:串口通信协议 (30)附2:GPIO说明 (31)安全操作指南为确保设备可靠使用及人员的安全,在安装、使用和维护时,请遵守以下事项:1.在设备安装时,应确保电源线中的地线接地良好,机箱接地点良好接地,请勿使用两芯插头。
确保设备的输入电源为100V-240V 、50/60Hz的交流电。
2.保持工作环境的良好通风,以便于设备在工作时所发的热量及时排出,以免温度过高而损坏设备。
3.在潮湿结露环境或长时间不使用时,应关闭设备总电源。
4.在下列操作之前一定要将设备的交流电源线从交流供电插座拔下:A.取下或重装设备的任何部件。
B.断开或重接设备的任何电器插头或连接。
5.设备内有交流高压部件,非专业人士未经许可,请勿擅自拆解设备,以免发生触电危险。
更不要私自维修,以免加重设备的损坏程度。
6.不要将任何腐蚀性化学品或液体洒在设备上或其附近。
一、产品概述1.1功能介绍本设备最大支持模拟通道16进16出,高品质的21级前置放大电路,DSP处理总线结构,内置反馈消除器、噪声消除器、回声消除器等多种功能,还原高品质声音,主要应用于各种大型场所,可以满足剧场、音乐厅、远程视频会议、体育场馆、教堂、会议中心、主题公园等公共扩声系统等多方面的应用需求。
其操作简单,控制智能:1、24bit/48KHz取样频率,高性能A/D D/A转换器和32-bit浮点DSP处理器,全功能矩阵混音功能,为用户提供卓越清晰的声音。
2、高精度的输入灵敏度调节,共计21档,步长3dB,最大输入增益60dB。
3、高效的算法处理:AFC,AEC,ANS,AUTOMIXER,EQ,GATE,AGC等。
4、丰富的接口扩展:GPIO支持8通道可自定义输入输入输出的GPIO,电平支持外部输入3.3~24V;场景保存等多种功能;RS-485支持自动摄像跟踪功能,轻松实现视频会议;RS-232双向串行控制接口:可控制或接收控制,如视频矩阵、摄像机等设备。
5、支持多组场景预设功能,人性化的操作软件界面。
6、快速的操作:网页控制模式,支持Android,iOS系统。
1.2产品参数二、前后面板接口说明2.1 前面板说明●(1)PWR:电源指示灯,灯亮设备供电正常,灯灭设备供电异常;●(2)SYS:状态指示灯,灯闪标表示设备正常运行,否则设备故障;2.2 背板接口说明●(1)机箱接地点;●(2)POWER:220V交流电源输入接口;●(3)ETHERNET:10M/100M以太网接口,用连接上位机;●(4)RESET:恢复出厂设置,长按5秒有效;●(5)RS232:支持中控命令和摄像跟踪,fX:接收数据, TX:发送数据 ,G:地线;●(6)RS485:支持摄像跟踪;●(7)GPIO:GPIO控制;●(8)OUTPUT:模拟输出;●(9)INPUT:模拟输入。
2.3 GPIO说明G:地1~8:8个GPIO,端口2-8均可自由配置输入或输出,端口1只有输入功能。
V:GPIO默认电源输出脚(5V)。
设备GPIO的状态实时显示在软件主界面的状态栏中:端口输出:每个输出端口均为OC输出,默认参考电压5V,也可外接小于15V的参考电压,取默认参电压时,7个输出端口总最大输出电流为200mA:端口输入:输入高电平最低> 2V,输入高电平最高<VCC+0.7V;输入低电平最高<0.3V.GPIO的使用分为两种:(一)输出:即是矩阵内部某个参数发生变化时(如静音),引起GPIO某个输出管脚的输出电平的发生变化,从而驱动外部电路。
音频矩阵内部变化 -〉 GPIO管脚电平变化 -〉驱动外部电路。
(二)输入:即是外部电路发生改变时导致GPIO某个输入管脚电平发生变化,从而触发矩阵的某个参数发生变化。
外部电路状态变化 -〉 GPIO管脚电平变化 -〉 音频矩阵内部变化。
详细操作见附录2。
三、软件操作说明3.1网页控制和软件下载设备出厂默认IP地址为“IP:192.168.0.200/子网掩码:255.255.255.0”,请先在PC中添加该网段的地址,以便设备正常连接。
设备启动完成后,在网页中输入地址“http://192.168.0.200/”:Control:快速控制设备的通道参数,以及各个处理器的快速启用和关闭。
Scene :快速调用和保存设备场景。
Download:下载控制软件,本软件支持XP、Win7、Win8操作系统。
在安装软件前,请确保PC端已经安装Net Framework3.5或以上版本。
注: 在部分系统(如WIN8)安装软件时,会弹出提示运行“用户账号控制信息”,请点“确定”运行提升软件的权限。
安装软件完成后,打开PC控制软件如下:1、菜单栏和工具栏:菜单栏包括软件各项功能菜单2、处理器参数控制区:可拖动或滚动鼠标显示隐藏部分,支持复制/粘贴功能。
3、流程控制区:音频数据流程图,可点击图标对每个处理的参数进行详细设置。
4、输入/输出通道快速控制区:显示每个通道的电平和增益,以及各个处理器的快速启用/关闭设置,支持复制/粘贴功能。
5、设备列表和场景控制区:控制当前设备的场景以及显示当前在线设备。
6、状态栏:显示当前的连接设备登录用户名、IP、GPIO状态、场景下载进度。
点击右下角的“搜索设备”按钮。
在设备列表中双击对应设备的IP,弹出身份验证框:输入用户名和密码(出厂用户名admin\密码123456),点击登陆,状态栏提示如下:当场景下载完后即可操控设备。
3.2 系统流程信号处理流程图3.3 软件特色打开软件,初始化界面如下图所示:流程图和处理器控制模块之间的切换:窗口2为处理器详细参数显示区域,窗口3为处理流程图以及快速打开和关闭处理器的快速通道。
双击窗口3中的处理器,可打开/关闭窗口2中对应的详细参数控制模块,如双击“输入/输入扩展器/输出”:如上图,“输入/输入扩展器/输出”按照的详细设置界面按照流程图中的顺序排列在窗口2中,同时窗口3中已经打开详细设置参数的处理器会在右上角显示已打开状态,用红色的勾表示;当前选中的处理器为输出,窗口3中的处理器为红色框表示。
已经打开详细参数设置的模块,在流程图中双击该模块,关闭对应的详细参数设置界面。
在详细设置框的上方标识区,显示当前控制的通道号,如上输入输出均显示的为1通道的参数。
如上输入部分显示为8通道的参数控制,输出部分显示为6通道的参数控制。
当输出通道的名称修改后,详细参数控制模块的通道名称会跟着变化。
快速控制区域:窗口4为输入输出通道的快捷控制方式,每个通道的处理器都可以快速直通和启用,选中不同的通道,会自动切换窗口2中显示的通道信息。
如通道数量较多,超过可显示的区域,可左右拖动或滚动鼠标中间滚轮来显示隐藏部分;输入:1)上方编辑框显示通道名称,可修改;修改后,窗口2中的详细参数控制界面的标识区域会跟着变化。
2)M、P、E、Q、C、G表示对应的输入通道快捷操作方式:3)电平表显示当前输入通道的输入电平。
4)推子调节当前输入通道的数字增益。
5)电平表显示当前输入通道的输入电平可左右拖动或滚动鼠标中间键来显示隐藏的通道;点击通道可切换上方的功能模块的通道参数。
输出:1)上方编辑框显示通道名称,可修改;修改后,窗口2种的详细参数控制界面的标识区域会跟着变化。
2)M、D、X、Q、L、V表示对应的输入通道快捷操作方式:3)电平表显示当前输出通道的输出电平。
4)推子调节当前输出通道的数字增益。
5)电平表显示当前输出通道的输出电平,可左右拖动或滚动鼠标中间键来显示隐藏通道;点击通道可切换上方的功能模块的通道参数。
示例:点击输出部分的延时器的全部启用快速按钮,如下所示,所有输出通道的延时器全部启用。
设备列表区:控制区:可以选择隐藏或显示设备列表。
场景设置:仅在连接上设备的情况下生效,可以选择运行设备不同的场景。
保持场景:将当前运行参数保持到选中的场景。
设备列表:显示当前在线设备,点击下方的“搜索设备”可刷新设备列表。
新增设备:已知设备IP,在弹出框中直接输入IP地址、用户名和密码进行连接。
3.4 菜单栏和状态栏3.4.1文件1、新建:新建一个场景,参数为出厂配置,仅脱机可用。
2、打开:打开本地已保存的场景,仅脱机可用。
3、另存为:把当前配置以文件保存到本地,仅脱机可用。
4、退出:关闭软件。
5、语言切换:本软件支持简体、繁体、英文3种语言。
3.4.2设备设置设备设置包括用户设置,网络设置,串口设置,场景设置,摄像跟踪,GPIO。
1)用户设置1、设备初始用户:用户名admin/密码123456。
管理员可添加、删除、修改所有用户信息;普通用户仅能修改个人信息。
2、修改用户:首先在左边列表中选择需要修改的用户,用户名和密码编辑框显示当前选中用户的信息,输入新信息,点击“修改”按钮即可。
3、删除用户:选择左边列表中要删除的行,点击“删除”按钮即可删除该用户。
4、添加用户:在左边列表中选择为空的行,并在右边的用户名和密码编辑框(应为空)中输入新用户的信息,点击“添加”按钮即可新添加一个用户。
2)网络设置查看和修改设备的网络地址信息,在对应的位置输入设备的IP地址、子网掩码、网关,点击应用即可修改当前设备的网络信息。
3)串口设置查看和修改当前连接设备的串口信息,设置完成后点击“应用”按钮即可修改当前设备的串口信息;如需恢复到默认值,直接点击“全部复位”按钮即可,设置时各项不能为空。
4)场景设置1、修改:修改选中的场景名称。
2、打开:将PC端的场景上传并覆盖选中的场景。
3、保存:将当前运行的参数保存到选中的场景中。