流控大师-安装手册
西默智能流量控制系统(XMNTC)安装配置手册

西默智能流量控制安装配置手册声明Copyright@2011-2012 上海西默通信技术有限公司(以下简称:西默科技、XIMO)版权所有,保留一切权利。
未经书面许可,任何单位和个人不得擅自摘抄、复制本书内容的部分或全部,并不得以任何形式传播。
由于产品版本升级或者其它原因,本手册内容可能有变更,西默科技保留在没有任何通知或提示的情况下对本手册的内容进行修改的权利。
本手册作为本产品安装配置的指导手册,西默科技会尽力为您提供准确的信息,但西默科技并不确保手册内容完全没有错误,本手册中所有陈述、信息和建议不构成任何明示或暗示的担保。
技术支持地址:上海市闵行区集心路 168 号 1 号楼 302邮编:201100400 服务热线:400-8200-354客服部 QQ 号码:support@电话:021-3453 7583 3453 7683 3453 7783传真:021-3453 7785前言感谢您选择并使用XIMO智能流控产品!XIMO 智能流量分析及控制系统(以下简称XIMO流控),是在互联网P2P(Peer-to-Peer)应用广泛流行的背景下,诞生的新一代应用层QOS产品。
XIMO流控是一款真正意义上的应用层级流控产品,基于连接过程和协议特征识别,对于加密协议采用主动探测引擎,经过一套完整的识别流程,准确识别应用,精确定位具体的软件客户端,把宽带网络的应用可视化和可管理提高到一个新的阶段。
XIMO流控系统能帮助宽带运营网络管理人员实时了解网络应用流量状态及应用概况,通过策略进行灵活可控的流量管理,提升网络运行效率。
应用层流控产品,是一个典型的服务型产品,需要根据互联网应用的变化,不断改进协议识别引擎和更新协议特征库,才能保证流控的效果。
应用层协议识别的重点和难点是P2P 应用,P2P 流控是应用层流控的核心;互联网不断有新增加的应用,已有的应用为了逃避流控设备监管,采用技术对抗方法,伪装和变换协议特征,甚至整个趋势向加密方向发展,这使得流控产品的技术要跟踪、适应或超越这些变化,才能为用户提供良好的服务。
碧海威流控L7cloud虚拟机安装指南

虚拟机安装L7 Cloud版软件
本次安装是在vmware 5.5.2版本下安装的,只是为了更多没有实体3网卡的pc机的网友体会一下安装的简便性和查看一下安装的过程。
一般情况下,虚拟机不能作为最后真正应用的系统。
整个过程包括以下几个步骤
1.配置虚拟机
2.安装系统
3.启动L7 Cloud
1.配置一个虚拟机,在生成一个默认的linux虚拟机以后,需要做以下更改:
1)硬盘类型要选择IDE,不能使用系统默认的scsi硬盘;
2)虚拟三块网卡(2个业务网卡1个管理网卡),分别连到vmnet1 vmnet2 vmnet3上(一
会会用到).
3)光盘选择下载的l7e.iso安装盘
2.启动虚拟机,从光盘启动的进入登陆界面(root/fedora)登陆后,进入安装命令行状态。
a)输入fdisk –l命令查看硬盘的信息(我的是/dev/hda)
b)输入./setup进行安装,询问安装目标的时候输入上面查询到的信息
c)不到一分钟以后安装完毕,重新启动
3.此次启动虚拟机默认从硬盘启动,屏幕上显示下图表明已经运行起来了。
现在ping管理ip地址192.168.0.120(首先把自己的网卡地址配置成192.168.0.x的地址)!
如果ping不通,在windows开始菜单的vmware程序组里面打开vmware的附属程序虚拟网络。
把你的物理网卡(配置了192.168.0.x地址的那个)设置到vmnet1 试一下通不通(因为不知道那个虚拟网卡是eth0)如果不通再试一下vmnet 2 vmnet3,必然有一个会通的。
使用浏览器连接https://192.168.0.120就可以登陆了(浏览器会有一个提示,不用管点继续浏览。
流控大师A380单线部署教程
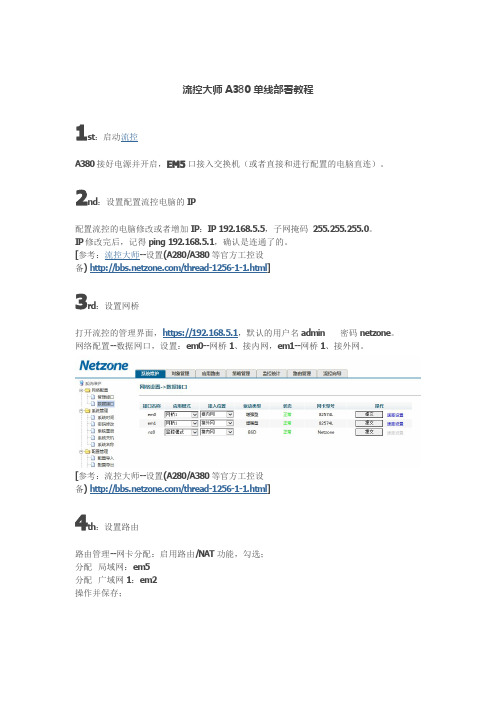
流控大师A380单线部署教程1st:启动流控A380接好电源并开启,EM5口接入交换机(或者直接和进行配置的电脑直连)。
2nd:设置配置流控电脑的IP配置流控的电脑修改或者增加IP:IP192.168.5.5,子网掩码255.255.255.0。
IP修改完后,记得ping192.168.5.1,确认是连通了的。
[参考:流控大师--设置(A280/A380等官方工控设备)/thread-1256-1-1.html]3rd:设置网桥打开流控的管理界面,https://192.168.5.1,默认的用户名admin密码netzone。
网络配置--数据网口,设置:em0--网桥1、接内网,em1--网桥1、接外网。
[参考:流控大师--设置(A280/A380等官方工控设备)/thread-1256-1-1.html]4th:设置路由路由管理--网卡分配:启用路由/NAT功能,勾选;分配局域网:em5分配广域网1:em2操作并保存;路由管理--广域网口,em2,设置好运营商给的IP信息[参考:流控大师--设置(A280/A380等官方工控设备)/thread-1256-1-1.html]5th:生成策略用策略向导,填好设置的网桥接口、终端数目、带宽大小生成策略;系统维护--配置管理--配置导入,上传并导入刚刚生成的策略。
[参考:流控大师--策略向导[单光纤]/thread-7682-1-1.html] [参考:流控大师--设置--导入策略/thread-1257-1-1.html] 6th:申请试用KEY在注册帐号,登入申请试用KEY,申请后大约1-3分钟后,会自动生成KEY,获取并下载;系统维护--升级License,上传导入获得的试用KEY。
[参考:流控大师--申请试用KEY /thread-1169-1-1.html]7th:接线上架使用根据上面的设置接线:em0接交换机,em1直连em5,em2接光纤。
AW-SF100 Standalone版本安装说明书

AW-SF100 Standalone Version Installation ProceduresRevision 4.05 June. 21, 20191.INTRODUCTION (3)2.SETTING THE REMOTE CAMERA (4)3.INSTALLATION (7)4.STARTUP AND EXIT (20)4.1.Starting the Software (20)4.2.Exiting the Software (20)5.ABOUT THE OPERATION MANUAL (20)6.ABOUT ACTIVATION (20)1. IntroductionThis manual describes the installation procedures of the Auto Tracking Software (Standalone version) that runs on a Windows PC.Operating EnvironmentThe below-mentioned environment is necessary for using this software:●Required SpecCPU: Core i5-3320M (2.60 GHz) or aboveMemory: 4 GB or aboveDisplay: 1600 x 900 or aboveOS: Windows 7 Professional (SP1), Ultimate (SP1) 32 bit/64 bitWindows 8.1 32 bit/64 bitWindows 10 32 bit/64 bit●Recommended SpecCPU: Core i7-4710MQ (2.50 GHz) or aboveMemory: 8 GB or aboveDisplay: 1920 x 1080 or aboveOS: Windows 7 Professional (SP1), Ultimate (SP1) 64 bitWindows 8.1 64 bitWindows 10 64 bit●In case of human body detection by deep learningNVIDIA GPUPascal architectureNVIDIA GeForce GTX 1050Ti or higherNVIDIA Quadro P2000 or higherTuring architectureNVIDIA GeForce RTX 2060 or higherOrCore i 7 CPU with more than 4 physical cores* If using a GeForce RTX for the GPU, please use Windows 10 for the operating system.●Remote cameraPanasonic remote cameraAW-UE150AW-UE70AW-HE130AW-HE40AW-HE42<Notes>• Use the latest version of the remote camera firmware. You can download the firmware from the following Website:/en/• Panasonic recommends a wired connection between the PC and remote camera. In the case of a wireless connection, sufficient tracking performance may not be achieved.• When using GPU for human body detection through deep learning, you must install CUDA Toolkit in the server pc.When using a GPU with Pascal architecture, please download and install CUDA Toolkit 8.0 from the website below.https:///cuda-80-ga2-download-archiveWhen using a GPU with Turing architecture, please download and install CUDA Toolkit 10.1 from the website below.https:///cuda-10.1-download-archive2. Setting the Remote CameraBefore using this software, make settings on the remote camera main unit.As a method of acquiring images from remote cameras, it is possible to select either acquisition by JPEG image or acquisition by H.264 stream.When using acquisition by JPEG image, set the [Image capture type] to JPEG on the [Settings – Camera] screen of this software.When using acquisition by H.264 stream, set the [Image capture type] to H.264 on the [Settings – Camera] screen of this software.• Setting of AW-UE150Tracking performance is higher when using acquisition with JPEG image.- When acquiring images with JPEG imagesChange [Setup] -> [Video over IP] -> [JPEG (1)] to the following settings on the web page of the camera.Image capture size: 1280 x 720 or higherRefresh interval: 15 fps or higher (NTSC), 12.5fps or higher (PAL)- When acquiring images with H.264 streamChange [Setup] -> [Video over IP] -> [H.264 (1)] to the following settings on the web page of the camera.H.264 transmission: OnImage capture size: 1280 x 720 or higherTransmission priority:Frame rateFrame rate: 15 fps or higher (NTSC), 12.5fps or higher (PAL)Set each item as follows on the web page of the camera.Initial display settings for “Live” pageStream: JPEG(1)Refrash interval (JPEG) : 15 fps or higher (NTSC), 12.5fps or higher (PAL)JPEG(1)JPEG transmission: OnImage capture size: 1280x720H.264(1)H.264 transmission: OffH.264(2)H.264 transmission: OffH.264(3)H.264 transmission: OffH.264(4)H.264 transmission: Off- When acquiring images with H.264 streamChange [Setup] -> [Image / Audio] -> [H.264 (1)] to the following settings on the web page of the camera.H.264 transmission: OnImage capture size: 1280 x 720 or higherTransmission priority:Frame rate• Setting of AW-UE70 / AW-HE42Tracking performance is higher when using acquisition with JPEG image.- When acquiring images with JPEG imagesChange [Setup] -> [Image / Audio] -> [JPEG (1)] to the following settings on the web page of the camera.Image capture size: Priority Mode setting is IP: 1280 x 720When priority mode is set to other than IP mode: 640 x 360 Refresh interval: 15 fps or higher (NTSC), 12.5fps or higher (PAL)Image quality: Normal- When acquiring images with H.264 streamChange [Setup] -> [Image / Audio] -> [H.264 (1)] to the following settings on the web page of the camera.H.264 transmission: OnImage capture size: 1280 x 720 or higherTransmission priority:Frame rateFrame rate: 15 fps or higher (NTSC), 12.5fps or higher (PAL)Change [Setup] -> [Image / Audio] -> [JPEG (1)] to the following settings on the web page of the camera.Image capture size: Priority Mode setting is IP: 1280 x 720When priority mode is set to other than IP mode: 640 x 360 Refresh interval: 15 fps or higher (NTSC), 12.5fps or higher (PAL)Image quality: Normal- When acquiring images with H.264 streamChange [Setup] -> [Image / Audio] -> [H.264 (1)] to the following settings on the web page of the camera.H.264 transmission: OnImage capture size: 1280 x 720 or higherTransmission priority:Frame rateFrame rate: 15 fps or higher (NTSC), 12.5fps or higher (PAL)3. InstallationPlease Install the Software, according to the following procedure.<Notes>• To install the software, log in as a user having the Administrator authority.• Please continue with the process by clicking the "Yes" when the confirmation of the user account control is displayed during installation.1. Right click on Setup.exe and select "Run as administrator".List of components that will be installed will be displayed.Depending on the OS and PC, some of the components may not appear when they are not required to be installed2. Click the [Install] button, a confirmation screen of the user account control will be displayed.Click [Yes] to continue the process.3-1. If the installation of Node.js is required, the following screen will be displayed. Click [Next]. 3-2. Select [I accept the terms in the license agreement], and then click [Next].3-4. Click [Next].3-6. Click [Finish] to close the dialog box..4-1. If the installation of “Windows Server 2003 Resource Kit Tools” is required, the following screen will be displayed. Select [Run program].4-2. Click [Next].4-3. Select [I Agree] and click [Next]. 4-4. Click [Next].4-5. Click [Install Now].4-6. Click [Finish] to close the dialog box.4-7. If the confirmation screen of the PC restart appears, click [Yes] to restart PC.5. If the installation of .NetFramework4.5 is required, the following screen will be displayed, theinstallation will be performed automatically.6-1. If the installation of MjpegProcessor is required, the following screen will be displayed, click [Next].6-2. Since the confirmation screen of the installation location appears, click [Next].6-3. The screen for starting installation appears. Click [Next].6-4. When installation is complete, click the [Close] button to close the dialog box.7. When the installation of the required components is completed, the installation screen appears. Click [Next].8. The Software License Agreement appears. Check the content, and if there is no problem, select [I accept the terms in the license agreement], and then click [Next].9. The screen for starting installation appears. Click [Install].10. When the following screen appears, set each item and click [Setup].Web Server Hostname:Set the IP address set for the PC's network adapterAdd Windows Firewall Setting for Web Application:Turn the checkbox ON to change the settings of Windows firewall.Normally, you should leave this checkbox ON.11. A confirmation screen appears, Click [Yes].12. A confirmation screen appears, Click [Yes].13. Close the screen that is displayed in step 10 by clicking the X button in the upper right corner of the screen.14. When installation is complete, click the [Finish] button to close the dialog box.4. Startup and Exit4.1. Starting the SoftwareClick the shortcut [Auto Tracking Software] created on the desktop to start the software.4.2. Exiting the SoftwareWhile the application is running, click the × button at the top right of the window to exit the software.5. About the Operation ManualThe operation manual of this software is provided in the help file format displayed on the Web browser. Click ? button on the upper left of the screen to display the operation manual.6. About ActivationThis is paid software.To enable you to test the functions of the software, we offer a trial period of 30 days from the day of installation of this software. Therefore, you can use it for free during this period, but you must purchase the key code (license) after the expiry of the trial period, and activate the software.For the activation procedure, see the operation manual of this software.。
流控大师使用说明书

1000BASE-T (RJ-45)*4 RS232*1
1000BASE-T (RJ-45)*6 RS232*1
电源
单
单
单
单
尺寸 cm
43.8*22.9*4.3 43.8*22.9*4.3 43.8*22.9*4.3 43.8*22.9*4.3
重量 kg
6
5.5
5.5
5.5
外形
1U 19”机架式 1U 19”机架式 1U 19”机架式 1U 19”机架式
型号
A860
A860-E 860-Q A860-Q2
应用环境 2000 IP
接 标准
口
类
型 扩展
1000BASE-T (000BASE-T (RJ-45)*6 无 单
10000 IP 1000BASE-T (RJ-45)*6 无 单
20000 IP 1000BASE-T (RJ-45)*6 双光口 单
6
录
图27 HTTP 管控规则
图33 域名群组
52
尺寸 cm
42.5*36.9*4.1 42.5*36.9*4.1 42.5*36.9*4.1 42.5*36.9*4.1
重量 kg 外形
8
8
8
8
1U 19”机架式 1U 19”机架式 1U 19”机架式 1U 19”机架式
5
流控大师主要由应用特征库、应用识别系统 、应用管理 系统、应用路由四大部份组成 ,并通过系统管理、策略管理、 系统维护、监控统计四大人机互动管理功能,对流经的所有 应用 数据进行实时监控与管理。其结构图如下:
型号
应 流控 用 模式 环 路由 境 模式
A525
1000 IP 600 IP
云博士流控新向导使用说明+

应VLAN口的名称.
C) 在【ADSL客户端】中添加多条ADSL,注意网络接口选择上面添加的对
D) 在【路由管理】->【路由规则】中添加一条DSCP9的规则.
E) 在【路由管理】->【负载均衡】中添加多条ADSL的负载,其中【网络 接口】选择C 中添加的【ADSL 客户端】名称。
F) 在【路由管理】->【路由管理】中添加路由策略,分别以【负载均衡 名】为网络接口 添加对应的多条策略。
G) 在向导第5步【应用分流】中,设置不同的应用采用多ADSL来负载分 流。
5) 单光纤+单ADSL 做副线:
A) 在向导的【副线设置】中添加光纤副线1 。
8/30/13
All Rights Reserved.
第 7页,共 12页
云博士流控新向导
B) 在向导的【副线设置】中添加ADSL副线2 。
网络接口:指外网接入的所有网口.
分WAN0、WAN1、WAN2 三个外网接口, 一般主线采用WAN0 接口。
运营商:是指提供网络服务的供应商,目前我们国内主要分为【电信】【联通】,南 方大多使用【电信】,北方【联通】用户较多,另外还有个别地区的【移动】、【长宽】、【广 电】等。
线路类型:目前我国线路主要分为【光纤】、【ADSL拨号】两种类型,个别地区采 用的拨号光纤属于【ADSL拨号】类。
第 2页,共 12页
云博士流控新向导
1 配置向导描述
为加强云博士流控设备的人性化体验,使的大多数网管技术人员能够快速上手,我们特别 制作本配置向导,通过本配置向导,我们将能够快速配置云博士流控设备;本向导主要配置如 下内容:
• 局域网参数配置: 设置局域网 LAN 口 IP 地址 ,更新,电影,收银服务器 IP(可多填)
Flowstar F7流动级别开关规格与安装及操作指南说明书

SPECIFICATIONSElectrical Rating (Maximum): F7-SB, -SS2 AC: 25VA, 1.0A, 200 V DC: 10W, 1.0A, 200V F7-PP , -BT, -HSS, -MHSAC: 25VA, 1.0A, 200 V DC: 10W, 1.0A, 200VF7-HPS-1, -2AC: 25VA, 1.0A, 200 V DC: 10W, 1.0A, 200V (F7-HSS is rated explosion-proof for Class I, Groups A, B, C, D;Class II, Groups E, F , G; Class III).Mounting Connection: 1/8″NPTM (all vertical mount), 1/2″NPTM (F7-HPS-2, F7-HSS), M16 x 2 (F7-HPS-1), 1/2″x 13 thread (F7-MHS)Wire leads: 22 AWG x 18″(46 cm), vertical mount models; 22 AWG x 39″(1 m), models F7-HPS-1, -2; 22 AWG x 24″(61 cm), models F7-HSS, -MHS.Magnet: Alnico (F7-SB, -PP , -BT, -HPS), ceramic (F7-SS2, -HSS, -MHS).Weight: 2 oz. (58 g), F7-SB; 1.2 oz. (34g), F7-SS2; 0.8 oz. (23 g), F7-PP; 0.7 oz.. (20 g), F7-BT; 1.5 oz. (43 g), F7-HPS-1; 2 oz. (57 g), F7-HPS-2 and -MHS; 3 oz. (94 g), F7-HSS.BULLETIN E-75SERIES F7 LIQUID LEVEL SWITCHESSpecifications – Installation and Operating InstructionsSeries F7 Level Switches provide simple, inexpensive control of liquid level within tanks or similar vessels. Switch ratings are suitable for many solid state control systems and monitors or alarms. Simple relay interfaces can be used for higher current applications. Two basic styles offer a choice of vertical or hori-zontal mounting. Hermetically sealed reed switches are actu-ated by magnets permanently bonded inside the float and can be easily adapted to open or close a circuit on rising or falling levels.SWITCH ACTION (Normally open/Normally closed)Vertical ModelsVertical mount models are shipped with normally open switch contacts which close as the float rises toward the mounting threads. Reverse switch action by removing the float, rotating it end-for-end and replacing it on the stem.Horizontal ModelsHorizontal models are in the normally open position when the indicating arrow points up (float is down), and normally closed when the arrow points down (float is up).INSTALLATIONChoose a location away from fill pipes, drains, or other areas where turbulence or wave motion might occur. Turbulence will cause false actuation and shorten contact life. Excess conta-minants in fluid may inhibit float operation and occasional wipe-down may be necessary. Care should be taken that switches are always operated within electrical ratings. Read and understand all safety precautions on back of this sheet before installing.MOUNTINGInstall vertical mount models in an appropriate 1/8″NPT fitting.Vertical models mount internally, oriented within 30°of vertical,or select optional fittings for external mounting. Models F7-HPS-1 and F7-MHS must be mounted internally, which means the switch must be secured to the wall of the tank or vessel from the inside. Install horizontal model F7-HPS-1 in a 5/8″(16mm) hole or model F7-MHS in a 1/2″(12.7 mm) hole. Secure into place with the nut provided. Tank wall should not exceed 1/8″(3 mm). Model F7-HPS-2 requires a horizontal 1/2″NPT female fitting and can be fitted to the tank or vessel from the outside. Model F7-HSS requires a horizontal 1/2″NPT female fitting and can be mounted from the inside or outside (inter-nally or externally) of the tank or vessel.DIMENSIONS, INCHES (MM) - Vertical MountModel (A) Stem (B) Float (C) Float (D) Actuation Number Length Diameter Height from HEX*F7-SB 2.75 (70) 1.13 (29) 1.38 (35) 1.2 (31)F7-SS2 2.06 (52) 1.0 (25) 1.0 (25)0.73 (19)F7-PP 2.18 (55) 1.18 (30) 1.0 (25)0.69 (18)F7-BT2.18 (55)1.18 (30)1.0 (25)0.69 (18)PHYSICAL DATAModel Material Max.Max.Min.Approx.Number Float/Stem Temp.Press.S.G.Deadband Vertical Mount F7-SB Buna-N & Epoxy/220°F 150 psig 0.601/16″316SS105°C 10 bar 2 mm F7-SS2316/SS (CYC)/300°F 450 psig 0.751/16″316SS149°C 31 bar 2 mm F7-PP Polypropylene & Epoxy/220°F 100 psig 0.601/8″Polypropylene105°C 6.89 bar 4 mm F7-BT Buna-N & Epoxy/220°F 150 psig 0.451/8″PBT*105°F 10 bar4 mm Horizontal Mount F7-HPS Polysulfone/185°F 150 psig 0.853/16″-1, -2Polysulfone 85°C 10 bar5 mm F7-HSS 316SS/316SS 392°F 300 psig 0.601/8″200°C 20.7 bar4 mm F7-MHS316 SS/316SS392°F 100 psig 0.703/16″200°C6.89 bar5 mm*DistancebetweenHEXandliquid(S.G.=1)******************************specific gravity changes.* PBT - Polybutylene Terephtalate3.750[95.3]1/2-13 THREAD2.875 [73]1.00[25.4]1.00 NOM.[25.4]1.375[34.9].1875 [4.76]F7-MHS, INTERNAL HORIZONTAL MOUNTDWYER INSTRUMENTS, INC. Phone: 219/879-8000P .O. BOX 373 • MICHIGAN CITY, INDIANA 46361, ,U.S.A. Fax: 219/872-9057e-mail:*******************Lit-By Fax: 888/891-4963©Copyright 1999 Dwyer instruments, Inc Printed in U.S.A. 2/99FR 82-440677-00+VInductive LoadReed Switch DiodePIV Diode > VDIODE SUPPRESSION+VReed SwitchUsed in AC CircuitsVARISTER PROTECTIONVaristorInductiveLoad+VReed SwitchRC SUPPRESSIONInductive LoadRCI switchI 2switch10[uF]C =R =V10 * I(1+50/E)SURGE LIMITER FOR CAPACITANCE IN SERIESRESISTOR PROTECTION FOR CAPACITIVE LOADINDUCTIVE PROTECTION FOR CABLE LENGTH CAPACITANCECURRENT LIMITING RESISTOR IN SERIES CURRENT LIMITING RESISTOR IN PARALLELReed SwitchLOADL PL P = 0.5 - 5 mHCable Length over 50 meters [162.5 ft.]L PL P = 0.5 - 5 mH Reed SwitchC LOAD+VR A R B R = 50 - 500 OhmsC LOAD+VR AReed SwitchR L R I =Reed Switch+VR II switchV - 0.12R L I 2switchR LReed Switch+VI switch5R L > R IR IDWYER INSTRUMENTS, INC. Phone: 219/879-8000P .O. BOX 373 • MICHIGAN CITY, INDIANA 46361, ,U.S.A. Fax: 219/872-9057e-mail:*******************Installation Notes-Do not subject reed switch controls to excessive shock or vibration or any of the following:• Bending or placing force loads on reed switch hous-ing.• Over-torquing fittings on reed switch housing.• Placing pull-out force on lead wires.Do not exceed 1.5 pounds/foot (2 N/m) tightening torque.Excessive torque may cause premature switch element or housing failure.Avoid installations where wiring entering the device issubmerged or exposed toexcessive amounts of liquid or humidity condensate.Gasket seal for internalmounting units should be pre-assembled before insertion through tank wall. Wall thick-ness should not exceed 1/8″(3mm).When preparing wires for termination, avoid pulling against the resin seal or end plug of the float switch. Units with tapered pipe threads should be treated with Teflon®based thread compound or tape before insertion in fitting.Sufficient torque is achieved at hand-tight plus one half turn.CIRCUIT INFORMATION FOR REED SWITCH PROTECTIONREAD INFORMATION BELOW BEFORE INSTALLING YOUR NEW REED SWITCH CONTROL!Exceeding the current capacity of this Reed Switch control may cause FAULTY OPERATION! Be aware of the inductive and capaci-tive or lamp loads you may be placing on your Reed Switch Control. the circuits below outline possible solution to preventing over-loads due to inrush or surge currents exceeding maximum or when the switch current and product of the inductive back EMFexceed the switch’s power rating. Also, the circuit for prevention of overload when switching filament lamps (low “cold” resistance) is outlined below. Failure to follow these measures to protect Reed Switch Contacts may cause the contacts to weld together or result in premature wear.Possible Circuit Solutions Indicated by Dashed LinesInductive Loads Possible causes-An electromagnetic relay, electro-magnetic solenoid, electromagnetic counter with inductive component as circuit load.Capacitive Loads Possible causes-A capacitor connected in series or parallel with Reed Switch Control. In a closed circuit, a cable length(usually greater than 50m [162.5 ft])used to connect reed switch may also introduce static capacitance.Lamp Loads Possible causes-A tungsten filament lamp load.。
流控大师专用使用手册 一学就会

目录流控大师使用手册简介 (5)历史 (5)流控结构框架 (6)典型部署方式 (7)纯流控接线 (7)双线流控路由接线 (8)1、安装部署 (9)1.1、推荐配置 (9)1.2、软件获取 (9)1.3、ISO镜像安装 (10)1.3.1、U盘安装引导制作 (10)1.3.2、硬盘安装引导制作 (13)1.3.3、正式安装过程 (17)1.4、完全卸载 (22)1.5、手动安装包 (22)2、流控配置 (28)2.1、WEB 基本设置 (28)2.1.1、关闭 CPU 超线程 (28)2.1.2、确认系统时间 (28)2.1.3、修改口令 (29)2.1.4、配置与测试网桥 (29)2.1.5、导入授权证书 (30)2.2、WEB进阶配置 (30)2.2.1、策略管理 (31)- 2 -流控大师使用手册2.2.1.1、流量控制 (32)1 策略组 (32)2 策略调度 (33)3 数据通道 (34)2.2.1.2、参数设置 (35)1 网桥带宽 (35)2 内网IP统计 (36)3 伪IP防护 (37)2.2.1.3、连接控制 (37)1 策略组 (37)2 策略调度 (38)2.2.1.4、HTTP 管控 (39)1 策略组 (39)2 策略调度 (40)2.2.2、对象管理 (40)2.2.2.1、HTTP对象 (41)1 文件类型 (41)2 域名群组 (41)2.2.2.2、自定义协议 (43)2.2.2.3、IP 群组 (44)2.2.2.4、自定义协议组 (45)2.2.2.5、虚拟链路 (46)2.2.3、系统维护 (47)3、策略框架实例分析 (48)4、附录 (55)流控大师使用手册4.1、兼容硬件参考 (55)4.2、AB交叉线接法 (59)简介《网吧流控大师》是基于性能卓著的FreeBSD平台开发的,以最先进的应用协议识别引擎、精确识别、通道控速、按需调控各种应用占总带宽的比例,更高效的"带宽限速、带宽保证、带宽预留”保证网络高速稳定运行。
- 1、下载文档前请自行甄别文档内容的完整性,平台不提供额外的编辑、内容补充、找答案等附加服务。
- 2、"仅部分预览"的文档,不可在线预览部分如存在完整性等问题,可反馈申请退款(可完整预览的文档不适用该条件!)。
- 3、如文档侵犯您的权益,请联系客服反馈,我们会尽快为您处理(人工客服工作时间:9:00-18:30)。
流控大师全攻略网吧爱好者收集《流控大师》-领先的网络核心技术,最专业的流控引擎、应用识别、智能控速、提升宽带使用率、保证网络高效稳定运行!打造不卡的网吧网络环境!还加入了路由功能,支持双线策略和负载。
1) 流控大师部署位置2) 流控大师硬件配置Panabit流控系统定位于网络设备级OS,需要安装在一台独立硬件中,3) 硬件配置要求《网吧流控大师》-推荐硬件配置:CPU:INTEL酷睿E2140或以上( 多核更能发挥PA的性能)内存:1G或以上、硬盘:1G以上电子盘或CF卡、硬盘均可网卡:单线4张,双线是5张,可用双口或者4口网卡。
必须是Intel的千M网卡,比如82540/1/2/3/4/5/6,82571/2/3/4, 建议PCI-E的网卡主板:随意按上面需求搭配特别注意:对于老CPU带(HT)超线程一定要在BIOS里关闭,一定要注意这个,切记!4) 流控大师一键安装镜像安装文件下载地址:/downloadPanabitWBTEST20091128_fb7x.iso 下载后,可以刻成光盘或使用U盘引导,menu.lst格式如下:title PA网吧版fallback 6find --set-root /iso/PanabitWB091128.isomap /iso/PanabitWB091128.iso (0xff) || map --mem /iso/PanabitWB091128.iso (0xff)map --hookchainloader (0xff)savedefault --wait=2使用光盘或U盘启动,启动之后在login:输入root用户名,口令root,即FreeBSD提示界面,输入Panabit# ./setup安装过程大约需要1分钟左右,时间视硬盘大小格式化时间,安装过程首先是自动查找盘,如果有多个盘,会自动安装在系统排序的第一个盘,建议仅安装一个盘,可以是硬盘、CF卡、U盘等(盘容量要大于256M,建议512M以上。
其中主要运行自动分区、格式化文件系统、安装精简FreeBSD 7.2、安装Panabit。
以下是运行交互提示:Welcome to Panabit system automatically install shell!The installation will delete all data on your hard disk and can not be restored!!Please confirm whether or not to continue the installation!Do you want to continue(y/n[n])? 输入y回车,否则退出。
Following disks are detected: ad0 显示系统中检测到的盘。
(有多盘要选对!)Please select one [da0]: 输入ad0回车安装。
We begin to format the disk "ad0" and begin to install FreeBSD 7.2!Do you want to continue(y/n[y])?回车继续。
******* Working on device /dev/ad0 *******cylinders=1024heads=64sectors/track=32此处可能显示一些磁盘分区调整扇区起始信息的警告提示,不用管。
FreeBSD 7.2 Install OK!这期间主要格式化文件系统,复制光盘上FreeBSD精简系统文件和配置。
Welcome installing panabit!****** Congratulations ******!You have successfully installed Panabit on your system!Following interfaces are installed in your system:em0 em1 em2 em3 em4 em5这里显示系统所有网卡,须选择一个做管理口的网卡,剩余的默认都作为数据接口。
(注:可以在Live CD 启动之后,使用FreeBSD命令ifconfig查看网卡,如果插上网线,显示网卡状态为Active,通过此方法确认物理接口对应关系。
)Please choose one of above as your admin interface: em5仅示例,根据实际情况选择网卡名称Please input ip address of admin interface: 192.168.1.226Please input network mask of admin interface: 255.255.252.0Please input default gateway: 192.168.0.1这里输入管理口网卡名称、IP地址、掩码、网关,则安装完毕!如果输入错误,等脚本运行完毕,重新做一遍!再次显示:Your interface configurations are:Admin interface : em5Admin ip address : 192.168.1.226Admin netmask : 255.255.252.0Default gateway : 192.168.0.1Data interfaces : em0 em1 em2 em3 em4Thank you for using panabit!Eject CDROM!Reboot system then the system automaticly start panabit at system startup!If you want to stop the currently running panabit, you can issue"/usr/panabit/bin/ipectrl stop" to stop it!You can issue "/usr/panabit/bin/ipectrl start" to start panabit!Panabit#安装完毕之后取出光盘,重启机器,即可https登录管理界面https://192.168.1.226,Web管理用户名admin,口令panabit。
进入Web管理界面,第一件事选择网络配置-> 数据接口配置网桥,如选择网桥1,则将其中一个网卡定义为接内网,将另一个网卡定义为接外网,分别点击提交即可,如下图:Panabit最多可以支持4路网桥,网桥配置完毕,测试网桥连通性,如果正常连通,即可上线实际使用。
刚开始上线,主要观察网络流量分析,不必急于配置策略,根据流量分析的结果,制定下一步的流量调策略。
到此为止,Panabit流控系统搭建完成,接下来参考管理配置手册,定义数据通道、配置策略组、进行策略组时间调度等,即可正常使用Panabit专业流控。
5) 流控大师的重装和系统升级,特征库升级1. 下载Panabit安装包Panabit下载地址见:/forum/viewthread.php?tid=5507&extra=page%3D1,Panabit安装包文件名格式PanabitXXXX.tar.gz,使用另存为或迅雷等常见下载工具均可。
2. 上传流控大师安装包当下载好PA安装包后,使用带sftp的ssh远程Shell客户端(推荐),将Panabit的安装包上传到FreeBSD系统;如文件上传到/usr/local目录下的SFTP参考下图。
说明:如果您熟悉FreeBSD系统的话,同样,您也可以用其它方法,将从光盘Panabit的安装包上传到自己喜欢的目录进行安装。
3. 卸载流控大师Panabit# /usr/panabit/bin/ipectrl stop停止Panabit进程Panabit# cd /usrPanabit# rm -rf panabit 删除PA系统目录Panabit# rm -rf panaetc 删除配制目录Panabit# rm -rf panalog 删除PA日记目录Panabit# rm -rf /etc/PG.conf 删除PA配制文件Panabit# rm -rf PanabitXXXX*删除旧版本安装包解压后生成的目录Panabit# rm -rf PanabitXXXX*.tar.gz删除旧版本安装包4. 重装Panabit步骤如下:Panabit# cd /usr/localPanabit# tar zxvf Panabitxxxx.tar.gz Panabitxxxx.tar.gz换成你下的文件名Panabit# cd PanabitxxxxPanabit# ./ipeinstall 键入此命令进入安装,安装过程只需1-2分钟即可安装完毕Welcome installing panabit!Please input the directory to install panabit [/usr/panabit]:直接回车即使用默认目录Please input the directory to store log [/usr/panalog]:直接回车即使用默认目录Please input the directory to store configuration [/usr/panaetc]:直接回车即使用默认目录The last time to verify your choice:陈列前面设置的安装目录,以便确认或修改(1) The directory that you want to install is "/usr/panabit"(2) The directory that the log to be stored is "/usr/panalog"(3) The directory that the configuration to be stored is "/usr/panaetc"Above are right(y/n[y])?yCreating directory "/usr/panabit" ...okCreating directory "/usr/panalog" ...okInstalling Panabit to "/usr/panabit" ...okInitializing configurations ...okSaving configuration to /etc/PG.conf ...****** Congratulations ******!You have successfully installed Panabit on your system:安装成功,并显示结构信息(1) The installed path is: /usr/panabit(2) The log path is: /usr/panalog(3) The configuration path is: /usr/panaetcTo make your system more sutiable for panabit running, it'srecomended of tuning your system according your system memorysize and cpu frequence.Do you want to tune your system(y/n)[y]: y是否让系统自动检测并调节内核优化参数Your kernel configuration has been tuned as the followings:#console="comconsole"autoboot_delay="2"beastie_disable="YES"if_em_load="YES"kern.ipc.nmbclusters=10240kern.maxdsiz=2000000000vm.pmap.pg_ps_enabled=1kern.hz=1000You should restart your system to make they take effects.(这些设置必须重启系统才能应用,注意安装完毕后记得reboot系统)Warning: your em driver has been compiled into kernel.To optimize panabit performance, we recommendyou use the optimized driver panaos provides.To use the optimized driver, please remove emdriver from your kernel.Following interfaces are installed in your system:(选择一个网络适配器,以便我们(管理员)能对Panabit进行管理与设置。