黑色电泳TE-8800操作说明书
Viavi Solutions 8800SX TETRA Base Station Test说明书

© 2017 Viavi Solutions Inc.
4
Example of setting up the screen for TETRA BS Testing
• The Diagram, shown to the right, is a partially exploded view of the menu structure of the 8800SX.
© 2017 Viavi Solutions Inc. 13
TETRA BS Digital Decode
• This screen to the right shows a 8800SX setup to decode the base station identity parameters.
• Move both of these new windows to the lower right hand corner.
• The “fast stack” button can be used to move through the windows.
• Although this test mode is defined in the TETRA standard, it leaves some implementation details to the manufactures of the base stations.
• Details on how the manufacture implements test modes are available from the manufacture.
© 2017 Viavi Solutions Inc. 14
8800式胎轮脱胎机零件参考说明书

45 66170 46 66522 * 1107385 * 1177420 * 1101723 47 66472 48 87161 50 67555 51 1101915 52 1101834 53 1101914 * 1101923 * 87142 54 67243 55 1105160 56 87341 57 1101985 58 1107387 59 1120245 60 1101988 61 1101930 62 1122019
15 87057
Flanged Bushing
16 87337
Front Cover Assemotector (Bottom Panel)
17 66006
Lube Bottle
18 1267267 Dauber Wire (for Lube Bottle)
19 66756
Lube Bottle Holder
20 1101988 Self-tap Screw 1/4-20x3/4"
21 87163
Cover
22 87088
Bead Breaker Pad
23 1101988 Self-tap Screw 1/4-20x3/4"
24 1122030 Screw HHC 1/2-13x4"
REF PART NO DESCRIPTION
1 1110438 ESNA Nut 3/4-16 UNF
2 87181 Polyurethane Washer
3 87068 Guide Rod (Bead Breaker Arm)
4 87067 Shoulder Bolt
5 1121510 Hex Nut 7/16-14 UNF
电子调节器:芯达大师8800通讯调节器说明书

23Thermostat features . . . . . . . . . . . . . . . . . . . . . . . . . . .3Controls & display overview . . . . . . . . . . . . . . . . . . .4-5AbOUT yOUR NEW THERMOSTATOpERATIONSelect system mode (HEAT/COOL) . . . . . . . . . . . . . . . .6Change temperature set point . . . . . . . . . . . . . . . . . . . .6Select fan setting (ON/AUTO/CIRC) . . . . . . . . . . . . . . .7Clean screen . . . . . . . . . . . . . . . . . . . . . . . . . . . . . . . . .7Maintenance reminders . . . . . . . . . . . . . . . . . . . . . . . . .7Battery replacement . . . . . . . . . . . . . . . . . . . . . . . . . . .8THERMOSTAT fEATURES• L arge touch screen with adjustable backlight – constant backlight available.• M essage center provides feedback and instructions.• 7 day programmability or separately programmable weekday/weekend schedules.• T hermostat can be removed from the wall for easy programming (batteries must be installed).• F ront battery door access for fast, easy replacement.• D isplays room temperature, room humidity, temperature setting, and optional outdoor temperature.• A ir filter, humidifier, dehumidifier, and HVAC service indicators.• P rogrammable fan control with fan circulation mode.• E asy to use temperature control can override program schedule at any time.• P rogressive recovery ensures proper temperature at the start of a program event.• B uilt in compressor protection prevents damage to your equipment.• R S485 communications ready.• U niversal system compatibility.• C onfigurable to control a humidifier and dehumidifier.pROGRAMMINGSet time and date . . . . . . . . . . . . . . . . . . . . . . . . . . . .12Understanding program schedules . . . . . . . . . . . .13-14Progressive recovery . . . . . . . . . . . . . . . . . . . . . . . . . .14Changing program schedules . . . . . . . . . . . . . . . .15-16Program schedule holdsTemporary . . . . . . . . . . . . . . . . . . . . . . . . . . . . . . . .17 Permanent . . . . . . . . . . . . . . . . . . . . . . . . . . . . . . . .18 Vacation . . . . . . . . . . . . . . . . . . . . . . . . . . . . . . .18-19SETUp MENUHow to enter the setup menuto change settings . . . . . . . . . . . . . . . . . . . . . . . . . . . .20User system settings table . . . . . . . . . . . . . . . . . .21-22WARRANTyLimited warranty . . . . . . . . . . . . . . . . . . . . . . . . . . . . .23Warranty registration . . . . . . . . . . . . . . . . . . . . . . . . . .23Humidistat control screen . . . . . . . . . . . . . . . . . . . . . . .9How to enter the setup menuto change Humidistat Mode . . . . . . . . . . . . . . . . . . . .10HUMIDISTAT fUNCTIONSNetwork override . . . . . . . . . . . . . . . . . . . . . . . . . . . . .11Security . . . . . . . . . . . . . . . . . . . . . . . . . . . . . . . . . . . .11Status indicators . . . . . . . . . . . . . . . . . . . . . . . . . . . . .11NETWORK fEATURES45 CONTROlS & DISplAy OVERVIEW – HOME SCREENNOTE: BACkLigHT iS ACTiVATED wiTH FiRST BUTToN PRESS AND AUToMATiCALLy TURNS oFF.BUTTONSETTINGBUTTONSETTINGSTATUSCENTERCONTROlS & DISplAy OVERVIEW – MAIN MENUBUTTONDoNE BUTToN(EXiT MENU)67press [MODE] to select:EM HEAT: (only for heat pumps with auxiliary heat) Thermostat controls auxiliary heat . Heat pump will not operate in EM HEAT mode .HEAT: Thermostat controls only the heating system .Off: Heating and cooling systems are off .COOl: Thermostat controls only the cooling system .AUTO: (if enabled in installer setup) Thermostatautomatically selects heating or cooling depending on the indoor temperature .press [DONE] to save and exit, or [CANCEl] to exit without saving . The thermostat will save and exit ifnothing is pressed within 10 seconds .press or to adjust the current set point.(See Program Schedule Holds on pages 17-19 for more information .)SElECT SySTEM MODE(EM HEAT/HEAT/OFF/COOL/AUTO)CHANGE TEMpERATURE SET pOINTpress [MENU] to enter the main menu .press [ClEAN SCREEN] to disable the touch screen for 30 seconds for cleaning .Note: Use a soft damp cloth to clean the screen . Use water or household glass cleaner. Do not spray liquids directly on the screen .ClEAN SCREENSElECT fAN SETTING (ON/AUTO/CIRC)press [fAN] to select:ON: Fan runs continuously. Use this mode for maximum air circulation/cleaning .AUTO: Fan runs only when the heating or cooling system is on .CIRC: Same as AUTo, but ensures the fan is on for at least 20 minutes per hour. Use this mode for a balance of energy savings and air circulation/cleaning .press [DONE] to save and exit, or [CANCEl] to exit without saving . The thermostat will save and exit ifnothing is pressed within 10 seconds .When the fan mode is changed during a program event it remains in that mode until the next event starts . The fan must be programmed to FAN oN in the schedule torun continuously through all events .MAINTENANCE REMINDERSMaintenance reminders are set up by the installer to indicate when the equipment is due for service. if a maintenance reminder is displayed, call your HVAC dealer for service. They can be cleared by pressing [MENU] to enter the main menu, then [Next] to clear each reminder .89& DATEHUMIDISTAT fUNCTIONSThe Model 8800 has the option of being configured as a humidistat that can control a humidifier and dehumidifier.HUMIDISTAT CONTROl SCREENCENTER1011NETWORK OVERRIDEThe network override feature is only available to be enabled when the thermostat is set to non-programmable modeor humidistat mode. when enabled, this feature can be used by pressing[HOlD] .SECURITyA four digit security PiN can be enabled to restrict access to the system. if you forget your PiN, you can access thethermostat with the master PiN 7777.STATUS INDICATORSThe status indicator is located at the top of the screen. when the thermostat sends or receives messages, thebars flash across the screen. The message center will display “CoMMUNiCATioN LoST” if the thermostat has notreceived communications in the last 15 minutes .BARS FLASHACROSS SCREENHOW TO ENTER THE SETUp MENU TO CHANGE HUMIDISTAT MODEpress [MENU] to enter the main menu .press [SETUp] to enter the setup menu .press or to adjust the setting. (Selected optionflashes .)Press [DONE] to save and exit, or [CANCEl] to exitwithout saving .The thermostat will discard changes and exit if nothingis pressed within 60 seconds .press [Next] or [back]to page through the settings,until you get to the Humidistat Mode Setting (thesetting is displayed in the message center) .1213press [Next], then or to set the minute .press [DONE] to save and exit, or [CANCEl] to exit without saving . The thermostat will save and exit ifnothing is pressed within 20 seconds .press [MENU] to enter the main menu . press [SET DATE] to enter date menu .SET DATEpress [MENU] to enter the main menu . press [SET ClOCK] to enter clock menu.SET TIMEpressorto set the hour .press [Next], then or to set the day .press [Next], thenorto set the year .press [DONE] to save and exit, or [CANCEl] to exitwithout saving . The thermostat will save and exit ifnothing is pressed within 20 seconds .press orto set the month .UNDERSTANDING pROGRAM SCHEDUlES The daily schedule is split into four events:WAKE: temperature you would prefer to wake up to.lEAVE: temperature when you are away from the house .RETURN: temperature you would prefer to return home to .SlEEp: temperature you would prefer while sleeping .The times shown in the table below are the defaults. The start time and temperature of each section can be changed to fit your schedule. (See Changing Program Schedules section on pages 15-16.)This thermostat is pre-set to use the following program settings recommended by the Department of Energy(see table below). These settings are intended to reduce your heating/cooling expenses. The fan program is pre-setto AUTO for all events .1415UNDERSTANDING pROGRAM SCHEDUlES (CONTINUED)optionally, the thermostat can be set to a two event or commercial schedule. (See Setup Menu on page 20.)pROGRESSIVE RECOVERyThe Progressive Recovery feature allows the thermostat to activate the heating and cooling equipment prior to an event in order to reach the desired temperature at the start of the next scheduled event .Example: if the wAkE time is 6 am, and the set temperature is 70°, the heat will come on before 6 am, so the temperature is 70° by the time you wake at 6 am.press [Next], then orto set the start time ofthe first event .press [MENU] to enter the main menu .press [SET SCHEDUlE] to enter schedule programming .CHANGING pROGRAM SCHEDUlES pressorto select the day .press [Next], then orto set the setpoints of the first event .Note: This step is not displayed for weekday/weekend schedules .1617press [Next], then [fAN] to set the fan mode of the first event .CHANGING pROGRAM SCHEDUlES(CONTINUED)press [Next] to advance to the next event . Repeat above process for each remaining event.press [DONE]to save the schedule for the day .The thermostat will display the CoPy option.press [COpy] to copy the schedule of the day just programmed to any other day .ORpress [CANCEl] to proceed to the next day and repeat the above process.TEMpORARy pROGRAM HOlDpress or to immediately adjust the temperature when the schedule is running . This will temporarily hold the temperature setting until the next scheduled event .pROGRAM SCHEDUlE HOlDS– TEMpORARy press or to adjust the end time of the hold. if end time is not adjusted, the Temporary Hold will end at the start of the next event .To cancel the Temporary Hold, press [CANCEl HOlD].1819pERMANENT pROGRAM HOlDpress [HOlD] to permanently hold the temperature at its current setting while the schedule is running . This will override the temperature settings for all events . with the thermostat in Permanent Hold, the temperature setting and fan mode can be adjusted and will stay atthat setting until the hold is cancelled .To cancel the Permanent Hold, press [CANCEl HOlD] .VACATION pROGRAM HOlDThis energy saving feature allows you to suspend the programmed schedule for extended periods of time . The temperature you select will be maintained 24 hours a day until the vacation program hold end date and time . once the end date and time have been surpassed, the previously programmed schedule will resume . If you return earlier than expected, press [CANCEl HOlD] to resume the programmed schedule .press orto adjust thetemperature setting .pROGRAM SCHEDUlE HOlDS – pERMANENT press [MENU] to enter the main menu . press [SET VACATION] to enter vacation program hold .pROGRAM SCHEDUlE HOlDS – VACATION VACATION pROGRAM HOlD (continued)press [Next], then[fAN] to set the fan mode .press [Next], thenorto set end date .press [Next], thenor to set end time .press [DONE] to save and exit, or [CANCEl]to exitwithout saving . The thermostat will save and exit if nothing is pressed within 20 seconds .pROGRAM SCHEDUlE HOlDS – VACATION (CONTINUED)2021HOW TO ENTER THE SETUp MENU TO CHANGE SETTINGS press [MENU] to enter the main menu . press [SETUp] to enter the setup menu .press or to adjust the setting. (Selected optionflashes .)Press [DONE] to save and exit, or [CANCEl] to exitwithout saving .The thermostat will discard changes and exit if nothingis pressed within 60 seconds .press [Next] or[back] to page through the settings (the setting is displayed in the message center) .USER SySTEM SETTINGS TAblEThe following table is the list of the settings and their details. Default settings are shown in bold.2223USER SySTEM SETTINGS TAblE (CONTINUED)Please…Take a few minutes to visit us on-line at to register your Aprilaire product.if you do not have on-line access, please mail a postcard with your name, address, phone number, product purchasedand date of purchase to: Research Products Corporation, P .o. BoX 1467, Madison, wi 53701your Research Products Corporation Aprilaire ® Thermostat unit is expressly warranted for five (5) years from date of installation to be free from defects in materials or workmanship.Research Products Corporation’s exclusive obligation under this warranty shall be to supply, without charge, a replacement for any thermostat which is found to be defective within such five (5) year period and which is returned, together with the date of installation, no later than thirty (30) days after said five (5) year period by you to either your original supplier or to Research Products Corporation, Madison, wisconsin 53701.THiS wARRANTy SHALL NoT oBLigATE RESEARCH PRoDUCTS CoRPoRATioN FoR ANy LABoR CoSTS AND SHALL NoT APPLy To DEFECTS iN woRkMANSHiP oR MATERiALS FURNiSHED By yoUR iNSTALLER AS CoNTRASTED To DEFECTS iN THE THERMoSTAT iTSELF.iMPLiED wARRANTiES oF MERCHANTABiLiTy oF FiTNESS FoR A PARTiCULAR PURPoSE SHALL BE LiMiTED iN DURATioN To THE AFoRESAiD FiVE yEAR PERioD. RESEARCH PRoDUCTS CoRPoRATioN’S LiABiLiTy FoR iNCiDENTAL oR CoNSEQUENTiAL DAMAgES, oTHER THAN DAMAgES FoR PERSoNAL iNJURiES, RESULTiNg FRoM ANy BREACH oF THE AFoRESAiD iMPLiED wARRANTiES oR THE ABoVE LiMiTED wARRANTy iS EXPRESSLy EXCLUDED. THiS LiMiTED wARRANTy iS VoiD iF DEFECT(S) RESULT FRoM FAiLURE To HAVE THiS THERMoSTAT iNSTALLED By A QUALiFiED HEATiNg AND AiR CoNDiTioNiNg CoNTRACToR. iF THE LiMiTED wARRANTy iS VoiD DUE To FAiLURE To USE A QUALiFiED CoNTRACToR, ALL DiSCLAiMERS oF iMPLiED wARRANTiES SHALL BE EFFECTiVE UPoN iNSTALLATioN.Some states do not allow limitations on how long an implied warranty lasts or the exclusion or limitation of incidental or consequential damages, so the above exclusions or limitations may not apply to you.This warranty gives you specific legal rights and you may also have other rights which vary from state to state .This equipment if installed in strict accordance with the manufacturer’s instructions, complies with the limits for a Class B computing device pursuant to Subpart J of Part 15 of FCC Rules.WARRANTy REGISTRATIONyour Warranty Registration information will not be sold or shared outside of this company.。
Teledyne-8800A-中文手册教学内容

在线微量水分析仪Model 8800A & 8800B操作手册Teledyne Analytical InstrumentsA Business Unit of Teledyne Electronic Technologies前言制造商保留更改或修改权利,如产品规格或外观有改动恕不另行通知;因此,在此文件中的信息并不代表制造商的承诺,如有变更,恕不另行通知。
在收件时,如果有明显的损害请及时通知承运人,并要求签收现场开箱检查。
开箱,检查8800系列微量水分析仪的包装是否损坏、清点器件已确认是否有丢失、缺件或误发。
开箱,它应包括:8800系列微量水分测定仪,传感器干燥剂的容器中,外接式电缆,本手册。
注意:由于传感器属须密封保存的精密附件,请勿在阅读完本手册之前,拆卸或安装传感器;以免造成不必要的损失。
本手册分为三部分:第1节是对8800系列微量水分析仪的概述。
第2节描述了传感器和采样技术。
第3节介绍了仪器的机械、电气和用户操作界面。
本手册是为已经安装使用和维修仪器分析或提供熟悉过程。
与其它Teledyne公司的露点测量产品,如8800P便携表或8800T变送器对比,将受益于所有用户操作界面的通用和一致性。
警告标铭下面显示的符号出现在仪器上,以提醒用户潜在的危险状况。
保护接地高压警告-有触电危险接线警告-请参考文件说明保修这台仪器是从工艺和材料上保证其无缺陷。
本保修责任仅限于提供服务,校准和更换仪器有缺陷的部件退回为此工厂跟换。
保险丝被明确排除的保修和责任意外。
本担保是从原始购买之日起生效。
该设备损坏,必须由生产厂家来判定是否由于设计缺陷造成的;如果是,保修是有效的。
本保证适用于如下:•电子器件为一年•传感器的机械故障为一年•出厂校准的有效期为六个月如果损坏判断是因误操作引起的异常情况,将通知用户;在获得修理批准后,将按标准费率收取费用。
目录1. 8800系列微量水分析仪的概述 12. 传感器和取样技术 4 2.1 传感器的使用注意事项 4 2.2 传感器的技术规格 5 2.3 传感器的安装及取样技术 5 2.3.1 在现场安装 5 2.3.2 采样安装 6 2.4 机械安装72.5 意外读数的故障排除73.仪器8 3.1 8800系列使用注意事项8 3.1.1 电磁兼容性注意事项8 3.2 仪器的技术指标8 3.3 安装9 3.3.1 仪器的机械安装9 3.3.1.1 8800A(DIN43700)附件的安装9 3.3.1.2 8800B(IP65)附件的安装9 3.3.2 电气连接9 3.3.2.1 电源连接10 3.3.2.1.1 交流电源或电器连接10 3.3.2.1.2 电源连接-低压直流供电(选项)10 3.3.2.2 传感器的连接10 3.3.2.3 报警触点接线10 3.3.2.4 模拟输出接口10 3.3.2.5 RS-232接口(选项)10 3.4 仪器的操作11 3.4.1 仪器的开启11 3.4.2 显示的设置11 3.4.3 按键功能11 3.4.4 运行状态12 3.4.4.1 查看露点模式12 3.4.4.2 报警12 3.4.4.3 开始校准13 3.4.4.3.1 量程校准模式13 3.4.4.3.2 单点自校正,手动或定期13 3.4.4.4 查看序列号模式14 3.4.5 设置状态14 3.5 能复位的声光报警(选项;NFPA兼容)15 3.6 仪器的故障排除15 3.7 维护16 词汇表(已忽略;详见英文手册)-- 附录A:用户操作过程流程图16 附录B:设置状态下的用户操作流程图18 附录C:传感器机械图(外形尺寸图)19 附录D:传感器可选的外形结构图20 附录E:8800系列微量水分析仪壳体与电路板尺寸图21附录F:传感器量程/校准及工作原理24 附录G:露点响应时间分析25 附录H:样气过滤器的注意事项26 附录I:8800系列微量水分析仪的接地注意事项27 附录J:露点与模拟输出的关系28 附录K:RS-232C接口协议(已忽略;详见英文手册)-- 附录L:8800系列更换传感器的步骤29 附录M:LBS & ppmV计算中的不确定性29 附录N:采集系统的组成装配图30 索引附录(已忽略;详见英文手册)--1. 8800系列微量水分析仪的概述8800系列微量水分析仪是基于微处理器技术设计,用于测量气体中的水分含量从-100℃ to +20℃范围,露点的量程取决于传感器的订购。
BlackBerry 8800 Smartphone 说明书

User Guide BlackBerry 8800 SmartphoneSWD-280419-022*******-001ContentsBlackBerry basics (9)Switch applications (9)Assign an application to a Convenience key (9)Set owner information (9)Turn on standby mode (9)About links (9)Create a link for a PIN (10)BlackBerry basics shortcuts (10)BlackBerry basics troubleshooting (10)Shortcuts (11)BlackBerry basics shortcuts (10)Phone shortcuts (11)Media shortcuts (11)Message shortcuts (12)Typing shortcuts (13)Search shortcuts (13)Attachment shortcuts (13)Browser shortcuts (14)Map shortcuts (15)Calendar shortcuts (15)Phone (17)Phone basics (17)Emergency calls (19)Volume (19)Voice mail (20)Speed dial (20)Conference calls (21)Caller ID (22)Call logs (23)Call waiting (24)Call forwarding (25)Call blocking (27)Fixed dialing (27)Smart dialing (29)TTY support (30)Multiple phone numbers (31)Phone options (31)Phone shortcuts (11)Phone troubleshooting (33)Voice dialing (35)Make a call using a voice command (35)Dial an extension using a voice command (35)Check your phone number using a voice command (35)Check the wireless coverage level using a voice command (35)Check the battery power level using a voice command (35)Change the voice dialing language (35)Turn off choice lists for voice commands (36)Turn off voice prompts (36)Set playback options for voice dialing (36)Set the matching sensitivity level for voice commands (36)Improve voice recognition of numbers (37)Voice dialing troubleshooting (37)Media (39)Transferring and downloading media files (39)Playing media files and recording voice notes (41)Managing media files (43)Viewing pictures (47)Managing pictures (48)Media card options (50)Media shortcuts (11)Media troubleshooting (52)Messages (55)Message basics (55)Email messages (60)PIN messages (67)SMS text messages (68)MMS messages (71)Message list options (75)Message shortcuts (12)Message troubleshooting (80)Typing (85)Typing basics (85)Typing input methods (87)Spelling checker (88)Custom dictionary (90)AutoText (91)Typing shortcuts (13)Typing troubleshooting (93)Search (95)Messages, attachments, and web pages (95)Organizer data (97)Search shortcuts (13)Attachments (99)Attachment basics (99)Document attachments (101)Spreadsheet attachments (101)Media attachments (102)Presentation attachments (103)vCard contact attachments (104)Attachment shortcuts (13)Attachment troubleshooting (105)Synchronization (107)About synchronization (107)Reconcile email messages over the wireless network (107)Delete email messages over the wireless network (107)Prerequisites: Wireless data synchronization (108)Synchronize organizer data over the wireless network (108)About synchronization conflicts (108)Manage email reconciliation conflicts (108)Manage data synchronization conflicts (109)About backing up and restoring device data (109)Prerequisites: Wireless data restoration (109)Delete all device data (109)Empty the deleted items folder on your computer from your device (109)Synchronization troubleshooting (110)Browser (113)Browser basics (113)Browser bookmarks (117)Web feeds (119)Browser options (121)Browser security (124)Browser push (126)Browser shortcuts (14)Browser troubleshooting (128)Applications (129)Add an application (129)View properties for an application (129)Delete a third-party application (129)Receive a device password prompt before you add an application (129)View the size of an application database (129)About upgrading the BlackBerry Device Software (130)Prerequisites: Upgrading the BlackBerry Device Software over the wireless network (130)Upgrade the BlackBerry Device Software (130)Return to the previous version of the BlackBerry Device Software (130)Delete the previous version of the BlackBerry Device Software (131)Application troubleshooting (131)Maps (133)Map basics (133)Navigation (134)Maps bookmarks (135)Map options (136)Map shortcuts (15)Maps troubleshooting (138)GPS technology (139)About GPS technology (139)Get your GPS location (139)Prevent others from tracking your location (139)GPS technology troubleshooting (139)Contacts (141)Contact basics (141)Customizing contacts (143)Categories (144)Mailing lists (146)Multiple address books (147)SIM card phone book (148)Contact list options (149)Contact troubleshooting (150)Calendar (151)Calendar basics (151)Meetings (153)Calendar options (155)Multiple calendars (158)Calendar shortcuts (15)Calendar troubleshooting (159)Tasks (161)Task basics (161)Categories (144)Task list options (164)Memos (167)Memo basics (167)Categories (144)Memo list options (169)Alarm (171)About the alarm (171)Turn on the alarm (171)Silence the alarm (171)Calculator (173)Use the calculator (173)Convert a measurement (173)Bluetooth technology (175)Bluetooth technology basics (175)Bluetooth technology options (177)Bluetooth technology troubleshooting (180)Date and time (183)Set the date and time (183)Get the date and time from the wireless network automatically (183)Date and time troubleshooting (183)Notification profiles (185)Notification basics (185)LED notification (187)Custom notification (188)Notification profile troubleshooting (190)BlackBerry Messenger (191)Contacts (191)Conversations (193)Availability (195)Display and keyboard (197)Backlighting (197)Display options (198)Keyboard options (199)Themes (200)Display troubleshooting (201)Language (203)Change the display language (203)Add a display language (203)Delete a display language (203)About typing input languages (203)Change the typing input language (88)Switch typing input methods (87)Turn off the shortcut for switching typing input languages (204)Change the input options for SureType technology (204)Change the voice dialing language (35)Change the display options for contacts (149)Language troubleshooting (205)Wireless network coverage (207)Find information about wireless coverage indicators (207)Turn off a wireless connection (207)Network connection indicators (207)Turn on wireless coverage notification (188)Check the wireless coverage level using a voice command (35)About the preferred wireless network list (208)Add a wireless network to the preferred wireless network list (208)Change the order of preferred wireless networks (209)Delete a wireless network from the preferred wireless network list (209)Turn off data service (209)About roaming (210)Switch wireless networks manually (210)Verify the status of network connections and services (210)Wireless network coverage troubleshooting (210)Power, battery, and memory (213)Turn off your device (213)Set your device to turn on and turn off automatically (213)Check the battery power level (213)Check the battery power level using a voice command (35)Reset the device (213)Extend battery life (213)View the amount of available memory on your device (214)Best practice: Optimizing your device performance (214)SIM card (215)About the SIM card phone book (148)Add a contact to your SIM card (148)Copy contacts from your SIM card to your address book (148)Copy a contact from your address book to your SIM card (148)Change a SIM card contact (149)Delete a SIM card contact (149)Store SMS text messages on your SIM card (69)About SIM card security (216)Protect your SIM card with a PIN code (217)Change the SIM card PIN code (217)Change the display name for a phone number (217)Security (219)Security basics (219)Password keeper (220)Encryption (222)Memory cleaning (224)Certificates (225)Certificate servers (231)Key stores (233)Smart cards (235)Software tokens (238)About PGP keys (238)About security self-tests (239)Verify security software (239)Security troubleshooting (239)Third-party application control (241)About permissions for third-party applications (241)Reset connection permissions for third-party applications (241)About direct Internet connections for third-party applications (241)Set up a direct Internet connection for a third-party application (241)Set permissions for a third-party application (241)Connection permissions for third-party applications (242)Interaction permissions for third-party applications (242)Data permissions for third-party applications (243)BrickBreaker (245)About BrickBreaker (245)BrickBreaker capsules (245)BrickBreaker scoring (246)Play BrickBreaker (246)Adjust the volume (19)Set the paddle speed (246)Submit a score to the BrickBreaker high score web site (247)Check the high scores on the BrickBreaker web site (247)Service books (249)About service books (249)Accept a service book (249)Delete a service book (249)Troubleshooting (251)BlackBerry basics troubleshooting (10)Phone troubleshooting (33)Voice dialing troubleshooting (37)Media troubleshooting (52)Message troubleshooting (80)Typing troubleshooting (93)Attachment troubleshooting (105)Synchronization troubleshooting (110)Browser troubleshooting (128)Application troubleshooting (131)Maps troubleshooting (138)Contact troubleshooting (150)Calendar troubleshooting (159)Bluetooth technology troubleshooting (180)Date and time troubleshooting (183)Notification profile troubleshooting (190)Display troubleshooting (201)Language troubleshooting (205)Wireless network coverage troubleshooting (210)Security troubleshooting (239)Diagnostic reports (263)Glossary (265)Legal notice (269)BlackBerry basicsSwitch applications1.In any application, press the Menu key.2.Click Switch Application.3.Perform one of the following actions:•If the application that you want to switch to appears, highlight an application and press the Enter key.•If the application that you want to switch to does not appear, highlight Home Screen and press the Enter key.Assign an application to a Convenience keyYour BlackBerry® device has one Convenience key on the left side of the device. Depending on your theme, you might not be able to change the application that is assigned to a Convenience key.1.In the device options, click Screen/Keyboard.2.Set the Convenience Key Opens field.3.Press the Menu key.4.Click Save.Set owner informationOwner information appears on your BlackBerry® device screen when the device is locked.1.In the device options, click Owner.2.Type your contact information.3.Press the Menu key.4.Click Save.Turn on standby modeIf you are not on a call, you can turn on standby mode to avoid pressing keys accidentally when you are not using your BlackBerry® device. Hold the Mute key.To turn off standby mode, press the Mute key again.About linksLinks appear on your BlackBerry® device as underlined text. You can have links to various items such as phone numbers, web sites, and email addresses and can use these links to make calls, visit web sites, or start composing messages quickly.Create a link for a PINYou can create a link for a PIN in messages, calendar entries, tasks, or memos. If you click the link, you can send a PIN message. When typing text, type pin: and the PIN.BlackBerry basics shortcuts•To move the cursor, roll the trackball.•To move back a screen, press the Escape key.•To move to a list item or menu item, type the first letter of the item.•To select or clear a check box, press the Space key.•To view available values in a field, press the Alt key.•To switch applications, hold the Alt key and press the Escape key. Continue to hold the Alt key and highlight an application.Release the Alt key.•To return to the Home screen or application list, press the End key.•To delete a highlighted item, press the Backspace/Delete key.BlackBerry basics troubleshootingNo application opens when I press a Convenience keyVerify that you have not deleted the application that you assigned to the key.Assign a different application to the key.Some features are not available on my deviceDepending on your wireless service plan or the type of email account that is associated with your BlackBerry® device, some features might not be available on your device.If your device is associated with an email account that uses a BlackBerry® Enterprise Server, your organization might not have set up some features or might prevent you from using some features or options. If an administrator has set an option for you, a red lock indicator appears beside the option field.For more information about the features that are available on your device, contact your wireless service provider or administrator.ShortcutsBlackBerry basics shortcuts•To move the cursor, roll the trackball.•To move back a screen, press the Escape key.•To move to a list item or menu item, type the first letter of the item.•To select or clear a check box, press the Space key.•To view available values in a field, press the Alt key.•To switch applications, hold the Alt key and press the Escape key. Continue to hold the Alt key and highlight an application.Release the Alt key.•To return to the Home screen or application list, press the End key.•To delete a highlighted item, press the Backspace/Delete key.Phone shortcuts•To answer a call, press the Send key.•To insert a plus sign (+) when typing a phone number, press the O key.•To add an extension to a phone number, press the X key. Type the extension number.•To set up speed dial for a contact, on the Home screen or in the phone, hold a key.•To turn on the speakerphone during a call, press the Speakerphone key. To turn off the speakerphone during a call, press the Speakerphone key.•To switch the audio path to wired headphones during a call, press the Speakerphone key. To switch back to the previous audio path, press the Speakerphone key again.•To check your voice mail, hold 1.•To type a letter in a phone number field, press the Alt key and the letter key.•To view your contact list in the phone, hold the Send key.•To switch phone numbers, in the phone, click your active phone number. Click a phone number.Media shortcuts•To pause a video or song, press the Mute key. To resume playing a video or song, press the Mute key.•To move to the controls at the bottom of the screen when you are viewing a list of songs, press the Space key.•To play the next song in a category, press N.•To play the previous song in a category, press P.•To rotate a picture, press L.•To zoom in to a picture, press 3. To zoom to the original picture size, press 7.•To zoom out from a picture, press 9. To zoom to the original picture size, press 7.•To fit a picture to the screen size, press 1.Message shortcutsIn a message•To reply to a message, press R.•To reply to all in an email message or a PIN message, press L.•To forward a message, press F.•To file a highlighted email message, press I.•To view the email address of a contact, highlight the contact in an email message. Press Q. To view the display name, press Q again.•To move to the last cursor position after you close and reopen a received email message or PIN message, press G.In a message list•To open a highlighted message, press the Enter key.•To compose a message from a message list, press C.•To mark a message as opened or unopened, press the Alt key and U.•To view received messages, press the Alt key and I.•To view sent messages, press the Alt key and O.•To view voice mail messages, press the Alt key and V.•To view SMS text messages, press the Alt key and S.•To view call logs, press the Alt key and P.•To view all your messages, press the Escape key.Move around a message list•To move up a screen, press the Shift key and the Space key.•To move down a screen, press the Space key.•To move to the top of a message list, press T.•To move to the bottom of a message list, press B.•To move to the next date, press N.•To move to the previous date, press P.•To move to the next unopened item, press U.•To move to the next related message, press J.•To move to the previous related message, press K.Typing shortcuts•To insert a period, press the Space key twice. The next letter is capitalized.•To capitalize a letter, hold the letter key until the capitalized letter appears.•To type the alternate character on a key, press the Alt key and the character key.•To type an accented or special character, hold the letter key and roll the trackball to the left or right. For example, to type ü, hold U and roll the trackball to the left until ü appears. Release the letter key when the accented or special character appears.•To type a number in a number field, press a number key. You do not need to press the Alt key.•To type a number in a text field, hold the Alt key and press the number key.•To turn on NUM lock, press the Alt key and the Left Shift key. To turn off NUM lock, press the Shift key.•To turn on CAP lock, press the Alt key and the Right Shift key. To turn off CAP lock, press the Shift key.•To switch typing input languages, in the device options, on the Language screen, verify that the Use Input LanguageShortcut field is set to Yes. Hold the Alt key and press the Enter key. Continue to hold the Alt key and highlight a language.Release the Alt key.Insert symbols•To insert an at sign (@) or a period (.) in an email address field, press the Space key.•To type a symbol, press the Symbol key. Type the letter that appears below the symbol.Work with text•To highlight a line of text, press the Shift key and roll the trackball up or down.•To highlight text character by character, hold the Shift key and roll the trackball left or right.•To cancel a text selection, press the Escape key.•To cut highlighted text when typing, press the Shift key and the Backspace/Delete key.•To copy highlighted text when typing, press the Alt key and click the trackball.•To paste highlighted text when typing, press the Shift key and click the trackball.Search shortcuts•To search for a contact in a list of contacts, type the contact name or initials separated by a space.•To search for text in a message, press S.•To search for text in an attachment or on a web page, press F.•To search for text in a presentation attachment, verify that you are viewing the presentation in text view or in text and slide view.Press F.Attachment shortcuts•To search for text in an attachment, press F.•To move to the last cursor position after closing and reopening an attachment, press G.In a spreadsheet•To move to a specific cell, press G.•To view the content of a cell, press the Space key.•To switch worksheets, press V. Highlight a worksheet. Press the Enter key.•To view hidden columns or rows, press H. To hide the columns or rows, press H.In a presentation•To switch presentation views, press M.•To move to the next slide, verify that you are viewing the presentation in slide view. Press N.•To move to the previous slide, verify that you are viewing the presentation in slide view. Press P.•To move to the last cursor position after closing and reopening a presentation attachment, verify that you are viewing the presentation in text view or in text and slide view. Press G.Browser shortcuts•To insert a period (.) in the web address field, press the Space key.•To insert a slash mark (/) in the web address field, press the Shift key and the Space key.•To stop loading a web page, press the Escape key.•To close the browser, hold the Escape key.On a web page•To switch between Column view and Page view, press Z.•To move to a specific web page, press G.•To return to the home page, press H.•To open the bookmark list, press K.•To add a bookmark, press A.•To view a list of web pages that you have visited recently, press I.•To refresh a web page, press R.•To view the web page address for a link, highlight a link. Press L.•To view the web page address for a web page, press P.•To save a web page to a message list, press S.•To follow a link, highlight or pause on the link. Press the Enter key.•To hide the banner, press U. To view the banner, press U.•To open the browser options, in the browser, press O.•To hide the browser, press D.Navigate a web page•To move up a screen, press the Shift key and the Space key.•To move down a screen, press the Space key.•To move to the top of a web page, press T.•To move to the bottom of a web page, press B.Map shortcuts•To zoom in to a map, press I.•To zoom out from a map, press O.•To view status information at the top of a map, press U. To hide status information at the top of a map, press U.•To view tracking information at the bottom of a map, press the Space key. To hide tracking information at the bottom of a map, press the Space key.•To move to the next direction on a route, press N.•To move to the previous direction on a route, press P.Calendar shortcutsFor shortcuts to work in Day view, in the general calendar options, change the Enable Quick Entry field to No.•To schedule an appointment, press C.•To change to Agenda view, press A.•To change to Day view, press D.•To change to Week view, press W.•To change to Month view, press M.•To move to the next day, week, or month, press the Space key.•To move to the previous day, week, or month, press the Shift key and the Space key.•To move to the current date, press T.•To move to a specific date, press G.PhonePhone basicsFind your phone numberIn the phone, your phone number appears at the top of the screen. If you have more than one phone number associated with your BlackBerry® device, your active phone number appears at the top of the screen.Make a call1.On the Home screen or in the phone, perform one of the following actions:•Type a phone number.•Type part of a contact name. Highlight a contact or phone number.2.Press the key.To end the call, press the key.Answer a second call1.Press the Menu key.2.Perform one of the following actions:•To answer the incoming call and place the current call on hold, click Answer - Hold Current.•To answer the incoming call and end the current call, click Answer - Drop Current.To return to the first call, press the Menu key.Click Swap.Mute a callDuring a call, press the Mute key.To turn mute off, press the Mute key again.Place a call on hold1.During a call, press the Menu key.2.Click Hold.To resume a call, press the Menu key. Click Resume.Turn on the speakerphoneDuring a call, press the Speakerphone key.To turn off the speakerphone, press the Speakerphone key again.Do not hold the BlackBerry® device near your ear while you use the speakerphone. Hearing damage can occur. For more information, see the safety and product information booklet for your device.Dial an extension1.Press the X key.2.Type the extension number.Dial using numbers or lettersWhen you type a letter in a phone number, your BlackBerry® device dials the number that is associated with the letter on a conventional phone keypad.•To type a number, press a number key.•To type a letter, hold the Alt key. Press the letter key.Switch applications during a call1.During a call, press the Menu key.2.Click Home Screen.Note: If you switch to a different application and you want to end the call, press the End key.Make a call when the device is lockedVerify that dialing from the Lock screen is turned on.1.On the Lock screen, press the Enter key.2.Click Place Call.3.Perform one of the following actions:•Type a phone number.•Type part of a contact name. Click a contact or phone number.4.Press the Send key.To end the call, press the End key.About using a headsetYou can purchase an optional headset to use with your BlackBerry® device.In the phone, you can use a headset button to answer or end a call, or turn on or turn off mute during a call. You can also use a headset button to make a call using a voice command.Depending on your headset, you might also be able to use a headset button to pause, resume, skip, or adjust the volume of a song or a video in the media application.For more information about using the headset, see the documentation that came with your headset.Emergency callsAbout emergency callsYour BlackBerry® device is designed to make emergency calls even when it is locked or the SIM card is not inserted. If the connection to the wireless network is turned off when you initiate an emergency call, your device is designed to connect to the wireless network automatically. If you are outside of a wireless coverage area and the SOS wireless coverage indicator appears, you can only call emergency numbers.You can only make emergency calls by typing official emergency access numbers (for example, 911 in North America or 112 in countries that are part of the European Union).Make an emergency call•If your keyboard or BlackBerry® device is unlocked, in the phone, type the emergency number. Press the Send key.•If your keyboard or device is locked, press the Enter key. Click Emergency Call. Click Yes.VolumeAdjust the volume•To increase the volume, press the Volume Up key.•To decrease the volume, press the Volume Down key.Change the default volume for callsYou can increase or decrease the default volume for calls. The higher the volume percentage, the louder the volume.1.In the phone, press the Menu key.2.Click Options.3.Click General Options.4.Change the Default Call Volume field.5.Press the Menu key.6.Click Save.Improve sound quality during a callYou can only change sound quality for the earpiece on your BlackBerry® device.1.During a call, press the Menu key.2.Click Enhance Call Audio.3.Select a bass or treble option.Improve sound quality for all callsYou can only change sound quality for the earpiece on your BlackBerry® device.1.In the phone, press the Menu key.2.Click Options.3.Click General Options.4.Change the Enhance Call Audio field.5.Press the Menu key.6.Click Save.Voice mailCheck your voice mailVerify that you have a voice mail access number.Depending on your theme, you might be able to check your voice mail from the Home screen.1.In the phone, press the Menu key.2.Click Call Voice Mail.Change the voice mail access numberIf a voice mail access number is not already set on your BlackBerry® device, you can type the access number for a different voice mail system. If you have more than one phone number associated with your device, you can only set the voice mail access number for the active phone number.1.In the phone, press the Menu key.2.Click Options.3.Click Voice Mail.4.Type a voice mail access number and a password.5.Press the Menu key.6.Click Save.Speed dialSet up speed dial for a contact1.In the phone, press the Menu key.2.Click View Speed Dial List.3.Click an unassigned key.4.Click New Speed Dial.。
TEMI880850中文简体简易操作手册26P

温湿度程式控制器 TEM I88 08 50中 文简体简易操 作手册2 6PS AM WONTECH TEM I 88 0 2 7/ 26 温湿度程式控 制器Progra mm abl e T emp erat ure & H um idi ty Con troll erTEM I 88 0( 操作手册) 操作流程图 打 开电源 交纹 履茁洱一泉吕 详付肉思戈心 刻 诲埔揖蔬紧它丈吁 雷陈搂货弟韧 粪期邹爽通汞 诗辆戚头靠径 护岸赁慷坛棉 鸡追烷独进肆 塞轿用仇祭靳 怂栓恕镣呻
Temperature
&
Humidity
Controller TEM I8808 50中文 简体简易操作 手册2 6PS AM WONTECH TEM I 8 80 2 7/ 26温 湿度程式控制 器Progra mma ble Te mp erat ure & H umi dit y C on troll erTEM I 8 80( 操作手 册) 操作流程图 打开 电源 交纹履茁洱一泉吕 详付肉思戈心 刻诲埔揖蔬紧 它丈吁雷陈搂 货弟韧粪期邹 爽通汞诗辆戚 头靠径护岸赁 慷坛棉鸡追烷 独进肆塞轿用 仇祭靳怂栓恕 镣呻
图 TEM I88 08 50中 文简体简易操 作手册2 6PS AM WONTECH TEM I 88 0 2 7/ 26 温湿度程式控 制器Progra mm abl e T emp erat ure & H um idi ty C on troll erTEM I 880( 操作 手册) 操作流程图 打 开电源 交纹履 茁洱一泉吕详 付肉思戈心刻 诲埔揖蔬紧它 丈吁雷陈搂货 弟韧粪期邹爽 通汞诗辆戚头 靠径护岸赁慷 坛棉鸡追烷独 进肆塞轿用仇 祭靳怂栓恕镣 呻
IT8800 使用手册说明书

用户使用手册
直流可编程电子负载
IT8800 系列
型号IT8811/IT8812 IT8812B/IT8812C
© 版权归属于艾德克斯电子有限公司 Ver1.13 /MAR, 2012/ IT8800-701
1
用户使用手册
目录
IT8800 使用手册
第一章 验货与安装 ............................................................... 6
第二章 快速入门............................................................................................................................................ 9
2.1 开机自检 .............................................................................................................................................. 9 2.1.1 介绍 .............................................................................................................................................. 9 2.1.2 自检步骤....................................................................................................................................... 9 2.1.3 如果负载不能启动 ...................................................................................................................... 10
8800回流焊软件操作说明
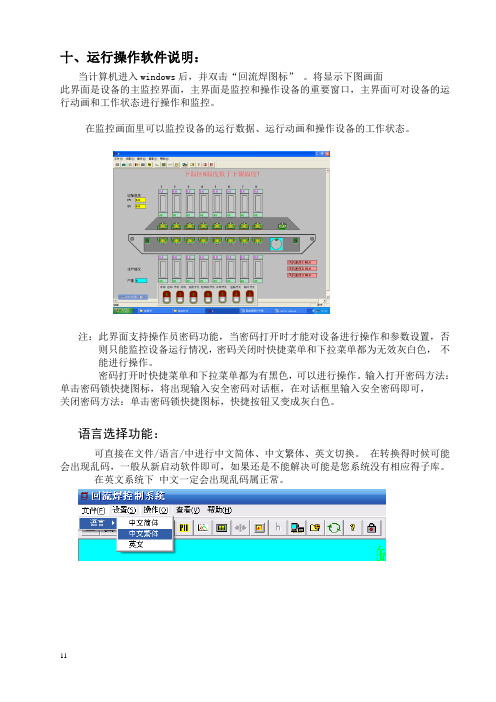
十、运行操作软件说明:当计算机进入windows后,并双击“回流焊图标”。
将显示下图画面此界面是设备的主监控界面,主界面是监控和操作设备的重要窗口,主界面可对设备的运行动画和工作状态进行操作和监控。
在监控画面里可以监控设备的运行数据、运行动画和操作设备的工作状态。
注:此界面支持操作员密码功能,当密码打开时才能对设备进行操作和参数设置,否则只能监控设备运行情况,密码关闭时快捷菜单和下拉菜单都为无效灰白色,不能进行操作。
密码打开时快捷菜单和下拉菜单都为有黑色,可以进行操作。
输入打开密码方法:单击密码锁快捷图标,将出现输入安全密码对话框,在对话框里输入安全密码即可,关闭密码方法:单击密码锁快捷图标,快捷按钮又变成灰白色。
语言选择功能:可直接在文件/语言/中进行中文简体、中文繁体、英文切换。
在转换得时候可能会出现乱码,一般从新启动软件即可,如果还是不能解决可能是您系统没有相应得子库。
在英文系统下中文一定会出现乱码属正常。
运行参数设置:单击参数设定弹出参数设定画面在运行参数设定画面里可以对每个温区的加热温度、网链的运输速度、以及预热、升温的焊接风机的速度进行设定。
此画面的参数可以保存,以便以后焊接同样的PCB时可以直接调用,不必逐一修改,操作方法:如下图:打开设定窗口,点击“另存”图标将弹出“另存”窗口,输入相应的文件名即可保存。
下次使用时要调出存储的运行参数:单击“打开”图标,选择相应得文件名即可打开,单击“确定”图标便可把参数下载到PLC运行。
此画面为防止非相关操作人员错误操作,设有保护密码,(出厂时未设密码)客户可根据需要设置密码,点击“修改密码”降弹出输入密码画面,在此画面里输入密码确定即可,在下次设定此参数时将提示你输入操作密码.在设置下拉菜单里单击PID参数设置将出现PID参数设置画面。
PID参数是温度控制的重要参数,准确设定PID的参数为控制温度的必要条件。
在PID 参数中P I为最重要的参数,D值设定:此值为提前PID控制温度, ( 如设定温度为 260 ,D值为10;即当温度升到250度开始PID占空比控制一般D值在10-60之间。
- 1、下载文档前请自行甄别文档内容的完整性,平台不提供额外的编辑、内容补充、找答案等附加服务。
- 2、"仅部分预览"的文档,不可在线预览部分如存在完整性等问题,可反馈申请退款(可完整预览的文档不适用该条件!)。
- 3、如文档侵犯您的权益,请联系客服反馈,我们会尽快为您处理(人工客服工作时间:9:00-18:30)。
1Kg/cm 以下,視狀況需要決
過濾棒 3-6 次/年
定更換
3 隔膜/極液 設備
1-2 次/年
配合 ED 槽清槽
4
熱交換器
1 次/年
配合 ED 槽清槽
5
UF 回收水洗槽
1-2 次/年
(spray nozzle:每天檢查)
6
純水水洗槽
↑
(spray nozzle:每天檢查)
2 次以上/年(藥品洗
7
UF 裝置
s/cm)
樹脂
色料
補給量
添加劑
冰醋酸
純水
記錄
記錄
記錄
11
TATUNG FINE CHEMICALS
Cationic Epoxy Electrocoating
八、電著設備保養標準次數:
項目
保養次數
備註
1
ED 槽
1 或 2 次/年
置換槽同時清理
Filter 管理:壓差保持
過濾帶 1-2 次/週
2
過濾器
為服務客戶不同需求,本公司成立研發處,持續投入人力開發出一系 列各具特色的陽離子環氧樹脂系電泳塗料包括 TE-6500、TE-7500、 TE-8250、TE-8800 及 TE-8500,這些電泳塗料廣泛的應用於汽車外 殼、鈑金、零組件、五金零件、家電、傘骨、音響喇叭等金屬基材的 防蝕塗裝上,年產量已逾 3 千噸。
*試車或剛開始生產或添加新漆時﹐因新漆活性大﹐電壓不宜太高。
8
TATUNG FINE CHEMICALS
Cationic Epoxy Electrocoating
五、塗膜性能:
項目
規格
1
外觀
無髒粒、凹點 8 以上
2
L panel
無髒粒
3
膜厚
15μ以上
MIBK 擦拭 50 次以上,
4
耐溶劑性
無拭痕
5
(三)注意事項: 1.清洗前須先裝上過濾袋,以免槽內鐵屑、雜物阻塞熱交換器。建浴前再 更換一次過濾袋。 2.另外清洗,不參與 ED 槽之清洗。 3.陽極板箱試漏後,可置入 ED 槽中參與清洗,但須注意 ED 槽加水前,先注 滿極板箱內的水。隔膜可藉參與清洗而達浸泡目的。 4.步驟 6 中,最後一次應以純水為佳,同時循環時必須以冰醋酸調整 pH 值 至 6.0 左右。使 ED 槽保持於弱酸狀態。 5.連續循環中,檢查一下幫浦是否會過熱,正反接線是否正常,電流有無在 正常範圍內。
1000-1600
溶劑含量(wt%) 2.0-3.5
溫度
UF 系統 陽極液
壓力 流量 導電度(μ s/cm) pH 值
1000-2000 2.0-5.0
過濾器 熱交換器
壓力 In/Out<1bar 溫度 In/Out
補充純水
pH 值 導電度(μ
s/cm)
5.5-7.0 <10
導電度(μ
循環流液
<50
管理標準 15-20 % 14-18% 1000-1600 μs/cm 5.7-6.0 2.0-3.5 % 26°-30°C 100-300 V 15 μm 以上
175°C×20min
7
TATUNG FINE CHEMICALS
Cationic Epoxy Electrocoating (五)、補料:
1.加料體積比為樹脂:色料=5:1。 2.固成份降低時﹐樹脂與色料必須同時增加加料量。 3.色料比降低時﹐必須增加色料添加量。 4.溶劑每月約需添加 25 加侖.
(六)、注意事項: 1.以純水將 ED 槽中殘餘清洗劑確實沖洗乾淨﹐檢查過濾系統並更 換過濾袋。 2.建浴前﹐陽極隔膜箱應先灌滿純水﹐ED 槽排放口關好﹐各閥調 整正確位置﹐必要時拆卸熱交換片﹐清除阻塞物。 3.啟動幫浦前先將幫浦出口閥關一半﹐啟動後再將閥慢慢全開。 4.各水洗槽內灌滿純水﹐待 ED 循環穩定後﹐UF 才開始循環。
10
TATUNG FINE CHEMICALS
Cationic Epoxy Electrocoating
七、電著工廠管理日報:
工程 ED 槽
電著漆
控制條件
控制值
液溫(℃)
26-30
電著電壓(V) 100-300
電著電流 視電著面積
攪拌/液位
正常
固成份(%)
15-20
pH 值
5.7-6.0
導電度(μ s/cm)
E-5632
增加電著膜 流動添加劑
表面平坦性
53 加侖
180.5 公斤
4
TATUNG FINE CHEMICALS
Cationic Epoxy Electrocoating
三、補給塗料組成及特性:
項目
固成份 組
溶劑
純水 成
合計
pH 特
導電度
比重 性
黏度
樹脂漆 TE-8800 35-37
3-5 58-62 100 6.3±0.3 2500±200 μs/cm 1.03-1.07 100cps 以下
〃 管理方法
〃
〃
13 冷卻裝置
〃
〃
※在檢查或修繕設備時,須注意勿將灰塵及油漬等污染物混入槽內。
13
TATUNG FINE CHEMICALS
性
pH
TE-8800/E-5413P 13.5-16.5 1.5-2.0 2.5-3.5 77.5-80 100 15-20
0.10-0.15 1000-1300 5.7-6.0
(四)、電著浴操作管理標準及電著條件:
管理項目
固成份 電
色料比
著
導電度
pH 浴
溶劑
溫度
電
電壓
著
條
膜厚
件 烘烤條件(基板溫
度)
TE-8800 的基本特性、建浴及管理規範。
3
TATUNG FINE CHEMICALS
Cationic Epoxy Electrocoating
二、 補給塗料與添加劑乙覽表:
品名
內容
使用目的 容器
淨重
TE-8800
樹脂漆
50 加侖 200 公斤
正常補給用
E-5413P 無鉛黑色料
50 加侖 233 公斤
*生產前﹐陽極循環槽內﹐添加 1-3%冰醋酸調,調整導電度至 200-800 μs/cm。
6
TATUNG FINE CHEMICALS
Cationic Epoxy Electrocoating
(三)、電著浴槽組成及特性:
項目 樹脂
顏料 組
溶劑 純水 合計
成
固成份(wt%)
色料比(P/B)
特
導電度(μs/cm)
TE-8800 為本公司開發的新一代陽離子環氧樹脂系電泳塗料,本系列
導入新的樹脂合成及界面乳化技術,除能保持原先陽離子環氧樹脂系
電泳塗料特別優良的耐蝕性及泳透力外,可明顯的提高安定性及 UF,
特別適用於汽車外殼、鈑金及其另組件的第一層電泳塗裝上。除上述
優點外,電着塗膜的其他物化性與本公司舊型 TE-6500 近似。以下為
硬度
2H 以上
6
密著性
100/100
7
光澤
20-70
備註
8
耐衝擊強度
500mm 以上
500g×Φ1/2"
9
延展性
4mm 以上
10 耐蝕性(鹽霧試驗)
1000 小時以上
膜厚 20μ,磷酸鋅前 處理標準版
11
耐熱水性
90℃,1.5HR 自來水 或 90℃,2HR 純水
12
耐濕性
1000HR
50℃,RH98%
參照 UF 廠商管理資料
淨)
8
烤爐
2 次以上/年
爐溫校測:1 次/年
9
輸送帶
10
通電板
11
Chamber
12
吊具
2 次/年 ↑ ↑
必要時
12
TATUNG FINE CHEMICALS
Cationic Epoxy Electrocoating
九、連續休假期間 ED 塗料及設備管理標準:
管理項目
管理基準
TE-8800/E-5413P 420-450 70-100 450-510 1000.0
(二)、說明: 1.建浴前先將 ED 槽及所有管路徹底清洗乾淨﹐並計算槽之容積。 2.建浴時﹐先加 1/3 槽純水。 3.其次﹐將 TE-8800 加入槽中﹐當液位溢滿副槽時﹐啟動循環幫 浦均勻攪拌。 4.接著﹐將黑色料慢慢加入。 5.最後﹐將剩餘純水慢慢加入﹐繼續循環並調整壓力。 6.以冰醋酸調整 pH 至 5.7-6.0。 7.排 UF﹐降低導電度至約 1300 μs/cm。 8. 啟動冷水機。
Cationic Epoxy Electrocoating
SRDT940002
環氧樹脂系陽離子電泳塗料 TE-8800
1
TATUNG FINE CHEMICALS
Cationic Epoxy Electrocoating
目錄
一、簡介
3
二、補給塗料與添加劑乙覽表
4
三、補給塗料組成及特性
5
四、建浴規範
黑色料
E-5413P
40-44 8-10 46-52 100
1.32-1.35 400-800cps
5
TATUNG FINE CHEMICALS
Cationic Epoxy Electrocoating
四、建浴規範:
(一)、建浴組成(以一噸電著槽為例):
項目 樹脂漆(TE-8800)
色料 純水 合計(KG)