1思科虚拟无线控制器安装解析文档
思科无线: 2500 系列无线控制器部署指南新

思科 ISE 网络部署说明书
思科ISE中的网络部署此产品的文档集力求使用无偏见语言。
在本文档集中,无偏见定义为不暗示基于年龄、残障、性别、种族身份、族群身份、性取向、社会经济地位和交叉性的歧视的语言。
由于产品软件的用户界面中使用的硬编码语言,基于RFP文档使用的语言或引用的第三方产品使用的语言,文档中可能存在例外情况。
注释•Cisco ISE网络架构,第1页•Cisco ISE部署术语,第2页•分布式部署中的节点类型和角色,第2页•独立和分布式ISE部署,第3页•分布式部署方案,第4页•小型网络部署,第4页•中型网络部署,第6页•大型网络部署,第7页•每个部署模式的最大支持会话数,第9页•SNS3500/3600系列设备的部署规模和扩展建议,第11页•支持Cisco ISE功能所需的交换机和无线局域网控制器配置,第11页Cisco ISE网络架构Cisco ISE架构包括以下组件:•节点和角色类型•Cisco ISE节点-Cisco ISE节点可以承担以下任意或所有角色:管理、策略服务、监控或pxGrid•网络资源•终端策略信息点表示外部信息传达给策略服务角色所在的点。
例如,外部信息可以是轻量级目录访问协议(LDAP)属性。
Cisco ISE 部署术语本指南在讨论Cisco ISE 部署方案时使用以下术语:定义术语角色提供的特定功能,例如网络访问、分析、状态、安全组访问、监控和故障排除。
服务单个物理或虚拟思科ISE 设备。
节点思科ISE 节点可以承担下列任何角色:管理、策略服务、监控节点类型确定节点提供的服务。
思科ISE 节点可以承担以下任一或全部角色:。
通过管理用户界面可使用的菜单选项取决于节点承担的角色和人员。
角色确定节点是独立节点、主要节点还是辅助节点,并且仅适用于管理和监控节点。
角色分布式部署中的节点类型和角色Cisco ISE 节点可以根据它承担的角色提供各种服务。
部署中的每个节点均可承担管理、策略服务、pxGrid 和监控角色。
思科C9800-CL无线控制器 虚拟部署指南
1 介绍思科C9800-CL 无线控制器虚拟部署指南的目的是提供虚拟部署选项的概述,并提供关于C9800-CL 无线控制器初始设置的说明。
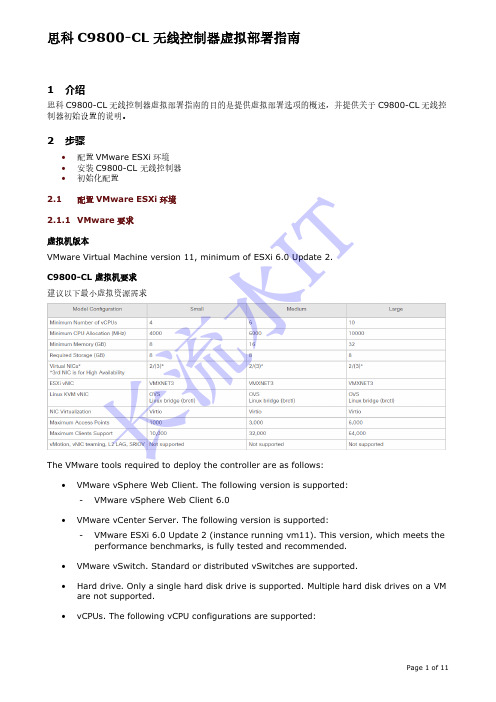
2 步骤• 配置VMware ESXi 环境 • 安装C9800-CL 无线控制器 • 初始化配置2.1配置VMware ESXi 环境2.1.1 VMware 要求 虚拟机版本VMware Virtual Machine version 11, minimum of ESXi 6.0 Update 2. C9800-CL 虚拟机要求 建议以下最小虚拟资源需求The VMware tools required to deploy the controller are as follows:• VMware vSphere Web Client. The following version is supported:-VMware vSphere Web Client 6.0•VMware vCenter Server. The following version is supported: -VMware ESXi 6.0 Update 2 (instance running vm11). This version, which meets the performance benchmarks, is fully tested and recommended.• VMware vSwitch. Standard or distributed vSwitches are supported.•Hard drive. Only a single hard disk drive is supported. Multiple hard disk drives on a VM are not supported.•vCPUs. The following vCPU configurations are supported:长流水I T- Small Template —4 vCPUs (requires minimum 4-GB RAM allocation) - Medium Template —6 vCPUs (requires minimum 16-GB RAM allocation) - Large Template —10 vCPUs (requires minimum 32-GB RAM allocation)• Virtual CPU core• Virtual hard disk space —Minimum 8 GB is required.•Virtual Network Interface Cards (vNICs).2.1.2 Creating a Network Interface on a VMIn ESXi, configure the appropriate networking needed to support C9800-CL WLC. Therecommendation is to use a trunk port for wireless management interface, use an optional access port for the Device Management interface, and use an optional access port for high-availability interface. Such as the example below:Perform the following steps in the VMware vSphere Client to create a network interface.Step 1 Log in to the VMware vSphere Client.Step 2 In the vSphere GUI, select the VM host that will deploy C9800-CL WLC. Click theConfiguration tab.Step 3 In the Networking area, click Add Networking…Step 4 Under Connection Type , retain the default settings, and click Next .Step 5 Under Network Access , select the trunk VM NIC, and Click Next.The VM NIC uplink switch port must be a “trunk ” mode port.长流水I TStep 6 Under Connection Settings , enter a name in the Network Label field. From the VLANID (Optional) drop-down list, choose ‘All (4095)’. And then click Next.Step 7 Under Summary , confirm the updates and click Finish.The newly added network interface is now available in the Networking area.vSwitch Promiscuous ModeBy default, a hypervisor vSwitch is configured to “Reject ” promiscuous mode. If C9800 is using tagged traffic (e.g. management VLAN, AP VLAN, etc.) via management port, promiscuous mode allows the vSwitch to carry tagged tr affic. Therefore configure to “Accept ” promiscuous mode for the vSwitch.长流水I TStep 1 Under hypervisor > Configuration > Networking > Networking select vSwitch# beingmapped to the C9800 management interface.Step 2 Properties> Ports > vSwitch and click Edit.长流水I TStep 3 In Security Tab > Policy Exceptions > set Promiscuous mode = Accept.2.2Installing C9800-CL in a VMware ESXi EnvironmentStep 1 Log in to the VMware vSphere Client.Step 2 From the vSphere Client menu, choose File > Deploy OVF Template.长流水I TStep 3 In the OVA wizard, select the source of the controller OVA that is to be deployed. Click Next.Step 4 In the OVA Template details field, click Next.Step 5 In the Name and Location field, specify the name for the VM and click Next.Step 6 Under Deployment Configuration , select the required profile from the drop-down list and click Next.长流水I TStep 7 Under Disk Format , select ‘Thin Provision ’ and click Next.Step 8 From the Network Mapping drop-down list, allocate one or more virtual Network Interface Cards (vNICs) to the destination network. Connect each network to a unique interface. The following mapping is recommended:• GigabitEthernet 1 to device management interface and map it to the out-of-bandmanagement network.• GigabitEthernet 2 to wireless management interface and map it to the network to reach APs and services. Usually this interface is a trunk to carry multiple VLANs. •GigabitEthernet 3 to high-availability interface and map it to a separate network for peer-to-peer communication for SSO.Note Do not connect 2 interfaces to a single subnet as that causes network loop.Click Next . And then click Next to skip the management configuration.长流水I TStep 9 Under Ready to Complete , verify all the deployment settings.长流水I TStep 10 Click Finish to deploy the OVA.The controller VM will appear on the left panel when the deployment is completed.长流水I T2.3Configuring C9800-CL initial setup from consoleStep 1 Click Power On to power on the C9800-CL WLC.Step 2 Open the C9800-CL WLC Console, it is important to click into the console window and press ANY key to access the terminal when it show "Press any key to continue."Step 3 Select “vWLC – packages.conf ”Step 4 Terminate the configuration wizard.Would you like to enter the initial configuration dialog? [yes/no]: no Would you like to terminate autoinstall? [yes]:yes长流水I T思科C9800-CL 无线控制器虚拟部署指南Page 11 of 11Step 5 Set the hostname WLC#enableWLC#configure terminalWLC(config)#hostname C9800Step 6 Add login credentials using the following command: C9800(config)#username cisco privilege 15 password Cisco123 C9800(config)#enable secret Cisco123 C9800(config)#service password-encryptionStep 7 Add an IP address on the device Management interface. C9800(config)#interface gi1 C9800(config-if)#no switchport C9800(config-if)#ip address 192.168.1.2 255.255.255.0 //Change the IP accordingly C9800(config-if)#no shut C9800(config-if)#exit Step 8 Add the route to the remote network where you want to manage the C9800-CL from. C9800(config)#ip route 0.0.0.0 0.0.0.0 192.168.1.1 //Change the gateway IP accordinglyStep 9 Configure VTYC9800(config)#line vty 0 4C9800(config-line)#login local C9800(config-line)#transport input allC9800(config-line)#exitStep 10 Login C9800-CL WLCNow you can login the C9800-CL WLC from CLI by SSH the management IP(192.168.1.2) or WEB GUI https://192.168.1.2 长流水I T。
思科路由模拟软件Packet Tracer安装及汉化教程

茂名门户: 茂名Seo:思科路由模拟软件Packet Tracer安装及汉化教程Packet Tracer 是由Cisco公司发布的一个辅助学习工具,为学习思科网络课程的初学者去设计、配置、排除网络故障提供了网络模拟环境。
用户可以在软件的图形用户界面上直接使用拖曳方法建立网络拓扑图,并可提供数据包在网络中行进的详细处理过程,观察网络实时运行情况。
可以学习IOS的配置、锻炼故障排查能力。
是要学习路由配置必不可少的模拟软件哦,今天茂名Seo就先给大家分享一下Packet Tracer的安装及汉化!工具/原料破电脑一台Packet Tracer模拟软件安装包一个Packet Tracer汉化补丁一、安装步骤:1、解压安装包,双击PacketTracer53_setup_no_tutorials.exe运行安装程序!2、安装提示,直接Next3、安装协议,选择I accept the agreement(我接受协议),继续单击Next!茂名门户: 茂名Seo:4、选择安装路径(喜欢安装在哪里就选择哪里吧)Next!5、问你这软件安装好了以后,在开始菜单里面的名称叫什么,可以自己随便填写,自己能记得就好!Next!茂名门户: 茂名Seo:6、有两个框,上面那个Create a desktop icon意思是问你是否要创建一个桌面图标(默认是选上的)另一个Create a Quick Launch icon意思是问你是否要创建一个快速启动图标!自己考虑,Next!7、检查确认你的安装信息!没问题就Install(安装)吧!茂名门户: 茂名Seo:8、安装完毕,问你是否需要马上启动Packet Tracer(勾上那个框就马上启动),然后单击Finish 完成安装大家现在可以看到,Packet Tracer的界面了,但现在界面还是英文的,怎么办呢?这时候就需要用到汉化补丁了!汉化步骤如下茂名门户: 茂名Seo:二、汉化1、解压汉化补丁所在的压缩包,把语言包“chinese.ptl”复制到文件安装目录下的“languages”目录下!2、启动Packet Tracer,在菜单栏选择“Options>>preferences”或按快捷键Ctrl+R弹出首选项!3、在弹出界面的下面“Select Language”范围中选择“chinese.ptl”补丁,点击“Change Language(更改语言)”。
思科UCSM VM-FEX安装配置手册
思科UCSM VM-FEX安装配置手册Cisco UCS针对虚拟化环境的网络管理提供了两种解决方案:一种是纯软件的Cisco Nexus 1000V;一种是基于Cisco UCS VIC (Virtual Interface Card)网卡的硬件解决方案。
Cisco Nexus 1000V是唯一的第三方分布式虚拟交换机,同样实现了交换机的数据功能和控制功能的分离。
基于硬件的解决方案服务器需要配置Cisco UCS VIC卡。
这块卡的虚拟化功能非常强大。
本文简要介绍一下Cisco UCS基于硬件的虚拟化网络管理解决方案的配置过程。
配置动态UCS vNIC登录到UCS Manager,进入服务器配置管理选项卡,选择某个Service Profile的vNIC配置,如图1所示,在Actions中选择“Change Dynamic vNIC Connection Policy”。
图1. 在UCSM中更改动态vNIC连接策略如图2所示,在弹出的“Change Dynamic vNIC Connection Policy”对话框中设置Dynamic vNIC的数量为53并选择适配器策略为VMwarePassThru。
图2. 设置动态vNIC数量以及适配器策略需要说明的是,每片UCS 刀片服务器的Cisco UCS VIC网卡能够虚拟的网卡和HBA卡数量总和为:vHBAs+vNICs+Dynamic vNICs=(15*n)-2 ,其中n为上联链路数量。
在我们的实验环境中,有4条上联链路,虚拟的vHBA卡为2块,vNIC为3块,所以能够虚拟的Dynamic vNIC数量为15*4-2-2-3=53。
利用Cisco UCS VIC网卡创建的vHBA、vNIC如图3所示。
图3. 在UCSM中创建的vHBA、动态vNIC、静态vNIC信息下表说明了在使用VMware平台时,不同连接情况下Cisco UCS VIC 可以支持的vHBA、动态vNIC、静态vNIC数量。
cisco思科怎么配置无线AP.doc
cisco思科怎么配置无线AP有许多人在使用了思科路由器后,不知道如何配置无线AP,不用急,在这里给大家详细介绍sisco思科如何配置无线AP。
cisco思科配置无线AP的方法无线接入点(AP)在无线网络中充当用户的中心通信点,可以连接有线和无线网络。
使用Web浏览器和命令行接口(CLI)都可以完成配置。
一般来说,AP可以配置两个接口以太网接口和无线端口。
a:配置方式1:控制台端口(需要翻转线)2:Telnet(远程登录)3:Web浏览器(这是最简单的配置方法,只需要在图形界面(GUI)上就可以操作)b:配置过程1:图形界面(GUI)根据IOS的不同,一般有两种基本的GUI 界面。
GUI配置简单这里就不说明了。
2:通过Telnet在MS-Dos中输入Telnet ip-address3:使用CLI(命令行)配置是本文的重点。
下面我将详细给大家说明。
首先连接物理线缆,打开超级终端(在系统开始菜单中的通讯中)。
超级终端的配置参数如下:* 每秒比特数:9600;*数据位:8;*奇偶效验:无;*停止位:1;*流控:Xon/Xoff或者无;进入命令行的界面如下:User Access VerificationUsername: CiscoPassword:Ap show version //可以查看当前版本信息一:设置系统名Ap enableAp#config tAp(config)#hostname myap //设置系统名,默认是ap二:为BVI分配IP地址当AP连接到有线网络的时候,会自动创建一个BVI(网桥虚拟接口)连接到网络,允许所有端口都聚合在一个IP地址下。
[说明一下我们只能在BVI接口上配置AP的IP地址,不能在其他接口]Ap#config tAp(config)#interface bvi1 //进入BVI接口配置模式Ap(config-if)#ip address address mask //第二个address为你分配的ip地址mask为掩码三:察看网络映射Ap(config)#dot11 network-map 30 //要建立无线网络映射Ap#show dot11 network-map //显示无线网络映射Ap#show dot11 adjacent-ap //显示一个与某个AP邻连的AP 列表下面给大家一个示范:Ap(config-if)#ip address 10.0.0.1 255.255.255.0Ap(config-if)#ip address dhcp ?Client-id Specify client-id to useHostname Specify value for hostname optionAp(config-if)#ip address dhcp关于启用和禁用接口的命令:shutdown 禁用no shutdown 启用四:配置SSIDSSID(服务集标示符)一个唯一的标识符,允许客户端识别出一个接入点(AP)Ap(config)#int dot11radio 0Ap(config-if)#ssid myAPAp(config-if-ssid)#authentication open //设置认证类型五:监控AP状态Ap#show interface dot11radio 加上相应接口号六:配置一些相应的服务1:Telnet/SSHAp(config)#line vty 0 4Ap(config-line)#login localAp(config-line)#endAp#show run!line con 0line vty 0 4login localline vty 5 15login!end2:热备份备用设备位于它监控的AP附近,并且它的配置与被监控的设备相同。
思科无线局域网控制器(WLC)错误和系统消息常见问题说明书
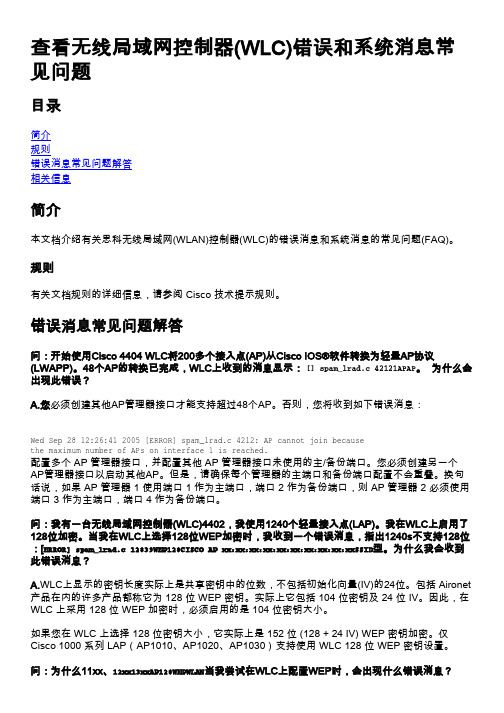
查看无线局域网控制器(WLC)错误和系统消息常见问题目录简介规则错误消息常见问题解答相关信息简介本文档介绍有关思科无线局域网(WLAN)控制器(WLC)的错误消息和系统消息的常见问题(FAQ)。
规则有关文档规则的详细信息,请参阅 Cisco 技术提示规则。
错误消息常见问题解答问:开始使用Cisco 4404 WLC将200多个接入点(AP)从Cisco IOS®软件转换为轻量AP协议(LWAPP)。
48个AP的转换已完成,WLC上收到的消息显示: [] spam_lrad.c 42121APAP。
为什么会出现此错误?A.您必须创建其他AP管理器接口才能支持超过48个AP。
否则,您将收到如下错误消息:Wed Sep 28 12:26:41 2005 [ERROR] spam_lrad.c 4212: AP cannot join becausethe maximum number of APs on interface 1 is reached.配置多个 AP 管理器接口,并配置其他 AP 管理器接口未使用的主/备份端口。
您必须创建另一个AP管理器接口以启动其他AP。
但是,请确保每个管理器的主端口和备份端口配置不会重叠。
换句话说,如果 AP 管理器 1 使用端口 1 作为主端口,端口 2 作为备份端口,则 AP 管理器 2 必须使用端口 3 作为主端口,端口 4 作为备份端口。
问:我有一台无线局域网控制器(WLC)4402,我使用1240个轻量接入点(LAP)。
我在WLC上启用了128位加密。
当我在WLC上选择128位WEP加密时,我收到一个错误消息,指出1240s不支持128位:[ERROR] spam_lrad.c 12839WEP128CISCO AP xx:xx:xx:xx:xx:xx:xx:xx:xx:xxSSID型。
为什么我会收到此错误消息?A.WLC上显示的密钥长度实际上是共享密钥中的位数,不包括初始化向量(IV)的24位。
思科 RV160W 路由器快速入门指南-1690805760.1775157说明书

快速入门指南思科 RV160W 路由器装箱清单•思科 RV160W 路由器•电源适配器•本快速入门指南•RoHS 合规信息卡•技术支持联系信息卡•以太网电缆•欧盟指令 2014/53/EU 合规信息(仅适用于欧盟 SKU)欢迎感谢您选择思科 RV160W 路由器。
RV160W 路由器不仅提供可靠的互联网访问连接,而且具备以下功能:•通过多种设置向导简化 UI 使用。
• 4 端口无线 AC VPN 路由器。
•支持 IPv6 防火墙。
•双频 WLAN(2.4GHz 和 5GHz)•企业级一体化小型企业网络。
本指南介绍思科 RV160W 的安装方法以及基于 Web 的设备管理器启动方法。
安装思科 RV160W1为防止设备过热或受损,请注意以下要求:•环境温度 - 请勿在环境温度超过 40°C (104°F) 的区域中使用本设备。
•通风 - 请确保设备周围通风良好。
若以壁挂方式安装设备,请确保散热孔朝向侧面。
•电路过载 - 接通设备电源不得造成电路过载。
•机械负载 - 请确保设备保持水平、平稳,以免出现任何危险情况;同时还应确保设备牢固固定,以防止其滑动或移位。
请勿在设备顶部放置任何物品,因为重量过高会损坏设备。
桌面安装若要将设备放置在桌面上,请将设备放置在平坦的表面上,以便设备依靠其四个橡胶支脚来支撑。
壁挂式安装路由器的底部面板上有两个壁挂槽。
要将路由器安装到墙壁上,需要使用壁挂式安装套件螺钉(随路由器提供)。
路由器壁挂式安装指南当选择路由器在墙壁上的安装位置时,需要考虑电缆限制和墙壁结构。
•安装路由器时,使前面板朝上。
确保将路由器安装在能够看到 LED 的高度。
2思科 RV160W 路由器快速入门指南•确保将电源放置在地板或桌面等水平表面上。
如果电源未得到适度支撑,电源适配器电缆过度拉紧可能会使其从路由器脱落。
•请勿将路由器或其电源安装在靠近任何类型热源(包括暖风出口)的位置。
您可以将路由器安装在空心墙或墙体立柱上。
- 1、下载文档前请自行甄别文档内容的完整性,平台不提供额外的编辑、内容补充、找答案等附加服务。
- 2、"仅部分预览"的文档,不可在线预览部分如存在完整性等问题,可反馈申请退款(可完整预览的文档不适用该条件!)。
- 3、如文档侵犯您的权益,请联系客服反馈,我们会尽快为您处理(人工客服工作时间:9:00-18:30)。
Cisco虚拟无线控制器导入到虚拟机
打开虚拟机按任意键
配置密码qaz@123
配置管理ip,无线名称
配置时间
配置完成后重启,ping网关测试
在进行web访问,进行登录
MONITOR
Provides a view of this controller, its APs and wireless clients
监视器提供这个控制器、它的AP和无线客户机的视图。
WLANs
Provides WLAN configurations such as SSIDs and security policies for all user group
无线局域网WLAN的配置等提供的所有用户组的SSID和安全政策
CONTROLLER
Provides controller wide configurations such as Layer 2/3 mode, Multicast and mobility settings 控制器提供控制器范围配置,如第2层/3层模式、组播和移动性设置
WIRELESS
Provides AP configurations, clients management and various RF settings 提供无线AP的配置,客户管理和各种射频设置
SECURITY
Provides integration into security structure such RADIUS connectivity
安全性提供了与安全结构的集成,例如RADIUS连接。
MANAGEMENT
Provides integration into the network such as IP addressing and SNMP 管理提供与网络的集成,如ip寻址和snmp。
COMMANDS
Provides administrative options such as upgrades and backups
命令提供了诸如升级和备份等管理选项
Refresh
Switch web interface will refresh every five minutes but when looking at statistics, it is recommended to observe the latest information which can be provided by clicking Refresh
交换机Web界面将每隔五分钟刷新一次,但在查看统计信息时,建议通过单击“刷新”来观察可以提供的最新信息
Cisco Airespace Controller can be managed via WLAN clients but this capability is disabled by default
思科airespace控制器可以通过WLAN客户端,但这个功能默认是禁用的
Local Management Users accounts are used by both CLI and switch web interface
CLI和交换机Web界面都使用本地管理用户帐户
After Switch Web configuration wizard saves the configuration and reboots the controller, HTTPS access will be enabled and it uses PKI to secure the transaction while HTTP access will be disabled by default
交换机Web配置向导保存配置并重新启动控制器后,将启用HTTPS访问,并且它使用PKI 来安全事务,而HTTP访问将由D禁用default未履行任务或责任
Cisco Airespace Controller supports both Telnet & SSH but SSH is enabled by default to secure the transactions
CiscoAISREACACE控制器支持Telnet和SSH,但默认情况下启用SSH来保护事务
Serial port timeout and data rate can be managed from switch web interface
可以从交换机Web界面管理串行端口超时和数据速率
Cisco Airespace Controller can also be managed via CLI and monitored from switch web interface 思科airespace控制器也可以通过CLI和Web界面监控开关
User Idle Timeout controls the amount of idle time an administrator has prior to being logged off by the controller from the CLI
用户空闲超时控制管理员在控制器从CLI注销之前的空闲时间量。