Global Cluster Manager
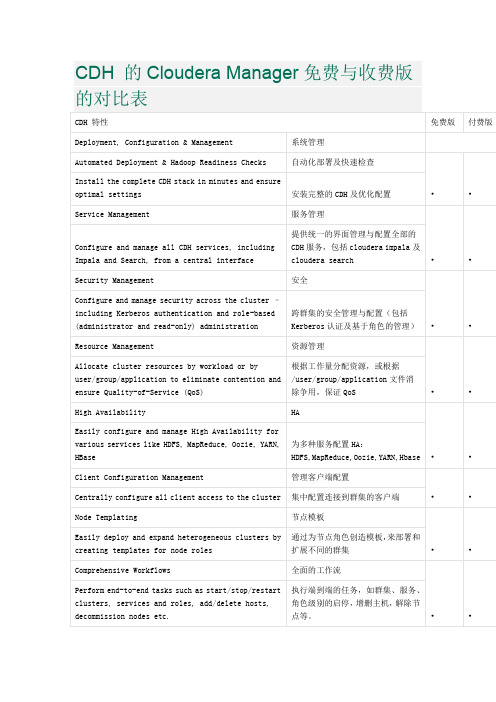
CDH的ClouderaManager与收费版的对比表
cloudera技术诊断的支持
•
Take a snapshot of the cluster state and automatically send it to Cloudera support to assist with optimization and issue resolution
Hadoop SSL相关配置
•
Simplify configs and eliminates need for safety valves
简化配置并减少安全阀的需求
LDAP/SAML Integration
LDAP/SAML的集成
•
Integrate user credentials with Active Directory and enable single sign-on (SSO) capabilities
为多种服务配置HA:HDFS,MapReduce,Oozie,YARN,Hbase
Client Configuration Management
管理客户端配置
•
•
Centrally configure all client access to the cluster
集中配置连接到群集的客户端
Node Templating
部署、管理和监控运行在群集上的第三方应用服务。
Advanced Management Features (Enabled by Subscription)
Operational Report & Quota Management
操作报告和配额管理
•
Visualize current and historical disk usage; set user and group-based quotas; and track MapReduce, Impala, YARN and HBase usage
系统管理员版本6.3 Manager(Windows版)复制设置指南(ExpressCluster

SystemManager Version 6.3 Manager (Windows Version) Duplication Setup Guide (ExpressCluster X Edition)June 2016CONTENTSChapter 1Preface (3)Chapter 2Configuration Procedure (4)2.1Setting up ExpressCluster X (4)2.2Setting up MasterScope SystemManager (10)2.3Set up the start setting of MasterScope SystemManager (12)Chapter 3Uninstalling SystemManager (16)3.1Uninstalling SystemManager (16)3.2Deleting Files (16)Chapter 4Other Notes (16)4.1Registering Licenses (16)DisclaimerThe contents of this document are subject to change without notice.NEC Corporation takes no responsibility for any technical or editorial errors, or omissions, in this document.In addition, you are responsible for installing and using the software in accordance with the descriptions in this document in order to obtain the expected results.NEC Corporation owns the copyright to the contents of this document. You are not permitted to reproduce, modify, or translate this document in whole or in part without the permission of NEC Corporation.Trademark informationCLUSTERPRO® X is a registered trademark of NEC Corporation.Microsoft and Windows are registered trademarks of Microsoft Corporation in the United States and other countries.Other product names and slogans in this document are trademarks or registered trademarks of their respective companies.Other system names, company names, and product names are trademarks or registered trademarks of their respective companies.Chapter 1 PrefaceThis document provides an example procedure for using ExpressCluster X to set up a cluster configuration that has two nodes (for duplication). ExpressCluster X is an NEC product that can be used to switch running processes between nodes in a duplicated system.In this document, a host system included in a cluster is referred to as a node.Supplemental informationUpgrading an OSIf the incorrect procedure is used to upgrade the OS on a cluster server, failovers might occur at unexpected times. In the worst case, this might damage the system.Only upgrade the OS in accordance with the procedure on the setup card.This also applies when applying a service pack.Application rangeThis document describes ExpressCluster X 1.0 for Windows.ExpressCluster X® is a registered trademark of NEC Corporation.Microsoft® and Windows®are either registered trademarks or trademarks of Microsoft Corporation in the United States and/or other countries.Other system names, company names, and product names are trademarks or registered trademarks of their respective companies.Chapter 2 Configuration ProcedureThis chapter provides a procedure for configuring a MasterScope SystemManager cluster environment.2.1 Setting up ExpressCluster XThis document assumes that ExpressCluster X is installed and that a cluster environment has been set up. For details about how to configure a cluster environment, also see the ExpressCluster X documents.* These documents can be downloaded from the following website: /en/global/prod/expresscluster/en/support/manuals.html?Creating failover groupsFor ExpressCluster X, nodes connected to the cluster are managed using units called failover groups (referred to as groups below).For details about how to create groups, see the relevant ExpressCluster X document (chapter 5 in the Installation and Creation Guide).Figure 2-1 WebManagerSetting up shared resourcesThe following describes how to set up shared resources for a failover group.Here, the following shared resources are assumed:⏹Floating IP address: 192.168.1.10⏹Shared (mirror) disk: Y drive⏹Service:Manager: MasterScope UMF Operations Manager_n (The italicized n representsa number.)Start Builder, and then select a failover group. (Here, select [MasterScope].)Figure 2-2 Group PropertiesRight click the group, and then select [Add Resource] from the displayed pop-up menu. The [Definition of a resouce] dialog box is displayed.First, set up the shared disk. For [Type], select [disk resource] or [mirror disk resource], and then enter the group name of the shared disk in the [Name] text box. Set up the disk in accordance with the instructions in the dialog box.Figure 2-3 Definition of a resouce (Shared Disk)Next, set up the floating IP address. Right click the group, select [Add Resource] from the displayed pop-up menu, select [floating ip resource] for [Type], and then enter the group name in the [Name] text box.Figure 2-4 Definition of a resouce (Floating IP Address)Specify the floating IP address in the [IP Address] text box.Figure 2-5 Floating IP Address AdditionSwitching between connected nodesTo switch between the active and standby nodes, use the following method.Open a command prompt, and then enter the following command:* A direct command can be entered because the environment variable PATH isregistered when ExpressCluster X is installed.The nodes can also be switched by right clicking the icon next to a group namedisplayed in the left WebManager pane and then selecting [Move] from the displayedpop-up menu.Figure 2-6 Switching Between Connected Nodes2.2 Setting up MasterScope SystemManagerInstall the MasterScope SystemManager manager on the Windows computers to be used as active and standby servers.For details about how to do so, see the Release Notes supplied with the product.As described in 2.1 Setting up ExpressCluster X, the following shared resources are assumed:∙Virtual host name: vhost1∙Shared disk: Y driveNotes* Install MasterScope SystemManager on the active server first, and then on the standby server.* It must be possible to reference the shared disk when installing the active server manager.* Use the same drive and folder as the installation destination for MasterScope SystemManager on the active and standby servers.* vhost1 is a host name that can be resolved to a floating IP address (192.168.1.10).The following describes the procedure for installing the MasterScope SystemManager manager.First, start up the cluster from the active node, and then install MasterScope SystemManager on the active node.In the installation settings window, specify the following settings:\Manager\sg is automatically added to the data area folder, and settings that must be shared are stored here.After installation finishes, confirm that \Manager\sg has been created in the data area folder.Next, set up the MasterScope SystemManager manager on the standby node.In the installation settings window, specify the following settings:After installation finishes, change the service startup attributes on both the active and standby nodes.In the [Start] menu, click [Administrative Tools] and then [Services]. Next, stop the [MasterScope UMF Operations Manager_1] service, and then change the [Startup type] in the properties from [Automatic] to [Manual].Figure 2-7 Service Properties* If using the bundled DB, change the [Startup type] for the bundled DB service to [Manual] in the same way.2.3 Set up the start setting of MasterScope SystemManagerSet up the service. Right click the group, select [Add Resource] from the displayed pop-up menu, select [execute resource] for [Type], and then enter the group name in the [Name] text box.Figure 2-8 Definition of a resouce (Service)Specify the Windows service name for the product in the [Service Name] text box.Figure 2-9 Service Name SpecificationThe service name varies depending on the node, so enter the following service name.* serial-number represents a number. Check the actual value in the Windows [Administrative Tools].To set up the dependencies, clear the [Follow the default dependence] check box, and then add resources that depend on the floating IP address and shared disk.Figure 2-10 Dependency SpecificationAfter specifying the settings, return to the failover group properties, and then confirm that the settings have been applied (by confirming that the window is like the one shown in Figure 2-2).* If using the bundled DB, add the resource for the bundled DB service in the same way. Set up the resource dependencies so that the bundled DB is dependent on SystemManager.Service name is [fdb_wfdbn].n indicates a service number of 1 or higher.(The value is set during installation of MasterScope products.)This manual describes startup settings for failover groups.Separately set up service monitoring in accordance with the relevant ExpressCluster X document.This concludes the ExpressCluster X setup.Chapter 3 Uninstalling SystemManager3.1 Uninstalling SystemManagerTo uninstall SystemManager, perform the procedure described in the SystemManager Release Memo (relememo.pdf).3.2 Deleting FilesAfter uninstalling SystemManager, files and directories remain on the shared disk.Manually delete directories on the shared disk specified during installation.Chapter 4 Other Notes4.1 Registering LicensesRegister licenses for a cluster environment on both the active and standby nodes.。
VCS3.5
VERITAS Cluster Server™ 3.5Release NotesSolarisJuly 200230-000803-011DisclaimerThe information contained in this publication is subject to change without notice.VERITAS Software Corporation makes no warranty of any kind with regard to thismanual, including, but not limited to, the implied warranties of merchantability andfitness for a particular purpose. VERITAS Software Corporation shall not be liable forerrors contained herein or for incidental or consequential damages in connection with thefurnishing, performance, or use of this manual.CopyrightCopyright © 1998-2002 VERITAS Software Corporation. All rights reserved. VERITAS,VERITAS SOFTWARE, the VERITAS logo, VERITAS Cluster Server, and all otherVERITAS product names and slogans are trademarks or registered trademarks ofVERITAS Software Corporation in the USA and/or other countries.Other product namesand/or slogans mentioned herein may be trademarks or registered trademarks of theirrespective companies.VERITAS Software Corporation350 Ellis St.Mountain View, CA 94043Phone 650–527–8000Fax 650–527–2908iiiContentsPackage Contents . . . . . . . . . . . . . . . . . . . . . . . . . . . . . . . . . . . . . . . . . . . . . . . . . . . . . . . . . . .1Hard-Copy Documentation Set . . . . . . . . . . . . . . . . . . . . . . . . . . . . . . . . . . . . . . . . . . . . . . .2VERITAS Documentation Online . . . . . . . . . . . . . . . . . . . . . . . . . . . . . . . . . . . . . . . . . . . . .3Manual Pages . . . . . . . . . . . . . . . . . . . . . . . . . . . . . . . . . . . . . . . . . . . . . . . . . . . . . . . . . . . . . .3Technical Support . . . . . . . . . . . . . . . . . . . . . . . . . . . . . . . . . . . . . . . . . . . . . . . . . . . . . . . . . .4Supported Hardware . . . . . . . . . . . . . . . . . . . . . . . . . . . . . . . . . . . . . . . . . . . . . . . . . . . . . . . .6Unsupported Hardware . . . . . . . . . . . . . . . . . . . . . . . . . . . . . . . . . . . . . . . . . . . . . . . . . . . . .8Supported Software . . . . . . . . . . . . . . . . . . . . . . . . . . . . . . . . . . . . . . . . . . . . . . . . . . . . . . . . .8Requirements for the VCS Graphical User Interface . . . . . . . . . . . . . . . . . . . . . . . . . . . . .8Required Patches for Configuration Editor and Cluster Manager . . . . . . . . . . . . . . . . . .8Installing or Upgrading to VCS 3.5. . . . . . . . . . . . . . . . . . . . . . . . . . . . . . . . . . . . . . . . . . . .9Migrating from FirstWatch or VERITAS-HA to VCS . . . . . . . . . . . . . . . . . . . . . . . . . . . . .9Obtaining License Keys for VCS . . . . . . . . . . . . . . . . . . . . . . . . . . . . . . . . . . . . . . . . . . . . . .9New Features in VCS 3.5. . . . . . . . . . . . . . . . . . . . . . . . . . . . . . . . . . . . . . . . . . . . . . . . . . . .10Bundled Agents . . . . . . . . . . . . . . . . . . . . . . . . . . . . . . . . . . . . . . . . . . . . . . . . . . . . . . . . . . .12Enterprise Agents . . . . . . . . . . . . . . . . . . . . . . . . . . . . . . . . . . . . . . . . . . . . . . . . . . . . . . . . . .13Custom Agents . . . . . . . . . . . . . . . . . . . . . . . . . . . . . . . . . . . . . . . . . . . . . . . . . . . . . . . . . . . .14Software Limitations in VCS 3.5 . . . . . . . . . . . . . . . . . . . . . . . . . . . . . . . . . . . . . . . . . . . . .15Known Issues in VCS 3.5 . . . . . . . . . . . . . . . . . . . . . . . . . . . . . . . . . . . . . . . . . . . . . . . . . . .19Features Introduced in Previous Releases . . . . . . . . . . . . . . . . . . . . . . . . . . . . . . . . . . . . .21Software Fixes and Enhancements . . . . . . . . . . . . . . . . . . . . . . . . . . . . . . . . . . . . . . . . . . .31iv VERITAS Cluster Server 3.5 Release Notes1VCS 3.5 Release NotesThis document provides important information regarding VERITAS Cluster Server ™(VCS) version 3.5 for Solaris 2.6 (32-bit) and Solaris 7, 8, and 9 (32-bit and 64-bit). Please review this entire document before installing VCS.Package ContentsThere are multiple CDs in this VERITAS product distribution.VCS is on VERITAS Storage Solutions 3.5Disc 1.VCS PackagesThe following packages for VCS are in the cluster_server/pkgs directory:xVRTScscm , VCS Cluster Manager (Java Console)xVRTSgab , Group Membership and Atomic Broadcast xVRTSllt , Low Latency Transport xVRTSperl , Perl for VRTSvcs xVRTSvcs , VERITAS Cluster Server xVRTSvcsag , VCS Bundled Agents xVRTSvcsmg , VCS Message Catalogs xVRTSvcsmn , VCS Manual Pages xVRTSvcsor , VCS Oracle Enterprise Extension xVRTSvcsw , Cluster Manager (Web Console)xVRTSvlic , VERITAS License Utilities xVRTSweb , VERITAS Web GUI Engine x VRTSvcsdc , VCS Documentation.2VERITAS Cluster Server 3.5 Release NotesVCS DocumentationDocumentation for VCS is in the cluster_server/docs directory in Portable Document Format (PDF):xvcs_adg.pdf ,Agent Developer’s Guide xvcs_barg.pdf ,Bundled Agents Reference Guide xvcs_ig.pdf ,Installation Guide xvcs_ug.pdf ,User’s Guide xvcs_appnote_rdc.pdf ,Application Note: Replicated Data Cluster for VCS xvcs_appnote_e10kdr.pdf ,Application Note: Sun Enterprise 10000 Dynamic Reconfiguration xvcs_appnote_a3x00.pdf ,Application Note: Sun StorEdge 3x00 Disk Array x vcs_appnote_a5000.pdf ,Application Note: Sun StorEdge 5000 Disk Array Release Notes for VCS are in the cluster_server/release_notes directory:x vcs_notes.pdf ,Release Notes in PDF formatVERITAS recommends copying the release notes from the CD to the/opt/VRTSvcs/docs directory so that they are available on your systemfor reference.Hard-Copy Documentation SetCopies of VERITAS software guides are available for purchase through the VERITAS DocStore ™ at /docstore .The following guides for VCS 3.5 on Solaris are available:xInstallation Guide xUser’s Guide xAgent Developer’s Guide xBundled Agents Reference Guide x Release Notes3VERITAS Documentation Online VERITAS Documentation OnlineVisit the website for VERITAS Cluster Server for UNIX:/menu_ddProduct_CLUSTERSERVER.htm to download VERITAS Cluster Server documentation from current and previous releases.Manual PagesThe manual pages for the VRTSllt,VRTSgab, and VRTSvcs are installed in/opt/VRTS/man. Set the MANPATH environment variable so the man(1) command canpoint to the VCS manual pages.For Bourne or Korn shell (sh or ksh), type:#MANPATH=$MANPATH:/opt/VRTS/man#export MANPATHFor C shell (csh or tcsh), type:#setenv MANPATH ${MANPATH}:/opt/VRTS/manFor more information, refer to the man(1) manual page.4VERITAS Cluster Server 3.5 Release NotesTechnical SupportContacting Technical SupportFor assistance with any VERITAS product, contact Technical Support:U.S. and Canada: call 1-800-342-0652.Europe, the Middle East, or Asia: visit the Technical Support Web site at for a list of each country’s contact information.Software updates, TechNotes, product alerts, and hardware compatibility lists are also available from .To learn more about VERITAS and its products, visit .Using VRTSexplorerThe VRTSexplorer program can help VERITAS Technical Support engineers diagnose technical problems associated with VERITAS products.You can install this program from the VERITAS CD or download it from the VERITAS FTP site. For more information,consult the README file in the VRTSexplorer directory on the VERITAS CD.w To install VRTSexplorer from the VERITAS CD1.Log in as root.2.Place the VERITAS CD into a CD-ROM drive connected to your system and enter:#mount -o ro /dev/cdrom /mnt3.Move to the /support directory and install the VRTSspt package:#cd /mnt/cluster_server/support#pkgadd -d . VRTSsptThe program is installed in the /opt/VRTSspt directory.5Technical Support w To download VRTSexplorer from the VERITAS FTP sitee a web browser or the ftp program to download the VRTSexplorer programfrom the following URL:ftp:///pub/support/vxexplore.tar.ZSave the file to the/opt/VRTSspt directory. Create the directory/opt/VRTSspt if it does not exist.2.Log in as root on the affected system, and use the following commands to extract thecontents of the downloaded file to the directory/opt/VRTSspt:#cd /opt/VRTSspt#zcat vxexplore.tar.Z | tar xvf -w To run the VRTSexplorer program, enter:1.Run the VRTSexplorer program from the VRTSexplorer directory by entering thefollowing command:#/opt/VRTSspt/VRTSexplorer/VRTSexplorerVRTSexplorer prompts you for a destination directory for the information that itcollects.2.Press Return to accept the default directory/tmp, or enter a path name of your ownchoice.VRTSexplorer writes information to a compressed tar file namedVRTSexplorer_casenumber_hostname.tar.Z in the specified directory.e the file upload facility of your web browser, or the ftp program, to transfer theVRTSexplorer output file to the VERITAS Technical Support anonymous FTP site:ftp:///incoming4.When you call VERITAS Technical Support, provide the name of the file youtransferred to the FTP site.Alternatively, if you have already been assigned a call ID number by VERITASTechnical Support,email support@ and include your case ID number in the subject line.6VERITAS Cluster Server 3.5 Release Notes Supported HardwareServersxSun workgroup servers: Ultra5S and Ultra10S xSun entry-level servers: Enterprise 220R, 250, 420R, and 450; Sun Fire 280R and V880xSun midrange servers:Sun Fire 3800,4800,4810,and 6800;Sun Enterprise 3x00,4x00,5x00, and 6500xSun high-end servers: Enterprise 10000; Sun Fire 12K and 15K xSun rack-optimized servers: Netra T1 AC200, Netra 20, Netra t 1120 and 1125,Netra t 1400 and t 1405.x Fujitsu Siemens Primepower 200, 400, 600, 650, 800, 850, 1000, and 2000For information on additional supported hardware, contact your VERITAS sales representative.Note VCS cannot access or control data cached by special-purpose hardware, such asPrestoserve NVRAM. If a VCS server fails, data cached in this manner may be work Interfaces (Controllers)xSBus Quad FastEthernet adapter (for private network, SBus architectures)xPCI Bus Quad FastEthernet adapter (for private network, PCI Bus architectures)xHME built-in or SunSwift (PCI/SBus)xSun Gigabit Ethernet 2.0 adapter xSun Gigabit Ethernet 3U CompactPCI adapter x Sun GigaSwift Ethernet adapterNote You must use external disk controllers for shared disk subsystems, and networkindependent hubs for each heartbeat link.SwitchesxBrocade SilkWorm 2800 (Firmware versions 3.0, 2.4.1, 2.2.1c)xQLogic SANbox2 (Firmware version 1.3.25.0)Supported Hardware Disk SubsystemsThe following disk subsystems are supported. The list is subject to change as testing of other systems takes place.x Baydel O/ESR 2000x Compaq StorageWorks MA8000, EMA12000x CLARiiON Alpine 4400/4500/4700 series, CLARiiON DAER, CLARiiON DGx EMC CLARiiON FC4700x EMC Symmetrix 3000, 3830, 5000, 8430, 8530x Hitachi Data Systems 5700 (DF 350), 5800x Hitachi Data Systems 7700E, 9200, 9910, 9960x HP XP256, XP512x IBM ESS 2105-E20, 2105-F20x Imperial MG-4000 RMx LSI Logic MetaStor E4400, E4600x MTI 3500 (SCSI), MTI ss-1200-SCSIx Solid Data Systems ULTRA 800U E800UD2x STK 9140/9145x Sun StorEdge MultiPackx Sun StorEdge A1000 and D1000x Sun StorEdge A3000x Sun StorEdge A3500 storage subsystem. For information on how to configure this StorEdge disk array, see the VCS Application Note for Sun Stor EDGE A3500 Disk Array,included with the VCS documentation set.x Sun StorEdge A5000 storage subsystem. For information on how to configure this StorEdge disk array, see the VCS Application Note for Sun Stor EDGE A5000 Disk Array,included with the VCS documentation set.x Sun StorEdge A5100, A5200x Sun StorEdge T3 arrayx XioTech MagnitudeFor information on additional supported disk subsystems, contact your VERITAS sales representative.Unsupported HardwareCLARiiON SCSI disk array SP split-bus configurations are no longer supported.Supported Softwarex Solaris 2.6 (32-bit), and 7, 8, and 9 operating systems (32-bit and 64-bit)For each platform, we recommend applying the latest Solaris operating systempatches available from Sun. See the following site:x VERITAS Volume Manager™ (VxVM) 3.1.1P2, 3.1.1P3, 3.2, and 3.5x VERITAS File System™ (VxFS) 3.3.x, 3.4P2, and 3.5x VERITAS Global Cluster Manager 1.2, 3.5Requirements for the VCS Graphical User Interface The minimum requirements on Solaris clients are Ultra5 or greater, 128MB RAM, and1280x1024 display resolution. The color depth of the monitor must be at least 8-bit (256colors), though 24-bit is recommended.The minimum requirements on Windows 2000 clients are Pentium II, 300MHz, 64MBRAM, and 800x600 display resolution. The color depth of the monitor must be at least8-bit (256 colors), and the graphics card must be able to render 2D images.The following supported Internet browsers have been tested:x Internet Explorer 5.0, 5.5, and 6.0x Netscape 4.5, 4.6, and 4.7xRequired Patches for Configuration Editor and Cluster ManagerPatches from Sun for Java 2 Standard Edition (J2SE) are required to use the automatedoffline configuration tool, Configuration Editor; the Java-based graphical user interface,Cluster Manager (Java Console); and the web-based graphical user interface, ClusterManager (Web Console). Apply the patches for J2SE that are required for your Solarisoperating system. Patches are available from Sun at:/j2se/1.3/install-solaris-patches.htmlInstalling or Upgrading to VCS 3.5 Installing or Upgrading to VCS 3.5Refer to the VERITAS Cluster Server3.5Installation Guide for instructions on how to installVCS 3.5 and how to upgrade to VCS 3.5 from earlier versions of VCS. The VCS 3.5Installation Guide is in the/docs directory of VERITAS Storage Solutions 3.5Disc 1.Migrating from FirstWatch or VERITAS-HA to VCSMigrating from supported versions of FirstWatch or VERITAS-HA requires consultingservices. VERITAS consultants have the tools and documentation to expedite migrationfrom either of these products. Contact your sales representative for more information.Obtaining License Keys for VCSVCS is a licensed software product. For information on obtaining licence keys for VCS,refer to the VERITAS Storage Solutions 3.5 Product License and Installation Guide or theVCS 3.5 Installation Guide.New Features in VCS 3.5The features described below are introduced in VCS version 3.5.Web Console Featuresx myVCS. The myVCS page provides a single view of consolidated information about service groups, resources, systems, and logs. Users define the contents and format ofmyVCS.x Cluster Query. Cluster Query enables users to run SQL-like queries about states, attribute values, and other details of cluster configuration. Users can cascade theresult of one query into another to get a combined query result.x Enhanced Service Group Operations. Two new operations have been added to the Service Group ers with Administrator privileges can now enable all resourcesusing the Enable Resources link or disable all resources using the Disable Resourceslink. Service Group operations are now organized to display differently, dependingon the privileges assigned to a user. All available operations are visible and enabledfor users logged in as Administrator. Users logged in as Operator see only theoperations they are permitted to access.x Offline Propagate. A new operation on the Resource page enables users to offline a resource and all the resources it is dependent on. This operation is available to bothAdministrators and Operators on the Resource page for a parent resource.x Resource Dependency Table. From the Resource Dependency page, users can now link to a tabular display of resource dependencies.x Integration with VCS Traffic Director. The VCS Web Console provides preliminary integration with the Traffic Director Web Console. If a domain in the Traffic Directorenvironment is configured as a service group in the VCS configuration, users cannavigate from the Group Summary page of this group in the VCS Web Console to thecorresponding configuration page in the Traffic Director Web Console.Java Console Featuresx Enhanced Graphs in Service Group View and Resource ers can now move service groups and resources by dragging them to a new position in the graph. Alllinks are visible and usable, with overlapping links displayed as curves. A new Linkbutton enables users to link nodes by clicking on them in the graph view. ClusterManager saves changes made to the graphs for display the next time a user logs on.x Notifier Configuration Wizard. The new Notifier wizard simplifies configuration of SNMP and SNTP notification.New Features in VCS 3.5 x Log ers set log messagefilters in a new Edit Filters dialog box.The Log Desk shows only the messages indicated by the filters applied. A new search string filterenables users to view all logs containing a specified string.x Cluster Query. Users can run SQL-like queries about the cluster configuration.Cluster Query is accessed from the toolbar of Cluster Explorer.The ignoreparent OptionThe ignoreparent option enables a resource to be taken offline even if its parentresources in the service group are online.At the command line,-ignoreparent is a new option to the hares command. A check box for this feature is available in Command Center.The UnableToRestartHad Event TriggerThe new UnableToRestartHad event trigger is invoked when hashadow is unable torestart HAD.Change in Behavior: Previously, hashadow logged a message and terminated when it could not restart HAD. The default behavior of the new trigger is to restart HAD on the system where the trigger is invoked. See the VCS3.5 User’s Guide for more information. FsckOpt AttributeChange in Behavior:The FsckOpt attribute is now a required attribute of the Mount agent and must be used to specify behavior for the fsck command.Previously,FsckOpt was an optional attribute of the Mount Agent. See the VCS3.5 User’s Guide for more information. Application AgentChange in Behavior: The Monitor and Clean entry points now check to ensure thatprocesses specified in the MonitorProcess list are running with the user ID specified in the User attribute. See the VCS3.5 User’s Guide for more information.New Bundled AgentsThe following bundled agents were added in the VCS 3.5 Release. For details, refer to the VERITAS Cluster Server Bundled Agents Reference Guide.x IPMultiNICB Agentx MultiNICB Agentx VRTSWebApp AgentNew Attributesx Cluster Attributes-PanicOnNoMemx Service Group Attributes-PreonlineTimeoutx System Attributes-CPUUsage-CPUUsageMonitoringx Resource Type Attributes-NameRuleBundled AgentsThe following agents are included with VCS. For information on any of the agents listedbelow, refer to the VCS 3.5 Bundled Agents Reference Guide.-Application-Disk-DiskGroup-DiskReservation-ElifNone-FileNone-FileOnOff-FileOnOnly-IP-IPMultiNIC-IPMultiNICB-Mount-MultiNICA-MultiNICB-NFS-NIC-NotifierMngr-Phantom-Process-Proxy-ServiceGroupHB-Share-Volume-VRTSWebAppEnterprise AgentsEnterprise AgentsEnterprise agents are sold separately. Contact your VERITAS sales representative for details about these agents, additional agents under development, and agents available as part of an Edition or through VERITAS Consulting Services.Note Before configuring an enterprise agent with VCS 3.5, verify that you have the latestversion of the agent.Supported Enterprise AgentsVCS enterprise agents listed below are on VERITAS Storage Solutions Disc 3. Refer to this table for supported application and operating system versions. VCS agents support a specified application version on Solaris 9 if the application vendor supports that version on Solaris 9.s – supported configuration n – not supported t – not available for testing at time of releaseSupported VCS AgentAgent versionVCS version ApplicationOS1.32.03.52.6789iPlanet (Sun ONE)3.5n s s Administration Server Messaging ServerMessaging Multiplexor Directory Server Web Server Proxy Server SOCKS Server5.0, 5.1, 5.25.0, 5.1, 5.25.0, 5.14.1,6.03.63.6s s s sOracle 2.0.1s s s Oracle 8.0.x,8i ,9i R1,9i R2s s s s ServPoint 2.0s s s ServPoint NAS for Oracle 1.1, 1.2s s s t Sybase 1.3.1s s s Sybase Adaptive Server 11.x–11.9.212.0,12.5s s s t NetApp 1.3.1s s s NetApp File Servers F700, F800s s s s NetBackup 1.3s s s NetBackup3.1, 3.2, 3.44.5s s s t DB2 1.3s s s DB2 Enterprise Edition 7.1 EE s s s t Informix 1.3s s s Informix Dynamic Server 7.1–9.21s s s t QuickLog1.3sssQuickLog feature of VxFS3.5ssstEnd of Life Enterprise AgentsEnd of Life VCS Enterprise Agents are listed in the table below.s – supported configuration n – not supportedc – available through consultingCustom AgentsCompiling Custom AgentsCustom agents developed in C++ must be compiled using SUNWspro 5.0 or Forte Developer 6 compilers. Note that an agent framework library is available for use with custom agents compiled with SUNWspro 4.x compilers.The following is the layout of libvcsagfw.so in /usr/li b:/usr/lib/libvcsagfw.so --> /usr/lib/libvcsagfw.so.2(compatible with SUNWspro5.0 and Forte Developer 6 compilers)/usr/lib/libvcsagfw.so.1(compatible with SUNWspro 4.x)All the agents developed on VCS 1.3 and 2.0 will continue to work since they link with libvcsagfw.so.1. If SUNWspro 4.x is used to compile a new custom agent,libvcsagfw.so should link to libvcsagfw.so.1 during link time. After the agent is developed, relink libvcsagfw.so to libvcsagfw.so.2.Upgrading Custom AgentsCustom agents developed prior to VCS 1.3 must be upgraded before they can be used with VCS 3.5. See the VCS 3.5 Agent Developer’s Guide for instructions on how to upgrade custom agents.End of Life VCS AgentAgent versionVCS version ApplicationOS1.32.03.52.678Apache 1.3s s c Apache Web Server1.3.x s s s Firewall 1.3s s c CheckPoint VPN-1/Firewall-1 4.1s s n PCNetlink 1.3s s n PC NetLink1.1s s s SIMS 1.3s s n Sun Internet Mail Server 4.0s s s SuiteSpot 1.3s s c NetScape SuiteSpot 3.5s s s VFR1.3sscFile Replicator3.0.2sssSoftware Limitations in VCS 3.5 Software Limitations in VCS 3.5The following limitations apply to VCS version 3.5.Cluster Manager (Java Console)Java Console for VCS 3.5 is RequiredCluster Manager (Java Console) from VCS versions earlier than 2.0 cannot be used tomanage VCS 3.5 clusters. VERITAS recommends always using the latest version ofCluster Manager. See the VERITAS Cluster Server 3.5 Installation Guide for instructions onupgrading to the VCS 3.5 version of Cluster Manager.Running Java Console on a Non-Cluster System is RecommendedVERITAS strongly recommends not running Cluster Manager (Java Console) for anextended period on a system in the cluster.The Solaris version of the Java Virtual Machinehas a memory leak that can gradually consume the host system’s swap space. This leakdoes not occur on Windows systems.Print Option in Java Console Help Requires Configured PrinterA Solaris system running Cluster Manager(Java Console)must have a printer configuredif the printing option is to be used.If a printer is not configured to the system on which theJava Console runs, the Java Console may hang when the “Print” button is clicked in theonline JavaHelp. This is a known problem related to components of JavaHelp.Upgrades from VCS2.0or Below Using the installvcs Utility When upgrading from versions of VCS before 2.0, you must manually configure ClusterManager (Web Console), SNMP, and SMTP in the main.cf file. Refer to the VCS 3.5Installation Guide for information on configuring these in the ClusterService service group.System Names in VCSThe name of a system specified in the VCS configuration file,main.cf, must not use thefully qualified form, that is, it must not include periods. The name in main.cf must beconsistent with the name used in/etc/nodename and/etc/llthosts. If the namelisted in/etc/nodename is fully qualified, VCS uses only the first segment of the name.If you create the file/etc/VRTSvcs/conf/sysname such that it contains the systemname to be used by main.cf, VCS uses it to verify the system name.Undocumented Commands, Command Options, and Libraries VCS contains undocumented commands and command options intended for VERITAS development use only. Undocumented commands are not supported by VERITAS. Perl libraries located under/opt/VRTSvcs/lib/perl5/.VCSagntfw are for VERITAS use only and are not supported.Engine Log Messages Report All Web Console Users as“root”With VCS 3.5, the engine log messages for the Web Console do not distinguish among users. Messages report all users as “root.”GCM 1.x Is Not Supported on VCS 3.5Clusters running VCS 3.5 for Solaris do not support GCM versions 1.1 and 1.2. To use GCM with VCS3.5,upgrade to GCM3.5.Refer to the VERITAS Global Cluster Manager3.5 Release Notes for the upgrade procedure. Note that you must uninstall GCM 1.1 or 1.2 before you upgrade to VCS 3.5.Link to VCS Traffic Director from the TDService Group in VCS Navigation to VCS Traffic Director from the TDService Group Summary page in VCS Cluster Manager (Web Console) takes users to the Domain Summary page of the first domain in the domain list.The installvcs Utility on Solaris 2.6 Requires Solaris Patch If you are running installvcs on Solaris 2.6 you must have the latest Solaris operating system patch update installed. Obtain it from /patches.Using Agents in NISPrograms using networked services (for example, NIS, NFS, RPC, or a TCP socketconnection to a remote host)can hang if the host is disconnected from the network.If sucha program is used as an agent entry point,a network disconnect can cause the entry pointto hang and possibly timeout. For example, if the host is configured to use NIS maps as a client,basic commands such as ps-ef can hang if there is network disconnect.VERITAS recommends creating users locally and that /etc/nsswitch.conf reflect local users.Software Limitations in VCS 3.5 MultiNicB Agent on Solaris 8 Requires Solaris Patch If you are running MultiNicB Agent on Solaris 8 you must have Solaris patch update 2 10/00. Obtain it from /patches.Networking Agents Do Not Support IPv6 ProtocolThe VCS 3.5 bundled IP, NIC, IPMultiNICB, and MultiNICB agents do not support the IPv6 enhanced IP protocol made available in Solaris 8.Volume Agent Clean May Forcibly Stop Volume Resources When the attribute FaultOnMonitorTimeouts calls the Volume agent clean entry point after a monitor timeout, the vxvol -f stop command is also issued. This command forcibly stops all volumes, even if they are still mounted.Custom AgentsReleases before VCS 1.1 included the libraries libvcsprimitives.a andlibvcscommon.a. Agent developers had to link with the agent framework library(libvcsagfw.so or libvcsagfw.a) and libvcsprimitives.a. (The librarylibvcscommon.a was not required.)In the current release,the only VCS library required for custom agents is the agent framework library.The VRTSvcs package does not include libvcsprimitives.a and libvcscommon.a. Agent developers using C++ mustchange their makefiles to delete any references to these two libraries.Custom agents must be developed using the SUNWspro 4.0, 4.2, or 5.0 C++ compilers.You must specify the-compat flag when compiling and linking with the 5.0 compiler.Other C++ compilers are not supported.NFS LockingNFS lock failover is not yet supported.EMC Does Not Support GAB Disk ObjectsEMC disk arrays do not support the creation of GAB disk objects, and therefore do not support the creation of disk heartbeat regions or service group heartbeat regions.。
CAD符号大全

CAD符号大全2D Solid 二维实体2D 实面2D Wireframe 二维线框3D Array 三维阵列3D 阵列3D Dynamic V iew 三维动态观察3D 动态检视3d objects 三维物体3D 物件3D Orbit 三维轨道3D 动态3D Orbit 三维动态观察3D 动态3D Studio 3D Studio 3D Studio3D Viewpoint 三维视点3D 检视点3dpoly 三维多段线3D 聚合线3dsin 3DS 输入3D 实体汇入3DSolid 三维实体3D 实体3dsout 3DS 输出3D 实体汇出abort 放弃中断abort 中断中断absolute coordinates 绝对坐标绝对座标abut 邻接相邻accelerator key 加速键快速键access 获取存取acisin ACIS 输入ACIS 汇入acisout ACIS 输出ACIS 汇出action 操作动作active 活动(的)作用中adaptive sampling 自适应采样最适取样add 添加加入Add a Printer 添加打印机新增印表机Add mode 添加模式Add Plot Style Table 添加打印样式表Add Plot Style Table 添加打印样式表Add Plotter 添加打印机Add Plotter 添加打印机Add to Favorites 添加到收藏夹加入我的最爱ADI ADI(Autodesk 设备接口) ADI (Autodesk 设备介面)adjacent 相邻相邻Adjust 调整调整Adjust Area fill 调整区域填充调整区域填满AdLM (Autodesk License Manager) AdLM(Autodesk 许可管理器)Administration dialog box 管理对话框管理对话方块Advanced Setup Wizard 高级设置向导进阶安装精灵Aerial V iew 鸟瞰视图鸟瞰视景affine calibration 仿射校准关系校正alert 警告警示alias 别名别名aliasing 走样锯齿化align 对齐对齐aligned dimension 对齐标注对齐式标注alignment 对齐(方式) 对齐allocate 分配配置Altitude 标高高度ambient color 环境色环境颜色ambient light 环境光环境光源angular dimension 角度标注角度标注angular unit 角度单位角度单位annotation 注释注解anonymous block 无名块匿名图块anti-aliasing 反走样消除锯齿aperture 靶框锁点框apparent intersections 外观交点外观交点append 附加附加Application key 授权申请号应用程式码appload 加载应用程序载入应用程式Apply 应用/申请套用approximation points 近似点近似点arc 圆弧弧Architectual Ticks 建筑标记建筑斜线area 区域,面积区域,面积Argument 参数引数Arrange icons 排列图标排列图示array 阵列阵列arrowhead 箭头箭头ASCII ASCII (美国标准信息交换码)ASCII aseadmin ASE 管理ASE 管理aseexport ASE 输出ASE 汇出aselinks ASE 链接ASE 连结aserows ASE 行ASE 列aseselect ASE 选择ASE 选取asesqled SQL 编辑ASE SQL 编辑器Aspect 纵横向间距纵横向间距aspect ratio 宽高比纵横比assign 指定指定Assist 助理辅助associative dimension 关联标注关联式标注associative hatches 关联填充关联式剖面线attach v.附着贴附attdef 属性定义属性定义attdisp 属性显示属性显示attedit 属性编辑属性编辑attenuation 衰减衰减attenuation of light 灯光衰减光源衰减attext 属性提取属性萃取attredef 属性重定义属性重新定义attribute definition 属性定义属性定义Attribute Display 属性显示属性显示attribute extraction file 属性提取文件属性萃取档attribute extraction template file 属性提取样板文件属性萃取样板档attribute prompt 属性提示属性提示attribute tag 属性标签属性标签attribute value 属性值属性值audit 核查检核authorization code 授权码授权码AutoCAD library search path AutoCAD 库搜索路径AutoCAD 资源库搜寻路径autocommit 自动提交自动确定AutoTrack 自动追踪自动追踪axis tripod 三轴架三向轴azimuth 方位角方位Back Clipping On 后向剪裁打开back view 后视图后视景background color 背景色背景颜色backup 备份备份Backward 反向左右反向bad 不正确的不正确base 基点基准,底端,底部base dimension 基准标注基线式标注base grips 基夹点基准掣点base point 基点基准点baseline 基线基准线基线式baseline dimension 基线标注基线式标注Basic color 基本色基本颜色batch plotting 批处理打印批次出图beam angles of spotlights 聚光灯光束角度点光源光线角度Beep on Error 出错报警错误时发出哔声bevel 倒角斜切bevel 倒角斜切beveling objects 斜角对象斜切物件Bezier curve Bezier 曲线Bezier 曲线Big Font 大字体大字体bind 绑定并入bitmap 位图点阵图blend 合成混成blipmode 点标记模式点记模式block 块图块block definition 块定义图块定义block reference 块参照图块参考block table 块表图块表格bmpout BMP 输出BMP 汇出body 体主体Boolean operation 布尔运算布林运算borders 边框图框bottom view 仰视图下视景boundary 边界边界boundary sets 边界集边界集bounding 边(框)边界框break (v.) 打断切断Bring Above Object 置于对象之上置于物件上方Bring to T op 顶置置于最上方brower 浏览器浏览器built-in 内置的内建bulge 凸度凸度bump map 凹凸贴图凸纹贴图button menu 按钮菜单按钮功能表BYBLOCK 随块BYBLOCKBYLAYER 随层BYLAYERbyte 字节位元组cabling 电缆布线配线cal 计算器校正calibrate 校准校正call 调用呼叫callback 回调(for LISP) 回覆callback 回叫回覆camera 相机照相机camera angle 相机角度相机角度Cancel 取消取消cap 封口封口cascade 层叠(的)重叠排列case (大小)写大小写cast 投射投射catalog 目录目录cell 单元储存格Center 圆心中心center mark 圆心标记中心点标记centerline 中心线中心线centroid 形心,质心矩心chamfer 倒角倒角change 修改变更character 字符字元Check 检查检查Check Box 复选框勾选框Check Spelling 拼写检查拼字检查child dimension style 下级标注样式子标注型式chord 弦翼弦chprop 修改特性变更性质circle 圆圆circular external reference 循环外部参照循环外部参考Circumference 圆周圆周class 类等级, 类别clause 子句子句Clean 清除清理Clean 清除清理clear 清除清除client 客户机用户端clip 剪裁截取Clipboard 剪贴板剪贴簿clipping boundaries 剪裁边界截取边界clipping planes 剪裁平面截取平面Close 闭合关闭(用于档案),闭合(用于边界,线,面域) cluster 组丛集code pages 代码页字码页color 颜色著色color depth 颜色深度颜色深度color map 色表颜色对映Color Wheel 颜色轮盘色轮color-dependent 颜色相关Color-Dependent Plot Style Table 颜色相关打印样式表dangle 不固定的悬挂Dark Color 暗色暗色dash 虚线虚线data integrity 数据完整性资料完整性database 数据库资料库datum 基准基准面datum axis 基准轴基准轴datum dimension 基准标注基准标注datum identifier 基准标识基准识别字datum reference frames 基准参考框架基准参考框datum reference letters 基准参考字母基准参考文字dbConnect 数据库连接资料库连结dbConnect Manager 数据库连接管理器dblist 数据库列表资料库列示DBMS drivers DBMS 驱动资料库管理系统(DBMS) ddattdef 属性定义对话框动态属性定义ddatte 属性编辑对话框动态属性编辑ddattext 属性提取对话框动态属性萃取ddcolor 颜色对话框动态颜色设定ddedit 文字编辑对话框编辑文字与属性定义ddgrips 夹点对话框动态掣点设定ddim 标注设置对话框标注设定ddinsert 插入对话框图块插入ddmodify 图元编辑对话框动态修改ddptype 点类型对话框点型式ddrename 重命名对话框动态更名ddrmodes 绘图模式对话框绘图设定ddselect 对象选择对话框动态选取设定dducs UCS 对话框动态UCS 设定dducsp UCS 方向对话框动态UCS 预设ddunits 单位对话框动态单位设定ddview 视图对话框动态视景ddvpoint 视点对话框动态检视点deactivate 释放停用dealer 经销商经销商decal effect 修剪效果除去杂质效果decimal dimensions 十进制标注十进位标注decurve 非曲线化直线化default 缺省预设值,预设default drawing 缺省图形预设图面default drawing 缺省图形预设图面definition point 定义点定义点Degenerate 退化退化delay 延迟延迟delete 删除删除DELta 增量差值demand loading 按需加载应要求载入dependent symbols 依赖符号deployment 展开布署Depth Map 深度贴图深度贴图derive 导出导出description 说明描述Design Center 设计中心设计中心detach 拆离分离Detection 检测侦测deviation 极限偏差偏差deviation tolerances 极限公差偏差公差device 设备设备device 设备设备Device and Default Selection 设备和默认General 基本一般generate 生成产生geometric characteristic symbols 几何特性几何特性符号Geometric T olerance 形位公差几何公差geometry 几何图形几何图形global 全局(的)整体Gouraud renderings Gouraud Gouraud 着色Gouraud 彩现Gradient 百分度渐层Grads 百分度分度graphic area 图形区图形区graphics cursor 图形光标图形游标graphics screen 图形屏图形萤幕graphics window 图形窗口图形视窗graphscr 图形屏图形萤幕gray 灰度灰阶grid 网格格点grid 网格,栅格格点grid mode 栅格模式格点模式grip 夹点掣点group 编组群组group code 组码群组码Haltftoning 半色调半色调handle 句柄处理码(用于性质对话方块) handshaking 握手信号交握Hardcopy 硬拷贝硬体复制,硬本hardware linetype 硬件线型硬体线型hardware lock 保密锁硬体锁hardware requirement 硬件需求硬体需求hatch 图案填充剖面线hatch areas 填充区域剖面区域hatch boundaries 填充边界剖面边界hatch pattern 填充图案剖面线样式hatch styles 填充样式剖面样式hatchedit 填充编辑剖面线编辑Heads-up Design 轻松设计抬头设计Height 高度高度help 帮助说明Hidden Line 隐藏线隐藏线hidden-line image 消隐图像隐藏线影像hide 隐藏(adj.) 隐藏hide 消隐(v.) 隐藏hideplot 消隐出图隐藏出图highlight 突出显示亮显highlight 亮光(for the color of 3D object) 亮显HIGHLIGHT 亮显亮显home page 主页首页home position 起始位置归位点hook line 钩线钩线hotspot 聚光角聚光点Hyperlink 超级链接超连结Icon 图标图示Identifier 标识符识别字IGES (International Graphics Exchange Specification) 初始图形交换标准基本图形交换规格Ignore 忽略忽略image 图像影像implement 实现实施import 输入汇入Imprint 压印盖印Imprint 压印盖印included angle 包含角夹角infinite lines 无限长线无限长直线information 信息资讯Inherit Properties 继承特性继承性质initial environment 初始环境初始环境Initialize 初始化起始设定in-place 在位现地inquiry 查询查询inscribed polygons 内接正多边形内接多边形insert 插入插入Insertion 插入点插入点insertobj 插入对象插入物件instance 引用实例Instruction 指示指示integer 整数整数IntelliMouse 智能鼠标智慧型滑鼠IntelliMouse 智能鼠标智慧型滑鼠Intensity 强度强度interactive 交互的互动式Interchange 互换交替interface 介面介面interfere 干涉干涉Interference 干涉干涉Interference 干涉干涉interlace 隔行交错internal 内部的内部Internet Utilities Internet应用程序网际网路公用程式interpolation points 插值点内插点intersect 交集交集interval 间距/间隔间隔时间Invalid 无效(的)无效inverse linear attenuation of light 线性衰减光线的线性反比衰减inverse square attenuation of light 平方衰减光线的平方反比衰减Invisible 不可见不可见invoke 调用呼叫island 孤岛孤立物件Island detection 孤岛检测侦测孤立物件ISO (International Standards Organization) ISO(国际标准化组织) ISO Isolation levels 隔离级别隔离层次isoline 素线等角线isometric 等轴测等角isometric snap style 等轴测捕捉样式等角锁点型式isometric view 等轴测视图等角视景isoplane 等轴测平面等角平面ISOPLANE 等轴测平面等角平面Italic 斜体斜体iterator 枚举器重述子join 合并结合joint 连接接合线Justification 对正对正方式justify 对正对正key 主键主键key n.名称主键knot vector 节点矢量要点向量label 标签标签landscape 横向横式Landscape 配景,风景,if used for "landscape object" etc. 横式Landscape Edit 编辑配景Landscape Library 配景库景物图库lateral tolerance symbol 尺寸公差符号侧向公差符号layer index 图层索引图层索引Layout 布局配置Layout from Template 来自样板的布局Layout from Template 来自样板的布局Layout Wizard 布局向导leader 引线引线Leading 前导前导Learning Assistance 学习助手学习助理Left View 左视图左视景legacy 传统旧式length 长度长度lengthen 拉长调整长度Lens Length 镜头长度镜头长度License Agreement 许可协议授权合约license key 许可证号授权码License Manager 许可管理器授权管理员License Server 许可服务器授权伺服器licenses 授权授权light 光源光源light color 浅色(for RAMT-wood ) 亮色Light Color 暖色亮色lighting 照明效果照明Lightness 亮度亮度limits 图形界限范围,图面范围line 行线line 直线线line font 线型线字体line object 线性对象线物件line segment 线段线段line width 线宽线宽Linear Dimension 线性标注线性标注linetype 线型线型Lineweight 线宽线宽link 链接连结list 表串列list 列表串列list box 列表框列示框List Files 文件列表load 加载载入locale 局部本地location 网址(for Internet) 位置location 位置(for file and directory) 位置locked 锁定锁护locked layer 锁定图层锁护图层logfileoff 关闭日志文件关闭记录档logfileon 打开日志文件开启记录档logical 逻辑逻辑的long file name 长文件名长档名loop 环回路ltscale 线型比例线型比例LTSCALE 线型比例线型比例Ltype 线型线型lump 块小块magnet 磁吸磁铁magnification (缩放)比例倍率magnifying glass 放大镜放大境main window 主窗口主视窗major axis 长轴长轴Make 新建制作Make 建立制作malformed 有缺陷畸形的Manipulate 操作管理Manipulate 操作管理Manufacture 制造商制造商mapper 贴图贴图mapping 贴图贴图,对映marble 大理石大理石mark 标记标记massprop 质量特性质量性质match 匹配相符material condition 包容条件材质条件material condition symbols 包容条件符号材质条件符号Materials 材质对话框材质Materials Library 材质库材质库matlib 材质库材质库measure 测量测量measure 等距等分(菜单内容)测量Measurement 测量单位测量结果MEASUREMENT 在图形中设置测量值测量结果member 成员成员memory 内存记忆体menu 菜单功能表menu bar 菜单栏功能表列menuload 加载菜单自订功能表Merge 合并合并message 信息讯息metafile 图元文件中继档Method 方法方法(用于物件导向程式观念) Middle 中央点中央Middle Center 正中点正中Midpoint 中点中点minsert 多重插入插入图块阵列mirror 镜像镜射mirror line 镜像射线镜射线mirror3d 三维镜像3 D 镜射Miscellaneous File Names 其他文件名其它档名Miter 斜接斜接mledit 多线编辑复线编辑mline 多线复线mlstyle 多线样式复线型式mode 模式模式model 型号模型model 型号模型model (v)建模,(n)模型模型model space 模型空间模型空间Modification 修改修改monitor resolution 显示器分辨率萤幕解析度monochrome 单色(的)单色mouse 鼠标滑鼠move 移动移动mslide 制作幻灯制作幻灯片mspace 模型空间模型空间mtext 多行文字多行文字Multiline 多线比例复线multiline scale 多线比例复线比例Multiline Style 多线样式复线型式mview 生成视口多重视埠mvsetup 设置图纸规格多重视埠设定named object 命名对象具名物件named plot style table 命名的打印样式表具名的出图型式表Named UCS 命名UCS 具名UCSnamed view 命名视图具名的视景NE Isometric 东北等轴测东北等角NE Isometric 东北等轴测东北等角Nearest 最近点最近点nested 嵌套巢状式nested blocks 嵌套块巢状式图块new 新建开新档案new 新的开新档案New Layout 新建布局New Layout 新建布局NURB surfaces NURBS(非一致有理 B 样条曲线)NURBS 曲面NW Isometric 西北等轴测西北等角NW Isometric 西北等轴测西北等角object 对象物件Object Properties 对象特性物件性质Object Properties Manager 对象特性管理器物件性质管理员Object Snap 对象捕捉物件锁点object snap override 对象捕捉覆盖物件锁点取代Object Snap Setting 对象捕捉设置objects 对象物件Oblique 斜尺寸界线倾斜obsolete 废弃旧式ODBC database ODBC数据库ODBC 资料库offset 偏移偏移OLE OLE(对象链接和嵌入)物件连接与嵌入(OLE) olelinks OLE 链接OLE 连结online help 联机帮助线上说明online manuals 联机手册线上手册oops 恢复取消删除opacity map 不透明贴图不透明贴图open 打开开启(大部分用于档案)open 打开(的) 开启(大部分用于档案)OPM(Object Property Manager) 对象特性管理器Optimization 优化最佳化option 选项选项Orbit 轨道动态, 动态检视Ordinate 坐标标注座标式orientation 方向方位origin 原点(对于坐标系)原点origin 原始位置(used for external Datebase) 原点origin 起点(对于尺寸界线和标注)原点ortho 正交正交Ortho mode 正交模式正交模式orthogonal 正交正交的orthographic 正交正投影osnap 对象捕捉物件锁点outside 外部的外侧(用于文字位置)overall dimension scale 全局比例整体标注比例overflow 溢出高溢(相对于underflow),溢位overlay 覆盖覆叠overline 上划线顶线override 忽略- For common sentences 取代override 替代- For dimension 取代overwrite 覆盖取代Palette 控制板选盘Palette 调色板选盘pan 平移平移pane 窗格窗格paper space 图纸空间图纸空间parameter 参数参数parent dimension style 上级标注样式父系标注型式parse 分析分析Partial 部分局部Partial Load 部分加载局部载入Partial Load 部分加载局部载入password 口令密码Paste Special 选择性粘贴选择性贴上pasteclip 粘贴贴上截取pastespec 选择性粘贴选择性贴上path 路径路径pattern 方式for "file search pattern" 样式pattern 图案for hatch pattern, line pattern, etc. 样式pedit 多段线编辑聚合线编辑pen plotters 笔式绘图仪笔式绘图机pen speed 笔速笔速pen width 笔宽笔宽Perfomance 性能效能perimeter 周长周长personalization 个人化个人化pface 复合面聚合面Phong shading Phong 着色描影Photo Raytrace renderer 照片级光线跟踪渲染光线追踪相片彩现Photo Real renderer 照片级真实感渲染真实相片彩现photo realistic rendering 照片级真实感渲染相片质感彩现pick button 拾取键点选钮pickbox 拾取框点选框PICKFIRST 选择优先先点选picture 图片图片pixel 像素像素placeholder 占位符定位器plan 平面图平面plan view 平面视图平面视景planar projection 平面投影平面投影pline 多段线聚合线plot 打印出图Plot Configuration 打印配置出图规划plot files 打印文件出图档plot rotation 打印旋转出图旋转plot spooling 打印假脱机出图伫列Plot Style Manager 打印样式管理器plot style table 打印样式表出图型式表plotter 绘图仪绘图机plotter linetype 绘图仪线型绘图机线型Plotter Manager 打印机管理器Point Filters 点过滤点过滤器point marker 点标记点标记Point Sample 点采样取样点Point Style 点样式点型式pointer 指针指标pointing device 定点设备指向设备polar array 环形阵列环形阵列polar coordinate 极坐标极座标polar tracking 极轴追踪极座标追踪polar tracking 极轴追踪极座标追踪polyface meshes 多面网格聚合面网面polygon 正多边形多边形polygon 多边形多边形polygon meshes 多边形网格多边形网面polygon window 多边形窗口多边形视窗polygonal clipping boundaries 多边形剪切边界多边形截取边界polyline 多段线聚合线polyline clipping boundaries 多段线裁剪边界聚合线截取边界polyline segments 多段线线段聚合线线段polymesh 多边形网格聚合网面popup 弹出弹出Popup List 弹出列表弹出列示port 端口埠Portrait 肖像直式Portrait 纵向,if used for paper layout 直式positional tolerances 位置公差位置公差precision 精度精确度predefine 预定义事先定义的preferences 系统配置环境设定Preferences dialog box 系统配置对话框「环境设定」对话方块preview 打印预览预览primitive 原型基本原件Priority 优先级优先权priviledge 特权专用权Procedural material 过程化材质程序材质process 处理程序Profile 配置/剖面(图) 轮廓program (v.) 编程程式Projected tolerance zone 投影公差带投影公差区Projected tolerances 投影公差投影公差prompt 提示提示Properties 特性内容Property painter 特性刷性质复制器Protocal 协议通讯协定prototype 原型原型proxy 代理代理proxy fonts 代理字体代理字型pull down menu 下拉菜单下拉功能表purge 清理清除pyramid 棱锥面三角锥体QDIM 快速标注快速标注qsave 快存快速存档qtext 快速文字快速文字Quadratic 二次二次quality 质量品质Quick Tour 快速指南快速导览radian 弧度弪度Radio Button 单选钮圆钮radius 半径?/pre>。
GDCA认证考试

GDCA认证考试1. 日志恢复技术保证了事务的()?A. 一致性B. 隔离性C. 原子性D. 持久性2. 下列不属于字符串类型的是?A. CHARB. VARCHARC. MEDIUMTEXTD. TINYINT3. ()是MySQL的物理日志,也叫重做日志,记录存储引擎InnoDB(特有)的事务日志?A. errorlogB. redologC. binlogD. warnninglog4. ()指用户的应用程序与数据库中数据的物理存储是相互独立的。
当数据的物理存储改变了,应用程序不用改变。
A. 物理独立性B. 数据独立性C. 应用程序独立性D. 逻辑独立性5. 关于传统集中式架构数据库,哪种说法不正确?A. 方便简单B. 系统成熟稳定C. 管理成本低D. 灵活性大6. GoldenDB金融分布式数据库在哪一年立项?A. 2002B. 2011C. 2014D. 20197. GoldenDB同城RTO可达到?A. 0秒B.小于30秒C. 小于3分钟D. 小于30分钟8. 针对部分节点事务失败的问题,GoldenDB的解决方案是?A. 引入多个计算节点B. 引入全局回滚机制C. 引入一主多备机制D. 引入快同步机制9. GoldenDB数据备份如何实现全局一致状性?A.支持同步备份全局状态信息B. 支持全量备份和增量备份C. 支持任务可视化 D. 支持备份策略灵活可配10. 以下哪条命令可以查看端口是否占用?A. df-hB. free-hC. lsof-i:80D. pkill-9-uzxdb111. 一键安装标准安装的ini配置文件?A. install_senior.iniB. install_fast.iniC. install_advance.iniD. install_triple.ini12. 以下关于一键安装说法正确的是?A. C模块组件均支持容器化安装B. 一键安装时可选择同步创建MPP集群C.License未更新为企业版,仍可以一键安装多分片集群 D. 若一键安装互信步骤未完成,则无法登陆insight界面使用Goldendb产品服务13. 修改哪个文件回到特定步骤开始执行?A. install.txtB. install_fast.iniC. install_step_000000.txtD. install_senior.ini14. 混合部署需要提前执行的命令?A. shsetup.sh-uB. shsetup.sh-cC. shsetup.sh-aD. shsetup.sh-m15. 下列选项,对于表分布规则的描述正确的是?A. GoldenDB仅支持以下分片规则:hash、range、list、duplicateB. GoldenDB支持横向分片,不支持纵向的分区 C. GoldenDB采用一致性hash算法 D. GoldenDB 分片规则只能基于一个表字段16. 下列选项不属于多级分片表优点的是?A. 精确控制数据分布形态B. 操作简单C. 提升批处理访问性能D. 数据物理隔离17. 分片路由功能是下列哪个组件实现的?A. 管理节点B. 数据节点C. 计算节点D. GTM节点18. 关于GoldenDB分布式数据库备份说法错误的是?A. 支持实时和定时备份B. 支持备份指定机房C. 选择备份指定节点后,系统无法自动选择备份其它节点 D. 定时备份任务调整后当天的备份计划不生效19. 不属于GoldenDB分布式数据库租户扩缩容的是?A. CN节点扩缩容B. 管理节点扩缩容C. DN节点扩缩容D. GTM节点扩缩容20. 某集群有1个分片,该分片有3个Team,每个Team包含3个db,主db 在Team2中,该分片水位配置为高水位3、低水位2、主数据节点计数,Team 内DN响应数设置为2。
IBM+SVC-PPRC+异地容灾解决方案知识讲解
I B M+S V C-P P R C+异地容灾解决方案IBM SVC_PPRC 异地容灾解决方案场景介绍:生产中心与灾备中心距离200公里,线路带宽20M,要求RPO等于零,实现数据级容灾,容灾系统尽可能减少对原生产系统的性能影响。
要点说明:●SVC PPRC Global Mirror,应对物理灾难●GeoRM + Log Shipping,应对逻辑错误,误操作容灾系统设计:异地容灾解决方案的核心即在线数据复制,就在其技术而言,我们认为比较成熟的数据复制技术为:基于智能存储设备实现的硬件级别的数据复制,这种数据复制技术无需占用主机设备的系统资源,它对主机系统的资源消耗极小,可以保证主机上的应用高性能运行。
IBM SVC(SAN Volume Controller)存储虚拟化产品具有通用性强、实施简单的特点,透明地加入原有SAN 环境是SVC的基本功能。
SVC是整个SAN 网络的控制器,在SAN的分区上,逻辑上主要划分为Host Zone和Disk Zone,从而解除主机与存储设备的紧密耦合。
它将整个SAN中的存储设备整合成一个巨大的存储池,可以充分利用所有的存储资源(包含第三方存储设备)并按业务的需求分配存储空间、性能和功能。
因此,通过SVC可以很方便的将目前的存储设备进行整合,建立统一的灾备管理和资源分配平台,可以按照应用/业务不断变化的需求来动态配置存储。
IBM SVC目前提供MetroMirror和GlobalMirror两种高级复制功能。
异步(Global Mirror)功能的设计目的在于针对业务连续性和灾难恢复提供几乎不受距离限制的长距离异步远程复制能力。
在SVC中,同步(MetroMirror)和异步可以作为同一项功能实现,以便灵活地实现远程复制功能。
1.PPRC MetroMirror/同步复制来自服务器的更新被写往本地连接的集群(Cluster)缓存,该系统将数据转发给远地点连接的SVC集群(Cluster)的缓存。
cloudera manager 指标
cloudera manager 指标Cloudera Manager是一款用于管理和监控Hadoop集群的工具,它提供了丰富的指标来帮助用户了解集群的健康状况和性能表现。
下面将介绍一些常见的Cloudera Manager指标。
1. CPU利用率CPU利用率是衡量集群性能的重要指标之一。
Cloudera Manager提供了实时的CPU利用率数据,可以帮助用户了解集群中每个节点的CPU使用情况,以及整个集群的平均CPU利用率。
通过监控CPU利用率,用户可以及时发现节点负载过高的情况,避免因为节点过载导致的性能下降和任务失败。
2. 内存利用率内存利用率也是衡量集群性能的重要指标之一。
Cloudera Manager 提供了实时的内存利用率数据,可以帮助用户了解集群中每个节点的内存使用情况,以及整个集群的平均内存利用率。
通过监控内存利用率,用户可以及时发现节点内存不足的情况,避免因为内存不足导致的性能下降和任务失败。
3. 磁盘利用率磁盘利用率是衡量集群存储容量的重要指标之一。
Cloudera Manager提供了实时的磁盘利用率数据,可以帮助用户了解集群中每个节点的磁盘使用情况,以及整个集群的平均磁盘利用率。
通过监控磁盘利用率,用户可以及时发现节点磁盘空间不足的情况,避免因为磁盘空间不足导致的数据丢失和任务失败。
4. 网络流量网络流量是衡量集群通信性能的重要指标之一。
Cloudera Manager 提供了实时的网络流量数据,可以帮助用户了解集群中每个节点的网络使用情况,以及整个集群的平均网络流量。
通过监控网络流量,用户可以及时发现节点之间通信异常的情况,避免因为网络故障导致的任务失败和数据丢失。
5. 任务执行时间任务执行时间是衡量集群任务性能的重要指标之一。
Cloudera Manager提供了实时的任务执行时间数据,可以帮助用户了解集群中每个任务的执行时间,以及整个集群的平均任务执行时间。
通过监控任务执行时间,用户可以及时发现任务执行时间过长的情况,优化任务执行计划,提高任务执行效率。
Bright Cluster Manager说明书
Bright ComputingBright Cluster Manager™Install your clusters ... EasyUse your clusters ... EasyMonitor your clusters ... EasyManage your clusters ... EasyScale your clusters ... Easy Advanced cluster management was never so easyComputing. It has been designed and proven to scale to thousands of nodes, and to run on mission-critical, production HPC clusters. Bright Cluster Manager has also been designed to interoperate with common Grid technologies and application APIs, and is compliant with the Intel ® Cluster Ready specification, which en-sures compatibility with a wide range of Intel Cluster Ready applications.Bright Cluster Manager has been installed on hundreds of clusters, including some of the larg-est and most complex clusters in the world, and several TOP500 systems. Bright Cluster Man-ager is available from resellers across the world and is supported on most x86-based hardware brands.Based on LinuxBright Cluster Manager is based on Linux and is available with a choice of pre-integrated, pre-configured and optimized Linux distributions, including SUSE Linux Enterprise Server, Red Hat Enterprise Linux, CentOS and Scientific Linux.Easy to Install and UseBright Cluster Manager is easy to install and use. It provides a single system view for man-aging all hardware and software aspects of the cluster through a single point of control. The graphical user interface (GUI) streamlines the administrative workflow by allowing all common tasks to be performed through one carefully de-signed interface. Furthermore, all tasks and con-figuration settings are also accessible through a scriptable command line interface (CLI).Bright Cluster Manager can be used to manage multiple clusters simultaneously. This is the default Overview screen for a selected cluster.When selecting a cluster node in the tree on the left and the Tasks tab on the right, the administrator can execute a number of powerful tasks on that node with only a single mouse click.Examples include CPU and GPU temperatures, fan speeds, SMART information, system load, memory us-age, network statistics, available disk space and work-load management statistics.Automated Cluster ManagementAutomated cluster management takes preemptive ac-tions when set system thresholds are exceeded. Sys-tem thresholds can be configured on any of the avail-able metrics.Standard actions include logging health state mes-sages, sending emails, powering up or down nodes, or running custom scripts. This system is highly configurable and easily adaptable using the cluster management GUI with built-in configuration wizard.The cluster man-agement automa-tion wizard guides the cluster admin-istrator through the steps of selecting a metric, thresholdand action.Cluster metrics, such as GPU and CPU temperatures, fan speeds and networks statistics can be visualized by simply dragging and dropping them from the list on the left into a graphing win-dow on the right. Multiple metrics can be combined in one graph and graph layout and colors can be tailored to your requirements.User & Administrator ManagementBright Cluster Manager offers a role-based access con-trol mechanism which supports an unlimited number of administrators, whereby privileges can be defined on a per-role basis. All user and administrator management operations can be performed through the GUI or the CLI. An LDAP service is included for user authentication within the cluster. Integration with external LDAP serv-ers is also possible.Parallel ShellThe parallel shell allows execution of commands and scripts across the cluster as a whole or on easily de-finable groups of nodes. Output from the executed commands is displayed in a convenient way with vari-able levels of verbosity. The parallel shell is available through the GUI and the CLI.Workload ManagementBright Cluster Manager provides a user-friendly inter-face for the monitoring and configuration of common workload managers such as Grid Engine and Torque/Maui. Various common tasks for manipulating jobs and queues are available to users and administrators.nisms for managing different versions of applications, compilers and libraries simultaneously without creating compatibility conflicts.Advanced FeaturesBright Cluster Manager is suitable for clusters of sev-eral thousands of nodes and includes many advanced features for large and complex clusters, including:management daemons with minimal CPU and mem-ory overhead which are synchronized to minimize their potential effect on parallel applications;multiple load-balanced provisioning nodes which allow provisioning to scale to many thousands of nodes;redundant head nodes that can failover from each other in case of failure;extensible cluster health checking mechanisms;centralized BIOS updates and configuration without the need for keyboard or console access;diskless slave nodes;slave node booting over InfiniBand.Comprehensive DocumentationA comprehensive system administrator manual and user manual are included.⏹⏹⏹⏹⏹⏹⏹The status of clus-ter nodes, switches and other rack-mounted hardware, as well as one or two metrics can be visualized in the Rackview. A zoom-out option is avail-able for clusters with many racks.The parallel shell allows for simulta-neous execution of commands or scripts on multiple nodes in the cluster.Bright Computing, Inc.2880 Zanker Road, Suite 203San Jose, California 95134United StatesTel: +1 408 954 7325Fax: +1 408 715 0102************************Bright Computing Terms & Conditions apply. Copyright © 2009‑2010 Bright Computing, Inc. All rights reserved. While every precaution has been taken in the preparation of this publication, the authors assume no responsibility for errors or omissions, or for damage resulting from the use of the informa‑tion contained herein. Bright Computing, Bright Cluster Manager and the Bright Computing logo are trademarks of Bright Computing, Inc. All other trademarks are the property of their respective owners.。
DBSPI配置手册说明书
DBSPI Configuration Manual:1.Add the virtual node in the node bank. Also configure the advance option in add node wizard.Please check Induction manual “Addition of the Node”.NOTE: In the advance option check the Cluster Virtual Node and fill the HA ResourcesGroup. Add the nodes where DB is running.2.Put the virtual node into the Oracle (UNIX) node group.3.To configure the DBSPI we required some information as shown below…Database NameResource group nameVirtual NameOracle HomeCluster serversServer where Database is ONLINEListener Name and PathRMAN PathAlert Log File PathTable Space Monitoring or HPOVO log file Path.See below…this information will be provided by the Oracle Database team.New HP Open View policies are to be deployed for monitoring the BSISPRD database.The Oracle home is:BSISPRD - /opt/local/bsispdbs/oracle/10gPlease configure the policies accordingly.1. RMAN log policyRMAN log file location:/opt/local/bsispdbs/oracle/10g/scripts/rman/logs/hotbackups/opt/local/bsispdbs/oracle/10g/scripts/rman/logs/coldbackups/opt/local/bsispdbs/oracle/10g/scripts/rman/logs/archive_logs2 .Tablespace monitoring policyHp open view log files:/opt/local/bsispdbs/oracle/10g/scripts/check/logs/hpopen.log3. Alert Log and Listener Log Monitoring PolicyAlert Log Path:/opt/local/bsis pdbs/admin/bdump/alert_bsisprd.logListener Log Path:/opt/local/bsispdbs/oracle/10g/network/log/bsisprd_listener.logDatabase is clustered in (TCPPDBS061, TCPPDBS007, TCPPDBS005, and TCPPDBS044).The HP_DBSPI user is also created according to the SEC1.Also find the information in the format below:4.Always remember that to configure you required a DBSPI user.er name: hp_dbspiii.Password: hp_dbspiIf the database is in cluster:•Based on the resource group name and information provided, apminfo.xml file has to be created with the mapping and copied to the following directory on each node in the cluster:/var/opt/OV/conf/conf•Always maintain a local copy in the management server Path: /opt/local/software.•Also check the following parameter locally on the server (DB node)o/opt/OV/bin/ovconfget | grep MONITORIf the parameter has not set or set to FALSE then set the parameter by running the following command. (This will enable cluster monitoring by setting MONITOR_MODE=TRUE key in conf.cluster namespace of that particular server.)On the manage node issue the command,sudo /opt/OV/bin/ovconfchg -change –ns conf.cluster -set MONITOR_MODE TRUE sudo /opt/OV/bin/ovc -restartOr you can usesudo /opt/OV/bin/ovc –killsudo /opt/OV/bin/ovc –start5.Assign Discovery and Message Templates to virtual node and deploy it by selecting templates,action, commands, and monitor.6.Now you required to run the DB Discovery program by selecting node. This is required becausethe discovery program creates some specific folder or files in on manage node which required by the DBSPI to configure DBSPI – Templates to setup the monitoring.DBSPI Discovery program is present in OVO bank go to windows tab --- Application Bank --- here a windows will open which has lists of all the application. Here you will find an icon named DBSPI. Double click on the icon. A new window will open. This window will have the DBSPI Admin and DBSPI. This will make entry in the different files or folder.7.To configure the DBSPI on the UNIX management server, you required to go into the DBSPIapplication…Here select the node and run the “Configure DB Connections”. Here an editor will appear where you need to provide the information in the EOF (End of the File) as given below…8.Then save the information…first time you may see a failed word which means the Database isnot running on that server or may be some error in the hp_dbspi user. If this is not a problem with the user then run the following command from the management server…sudo ovdeploy –cmd “dbspicol OFF <instance_name>” –host <node-name>9.Then again try to save the configuration. This time you see that everything is fine.See the below following screen shots…Enter the configurationinformation.Example of the FAILED…10.Also put the physical node in Node Group bank in group Oracle-Custom.11.Set the File System monitoring for given Database.Go to the Template window…Toyota > Toy OS Sun > File System.Click on the condition option or button. A window will appear.Find Name “Space on FileSystem [OSSPI-FileSystemMsg-4.2] for the Databases(x).Where x is the number 1, 2, 3…Put the name of the instance in the “Message Text” area.Select the template then click on the “condition” button. You can find it on the right hand side at the bottom of appear window or Template Window.Find the condition for the Database File System (DB FS) monitoring. As seen below…The condition name should be like as underline below in the screen shot. Then click modify you can able to see a new window with some information…as shown next…Enter the database instance name in the under line area and click OK.NOTE: Do not enter more than 15 instance name as the template work will be affected. If the instance reached to 15 then create a new template my copying the existing template change the name according to the naming convention. Then remove the entry from the under line area. (Only the instance name). Then do same as previously.12.Set the Listener monitoring Policy for given Database.Go to the Template window…Toyota > Toy Oracle RMAN > Toy Listener for Database(x)This is a logfile policy. Click Modify by selecting template. Here you need to add the Database instance name in the message text in the condition area like crippdbs*…as show in the figure…Note: In above two policies do not make entry more then 15 names. As it will not work. If such condition will happen then create a new set of policy by copying the existing policy.13.RMAN and Alert logfile policy were all ready define and there we don’t require making newentry in it. It does not require any changes.14.Assign the Templates (Group DBSPI Oracle - Quick Start PRD) to the virtual node and deploythe templates to virtual node by selecting virtual node.15.This process will make take more then 2 to 4 hours to deploy some time may be less 30 mins.16.When template deployment/distribution process will complete, you can able to see a successfulmessage in the history message browser. Or you can verify with the running the command from the management server.Sudo ovpolicy –list –host <node name>Or you can also verify by checking the level 4 information. For that you can run following commandSudo ovpolicy –list –level 4 –host <node name>Here you are able to see the HA Resource Group Name.17.Finally run the verify deployment from the DBSPI Tools sets. This will provide you everyinformation about the DBSPI configuration…like dbtab information, defaults file information, Template information, instances info, check connection info and others…。
PADS Layout中英文对照
PADS Layout中英文对照PADS PCB:一 Setup1、Preference优先设置⑴ global◆ Pick Radius捕捉半径◆ Keep Same View on Window Resize设计环境窗口变化是否保持同一视图◆ Active Layer Comes to Front激活的曾显示在最上面层◆ Minimum Display Width最小显示线宽,如果当前PCB 板中有小于这个值的线宽时,则此线不以其真实线宽显示而只显示其中心线◆ Drag and attach附属拖动◆ Drag and drop放下拖动对象就可完成移动◆ No Drag Move禁止采用拖取移动方式⑵ Design◆ Stretch Trace During Component Move移动元件时保持走线链接◆ Miter倒角◆ Keep Signal and Part Name保持信号和元件名称◆ Include Traces not Attached定义一个区域时,内部包含的和块内没有相同网络的连接也作为块的一部分◆ Line/Trace Angle 2D和走线的角度◆ Drill oversize对沉铜进行全景补偿⑶ Routing◆ Generate Teardrops产生泪滴◆ Show Guard Band显示保护带,如果违反了操作,会在违规的临界点上用一个八边形来阻止用户的操作,可通过On-Line DRC设置◆ Highlight Current Net当前选中的或正在操作的网络是否要高亮显示◆ Show Drills Holes是否显示钻孔◆ Show Tracks是否显示Tack,Tack是一种错误标志,当在层定义里定义的走线方向和实际的走向不一致时,就会有这种菱形的标记出现◆ Show Protection显示保护线◆ Show Test Points显示测试点,如果关闭此选项,测试点和过孔就表现为相同的形式了◆ Show Trace Length显示线长,实时地显示走线的长度和已布线的总长度◆ Centering-Maximum Channel设置最大的通道长度◆ Unrouted Path Double Click用鼠标双击未连接的飞线,通过设置可以产生两种结果,一种是自动连线(Dynamic Route),一种是手动连线(Add Route),如果是自动连线,最好打开在线检查设计规则On-Line DRC◆ Auto Protect Traces自动保护走线,保护一个网络的走线,包括长度受控的网络和走线末端的过孔◆ Enable Bus Route Smoothing使总线圆滑,当完成总线布线后,进行一个圆滑的动作,这个设置只在总线布线模式下有效,它的优先级高于全局优化的优先级◆ Guide Pad Entry允许连线以任何角度和焊盘连接◆ Smooth Pad Entry/Exit允许对和焊盘成90°的连线进行优化,优化为45°的连线◆ Minimum Amplitude(Times Trace Width)蛇形走线的高度,这个高度是按照线宽的整数倍来设置的◆ Minimum Gap(Times Trace to Trace Clearance)蛇形走线时GAP的宽度,这个宽度是按照垂直线之间距离的整数倍来设置的◆ Thermals热焊盘在电源和地层也称为花孔,为了对电路板进行好的屏蔽,通常会在顶层和底层甚至中间层铺大量的铜皮,并将其与地网络连接在一起,铜皮与地网络连接的过孔或焊盘称为热焊盘,通常分为两种:通孔热焊盘(Drilled Thermals)和表面贴装的热焊盘(Non-drilled Thermals)·Width热焊盘连接线的线宽·Min.Spoke最少连接线,一个热焊盘上至少有几根连接线·Pad Shape焊盘形状·Flood over填满,创建完全连接的热焊盘·Orthogonal正交,连线和焊盘的连接角度为正交·No Connect不形成热焊盘·Routed Pad Thermals元件的焊盘也可以形成热焊盘·Show Genernal Plane Indicators是否显示内层的热焊盘,关闭这个选项,热焊盘就表现为通常的焊盘了·Remove Isolated Copper移除孤立的铜皮·Remove violating Thermal Spokes移除冲突的热焊盘连接,违反规则的连接线应该被移除◆ Auto Dimensioning自动尺寸标注·General Settings通用设置·Draw 1st起点标注线·Draw 2nd终点标注线·Pick Gap测量点到尺寸标注线一端之间的距离·Circle Dimension圆弧测量·Alignment and Arrow校准直线和标注箭头·Alignmen t tool校直工具·Text尺寸标注值文字·Omit Text不需要尺寸标注文字◆ Teardrops泪滴·Auto Adjust允许在设计过程中根据不同的要求来自动调整泪滴◆ Drafting·Board component height restriction板上元件高度限制·See through将铜皮显示成一些Hatch平行线·Min.hatch最小铜皮面积·Smoothing铜皮在拐角处的平滑度·Pour outline显示整块铜皮的外框·Hatch outline显示铜皮(Pour)中每一个Hatch的外框◆ Grids·Fanout Grid扇出栅格,仅用于BlazeRouter·Radial Move Setup径向移动·Inner Radius靠近原点的第一个圆环跟原点的径向距离·Delta Radius除第一个圆环外,其他各圆环之间的径向距离·Sites Per Ring在移动角度范围内最小移动角度的个数·Auto Rotate移动元件时自动调整元件状态·Disperse移动元件时自动疏散元件·Use Discrete Radius移动元件时可以在径向上进行不连续地移动元件·Initial使用最初的·Let me Specify极的方向由自己设置◆ Split/Mixed Plane混合分割层·Plane Polygon Outline只显示分割层的外框·Plane Thermal Indicators除了显示分割层以外还要显示热焊盘·Generated Plane Date显示分割层上的所有数据·Smoothing Radius设置分割层的铜皮的平滑度·Auto Separate Gap设置分割的各个平面之间的距离·Use Design Rules for Thermals and Antipads对花孔和反焊盘使用设计规则·Die component模具元件2、Layer Definition叠层设置◆ No Plane布线层◆ CAM Plane整个的平面层,比如电源和地层等◆ Split/Mixed Plane分割后的平面层,比如存在多种电源和地的平面层3、Pad Stacks焊盘叠设置4、Drill Pairs钻孔层对设置5、Jumpers跳线设置6、ECO(Engineering Change Order)工程变更设置◆ Write ECO files记录ECO文件◆ Append to files追加到文件中◆ Write ECO file after close ECO toolbox在关闭ECO工具盒或者退出ECO模式时,更新E CO文件数据7、Design Rules设计规则设置设计规则优先级:(低)Default->Layer->Class->Net->Group->Pin pairs(高)◆ Default默认设置·Drill to Drill钻孔之间·Body to Body元件体之间·Clearance-Pad(通孔焊盘)、SMD(表贴焊盘)、Board(板框)·Protected不对飞线进行优化·Min imized采用网络的所有管脚对的连接最短的规则来产生飞线·Serial Source对ECL电路适用,多个驱动源串在一起·Parallel Source对ECL电路适用,多个驱动源并在一起·Mid-driven这个规则适用于高速电路和ECL电路,最小化网络中所有管脚对的距离,中间驱动意味着网络可以尽量短,如果是一个源两个接收端的话,那么这个拓扑表现为源在中间接收端在两边,并且源到两个接收端等长·Copper sharing铜皮共享一via过孔的铜皮共享·A uto Route自动布线器可以自动对网络布线·Allow Ripup自动布线器在布一个已经布过的网络时,允许删除现有的走线·Allow Shove自动推挤功能,可以对一个已布的网络进行推挤和重布·Allow Shove Protected自动布线器可以对一个已布的并且受保护的网络进行推挤和重布·Layer Biasing设置约束生效的层·Vias选择定义的过孔·Parallelism平行长度·Tandem纵向平行度·Aggre ssor此网络是否是干扰源,可以定义电流较大和速率较高的信号为干扰源·Shielding使用屏蔽功能,减少外界的干扰,通常用平面层作屏蔽信号·Gap网络同屏蔽网络走线之间的距离·Use Net屏蔽的网络·Stub走线中出现分支会难以控制匹配和端接,较长的分支会引起反射以及过冲,所以要加以约束·Match Length要求长度匹配·Fanout Length扇出的长度·Nets扇出的类型·Pad Entry Quality焊盘引入的质量控制,在BlazeRouter中有效·Via at SMD焊盘下放置过孔◆ Class类设置◆ Net网络设置◆ Group组设置◆ Pin Pairs管脚对设置◆ Decal封装设置◆ Component元件设置◆ Conditional Rules条件规则设置◆ Differentia Pairs差分对设置◆ Report报表设置二 Tools工具设置1、Automatic Cluster Placement簇的自动布局◆ Build Clusters创建簇·Min.Top Level Count最小的顶层簇的数量·Unglued Parts Number当前没有被锁定的元件的数目·Build Mode创建模式,簇分为open簇和close簇,其区别在于是否在Query/Modify窗口选中了close选项,在选择创建模式的时候,Rebuild open clusters指open的簇可以拆开重建Maintain O pen Clusters指要保留open属性的簇◆ Place Clusters放置簇·Board Outline Clearance簇到板框的最小间距·Percent Part Expansion簇之间的距离·Efforts布局的努力程度·Number of Iterations簇布局的次数·Attemps Per Iterations每次布局的尝试·% From Part Swappling元件、簇或组合交换的频率·Create Pass大范围的布局·Refine Pass小范围的微调◆ Place Parts放置元件·Eliminate Overlaps是否要消除元件重叠的情况·Min % Expansion Allowed最小的元件空间扩展的比例·Align Parts布局微调时,相邻的元件是否要对齐·Only if No Overlaps相邻的元件要对齐的前提是没有元件叠加的情况2、Disperse Componets打散元件3、Length Minimization长度最小化4、Cluster Manager簇管理器5、Auto Nudge自动推挤6、Specctra是Cadence公司的自动布线器7、DX-Designer反标注8、BoardSim板级防真9、BlazeRouter自动布线器10、CAM350菲林输出11、Pour Manager灌铜管理器12、Assembly Options装配选项13、Verify Design验证设计14、Compare Test Points比较测试点15、Compare/ECO Tools比较网络表16、DFT Audit(Design For Test)自动为设计插入测试点。
- 1、下载文档前请自行甄别文档内容的完整性,平台不提供额外的编辑、内容补充、找答案等附加服务。
- 2、"仅部分预览"的文档,不可在线预览部分如存在完整性等问题,可反馈申请退款(可完整预览的文档不适用该条件!)。
- 3、如文档侵犯您的权益,请联系客服反馈,我们会尽快为您处理(人工客服工作时间:9:00-18:30)。
© 2000 VERITAS Software Corporation. All rights reserved. VERITAS is a registered trademark of VERITAS Software Corporation in the US and other countries. The VERITAS logo, Business Without Interruption, VERITAS Global Cluster Manager, VERITAS Cluster Server and VERITAS Storage Replicator are trademarks of VERITAS Software Corporation in the US and other countries. Other product names mentioned herein may be trademarks and/or registered trademarks of their respective companies. Specifications and product offerings subject to change without notice. Printed in USA. April 2000.
Browser-based Graphical User Interface
ห้องสมุดไป่ตู้
Monitoring and Management
United Kingdom 0800-614-961 or 44-(0)870-2431000 44-(0)870-2431001 Fax France 33-1-41-91-96-37 33-1-41-91-96-38 Fax Germany 49-(0)69-9509-6188 49-(0)69-9509-6264 Fax South Africa 27-11-448-2080 27-11-448-1980 Fax Australia 1-800-BACKUP 612-8904-9833 Fax Hong Kong 852-2507-2233 852-2598-7788 Fax Japan 81-3-5532-8221 81-3-5532-0887 Fax Malaysia 603-715-9297 603-715-9291 Fax Singapore 65-488-7596 65-488-7525 Fax China 8610-62638358 8610-62638359 Fax
Follow the Sun
Integrates with Replication technology
Electronic communication E-Mail: sales@ World Wide Web:
VERITAS Global Cluster Manager™ events tracking log.
VERITAS Software Corporate Headquarters 1600 Plymouth Street Mountain View, CA 94043 North American Sales Headquarters 400 International Parkway Heathrow, FL 32746 800-327-2232 or 407-531-7501 407-531-7730 Fax Global Locations
Global Cluster Manager
™
The Availability Management Solution
About VERITAS®: For enterprises that demand continuous availability of business-critical information, VERITAS is the leading enterprise-class application storage management software provider. Unlike other types of storage management vendors who offer proprietary hardware-centric solutions, or limited product offerings, VERITAS provides leading, comprehensive, enterpriseclass application storage management solutions that ensure information availability, enabling customers to protect, access and manage their business-critical information.
VERITAS Global Cluster Manager™ events at-a-glance.
Integrating VERITAS Global Cluster Manager at a site that hosts multiple clustered servers achieves better site manageability. By extending the clustered solution to include a replication technology GCM creates the most robust site disaster availability. The combination of Global Cluster Manager, VERITAS Cluster Server™ and replication technologies enable enterprise wide area failover to address disaster recovery and follow the sun support solutions. Global Cluster Manager provides the most robust site management solution by managing multiple clusters within a site or multiple sites through a single system graphical user interface. The centralized management console allows administrators to maintain and manage planned and unplanned downtime for the clustered server enterprise wide. The goal of the VERITAS Global Cluster Manager is to provide a management solution that allows for the proactive management of dispersed clustered services and all the resources for which they depend. Used in conjunction with VERITAS clustering and replication solutions, Global Cluster Manager provides a comprehensive and flexible availability management solution for Sun Solaris environments today and cross-platform environments in the near future.
Features
Administrative Migration
Benefits
Services running on one cluster can be migrated to another cluster - either locally or globally. Ability to log in to the environment from any location with no special software. Allows for manipulating the state of multiple clusters and applications running on those clusters from a single console. Applications can be available on a cluster in a certain geographic location then migrate to another geographic location. Software- or hardware-based replication to remote sites for disaster recovery (Example: VERITAS Storage Replicator™ for Volume Manager™ - SRVM).
Global Cluster Manager
™
The Availability Management Solution
VERITAS Global Cluster Manager™ (GCM) is an availability management solution focused on proactive management of the distributed-clustered computing environment. Global Cluster Manager leverages existing clustering and replication technology within the enterprise environment to minimize both planned and unplanned down time. Building on the existing enterprise infrastructure extends to customers an availability management growth path for handling one or more site failures or disasters. E-commerce environments today are continuously striving to achieve new levels of availability. These environments are undergoing huge growth in both application and storage availability requirements. The issue for the growing base of e-commerce environments revolves around achieving the most robust environment levels of availability. Critical applications and services for the computing environment need to be proactively managed to ensure continuous availability at one site or many. If an application or a service becomes unavailable, regardless of planned or unplanned down time, a business will sustain phenomenal negative impacts. Impacts to customer satisfaction, employee productivity, and revenue to name a few. These impacts clearly establish a requirement for an availability management solution that is scalable, flexible, and easy to install and configure.