excel作为opc服务器pc+access的opc客户端
用S7-200 PC Access Smart来监控数据,并用Excel表格将其输出

用S7-200 PC Access Smart来监控数据,并用Excel表格将其输出,USB转RS-485模块对其读写1:用到的软件:S7-200 PC Access Smart V2.0,STEP 7-MicroWIN SMART V2.0,Excel 2010(07版以后都可以),USB转RS-485驱动程序,modbus从站主站模拟器2:用到的硬件:S7-200 SMART CPU ST40,AC 220V转DC 24V开关电源,UT485-E USB转RS485模块,各种连接电缆:带水晶头网线,各种电源连接线,模块接头处的短接线等等3:实施过程:首先打开STEP 7-MicroWIN SMART V2.0 软件,设置好IP地址,上载(或下载)程序到电脑(或PLC),然后监控几个有实际模拟量数值的数据打开S7-200 PC Access Smart ,在项目菜单里MWSMART(TCP/IP)右键网络接口卡选择好连接PLC的网卡,然后在新建PLC中直接查找,或需要添加PLC(不用设置其它参数)连点两下确定,也可能直接查找到(注意设置IP地址),如下图所示,找到改名后确定即可这里我们可以右键PLC名字新建文件夹或者条目,定义PLC变量地址,以便以后监控添加到测试客户端,然后点击,即可出现要通讯的数据(前提先要保存)这里可以很清晰的读取PLC中各个变量的数值大小,做到这里说明PLC与OPC通讯成功了。
下面我们用Excel报表来读取显示各个参数值的大小打开一个空表格,取名为test,在它的加载项里找到如下图所示的样式模板如果没有,必须点击文件,在选项这一栏找到加载项,右侧会显示一些条目可以看见有OPCS7200SMARTExcelAddin和OPCS7200ExcelAddin,若找不到可以按以下操作这里选择Excel加载项,点击转到,显示可以用的加载宏,若有则打上勾,若无点自动化,找到关于西门子相关的一些选项,查找以上所述的加载宏,若还是没有则点击浏览,在安装PC Access SMART V2文件夹里面找到这两项,然后确定,即可复原成上图划勾的加载项!返回到加载项,会出现如图所示的一些按钮图标选项指定表格中的其中一个单元格,在加载项工具栏点击,则会出现下图在来源ItemID省略号按钮里,选择刚才添加的一些PLC变量参数,四个变量每个都添加试然后点向右箭头开始收集数据,即将采集数据样式点可见表格原先在PC Access SMART V2里的数据现也在表格中呈现出来了在第二个就是写入向导,可以用来修改数据,后面分别是启动停止分别都会在桌面右下角任务栏中多出如下一些连接的图标来这里就是连接监控输出的案例,最后可编辑表格,变成如组态软件样式的实时显示最后我们用UT485-E模块进行modbus读写:装好驱动,我的电脑右键,双击设置属性打开设置好连接参数相应的可进行读写,操作方法类似,不再累述。
适用于 WinCC V7.4 SP1 的 OPC UA Excel 客户端
Table of ContentsTable of ContentsWarranty and Liability (2)1Introduction (4)1.1Overview (4)1.2Mode of operation and hardware configuration (5)1.3Components used (5)2Engineering (6)2.1Installation (6)2.2Integrating the WinCC example project (6)2.3Project setup and functioning (7)2.3.1The “Home screen” (7)2.3.2Process screen: “Heating Tank” (8)2.4Installing the OPC UA Client Library (10)2.5Customizing the host file (12)2.6OPC UA Excel client (13)2.6.1Description of the user interface (13)2.6.2Reading and writing of values (16)2.7Certificate exchange of encrypted communication (17)3Appendix (18)3.1Service and Support (18)3.2Links and literature (19)3.3Change documentation (19)1 Introduction1.1 OverviewMotivationA separate OPC UA server is included together with the connectivity pack forWinCC V7.4 SP1. This server makes it possible to access tag values of SCADAprojects from different systems and programs that also provide this communicationchannel.TaskThe requirement is to set up a connection between a WinCC OPC UA server andthe OPC UA Excel client provided. The Excel client can then be expanded orchanged, depending on requirement.The server and the client are located on separate PC stations.Applicative implementationTogether with this document you receive instructions that show you how toestablish a connection between WinCC OPC UA server and the Excel client.The download on the entry page provides you with the Excel client, the Excel OPCUA library as well as an example project that explains the work steps.This is how you are guided through the required configurations step by step.Screenshots and notes also support you.Assumed knowledgeBasic knowledge of WinCC V7 is assumed.1.2 Mode of operation and hardware configurationOverviewThe following figure shows you how the components interact in this configurationexample.Figure 1-1WinCC V7.4 SP1 ConPack OPC UA Excel clientCommunication channelNote1.32 Engineering2.1 InstallationMicrosoft Office InstallationA licensed Excel version has to be installed on the computer on which the client isto be run. Office version 2010 is used in this application example.Installing WinCC V7.4Install WinCC V7.4 SP1 Update 2 on the computer on which the Runtime is to runand follow the installation manual (see also \3\ in chapter 3.2). You can also use anexisting WinCC installation.Installing connectivity packInstall the Connectivity Pack V7.4 SP1 on the computer on which you also haveWinCC installed and follow the installation manual (see also \4\ in chapter 3.2). Youcan also use an existing installation of the connectivity pack.2.2 Integrating the WinCC example projectAdapting projects to the WinCC stationOpen the example project with your WinCC Explorer and adjust the computername. To do this, follow the steps below.1.Double-click on the “Computer” module in the project overview2.Open the context menu of the created computer in the editor window.3.Go to the menu item “Properties”.4.Adjust the “Computer name” to the one of your computer.5.Confirm the changes with the “OK” button.6.Close the project and reopen it for the settings to be effective.Result:You have now successfully opened the project on your computer and you can startRuntime.2.3 Project setup and functioningThe project contains a simulation of a heating tank. It consists of two screens, the“Home screen” and the “Plant screen”. The actual process screen is called from the“Plant screen” in a screen window.2.3.1 The “Home screen”DescriptionThe “Home screen” is the start screen of the example project. The control elementsand displays have the functions described below.Control elementsTable 2-12.3.2 Process screen: “Heating Tank”Structure of the process screenThe process screen consists of the boiler with intake, drain and a flow heater. The control elements are arranged in the bottom right corner.Control elementsTable 2-2NoteEach button resets the current processing step and starts the new one. Only one of the three processes can be active at the same time.123 456ActuatorsTable 2-3Process valuesThere are two relevant process values in this example. The filling level “Level” and the temperature “Temp”. Both are realized as internal tags and can, after being set up, be monitored and changed via the OPC UA Excel client.For the visualization of the “Level” process level a bar chart (10) was inserted in the boiler. An I/O field (9) on the right specifies the filling level in numeric form (percentage).The current temperature value “Temp” is output in an I/O field (8) that is located next to a symbolically placed measuring device on the top right corner of the boiler.Figure 2-31 23 456789102.4 Installing the OPC UA Client LibraryTo use the OPC UA client library, you need to register the library on your clientsystem. For this, you can use the Microsoft .NET Framework AssemblyRegistration Utility. The Utility (regasm.exe) is contained in the Microsoft .NETFramework 4.6.1.The instructions below show you the required steps:1.Install the .NET Framework 4.6.12.The path, in which the .NET Framework has been installed, is:"C:\Windows\\Framework\v4.0.30319".3.Download the "109752976_OPC_UA_ClientLibrary_CODE_V10.zip" file fromthe entry page.4.Unzip this file on the same drive on which your operating system is installed.To facilitate browsing, the following path was selected in this example: "C:\109752976_OPC_UA_ClientLibrary_CODE_V10".5.Start the command prompt as administrator.Figure 2-46.Register the library on your system. Enter the following command:"C:\Windows\\Framework\v4.0.30319\regasm.exeC:\109752976_OPC_UA_ClientLibrary_CODE_V10\OPC_UA_ClientLibrary\Application\OPC_UA_ClientLibrary.dll /tlb /codebase" and confirm the entry byclicking return.Note Make sure that the commands /tlb and /codebase are separated from the path entry and from each other and are preceded by a slash.For easier path entry, use the browse function of the command application that isexecuted with the tab button. This is how you can check the correctness of thepaths.Figure 2-5Result:You have now successfully registered the library for the OPC UA client on thecomputer and you can use it.2.5 Customizing the host fileDepending on the network architecture, it may be necessary to introduce the clientcomputer to the server to guarantee access to the communication endpoints ofWinCC. To do this, a host file is customized on the client and server PC. The stepsnecessary for it are described below.Note For further information on the operation of WinCC in Windows networks, please refer to the following entry:1.Navigate to the host file of the client computer in path“C:\Windows\System32\drivers\etc\hosts”.2.Open the host file using the notepad as administrator.3.Add the IP and the computer name of the server in the host file, as shown inthe following screen.4.Save and close the file.5.It is recommended to delete the comments in the host file.Figure 2-6Result:Now you have introduced the client to the server. You can call the endpoints viathe OPC UA Excel client.2.6 OPC UA Excel clientThis section describes the configuration and functioning of the Excel client. It islocated in the zip file that you can download on the entry page and in which theOPC library is also located. The client has the name“109752976_OPC_UA_ClientLibrary_Sample.xlsm”Note Requirement: OPC UA Client Library is registered on your system.Note This example creates an OPC UA client certificate for the current user with the common name (CN) CN = UA Client 1500If you want to change this setting, you need to adjust it in the .NET SourceCode.2.6.1 Description of the user interfaceThe user interface of the “OPC UA Excel Client” example client is divided in threesheets: “Connect” “ReadWrite” “Subscribe”“Connect”The following figure shows the “Connect” interface:Figure 2-71 2534The following table describes the interface functions of the previous figure:Table 2-4“ReadWrite”The following figure shows the “Read/Write” interface:Figure 2-8The following table describes the interface functions of the previous figure:Table 2-51 2 3 4567 8 9 1011 12 1314"Subscribe"The following figure shows the “Subscribe” interface:Figure 2-91 234The following table describes the interface functions of the previous figure:Table 2-6。
用S7-200PCAccessSmart来监控数据,并用Excel表格将其输出
用S7-200 PC Access Smart来监控数据,并用Excel表格将其输出,USB转RS-485模块对其读写1:用到的软件:S7-200 PC Access Smart V2.0,STEP 7-MicroWIN SMART V2.0,Excel 2010(07版以后都可以),USB转RS-485驱动程序,modbus从站主站模拟器2:用到的硬件:S7-200 SMART CPU ST40,AC 220V转DC 24V开关电源,UT485-E USB 转RS485模块,各种连接电缆:带水晶头网线,各种电源连接线,模块接头处的短接线等等3:实施过程:首先打开STEP 7-MicroWIN SMART V2.0 软件,设置好IP 地址,上载(或下载)程序到电脑(或PLC),然后监控几个有实际模拟量数值的数据打开S7-200 PC Access Smart ,在项目菜单里MWSMART(TCP/IP)右键网络接口卡选择好连接PLC的网卡,然后在新建PLC中直接查找,或需要添加PLC(不用设置其它参数)连点两下确定,也可能直接查找到(注意设置IP地址),如下图所示,找到改名后确定即可这里我们可以右键PLC名字新建文件夹或者条目,定义PLC变量地址,以便以后监控添加到测试客户端,然后点击,即可出现要通讯的数据(前提先要保存)这里可以很清晰的读取PLC中各个变量的数值大小,做到这里说明PLC与OPC通讯成功了。
下面我们用Excel报表来读取显示各个参数值的大小打开一个空表格,取名为test,在它的加载项里找到如下图所示的样式模板如果没有,必须点击文件,在选项这一栏找到加载项,右侧会显示一些条目可以看见有OPCS7200SMARTExcelAddin和OPCS7200ExcelAddin,若找不到可以按以下操作这里选择Excel加载项,点击转到,显示可以用的加载宏,若有则打上勾,若无点自动化,找到关于西门子相关的一些选项,查找以上所述的加载宏,若还是没有则点击浏览,在安装PC Access SMART V2文件夹里面找到这两项,然后确定,即可复原成上图划勾的加载项!返回到加载项,会出现如图所示的一些按钮图标选项指定表格中的其中一个单元格,在加载项工具栏点击,则会出现下图在来源ItemID省略号按钮里,选择刚才添加的一些PLC变量参数,四个变量每个都添加试然后点向右箭头开始收集数据,即将采集数据样式点可见表格原先在PC Access SMART V2里的数据现也在表格中呈现出来了在第二个就是写入向导,可以用来修改数据,后面分别是启动停止分别都会在桌面右下角任务栏中多出如下一些连接的图标来这里就是连接监控输出的案例,最后可编辑表格,变成如组态软件样式的实时显示最后我们用UT485-E模块进行modbus读写:装好驱动,我的电脑右键,双击设置属性打开设置好连接参数相应的可进行读写,操作方法类似,不再累述。
WinCCExcel脚本
WinCCExcel脚本Option ExplicitOption Base 1Const ServerName = "OPCServer.WinCC"Dim WithEvents MyOPCServer As OpcServerDim WithEvents MyOPCGroup As OPCGroupDim MyOPCGroupColl As OPCGroupsDim MyOPCItemColl As OPCItemsDim MyOPCItems As OPCItemsDim MyOPCItem As OPCItemDim ClientHandles(1) As LongDim ServerHandles() As LongDim Values(1) As VariantDim Errors() As LongDim ItemIDs(1) As StringDim GroupName As StringDim NodeName As String'---------------------------------------------------------------------' Sub StartClient()' Purpose: Connect to OPC_server, create group and add item'---------------------------------------------------------------------Sub StartClient()' On Error GoTo ErrorHandler'----------- We freely can choose a ClientHandle and GroupNameClientHandles(1) = 1GroupName = "MyGroup"'----------- Get the ItemID from cell "A1"NodeName = Range("A1").ValueItemIDs(1) = Range("A2").Value'----------- Get an instance of the OPC-ServerSet MyOPCServer = New OpcServerMyOPCServer.Connect ServerName, NodeNameSet MyOPCGroupColl = MyOPCServer.OPCGroups'----------- Set the default active state for adding groups MyOPCGroupColl.DefaultGroupIsActive = True '----------- Add our group to the CollectionSet MyOPCGroup = MyOPCGroupColl.Add(GroupName)Set MyOPCItemColl = MyOPCGroup.OPCItems'----------- Add one item, ServerHandles are returned MyOPCItemColl.AddItems 1, ItemIDs, ClientHandles, ServerHandles, Errors'----------- A group that is subscribed receives asynchronous notificationsMyOPCGroup.IsSubscribed = TrueExit SubErrorHandler:MsgBox "Error: " & Err.Description, vbCritical, "ERROR"End Sub'---------------------------------------------------------------------' Sub StopClient()' Purpose: Release the objects and disconnect from the server'---------------------------------------------------------------------Sub StopClient()'----------- Release the Group and Server objectsMyOPCGroupColl.RemoveAll'----------- Disconnect from the server and clean upMyOPCServer.DisconnectSet MyOPCItemColl = NothingSet MyOPCGroup = NothingSet MyOPCGroupColl = NothingSet MyOPCServer = NothingEnd Sub'---------------------------------------------------------------------' Sub MyOPCGroup_DataChange()' Purpose: This event is fired when a value, quality or timestamp in our Group has changed'---------------------------------------------------------------------'----------- If OPC-DA Automation 2.1 is installed, use:Private Sub MyOPCGroup_DataChange(ByVal TransactionID As Long, ByVal NumItems As Long, ClientHandles() As Long, ItemValues() As Variant, Qualities() As Long, TimeStamps() As Date)'----------- Set the spreadsheet cell values to the values readRange("B2").Value = CStr(ItemValues(1))Range("D2").Value = CStr(TimeStamps(1))End Sub'---------------------------------------------------------------------' Sub worksheet_change()' Purpose: This event is fired when our worksheet changes, so we can write a new value'---------------------------------------------------------------------Private Sub worksheet_change(ByVal Selection As Range)'----------- Only if cell "C2" changes, write this valueIf Selection <> Range("C2") Then Exit SubValues(1) = Selection.Cells.Value'----------- Write the new value in synchronous modeMyOPCGroup.SyncWrite 1, ServerHandles, Values, ErrorsEnd Sub注意:excel启动宏之前先启动WINCC运⾏。
PC+Access_OPC+Server
Diagnostic Recipe Data logging PTO/PWM Wizard PID Auto Tune TD200/TD200C PC-Access RTU Application
简化的用户界面,便于快捷的安装与配置 更新每个标签的时间戳 (当测试客户端时) 高级选项,例如上下限通知
*注意:该电缆取决于您使用的协议
全面的帮助 (可作为用户手册打印)。
12
概括
PC-Access
Hardware Software Workshop
快速安装 支持不超过3.0版的OPC DA 符合OPC标准 全面的HTML帮助系统 多语言支持 支持Modem Modem 包括示例项目 支持西门子CP
4
新的OPC产品 PC Access 产品: 新的 产品
PC-Access
PC Access是S7-200CN PLC的一种 的一种OPC服务器 是 的一种 服务器
Hardware Software Fra bibliotekorkshop
唯一专供微型PLC使用的低成本 使用的低成本OPC工具 唯一专供微型 使用的低成本 工具 可与任何标准OPC客户端配合使用 支持不超过 版的 客户端配合使用, 支持不超过3.0版的 版的OPC 可与任何标准 客户端配合使用 Data Access (DA)
10
竞争优势
PC-Access
Hardware Software Workshop
S7-200CN PC Access
通信能力
Simatic NET Lean
KepWare
以太网、 PPI 或 、 Modem,每种作为独 立的软件包
包括所有的 S7-200CN 协 以太网 议(MM-PPI、标准Modem、 cell Modems、 Radio modems、以太网 Profibus-DP with CP 卡 ) 支持所有S7-200CN的数 据类型 快速安装、设置以及客户 端设置 提供简洁的界面,允许快 速组织和测试所有PLC数 据。 完全兼容Windows 标准。 符号可以直接从STEP 7Micro/WIN导入 $295 (荣誉制度) 允许 不包括S7-200CN定 时器和计数器 需要S7-300全集成自 动化工具的知识 需要 S7-300 全集成 自动化工具的知识
利用Excel和Access相结合解决问题
利用Excel和Access相结合解决问题作者:管智贇来源:《电脑知识与技术》2019年第21期摘要:目前Office套件中的Excel和Access组件在职場中都是应用很广的办公软件,它们各自都有自己擅长的领域。
在实际学习和使用过程中它们大多是被作为独立的学习对象进行的,本文利用实际案例来说明将Excel和Access结合起来解决问题,充分利用它们各自的长处,能够更好地解决问题、提高工作效率。
关键词:Excel;Access;数据处理;查询中图分类号: TP311; ; ; ; 文献标识码:A文章编号:1009-3044(2019)21-0212-03开放科学(资源服务)标识码(OSID):Abstract: Excel and Access are now used everywhere in the workplace, what they do best are different. Learning and using on them are separate. In this paper, a case study of graduation Qualification illustrates that if we combine respective advantages of Excel and Access to solve questions, we would obtain higher work efficiency and better results.Key words: Excel;Access ;Data Processing;QueryOffice是目前全世界最流行的办公软件,包含的组件中又以“Excel”最受职场中的白领们欢迎,堪称“职场护身符”,它能在相当程度上提高个人甚至整个部门的工作效率。
全国各大高校为了满足学生们步入职场之后的通用需求基本都在低年级开设课程,进行包括Office中Word、Excel、PowerPoint、Access组件在内的计算机基础知识的学习。
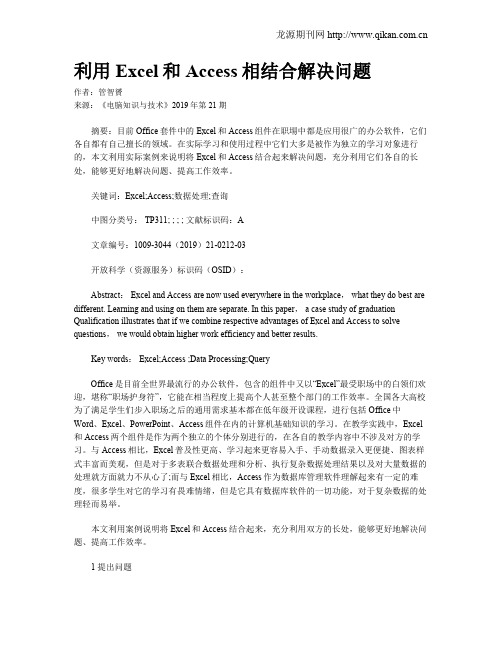
在 Microsoft Excel 里如何建立OPC Client
图01)) 图09OPCClient.zip ( 17 KB )图01:导入附加控件在打开的对话框中选择下列项目:- Siemens S7 标签控件- Siemens S7 数量控件- Siemens_S7WCVB_Button.S7vbBttn - Siemens_S7WCBVB_Slider.S7vbSlid图03:显示数据控件的自定义设置选择“Items”标签,然后选择“Assign”。
在打开的对话框中,请选择控制元素,然后在“Assigned item”区域中输入条目号,或浏览条目器。
然后选择“Set”。
图04:连接变量其他控件的步骤与以上步骤一致。
下载:图05:在组态控制台中的设置Test_OPC.xls ( 60 KB )OPC_Scout.zip ( 344 bytes )该实例在Microsoft Excel 2003 SP2 环境下创建。
注意事项:如果您将S7 数据控件直接插入Excel 电子表格中,您需要自行对S7 控件的功能重新进行编程。
关键字:标签,数量,按钮,滚动条,S7vbBttn,S7vbSlid如何用同一总线上的S7-CPU 主站执行S7 通讯和DP 通讯?显示订货号组态注意事项:在DP/PA link 后面可以使用多达5 个DP/PA 耦合器。
在此,并不介意DP/PA 耦合器是Ex 版本(危险区域) 还是非Ex 版本。
如何在STEP 7 中组态一个PROFIBUS PA 网络?显示订货号6ES7156-0AA00-0XA0DP/AS-I Link Field bus coupling6ES7156-0AA01-0XA0DP/AS-i Link Field bus coupling6ES7157-0AA82-0XA0IM 157, Interface DP/PA Link DPV1.Slave6ES7157-0AC82-0XA0DP/PA Coupler non ex-version 400MA6ES7157-0AD82-0XA06ES7158-0AA00-0XA0DP/RS 232C Link6ES7158-0AA01-0XA0DP/RS 232C Link6ES7158-0AC00-0XA0DP Link6ES7158-0AD01-0XA0DP/DP Coupler6GK1415-0AA006GK1415-0AA016GK1415-2AA00DP/AS-Interface Link 206GK1415-2AA01说明:当组态PROFIBUS PA 网络时,可以使用很多个连接和组态PA 从站的方法。
通过excel向s7
通过excel向s71、现在通过以太网可以把plc内的数据读到excel表格内,也可以通过microsystemsopc工具条中的“写入向导”按钮逐个向plc内写入数据。
2、可以通过写入”向导按钮“向plc内写入数据,但是这种方法对于我来说比较繁琐,因为我需要写入的数据比较多,大概有60个数据。
3、我想在excel表格内建立一个按钮,当我按下这个按钮时,excel表格中指定单元格内的数据被写入plc中的指定地址中。
4、我的设计步骤如下(以向plc写入1个数据叙述):4.1按照s7200pcaccess帮助文件中的步骤加载宏opcs7200exceladdin.xla,然后excel中会出现microsystemsopc 工具条。
4.2在excel中建立“commandbutton1”按钮,编辑“commandbutton1”按钮的vba程序,编辑完vba程序后退出了编辑模式,程序如下:privatesubcommandbutton1_click()callexcel.application.run(“opcs7200exceladdin.xla!opcwrite”,”1 92.168.2.4,vd768,real,rw”,cells(4,3),”“)endsub4.3.打开s7200pcaccess项目文件,测试客户机,通讯质量“好”。
备注:通讯方式为以太网通讯。
保存并退出s7200pcaccess。
5.我想把excel表格中第4行3列单元格中的数据写入ip 地址为192.168.2.4plc的vd768中。
当我单击excel表格中的“commandbutton1”按钮后,第4行3列单元格中的数据始终不能写入plc,求解这是为啥啊,困惑了我好长时间了,请各位大侠帮忙。
问题补充:我怀疑是vba程序中ip地址的问题,因为当我使用ppi 通讯时可以实现用“commandbutton1”按钮把指定单元格中的数据写入plc中的指定地址内。