【固定翼 无人机】1500滑翔机 英文说明书-重新设计
固定翼无人机技术使用说明书_电子版

CA2201固定翼无人机技术使用说明书(版本:V1.00)航天科工深圳(集团)有限公司Aerospace Science & Industry Shenzhen (Group) Co.,Ltd目录1 机体布局 (1)2 结构安装说明 (2)2.1机体各部分安装 (2)2.1.1 机翼对接安装(见图2-1) (2)2.1.2 尾翼对接安装(见图3-1) (2)2.1.3 整机对接安装(见图4-1) (3)2.2机体的使用与维护 (4)2.2.1 使用要求 (4)2.2.2 维护要求 (5)3 发动机的使用说明 (6)3.1启动前准备 (6)3.2发动机启动 (6)3.3发动机的关闭 (6)3.4发动机的维护 (6)4 稳压电源使用说明 (8)4.1通电前的准备工作 (8)4.2充电器使用说明 (8)4.3稳压电源维护说明 (8)4.4主电源维护说明 (8)4.5充电器维护说明 (8)5 机载相机使用说明 (9)5.1相机参数 (9)5.2航拍设置 (9)5.2.1航线设置 (9)5.2.2对焦设置 (9)6 全系统飞行使用说明 (10)6.1飞行现场工作流程图 (10)6.2工作流程 (10)6.2.1 进入飞行场地前的准备工作 (10)6.2.2 外场飞行 (11)6.3无人机飞行四不飞 (14)1 机体布局图1-1 机体布局2 结构安装说明CA2201的机体采用快装快卸对接方式进行安装。
机体四大组件分别进行对接安装后,再进行整机的对接安装。
2.1 机体各部分安装2.1.1 机翼对接安装(见图2-1)将连接杆插入到左右两侧机翼的圆形插孔中,保证左右两侧机翼的根弦面贴合。
图2-1 机翼对接安装2.1.2 尾翼对接安装(见图3-1)将尾杆插入机翼两侧,使用配套的螺纹紧固件(包括:M3×16内六角圆柱头螺钉2个,φ3平垫圈2个)锁紧。
图3-1 尾翼对接安装2.1.3 整机对接安装(见图4-1)(1)、将机翼放到机身安装位置,使用配套的螺纹紧固件锁紧(包括:M5×40内六角圆柱头螺钉2个)。
Futaba10C-10CH中文说明书(1)

2
目
简介.....................................5 支持与服务............................5 使用、出口和改装......................5 特殊标志的意义........................6 安全注意事项(操作前请务必阅读........6 对 10C 系统的简介.....................8 部件和技术特性.......................11 配件.................................12 发射机控制项和开关设置...............14 对镍镉电池进行充电...................18 操纵杆调整...........................19 调整显示屏的对比度...................19 改变模式.............................20 省电模式(只对 TM10 适用)............20 CP 卡的初始化和数据转换..............20 遥控设备的安装和范围检测.............21 飞行频率.............................26 发射机显示屏和按键...................27 警告和错误显示.......................28
滑翔机的功能菜单........................80 子目录...............................80 从基本的 4 通道滑翔机开始.............81 滑翔机的基础功能菜单.................83 模型类型(PARAMETER 子菜单).........83 电动机关闭 MOTOR CUT................84 滑翔机的高级功能菜单.................85 副翼/方向舵混控 AILE/RUDD............86 副翼,襟翼混控 AILE-FLAP(仅限于滑翔机 [2A+2F]).............................87 阻流板混控 SPOILER MIX................88 微调杆偏置 OFFSETs 附加飞行条件)......89 起飞延迟(仅限于滑翔机[1A+’F[)......90 翼型混控 CAMBER MIX.................90 翼型襟翼 CAMBER FLAP.................91 蝶式混控 BUTTERFLY...................92 通道 3 的功能选择(飞行条件/功能) ( CONDITION/FUNCTION) ...............93
HOBBYWING无刷电调说明书
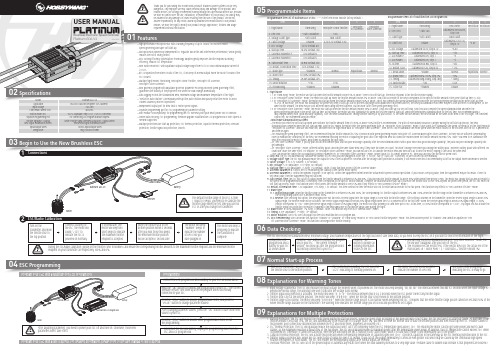
0102Specifications03Begin to Use the New Brushless ESC04ESC Programming05Programmable Items06Data Checking07Normal Start-up ProcessProgrammable Item List of Platinum 60A V4 ESC. (“*” in the form below indicate factory defaults. )Programmable Item List of Multifunction LCD Program BoxUSER MANUALPlatinum 60A V4Brushless Electronic Speed Controller201512031. Flight Mode1.1. In “Fixed-wing” mode, the motor will start up when the throttle amount reaches 5% or above. There is no soft start-up, the motor responds to the throttle increase rapidly.1.2. In “Helicopter (Linear Throttle)” mode, the motor will start up when the throttle amount reaches 5% or above. And it will accelerate to the RPM corresponds to the specific throttle amount in the preset start-up time (4~25s). 1.3. In “Helicopter (Elf Governor)” mode, the motor will start up when the throttle amount reaches 40% or above. And it will complete the speed standardization and enter the speed-governing operation in the preset start-up time(4~25s). In this mode, the motor will standardize its speed every time it starts up. Due to different discharge rates/capabilities of different batteries, the RPM you standardize each time may be a little different. In consequence, at the same throttle amount, the RPM may be a bit different when using different batteries, but this won’t affect the speed-governing effect.1.4. In “Helicopter (Store Governor)” mode, the motor will start up when the throttle amount reaches 40% or above. It will also start up in a very soft way. And it will also complete the speed standardization and enter thespeed-governing operation in the preset start-up time. In this mode, the motor will only standardize its speed the first time when it starts up. When performing RPM standardization for the first time, we recommend using afully-charged battery with good discharge capability. After the RPM standardization, change another battery to fly your aircraft. At the same throttle amount, the RPM should be the same as the RPM of the first flight. For consistent control feel, we recommend using this mode. About RPM Standardization & Others• The motor will enter the soft start-up when user switches the throttle amount from 0 to 40% or above (50% throttle is recommended). The pitch of main blades should be 0 degree during the soft start-up process, the RPMstandardization completes when the soft start-up ends, and the ESC makes the motor enter the speed-governing state. In “Helicopter (Store Governor)” mode, if user wants to re-standardize the speed, he needs to set the flight mode to “Helicopter (Elf Governor)” and save this mode first, and then reset the flight mode back to “Helicopter (Store Governor)”, then the ESC will re-standardize the motor speed when the motor rotates for the first time after the ESC is powered off and then on again.• For ensuring the speed-governing effect, we recommend setting the throttle amount to 85% or below in both speed-governing modes (Helicopter (Elf Governor)&Helicopter (Store Governor), so there will be sufficient compensating room to maintain the consistency of the RPM. We recommend replacing the motor or adjusting the gear ratio if the expected RPM still cannot be reached when the throttle amount exceeds 85%. (Note: You need to re-standardize the RPM after replacing the motor, blades, body frame or adjusting the gear ratio.)• In “Heli Store Governor” mode, if you fly your aircraft with another pack that has poor discharge capability after the RPM standardization (with a pack which has good discharge capability), the pack has poor discharge capability will get damaged.• In “Helicopter (Store Governor)” mode, different battery packs can bring the same stable RPM only if they have the same cell count. This won’t change even when you change the battery pack. However, battery packs with different cell count don’t have the same effect. For instance, in “Helicopter (Store Governor)” mode, you can not use a 4S to calibrate the motor RPM and then use a 6S to drive the motor, hoping it can run at the same RPM. • User can decide the control feel via adjusting Governor Parameter P/I. In “Helicopter (Store Governor)” mode, connect your ESC to a smart phone or PC, then you can check the throttle vs speed chart.2. LiPo Cells: the ESC will automatically calculate the number of LiPo cells you have plugged in as per the “3.7V/Cell” rule if “Auto Calc” is selected. Or user can set this item manually.3. Voltage Cutoff Type: the ESC will gradually reduce the output to 50% of the full power in 3 seconds after the voltage cutoff protection is activated, if soft mode is selected..It will immediately cut off all the output when hard mode is selected.4. Cutoff Voltage: 2.7V-3.7V (custom), 3.3V (default).5. BEC Voltage: 5-8V (adjustable), 0.1V (step), 6V (default).6. Start-up Time: 4-25s (adjustable), 1s (step), 15s (default). (Note: It only functions in Heli Elf/Store Governor Mode)7. Governor Parameter P: Control the ESC maintaining the stability of the current motor speed.8. Governor Parameter I: Control the dynamic response. To be specific, control the supplement extent when the actual motor speed is below expectation. If you choose a very big value, then the supplement may be too much. If select a very small value, then the supplement may not sufficient.9. Auto Restart Time: the ESC will cut off its output when the throttle amount is between 25% and 40%. If you increase the throttle amount to above 40% within preset time period (0-90s), the motor will rapidly start up and accelerate to the speed (in the programmed Restart Acceleration Time) corresponds to the specific throttle amount, complete the shutdown and restart up.If you move the throttle stick to over 40% beyond the preset time period, the ESC will enter the soft start-up process. (Note: This function won’t effect unless the throttle amount is over 25% and it only effects in “Heli Governor Elf/Store” mode.)10. Restart Acceleration Time: 1-3s (adjustable), 0.5s (step), 1.5s (default). This item controls the time the motor will cost to restart and accelerate to the full speed. (This function only effects in “Heli Governor Elf/Store” mode) 11. Brake Type11.1. Proportional Brake: when the throttle range on the transmitter is between 20% and 100%, the corresponding ESC throttle output is between 0% and 100%.When the throttle range on the transmitter is between 20% and 0%, the corresponding brake force is between 0 and 100%.11.2. Reverse: after selecting this option, the RPM signal wire will turn into a reverse signal wire (the signal range is in line with the throttle range). After setting a channel on the transmitter, when the reverse signal length is above 20% signal length, the Reverse mode will be activated. The reverse signal length must be below 20% signal length when the ESC is powered on for the first time. When the reverse signal length is below 20% signal length, 0-100%throttle corresponds to “CW”; when the reverse signal length is above 20% signal length, the motor will stop spinning CW (and then spin CCW); at this time, 0-100% throttle corresponds to “CCW”. Any signal loss will activate the throttle signal loss protection, no matter it happens to the RPM signal wire or the throttle signal cable during the flight.12. Brake Force: 0-100% (adjustable), 1% (step), 0 (default). (Note: this function only effects in “Normal Brake” mode.)13. Timing: 0-30° (adjustable), 1° (step), 15° (default).14. Motor Rotation: CW/CCW. User can adjust this item via a multifunction LCD program box.15. DEO Freewheeling: User can decide this function “Enabled” or “Disabled” in “Fixed Wing” mode or in “Heli (Linear Throttle Response)” mode. This item has been preset to “Enabled” and cannot be adjusted in “Heli (Elf Governor/Store Governor)” mode. This function can brings better throttle linearity.Model Application Input VoltageCont./Peak Current (10s)(Switch-mode) BEC Platinum 60A V4450-480 Class Heli (Propeller: 325-360mm )3-6S LiPo 60A/80A5V-8V Adjustable (Step: 0.1V), 7A/18A Cont./Peak For connecting LCD Program Box/WIFI Express White Throttle Signal Wire/Red & Black BEC Output Wires/Yellow RPM Signal Transmission Wire14AWG Input/Output Wires 49g / 48x30x15.5mmProgrammingConnect the LCD program box and a battery to your ESC as shown above.Platinum 60A V4Program Your ESC with a WIFI Express: For detailed information, please refer to the user manual of WIFI Express.Turn on the transmitter, and then move the throttle stick to the bottom position.After connected to a battery, the ESC will emit “♪123” indicating it’s normally powered on.The motor will emit several beeps to indicate the number of LiPo cells.The motor emits a long beep indicating the ESC is ready to go.08Explanations for Warning Tones1. Input voltage is abnormal: The ESC will measure the input voltage the moment when it’s powered on. The motor will keep beeping “BB, BB, BB” (the interval between two BBs is 1 second) when the input voltage is beyond the normal range. The warning tone won’t stop until the voltage turns normal.2. Throttle signal loss protection is activated: The motor will beep “B-, B-, B-” (the interval between two B-s is 2 seconds) when the ESC doesn’t detect any throttle signal.3. Throttle stick is not at the bottom position: The motor will beep “B-B-B-B-B-” when the throttle stick is not moved to the bottom position.4. Throttle range is too narrow: The motor will beep “B-B-B-B-B-” when the throttle range you set is too narrow (when designing this ESC, it requires that the entire throttle range you set cannot be less than 50% of the whole throttle range available on the transmitter.) The warning tone indicates the throttle range you set is void and you need to set it again.09Explanations for Multiple Protections1. Start-up Protection: The ESC will monitor the motor speed during the start-up process. When the speed stops increasing or the speed increase is not stable, the ESC will take it as a start-up failure. At that time, if the throttle amount is less than 15%, the ESC will automatically try to restart up; if it is larger than 15%, you need to move the throttle stick to back the bottom position and then restart up the ESC. (Possible causes of this problem: poor connection/ disconnection between the ESC and motor wires, propellers are blocked, etc.)2. ESC Thermal Protection: The ESC will gradually reduce the output but won’t cut it off completely when the ESC temperature goes above 110℃. For ensuring the motor can still get some power and won’t causecrashes, so the maximum reduction is about 50% of the full power. The ESC will gradually resume its maximum power after the temperature lowers down. In addition, the ESC temperature cannot exceed 70℃ when it’s powered on. Otherwise, it cannot be started up. (Here we are describing the ESC’s reaction in soft cutoff mode, while if in hard cutoff mode; it will immediately cut off the power.)3. Capacitor Thermal Protection: The ESC will activate this protection when the operating temperature of capacitors goes over 130℃. It protects capacitors in the same way as the ESC thermal protection does to the ESC .4. Throttle Signal Loss Protection: When the ESC detects loss of signal for over 0.25 second, it will cut off the output immediately to avoid an even greater loss which may be caused by the continuous high-speed rotation of propellers or rotor blades. The ESC will resume the corresponding output after normal signals are received.5. Overload Protection: The ESC will cut off the power/output or automatically restart itself when the load suddenly increases to a very high value. (Possible cause to sudden load increase is that propellers are blocked.)0104可编程参数项目及其说明Platinum 60A V420151203空模无刷电子调速器使用说明书下表中带“*”的为出厂默认参数:可编程参数表(英文对照)1、飞行模式1.1 固定翼模式下,油门达到5%启动电机,无缓启动,油门响应迅速;1.2 直升机线性模式下,油门达到5%启动电机,有缓启动,马达在设定的缓启动时间内加速至当前油门应有转速;1.3 直升机精灵定速模式下,油门达到40%启动电机,有缓启动,马达在设定的缓启动时间内完成转速标定进入定速运行状态。
无人机设计(基于UG的固定翼滑翔式飞机的机械部分)

基于UG的滑翔式无人机设计(机械部分)完成日期:指导教师签字:评阅教师签字:答辩小组组长签字:答辩小组成员签字:摘要本文主要是以多用途民用固定翼滑翔式无人机为研究对象进行机身部分、动力系统的设计选用以及对于电子控制系统的简单要求,在设计上遵循模块化的制造理念,因为无人机在多个领域具备应用前景,需要在机身设计上遵循全天候、多功能、强适应性的制造要求。
而在机身设备的装载上也需要很强的装载能力,这样可以装载更多的电池,提供更强的续航能力。
在设计时尽量遵循自动化的原则,尽量减少操作者的命令发送的繁琐性,提高执行效率。
另外设计时要做到整体性原则,着重考虑无人人机整体的刚性、协调性、平顺性、节能性等等,在技术开发时特别要注意对于环境和人文生态的保护,考虑人与自然的协调发展。
通过技术的进步使人更加接近自然,让大自然更加接近我们的生活,全面协调可持续。
关键词:无人机;模块化;自动化;整体性;可持续AbstractThis article is mainly to civilian fixed-wing sail-type unmanned aerial vehicles to study body parts, powertrain design and simple requirements for electronic control systems, designed to follow the modular manufacturing concept, for UA V applications in many fields, need to follow on design all weather, multifunctional, resilient manufacturing requirements. Equipment mounted in the fuselage also need a strong loading capacity, so you can load more battery, providing more power. As possible in the design follows the principle of automation, minimizing the operator's commands sent by red tape, improve execution efficiency. Also designed to achieve wholeness, especially considering no one of the man-machine overall rigidity, balance, comfort, energy efficiency, and more in technology development with special attention to the environment and human ecology protection, taking into account the harmonious development of man and nature. Through advances in technology are all the more close to nature and nature closer to my life.key words: UA V; modular automatic; holistic;sustainable目录1绪论 (1)1.1题目背景及目的 (1)1.2 国内外研究状况 (1)1.3题目研究思路 (2)2民用固定翼滑翔式无人机机械部分设计与分析 (3)2.1固定翼滑翔式无人机设计基础 (3)2.1.1机身材料的选用 (3)2.1.2 机身动力系统以及材料的选用 (3)2.1.3机身整体机械部分的装配设计 (3)2.2 机身机械性能的设计与分析 (3)2.2.1整体机械外观部分的设计 (3)2.2.2动力系统的匹配与分析 (6)3对于机载电子控制系统的应用与实现功能的要求与分析 (7)3.1电子控制系统主要分析思路 (7)3.2基本功能实现效果与要求 (7)4民用固定翼滑翔式无人机实现的功能与效果要求分析 (8)4.1机械与动力部分实现效果与要求 (8)4.2机械与动力部分同电子控制系统的整体匹配的效果与要求 (8)5 地面终端以及联系网络的功能、效果与要求分析 (9)6展望与市场前景 (13)7目前我国的无人机市场分析 (14)参考文献 (17)致谢 (18)1绪论1.1题目的背景及目的飞机(Fixed-wing Aircraft)作为人类历史上的伟大发明,自20世纪初美国莱特兄弟发明发展到今天。
WFT09(S)II 简易说明书 CN

1024/4096PCMS九通道2.4GHz遥控器感谢选用天地飞产品。
请在使用前详细阅读使用说明书,确保使用安全。
●售后服务●安全提示●产品配置如果您忽略此标志所指的操作说明,而做出错误的操作,有可能会造成使用者或他人死亡等严重危险伤害。
如果您忽略此标志所指的操作说明,而做出错误的操作,有可能会造成使用者或他人严重伤害或物品损坏。
如果您忽略此标志所指的操作说明,而做出错误的操作,有可能会造成使用者或他人的伤害或者物品损坏。
任何情况下都禁止尝试的操作。
任何情况下都请您务必遵守。
标志含义危险警告注意禁止务必遵守1.本使用说明书所记载的产品,在国内的无线电法令规定下,用途仅限于模型应用。
2.本产品在改装、调整、更换零件后,本公司将不负任何责任,敬请谅解。
本产品的用途、改装等注意事项1.WFLY 产品自购买之日起,属于质量问题一年内由深圳市天地飞科技开发有限公司免费保修(公司承担往返邮费)。
2.WFLY 产品自购买之日起七天内,在正常使用的情况下出现质量问题,外观无损坏,可凭保修卡及购机凭证在经销商处免费更换同型号产品;经销商收到更换产品时必须第一时间通知公司予以备案更换。
3.WFLY 产品将由深圳市天地飞科技开发有限公司提供终身售后服务;对于自购买之日起,人为损坏、改装、开盖损坏封条以及超过一年免费保修期的,用户必须支付往返邮费、材料成本费及维修成本费用。
4.为确保您的权益受到保护,并能及时有效的为您服务。
请在购买WFLY 产品时务必完整填写好保修卡及索要购机凭证;由销售商签字盖章。
用户享受本售后服务条款必须提供保修卡及购机凭证,缺一不可;销售商没有给消费者保修卡或不按要求填写的,由销售商承担全部的售后服务费用。
5.本售后服务条款仅限于中国大陆销售的WFLY 产品。
售后服务注意警告安全提示 (注意事项)在使用前请确认商品的配件是否都有备齐,接收机是否已经正常连接三线开关,舵机,遥控器与接收机是否都连接好了电源,以及确认是否都可开启并且有正确的动作后再使用。
固定翼无人机技术-固定翼无人机概述

1.2
固定翼无人机的飞行环境
大气飞行环境
空气的性质与标准大气 飞行中各种高度
大气飞行环境
包围地球的空气层称为大气层,是航空器唯一的飞行环境,也是导弹与航天器飞 行的重要环境。
大气密度随高度的变化
大气的分层
按大气温度随高度分布的特征,可把大气分成对流层、平流层(旧称同温层)ຫໍສະໝຸດ 中间层、热层和散逸层。非杀伤
杀伤
军 用 靶
机
探 测 无 人
机
通 信 中 继 无 人
机
毁 伤 评 估 无 人
机
边 海 防 巡 逻 无 人
机
电 子 侦 察 无 人
机
图 像 侦 察 无 人
机
电 子 战 无 人
机
察 打 一 体 无 人
机
反 辐 射 无 人
机
对 地 攻 击 无 人
机
空 战 无 人
机
反 潜 无 人
机
炮 火 校 射 无 人
k= −
(1-2)
式中 k——体积压缩率:Pa−1;V——流体的体积:m3;ΔV——流体体积的变化量:m3; Δp——流体压强的变化量:Pa;
空气的性质
3. 黏性与雷诺数
流体流动时,在流体内部产生阻碍运动的摩擦力的性质称做流体的黏性。黏性是流 体物理性质中最重要的性质。
流体产生黏性的最主要的原因有两条:一是流体分子之间的吸引力产生阻力;二是 流体分子做不规则的热运动的动量交换产生阻力。
固定翼无人机概述
固定翼无人机概述
1.1
固定翼无人机的定义
概念辨析
特点与分类
概念辨析
固定翼无人机是由动力装置产生推力/拉力,由固定机翼产生升力,在大气层中飞 行的重于空气的航空器。
通用技术制作滑翔机使用说明

通用技术制作滑翔机使用说明嘿,朋友们,今天咱们来聊聊怎么制作一架滑翔机。
这可不是什么高大上的工程,咱们就用简单的材料,动动脑筋,来个快乐DIY。
咱们得准备一些基本材料,比如硬纸板、剪刀、胶水,还有一根木棍。
别小看这根木棍,它可是咱们的“飞机桅杆”,没有它,滑翔机就像没头苍蝇一样乱飞。
好了,先把纸板裁成一个简单的机身,记得形状要流线一点,才能飞得更远。
想象一下,咱们的滑翔机就像一只小鸟,翅膀张开,准备翱翔天际。
咱们要制作翅膀。
翅膀的大小可不能随便哦,太大了飞不起来,太小了就像纸飞机一样。
可以把纸板裁成长方形,四周稍微修整一下,像是给它做了一套时尚的“衣服”。
再把翅膀固定到机身上,记得用胶水好好粘牢,毕竟飞起来的时候可不能掉啊。
嘿嘿,想象一下,咱们的滑翔机飞起来的样子,真是酷毙了!咱们要装上“引擎”。
虽然咱们的滑翔机没有真正的引擎,但可以用一些小的重物,比如硬币,来平衡飞机的重心。
把它们放在机身的前面或者后面,找到最佳的平衡点。
这样一来,滑翔机飞起来的时候就不会翻滚,稳稳当当的飞行,真是像个专业的飞行员呢!测试的时候也别忘了带上好心情,心态放松才能飞得更远。
咱们找个宽敞的地方来试飞。
可以是在公园、操场,或者家里的阳台,只要有足够的空间就行。
手握滑翔机,深吸一口气,仿佛自己变成了大鸟,轻轻一抛,滑翔机就像离弦之箭一样飞了出去。
哇,感觉好棒啊!看着它在空中划出优美的弧线,仿佛时间都停住了。
飞行的瞬间,那种自由的感觉,真是让人心旷神怡。
如果第一次飞得不太好,也没关系,这就是乐趣所在嘛。
可以调整翅膀的角度,或者增加一些重物,继续尝试。
每一次的失败都是成功的垫脚石,慢慢来,飞得越来越好,简直像个飞行专家了!别忘了跟朋友们分享这份快乐,大家一起试飞,增进感情,岂不是一举两得?咱们还可以为滑翔机装饰一下,给它画上炫酷的图案,或者贴上亮闪闪的贴纸。
让你的滑翔机与众不同,飞起来的时候也能引起路人的注意,简直是个小明星。
天地飞新9通新说明书(中文)

目录
39 8 油门曲线设置 41 9 螺距曲线设置 42 10反扭矩混控设置 43 11微调设置 44 12熄火设置 45 13飞行模式开关 46 14油门锁定设置 47 15失控设置 48 16定时器 49 17高级设置
高级设置 49 1 陀螺仪感度混控 50 2 油门悬停设置 51 3 螺距悬停设置 52 4 螺距调节 53 5 空中微调 54 6 延时设置 55 7 定速器混控设置 56 8 十字盘油门温控 57 9 曲线设置 58 10可编程普通混控 59 17可编程曲线混控 60 21油针气门混控 61 22对码
② 基 础操作/编 辑 、调整 操 作方法 ( 第 16 页 ) 了 解各按 键 功能... . .
③ 了 解显示 界 面/菜单( 第 18 页) 初 始界面/参 数 设置/高级 设 置/系统设 置. ....
设置
①常用功能与操作(第 27 页) ②调试实例(第 21 页)
以 电动直 升 机450为 例.. . . . . ③详尽参考(第 31 页)
各功能菜单的详尽解说
飞行
①接收机连接方法(第 4 页) ②接收机对码(第 27 页) ③失控设置(第 28 页) ④安全关机方法(第 28 页)
第5页
产品配置
WFT09SII配 置/ WFT09II配 置
开始前,请检查相机包装内是否包含以下物品。如有缺失,请与经销商联系
W F R 0 9 S接 收 机
电
源: 4.8-6V
尺
寸 : 4 4 . 8×2 7 . 9×1 6.39mm
重
量: 14.8g
■ 采用了双核,双天线,双路接收。 ■ 可选择最佳的信号。 ■ 提高了响应速度。 ■ 增加使用距离。 ■ 增强了可靠性和抗干扰性。
- 1、下载文档前请自行甄别文档内容的完整性,平台不提供额外的编辑、内容补充、找答案等附加服务。
- 2、"仅部分预览"的文档,不可在线预览部分如存在完整性等问题,可反馈申请退款(可完整预览的文档不适用该条件!)。
- 3、如文档侵犯您的权益,请联系客服反馈,我们会尽快为您处理(人工客服工作时间:9:00-18:30)。
ASSEMBLY AND OPERATING INSTRUCTIONS
1
读万卷书行万里路
读万卷书 行万里路
1
GLIDER SOLO Specifications: Length: 930mm Wingspan: 1500mm
Wing Area: 26.5dm2 Wing Loading: 27g/dm2
Flying Weight: 715g
读万卷书 行万里路 1
Please read carefully before use SOLO RTF.
Remark: this glider has two horizontal tails: V-tail and T-tail.
Safety Precautions:
★ This electric R/C model plane is not a toy. ★
Skill level is designed for the intermediate pilot with some flying and building experience.
★ Children younger than 14 years old must use it accompanied by an adult.
★ Please choose an open place to fly away from buildings and overhead power lines.
★ Please always put safety first and operate in a safe and reasonable manner.
bridgeskyrc
The battery must be fully charged before attempting to fly this model.
Battery Charging:
T o charge the battery, connect the white lithium balance connector of the battery to your charger and connect the charger to a suitable 11.1v battery. The green charging light will illuminate indicating that the battery is charging correctly. When the green light is no longer illuminated the battery is ready to use. Charging time will be approximately 2.5 hours, but this will vary depending upon the condition of the battery and the charge remaining in it at the time of charging.
Important Safety Note:
When charging the battery, it is important to keep battery and charger under observation and never to leave them unattended.
1
读万卷书行万里路。