SAP界面操作简介
(实施)SAP基本操作完整版.

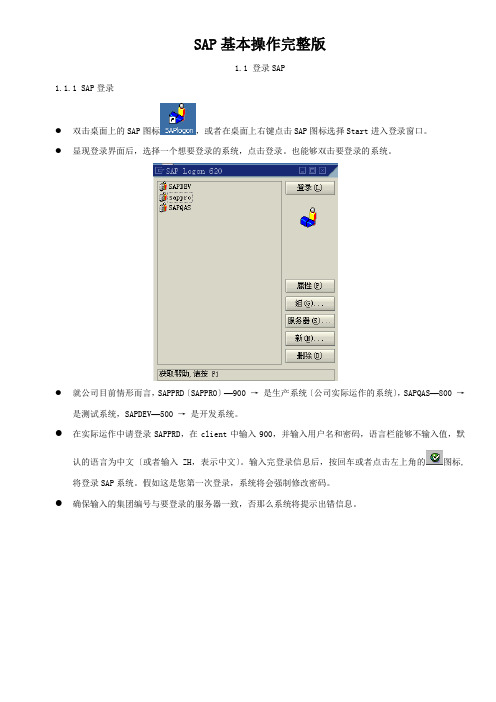
(实施)SAP基本操作完整版第1章启动和关闭SAP系统1.1 登录SAP1.1.1 SAP登录●双击桌面上的SAP图标,或者在桌面上右键点击SAP图标选择Start进入登录窗口。
●出现登录界面后,选择一个想要登录的系统,点击登录。
也可以双击要登录的系统。
●就公司目前情况而言,SAPPRD(SAPPRO)—900 →是生产系统(公司实际运作的系统),SAPQAS—800 →是测试系统,SAPDEV—500 →是开发系统。
●在实际运作中请登录SAPPRD,在client中输入900,并输入用户名和密码,语言栏可以不输入值,默认的语言为中文(或者输入ZH,表示中文)。
输入完登录信息后,按回车或者点击左上角的图标,将登录SAP系统。
如果这是您第一次登录,系统将会强制修改密码。
●确保输入的集团编号与要登录的服务器一致,否则系统将提示出错信息。
1.1.2 修改密码●在以上界面输入登录信息后,可点击工具条上的按钮进入修改密码状态。
●在新口令和重复口令中输入新的密码。
●输入完成后点击按钮或者按回车,系统将会保存新的密码。
●如果这是你第一次登录,系统将会出现提示修改密码窗口。
首先在弹出的对话框中点击OK,然后两次输入新的密码,点击按钮或者按回车,系统将会保存新的密码。
●为保证用户的安全性,SAP管理规定中设计SAP的密码不少于6位,每两个月系统自动提示修改密码,且修改的密码不能与前5次的密码相同。
●输入了登录信息,按回车键或者点击左上角的图标,将登录SAP系统。
1.2退出SAP系统1.2.1 退出SAP系统●可以从SAP系统的任意一个屏幕退出。
●从菜单栏,选择“系统”退出系统。
●点击所有运行屏幕右上角的按钮。
●在SAP初始界面中点击按钮退出。
●系统将弹出对话框,选择“是”即可退出SAP系统。
第2章SAP窗口2.1 窗口简介成功登陆后进入到SAP的初始界面,也就是会话管理界面,从这个界面我们可以对SAP进行事物操作。
sap基本操作

sap基本操作SAP基本操作SAP(System Analysis and Program Development)是一套企业资源计划(ERP)软件,被广泛应用于各个行业中的企业管理和运营。
掌握SAP基本操作,对于提高工作效率和准确性非常重要。
本文将介绍一些常用的SAP基本操作。
一、登录SAP系统打开SAP软件,并输入正确的用户名和密码来登录SAP系统。
登录成功后,可以看到SAP的主界面。
二、导航菜单在SAP主界面的顶部有一个导航菜单,通过导航菜单可以快速访问各个模块和功能。
常用的导航菜单包括:采购、销售、库存管理、财务会计等。
点击相应的导航菜单,可以进入对应的功能页面。
三、主数据管理在SAP系统中,主数据是指一些常用的、重要的数据信息,如供应商、客户、物料等。
通过主数据管理功能,可以对这些数据进行维护和管理。
例如,可以添加新的供应商、修改客户信息、更新物料价格等。
四、交易数据录入在SAP系统中,交易数据是指一些具体的业务操作,如采购订单、销售订单、收款等。
通过交易数据录入功能,可以在系统中输入这些业务数据,并进行相应的处理和跟踪。
例如,可以录入采购订单,填写相关的物料、数量和价格等信息,然后保存订单并发送给供应商。
五、报表和查询SAP系统提供了丰富的报表和查询功能,可以根据需要生成各种统计和分析报告。
通过报表和查询功能,可以实时监控企业的运营情况,了解各个方面的数据指标。
例如,可以生成销售报表,查看销售额、销售量、客户分布等信息,并进行比较和分析。
六、批量处理在SAP系统中,批量处理功能可以帮助用户批量处理一些重复性的操作,提高工作效率。
例如,可以批量导入供应商数据、批量更新物料价格、批量审批采购订单等。
通过批量处理功能,可以快速完成大量的操作,减少手动输入和处理的时间。
七、系统设置和个性化SAP系统支持用户进行个性化设置,根据自己的需求调整界面布局、显示字段、快捷键等。
通过个性化设置,可以提高工作效率和舒适度,使系统更加符合个人的使用习惯。
SAP操作简介
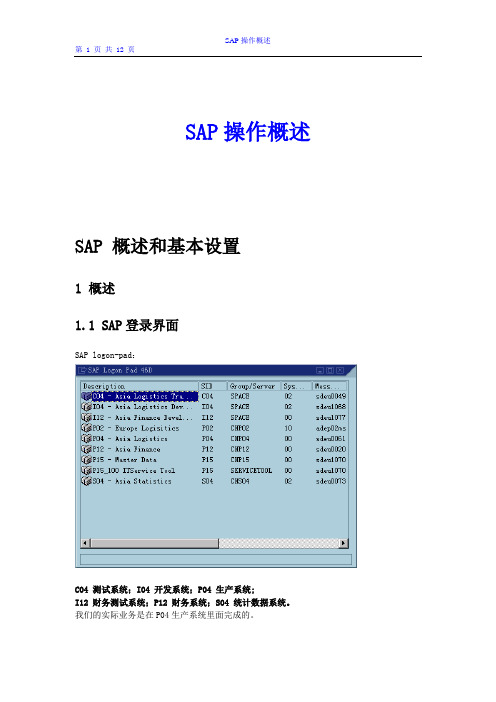
SAP操作概述SAP 概述和基本设置1 概述1.1 SAP登录界面SAP logon-pad:C04 测试系统;I04 开发系统;P04 生产系统;I12 财务测试系统;P12 财务系统;S04 统计数据系统。
我们的实际业务是在P04生产系统里面完成的。
鼠标双击,进入系统:输入用户名和密码,LANGUAGE一栏输入:ZH(表示使用中文登录):对于第一次登录系统的用户,系统会自动弹出下面的界面:请在这里输入便于你自己记忆的新的密码。
请务必将自己的用户名和修改以后的新密码抄在自己以后方便查找的地方,切勿忘记。
SAP 登录密码是可以更改的,大家可以按界面左上方的按钮来随时更改密码。
按下以后系统也会出现界面:新密码请务必牢记!如果重复使用同一个用户名登录,系统会出现下面的界面:在P04、P12、S04等生产系统中,尽量不要重复登陆。
如实在有必要,在第2次登陆完成所需工作后,立即退出系统。
C04中不受此限制。
1.2 SAP 主画面窗口SAP 主画面窗口:在左上角的空白处输入事务代码。
事务代码相当于一个命令,不同的命令便于我们在系统中做不同的操作。
例如:VA01(创建销售订单)/O VA01 表示在一个新的SAP窗口下打开VA01(创建销售订单)。
使用同一个用户登录SAP系统的时候,最多可以同时开6个SAP窗口。
/N VA01 表示在本SAP窗口下转换到VA01(创建销售订单)中去。
点击下拉菜单可以显示出最近用过的事务代码。
工具条的意思:2 基本设置在我们第一次使用SAP 运行事务代码之前,我们最好还要看看一些基本设置。
第一个是关于事务代码能否显示出来的设置。
点击主画面菜单栏―――细节―――设置:第一页上一页下一页 最后一页回车返回退出取消保存帮助多开一个SAP 主画面窗口输入事务处理代码弹出界面:将“显示技术名称”点勾。
然后点击。
这里说的“技术名称”就是事务代码的意思。
这样设置以后,我们就可以在SAP主画面窗口里面看到事务代码在事务描述前面显示出来了,如下图所示:如果这里不做设置,那么SAP主画面窗口下事务代码是不会显示出来的,只能显示事务描述。
SAP基本操作完整版
SAP基本操作完整版1.1 登录SAP1.1.1 SAP登录●双击桌面上的SAP图标,或者在桌面上右键点击SAP图标选择Start进入登录窗口。
●显现登录界面后,选择一个想要登录的系统,点击登录。
也能够双击要登录的系统。
●就公司目前情形而言,SAPPRD〔SAPPRO〕—900 →是生产系统〔公司实际运作的系统〕,SAPQAS—800 →是测试系统,SAPDEV—500 →是开发系统。
●在实际运作中请登录SAPPRD,在client中输入900,并输入用户名和密码,语言栏能够不输入值,默认的语言为中文〔或者输入ZH,表示中文〕。
输入完登录信息后,按回车或者点击左上角的图标,将登录SAP系统。
假如这是您第一次登录,系统将会强制修改密码。
●确保输入的集团编号与要登录的服务器一致,否那么系统将提示出错信息。
1.1.2 修改密码●在以上界面输入登录信息后,可点击工具条上的按钮进入修改密码状态。
●在新口令和重复口令中输入新的密码。
●输入完成后点击按钮或者按回车,系统将会储存新的密码。
●假如这是你第一次登录,系统将会显现提示修改密码窗口。
第一在弹出的对话框中点击OK,然后两次输入新的密码,点击按钮或者按回车,系统将会储存新的密码。
●为保证用户的安全性,SAP治理规定中设计SAP的密码许多于6位,每两个月系统自动提示修改密码,且修改的密码不能与前5次的密码相同。
●输入了登录信息,按回车键或者点击左上角的图标,将登录SAP系统。
1.2退出SAP系统1.2.1 退出SAP系统●能够从SAP系统的任意一个屏幕退出。
●从菜单栏,选择〝系统〞退出系统。
●点击所有运行屏幕右上角的按钮。
●在SAP初始界面中点击按钮退出。
系统将弹出对话框,选择〝是〞即可退出SAP系统。
第2章 SAP窗口2.1 窗口简介成功登陆后进入到SAP的初始界面,也确实是会话治理界面,从那个界面我们能够对SAP进行事物操作。
系统中的任何操作可称作SAP的一次事务处理。
SAP系统基本操作手册
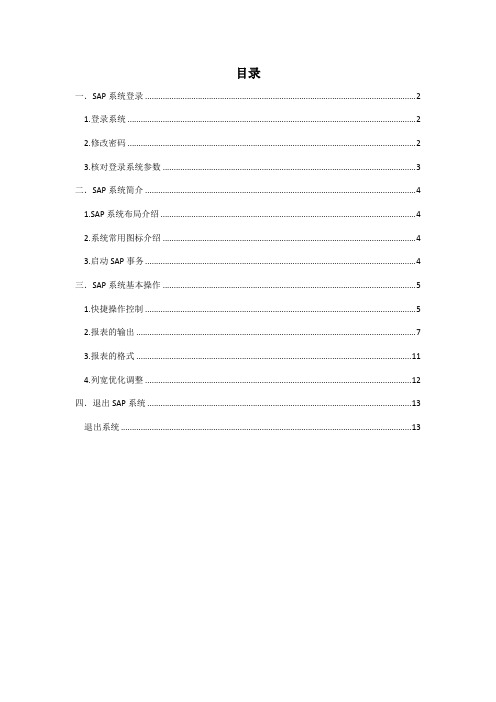
目录一.SAP系统登录 (2)1.登录系统 (2)2.修改密码 (2)3.核对登录系统参数 (3)二.SAP系统简介 (4)1.SAP系统布局介绍 (4)2.系统常用图标介绍 (4)3.启动SAP事务 (4)三.SAP系统基本操作 (5)1.快捷操作控制 (5)2.报表的输出 (7)3.报表的格式 (11)4.列宽优化调整 (12)四.退出SAP系统 (13)退出系统 (13)一.SAP 系统登录1.登录系统在登录初始界面,双击要登录的系统,例如600(测试系统);或者选中后,点击登录按钮,进入到1-1界面,如图。
登录初始界面图图1-12.修改密码 点击上图新密码按钮,输入新的口令并保存。
如下图1-2:用户名密码集团代码图1-23.核对登录系统参数填写完相关信息,单击左上角按钮或回车进入600系统,可检查当前登录系统的参数。
如下图:二.SAP1.SAP2.系统常用图标介绍3.启动SAP事务:路径/事务码(1)菜单路径进入(2)直接在命令行输入事务代码(注:SAP不区分大小写)菜单栏(3)当不在SAP主屏幕时,命令前增加“/n”,系统将切换至另一屏幕。
(4)如要开启新屏幕但不关闭当前屏幕,命令前加“/o”(5)创建新主屏幕,点击图标。
三.SAP系统基本操作1.快捷操作控制(1)显示SAP路径中的事务码,如图比较:(2)显示技术代码,适用于各界面内的代码显示,如MM01.显示事务代码2.报表的输出(1).用户可以根据自己的需要将常使用的输入数据保存成为变式,在下次使用时只需选择变式,然后执行,同样的查询条件执行结果仍然是你需要查询的结果。
以查询采购订单为例,使用事务码ME2L进入下面的屏幕:输入查询条件后,点击保存,也可从系统菜单转到--变式--另存为变式,如下图:如查询条件全部输入,固定字段后,需输入变式名称和描述后点击保存按钮。
见下图屏幕:设置变量左下角显示:点击保存后,初始屏幕点击获取变式按钮,如图:获取变式(2)以ME2L查询采购订单执行变式T-001为例,3种报表的输出方法,如下图:点击图标,输出到本地文件,保存指定路径。
sap操作流程详解

sap操作流程详解SAP(Systems, Applications, and Products in Data Processing)是一种企业资源规划(ERP)软件,被广泛应用于全球各行各业的企业中。
它能够帮助企业管理各种业务流程,包括财务、采购、销售、生产等。
在使用SAP时,用户需要按照一定的操作流程来进行操作,下面将详细介绍SAP的操作流程。
首先,用户需要登录SAP系统。
在登录界面输入用户名和密码后,系统会验证用户的身份并进入主界面。
在主界面上,用户可以看到各种功能模块,如财务、采购、销售等。
接下来,用户需要选择相应的功能模块进行操作。
比如,如果用户想要进行采购操作,就需要进入采购模块。
在采购模块中,用户可以进行采购订单的创建、审批、跟踪等操作。
在进行具体操作时,用户需要按照系统给出的步骤来进行。
比如,在创建采购订单时,用户需要填写供应商信息、物料信息、数量、价格等。
系统会根据用户输入的信息生成采购订单,并自动更新到系统中。
在操作过程中,用户还可以进行数据查询、报表生成等操作。
SAP系统提供了丰富的报表功能,用户可以根据需要生成各种报表,如财务报表、销售报表等,帮助企业管理者进行决策分析。
除了基本的操作流程外,用户还可以根据需要进行系统配置和定制。
SAP系统具有高度的可定制性,用户可以根据自己的业务需求进行配置,使系统更符合企业的实际情况。
总的来说,SAP的操作流程是一个系统化、标准化的过程,用户需要按照一定的步骤来进行操作。
通过合理的使用SAP系统,企业可以提高工作效率、降低成本,实现业务流程的优化和管理。
希望以上介绍对您有所帮助。
sap系统操作流程
sap系统操作流程SAP系统操作流程一、概述SAP(Systems, Applications and Products)是全球领先的企业管理软件系统,被广泛应用于各个行业的企业中。
使用SAP系统可以实现企业各个部门的信息共享与协同,提高工作效率,优化业务流程。
本文将介绍SAP系统的操作流程,帮助用户更好地使用SAP 系统。
二、登录SAP系统首先,用户需要打开计算机,并确保计算机已连接到公司的网络。
然后,打开SAP软件,并在登录界面输入正确的用户名和密码。
登录成功后,用户将进入SAP系统的主界面。
三、主界面导航SAP系统的主界面通常由菜单栏、工具栏和工作区组成。
用户可以通过菜单栏和工具栏上的按钮来访问系统的各个功能模块和操作。
在工作区内,用户可以打开、编辑、保存和关闭各种工作对象,如报表、表格、订单等。
四、功能模块选择SAP系统提供了丰富的功能模块,涵盖了企业管理的各个方面,包括财务会计、人力资源、采购管理、销售管理、生产计划等。
用户根据自己的工作需要,在菜单栏或工具栏上选择相应的功能模块进行操作。
五、操作流程1. 创建新的工作对象:在选择了相应的功能模块后,用户可以通过点击工具栏上的“新建”按钮,或选择菜单栏上的“文件”-“新建”命令来创建新的工作对象。
根据具体的功能模块,用户需要填写相关的字段和选项,如订单号、客户信息、产品类型等。
2. 编辑和保存工作对象:用户可以在工作区内对已创建的工作对象进行编辑和保存操作。
通过双击工作对象,用户可以进入编辑模式,修改相关内容。
在编辑过程中,用户可以使用工具栏上的各种功能按钮,如剪切、复制、粘贴、撤销、重做等。
编辑完成后,通过点击工具栏上的“保存”按钮,或选择菜单栏上的“文件”-“保存”命令,用户可以保存已修改的工作对象。
3. 查找和浏览工作对象:用户可以使用SAP系统提供的搜索功能,在系统中查找和浏览已创建的工作对象。
通过菜单栏上的“编辑”-“查找”命令,用户可以输入关键字进行搜索。
SAP系统基本操作及技巧
SAP系统基本操作及技巧SAP系统是一种企业资源规划软件,被广泛应用于各种企业和组织中,涵盖了财务、物流、人力资源、销售等方面的功能。
本文将介绍SAP系统的基本操作和一些技巧,帮助用户更加高效地使用该软件。
SAP系统介绍SAP系统是一种大型的企业资源规划软件,由SAP公司开发。
该软件涵盖了财务、物流、人力资源、销售等方面的功能,可以帮助企业实现资源整合和流程优化。
SAP系统具有界面友好、功能强大、稳定可靠的特点,被广泛应用于各种企业和组织中。
SAP系统基本操作在使用SAP系统之前,需要首先进行登录。
SAP系统的登录界面如下图所示:1. 打开SAP Logon程序;2. 选择应用服务器;3. 输入用户名;4. 输入密码;5. 点击“Logon”按钮。
SAP登录界面SAP登录界面登录成功后,将会进入SAP Easy Access界面。
该界面显示了用户常用的SAP模块和功能的菜单,如下图所示:SAP Easy Access界面SAP Easy Access界面用户可以根据自己的需求选择相应的功能和模块进行操作。
下面列举了几个常用的SAP功能和操作。
创建销售订单1.进入“Sales and Distribution”-“Sales”-“Order”菜单;2.点击“Create”按钮;3.在弹出的界面中输入订单相关信息,如客户名称、物料编号、数量等;4.点击“Save”按钮保存该订单。
查看库存1.进入“Logistics”-“Materials Management”-“Inventory Management”菜单;2.点击“Display Stock Overview”按钮;3.在弹出的界面中输入物料编号;4.系统将显示该物料的库存信息。
创建供应商发票1.进入“Logistics”-“Materials Management”-“Invoice Verification”菜单;2.点击“Enter Invoice”按钮;3.在弹出的界面中输入发票相关信息,如供应商名称、物料编号、数量、价格等;4.点击“Save”按钮保存该发票。
- 1、下载文档前请自行甄别文档内容的完整性,平台不提供额外的编辑、内容补充、找答案等附加服务。
- 2、"仅部分预览"的文档,不可在线预览部分如存在完整性等问题,可反馈申请退款(可完整预览的文档不适用该条件!)。
- 3、如文档侵犯您的权益,请联系客服反馈,我们会尽快为您处理(人工客服工作时间:9:00-18:30)。
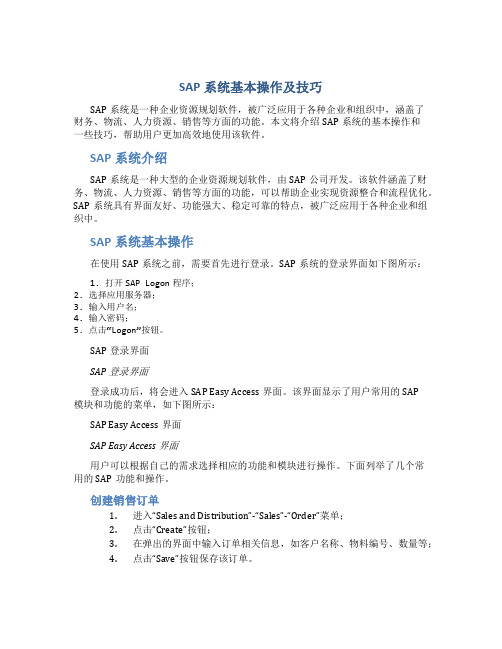
© SAP AG 1999Screen ElementsI42 (1) (400)iwdf4042INSInput field1st selection 2nd selection 3rd selection 4th selection 5th selection ChangeDisplay2nd selection 1st selection 3rd selectionGreen light; positive Yellow light; neutralOverviewExecuteMessagePushbuttonCheckboxesCommand fieldStandard toolbarRadio buttonMenu barApplication toolbarInput fieldTabMenu Edit Favorites Extras System HelpSystem function name : ActivityThis screen is made up of various screen elements. It does not exist in the system.Options⏹Command field: You can use the command field to go to applications directly by entering the transaction code. You can find the transaction code either in the SAP Easy Access menu tree (see next slide) or in the relevant application under System → Status .⏹ Menu bar: The menus shown here depend on which application you are working in. These menus contain cascading menu options.⏹Standard toolbar: The icons in the system function bar are available on all R/3 screens. Any icons that you cannot use on a particular screen are dimmed. If you leave the cursor on an icon for a moment, a small flag will appear with the name (or function) of that icon. You will also see thecorresponding function key. The application toolbar shows you which functions are available in the current application.⏹ Title bar: The title bar displays your current position and activity in the system.⏹ Check boxes: Checkboxes allow you to select several options simultaneously within a group. ⏹ Radio buttons: Radio buttons allow you to select one option only.⏹ Status bar: The status bar displays information on the current system status, for example, warning and error messages.⏹ A tab provides a clearer overview of several information screens. ⏹Options: You can set your font size, list colors, and so on here.NavigationContents:SAP AG 1999Logging on to the R/3 SystemLog offNew passwordUser System HelpSAP R/3Client User PasswordLanguageiwdf4042OVR⏹The R/3 System is a client system . The client concept enables the joint operation, in one system, of several enterprises that are independent of each other in business terms. During each user session you can only access the data of the client selected during the logon.⏹A client is, in organizational terms, an independent unit in the R/3 System. Each client has its own data environment and therefore its own master data and transaction data, assigned user master records and charts of accounts, and specific customizing parameters.⏹ A user master record linked to the relevant client must be created for users to be able to log on to the system.⏹ To protect access, a password is required for logon.The password is hidden as you type (you only see asterisks).⏹ SAP systems are available in several languages. Use the Language input field to select the logon language for each session.⏹Multiple logons are always logged in the system beginning with Release 4.6. This is for security as well as licensing reasons. A warning message appears if the same user attempts to log on twice or more. This message offers three options:• Continue with current logon and end any other logons in the system• Continue with current logon without ending any other logons in the system (logged in system) • Terminate current logonSAP AG 1999SAP Easy Access - StandardSAP Easy AccessOffice Logistics AccountingHuman ResourcesPPMDT - Manager 憇 Desktop Personnel management Time management Payroll accounting Training and eventsOrganizational management Travel management Information system Information Systems ToolsInboxAccounts payable Create FD01Change FD02Display FD03Accounts receivableFavoritesSAP standard menuOther menuCreate menu Assign users DocumentationI42 (1) (400)iwdf4042INSMenu Edit Favorites Extras System Help⏹SAP Easy Access is the standard entry screen displayed after logon. Using the menu path Extras → Set start transaction you can select a transaction of your choice to be the default entry screen after logon.⏹You navigate through the system using a compact tree structure that you can adapt to your ownspecific requirements. Use the menu path Extras → Settings to change your view of the tree structure. You can use this to display technical names (transaction codes).⏹ You can also create a Favorites list of the transactions, reports, files and Web sites you use most. ⏹You can add items to your favorites list using the Favorites menu option or by simply dragging & dropping them with the mouse.SAP AG 1999Selecting Functions...FavoritesSAP standard menuSAP Easy AccessOther menuCreate menuAssign usersDocumentation/nFD03卽sing the menu path卽sing the technical name (transaction codes)卽singFavorites or the tree structureCreate sessionEnd session User profile Services Utilities List Workflow Links Private notes Own spool requests Own jobs Short messages Status...Log offMenu Edit Favorites Extras System HelpYou can select system functions in the following ways:⏹Use the mouse to choose • Menu options • Favorites• Other options in the tree structure (tree control)⏹ Use the keyboard (ALT + the underlined letter of the relevant menu option) ⏹Enter a transaction code in the command field :• A transaction code (T-Code) is assigned to each function in R/3 (not each screen). • You can access the assigned transaction code from any screen in the R/3 System.• You can find the transaction code for the function you are working in under the Status option of the System menu.• For example, to display Accounts receivable master data, enter “/n” and the appropriate transaction code (in this case “/nfd03”).• Other possible entries:“/n” ends the current transaction. “/i” ends the current session.“/osm04” creates a new session and goes to the transaction specified (SM04).• You can also use the keyboard to get to the command field. Use the CTRL + TAB keycombination to make the cursor move from one (input) field group to the next. Use TAB to move between fields within a group.SAP AG 1999Role-Based User MenuSAP Easy AccessOther menuCreate menu Assign users DocumentationI42 (1) (400)iwdf4042INSFavorites User menuSchedule Manager Information system ClosingAccount master dataCreate Change DisplayDisplay changes Block / unblock Set deletion flag Confirmation of change CompareMaintain centrallyAccount balances and account items EntryPayment and clearing Editing optionsMenu Edit Favorites Extras System Help⏹ A role describes a set of logically linked transactions. These transactions represent the range of functions users typically need at their workstations.⏹Activity groups (user roles) have to be set up using the Profile Generator so that users of the SAP System can work with user-specific or position-related menus.The authorizations for the activities listed in the menus are also assigned to the users using activity groups. With Release 4.6, predefined activity groups (user roles) from all application areas are included in the standard system.⏹ Users who have been assigned to an activity group can choose between the user menu and the SAP standard menu.⏹The above screen shows the role-based user menu for the “Accounts Receivable Supervisor” as an example. You can find other roles that are supplied in the standard SAP System with thecorresponding activity groups using the Other menu pushbutton in the SAP Easy Access initial screen.SAP AG 1999Field Help - F1, F4Display Customer: Initial ScreenDisplay Customer: Initial ScreenCustomerCompany code 10001000IDESBecker BerlinCustomer account numberA unique key is used to clearly identify the customer within the SAP system.ProcedureWhen creating a customer master record, the user either enters the account number of the customer or has the system determine the number when the record is saved, depending on the type of number assignment used..Application help Technical infoF1F4Possible entriesFD03iwdf4042INSMessage Hit listDisplay Customer: Initial Screen Help - Display Customer: Initial ScreenRestrictions Customer Company code Company name City CurrencyRestrict number toNo restrictionRestrict Value Range⏹ Use F1 for help on fields, menus, functions and messages.⏹ F1 help also provides technical information on the relevant field. This includes, for example, the parameter ID, which you can use to assign values to the field for your user.⏹ Use F4 for information on what values you can enter. You can also access F4 help for a selected field using the button immediately to the right of that field.⏹If input fields are marked with a small icon with a checkmark, then you can only continue in that application by entering a permitted value.• You can flag many fields in an application to make them either required entry fields or optional entry fields. You can also hide fields using transaction or screen variants or Customizing.SAP AG 1999SAP Online HelpApplication help SAP library Glossary SAPNet Release notes Settings...Feedback SAP LibrarySAP Library Getting started Release notes Basis ServiceCross-Application Components Financials Human Resources LogisticsCopyright and ConventionsMenu Edit Favorites Extras System Help⏹ The R/3 System provides comprehensive online help. You can display the help from any screen in the system. You can always request help using the Help menu or using the relevant icon. ⏹The Help menu contains the following options:• Application help: Displays comprehensive help on the current application. Selecting this menu option in the initial screen displays help on getting started with R/3. • SAP Library: This is where all online documentation can be found. • Glossary: Enables you to search for definitions of terms.• Release notes: Displays notes which describe functional changes that occur between R/3 releases. • SAPNet: Enables you to log on to SAPNet.• Feedback: Enables you to send a message to the SAPNet R/3 Frontend, SAP’s service system. • Settings: Enables you to select settings for help.© SAP AG 1999System Functions - ServicesFavoritesSAP standard menuSAP Easy AccessOther menuDocumentationReporting Quick Viewer Output controller Table maintenance Batch input Fast entry Direct input CATT Jobs Queue SAP ServiceAppointment calendar Business WorkplaceMenu Edit Favorites Extras System HelpCreate sessionEnd session User profile Services Utilities List Workflow Links Private notes Own spool requests Own jobs Short messages Status...Log off⏹The System menu contains, among others, the following options:• Create/end session: Enables you to create and end sessions. You can work with up to 6 sessions at a time.• User profile: This is where you can enter user-specific settings. • Services: Takes you to important service functions (see below).• List: Contains important list functions, such as searching for character strings, saving in PC files, printing, and so on.• Status: Enables you to display important user and system data. • Log off: Ends the SAP R/3 session with a confirmation prompt.⏹The System → Services menu contains, among others, the following options: • Reporting: Starts reports (ABAP programs).• Output controller: This is where you manage user-specific print requests. • Table maintenance: This is where you process tables and views. • Batch input: Administers batch input sessions and data transfer.• Jobs: This is where you can administer jobs that are processed in the background. • SAP Service: Enables you to log on to SAP’s SAPNet R/3 Frontend.SAP AG 1999System Functions - User ProfileUserLast changed by Start menu Logon language Output immediately Delete after output MUSTER ADMINDecimal notation01.01.2000 12:00:00Status SavedDate formatCATTDD.MM.YYYY MM/DD/YYYY MM-DD-YYYY YYYY.MM.DDYYYY/MM/DDPersonal timezoneOutput controllerAddress Defaults Parameters 1.234.567,891,234,567.891 234 567,89Maintaining your user profileI42 (1) (400)iwdf4042INSUser Edit Goto System Help⏹Use the menu option System → User profile → Own data to set your own personal profile. You can choose between the Address, Defaults and Parameters tabs.• Address: You can create and maintain personal data here, for example, name,function, room number, telephone number, e-mail addresses and so on.• Defaults: Defaults include the date display format, the decimal notation format, the default printer, the logon language, and so on.• Parameters: Use this to assign entries to commonly-used fields. This is only available for input fields that have been allocated a parameter ID.Procedure for finding out a field’s Parameter ID : Go to the input field to which you want to assign a value. Choose F1, then the “Technical info” pushbutton. This opens a window that displays the corresponding parameter ID (if one has been allocated to the field) in the “Field data” section.⏹The User profile menu also contains, among others, the following options:• Hold data, Set data, Delete data. Use Hold data to keep data values that you have entered in fields in an application for the duration of a user session. When you call up the application again, you can overwrite these values. Once you have Set data , you can no longer overwrite these values and have to use Delete data if you want to enter different values.Table Settings - ExampleParameters ValueTextCompany code Processing group Bank keySales order type Choose Variants Maintain Variants Use as standard settingVariantSave Standard setting Current setting Create Delete AdministratorMy variant Basic settingTable Settings⏹Use the Table Settings function to change, in the table control, the individual basic table settings that are supplied with the system. This is particularly useful for tables where you do not need all the columns. You can use the mouse to drag & drop column positions and widths, or even make the column disappear.⏹Save the changed table settings as a variant . The number of different variants you can create per table is not restricted.⏹The first variant is called the basic setting ; the SAP System defines this setting. You cannot delete the basic setting (you can delete the variants you define yourself).⏹The table settings are stored with your user name. The system uses the variant currently valid until you exit the relevant application. If you then select the application again, the system will use the standard settings valid for this table.⏹Note: you can change table settings wherever you see the table control icon in the top right-hand corner of a table.⏹The R/3 System provides numerous options for settings and adjustments:•Define default values for input fields•Hide screen elements•Deactivate screen elements (shaded out).You can do this by, for example, defining transaction variants.If you preallocate all necessary parameters for parameter transactions, you do not need to go through the initial screen.These functions have been available in R/3 for several releases.⏹SAP now also includes the GuiXT. In addition to all the above functions, you can now: •Include graphics•Convert fields and add pushbuttons and text•Change input fields (or their F4 help results) into radio buttons⏹The GuiXT scripts are stored on the frontend. In accordance with local scripts, the GuiXT scriptsdetermine how data sent from the application server is displayed. These scripts can be standard throughout a company, or they can be different for each frontend.⏹As of Release 4.6, GuiXT is part of the SAP standard system.Navigation: Unit Summary。