凤凰160A电调说明书
Seaking Pro 120A 160A 无刷电调说明书

Connections1ESC/Radio Calibration2Program your ESC with the transmitter stick/trigger1Factory Reset3Start-up201Introduction06ESC Setup07ESC Programming(Those "black backgroud and white text" options are the factory default settings)08Explanations for LED Status09Explanations for Protections10Trouble Shooting• During the Start-up Process1) The RED LED flashes one time per 2 seconds and the motor beeps “B,B,B,B,...“ at the same time indicating the ESC doesn’t detect any throttle signal. 2) The GREEN LED flashes “Number” times indicating the number of Lipo cells you have connected to the ESC.• In Operation1) The RED LED & GREEN LED die out when the throttle stick is located at the neutral position.2) The RED LED turns on solid when your boat runs forward. The GREEN LED will also come on when moving the throttle stick to the full throttle (100%) endpoint. 3) The RED LED turns on solid when you reverse your boat.• When Some Protection is Activated1) The RED LED flashes a short, single flash that repeats (☆, ☆, ☆) indicating the low-voltage cutoff protection is activated. 2) The GREEN LED flashes a short, single flash that repeats (☆, ☆, ☆) indicating the ESC thermal protection is activated.• Low-voltage Cutoff ProtectionThe ESC will not cut off the output but reduce it to 50% when the ESC detects the battery voltage goes below the preset cutoff voltage for 1 second. The RED LED will flash a single flash repeatedly every time when you release the throttle trigger to the neutral position. • ESC Thermal ProtectionThe ESC will not cut off the output but reduce it to 50% when the ESC internal temperature goes above the preset value. The GREEN LED will flash a single flash repeatedly every time when you release the throttle trigger to the neutral position. The ESC will resume normal output after the temperature goes below 80℃(176℉).Note 3: Temperature here means the internal temperature of the ESC. It’s often 60 Fahrenheit degrees higher than the heat-sink temperature (of the ESC). • Throttle Signal Loss ProtectionThe ESC will cut off the output after it fails to detect any throttle signal for 0.1 second. The motor will immediately resume rotation after the signal is re-detected. We recommend activating the “Fail Save” function of the radio system and set it (F/S) to “Output OFF” or set its value to the “Zero-Speed Position” to ensure the motor can be stopped when there is no signal received from the transmitter.please refer to the user manual of Hobbywing’s WiFi Express.• Please keep the propeller away from your body and other objects.1. Running ModeOption 1: Forward OnlyThe boat can only go forward in this mode. This mode is usually for racing. Option 2: Forward/ReverseThe boat can also go backward in this mode. This mode is applicable to most applications. (Note: Please ensure that the drivetrain of your boat can reverse. Because the drivetrain with flexible shaft can only go in one direction, the reversal may damage the flexible shaft.) 2. Lipo CellsThe ESC will automatically calculate the number of Lipo cells you have plugged in as per the battery voltage it detects, if the voltage is below 8.8V, it will be identified as 2S Lipo; if the voltage is from 8.8V to 13.2V, it will be identified as 3S Lipo; and so on. If a battery pack is not fully charged before connecting it to the ESC, miscalculation may occur like a not fully charged 6S Lipo may be identified as a 5S Lipo. This may cause the Low-Voltage Cutoff Protection function abnormal. Therefore, you need to ensure that the battery you connect to the ESC is fully charged. If you only use one particular Lipo battery, we recommend manually setting the “Lipo Cells” to the specific option instead of using “Auto Calc.”, so the Low-voltage Cutoff Protection can always function properly. 3. Cutoff VoltageWhen using a LiPo battery, you need to set a proper cutoff voltage for your battery as per its discharge C count and the load. The ESC will monitor the battery voltage all the time, LVC(Low Voltage Cutoff) protection will be activated and the output power will be remarkably decreased when the battery voltage goes below the programmed cutoff voltage.A. How to calculate the cutoff voltage: cutoff voltage=cutoff voltage per cell * cell count. For instance, when setting the cutoff voltage per cell at 3.2V, the total cutoff voltage for a 3S Lipo should be 3.2V*3=9.6V.B. After entering the Low-Voltage Cutoff Protection: when the LVC protection is activated, the ESC will not cut off the output but reduce it to 50%. The RED LED will flash a single flash repeatedly every time when you release the throttle trigger to the neutral position. Please get your boat back immediately when this happens and change another fully charged battery. Warning! If you ignore the “hint” and keep using the battery will get your battery irreversibly damaged.C. When using a NiMH battery: because NiMH batteries don’t need this LVC protection, so you can set the “Cutoff Voltage” to “Disabled”. When you find the power is remarkably decreased in sailing, you only need to get the boat back immediately. 4. ESC Thermal ProtectionThe ESC will not cut off the output but reduce it to 50% when the ESC internal temperature goes above the preset value. The GREEN LED will flash a single flash repeatedly every time when you release the throttle trigger to the neutral position.The ESC will resume normal output after the temperature goes below 80℃ (176℉).5. BEC Voltage Option 1:6.0VIt’s applicable to ordinary servos. Do not use this option with high voltage servos; otherwise your servos may not function normally due to insufficient voltage. Option 2:7.4VIt’s applicable to high voltage servos. Do not use this option with ordinary servos; otherwise your servos may be burnt due to high voltage.6. Start Mode / PunchYou can choose the punch from level 1 (very soft) to level 5 (very aggressive). In addition, “level 4” and “level 5” have strict requirement on battery’s discharge capability. It may affect the starting-up if the battery discharges poorly and cannot provide large current. The boat stutters or suddenly loses power indicating the battery’s discharge capability is not good, then you need to lower down the punch.7. Timing / General Timing This item has three effects:• Make the ESC compatible with different motors. Some motors may function abnormally with the default Timing (15 degrees), you need to adjust the ESC timing to a proper degree and then they will work fine.• Fine tune the output power of the motor. The bigger the ESC timing, the higher the motor speed , and the more electric energy it will consume. • Make the motor operate at the optimum efficiency point through adjusting this item. 8. Turbo AccelerationIf the Turbo Acceleration is triggered, the ESC will immediately activate the programmed Turbo Timing (refer to the 9th programmable item). The motor can output greater power (than in normal condition). This function is mainly used on long waterway or when driving the boat out of corner. Note 1:• Turbo Acceleration signal wire is usually plugged into CH3 or CH4 on receiver, and the amount of the valid signal must over 80% of the maximum travel volume (usually the maximum travel volume is 100%) .• With a pistol-style transmitter: CH3/CH4 is often controlled by a button (on the transmitter), you only need to press the button to activate the Turbo Acceleration. With a board-style transmitter: If CH3/CH4 is controlled by a switch, then push the switch to the up/down position can deactivate/activate the Turbo Acceleration.• When the programmed General Timing is bigger than Turbo Timing (for example,. the General Timing is set to 22.5 degrees and the Turbo Timing is 15 degrees), there won’t be any effect even if Turbo Acceleration is enabled. Please ensure that the Turbo Timing value must bigger than General Timing if you want to use Turbo Acceleration function. 9. Turbo TimingTurbo Timing is adjustable from 0 to 26.25 degrees. With the Turbo Acceleration is enabled, the ESC will activate the corresponding Turbo Timing after it receives Turbo Acceleration signals.10. PWM frequencyThe increase of PWM frequency can make the motor running smoother and the noise lower, but it will also make your ESC hotter. If the motor has no unsmooth/uneven issue, we recommend selecting the default setting (8KHz).Four steps to program your ESC with a transmitter:Entering Programming Mode —> Selecting Programmable Item(s) —> Selecting Parameter Value(s) /Option(s) —> Exiting Programming Mode.03Features• Light-weight perfectly meets users' strict requirement against the weight of competition marine ESCs.• No extra precaution is needed because of its outstanding water resistance (injection molding for Pro 160A & nano-coating for Pro 120A, it can be immersed in water). (Note: It’s necessary to fully dry all the connectors after use if they are immersed in water)• Internal switch-mode BEC with switchable voltage of 6V/7.4V and cont./peak amp of 4A/8A for easily driving big torque servos and high voltage servos.• HOBBYWING-patented heat-conductive copper bars combined with water cooling heatsink and MOSFETs with extremely low internal resistance greatly improve the current endurance and reliability of the ESC.• Advanced firmware guarantees the user the excellent control feel and “abundant” programmable items for different competition environments.• Innovative Turbo Acceleration function (which enables the Turbo Timing) can make the motor unleash the maximum power to speed up, and leave all rivals far behind in a moment. • “Forward Only”& “Forward/Reverse” running modes.• Multiple protections: low-voltage cutoff protection, ESC thermal protection, and fail safe (throttle signal loss protection).• 8 Timing options perfectly match with various of brushless motors.• Advanced programming via portable multifunction LCD program box or WiFi module (sold separately).• Firmware upgrade via HOBBYWING multifunction LCD program box or WiFi module (sold separately).1. Water Cooling Tube Connecting (Silicon tube needs to be provided by users.)The aluminum water cooling tube (outer diameter = 5.5mm) has been pre-mounted on the ESC heatsink at factory. Please connect the silicon tube to the aluminum water cooling tube. 2. Motor WiringThere is no polarity on the A/B/C wires between ESC and motor, so do not worry about how you connect them initially. You may find it necessary to swap two wires if the motor runs in reverse.3. Receiver Wiring1) How to connect the throttle control cablePlug the throttle control cable (also called Rx cable) on the ESC into the throttle (TH) channel on receiver. The RED wire in the throttle control cable will output the BEC voltage of 6V/7.4V to the receiver and servo, so please do not connect any additional battery to the receiver. 2) How to connect the Turbo Acceleration signal wire (/single YELLOW wire)Plug the Turbo Acceleration signal wire of the ESC into any unoccupied channel (for example, CH3/CH4) on your receiver. 4. Battery WiringProper polarity is essential here! Make absolutely sure positive (+) of ESC connects to positive (+) of battery, and negative (-) of ESC connects to negative (-) of battery when you plug in your battery! If reverse polarity is applied to your ESC from the battery, it will damage your ESC. This will NOT be covered under warranty!Move the throttle trigger/stick to the Zero-Speed throttle position, and then turn on the transmitter.1. Connect a battery pack to the ESC; the motor will beep “Number” times to indicate the amount of Lipo cells you have plugged in. Please ensure the cell count is correct. If the motor only beeps one time, it means the Low-Voltage Cutoff Protection is disabled. This “Disabled” option is only applicable to NiMH battery packs.2. 1 second later, the motor will beep a long beep “B—“to indicate the ESC is ready to run. If the throttle trigger/stick is not at the Zero-Speed throttle position, the motor will keep beeping a short beep “BBB……” until the throttle trigger/stick is moved to the Zero-Speed throttle position.3. Increase the throttle amount, the motor spins up.USER MANUALSeaking Pro 120A • Seaking Pro 160ABrushless Electronic Speed Controller 04Specifications05Begin to Use a New ESCStep 1: Entering Programming Mode1. Turn on the transmitter, move the throttle stick to the top position (/full throttle position), connect a battery pack to the ESC, and the motor will beep “BB“ (to indicate the full throttle position has confirmed).2. Five seconds later, the motor will beep “♪56712” to indicate the ESC has entered the programming mode.Step 2: Selecting Programmable Item(s)After entering the programming mode, you will hear 10 kinds of tones beep out circularly. Move the throttle stick to the bottom position within 3 seconds after you hear one specific kind of warning tone, you will enter the corresponding programmable item. 1. “B”, Running Mode (One Short Beep) 2. “BB”, Lipo Cells (Two Short Beeps)3. “BBB”, Cutoff Voltage (Three Short Beeps)4. “BBBB”, ESC Thermal Protection (Four Short Beeps)5. “B——”, BEC Voltage (One Long Beep)6. “B——B”, Start Mode (Punch) (One Long Beep & One Short Beep)7. “B——BB”, Timing (General Timing) (One Long Beep & Two Short Beeps) 8. “B——BBB”, Turbo Acceleration (One Long Beep & Three Short Beeps) 9. “B——BBBB”, Turbo Timing (One Long Beep & Four Short Beeps) 10. “B——B——”, PWM Frequency (Two Long Beeps)Step 4: Exiting Programming Mode1. Move the throttle stick to the bottom position within 2 seconds after you select the parameter value and hear the special warning tone “ ” beeped out by motor in Step 3 can exit programming mode.2. Or you disconnect the ESC when it's in programming mode to forcibly exit programming.• Restore the default values with a multifunction LCD program boxAfter connecting the program box to the ESC, continuously press the “ITEM” button on the program box until you see the “RESTORE DEFAULT” item, and then press “OK” to factory reset your ESC.• Restore the default values with a WiFi module (&WiFi Link)After connecting the WiFi module to the ESC, open the HOBBYWING WiFi LINK software on your smart phone,select “Parameters” followed by “Factory Reset” to reset the ESC.。
Phoenix 用户手册说明书

O PERATOR'S M ANUALVersion 3Dec. 9, 20052117 East 5th StreetSuperior, WI 54880 USAtel: 715-398-3627fax: 715-398-3279© 2004, 2005, 2006 Crane Song, LTD. Subject to change without notice. Printed in the U.S.A.A TDM Plug-inPhoenix is Crane Song’s suite of TDM only plug-ins designed to emulate the unique prop-erties of a magnetic tape machine. Designer Dave Hill has crafted this software with the same attention to detail he used to create the electronics for ATR Service’s much heralded “Aria” discrete tape recorders. His intimate knowledge of analog electronics, as well as decades of experience as a recording engineer has spawned a very useful, musical suite of plug-ins. The Phoenix process not only incorporates the nonlinear saturation characteris-tics created by magnetic tape itself, but also includes the interrelation of an analog tape recorder’s record/reproduce electronics and equalization curves. The Phoenix suite is not merely a downscaled version of the Crane Song HEDD processor, but a ground-up applica-tion derived from HEDD technology, and specifically engineered and optimized for Digidesign’s TDM architecture.Five different TDM plug-ins emulate different tape characteristics, each one incorporating a color change button allowing three choices to modify the process. The Gold button is the position where the color is approximately flat in frequency response, with Sapphire being a brighter, and Opal being a warmer tonality. A level control determines the amount of the Phoenix process integrated into the audio signal, and an input trim determines “how hard you hit the tape.” Because the DSP process is level dependent, reducing the input level will also cause a change in sound.The input trim can also be used to prevent clipping in the rare cases where clipping may be a problem. This can be useful on material that is hitting close to or at digital zero. When the input trim is at 0dB, (no change in gain) and no tape process is being added to the sound, the plug-in is bit accurate, meaning the output exactly matches the input.The Phoenix suite contains five separate plug-ins:•Luminescent is the most neutral sounding process of the five.•Iridescent has a similar magnetic character, but with a fatter bottom and midrange.This plug-in is the most similar to the tape knob on HEDD-192.•Radiant is characterized by a more aggressive compression curve•Dark Essence is even more aggressive. (The effect is a color with a wider frequency range—when used on a vocal Dark Essence can reduce sibilance problems byincreasing the apparent loudness of the rest of the signal.)•Luster starts more gently than the other four processes, but becomes as aggressive as Dark Essence when the process is at full scale.Running within Digidesign’s TDM architecture, Phoenix is very DSP efficient. It will run approximately twenty instances of a plug-in on a single DSP chip (HD system at 44.1 kHz sample rate).Phoenix’s color is dependant on signal level, program material and sample rate. A higher sample rate results in smother soundsThe Phoenix plug-in suite provides a wide range of choices to make your digital world sound warmer, fatter, and more analog. The plug-ins can be somewhat subtle, but the cumulative affect when used on a number of tracks can bring back the warmth and rich-ness which only analog recording has been able to provide.By grabing the text “INPUT TRIM” with the mouse and moving in the vertical direction the input trim level can be adjusted. It can also have a value between 0 and -12db entered into the window. The Process level can be moved by a mouse by grabbing it’s knob and mov-ing the mouse vertically. It can also have a value entered into it’s window with 0 db being the maximum value. Phoenix is mono, multi-mono, stereo and 5.1 capable.InstallationInstall the plug-in in and osX system by putting the decompressed file into theApplications/DigiDesign/ProTools/Plug-Ins alias directory.Under os9 the decompressed file is put into the System/DAE Folder/Plug-Ins directoryThe latest version of Phoenix contains an installer for PT7 and PT6.9 and manual installation is not required.System RequirementsYou MUST have the following to run a Crane Song Plug-In:Pro Tools TDM Hardware: MIX or HD. Our plug-ins are currently only available for Pro Tools TDM systems.We do not currently support any other plug-in format.Pro Tools 5.1.1 or higher running on Mac OS 9 or Pro Tools 6.0 (or later) running on Mac OS 10.2.4 (or later).Phoenix will also run on a Windows XP system and on VENUEAn ILok USB Smart Key and an accountIf you do not currently own an iLok, you must purchase one in order to authorize and run Crane Song plug-ins for both authorized and demonstration mode.An iLok can be purchased from a variety of sources, including the online DigiStore oper-ated by Digidesign.An account. Creating an account is simple and free. Visit for details. If you do not have one proceed to and set up an accountPhoenix Plug-in Registration FormandAuthorization FormProduct*Company or OrganizationYour name*TitleAddress 1*City*State*Zip/postal code*Country*Email*ilok user ID*Type of Work Produced* Music Film Post TV Post Radio Other: Operating System* (plug-ins available only for Mac OS) os9 osXSerial Number (Provided by Crane Song)Dealer(plug-ins available only for Pro Tools TDM systems)Phoenix Down load Location/gtg1663ft1/phoenix/downloadsThe above information must be provided to Crane Song Ltd. in order for the Authorization to be sent to your account. The Authorization is re-quired for Phoenix to run in BOTH demo and purchased modes. A different Authorization will be provide on purchase of the plug-infields with * are required1. License.YOU (either as an individual or an entity) MAY: (a) use this Software on a single computer; (b) physically transfer the Software from one computer to another provided that the Software is used on only one computer at a time and that you remove any copies of the Software from the computer from which the Software is being transferred; YOU MAY NOT: (a) distribute copies of the Software or the Documentation to others; (b) modify or grant sublicenses or other rights to the Software. The License is effective until terminated. You may terminate this License at any time by destroying the Software together with any copies in any form. This Agreement, including the license to use the Software, will terminate automatically if you fail to comply with any term of condition of this Agreement.2. Ownership.This License is not a sale of the Software contained in the Product. Crane Song Ltd. retains all rights, interest, title in and ownership of the Software, and Documentation, including all intellec-tual property rights. No title to the intellectual property in the Software is transferred to you. You will not acquire rights to the Software and Firmware except as expressly set forth above.3. No Reverse Engineering and Other Restrictions.You agree that you will not (and if you are a corporation, you will use your best efforts to prevent your employees and contractors from attempting to) reverse engineer, disassemble, decompile, modify, translate, investigate or otherwise study the Product in whole or in part.4. Compliance with Laws and Indemnification.You agree to use the Product in a manner that applies to all applicable laws in the jurisdiction in which you use the Product, including all intellectual property laws. You may not use the Software in conjunction with any device or service designed to circumvent technological measures employed to control access to, or the rights in, a content file or other work protected by the copyright laws of any jurisdiction. You agree to indemnify, defend, and hold harmless Crane Song Ltd from and against losses, damages, expenses, (including reasonable attorneys’ fees), fines, or claims arising from or relating to any claim that the Product was used by you to violate, either directly or indirectly, another party’s intellectual property rights.5. Limited Warranty on Software.Crane Song Ltd warrants that the media on which the Software is furnished will be free from defects in materials and workmanship under normal use for a period of ninety (90) days from the date of purchase. If a defect appears during the warranty period, return the compact disc to Crane Song Ltd., and you will receive a free replacement, or at Crane Song’s option, a refund, so long as the Software, documentation, are returned with a copy of your receipts. This Limited Warranty is void if failure of the Software has resulted from accident, abuse, or misapplication. Any replace-ment Software will be warranted for the remainder of the original warranty period. THIS WAR-RANTY GIVES YOU SPECIFIC LEGAL RIGHTS AND YOU MAY ALSO HA VE OTHER RIGHTS WHICH V ARY BY JURISDICITON.6. No Other Warranties.Crane Song Ltd. AND ITS LICENSOR(s) (hereafter collectively “Crane Song Ltd”) DO NOT WARRANT THAT THE SOFTWARE NOR ANY THIRD-PARTY SOFTWARE EMBEDDED ON THE DISK (collectively “SOFTWARE”) ARE ERROR FREE. YOU EXPRESSLY ACKNOWL-EDGE THAT THE SOFTWARE AND DOCUMENTATION ARE PROVIDED “AS IS.” CRANE SONG LTD. DISCLAIMS ALL OTHER WARRANTIES, EITHER EXPRESS OR IMPLIED, INCLUDING BUT NOT LIMITED TO IMPLIED WARRANTIES OF MERCHANTABILITY, FITNESS FOR A PARTICULAR PURPOSE AND NON-INFRINGEMENT OF THIRD PARTY RIGHTS WITH RESPECT TO THE SOFTWARE, THE ACCOMPANYING DOCUMENTATION OR CD ROMS. SHOULD THE SOFTWARE PROVE DEFECTIVE, YOU (AND NOT CRANE SONG LTD OR AN AUTHORIZED REPRESENTATIVE) ASSUME THE ENTIRE COST OF ALL NECESSARY SERVICING, REPAIR OR CORRECTION.7. No Liability for Consequential Damages. IN NO EVENT SHALL CRANE SONG LTD BE LIABLE TO YOU FOR ANY CONSEQUENTIAL, SPECIAL, INCIDENTAL OR INDIRECT DAMAGES OF ANY KIND ARISING OUT OF THE USE OF THE PRODUCT, OR INABILITY TO USE THE PRODUCT, EVEN IF Crane Song Ltd. HAS BEEN ADVISED OF THE POSSIBIL-ITY OF SUCH DAMAGES. CRANE SONG’S LIABILITY FOR ANY CLAIM, LOSSES, DAM-AGES OR INJURY, WHETHER CAUSED BY BREACH OF CONTRACT, TORT OR ANY OTHER THEORY OF LIABILITY, SHALL NOT EXCEED THE FEE PAID BY YOU. SOME JURISDICTIONS DO NOT ALLOW THE EXCLUSION OF IMPLIED WARRANTIES OR INCIDENTAL OR CONSEQUENTIAL DAMAGES, SO THE ABOVE LIMITATION OR EXCLU-SIONS MAY NOT APPLY TO YOU.8. Export. You acknowledge that the laws and regulations of the United States restrict the export and re-export of the Software and Documentation. You agree the Software will not be exported or re-exported without the appropriate U.S. or foreign government licenses. You also agree not to export the Software (including over the Internet) into any country subject to U.S. embargo.Crane Song LTD. 2117 East 5th Street. Superior, WI 54880 USA Phone715-398-3627 Fax 715-398-3279 web site: “Black Crowned Crane” Photo used with permission from International Crane Foundation 。
mk电调说明书

mk电调说明书篇一:电调设置选项说明书电调设置选项说明书45A/50A/60A/70A/80A/100A/125A/200A·如何进入选项设置模式:1. 把马达和电调,以及接收机相互之间的连线全部接好,不过注意先不要连接电池和电调的电源线。
2. 打开遥控器,并把油门杆位拨到最高(满油门)。
(注意:大部分Futaba遥控器的油门杆位是反向的。
)3. 联接电调与电池的电源线,电调上电,并控制马达并发出一些带节奏的鸣叫。
·如何操作选项设置:进入选项设置模式后,马达会发出一些有特定规律的鸣叫:一个升调的短音乐之后接一个或多个短鸣响。
这些声音是电调程序当前选项的提示音,每个提示音会重复3次之后变换为下一个主选项,在声音结束之前都可以进行命令(油门杆位拨动)的输入。
主选项菜单是循环的,如果错过了,可以等提示音再次到达,只是要花一些时间而已。
主选项提示声的含义如下表:表1.1提示音提示音含意短音乐+ 1短高?—主选项一:电池类型及电池数量鸣短音乐+ 2短高?——主选项二:油门相关设置鸣主选项三:刹车(标准固定翼版短音乐+ 3短高?———本电调)鸣 /操作模式(电直版本电调)短音乐+ 4短高?————主选项四:方向及保护模式鸣?————短音乐+ 5短高主选项五:PWM设置—鸣第一步,选择主选项并进入子选项菜单。
如表1.1,当听到需要设置的主选项提示音出现时,因为提示音是重复3次的,建议第一次听到则留意,第二次听到则复核并进行选择操作:拨动油门杆位到中间位置,此表示选择当前主选项并进入子选项菜单。
因为已经进入第二层菜单,现在马达发出的声音会有一些变化以区别主选项菜单,升调短音乐改为短高鸣提示当前为第几主选项,主选项的短高鸣改为长低鸣提示当前为第几子选项(提示主选项的一个或多个短高鸣+提示子选项的一个或多个长低鸣)。
详细含义可以查第二页和第三页的子选项列表。
每个子选项提示音也是重复3次然后变成下一子选项并循环。
飞行色 X-Cross HV3 3-160A 无刷电子调速器说明书
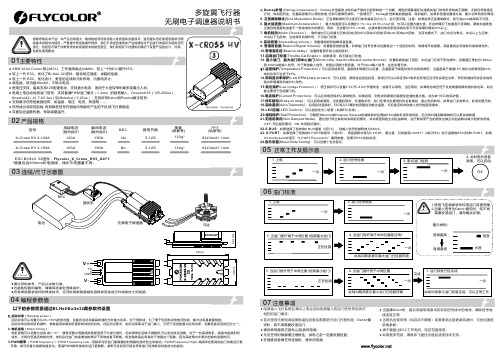
多旋翼飞行器以下的参数需要通过BLHeliSuite32调参软件设置BEC 瞬间电流(散热良好)尺寸(供参考)重量(供参考)锂电节数持续电流(散热良好)型号180A5-12S132g*No82x34x21.1mmX-Cross HV 3-160A160A02 产品规格03 连线/尺寸示意图*图片仅供参考,产品以实物为准04 编程参数值ESC B LHeli -32固件:Flycolor_X_Cross_HV3_G071;*重量包含300mm 长电源线,线长不同重量不同;07注意事项150A 5-12S 132g*No 82x34x21.1mm X-Cross HV 3-120A 120A ●图片仅供参考,产品以实物为准。
为避免短路和漏电,请确保连接处绝缘良好。
●●所有焊接要求良好的焊接技术,任何时候都需要避免因焊接而造成元件或线材之间短路。
1. 启动功率(Rampup power ):启动功率可以设置为从3%-150%的相对值。
这是在启动和提高转速时允许最大功率。
对于低转速,为了便于低反电动势电压检测,最大功率是被限制的。
启动功率也影响双向操作,参数是用来限制在更改转向时的功率。
在启动过程中,实际功率取决于油门输入,可低于设定的最大启动功率,但最低是设定的四分之一。
2. 电机进角(Motor timing ):电机进角可以设置为1°-31°,通常设置中等数值进角即适用于大部分电机,但如果电机运转不顺畅时,可以尝试改变进角。
对于一些高感电机,其换向退磁时间自动 或 较长,尤其在低速运转的时候,电机会在油门快速增加的情况下停转或者不顺畅。
将进角改高会有有助于改善这个现象,因为高进角允许更长的换向退磁时间。
3.PWM 频率 (PWM frequency ): PWM Frequency Low - 低频率在低油门最需要的时候提供良好的主动制动;PWM Frequency High -高频率在更高的油门时使运行更 平稳,或可设置为根据转速变化。
中特威 Beast Pro SS 160A G2 无刷电子调速器说明书.pdf

无刷电子调速器说明书感谢您购买中特威产品,Beast Pro G2 系列电调是我们新一代高性能有感无刷电子调速器(竞赛版本)。
无刷动力系统功率强大,请您在使用设备前仔细阅读本说明书。
深圳市中特威科技有限公司有权不经通知变更其产品,包括其外观和性能参数及使用要求;对其产品是否适合特定用途不作任何保证、申明或承诺。
不承担因第三方产品相关修改所引起的任何责任,中特威科技有限公司也不承担因应用该产品而产生的任何责任,包括直接损失或间接损失的赔偿责任。
不能让小孩在无成人监管的情况下使用此产品。
电调在使用过程中可能会变烫,拿的时候要小心。
若需对电调的输入输出线、插头做相关焊接时,请使用至少60W功率的焊接设备进行焊接。
不使用电调时需要断开电池。
使用电调时不能靠近易燃物品。
如果电调出现过热,冒烟或者着火,请立即停止使用,断开电池并寻求帮助。
1. 全铝制金属外壳设计,散热性能优异,耐流能力强大。
2. 更加丰富的参数设置,允许设置大多数竞赛级参数,例如Modified模式、Stock模式、零进角、漂移等。
3. 采用高性能的32位处理器,提供更加强大的数据处理能力以及更精准的油门输出。
4. 全新的软件设计,超流畅的启动与精准的油门线性。
5. 多重保护功能:电池低压保护、过温保护、油门信号丢失保护。
6. 内置蓝牙,可通过手机APP对电调进行参数设置及软件升级(支持实时调参,无需重启电调)。
7. 支持实时数据记录功能,可实时查看电调最高温度、马达转速、电压、进角等数据,注意事项主要特性产品规格电池连接电调连接电池时,要特别注意正负极位置,错误的连接会损坏电调和电池。
如上图所示,电调正极线连接电池的正极,负极线连接电池的负极。
电机连接(1)有感模式连接有感无刷马达时,电调与马达相连有严格的线序要求,电调的#A/#B/#C必须与电机的#A/#B/#C三线严格一一对应,用6针感应线把电调与电机的感应口对接。
(2)无感模式连接无感无刷马达时,电调与马达相连无严格的线序要求,电调的#A/#B/#C可以与电机的三线随意对接,若出现转向相反,任意交换两条马达线即可。
Platinum HV-160A 空模无刷电子调速器 使用说明书
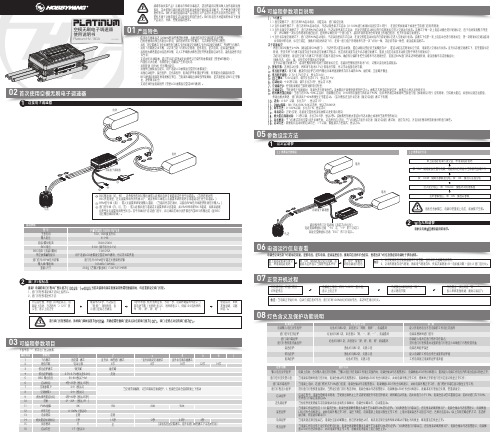
0104可编程参数项目说明06电调运行信息查看Platinum HV-160A空模无刷电子调速器使用说明书1、飞行模式1.1 固定翼模式下,油门达到5%启动电机,无缓启动,油门响应迅速;1.2 直升机线性模式下,油门达到5%启动电机,马达以较柔和方式启动(0-100%油门加速时间固定为3.5秒),在固定的加速率下加速至当前油门应有的转速;1.3 直升机精灵定速模式下,油门达到40%启动电机,马达以超柔和方式启动,在设定的缓启动时间内完成转速标定进入定速运行状态。
该模式下每一次上电启动都会进行转速标定,由于电池放电能力等差异,将导致每一次标定的转速有细微区别,最终将导致在同一个油门值下,使用不同的电池会有转速上的细微差别,但并不影响定速效果。
1.4 直升机存储定速模式下,油门达到40%启动电机,马达以超柔和方式启动,在设定的缓启动时间内完成转速标定进入定速运行状态。
该模式下仅第一次上电启动会进行转速标定,第一次转速标定建议使用状态较好的电池,标定完成后,更换不同电池再次飞行,在同一油门值下的转速将与第一次飞行时一致,为保持手感一致性,建议使用该模式。
关于转速标定:· 将油门从0切换至≥40%(建议使用50%油门),马达将进入缓启动阶段,缓启动期间需保持主桨螺距为0°,缓启动结束后转速标定完成,电调进入定速运行状态。
直升机存储定速模式下,若需重新标定转速,需首先将飞行模式设置为直升机精灵定速模式并保存,然后再次设置为直升机存储定速模式,重新上电后电机首次运转过程中将进行转速标定;· 为保证定速效果,建议在定速飞行模式下的油门范围不超过90%,确保有足够的补偿空间维系马达转速恒定,若超过90%油门仍未达到理想转速,建议更换马达或更换齿比;(更换马达、齿比、桨、机架后均需重新标定转速)· 直升机存储定速模式下,使用性能较好的电池完成转速标定后,若使用性能较差的电池飞行,可能对该电池造成损害。
凤凰电调基本设置详解

凤凰电调基本设置详解凤凰电调是一种常见的无刷电调,适用于多种不同类型的电动机,如无刷直流电机和有刷直流电机等。
在无人机、遥控车、遥控船等遥控模型领域中,凤凰电调的应用非常广泛。
本文将详细介绍凤凰电调的基本设置方法,帮助读者更好地了解和使用这种关键的遥控模型设备。
凤凰电调的基本设置凤凰电调包括许多不同的设置项,其中最基本的设置是绑定和校准。
下面将详细介绍这些设置的方法。
1. 绑定设置在使用无线遥控器时,必须先将遥控器与凤凰电调绑定,否则无法进行任何操作。
使用方法如下:(1) 确保遥控器关闭并且油门杆在最低位置。
(2) 将凤凰电调连接到电机和电源,然后按下调谐按钮,此时电调会进入绑定模式。
(3) 打开遥控器电源,将S1杆升起至上限,此时电调将会响一声,表示已经成功绑定。
2. 校准设置校准操作可以确保凤凰电调能够准确识别油门信号,不同遥控器品牌之间可能存在微小的信号差异,因此需要进行校准操作。
使用方法如下:(1) 确保遥控器关闭并且油门杆在最低位置。
(2) 将凤凰电调连接到电机和电源,然后按下调谐按钮,此时电调会进入校准模式。
(3) 打开遥控器电源,将S1杆升起至最高位置并保持1秒钟,然后将S1杆降至最低位置并保持1秒钟,此时电调将会响两声,表示已经成功校准。
其他设置除了绑定和校准之外,凤凰电调还具有很多其他设置,例如油门曲线、刹车力度、起始电压和最大电流限制等。
下面将对这些设置进行简单介绍。
1. 油门曲线油门曲线可以帮助调整电机速度和动力输出,以适应不同的航模需求。
可在遥控器上设置油门杆的最大、最小值和中间值,以及相应的油门曲线,来控制电机速度的调整。
2. 刹车力度刹车力度可以帮助实现紧急停机。
设置较高的刹车力度可以使电机停止更快,从而提高停止精度。
但刹车力度太高也可能对电机造成损伤,因此需要根据具体情况进行调整。
3. 起始电压设置起始电压可以确保电机在启动时的稳定性。
通常情况下,应将起始电压设置为电机运转电压的一半,以确保在低电量时也能正常启动。
各厂家电调器使用方法

说明:使用率最高的电调器,需要有220V交流电源。
如果第一次角度设定错误,切忌不要在扫描后直接调整角度,要先复位后调整角度。
说明:使用率一般,需要连接电脑,附件为凯仕林电调器的中文说明文档及软件驱动。
简要软件截图说明:
说明:多用于2G天线调整,附件为海天电调器中文说明文档
说明:使用率较低,需要有220V交流电源,电调器背面有使用说明。
说明:多用于2G天线调整,无需电源。
充电即可。
说明:使用方法与凯仕林电调器类似,需要连接电脑,附件为安德鲁电调器所需软件。
- 1、下载文档前请自行甄别文档内容的完整性,平台不提供额外的编辑、内容补充、找答案等附加服务。
- 2、"仅部分预览"的文档,不可在线预览部分如存在完整性等问题,可反馈申请退款(可完整预览的文档不适用该条件!)。
- 3、如文档侵犯您的权益,请联系客服反馈,我们会尽快为您处理(人工客服工作时间:9:00-18:30)。
凤凰电调说明书帮别人飞飞桶,好淫120A烧了,换来凤凰160A,HV高压版,一开始苦于不知道怎么设置,电机不转,后来搜出说明书,在网上照着网友帖子上讲的进入编程模式,摸索了一阵子,基本设置好了。
不需要编程卡,不需要电脑和软件,只要一步一步来!E文说明书上其实讲得非常详细,我这份说明书是展开一张很长的纸,不知大家的是不是一样的。
首先要进入编程模式(强烈建议设置时把螺旋桨卸下以保安全):1.开发射机,油门开最大(FUTABA的设备油门通道请设反舵);2.接通接收机电池(高压板的电调一般不带BEC的),然后接通动力电池;3.电机欢快地叫了几下,接着电调灯一下一下地慢闪,油门收回到中间,电机欢快地叫几下;4.油门再推最大,电机又欢快地叫几下,接着电调灯两下两下地闪,油门收回到中间,电机又欢快地叫几下;5.油门又推最大,电机更欢快地叫几下,接着电调等三下三下地闪,油门收回到中间,电机特别地叫了几下,接着电调开始隔大概一秒响一次,“嘀——嘀”;这时电调开始让人摸不着头脑让人晕头转向的反复的循环的乱叫,恭喜,电调进入了编程模式!总之整个过程就是把油门三次开到最大又回中,才能进入编程模式。
第一次用的人总感觉没头绪,特别是几个人一起讨论某个音调是什么意思的时候更会添乱。
其实这时你应该看着说明书细心听。
刚进入编程模式,油门在中间,你什么都先别动,电调应该是隔大概一秒响一次,它这是在问你第一栏的第一项要选是还是否。
事实上你应该把两次响声作为一组,即第一响表示第一栏,第二响表示第一栏的第一项,听到后面你就能领会了。
我这电调是高压版的,因此要从说明书上的“Setting 1B:Cutoff V oltage-Phoenix HV/Phoenix Ice HV”开始。
自己对照看电调上的字就知道了。
第一栏是设置电调的保护截止电压项,第一项是自动检测锂电节数,第二项是设定为4S锂电,第三项是设定为6S锂电,第四项是设定为8S锂电,第五项是设定为10S锂电,第六项是设定为12S锂电。
我这次使用的是12S锂电,我要选择第六项。
因此电调隔大概一秒响一次时“嘀——嘀——”,我选否,即拉低油门,等电调确认声,确认后回中;当电调响“嘀——嘀嘀——”时,我选否,拉低油门,等电调确认声,确认后回中;当电调响“嘀——嘀嘀嘀——”时,我选否,拉低油门,等电调确认声,确认后回中;当电调响“嘀——嘀嘀嘀嘀——”时,我选否,拉低油门,等电调确认声,确认后回中;......一直重复动作到电调响“嘀——嘀嘀嘀嘀嘀嘀——”,即1+6时,我选是,推高油门,等电调确认声,确认后回中。
当然,我现在的电池是充满了的,也可以设置为自动检测锂电节数,即电调响“嘀——嘀——”时我就可以选是,推高油门,等电调确认声,确认后回中。
在这以后,不管在哪一栏哪一项,只要选择了“是”,并确认回中以后,电调都自动跳入到下一栏进行询问,进入下一栏的选择。
只要选择了“否”,并确认回中以后,电调就问当前栏的下一项了。
一旦觉得自己弄乱了,糊涂了,就断电后重新来过,否则很容易把所有项目都选错。
下面是说明书上各个栏各个项目的基本意思:第一栏:Setting 1A:Cutoff V oltage-Phoenix/Phoenix Ice 截止电压设置1.自动检测锂电节数,默认截止电压为3.0V每节。
如果是用镍铬电池或镍氢电池的话就检测不准确了,这是出厂设置;2.截止电压为4.0V,即5节镍铬或镍氢电池;3.截止电压为5.0V,即5-8节镍铬或镍氢电池;4.截止电压为6.0V,即5-10节镍铬或镍氢电池,或者是2S锂电;5.截止电压为9.0V,即5-16节镍铬或镍氢电池,或者是3S锂电。
(使用10节以上镍氢/镍铬电池时必须断开电调的BEC,即把红线挑掉接收机另接电源)第二栏:Setting 1B:Cutoff V oltage-Phoenix HV/Phoenix Ice HV截止电压设置1.自动检测锂电节数,默认截止电压为3.0V每节。
如果是用镍铬电池或镍氢电池的话就检测不准确了,这是出厂设置。
2.截止电压为12V,即4S锂电;3.截止电压为18V,即6S锂电;4.截止电压为24V,即8S锂电;5.截止电压为30V,即10S锂电;6.截止电压为36V,即12S锂电;注意:这里讲的锂电都是指锂聚合物电池(LiPo),最低截止电压为3.0V,使用其他类型锂电池时自己考虑电压设定值。
第三栏:Setting 2: Current Limiting 限流设置注意:自己负责更改这栏的设定产生的风险!因过流导致损坏电调与制造商无关。
这栏只能交给经验丰富的模型爱好者来设置。
过流保护功能是体现电调检测到出现过流情况时做出反应的能力(这句不知怎么描述啊Current limiting describes the reaction of the Phoenix ESC when an over-current condition is detected.)。
1.非常敏感,当检测到过流时迅速地切断供电;2.敏感;3.正常模式,适度的过流门限,会延时短暂时间再关断。
建议所有系统的应用,除了直升机和大功率LMR的应用。
这是出厂设定;4.不敏感,建议用于所有直升机和LMR的应用上;(在保修范围内)5.禁用,自己承担风险!第四栏:Brake Type 刹车模式软刹车提供50%的刹车能量,硬刹车提供100%的刹车能量1.延时软刹车,一般是固定翼使用,用于固定桨或折叠桨。
凤凰电调高压版的默认出厂设置;2.延时硬刹车,直驱应用场合,需要消耗更多的刹车能量;3.无延时软刹车,竞赛需要的短延时软刹车;4.无延时硬刹车,竞赛需要的短延时硬刹车,刹车动作可能会非常迅速。
特别注意,这是大功率设置项(Be very cautious with high-powered setups);5.禁用刹车,直升机,3D飞机以及用在绝大多数特技飞机上。
凤凰电调低压版的默认出厂设定。
第五栏:Throttle Type 油门模式1.自校正模式,任何固定翼飞机,但不适用于直升机。
当使用自校正模式时,每次接通电源时都要把油门先放在全油位置4秒钟然后退回到关闭位置。
这样在电调内部就设置好了油门行程。
这是出厂设定。
2.固定油门行程,任何固定翼飞机和固定螺距直升机以及变距(Collective Pitch Helicopters)直升机,可以设定相应的油门曲线;以下选项只限于直升机的应用。
我们强烈建议使用编程卡(Castle Link USB Programming Kit)以进入直升机高级设定,单用油门杆无法设定。
ernor Mode LOW,低定速模式,只适用于可变距直升机:定速模式是一种转速控制模式,而不是油门大小控制。
油门位置对应的是电机转速,电调会试图保持住特定转速而不管负载如何变化。
这里讲的锂电都是指锂聚合物电池(LiPo),使用其他类型锂电池时自己考虑电压设定值。
关于第1~3步,E文说明书上是这样说的:1A.The Phoenix controller must be connected to a motor in order for you to hear the programming beeps.Turn your transmitter on ,and leave the Phoenix ESC unpowered.Move the transmitter stick to the top position(full throttle).1B.Connect battery power to the Phoenix ESC.The Phoenix ESC will beep its initialization tones when first plugged in.After a short period of time the Phoenix ESC will emit another short tone and the LED on the Phoenix ESC should flash a short,single flash that repeats.If the ESC flashes continuously it is not seeing a full throttle position.Move your throttle trim to the top position or increase your full throttle endpoint or ATV on your transmitter.1C.Move your transmitter stick to the middle position.The Phoenix ESC will emit another short tone,and the LED on the Phoenix ESC should flash a short,double flash that repeats.1D.Move your transmitter stick back to the top position again.After a short time,the Phoenix ESC will emit a short tone,and the LED on the Phoenix ESC should flash a short,triple flash that repeats.1E.Move your transmitter stick back to the middle position again.The Phoenix ESC will emit four short tones in a row,and the LED on the Phoenix ESC will start a repetitive flash sequence of a single flash followed by a long pause.The Phoenix ESC is now in programming mode and asking you the first question.......总之大体意思是这样的:1A.让电调接上电机,这样就能听见设置音乐。
打开发射机,先把油门开到最大。
(然后接通接收机电源这点它好像没说)1B.接通电调的电源,(若是第一次接通电源)电机将发出初始化音乐,过了一下子电调上的灯就会一下一下地慢闪。
若灯不停地快速闪动则表明油门还没开到最大。
想办法把油门开到最大,如调整油门通道的行程等等。