数据库服务器配置方法
oracle数据库RAC服务器配置文档
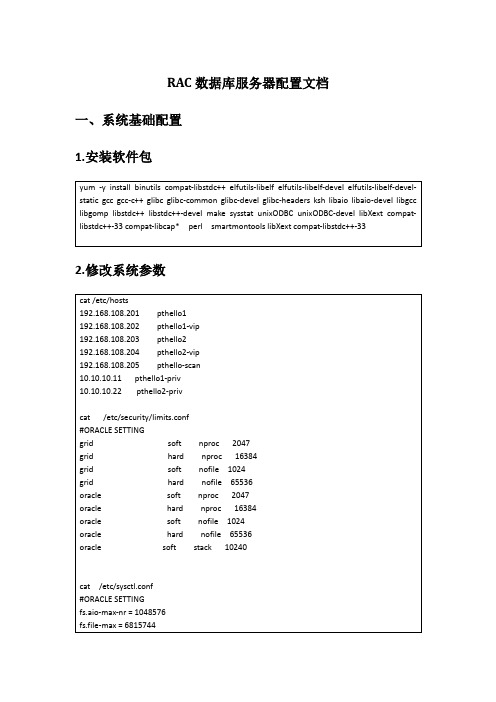
RAC数据库服务器配置文档一、系统基础配置1.安装软件包2.修改系统参数3.添加用户和组4 修改用户环境变量Grid用户5 通过ASMLIB管理磁盘二、安装集群软件密码:system123[root@pthello1 ~]# /u01/app/oraInventory/orainstRoot.sh Changing permissions of /u01/app/oraInventory.Adding read,write permissions for group.Removing read,write,execute permissions for world.Changing groupname of /u01/app/oraInventory to oinstall.The execution of the script is complete.[root@pthello1 ~]# /u01/app/11.2.0/grid/root.shPerforming root user operation for Oracle 11gThe following environment variables are set as:ORACLE_OWNER= gridORACLE_HOME= /u01/app/11.2.0/gridEnter the full pathname of the local bin directory: [/usr/local/bin]: Copying dbhome to /usr/local/bin ...Copying oraenv to /usr/local/bin ...Copying coraenv to /usr/local/bin ...Creating /etc/oratab file...Entries will be added to the /etc/oratab file as needed by Database Configuration Assistant when a database is createdFinished running generic part of root script.Now product-specific root actions will be performed.Using configuration parameter file: /u01/app/11.2.0/grid/crs/install/crsconfig_params Creating trace directoryInstalling Trace File AnalyzerOLR initialization - successfulroot walletroot wallet certroot cert exportpeer walletprofile reader walletpa walletpeer wallet keyspa wallet keyspeer cert requestpa cert requestpeer certpa certpeer root cert TPprofile reader root cert TPpa root cert TPpeer pa cert TPpa peer cert TPprofile reader pa cert TPprofile reader peer cert TPpeer user certpa user certAdding Clusterware entries to upstartCRS-2672: Attempting to start 'ora.mdnsd' on 'pthello1'CRS-2676: Start of 'ora.mdnsd' on 'pthello1' succeededCRS-2672: Attempting to start 'ora.gpnpd' on 'pthello1'CRS-2676: Start of 'ora.gpnpd' on 'pthello1' succeededCRS-2672: Attempting to start 'ora.cssdmonitor' on 'pthello1'CRS-2672: Attempting to start 'ora.gipcd' on 'pthello1'CRS-2676: Start of 'ora.cssdmonitor' on 'pthello1' succeededCRS-2676: Start of 'ora.gipcd' on 'pthello1' succeededCRS-2672: Attempting to start 'ora.cssd' on 'pthello1'CRS-2672: Attempting to start 'ora.diskmon' on 'pthello1'CRS-2676: Start of 'ora.diskmon' on 'pthello1' succeededCRS-2676: Start of 'ora.cssd' on 'pthello1' succeededASM created and started successfully.Disk Group OCR created successfully.clscfg: -install mode specifiedSuccessfully accumulated necessary OCR keys.Creating OCR keys for user 'root', privgrp 'root'..Operation successful.CRS-4256: Updating the profileSuccessful addition of voting disk a6bad62405144f4bbf5ff6551ea45a59.Successful addition of voting disk 538bba4d8aa14f8dbf111803543072a8.Successful addition of voting disk 59db1c91b1f04fb9bf6454344c5774e4.Successfully replaced voting disk group with +OCR.CRS-4256: Updating the profileCRS-4266: Voting file(s) successfully replaced## STATE File Universal Id File Name Disk group-- ----- ----------------- --------- ---------1. ONLINE a6bad62405144f4bbf5ff6551ea45a59 (ORCL:OCR_VOL1) [OCR]2. ONLINE 538bba4d8aa14f8dbf111803543072a8 (ORCL:OCR_VOL2) [OCR]3. ONLINE 59db1c91b1f04fb9bf6454344c5774e4 (ORCL:OCR_VOL3) [OCR]Located 3 voting disk(s).CRS-2672: Attempting to start 'ora.asm' on 'pthello1'CRS-2676: Start of 'ora.asm' on 'pthello1' succeededCRS-2672: Attempting to start 'ora.OCR.dg' on 'pthello1'CRS-2676: Start of 'ora.OCR.dg' on 'pthello1' succeededConfigure Oracle Grid Infrastructure for a Cluster ... succeeded1:pdksh ########################################### [100%] [root@pthello2 ~]# /u01/app/oraInventory/orainstRoot.shChanging permissions of /u01/app/oraInventory.Adding read,write permissions for group.Removing read,write,execute permissions for world.Changing groupname of /u01/app/oraInventory to oinstall.The execution of the script is complete.[root@pthello2 ~]# /u01/app/11.2.0/grid/root.shPerforming root user operation for Oracle 11gThe following environment variables are set as:ORACLE_OWNER= gridORACLE_HOME= /u01/app/11.2.0/gridEnter the full pathname of the local bin directory: [/usr/local/bin]:Copying dbhome to /usr/local/bin ...Copying oraenv to /usr/local/bin ...Copying coraenv to /usr/local/bin ...Creating /etc/oratab file...Entries will be added to the /etc/oratab file as needed byDatabase Configuration Assistant when a database is createdFinished running generic part of root script.Now product-specific root actions will be performed.Using configuration parameter file: /u01/app/11.2.0/grid/crs/install/crsconfig_paramsCreating trace directoryInstalling Trace File AnalyzerOLR initialization - successfulAdding Clusterware entries to upstartCRS-4402: The CSS daemon was started in exclusive mode but found an active CSS daemon on node pthello1, number 1, and is terminatingAn active cluster was found during exclusive startup, restarting to join the clusterConfigure Oracle Grid Infrastructure for a Cluster ... succeeded[root@pthello1 ~]# /u01/app/oracle/product/11.2.0/db_1/root.shPerforming root user operation for Oracle 11gThe following environment variables are set as:ORACLE_OWNER= oracleORACLE_HOME= /u01/app/oracle/product/11.2.0/db_1Enter the full pathname of the local bin directory: [/usr/local/bin]:The contents of "dbhome" have not changed. No need to overwrite.The contents of "oraenv" have not changed. No need to overwrite.The contents of "coraenv" have not changed. No need to overwrite.Entries will be added to the /etc/oratab file as needed byDatabase Configuration Assistant when a database is createdFinished running generic part of root script.Now product-specific root actions will be performed.Finished product-specific root actions.[root@pthello1 ~]#[root@pthello2 ~]# /u01/app/oraInventory/orainstRoot.shChanging permissions of /u01/app/oraInventory.Adding read,write permissions for group.Removing read,write,execute permissions for world.Changing groupname of /u01/app/oraInventory to oinstall.The execution of the script is complete.[root@pthello2 ~]# /u01/app/oracle/product/11.2.0/db_1/root.sh Performing root user operation for Oracle 11gThe following environment variables are set as:ORACLE_OWNER= oracleORACLE_HOME= /u01/app/oracle/product/11.2.0/db_1Enter the full pathname of the local bin directory: [/usr/local/bin]: The contents of "dbhome" have not changed. No need to overwrite. The contents of "oraenv" have not changed. No need to overwrite. The contents of "coraenv" have not changed. No need to overwrite.Entries will be added to the /etc/oratab file as needed by Database Configuration Assistant when a database is created Finished running generic part of root script.Now product-specific root actions will be performed.Finished product-specific root actions.[root@pthello2 ~]#三、安装数据库软件[root@pthello1 ~]# /u01/app/oracle/product/11.2.0/db_1/root.sh Performing root user operation for Oracle 11gThe following environment variables are set as:ORACLE_OWNER= oracleORACLE_HOME= /u01/app/oracle/product/11.2.0/db_1Enter the full pathname of the local bin directory: [/usr/local/bin]: The contents of "dbhome" have not changed. No need to overwrite. The contents of "oraenv" have not changed. No need to overwrite. The contents of "coraenv" have not changed. No need to overwrite.Entries will be added to the /etc/oratab file as needed by Database Configuration Assistant when a database is created Finished running generic part of root script.Now product-specific root actions will be performed.Finished product-specific root actions.[root@pthello2 ~]# /u01/app/oracle/product/11.2.0/db_1/root.sh Performing root user operation for Oracle 11gThe following environment variables are set as:ORACLE_OWNER= oracleORACLE_HOME= /u01/app/oracle/product/11.2.0/db_1Enter the full pathname of the local bin directory: [/usr/local/bin]: The contents of "dbhome" have not changed. No need to overwrite. The contents of "oraenv" have not changed. No need to overwrite. The contents of "coraenv" have not changed. No need to overwrite.Entries will be added to the /etc/oratab file as needed by Database Configuration Assistant when a database is created Finished running generic part of root script.Now product-specific root actions will be performed.Finished product-specific root actions.四、配置数据库密码:system123五、集群状态验证。
数据库主从同步配置MySql数据双向同步配置的方法

数据库主从同步配置MySql数据双向同步配置的方法配置MySQL数据库的主从同步可以实现数据的双向同步,以下是一种常见的配置方法:1. 确保两台MySQL服务器之间能够互相访问,比如在操作系统级别上配置好网络和防火墙规则。
2. 在主服务器上,编辑MySQL配置文件(f或my.ini),找到并修改以下几个参数:```server-id = 1 #设置服务器唯一ID,主服务器设为1,从服务器设为不同的值log_bin = mysql-bin #开启二进制日志记录功能binlog_format = row #设置二进制日志的格式为行级格式```3. 在主服务器上重启MySQL服务,使配置生效。
4. 在主服务器上创建一个专门用于主从同步的账号,并授予对应的权限。
比如创建一个账号名为replication的账号,并为其授予REPLICATION SLAVE权限:```sqlCREATE USER 'replication'@'从服务器IP' IDENTIFIED BY '密码';GRANT REPLICATION SLAVE ON *.* TO 'replication'@'从服务器IP';FLUSH PRIVILEGES;```5. 在从服务器上,编辑MySQL配置文件(f或my.ini),找到并修改以下几个参数:```server-id = 2 #设置服务器唯一ID,主服务器设为1,从服务器设为不同的值 log_bin = mysql-bin #开启二进制日志记录功能binlog_format = row #设置二进制日志的格式为行级格式```6. 在从服务器上重启MySQL服务,使配置生效。
7. 在从服务器上执行以下命令,配置主从关系:```sqlCHANGE MASTER TOMASTER_HOST ='主服务器IP',MASTER_PORT = 主服务器端口号,MASTER_USER ='replication',MASTER_PASSWORD ='密码',MASTER_LOG_FILE ='主服务器当前二进制日志文件名',MASTER_LOG_POS = 主服务器当前二进制日志位置;```8. 在从服务器上启动从服务器的复制进程:```sqlSTART SLAVE;```9. 在主服务器上执行以下命令,查看主从同步状态:```sqlSHOW MASTER STATUS;```10. 在从服务器上执行以下命令,查看主从同步状态:```sqlSHOW SLAVE STATUS;```以上是一种常见的MySQL数据库主从同步配置方法,根据实际情况可能还需要进行其他配置和调优。
如何在局域网中搭建数据库服务器

如何在局域网中搭建数据库服务器在局域网中搭建数据库服务器是为了方便团队成员之间的数据共享和协作,提高工作效率。
本文将介绍如何在局域网中搭建数据库服务器并进行配置。
一、选择数据库服务器软件在搭建数据库服务器之前,我们需要选择适合的数据库服务器软件。
常见的数据库服务器软件有MySQL、Oracle、SQL Server等。
根据自己的需求和技术水平选择一个合适的数据库服务器软件。
二、准备服务器硬件搭建数据库服务器需要一台稳定的服务器来运行数据库软件。
服务器的硬件配置需根据数据库的规模和访问量来确定。
一般来说,至少需要4GB的内存,100GB的硬盘空间和2个以上的CPU核心来保证服务器的性能。
三、安装数据库服务器软件1. 软件下载与安装:根据所选择的数据库服务器软件,前往官方网站下载最新版本的软件安装包。
下载完成后,按照软件安装向导进行安装。
2. 配置管理员账户:在安装过程中,会要求设置管理员账户,包括用户名和密码。
请务必设置一个安全的密码,以保护数据库的安全性。
3. 端口配置:数据库服务器通过端口来监听用户请求和与客户端进行通信。
默认情况下,MySQL使用3306端口,Oracle使用1521端口,SQL Server使用1433端口。
如果需要修改默认端口号,请在安装过程中进行相应配置。
四、配置数据库服务器1. 数据库创建:在数据库服务器上创建一个新的数据库,并设置相关的配置参数。
参数包括字符集、排序规则等。
根据业务需求选择合适的选项。
2. 用户权限管理:设置数据库用户及其权限,限制用户访问数据库的权限范围,保证数据的安全性。
通常会设置管理员账户和普通用户账户进行权限管理。
3. 数据库连接配置:配置数据库服务器的连接信息,包括主机名、端口号、数据库名、用户名和密码等。
根据实际情况修改配置文件或使用可视化工具进行配置。
五、测试数据库服务器连接完成数据库服务器的配置后,需要测试服务器的连接是否正常。
可以使用命令行工具或可视化工具连接数据库服务器,并执行一些简单的SQL语句进行测试。
如何在电脑上搭建数据库服务器独立IP

如何在电脑上搭建数据库服务器独立IP在当今信息化时代,数据库服务器扮演着至关重要的角色。
在许多情况下,构建一个拥有独立IP的数据库服务器是必要的。
本文将介绍如何在电脑上搭建一个具有独立IP的数据库服务器。
第一步: 准备工作在开始之前,我们需要准备一些必要的工作。
首先,确保你的电脑满足一些基本的要求,包括稳定的网络连接和足够的处理能力。
其次,确定你需要使用的数据库管理系统,比如MySQL、Oracle或者SQL Server等。
最后,确保你已经具备一定的计算机网络知识和操作经验。
第二步: 安装数据库管理系统在搭建数据库服务器之前,我们首先需要在电脑上安装所需的数据库管理系统。
根据你的需求和操作系统的不同,选择对应的安装程序,并按照提示进行安装。
确保选择自定义安装选项,以便选择需要的组件和功能。
第三步: 配置数据库服务器安装完成后,我们需要配置数据库服务器以使其具有独立的IP地址。
打开数据库管理系统,进入配置界面。
根据系统的不同,配置方式可能会有所差异。
一般来说,你需要指定服务器的监听地址为本地IP地址,同时设置一个固定的外部IP地址作为服务器的公网地址。
另外,确保打开数据库的网络访问功能,以便外部设备可以通过IP地址与数据库服务器进行通信。
第四步: 防火墙配置为了确保数据库服务器的安全性,我们需要配置防火墙来限制对数据库的访问。
打开操作系统的防火墙设置,添加规则以允许外部设备与数据库服务器进行通信。
同时,为了防止恶意攻击和未授权访问,建议只允许特定IP地址或IP地址范围访问数据库。
第五步: 测试连接在完成以上配置后,我们可以进行一次连接测试,确保数据库服务器能够正常运行。
在另一台电脑上打开数据库客户端软件,输入配置的外部IP地址和数据库的端口号,尝试连接到数据库服务器。
如果连接成功并且可以正常操作数据库,说明你已经成功搭建了一个具有独立IP的数据库服务器。
总结通过以上步骤,我们可以在电脑上搭建一个具有独立IP的数据库服务器。
数据库服务器安装及配置手册 PPT课件

器的硬件配置,主要是由网络对服务器的要 求和服务器所担负的工作决定。
4
服务器硬件配置
1. 运行企望ERP系统和SQLSERVER2003的服务器 ,推荐如下硬件配置:
2. CPU:P4 2.7或以上;(高性能CPU) 3. 内存:2G或以上; 4. 硬盘:100G(大容量硬盘)
(3)SQL客户端的安装及配置
2 SQL客户端的安装 • 在客户端电脑中,只需安装“客户端网络连接
工具”即可,安装完成后,就可以通过配置客 户端网络实用工具来连接SQL服务器了。配置 过程如下:
64
SQL客户端的安装及配置
65
SQL客户端的安装及配置
• 可选择SQL访问的协议,默认为TCPIP。
数据库维护计划
第五步:维护计划中的第三项任务,指定事 务日志备份计划,点击“更改”按钮,如图 所示。
90
数据库维护计划
第五步:指定维护计划所生成的报表。如图 所示。
指定写入文 件目录
据磁盘空间 设置删除天
周数
91
数据库维护计划
第六步:指定维护计划所生的记录限制行以 内。如图所示。
92
数据库维护计划
42打开sql的企业管理器43从上至下依次展开控制台目录找到witbase数据库名右击所有任务备份数据库44点击添加增加新的数据备份路径将弹出选择备份目录界面选文件名选项点击右边的按钮会弹出数据备份目的设定界面46选择数据备份路径及文件名按确定后完成备份路径的设置
上海企望信息科技有限公司
Want I.T. CO., LTD
31
• 第三步:
如图所示
32
• 第四步:
用友NC数据库服务器参数配置说明

数据库服务器参数配置说明目录DB2的参数配置说明数据库环境变量配置2CPU,2G内存配置建议4CPU,4G内存配置建议8CPU,8G内存配置建议ORACLE的参数配置说明公共参数(适用于所有硬件配置)2CPU,2G内存配置建议4CPU,4G内存,32位数据库配置建议4CPU,4G内存,64位数据库配置建议8CPU,8G内存配置建议SQL Server数据库配置建议DB2的参数配置说明下面参数是针对NC应用建议性调整,具体需要根据应用规模和特点再调整数据库环境变量设置db2set DB2_SKIPINSERTED=YESdb2set DB2_INLIST_TO_NLJN=YESdb2set DB2_MINIMIZE_LISTPREFETCH=YESdb2set DB2_ANTIJOIN=EXTEND2CPU,2G内存配置建议系统大约支持用户并发数:30左右数据库管理器配置参数--1.应用程序支持层堆大小(aslheapsz) (4K)update dbm cfg using aslheapsz 256;--2.排序堆阈值(sheapthres) (4K)update dbm cfg using sheapthres 20000 ;--3.代理程序的最大数目(maxagents)update dbm cfg using maxagents 100;--4.代理程序池大小(NUM_POOLAGENTS)update dbm cfg using NUM_POOLAGENTS 30;数据库配置参数假设NC数据库名称为“ncdata00”--1.数据库堆(DBHEAP)(4K)update database configuration for ncdata00 using DBHEAP 4096 automatic;--2.日志缓冲区大小(logbufsz) (4K)update database configuration for ncdata00 using logbufsz 512 automatic;--3.编目高速缓存大小(CATALOGCACHE_SZ) (4K)update database configuration for ncdata00 using CATALOGCACHE_SZ 1024 automatic;--4.用于锁定列表的最大内存(locklist) (4K)update database configuration for ncdata00 using locklist 4096 automatic;--5.最大应用程序控制堆大小(app_ctl_heap_sz) (4K)-- update database configuration for ncdata00 using app_ctl_heap_sz 2048;update database configuration for ncdata00 using appl_memory automatic;--6.排序堆大小(sortheap)(4K)update database configuration for ncdata00 using sortheap 2048 automatic;--7.语句堆大小(stmtheap) (4K)update database configuration for ncdata00 using stmtheap 2048 automatic;--8.应用程序堆大小(applheapsz)(4K)update database configuration for ncdata00 using applheapsz 1024 automatic;--9.程序包高速缓存大小(pckcachesz) (4K)update database configuration for ncdata00 using pckcachesz 10240 automatic;--10. 逐步升级前锁定列表的最大百分比(maxlocks)update database configuration for ncdata00 using maxlocks 80;--11. 异步页清除程序数目(NUM_IOCLEANERS)update database configuration for ncdata00 using NUM_IOCLEANERS 1 automatic;--12. I/O 服务器数目(NUM_IOSERVERS)update database configuration for ncdata00 using NUM_IOSERVERS 1 automatic;--13. 活动应用程序的最大数目(MAXAPPLS)update database configuration for ncdata00 using MAXAPPLS 50;--14. 活动应用程序的平均数目(AVG_APPLS)update database configuration for ncdata00 using AVG_APPLS 30;--15.日志文件的大小(logfilsiz) (4K)update database configuration for ncdata00 using logfilsiz 40960;--16.主日志文件数目(logprimary)update database configuration for ncdata00 using logprimary 12;--17.辅助日志文件数目(LOGSECOND)update database configuration for ncdata00 using logsecond 100;--18.组提交计数(MINCOMMIT)update database configuration for ncdata00 using MINCOMMIT 1;[返回页首]4CPU,4G内存配置建议系统大约支持用户并发数:80左右数据库管理器配置参数--1.应用程序支持层堆大小(aslheapsz) (4K)update dbm cfg using aslheapsz 512;--2.排序堆阈值(sheapthres) (4K)update dbm cfg using sheapthres 30000 ;--3.代理程序的最大数目(maxagents)update dbm cfg using maxagents 150;--4.代理程序池大小(NUM_POOLAGENTS)update dbm cfg using NUM_POOLAGENTS 60;数据库配置参数假设NC数据库名称为“ncdata00”--1.数据库堆(DBHEAP)(4K)update database configuration for ncdata00 using DBHEAP 7168 automatic;--2.日志缓冲区大小(logbufsz) (4K)update database configuration for ncdata00 using logbufsz 1024 automatic;--3.编目高速缓存大小(CATALOGCACHE_SZ) (4K)update database configuration for ncdata00 using CATALOGCACHE_SZ 2048 automatic;--4.用于锁定列表的最大内存(locklist) (4K)update database configuration for ncdata00 using locklist 8192 automatic;--5.最大应用程序控制堆大小(app_ctl_heap_sz) (4K)-- update database configuration for ncdata00 using app_ctl_heap_sz 3072;update database configuration for ncdata00 using appl_memory automatic;--6.排序堆大小(sortheap)(4K)update database configuration for ncdata00 using sortheap 3072 automatic;--7.语句堆大小(stmtheap) (4K)update database configuration for ncdata00 using stmtheap 3072 automatic;--8.应用程序堆大小(applheapsz)(4K)update database configuration for ncdata00 using applheapsz 1024 automatic;--9.程序包高速缓存大小(pckcachesz) (4K)update database configuration for ncdata00 using pckcachesz 15360 automatic;--12. 逐步升级前锁定列表的最大百分比(maxlocks)update database configuration for ncdata00 using maxlocks 80;--13. 异步页清除程序数目(NUM_IOCLEANERS)update database configuration for ncdata00 using NUM_IOCLEANERS 1 automatic;--14. I/O 服务器数目(NUM_IOSERVERS)update database configuration for ncdata00 using NUM_IOSERVERS 1 automatic;--15. 活动应用程序的最大数目(MAXAPPLS)update database configuration for ncdata00 using MAXAPPLS 150;--16. 活动应用程序的平均数目(AVG_APPLS)update database configuration for ncdata00 using AVG_APPLS 60;--17.日志文件的大小(logfilsiz) (4K)update database configuration for ncdata00 using logfilsiz 51200;--18.主日志文件数目(logprimary)update database configuration for ncdata00 using logprimary 12;--19.辅助日志文件数目(LOGSECOND)update database configuration for ncdata00 using logsecond 100;--20.组提交计数(MINCOMMIT)update database configuration for ncdata00 using MINCOMMIT 1;[返回页首]8CPU,8G内存配置建议系统大约支持用户并发数:150左右数据库管理器配置参数--1.应用程序支持层堆大小(aslheapsz) (4K)update dbm cfg using aslheapsz 1024;--2.排序堆阈值(sheapthres) (4K)update dbm cfg using sheapthres 40000 ;--3.代理程序的最大数目(maxagents)update dbm cfg using maxagents 300;--4.代理程序池大小(NUM_POOLAGENTS)update dbm cfg using NUM_POOLAGENTS 100;数据库配置参数假设NC数据库名称为“ncdata00”--1.数据库堆(DBHEAP)(4K)update database configuration for ncdata00 using DBHEAP 10240 automatic;--2.日志缓冲区大小(logbufsz) (4K)update database configuration for ncdata00 using logbufsz 2048 automatic;--3.编目高速缓存大小(CATALOGCACHE_SZ) (4K)update database configuration for ncdata00 using CATALOGCACHE_SZ 3072 automatic;--4.用于锁定列表的最大内存(locklist) (4K)update database configuration for ncdata00 using locklist 10240 automatic;--5.最大应用程序控制堆大小(app_ctl_heap_sz) (4K)-- update database configuration for ncdata00 using app_ctl_heap_sz 4096;update database configuration for ncdata00 using appl_memory automatic;--6.排序堆大小(sortheap)(4K)update database configuration for ncdata00 using sortheap 4096 automatic;--7.语句堆大小(stmtheap) (4K)update database configuration for ncdata00 using stmtheap 3072 automatic;--8.应用程序堆大小(applheapsz)(4K)update database configuration for ncdata00 using applheapsz 2048 automatic;--9.程序包高速缓存大小(pckcachesz) (4K)update database configuration for ncdata00 using pckcachesz 20480 automatic;--12. 逐步升级前锁定列表的最大百分比(maxlocks)update database configuration for ncdata00 using maxlocks 80;--13. 异步页清除程序数目(NUM_IOCLEANERS)update database configuration for ncdata00 using NUM_IOCLEANERS 1 automatic;--14. I/O 服务器数目(NUM_IOSERVERS)update database configuration for ncdata00 using NUM_IOSERVERS 1 automatic;--15. 活动应用程序的最大数目(MAXAPPLS)update database configuration for ncdata00 using MAXAPPLS 300;--16. 活动应用程序的平均数目(AVG_APPLS)update database configuration for ncdata00 using AVG_APPLS 200;--17.日志文件的大小(logfilsiz) (4K)update database configuration for ncdata00 using logfilsiz 51200;--18.主日志文件数目(logprimary)update database configuration for ncdata00 using logprimary 15;--19.辅助日志文件数目(LOGSECOND)update database configuration for ncdata00 using logsecond 100;--20.组提交计数(MINCOMMIT)update database configuration for ncdata00 using MINCOMMIT 1; [返回页首]ORACLE的参数配置说明下面是建议的oracle参数配置表,需要根据具体应用情况再调整。
K3V10.4 64位数据库服务器安装配置解决方案
K/3V10.4 产品64位(x64)数据库解决方案1、K/3数据服务部件对64位数据库的支持目前Windows平台支持的64位硬件架构有两种:IA64和x64,前者的产品核心是Intel 和HP联合研制的安腾系列CPU,后者在服务器平台上主要是AMD皓龙和Intel带EM64T 扩展的至强(Xeon)。
针对IA64和x64,微软分别有相应版本的64位Windows Server和SQL Server,互相不能通用。
K/3数据服务部件从9.0版本开始,支持IA64架构的64位SQL Server,但我们客户使用安腾服务器的不多,现在绝大多数客户的64位服务器是x64架构的。
K/3 10.3及更早版本的K/3数据服务部件都不支持x64架构64位Windows和SQL Server,这表示虽然K/3可以用x64版SQL Server作为数据库服务器,但不能通过中间层对账套进行备份/恢复、新建等操作。
K/3数据服务部件从K/3V10.4包括(K/310.3 SP1)开始提供x64版SQL Server支持,但因为安装程序暂时不支持x64版Windows,必须手工注册K/3数据服务部件,详细操作方法见下。
备注:最近陆续有机构同事反映,按K/3V10.3 SP1发版说明在64位SQL Server上注册K/3数据服务部件后,在中间层不能新建账套,提示一般如下图1:图1 新建账套出错我们测试后发现除了发版说明上的步骤外,还需要再做几个附加的步骤才能使10.3 SP1在x64数据库服务器上新建账套成功。
2、64位数据库服务器的配置方案2.1 第一步安装数据库服务部件在64位数据库服务器上安装K/3 V10.4,只选择“数据服务部件”。
虽然K/3安装程序不支持x64版Windows操作系统,但只是部分文件拷贝和写注册表的位置不对,造成装完之后不能用,安装程序本身还是可以运行的。
2.3 第二步配置PKDAC组件1.建议将数据库与中间层加入同一个域,并都以域用户登录2.确认数据库服务器上启用了COM+和MSDTC服务,如下图图2 启用COM+和MSDTC3.在数据库服务器的“组件服务”中手工创建COM+组件包,命名为KDSQL4.在KDSQL里安装新组件,位置在Windows\SysWOW64\KDCOM目录中的PKDac.dll图3 注册新组件PKDAC5.组件包属性参考下图红框部分设置图4 组件包属性设置备注:在数据库与中间层在同一域下,可以忽略该步骤6.重启服务器2.4 第三步修改注册表运行注册表编辑器,手工增加这个路径项:HKEY_LOCAL_MACHINE\SOFTWARE\Kingdee\KDPRODUCT 路径项下添加键值PATH,字符串类型,赋值为第二步时安装K/3的路径,默认是:C:\Program Files (x86)\Kingdee\K3ERP注意:如果在第一步,安装数据服务部件时不是用这个路径,请更改为实际路径。
MySQL数据库双机热备服务器配置
MySQL数据库双机热备服务器配置MySQL数据库服务器安装配置北京华夏电通科技有限公司2008年01月10日目录一平台整体拓扑结构错误!未定义书签。
二概述12.1 安装预备12.2 安装规划12.2.1 服务器磁盘分区12.2.2 磁盘阵列22.2.3 IP规划22.3 安装概要2三操作系统安装配置23.1 系统安装33.2 网络配置(Bonding)63.3 JRE安装9四HDLM安装94.1 安装9五数据库安装配置13六Rose HA安装配置136.1 安装136.2 初始设置Rose软件156.3 配置双机HA 16概述mysql图例:千兆光纤心跳线服务器千兆铜缆两台服务器通过以太网卡连接网络,通过网络对外提供服务、相互通信。
两台服务器之间用com 口直截了当互联,双机热备软件利用那个连接进行双机热备有关的通信、监控、和操纵等等。
两台服务器通过HBA 卡连接FC 网络,访咨询共同的磁盘阵列,实现双机热不系统必要的磁盘。
安装预备 硬件信息软件预备操作系统:Red Hat Enterprise Linux AS 4 update5 x86 64位版 JRE :Java Runtime Environment 5.0 Update 13 for linux x64版 HDLM 5.9.3-00 for linuxMySQL 5.0.45-0 for RedHatEnterpriseLinux 64 Rose HA for linux 6.1 安装规划 服务器磁盘分区磁盘阵列MySQL数据库双机热备系统需要使用HDS AMS1000磁盘阵列提供的磁盘,在AMS1000上,unit 0的disk 0到disk 3,共4块300G磁盘做R AID 1+0,分配给MySQL数据库储备数据,可用容量约600G。
192.168.35.1和192.168.35.2分不是两台服务器的固定IP,192.168.35. 3是漂移IP,负责在双机系统中对外提供MySQL服务,在银河平台中有用到此MySQL服务的应用均要将目标地址指向192.168.35.3而不是1或2。
odbc数据库配置正确方法
odbc数据库配置正确方法ODBC数据库配置正确方法一、概述ODBC(Open Database Connectivity)是一种标准的数据库访问接口,允许应用程序通过统一的方式连接和访问各种数据库。
正确配置ODBC数据库连接是保证应用程序正常运行的重要环节。
二、安装ODBC驱动程序在进行ODBC数据库配置之前,首先需要安装相应的ODBC驱动程序。
不同的数据库有不同的ODBC驱动程序,因此需要根据实际情况选择合适的驱动程序进行安装。
三、创建ODBC数据源1. 打开ODBC数据源管理器。
在Windows操作系统中,可以通过“控制面板” - “管理工具” - “ODBC数据源(32位)”打开ODBC数据源管理器。
2. 在ODBC数据源管理器中,切换到“用户DSN”或“系统DSN”选项卡,这取决于你希望创建的数据源是用户特定的还是系统范围内可用的。
3. 点击“添加”按钮,选择相应的ODBC驱动程序。
4. 根据ODBC驱动程序的要求填写数据源名称、描述等信息。
5. 配置连接参数,包括数据库服务器地址、端口号、用户名、密码等。
6. 点击“测试连接”按钮,确保连接配置正确。
7. 点击“确定”完成ODBC数据源的创建。
四、配置应用程序连接在应用程序中使用ODBC连接数据库时,需要进行相应的配置。
1. 引入ODBC相关的库文件或依赖。
2. 在应用程序中指定ODBC数据源名称或连接字符串。
ODBC数据源名称是在创建ODBC数据源时指定的名称,连接字符串是连接数据库的一种灵活方式,可以直接指定数据库的地址、用户名、密码等信息。
3. 使用ODBC API或相应的编程语言提供的ODBC接口,进行连接、查询、更新等操作。
五、常见问题与解决方法1. 连接超时:可以尝试增加连接超时时间,或检查网络连接是否正常。
2. 数据库驱动错误:确保安装了正确版本的ODBC驱动程序,驱动程序是否与应用程序位数(32位或64位)一致。
3. 用户名或密码错误:检查用户名和密码是否正确,并确保数据库用户具有足够的权限。
实验1 MySQL数据库服务器配置
实验1 MySQL数据库服务器配置(预备知识:第1,2章;分值:16分;需辅导教师评分)1.实验目的掌握MySQL的安装方法,练习MySQL数据库服务器的使用,理解MySQL 服务器的组成,掌握MySQL服务器的配置方法。
2.实验内容【实验1-1】下载当前最新版本的MySQL,或者之前某个版本的MySQL,并在Windows上完成安装。
【实验1-2】安装完毕后,找到MySQL的配置文件;并查看初始化配置文件的内容。
【实验1-3】使用start和stop命令启动和关闭mysql数据库。
【实验1-4】连接到MySQL服务器,连接成功后是一个mysql>的提示。
【实验1-5】在MySQL数据库服务器端找到错误日志文件,并查看错误日志的内容。
【实验1-6】通过初始化配置文件,启用二进制日志、慢查询日志和通用查询日志。
【实验1-7】查看二进制日志、慢查询日志和通用查询日志的内容。
【实验1-8】关闭二进制日志、慢查询日志和通用查询日志。
【实验1-9】用CREATE DATABASE语句创建数据库,使用SHOW DATABASES命令查看显示所有数据库,可以看到新建的数据库名称。
【实验1-10】使用Workbench图形化管理工具创建数据库。
【实验1-11】使用SHOW STATUS命令查看系统状态参数;使用SHOW VARIABLES命令查看服务器变量设置。
【实验1-12】使用命令“select @@basedir”和“select @@datadir”寻找到MySQL的安装目录和数据存放目录。
【实验1-13】使用SHOW ENGINES查看所有引擎,在配置文件中更改默认存储引擎default-storage-engine变量,改为MyISAM。
重启MySQL,查看默认存储引擎是否改变。
【实验1-14】创建一个数据表t_myisam(id int auto_increment, name varchar(30),primary key(id)),创建时显式指定存储引擎为MyISAM。
- 1、下载文档前请自行甄别文档内容的完整性,平台不提供额外的编辑、内容补充、找答案等附加服务。
- 2、"仅部分预览"的文档,不可在线预览部分如存在完整性等问题,可反馈申请退款(可完整预览的文档不适用该条件!)。
- 3、如文档侵犯您的权益,请联系客服反馈,我们会尽快为您处理(人工客服工作时间:9:00-18:30)。
因每台电脑的系统为网络同传,因此每台电脑的数据库为同一台电脑的数据库,且电脑有还原功能,每次上机要使用本机的数据库,需配置服务器
1、开始——所有程序——U8V10——系统服务——应用服务器配置,双击打开窗口
应用服务器配置方法:
2.点击服务器参数配置选项卡,进入服务器参数配置窗口
参照负载均衡即本机电脑号,将加密服务器改为自己的电脑号:如stu98b674,然后单击[确定]
3.配置数据库服务器
双击数据数据库服务器,在新建数据库窗口,删除原来的数据源(第一行蓝色光标处),单击增加按钮。
在新建数据源窗口,输入数据源(default),输入数据库服务器(local),输入:连接使用密码:sa123”点击[测试连接]],提示成功才可操作。