圣歌MRX中文说明书
圣歌MRX中文说明书
介绍感谢您购买Anthem MRX系列接收机.MRX300、MRX500和MRX700接收机都是尖端的家庭影院声频设配并具有接口交换和视频上转换功能,多媒体和第二区能力,FM/AM调谐器,高清晰无线电™接收(MRX 700 120伏)和连接自选MDX1 iPod /iphone。
Anthem产品的设计利用最高水平的电路设计和私有软件以及优越的建设质量、创新的特点、直观的人类工程学、承受着巨大的灵活性等等这些将创造激情的现场表演和激动人心的极好影院。
1.1制造之前的关系尽快地检查你所收到的一切事物并列好,报告与你的经销商之间的差异。
以防万一他们有需要的一天,保存好购买时授权Anthem经销商的包装材料和发票,没有它,售后服务将不被提供在保修期内。
包装清单:MRX接收机、FM天线、第二区遥控器、主遥控器、AM环形天线、CR2025电池、2块AAA电池、IEC电源线(只有美国或欧洲类型)Anthem房间纠正的额外项目(ARC):软件安装光盘、麦克风和夹、收缩架、系列延长线、USB麦克风电缆序列号:尽管现在方便联系,但还是把它复制下来以备日后参考。
1.2使用中注意事项在连接或不连接任何部件之前切断电源线;如果在冷的环境下接收机被转移或储存起来,那么在使用之前请把房间温度变暖;基于持续运行可能会改变工作中的进展。
如果本手册含有不符之处请检查最近手册或软件。
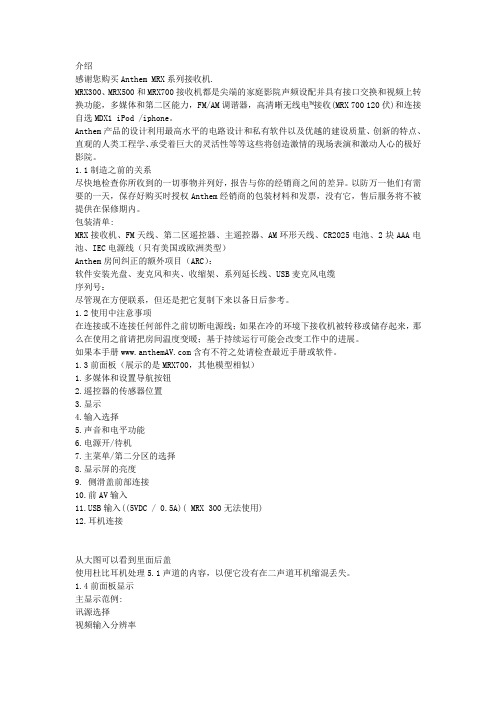
1.3前面板(展示的是MRX700,其他模型相似)1.多媒体和设置导航按钮2.遥控器的传感器位置3.显示4.输入选择5.声音和电平功能6.电源开/待机7.主菜单/第二分区的选择8.显示屏的亮度9. 侧滑盖前部连接10.前AV输入B输入((5VDC / 0.5A)( MRX 300无法使用)12.耳机连接从大图可以看到里面后盖使用杜比耳机处理5.1声道的内容,以便它没有在二声道耳机缩混丢失。
1.4前面板显示主显示范例:讯源选择视频输入分辨率3.前面的数字/环绕声道。
700繁体中文手册MRX-CT
Copy To Cal Number: Range:1 to100
選擇所要複製到的位置 輸入完成按
Calibration Name For Current:xx Or Enter New Name:
輸入新名稱完成按
Calibration Identity For Current:xx Or Enter New Name:
Print List
Page Eject
△
△
△
△
△
8
△
△
△
1
****
***
面銅其他檔案延伸
Mon May 13, 2002 15 : 49 : 55
No.
Name
Identity Sort Name
△
CALIBRATION LIST
Main Menu
New
Edit
View
Print List
Page Eject
1
儀器說明
正面
7 4 1 .
8 5 2 0
9 6 3 ± C
m =
按鍵說明 確認 主選單或功能按鍵 退格 修改(單位,小數點位數等) 校正 m = 測量 手動測試或校正時測量 2 0-9
. C
清除(測試中最後一筆資料) 取消
數字 小數點
背面 MRX PROBES SRP TRP ETP EMX PROBES SMP ECP NIP
步驟8 是否輸入上限? 一般皆設定為:Off
6
Low Limit For Current:Off Or Select Number: 1:Off 2:On
步驟9 是否輸入下限? 一般皆設定為:Off
Measure Fine Lines For Current:Off Or Select Number: 1:Off 2:On
圣歌MRX中文说明书
介绍感谢您购买Anthem MRX系列接收机.MRX300、MRX500和MRX700接收机都是尖端的家庭影院声频设配并具有接口交换和视频上转换功能,多媒体和第二区能力,FM/AM调谐器,高清晰无线电™接收(MRX 700 120伏)和连接自选MDX1 iPod /iphone。
Anthem产品的设计利用最高水平的电路设计和私有软件以及优越的建设质量、创新的特点、直观的人类工程学、承受着巨大的灵活性等等这些将创造激情的现场表演和激动人心的极好影院。
1.1制造之前的关系尽快地检查你所收到的一切事物并列好,报告与你的经销商之间的差异。
以防万一他们有需要的一天,保存好购买时授权Anthem经销商的包装材料和发票,没有它,售后服务将不被提供在保修期内。
包装清单:MRX接收机、FM天线、第二区遥控器、主遥控器、AM环形天线、CR2025电池、2块AAA电池、IEC电源线(只有美国或欧洲类型)Anthem房间纠正的额外项目(ARC):软件安装光盘、麦克风和夹、收缩架、系列延长线、USB麦克风电缆序列号:尽管现在方便联系,但还是把它复制下来以备日后参考。
1.2使用中注意事项在连接或不连接任何部件之前切断电源线;如果在冷的环境下接收机被转移或储存起来,那么在使用之前请把房间温度变暖;基于持续运行可能会改变工作中的进展。
如果本手册含有不符之处请检查最近手册或软件。
1.3前面板(展示的是MRX700,其他模型相似)1.多媒体和设置导航按钮2.遥控器的传感器位置3.显示4.输入选择5.声音和电平功能6.电源开/待机7.主菜单/第二分区的选择8.显示屏的亮度9. 侧滑盖前部连接10.前AV输入B输入((5VDC / 0.5A)( MRX 300无法使用)12.耳机连接从大图可以看到里面后盖使用杜比耳机处理5.1声道的内容,以便它没有在二声道耳机缩混丢失。
1.4前面板显示主显示范例:讯源选择视频输入分辨率3.前面的数字/环绕声道。
极其出色的包围感体验Anthem(圣歌)MRX 740 AV 接收机

Personal Hi-E n d Theater品味私人影音极其出色的包围感体验Anthem (圣歌)MRX 740 A V接收机文/晨光图/小路产品代理:佰籁镫音响Anthem (圣歌)是来自加拿大的品牌,原名Sonic Frontier,产品主要以胆机为主,很受老发烧友的欢迎。
Paradigm (百里登)集团在90年代收购了Anthem。
后来Anthem将主要领域转移到了AV产品,胆机则继续使用原有品牌。
Anthem也是Paradigm旗下影院市场的主打品牌,有着Paradigm强大技术后盾的支持,让Anthem的技术一直走在业界前沿,也是最早支持杜比全景声以及DTS:X的品牌之―。
随着全景声相关软硬件的普及,Anthem于2021年1月推出了全新一代的MRX系列AV接收机,分别是MRX 1140、MRX740及MRX 540,对应11声道、7声道及5声道功放,为用户带来最顶级的沉浸式音效。
>时尚大气的外观设计这次送到本刊试音室的是中端型号MRX740。
外观方面一改以往MRX系列的传统AV机型的外观,采用了Anthem同门STR立体声系列的产品设计——左半侧都是一块大玻璃和液晶屏幕,面板右侧一个大旋钮再配上5颗小按键以及遥控接收窗,整体非常大气、时尚优雅又不失沉稳。
以往繁杂的功能按键,经过莱单的整合和深度优化后,仅靠液晶屏和5个按键就能操作所有设置,十分人性52技术参数■形式:11.2声道环绕前级功放/7声道后级_HDM丨接口 :H D M I2.0b H D C P2.2,可升级至HD M I2.1(8K), H D M I输出支持e A R C音频回传■音频格式:Dolby Atmos、D T S:X、D TSVirtual:X(向下兼容过往格式}■视频格式:Dolby Vision、IMAX Enhanced、H D R、H LG、Y C b C r@4K60、B T.2020■解码芯片:AKM AK4458VN( 32bit/768kHz )■串流平台:AirPlay2、Google Chromecast、蓝牙4.2,即将支持Spotify和Roon■输出功率:1-5通道:140W/8Q、170W/6Q;6-7通道:60W/8Q、75W/6Q■讯噪比:91d B(1-5 声道),86d B(6-7通道)■频率响应:20Hz-30kHz化。
axis 声道播放器使用手册说明书

Player for Soundtrack Business User ManualHow to connect Soundtrack Your Brand's music service to your Axis network audio systemWhen you connect your audio system to Soundtrack Your Brand,you can manage your music and volume settings from the Soundtrack Your Brand webpage.NoteCurrently,you cannot use the Player for Soundtrack Business if your network connection uses a proxy server. Prerequisites•Download the latest firmware for your Axis devices from /audio•Download the Player for Soundtrack Business application from /audio•Download AXIS IP Utility from /support/downloads/axis-ip-utilityPrepare the hardware1.Connect your Axis audio devices to the internet through Power over Ethernet(PoE).2.Choose one of the devices to be the leader,and insert an SD card in the SD card slot.NoteWe recommend AXIS Surveillance Card64GB.See /products/storage/axis-surveillance-card-64-gbSet up your Axis network audio system1.Start AXIS IP Utility to locate your devices on the network.2.Double-click the device name to display the webpage of a device.3.In the device's webpage,go to System Options>Date&Time and check that the date and time settings are correct.4.In Maintenance,click Choose file,browse to the latest firmware file and click Upgrade.5.Repeat steps2-4for all audio devices.6.In the leader device's webpage,go to Audio>System Settings>Available audio devices.7.Click+to add a device to your system.8.Go to Audio>Overview and set the volume to max(0dB).Install the Player for Soundtrack Business application1.In the leader device's webpage,go to System Options>Storage>SD Card and click Format.2.Select ext4from the File system dropdown and click OK twice.3.Go to Applications>Overview.4.Click Choose file,browse to the Player for Soundtrack Business application file and click Upload Package.5.Start the application.6.Go to Application>Player for Soundtrack Business and click the link in the Application Settings section.7.Copy the Device ID from the About section.Connect to Soundtrack Your Brand1.Create an account at 2.Go to Locations and add a zone.3.Select Hardware device and enter the Device ID from the Player for Soundtrack Business application.4.Click Connect player.When you get a confirmation,you are ready to start using Soundtrack Your Brand's music service with your Axis network audio system.TroubleshootingThis section contains a few tips on how to solve problems you may experience.Please contact Axis support if problems persist,or for any other questions regarding Axis devices or the Player for Soundtrack Business application.To learn more about the Soundtrack Business subscription,go to ImportantPlease note that the device does not currently support the use of proxy servers.The firewall needs to be configured according to this document:https:///hc/en-us/articles/115002592192-Firewall-settingsPlayer_for_Soundtrack_Business_1_0will only work with a properly mounted SD Card.Check under storage management if the SD card is working correctly.To check if the application is running,see http://<device IP address>/app_params.shtml?app=sbplayer=34Status overviewYou can get a status overview and troubleshooting section that lists most settings at:http://<device IP Address>/local/sbplayer/main.shtml#/.StatusError message ActionSound is not playing 1.Ensure that the Soundtrack Business version does not show“no lib loaded”(seeMessages below).2.Click“Troubleshoot”(see instructions below).SD card is not connected Ensure SD card is correctly inserted in the device and is formatted according to theinstallation instructions(ext4).AboutMessage ActionWaiting for device ID Ensure connectivity and that the firewall is correctly configured.No lib loaded Ensure connectivity and that firewall is correctly configured.TroubleshootingSee below for appropriate actions if any of these sections state“result:false”.Section ActionIP address and connectivity Ensure connectivity and that the firewall is correctly configured.Ensure connectivity and that the firewall is correctly configured.Connected to Soundtrack Your BrandservicesPaired to Soundzone Use the device ID in Player for Soundtrack Business and enter it on your sound zonepage on .Active subscription Activate your sound zone on .Connected to content provider Ensure connectivity and that the firewall is correctly configured.Authenticated at content provider Ensure connectivity and that the firewall is correctly configured.Channel assigned Add a soundtrack to your sound zone on .Music scheduled No music scheduled to play.Go to to schedule yourmusic.Collections Downloaded Depending on your connection,it can take some time to download music.Volume setting Go to and ensure the volume is set higher than0.User Manual Ver.M3.2 Player for Soundtrack Business Date:July2018©Axis Communications AB,2018Part No.T10128355。
Soundstream EXACT5.2 Coaxial 潜音门系统说明书

1
Coaxial Speaker System
INTRODUCTION AND REGISTRATION
Congratulations on your purchase of the Soundstream EXACT5.2 Coaxial Speaker System. You now own one of the finest car audio speaker systems available.
Hardware 12 each - #8 x 1" sheet metal screws (for mounting speakers and crossovers)
ቤተ መጻሕፍቲ ባይዱ
Connectors 8 each - gold spade connectors (for connecting to crossover)
EXACT5.2X Passive Crossover Network
The EXACT5.2X Passive Crossover represents a new concept in crossover philosophy. The EXACT5.2X crossover consists of high quality, multi-element components with two switchable functions. First is a three position tweeter level control. Second, is a two position midrange “presence” control. The combination of each allows for a multitude of control options. Dual inputs allow for multi-channel amp operation of woofer and tweeter circuits. • 24 dB/octave Acoustic Summation Crossover Slopes • Variable Tweeter and Midrange Controls for added flexibility • Dual Inputs for multi-amp operation and further flexibility • Dynamic Tweeter Level Control allows for improved power handling and continuous output • Ultra-low DCR Inductors for minimal signal loss (High power Air-core in woofer path) • Mylar Film Capacitors to ensure low saturation and accuracy in the high frequencies
Pioneer Mixtrax 车载音响手册说明书

How do you set the clock on a pioneer mixtrax radio. Resetting pioneer mixtrax car stereo. How to turn on pioneer mixtrax radio. How to work a pioneer mixtrax radio.The pioneer stereo has several buttons on the bottom of it which helps you to navigate when the touch is not responding correctly or you do not want to use the touchscreen. chemical bonding and chemical reactions worksheet answerschannel number for 5 seconds, which is displayed on the left side of the display.The stereo will save the channel number and the next time you tap on that channel number, and it will play that radio channel that you saved on it. This is how you save a radio frequency to a stereo channel. Select your desired radio preset This is an important thing to do, when setting up radio channels on your Pioneer car stereo. The radio on the pioneer car stereo has 18-channels on it because it has three presets of FM that it can operate and save channels. As the FM1 preset displays six-channel options on the left side of the display. You can change that preset to two more options and save your frequencies on the new channels of the second and third preset. How would you do that? The next preset by tapping on the FM1 button on the touchscreen, it will take you to the FM2 preset. The procedure for saving radio frequencies on channel numbers for all presets is the same as for FM1 preset.。
SiriusXM Radio 音频系统用户指南说明书
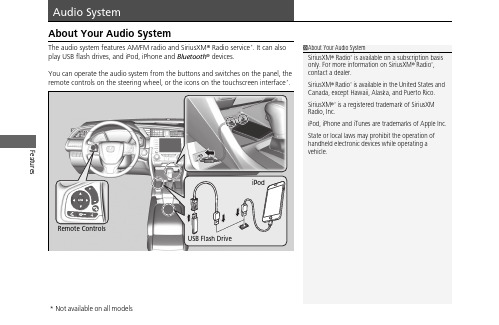
Features About Your Audio SystemThe audio system features AM/FM radio and SiriusXM® Radio service*. It can alsoplay USB flash drives, and iPod, iPhone and Bluetooth® devices.You can operate the audio system from the buttons and switches on the panel, theremote controls on the steering wheel, or the icons on the touchscreen interface.*1About Your Audio SystemSiriusXM® Radio* is available on a subscription basisonly. For more information on SiriusXM® Radio*,contact a dealer.SiriusXM® Radio* is available in the United States andCanada, except Hawaii, Alaska, and Puerto Rico.SiriusXM®* is a registered trademark of SiriusXMRadio, Inc.iPod, iPhone and iTunes are trademarks of Apple Inc.State or local laws may prohibit the operation ofhandheld electronic devices while operating avehicle.Remote ControlsiPodUSB Flash Driveuu Audio System u USB Port(s)FeaturesUSB Port(s)u The USB port (1.0A) is for playing audio files on a USB flash drive and connecting a cellular phone and charging device.u The USB port (1.5A) is for charging devices, playing audio files andconnecting compatible phones with Apple CarPlay or Android Auto.u To prevent any potential issues, be sure to use an Apple MFi Certified Lightning Connector for Apple CarPlay, and for Android Auto, the USB cables should be certified by USB-IF to be compliant with USB 2.0 Standard.Your vehicle comes supplied with a USB extension cable that runs from the USB port up through to the front console.*1: Models with the smart entry system have an ENGINE START/STOP button instead of an ignition switch.*2: Pre-installed on U.S. models only.1USB Port(s)•Do not leave the iPod or USB flash drive in the vehicle. Direct sunlight and high temperatures may damage it.•We recommend that you use a USB cable if you are attaching a USB flash drive to the USB port.•You may also use your own USB cable.•Do not connect the iPod or USB flash drive using a hub.•Do not use a device such as a card reader or hard disk drive, as the device or your files may be damaged.•We recommend backing up your data before using the device in your vehicle.•Displayed messages may vary depending on the device model and software version.The USB port can supply up to 1.5A of power. It does not output 1.5A unless requested by the device.For amperage details, read the operating manual of the device that needs to be charged.Under certain conditions, a device connected to the port may generate noise in the radio you are listening to.USB chargeModels with color audio system Models with Display AudioUSB Extension Cable *2Models with Display AudioU.S. modelsuu Audio System u USB Port(s)Features ■In the console compartment*The USB port (1.0A) is for playing audio files on the USB flash drive and connecting a cellular phone and charging device.u Move the removable beverage holdertray rearward.uu Audio System u Audio System Theft ProtectionAudio System Theft ProtectionThe audio system is disabled when it is disconnected from the power source, such aswhen the battery is disconnected or goes dead. In certain conditions, the systemmay display a code entry screen. If this occurs, reactivate the audio system.■Reactivating the audio system1.Turn the ignition switch to ON w*1.2.Turn on the audio system.3.Press and hold the audio system power button for more than two seconds.u The audio system is reactivated when the audio control unit establishes aconnection with the vehicle control unit. If the control unit fails to recognizethe audio unit, you must go to a dealer and have the audio unit checked.Features *1: Models with the smart entry system have an ENGINE START/STOP button instead of anignition switch.uu Audio System u Audio Remote ControlsFeatures Audio Remote ControlsAllow you to operate the audio system while driving. The information is shown onthe driver information interface.ButtonsPress or to cycle through the audiomode as follows:FM AM SiriusXM®*USB iPodBluetooth® Audio Pandora®*AppleCarPlay/Android Auto*Audio Apps*ENTER Button•When listening to the radio and SiriusXM®*1.Press ENTER to switch the display to a preset list you stored in the preset buttons.2.Press or to select a preset, then press ENTER.•When listening to a USB flash drive1.Press ENTER to display the folder list.2.Press or to select a folder.3.Press ENTER to display a list of files in that folder.4.Press or to select a file, then press ENTER.1Audio Remote ControlsSome modes appear only when an appropriatedevice or medium is used.Depending on the Bluetooth® device you connect,some functions may not be available.Press the (Hang-up/back) button to go backto the previous command or cancel a command.Press the button to switch display.ButtonButton+- BarButtonButton3Button4ENTER Button3434Models with Display Audio343434uu Audio System u Audio Remote ControlsFeatures•When listening to an iPod1.Press ENTER to display the iPod music list.2.Press or to select a category.3.Press ENTER to display a list of items in the category.4.Press or to select an item, then press ENTER .u Press ENTER and press or repeatedly until the desired mode you want to listen to is displayed.•When listening to Pandora ®*1.Press ENTER to display the station list.2.Press or to select an item, then press ENTER .•When listening to Bluetooth ®Audio 1.Press ENTER to display the track list.2.Press or to select a track, then press ENTER .3434343434uu Audio System u Audio Remote ControlsFeatures +- (Volume) BarPress +: To increase the volume.Press -: To decrease the volume.Buttons•When listening to the radioPress :To select the next preset radio station.Press :To select the previous preset radio station.Press and hold : To select the next strong station.Press and hold : To select the previous strong station.•When listening to an iPod, USB flash drive, or Bluetooth® Audio Press :To skip to the next song.Press :To go back to the beginning of the current or previous song.•When listening to a USB flash drivePress and hold : To skip to the next folder.Press and hold : To go back to the previous folder.•When listening to Pandora®*Press :To skip to the next track.Press and hold : To select the next station.Press and hold : To select the previous station.FeaturesTo use the audio system, the ignition switch must be in ACCESSORY q or ON w .Use the selector knob or MENU/CLOCK button to access some audio functions.Press to switch between the normal and extended display for some functions.Selector Knob: Rotate left or right to scroll through the available choices. Press to set your selection.MENU/CLOCK button: Press to select any mode.The available modes include wallpaper, display, clock, language setup, and play modes. Play mode choices include scan, random, repeat, and so on.(Back) button: Press to go back to the previous display.button: Press to select the sound (Day/Night) button: Press to change the audio/information screen brightness.Press , then adjust the brightness using .u Each time you press , the mode switches between the daytime mode, nighttime mode and OFF mode.1Audio System Basic OperationThese indications are used to show how to operate the selector knob.Rotate to select.Pressto enter.Press the button on the steering wheel to change any audio setting.uu Audio System Basic Operation u Audio/Information ScreenFeatures Audio/Information ScreenDisplays the audio status and wallpaper. From this screen, you can go to varioussetup options.■Switching the DisplayAudio/Information ScreenAudioClock/Wallpaperuu Audio System Basic Operation u Audio/Information Screen■AudioShows the current audio information.■Clock/WallpaperShows a clock screen or an image you import.■Change display1.Press the MENU/CLOCK button.2.Rotate to select Settings, then press .3.Rotate to select Display Change, then press .4.Rotate to select Wallpaper, then press .u If you want to return to the audio display, select Audio.Featuresuu Audio System Basic Operation u Adjusting the SoundFeatures Adjusting the SoundPress the (Sound) button, and rotateto scroll through the following choices:Rotate to adjust the sound setting, thenpress .1Adjusting the SoundThe SVC has four modes: Off, Low, Mid, and High.SVC adjusts the volume level based on the vehiclespeed. As you go faster, audio volume increases. Asyou slow down, audio volume decreases.BASTREFADBALSVCBassTrebleFaderBalanceSpeed-sensitiveVolumeCompensationMID Middle。
- 1、下载文档前请自行甄别文档内容的完整性,平台不提供额外的编辑、内容补充、找答案等附加服务。
- 2、"仅部分预览"的文档,不可在线预览部分如存在完整性等问题,可反馈申请退款(可完整预览的文档不适用该条件!)。
- 3、如文档侵犯您的权益,请联系客服反馈,我们会尽快为您处理(人工客服工作时间:9:00-18:30)。
介绍感谢您购买Anthem MRX系列接收机.MRX300、MRX500和MRX700接收机都是尖端的家庭影院声频设配并具有接口交换和视频上转换功能,多媒体和第二区能力,FM/AM调谐器,高清晰无线电™接收(MRX 700 120伏)和连接自选MDX1 iPod /iphone。
Anthem产品的设计利用最高水平的电路设计和私有软件以及优越的建设质量、创新的特点、直观的人类工程学、承受着巨大的灵活性等等这些将创造激情的现场表演和激动人心的极好影院。
1.1制造之前的关系尽快地检查你所收到的一切事物并列好,报告与你的经销商之间的差异。
以防万一他们有需要的一天,保存好购买时授权Anthem经销商的包装材料和发票,没有它,售后服务将不被提供在保修期内。
包装清单:MRX接收机、FM天线、第二区遥控器、主遥控器、AM环形天线、CR2025电池、2块AAA电池、IEC电源线(只有美国或欧洲类型)Anthem房间纠正的额外项目(ARC):软件安装光盘、麦克风和夹、收缩架、系列延长线、USB麦克风电缆序列号:尽管现在方便联系,但还是把它复制下来以备日后参考。
1.2使用中注意事项在连接或不连接任何部件之前切断电源线;如果在冷的环境下接收机被转移或储存起来,那么在使用之前请把房间温度变暖;基于持续运行可能会改变工作中的进展。
如果本手册含有不符之处请检查最近手册或软件。
1.3前面板(展示的是MRX700,其他模型相似)1.多媒体和设置导航按钮2.遥控器的传感器位置3.显示4.输入选择5.声音和电平功能6.电源开/待机7.主菜单/第二分区的选择8.显示屏的亮度9. 侧滑盖前部连接10.前AV输入B输入((5VDC / 0.5A)( MRX 300无法使用)12.耳机连接从大图可以看到里面后盖使用杜比耳机处理5.1声道的内容,以便它没有在二声道耳机缩混丢失。
1.4前面板显示主显示范例:讯源选择视频输入分辨率3.前面的数字/环绕声道。
4.音频格式。
调谐器显示范例:1.乐队和预设2. 频率。
AM是调整将近10千赫(120伏模型)或9千赫(230型)。
1.连接可选的MDX1底座2. HDMI输出3.以太网连接(MRX300无法使用)4. USB输入(5VDC/0.5A)(MRX300无法使用)5. HDMI输入6. 调谐器天线的连接7. 同轴和光纤数字音频输出8. 复合视频输入9. 同轴和光纤数字音频输入10. 分量视频输入11. 开关AC电源插座(50瓦的最大输出)*12.AC输入13.分量视频输出(通过缩放)14.扬声器连接15.录制音频输出16.模拟音频L/ R输入17.RS - 232接口(双向)18.前期主要输出连接19.IR和触发连接20.第二区音频输出1.5后面板(展示的是MRX700,其他模型相似)大图可见封底内页*根据国家规定交流电源插座可能无法使用1.6遥控器1.主要区域电源开2.主要区域电源关3.第二区电源和静音4.休眠控制5.前面板调光控制6.主要区域音频控制7.控制调谐器预置8.主视频输出解析度控制9.导航器和调谐器控制10.输入选择器11.背光控制12.多媒体控制第二区遥控器:注:MRX300/500/700无法通过媒体进入第二区1.7扬声器布置呈现出典型的情形如下图所示7.1声道扬声器放置。
副低音扬声器可以放在任何地点以防止严重的共振,见第3.2节。
下图显示了与杜比定向逻辑IIz技术利用7.1声道扬声器的位置。
2.1视频连接配置输入见第3.5节和配置视频输出见3.1节。
HDMI接口:音频视频是从源发送到接收器组件。
最大视频分辨率为1080p60。
主HDMI输出连接到具有HDMI或DVI输入显示器-----一种高带宽数字内容保(HDCP)是需要显示版权保护的材料。
光盘播放机,通常能支持HDCP甚至家庭电影。
在打去技术支持部处理恶劣的、断断续续的或是没有通过HDMI图片调用之前:1080p使用两倍带宽,那是720p和1080i都能做的事情,确保该电缆适用于应用程序,否则图片可能包含像素辍学或无法播放。
使用HDMI第二类电缆,也被称为“v1.3标准认证”。
这是所有连接设备的一个必须条件,包括扩展连接显示器时支持的色深(10-12位)。
连接装置或许不能与色深工作在一个更老的安装程序里。
如果色深源允许被关闭,那么启动故障排除也将其关闭。
12位色深可以工作在1080p24或许不能达到1080p50或1080p60。
. 连接时要小心HDMI电缆。
连接器应该很容易会滑进插口,所以不要勉强将其插入一个角度上。
每个连接器含有19个精致的针和被损害的针,这些都会损害到插口。
而这些受损插口是不包括在保修里面的。
如果您的HDMI电缆已经连接上足够长的时间,它们很可能会穿破,我们建议您最好换掉它。
如果使用DVI连接时请注意,使用DVI连接,另一端上的其它HDMI连接线比DVI转HDMI 适配器可靠。
如果您有一个连接问题,一个适配器在使用中,首先消除适配器故障排除。
有线和卫星接收机:有些禁用它们曾经的HDMI组件视频输出连接。
要使用一个辅助区域,使用分量视频,有线电视/卫星电视机顶盒就可以通过分量,而不是HDMI的到接收盒。
旧的电缆和卫星电视接收器:HDMI连接时可能会有问题,尤其是根据通道在标清,720p和1080i的输出分辨率的变化。
在这种情况下使用分量视频连接,而不是与同轴或光纤音频连接。
分量视频:分量视频使用三同轴电缆,在未加工或480p时拥有最高分辨率1080p,源头被Macrovision 公司复制保护。
如果输入时被处理或转换为HDMI那么最大输入分辨率是1080i60。
复合视频:最大分辨率为480i的(NTSC制式)/576i(PAL制式)。
这种传统的格式结合了黑/白和彩色信息传输在单一的同轴电缆上。
要显示的信息会被分开,这个过程同时会降低视频质量。
2连接2.2音频连接数字音频输入和输出:数字音频源可以与一个同轴,光纤或HDMI电缆连接。
这些携带第二通道的PCM,杜比数字和DTS。
HDMI接口还接受多达8个PCM声道。
如果您的显示器有兼容HDCP的HDMI或DVI输入,那么可以使用HDMI输入,否则使用同轴或光纤输入。
所有数字输入可以被指定到任何一个设定好的数字源。
如果您需要把音频从HDMI输出到您的显示屏上,那就是第二频道的PCM。
要把数字音频更改为出厂设置,见第3.5节。
数字录音输出可提供一个信号从任何同轴或光纤到数字音频输入的迷你光盘录音机、CD刻录机上等。
模拟音频输入和输出:模拟音频连接都采用RCA连接器。
使用第二区或录制模拟输出,连接数字和模拟数字信号源的音频和视频(世界上没有模拟输入输出)。
扬声器:连接使用喇叭线。
美国模型也允许使用香蕉插头。
注意,在后面板上的辅助扬声器于SB标识(传统的7.1声道系统环绕恢复),重链可变区(上限为前采用杜比定向逻辑IIz扬声器的垂直高度),第二区左,扬声器右。
连接在扬声器正极(+)连接到正极(+)在适当的接收通道接线柱,负( -)连接的扬声器负(- )对同一接收机通道绑定后,使用被绝缘电缆来处理最大输出的接收器。
请勿连接多个扬声器每个接收机通道。
当连接或断开任何物件时确保电源已经关闭,并额定扬声器只能使用此接收器。
2.3天线连接AM环形天线,按住弹簧标签为AM天线连接器和插尽裸露在外的两条电线。
移动天线直到找到最好的接收位置。
对于FM天线,使用FM天线连接器。
然后,等待单位运行移动到天线所找到的最佳接受点。
如果您的电缆公司提供FM调频服务,您可以把电缆连接到接收器上。
2.4以太网(MRx300无法使用)这个连接是需要使用vTuner网络广播。
连接使用CAT5电缆或无线接收器。
ANTHEM MDX1底座(可选)连接使用特殊的并可提供底座的电缆。
要断开电缆,先压缩释放在标签两边的接收器。
经初步对接您的iPod或iPhone,通过尺寸或播放器的厚度来调整基座的靠背。
12伏触发如果其他系统组件有一个触发输入,你可以使用接收器来激活它。
使用一个3.5毫米单声道迷你插头来连接接收器的触发输出。
接收器提供了灵活的触发选项。
通过设置菜单,使您可以指定触发条件(见3.9节)。
2.7红外线输入外部红外线接收器允许在你家里的其他地方使用遥控器来操控,一旦红外线接收器连接到另外一个房间,将其连接到IN红外线输入。
2.8红外线输出当红外线接收器已连接到接收器上,红外线发射器就可以在您家里任何一个地方控制您的源组件。
红外发射器定位后根据其指示,将它连接到红外输出。
指令通过后面板红外在经红外光谱重新发送。
2.9开关AC插座这可以用于小型设备的功率需要不大于50W。
在关闭电源插座时,接收器是关闭的。
2.10电源把电源线连接到接收器和电源上。
例1:光盘播放机到接收器的主显示例2:A/V录音机到接收器设置为了达到最佳的性能和享受,你的接收机必须正确设置。
这可能看起来很多工作,但请记住,大部分设置并不需要从默认改变。
最重要的是进入您显示器和扬声器的信息是否默认不提供,并且每个扬声器到聆听区域都有一定距离。
其余的是有关联和偏好的Anthem室内纠正,欣赏模式预置,例如,您设定后可以应用不同的源来决定您最喜爱的环绕模式。
前面板遥控器如何浏览设置菜单•按SETUP键进入或退出。
•使用56和34键滚动菜单和选择。
•按SELECT键设定一个选择。
在进入设置菜单时您的显示器通常会显示菜单下方是否有连接HDMI,最多能同时显示八个菜单。
为清晰起见,本手册介绍每个菜单的所有项目。
屏幕显示建议尽管前面板介绍相似信息,但还是一次一个项目。
如果屏幕上显示的不是在电视上显示,使用前面板显示屏上设置适当的视频输出。
要进入一个子菜单,突出一个菜单项,按4。
要返回上一个菜单按3。
在每个多达四个屏幕的右下角的小箭头表示下一步可能采取的步骤。
快速设置突出显示快速设置按4。
最多四个问题都将出现在屏幕上,在时间序列中选择一个与多个不同以往的答案回答:•您是否利用HDMI / DVI电视吗?没有/是的•色差视频输出分辨率是多少?480i/480p(120伏模型)或576i/576p(230伏)/720p/1080i •·•你有低音吗?没有/是的•你有多少额外的扬声器? 7(上限)/ 7(回)/5 / 2如需详细的设置,按照第3节的其余部分。
3.1视频输出配置突出视频输出配置,然后按4显示该菜单:视频输出配置:两种配置均可设置,每个分配给每个输入。
大多数情况下只可以使用一个。
第二个可用于辅助显示器,需要不同的一个不同设置,例如一连接到监视器组件视频输出。
输出源分配解释在第3.5节上。
产品名称:每个配置都可以使用导航键来重命名,名称最多有8个字符长。
分辨率:分辨率表示如下:默认是自动的,并通过HDMI连接器显示屏的最高能力来设定分辨率。