烘干机电脑板说明书
智能烘干机用户手册2023
智能烘干机用户手册2023欢迎使用智能烘干机2023版!本手册将为您提供详细的操作指引和使用说明,以确保您能充分发挥该产品的各种功能,使您的衣物干燥更加便捷高效。
1. 产品概述智能烘干机2023版是一款采用先进技术的家用电器,具备多种智能功能,可满足您的不同需求。
通过本手册,您将了解到烘干机的各个部件、功能和操作方式。
2. 安装在开始使用智能烘干机之前,请确保您已经将该产品正确安装,并遵循以下步骤进行操作:- 将烘干机放置在平稳的地面上,并与电源插座连接;- 检查产品的电源是否符合您家庭使用的电压;- 外部电源线需要保持干燥,并避免与尖锐物品接触。
3. 功能介绍智能烘干机2023版提供了多种实用的功能,包括但不限于:- 精确温度控制:根据不同的衣物材质,您可以选择恰当的温度进行烘干;- 多种模式选择:智能烘干机提供多种烘干模式,满足您对不同类型衣物的需求;- 快速烘干:特定模式下的快速烘干功能可帮助您快速完成烘干任务;- 静音设计:采用先进的降噪技术,使烘干机的工作过程更为安静。
4. 操作指南为了方便您的使用,我们提供了以下的操作指南:- 打开电源开关,并确保产品正常启动;- 打开烘干机门,将需要烘干的衣物放入烘干室内;- 根据衣物的类型和要求,选择相应的烘干模式和时间;- 关闭烘干机门,并开始启动烘干程序。
5. 注意事项在使用智能烘干机时,请注意以下事项:- 在使用烘干机之前,请先检查衣物上是否还有易燃物品,以避免火灾的发生;- 在清洁烘干机时,请确保电源已关闭,并使用柔软的布擦拭;- 请勿将过重的物品放入烘干机,以免损坏机器或影响使用效果;- 在使用过程中,如发现烘干机存在异常情况,请立即停止使用,并联系售后服务。
6. 常见问题解答以下是一些常见问题的解答,帮助您更好地解决可能遇到的问题:- 为什么烘干机不能正常启动?请检查是否已正确连接电源,并确保电源开关处于打开状态。
- 烘干时间过长怎么办?请检查是否选择了合适的烘干模式和时间,或者是否存在其他故障情况。
电子产品指南 干衣机操作指南说明书

FAQs• What can I do to optimize the drying performance?After ensuring your lint filter is clean, check to make sure the cycleand settings selected are the right ones for your load type. Avoidoverloading your dryer as items need room to tumble freely and use the DRY BOOST option to increase the drying temperature for select drying cycles. • Is it normal for my dryer to make sounds or noises?Some sounds are part of your dryer’s normal operations. Youmay hear the suspension rollers or exhaust system moving airthrough the cycle. For gas models, you may hear a clicking sound as the gas valve opens and closes to control the gas flow. Check your Use & Care Manual to learn more.• How do I add a forgotten item to the load?To add an item to the dryer, press START/PAUSE, add the item, close the door and press START/PAUSE again to resume the cycle.• A waxy build-up from fabric softener sheets may form on the lint filter or moisture sensing bars. Clean the filter periodically with warm, soapy water, and dry thoroughly before replacing.Important Reminder:Regularly check the entire outdoorexhaust and venting system andclean any lint build up.BALANCED DRYLUX CARE DRY* Please note your model may look slightly different than pictured.PERFECT STEAM WRINKLE RELEASE EXTENDED TUMBLEANTI-STATIC CONTROL LOCKDELAY TIME DRUM LIGHT BALANCED DRY LUX CARE DRYPOWERTEMP HIGH SANITIZE NORMAL LOW ECO DRYHIGH MAX NORMAL LOW DAMPAUTO 75 MIN 60 MIN 45 MIN 30 MINOPTIONSSELECTTIMEDRYLEVELDRYSTARTPAUSE CANCELDRY BOOSTALLERGEN HEAVY DUTY NORMALACTIVEWEAR MIXED LOAD TOWELSDELICATES 15 FAST DRY AIR DRY TIME DRY INSTANT REFRESHMINCLEAN LINTPeace of Mind & ProtectionUnlock exclusive benefits by registering your product with us. Review your registration card for all the ways to register or visit us online directly.Press the POWER button to turn on your unit.Turn the cycle selector in either direction or press the cycles button (depending on your model) to scroll to the desired cycle.ALLERGENAvailable on 500 & 600 series, for allergen reduction, not for delicate items.BULKYAvailable on 300 & 400 series, for large loads and durable fabrics.HEA VY DUTYFor large loads and durable fabrics.NORMAL (ECO FRIENDLY)For everyday loads including cotton, linen or sheets. Select the Dry Boost option if needed.ACTIVEWEARAvailable on 500 & 600 series, for lightweight, synthetic, athletic and stretch fabrics.MIXED LOADAvailable on 500 & 600 series, for mixed fabric loads.TOWELSAvailable on 300, 500 & 600 series, for drying loads of towels.FAST DRYDries small loads consisting of a few items in 15, 18, or 20 minutes depending on your dryer model.DELICATESFor knit and delicate fabrics.AIR DRY (no heat)Available on 600 series, for small loads of delicate items.TIME DRYVarious drying times and temperature settings can be selected.INSTANT REFRESHA vailable on 400, 500 & 600 series, uses steam to refresh fabrics, remove odors and reduce static.We recommend familiarizing yourself with product features and terminology in your Use & Care Manual. (877) 435-328710200 David Taylor Drive Charlotte, NC 28262electroluxappliances.ca (800) 265-83525855 Terry Fox WayMississauga, ON L5V 3E4Turn on your dryerSelect a cycleSelect cycle settingsSelect optionsGetting StartedStart loadLearn MoreTEMPPress the TEMP button to select the desired dry temperature setting.SANITIZEAvailable on 400, 500 & 600 series,for removing harmful bacteria from yourclothing or other items. Check fabric care labels to prevent damage.HIGHFor most cotton fabrics.NORMALFor wrinkle free, easy care, lightweight fabrics and bulky loads.LOWFor delicate fabrics.ECO DRY (NO HEAT)Use with a time dry cycle to dry items containing feathers, down, foam rubber, plastics or rubber-like materials.DRY LEVELSelect to choose the desired dryness level. The dryness levels include MAX (on select models), high, normal, low, and damp. Select damp for items you wish to partially dry before hanging or ironing. Not all dryness levels are available with every cycle.DRY TIMEPress the DRY TIME button to choose a dry time of 30–75 minutes for a manual dry time cycle.AUTOAutomatically dries at the selectedtemperature to the desired dryness level.Close the door and press the START/PAUSE button.ANTI-STATICAvailable on 500 & 600series, injects steam just prior to cycle end to reduce static.EXTENDED TUMBLESelect to extend tumble time for 30 minutes without heat if the dried load won’t be promptly removed at cycle end.DRUM LIGHTSelect to enable or disable the drum light option.DRY BOOSTIncreases the dryingeffectiveness for heavier fabrics or bulky loads by increasing the drying temperature by less than 20°F (>1°C). (Varies based on cycle selection).WRINKLE RELEASE Select to help prevent wrinkles and tangling bytumbling the dry load without heat for 5 minutes out of every 10 minutes.CONTROL LOCKSelect to lock the controls between cycles Repeat to deactivate.DELAY TIMEUse delay time to delay the start of the drying cycle to a time convenient to your schedule or during off-peak energy hours.* Your model may look slightly different than pictured. See your Use & Care Manual for more information on each cycle, setting & option.Press the OPTIONS button, turn the cycle selector in either direction to scroll to the desired option then press SELECT to set.PERFECT STEAM™Available on 400, 500 & 600 series, injects steam prior to cool down to reduce wrinkles and static.。
CHS 滚筒式干衣机 用户手册说明书

CHS 滾筒式乾衣機/用戶手冊感謝您選擇本產品。
此使用者手冊包含重要的安全資訊以及有關電器的操作和維修說明。
在使用本電器之前, 請花些時間閱讀本用戶手冊並保存以供將來參考。
圖示圖片說明 說明警告嚴重人身傷害或者死亡風險電擊風險危險電壓火災火災風險小心導致人身傷害或材料損壞的危險重要注意事項系統正確操作資訊請仔細閱讀本說明書。
灼熱表面目錄1. 安全說明 (2)1.1. 電器安全 (2)1.2. 兒童安全 (3)1.3. 產品安全 (4)1.4. 正確使用 (5)1.5. 在洗衣機上安裝 (7)2. 安裝 (9)2.1. 拆下安全性群組件 (9)2.2. 出水口連接(附帶選配排水軟管) (9)2.2.1. 連接排水軟管 (9)2.3. 調節支腳 (10)2.4. 電氣連接 (10)2.5. 檯面下安裝 (10)3. 簡述 (10)4. 準備好要洗的衣服 (11)4.1. 分類整理待烘乾的衣服 (11)4.2. 準備好要烘乾的衣服 (12)4.3. 負荷量 (12)5. 使用滾筒式乾衣機 (13)5.1. 控制台 (13)5.1.1. 程式選擇旋鈕 (13)5.1.2. 電子指示器和附加功能 (13)5.2. 程式選擇和能源消耗表 (14)5.2.1. 協助工具 (15)5.2.2. 啟動程式 (16)5.2.3. 程式進度 (17)6. 清潔和護理 (19)6.1. 清潔隔層網 (19)6.2. 排水箱 (19)6.3. 清潔冷凝器 (20)6.4. 清潔濕度感測器 (20)6.5. 清洗玻璃門的內表面 (21)7. 技術參數 (22)8. 故障排除 (23)9. 環保包裝資訊 (25)9.1. 包裝資訊 (25)10. 描述能源標籤與節能 (25)10.1. 能源標籤 (25)10.2. 能源效率 (26)主要注意事項♦如果有人負責提供有關安全使用本設備的監督或指導並瞭解相關危險,本設備可以供8 歲以上的兒童以及體力、感知力或腦力下降或經驗和知識缺乏的人士使用。
800X5500滚筒干燥机说明书
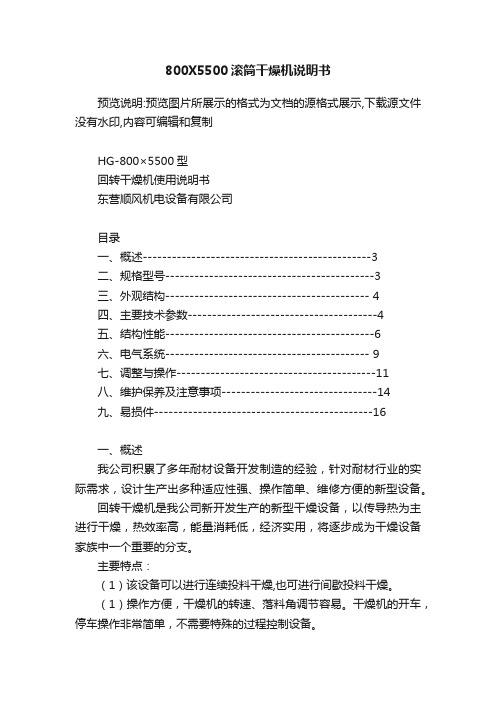
800X5500滚筒干燥机说明书预览说明:预览图片所展示的格式为文档的源格式展示,下载源文件没有水印,内容可编辑和复制HG-800×5500型回转干燥机使用说明书东营顺风机电设备有限公司目录一、概述-----------------------------------------------3二、规格型号-------------------------------------------3三、外观结构------------------------------------------ 4四、主要技术参数---------------------------------------4五、结构性能-------------------------------------------6六、电气系统------------------------------------------ 9七、调整与操作-----------------------------------------11八、维护保养及注意事项--------------------------------14九、易损件---------------------------------------------16一、概述我公司积累了多年耐材设备开发制造的经验,针对耐材行业的实际需求,设计生产出多种适应性强、操作简单、维修方便的新型设备。
回转干燥机是我公司新开发生产的新型干燥设备,以传导热为主进行干燥,热效率高,能量消耗低,经济实用,将逐步成为干燥设备家族中一个重要的分支。
主要特点:(1)该设备可以进行连续投料干燥,也可进行间歇投料干燥。
(1)操作方便,干燥机的转速、落料角调节容易。
干燥机的开车,停车操作非常简单,不需要特殊的过程控制设备。
(2)以传导热为主进行干燥,干燥面积大,热效率高,能量消耗低。
(3)不扬尘,配方中的微量物质不会流失;操作环境也较好。
KH200A用户使用说明书-new-推荐下载

KH200A干洗机电脑用户使用说明书目录一、KH200A电脑控制板总述 (1)二、画面及各部分介绍 (2)1、界面流程 (2)2、界面介绍 (2)3、洗衣按键操作部分 (6)4、开关量输入端子列表 (10)5、温度探头列表 (10)6、串口通信列表 (11)7、输出端子列表 (11)三、洗衣操作 (13)1、上电启动 (13)2、手动操作 (13)四、编程方法 (17)1、程序的编写、修改与查阅 (17)2、编程举例: (17)五、参数设定 (19)1、参数设定 (19)六、故障检修 (24)1、故障列表 (24)2、问与答 (28)3、运行过程中可能出现的故障与解决方法 (28)七、附录 (29)1、附录1 (29)2、附录2 (30)3、附录3 (31)KH200A干洗机电脑控制器用户使用说明书-TY-F01C 1完善,具有16路开关量输入,24路继电器输出,并能同时控制3路温度,而且KH200A电脑采用液晶显示,具有良好的人机对话界面,液晶显示屏即时显示机器工作状况,数码管显示温度。
各按键工作状态由发光管指示,帮助监控机器运行在最佳状态。
其轻触面板密封性好,防水,防尘,抗腐蚀,按键寿命长达100万次以上。
该电脑提供手动和自动两种工作方式,手动操作各按键之间有完善的互锁功能,避免了误操作的发生。
自动操作方式可以随意编制所需要的15个程序,运行程序时,只要按动《Start Program》键,整个洗衣过程将自动完成。
用KH200A电脑控制的干洗机还具有以下特性:●手动操作可定时;●可设置中文或英文界面;●采用先进的高速嵌入式微处理器,运行速度快;●主板采用SMT表面贴装工艺,结构紧凑,发热量低,具有很强的抗干扰能力;●通讯采用差分技术,利用一条线即可轻松的实现主辅板的数据通讯,便于控制器的安装与分体;●显示部分采用液晶显示,显示清晰;●辅板采用继电器输出,无需中间继电器,减少了故障点和维修检测困难;●具有故障的统计功能,可以用来分析机器的不稳定部分,以便加以完善;●若按合理键,喇叭将响一声,若误操作按不合理键,喇叭将响两声提示;●自动运行中,也可通过手动直接更改当前步骤的工作时间,不必停机;●最长甩干保护时间,防止甩干时间过长对机件及衣物的损伤;●运行过程中,可随时查看各点实际温度和设定温度,并可修改设定温度;●机器管路直接从面板显示,便于操作者学习、使用;●内置多种参数,可供厂家出厂前选择设定,并提供口令保护功能。
干燥机控制面板说明书
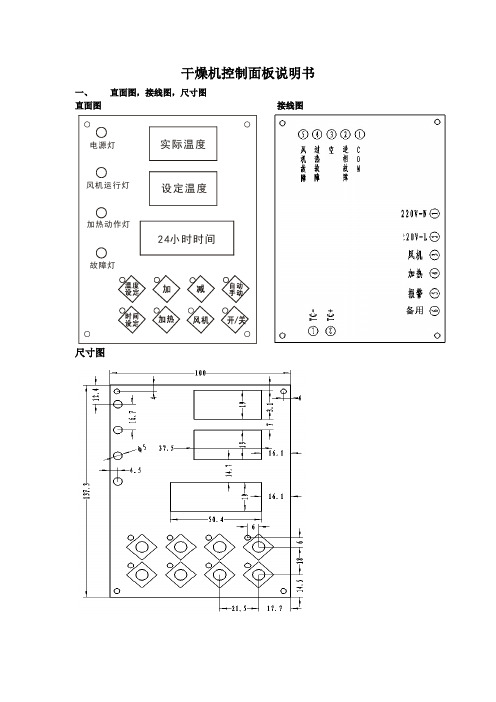
干燥机控制面板说明书一、 直面图,接线图,尺寸图直面图 接线图尺寸图电源灯风机运行灯加热动作灯故障灯实际温度设定温度24小时时间二、功能说明①.测、控温范围:0-400度②.加热、为PID控温方式③.24小时实时时间显示④.九段定时开,关机功能⑤.开机延时和关机延时⑥.一周七天预约时间设定方法:在上电情况下,长按“时间设定键”3S,设定灯亮,则在PV上显示“1ON”星期一开机时间,此时可以通过按“加键”或“减键”和“移位键”可修改当前设定值,再按一下“时间设定键”,则在PV上显示“1OF”星期一关机时间,此时可以通过按“加键”或“减键”和“移位键”可修改当前设定值,如此类推在“1ON-1OFF~7ON-7OFF”之间循环显示,按照上述操作,可设置周一至周七的开、关机的时间。
并且此时在“TIME”显示器上以闪烁方式显示对应的时间,完成设定后再长按“时间设定键”,或不操作10S,退出并保存参数。
⑦.时钟时间校正设定:(设定范:24小时实时时间)在上电状态下,按一下“时间SET”键,设定灯亮,进入设定状态,PV显示器显示“TNE”字样,此时“TIME”显示器闪动,此时按“加键”或“减键”和“移位键”可修改当前实时时间值。
再按一下“时间SET”键,PV显示器显示“DAY”,系统进入星期校正,此时按“加键”或“减键”和“移位键”可调整当前为星期几,范围(1~7)⑧.自动运行方式:当一周预约时间设置好后,按下“手/自动键”此时”手/自灯亮”,系统按设置好的一周预约时间,运行。
⑨.电源未开启时,按“风机”和“加热”键无效,风机未开启时,按“加热”键无效,电源开启后开,关“风机”键有效,风机开启后,开、关“加热”键有效⑩.过温温度:指PV上的测量温度大于此项温度设定时,则系统停止加热并同时输出报警三、操作按键时有风鸣音作提示开、关机过程①.上电时在PV上显示3S倒计时,在SV上显示软件版本号,3S过后,则在PV上显示“OFF”字样(此为关机状态)②.开机过程:在关机状态下,此时,按一下开/关机键,则PV、SV上立即显示出相应参数,电源指示灯亮,此时按一下“风机”键,则风机灯亮,风机继电器吸合,此时按一下“加热”键,则加热灯亮,加热继电器作PID输出,加热输出灯随加热继电器输出亮和灭(此为开机过程)③.关机过程:1.直接通过按开/关键关机时:先关加热,延时完关机风机延时后,再关风机,在延时过程中,PV上以交替方式显示“OFF”和当前温度。
全自动工业烘干机衣物干衣机使用说明书
GZZ/GDZ系列全自动工业烘干机衣物干衣机使用说明书上海尼萨福洗涤设备有限公司目录一、全自动工业烘干机衣物干衣机操作界面 (1)二、全自动工业烘干机衣物干衣机操作说明 (3)2.1 待机状态 (3)2.2 门开状态 (3)2.3 用户参数设置 (3)2.4 编程状态 (3)2.5 运行状态 (4)2.6 报警状态 (5)2.7 密码说明 (5)三、全自动工业烘干机衣物干衣机电气连接示意图 (6)四、全自动工业烘干机衣物干衣机外形尺寸图 (7)五、全自动工业烘干机衣物干衣机附录 (8)禁止带电拔插网络线或触摸电脑板上元件,以免发生意外!一、全自动工业烘干机衣物干衣机操作界面数码管上方指示灯含义说明:编号含义编号含义门开关指示灯,门关灯亮烘干指示,当前显示的是烘干的参数或运行烘干,指示灯亮冷却指示灯,当前显示冷却参数或者运行冷却,指示灯亮单/双向指示灯,如果当前程序为双向运行,则指示灯亮编程指示灯,当前为编程状态,灯亮加热指示灯,若有加热输出,则灯亮风机运行指示灯,风机运行,灯亮正转指示灯,如果电机正转,灯亮反转指示灯,如果电机反转,灯亮电机过载指示灯,如果电机过载,灯亮备用,无定义电过热指示灯,如果电过热,灯亮旁边的灯三色灯,当有故障时,该灯为红色;当运行时,该灯为绿色;其它状态,为红色+绿色按键说明:二、全自动工业烘干机衣物干衣机操作说明2.1 待机状态系统上电,控制器开始倒计时,数码管时间区显示倒计时时间,温度区显示版本号。
如果当前版本是:V1.00,那么温度区数码管显示:。
倒计时完成后,系统进入待机状态。
此时,温度区不显示,时间区显示X,表示当前程序是程序X(1-5)。
利用向上向下键翻看当前程序的设定值。
利用程序键选择程序1~5。
注:当前显示的程序号在掉电时被记忆。
所以,如果断电重新启动,电脑控制器将显示上次关电时的程序号。
2.2 门开状态当门开的时候,数码管会显示“”。
此时,可以通过《+》、《—》键来控制电机正反转。
PDV556HQWA EN ZH滚筒式干衣机用户手册说明书
PDV556HQWAEN ZH Tumble Dryer滾筒乾衣機User Manual使用指南2152CONTENTSCUSTOMER CARE AND SERVICEIMPORTANT INFORMATION THAT MAY IMPACT YOUR MANUFACTURER’S WARRANTYAdherence to the directions for use in this manual is extremely important for health and safety. Failure to strictly adhere to the requirements in this manual may result in personal injury, property damage and affect your ability to make a claim under the Philco manufacturer’s warranty provided with your product. Products must be used, installed and operated in accordance with this manual. You may not be able to claim on the Philco manufacturer’s warranty in the event that your product fault is due to failure to adhere to this manual.We recommend the use of original spare parts. When contacting Service, ensure that you have the following data available. The information can be found on the rating plate. Model, PNC, Serial Number.Subject to change without notice.Warning / Caution-Safety information.General information and tips.Environmental information.IMPORTANT SAFETY INSTRUCTIONS 3PRODUCT DESCRIPTION 7CONTROL PANEL 7USE 10HINTS 11TROUBLESHOOTING & ACCESSORIES 12TECHNICAL DATA 13INSTALLATION INSTRUCTIONS 14ENGLISH 3WARNING! The appliance must not be supplied through an external switching device, such as timer, or connected to a circuit that is regularly switched on and off by utility.In the interest of your safety and to ensure the correct use, before installing and first using the appliance, read this user manual carefully, including its hints and warnings.To avoid unnecessary mistakes and accidents, it is important to ensure that all people using the appliance are thoroughly familiar with its operation and safety features.Save these instructions and make sure that they remain with the appliance if it is moved or sold, so that everyone using it through its life will be properly informed on appliance use and safety.1. 1.1 Conditions Of Use1.2 Child SafetyThis appliance is intended to be used in household andsimilar applications such as:• staff kitchen areas in shops, offices and other working environment;• farm houses;• by clients in hotels, motels, and other residential type environment;• bed and breakfast type environtments;• areas for communal use in blocks of flats or in launderettes.• This appliance is not intended for use by persons (including children) with reduced physical, sensory or mental capabilities, or lack of experience andknowledge, unless they have been given supervision or instruction concerning use of the appliance by a person responsible for their safety.IMPORTANT SAFETY INSTRUCTIONS4• Children should be supervised to ensure that they do not play with the appliance.• The packaging components (e.g. plastic film,polystyrene) can be dangerous to children - danger of suffocation! Keep them out of children’s reach.• Make sure that children or pets do not climb into the drum.1.3 Dryer Safety1.4 Fire HazardsFailure to follow these safety instructions could damage the dryer or your clothes.You may then not be covered by warranty for this damage.Only plug this appliance directly into an AC power supply, which is properly earthed and has the correct voltage.Some fabrics are not suitable for tumble drying. The following MUST NOT be placed in your dryer due to the risk of a fire or an explosion:• Items that have been spotted orsoaked with vegetable oil, cooking oil, suntan oil, linseed oil, salad oil,lubrication oil or grease. Oil affected items can ignite spontaneously, especially when exposed to heatsources such as in a tumble dryer.The items becomce warm, causing as oxidation reaction in the oil.See the serial number sticker located on the bottom of the door opening for voltage information.For Safety reasons we strongly advise against the use of double adaptor, extension cords or power boards.if this appliance is supplied form a cord extension set or electrical portable outlet device, the cord extension set or electrical portable outlet device must be positioned or that it is not subject to splashing or ingress of moisture.• If the electrical cord of thisappliance is damaged, it must be replaced by the Manufacturer,Authorised Service Agent in order to avoid a hazard.• These dryers are for drying clothes, towels and linen at home. Do not use them for any other purpose.• Lint must not be allowed to accumulate around the tumble dryer.• Do not dry unwashed items in the tumble dryer.Never stop a tumble dryer before the end of the drying cycle unless allitems are quickly removed and spread out so that the heat is dissipated.CAUTIONIMPORTANTWARNINGENGLISH 5Oxidation creates heat. If heat cannotescape, the items can become hot enough to ignite. Pilling, stacking or storing oil-affected items can prevent heat from escaping and create a fire hazard. If it is unavoidable that fabrics that contain vegetable or cooking oil, or have been contaminated by hair care products be placed in a tumble dryer, they should first be washed is hot water with extra detergent - this will reduce, but not eliminate the hazard.The final part of tumble dryer cycle occurs without heat (Cooling cycle) to ensure that the items are left at the temperature that ensures that the items will not be damage.For your safety, and to reduce the risk of fire or an explosion, DO NOT store or use petrol or otherinflammable vapours and liquids near your dryer.• Item that have previously beencleaned in, washed in, or spotted with petrol/gasoline, industrial chemicals used only for cleaning, dry-cleaning solvents or other flammable or explosive substances are highly flammable. Highly flammable orexplosive commonly found around the house include acetone, (nail polish remover) denatured alcohol, petrol/gasoline, kerosene, some spotremovers, turpentine, waxes and wax removers should not be put in the dryer. Items containing foam rubber (also known as latex foam) or similarly textured rubber-like materials. Foam rubber materials can produce fire by spontaneous combustion when heated.• Rubber-backed articles, clothes fitted with foam rubber pads, pillows, rubber boots and rubber-coated sports shoes.1.5 Cleaning The Lint FilterLINT BUILD-UP IS A FIRE HAZARD A clean lint filter reduces drying times, saves energy and avoids overheating. Overheating may also damage your clothes.What happens If I forget to clean the lint filter?The lint filter is located at the front of your dryer at the bottom of the door opening.To remove the lint filter open the doorYou must clean this lint filter after every load.61.6 Drying GuideYour load, when dry must not exceed the rated capacity Always check your labels for the drying symbol which this international Care Labelling Code now uses.• Permanent press and synthetics take out as soon as the dryer stops to reduce wrinkles.• Woollen articlesnot recommended. Pull them to their original shape, then dry them flat.• Woven and loop knit materials may shrink, by varying amount,depending on their quality. Do not use the “Extra” setting for these fabrics, Always stretch them out immediately after drying.• Fibre or leather materialsalways check the manufacturer’s instructions.• Baby clothes and night gownsacrylic clothing or sleepwear use only on the “Iron” setting.• Rubber and plasticsDo not dry any items made from or containing rubber or plastics, such as aprons, bibs, babies’ water proofnapkins, curtains, tablecloths, shower caps, clothes fitted with foam rubber pads, pillows, galoshes, or rubber coated tennis shoes.• Fibreglassnot recommended, glass particles left in the dryer could be picked up by your clothes the next time you use the dryer and irritate your skin.Fabric softeners or similar products should not be used in a tumble dryer to eliminate the effects of static electricity unless this practice is specifically recommended by the manufacturer of the fabric softener or product.May be tumble driedDo not tumble dryDo not tumble dryNormal drying(high temp.)(See page 12 for a table of average weights of laundry items)• 5.5 kgLint filter can only be inserted one way.We strongly advise against the use of fabric conditioners of the sheet type that are added to the clothes in the drum. These products may lead to rapid blockage of the lint filter and inefficient operation of your dryer.Ensure the lint filter “Clicks” when replacing.• Never operate your dryer without the lint filter.• Do not allow lint to build around your dryer.• A torn or damaged lint filter must be replaced immediately.• Overloading can increase lint build-up because the airflow is reduced.To avoid potential fire hazards, we recommend that you pay withauthorized service agent periodically clean your dryer. You must do this also when you change your mounting from upright to inverted, or vice versa.ENGLISH 72. 3.PRODUCT DESCRIPTION CONTROL PANELParts1Program Selector Knob Turn the Program Selector knob to choose a drying program. The table “Program Guide” shown on page 9 will help you in selecting the right program.The Program Selector knob is not a timer. Once you select a drying program, the Program Selector knob will stay at that position for the whole drying cycle.NOTES3.1 Control Panel Description832Start/Pause ButtonEnable/Disable BuzzerIndicatorsThis button allows you to start or pause the dryer to check the contents or perhaps add more clothes.If selector knob is turned while dryer is running or paused mid cycle 3 beeps is heard to indicate operation is not allowed. Cycle will not continue ifselector knob is not returned to original selected program.To Enable/Disable the Buzzer select “Airing 60” then press and hold Start/Pause button for 3 seconds (buzzer is enabled by default).Select program“Airing 60”“Start/Pause” 3 SecondsThe dryer will not start unless the door is closed. (If door is not closed you will hear 6 beeps followed by DRY LED blinking 4 times.)NOTESENGLISH 9 3.2 Program Guide10For best results we recommend to sort out your laundryLoad your dryer loosely until it is no more than TWO THIRD FULL.Clothes must tumble freely in a dryer. Don’t cram them in. Wet clothes fluff up when dry.not operate close.Turn the Program Selector knob to choose the drying program you want.Turn the Program Selector knob to “OFF” When you have finished using the dryer to turn off the power, then switch off at the power point. It is recommended to power off the appliance when not in use.To check the dryness or add clothes during the cycle, simply open the door. The dryer will beep several times indicating the door is open. If further drying is required, close the door and then press the Start/Pause button to continue.For the best drying performance, only add or remove clothes at the beginning of the drying cycle.After every load clean the lint filter to reduce drying time and avoid overheating.Clean Lint FilterChecking the LoadTo start a program, press the Start/Pause button.• Reduce efficiency • Increase drying time• Increases the risk of creasingOverloading will:• Do not select the “Extra Dry” option for delicate fabrics such polyester as shrinking may occur.• To obtain the best drying results with small loads it is recommended to use “Time drying” program.NOTESEOperating Sequence • Step 1• Step 2• Step 3• Step 4• Step 5Do not load clothes or otherarticles which are dripping wet or have sand and grit on them into your dryer.Never stop a tumble dryer before the end of the drying cycle unless all items are quickly removed and spread out so that the heat is dissipated.Switch On CAUTIONWARNINGENGLISH 11 5.HINTS• Never tumble dry the following: Delicate items such as net curtains,woollen, silk, fabric with metal trim,nylon tights, bulky metarials such asanoraks, blankets, eiderdown,sleeping bags, feather quilts and anyitem containing rubber foam ormaterials similar to foam rubber.• Do not place in your dryerundergarments such as bras andcorsets that contain metalreinforcements.Your dryer may bedamaged if metal part were to comeloose for the garment. Place suchitems in a bag designed for thispurpose.• Check and empty pockets. Clip, pens, nails and pins can damage both thedryer and your clothes. Other itemsuch as matches or cigarette lighterswill cause a fire.• Close all press studs, hooks, eyes and zips that may catch on something else. Tie all belts and apron string toprevent tangling.• Drying time will depend on fabric type and construction, load size andwetness. Save time and money andalways spin the load as dry aspossible your washing machine.• Always clean the lint filter-this will reduce drying time and save youmoney.• The laundry must be thoroughly spin before tumble drying.• Easy-care items eg shirt, should be briefly pre-spin before drying(depending on the crease resistanceapproximately 30 seconds).• To avoid static charge when drying is completed, use either a fabric softener when you are washing the laundry ora fabric conditioner specifically fortumble dryers.• Remove the laundry when the dryer has finished drying.• Do not over-dry laundry, this avoids creasing and saves energy.• Clothes or towels containing sand or grit should be washed first.• Due to variations in dryer load fabric texture and thickness it is possiblethat not all items will be dried evenly.It you experience uneven dryness onCupboard program please use eitherExtra Dry or Timer Program but bemindful of the type of fabric beingdried to avoid overdrying certain types of fabric. Always follow dryinginstructions attached to the itemsintended to be dried in a clothes dryer.• Drying time will also be effected by voltage fluctuations,room temperature and humidity. Clothes will dry moreslowly on a cool or humid day.• For best results, sort the loadaccording to fabric. Such as heavyitems which may take longer to dry,eg. towels, flannelette sheets, etc.than ones which dry quickly, eg. poly/cotton shirts and and sheets.• Avoid drying dark clothes with light coloured items such as towels as lintwill show on the dark clothes.• Note: Some fabrics will collect lint from other clothes and items.Separate the lint “gives” and the lint“collectors” to minimise this problem.• Clothes that give lint include towels, nappies, chenille. Clothes that collect lint include corduroy, synthetics andpermanent press garments.• If individual items are still damp after drying, set a 30 minutes post dryingtime. This will be necessaryparticularly for multilayered items (eg.collars, pockets, etc).126.TROUBLESHOOTING & ACCESSORIES• To help you, here is a list of the average weights of some common laundry items.• Sheet• Tablecloth • Kitchen towel • Table napkin • Towelling hand towel • Bathrobe • Men’s shirt • Pillowcase • Men’s pyjamas • Ladies nightdress • Bath towel 700 - 1000 g400 - 500 g 70 - 120 g 50 - 100 g 150 - 250 g 1000 - 1500 g 200 - 300 g 100 - 200 g 400 - 500 g 200 - 250 g 300 - 400 g6.1 Troubleshooting6.2 Possible FailuresCheck the points listed here before you call for help, and make sure that you havefollowed the Important safety Instructions on page 3.Certain problems are due to lack ofsimple maintenance or oversights, which can be solved easily without calling out an engineer.Before contacting your local Service Centre, please check possible cause of malfunction and solution listed.Once the problem has been eliminated, press the Start/Pause button to restart the program. If after all checks, the problem persists, contact your local Service Centre.ENGLISH 13Alarm Code Indicator:Deactivate the appliance before youdo the checks.WARNING!To operate efficiently the clothes dryer must have an unrestricted air supply and exhaust ventilation.Service calls resulting from installation where ventilation is restricted are not covered by warranty.THE COST OF THIS TYPE OF CALL WILL BE CHARGED TO THE CUSTOMERShould you require further instructions in the use and care of your clothes dryer please contact the CUSTOMER CENTER.Dimensions (Height / Width / Depth) 795 mm x 600 mm x 560 mmPower Supply (Voltage / Frequency) 220 - 240 V / 50 HzHeater Power (Watt) 2100 W Fuse Installation 10 AMaximum CapacityIMPORTANT7.TECHNICAL DATAExtra Cottons Dry 5.5 kg Cupboard Cottons Dry 5.5 kg Iron Cottons Dry 5.5 kg Extra Mixed Dry 3 kg Cupboard Mixed Dry 3 kg Iron Mixed Dry 3 kg Airing 30 1 kg - 1.5 kg Airing 60 3 kg Airing 90 4 kg Time dry 30 1 kg - 1.5 kg Time dry 60 3 kg Time dry 90 4 kg Time dry 120 5 kg Time dry 150 5.5 kg14You can choose to put your dryer:The appliance must not be installed behind a lockable door, a sliding door or a door with a hinge on the opposite sideIf you choose to use the optional vent kit, the exhaust grille at the front of the dryer will need to be replaced with the outlet cover from the back of the dryer. Gently prise open the grille, using a thin bladed tool. Next, remove the cover from the back and clip it into the grille space at the front. The exhaust grille is not required when using a vent kit.The exhaust duct must not exceed 2 meters in length at 100 mm diameter. If connecting the dryer to a commonducting system, safety advice should be requested from the manufacturer.Inlet and outlet points need clear airflow to prevent overheating, so ensure there is adequate ventilation. (i.e. open window or external door.)If a venting kit is used and the exhaust is discharged out of the room, there must be adequate ventilation to avoid the backflow of gases into the room from appliances burning other fuels, including open fires, when operating the tumble dryer. This is not applicable where a venting hose is discharged into a flue which is used for exhausting fumes from appliances burning gas or other fuels.You can position the vent kit at the backof the dryer to remove air upwards or sideways.There are 2 VENTING OPTIONS • front• rear-using a venting kit (optional extra)• on the floor• on a work bench• on a wall, upside down or upright, using the included mounting kit.• on top of a front load washing machine using a stacking kit available as an optional extra (not available for all washing machine models).8.INSTALLATION INSTRUCTIONSDo not install your dryer in a cupboard or small un-vented laundry unless you using a venting kit.中文 15 目錄安全信息 16產品圖解 20用途 20使用 23提示 24疑難排解與配件 25技術參數 26安裝說明 27可能會影響製造商保養的重要資訊遵照本使用手冊的指示使用,對您的健康與安全至關重要。
派沃烘干机专用控制器说明书.
TXZK-1型密集烤房控制器使用说明书深圳市派沃新能源科技有限公司目录一、密集烤房控制器简介: (1)二、控制器面板功能说明 (3)三、控制器的工作模式 (5)四、按键功能与操作说明 (6)五、高级设置与手动操作 (9)六、安装指导....................................................... 错误!未定义书签。
七、注意事项....................................................... 错误!未定义书签。
八、技术指标....................................................... 错误!未定义书签。
九、售后服务承诺及免责声明......................................... 错误!未定义书签。
十、环境保护倡议................................................... 错误!未定义书签。
十一、保修卡.. (18)一、密集烤房控制器简介:密集烤房控制器是为烟叶烘烤设计的一款自动控制产品,适用于各种密集型烤房。
该控制器采用数字温度传感器及高性能单片机设计,内置烘烤曲线,适应不同地区不同种类烟叶的烘烤,具有很大的灵活性和实用性。
控制器具有以下特点:1)使用超大液晶屏显示,简单直观易操作。
2)采用美国原装数字温度传感器,具有测温精确、抗干扰能力强及防潮防水等性能。
3)控制器内置两种工作模式:自设模式(单段或多段工作方式)、曲线模式(3条曲线:上部叶、中部叶、下部叶),满足用户的不同需要。
4)完备的安全保护功能,包括过流保护、防雷击保护、输出短路保护,具有传感器开路报警、循环风机故障报警、电源故障报警、偏温报警等,确保烘烤过程及烘烤设备的安全。
5)具有循环风机电机过载保护功能,在发生缺相、过载的情况下,能自动切断循环风机电源,防止设备损坏。
烘干设备操作说明
烘干设备操作说明烘干设备是一种常用于家庭和商业环境的电器,能够将湿衣物快速干燥。
正确操作烘干设备不仅可以提高效率,还能延长设备的使用寿命。
本文将详细介绍烘干设备的正确操作步骤及一些注意事项,以帮助用户更好地使用烘干设备。
一、准备工作1. 安装位置:烘干设备应放置在干燥、通风良好的地方,远离易燃物品和水源。
确保设备底部有足够的空间留出通风孔。
2. 供电:接通设备电源后,确保电压和频率与设备要求相符。
3. 检查过滤器:打开设备面板,检查过滤器是否干净,无异物。
如有异物,请及时清理。
二、操作步骤1. 整理衣物:首先,将湿衣物轻轻摊开,去除衣物上的大量水分,避免衣物过于潮湿导致烘干不均。
同时,检查衣物上是否有明火、易燃物等危险物品。
2. 分批烘干:根据衣物的种类、厚度和大小,合理分批进行烘干,避免过度堆积导致烘干不均。
3. 调节时间和温度:根据衣物的材质和厚度,选择适当的烘干时间和温度。
通常,烘干时间会在设备上有标示,可根据需要调节。
4. 启动设备:关闭烘干室门,按下启动按钮,烘干设备开始运转。
在烘干过程中,不要随意打开烘干室门,以免影响烘干效果。
5. 定期清理过滤器:在使用过程中,定期检查和清理过滤器,防止灰尘和纤维堆积影响设备性能。
6. 关闭设备:烘干完成后,关闭设备电源并拔掉插头。
等待设备冷却后,才能进行下一次使用或清洁。
三、注意事项1. 安全第一:使用烘干设备时,务必注意安全。
避免长时间无人看管,同时不要让儿童靠近设备。
2. 禁止烘干特定物品:避免烘干易燃、爆炸性或有毒物品,如油漆刷子、溶剂、化妆品等,以免引发火灾或产生有害气体。
3. 不要超载:设备的烘干容量是有限的,不要超过其承载范围。
超载可能导致设备故障或烘干效果不佳。
4. 定期维护:定期检查设备的电源线、插头和其他连接部件,确保它们的正常工作状态。
如果发现损坏或异常现象,应立即维修或更换。
5. 清洁保养:每次使用后,清理烘干室和过滤器,保持设备的卫生和性能。
- 1、下载文档前请自行甄别文档内容的完整性,平台不提供额外的编辑、内容补充、找答案等附加服务。
- 2、"仅部分预览"的文档,不可在线预览部分如存在完整性等问题,可反馈申请退款(可完整预览的文档不适用该条件!)。
- 3、如文档侵犯您的权益,请联系客服反馈,我们会尽快为您处理(人工客服工作时间:9:00-18:30)。
烘干机微电脑控制器使用手册
1、烘干机控制器的设置方法
按【设置】键,“设置”灯亮,同时温度数码管闪烁,程序进入“温度”设置状态。
按【+】键或者【-】键调整到你所需的温度(单位:℃)。
按【设置】键,该温度值立即被存储,同时程序进入“烘干时间”设置状态。
显示烘干时间数码管闪烁,按【+】键或者【-】键调整到你所需的烘干时间(单位:分钟)。
按【设置】键,该烘干时间立即被存储,同时程序进入“冷却时间”设置状态。
显示冷却时间数码管闪烁,按【+】键或者【-】键调整到你所需的冷却时间(单位:分钟)。
按【设置】键,该冷却时间立即被存储。
数码管显示“―――“状态,设置灯灭,进入设置正反转及停止时间状态,按【停止】键进入循环设置密码,按【+】键或者【-】键设置规定的密码(9660211)后(如果密码不正确,按【设置】键或【停止】键进入原设置状态),按【设置】键温度数码管显示正反转时间(秒),设置范围(5~40秒);烘干时间数码管显示停止时间(秒),按【+】键或者【-】键及【停止】键设定所需的正反转及停止时间(秒),停止时间设置范围(3~15秒)。
【设置】键锁定所设置的内容(温度,烘干时间,冷却时间、正反转时间、停止时间),进入待机状态。
如果你处在“温度”设置状态,或者“烘干时间”设置状态,或者“冷却时间”设置状态,按【启动】键存储该状态的设置值(温度,烘干时间,冷却时间、正反转时间、停止时间)并且退出“设置”状态,“设置”灯灭。
进入待机状态。
按【启动】键,“运行”指示灯亮,控制器按设定值运行。
如果设置参数(温度>120℃,烘干冷却时间>98分钟,正转<5秒,停止<3秒)则以上设置恢复至初始值。
(100℃,60分钟,60分钟,25秒,5秒)。
2、烘干机控制器的使用方法
按【启动】键,机器进入工作状态,同时“运行”指示灯亮。
若需“单正转”,则按【单/双】键,解除再按一次【单/双】键。
如果用户需要主机不转、风机转,在启动状态下,只需按【启动】键就可实现此功能,如不需要再按【启动】键恢复正常。
在烘干过程中,如果用户需要停止加热,只需按【+】键就可实现此功能,如不需要再按【+】键恢复正常。
设置过程中移位设置按【停止】键。
若需停止工作,则按“停止”键,机器进入待机状态,“运行”指示灯灭。
3、故障诊断显示
运行中若温度数码管显示为“EEE”状态,则表示过载保护动作,机器退出工作状态。
若温度数码管显示为“―――”状态,则表示门开保护动作,机器暂时退出工作状态。
若门
开保护消除,机器则继续工作。
若温度数码管显示为“E――”状态,则表示温度传感器是
开路状态。
机器仍可以工作。
4、主要技术指示
电源电压:交流220V±10%输出触点电流:阻性 220V 6A
整机功率耗:约3W 重量:约800克
计时精度:±1‰,测量温度误差:±(1%FS+1℃)
机箱长x宽x高:190x100x100mm,面板螺距长x宽:220x120mm。
5、烘干机的安装
14芯接插件定义:1——零线 2——加热1 3——风机 4——火线
5——加热 2 6——报警 7——温度传感器 A 8,9——温度传感器 B 10——反转 11——超载 12——门控 13——正转 14——公共端
6、烘干机原理图
7、保修条例
感谢您选购本产品,自购买之日起,在正常使用条件下,如发生故障,本公司实行一年
免费保修。