640系统usb接口用户操作手册
HP t640 Thin Client 产品快速规格书说明书

HP t640 Thin ClientFRONTBACK1 Power button (with integrated power indicator) 1 (2) USB-A 3.1 Gen 1 port2 Flash memory activity indicator 2 (3) DisplayPort ™1.2 digital video outputs3 (1) USB-A 3.1 Gen 1 port 3 19V DC power input4 (1) USB-A 3.1 Gen 2 port 4 Cable lock slot5 (1) USB-C ™ 3.1 Gen 2 port 5Configurable Option Port supporting one of the following: • Blank; no optional configured port • 2 x USB-A 3.1 Gen 1 ports• DisplayPort ™ over USB-C ™ with USB Power Delivery • HDMI digital video output • VGA analog video output• External Wi-Fi antenna connector • Fiber Optic NIC connectors (SC or LC)• Serial port with configurable power (shown) • Dual serial ports (includes cable adapter) 6 3.5 mm combo headset/audio jack7 Access panel to information labels and VESA 100 mounting holes 8System stand 6 3.5 mm audio jack 7 (1) USB-A 2.0 port 8 (1) USB-A 2.0 port(designated for Power-on with Keyboard if equipped) 9 RJ45 GbE network connector10Rear I/O cover removal latchAT A GLANCE•AMD Ryzen R1505G System-on-Chip; 2.4 – 3.3 GHz; 2 cores, 4 threads3•AMD Memory Guard Secure Run technology that encrypts data in main memory•DDR4 dual-channel SDRAM system memory; up to 2400 MT/s transfer rate; two SODIMM slots•(3) DisplayPort 1.2 video outputs supporting up to UHD/4K (3840 x 2160 @ 60 Hz) resolutionsNOTE: DisplayPort cables and displays sold separately.•Solid-state flash memory storage; M.2 form factor modules; one slot•Gigabit Ethernet (GbE) network connection; support for DASH out-of-band remote management•Optional Allied Telesis M.2 Fiber Optic NICs; Fast Ethernet (100 Mb/s) or Gigabit (1,000 Mb/s)•Optional Intel Wireless-AC 9260 Wi-Fi/Bluetooth® adapter including antennas integrated internally in the chassis NOTE: Fiber optic and Wi-Fi NIC options cannot be supported together1NOTE: Wireless features, performance and support may vary depending on environmental variables such placement, settings andfirmware of your access points. Please contact your wireless vendor for support of your wireless environment•Optional remote external Wi-Fi antenna system•Option Port with a selection of available factory options (see detailed listing later in this document)•Integrated PC speaker for basic audio playback; 3.5 mm combo headset/audio port on front and 3.5 mm audio port on rear that can be configured as line in or line out supporting headphones, external speaker systems, or microphone•45W non-PFC external power adapter•Security features include a TCG certified TPM version 2.0 and a system UEFI (BIOS) designed to address NIST SP 800-147 BIOS protection guidelines and NIST SP800-155 BIOS integrity measurement guidelines. A cable lock slot is provided for use with a cable lock to enable the system’s physical security•Passive thermal design (no cooling fans) and active thermal management technology that monitors the system operating temperatures, throttles SOC operation if appropriate and prevents unit thermal shutdown.•Rated for a maximum ambient operating temperature of 40 degree C•ENERGY STAR® certified configurations available and EPEAT® Silver registered in the United States (except for some models configured with Fiber Optic NIC networking options). See for registration status in other countries •Post-consumer recycled plastics content greater than 25% total unit plastics (by weight)•Low halogen2material content•All models TAA compliant in North America1 Wireless access point and Internet access is required; availability of public wireless access points is limited2 This product is low halogen except for power cords, cables and peripherals, as well as the optional Fiber Optic NIC module; service parts obtained aftermarket may not be low halogen3 Multicore is designed to improve performance of certain software products. Not all customers or software applications will necessarily benefit from use of this technology. Performance and clock frequency will vary depending on application workload and your hardware and software configurations. AMD’s numbering is not a measurement of clock speedWarrantyHP Customer Support: limited three-year hardware limited warranty in most regions; HP Care Packs are extended service contracts that go beyond your standard limited warranties; for more details visit /go/cpcOPERATING SYSTEMS•HP ThinPro, including HP /Smart Zero Core •Windows 10 IoT Enterprise LTSC 2021 •Windows 10 IoT Enterprise LTSC 2019•IGELPROCESSORModel CPU FrequencyMax/BaseCores/Threads GPU Type GPU FrequencyAMD Ryzen R1505G 3.3/2.4 GHz2/4 Radeon Vega 3 1000 MHzDISPLAY SUPPORTNumber of displays supported A maximum of 3 displays are supported.Combination:3 x DisplayPort(onboard)2 x DisplayPort(onboard) + 1 x DisplayPort over USB-C(optional)2 x DisplayPort(onboard) + 1 x HDMI(optional)2 x DisplayPort(onboard) + 1 x VGA(optional)Video outputs 3 x DisplayPort(onboard)2 x DisplayPort(onboard) + 1 x DisplayPort over USB-C(optional)Video Resolution Support MatrixGRAPHICSNumber of displays supported: 3Video outputs: Standard: (3) DisplayPort™ 1.2Optional: (1) DisplayPort™ over USB-C™ with USB Power Delivery(1) VGA analog output(1) HDMI digital outputNOTE: adding and optional output does not increase the number of displays supported.Max. screen resolution: 3840 x 2160 @ 60 HzNOTE: HP recommends dual channel memory (two SODIMMs) configurations for optimal display resolution performanceMEMORYType: DDR4 dual channel SDRAMData Transfer Rate: Up to 2,400 MT/sPeak Transfer Rate: Up to 19,200 MB/sNumber of Slots 2 x SODIMMCapacities: 4, 8, 16 and 32 GBNOTES:•The actual transfer rates will be dependent upon the specification of the SODIMM modules used•The Graphics Processing Unit (GPU) uses part of the total system memory. System memory dedicated to graphics performance is not available for use by other programs•HP recommends dual channel memory (two SODIMMs) configurations for optimal system performanceUEFIUEFI Specification Revision 2.3.1TPM 2.0Meets requirements for Common Criteria, an independent third-party certification oftrustworthinessMeets requirements for FIPS 140-2, a standard for cryptographic integritySecurity features System UEFI designed to address NIST SP 800-147 BIOS protection guidelines and NIST SP800-155 BIOS integrity measurement guidelinesSTORAGEType: NAND flash memory; non-volatileNumber of Sockets: (1) M.2Capacities: 16 GB M.2 eMMC flash module32 GB M.2 eMMC flash module64 GB M.2 eMMC flash module128 GB M.2 SATA flash module256 GB M.2 NVMe flash module512 GB M.2 NVMe flash moduleInput/OutputUSB: Front access: (1) USB-A 3.1 Gen 1 port(1) USB-A 3.1 Gen 2 port(1) USB-C™ 3.1 Gen 2 portRear access: (1) USB-A 2.0 port(1) USB-A 2.0 port (designated for Power-on from Keyboard if equipped)(2) USB-A 3.1 Gen 1 ports(2) USB-A 3.1 Gen 1 ports (optional)Video Outputs: Standard: (3) DisplayPort™ 1.2 digital outputsOptional: (1) VGA analog output(1) HDMI digital output(1) DisplayPort™ over USB-C™ with USB Power DeliveryNOTE: adding an optional output does not increase the number of displays supported.I/O Interfaces: Standard: (1) RJ45 network connector(1) 3.5 mm combo headset/audio jack (front)(1) 3.5 mm audio jack (rear)Optional: (1) serial port with configurable power(2) serial ports enabled with an included cable adapterOption Port: The rear I/O panel includes an Option Port that can be configured with one of the following factory options:•Blank; no optional configured port• 2 x USB-A 3.1 Gen 1 ports•DisplayPort™ over USB-C™ with USB Power Delivery•HDMI digital video output•VGA analog video output•External Wi-Fi antenna connector (requires Wi-Fi adapter option)•Fiber Optic NIC connectors; SC or LC connector (requires Fiber Optic NIC option)•Serial port with configurable power•Dual serial ports enabled with an included cable adapterAUDIO/VIDEOAudio Subsystem •Internal amplified speaker system for basic audio playback• 3.5 mm combo headset/headphone/analog microphone audio jack (front access)• 3.5 mm combo line-out/ line-in socket (rear access)Audio CODECs •MP3•AAC Stereo•HE AAC•Includes hardware acceleration supportVideo CODECs •MPEG-4 part 2 (DivX, Xvid)•MPEG-4 part 10 (H.264, AVC), Advanced Video Coding (AVC) (H.264 encode & decode )•MPEG-H part 2, High Efficiency Video Coding (HEVC, available with Windows 10 IoT Only) (H.265 (8-bit / 10-bit) decode and (8-bit) encode•WMV 7/8/9 VC-1 & ASF Demuxer•Includes hardware acceleration supportNETWORKINGLocal Area Networking Realtek RTL8111EPH-CG Gigabit Ethernet (GbE) Controller with support for DASH out-of-band remote managementWi-Fi Networking Intel® Wireless-AC 9260 Wi-Fi/Bluetooth® combo; 2x2 802.11ac Wi-Fi and Bluetooth 5Intel® Wireless ax200 wifi 6Realtek 8852AE Wi-Fi6 +BT5.2 WLANNOTES: Wireless access point and internet access required. Availability of public wireless access points limited Wireless features, performance and support may vary depending on environmental variables such placement, settings and firmware of your access points. Please contact your wireless vendor for support of your wireless environmentFIBER OPTIC NETWORKINGAdapter Options: •Allied Telesis AT-27M2/SC Fiber Fast Ethernet M.2 Adapter•Allied Telesis AT-29M2/SC or LC Fiber Gigabit M.2 AdapterFeatures: •IEEE 802.1p priority encoding/tagging (QoS, CoS)•IEEE 802.1q VLAN tagging•IEEE 802.3x flow control•Buffer/FIFO: 2K transmit and 2K receive (AT-27M2)•Buffer/FIFO: 22K transmit and 40K receive (AT-29M2)•Loopback mode•Descriptor-Based Buffer Management•Wake-on-LAN from S3 (Sleep) and S4 (Hibernate) not supported•Link Detection and PHY interface power; the PHY interface, Link detection and Link LED should beenabled by default at power-upPerformance: AT-27M2 •>= 85 Mbit/s receive, <= 30% CPU utilization•>= 85 Mbit/s transmit, <= 30% CPU utilization•>= 170 Mbit/s total bi-directional, <= 30% CPU utilizationNOTE: The minimum transfer size at 100 Mbit/s is 1 GbpsAT-29M2 •>= 800 Mbit/s receive, <= 30% CPU utilization•>= 800 Mbit/s transmit, <= 30% CPU utilization•>= 1500 Mbit/s total bi-directional, <= 30% C:U utilizationNOTE: The minimum transfer size at 1000 Mbit/s is 1500 Gbps External Interface: Complies with IEEE 802.3 1000BASE-X operationPower: •Uses less than 1775 mW of power at full performance (AT-27M2)•Uses less than 2100 mW of power at full performance (AT-29M2)•Supports all PCI Express bus states L0, L0s, L1 and L2Non-volatile Storage: The MAC address is unique for each system; assigned from the board assembly manufacturer’s IEEE registered allocation.The PCI subsystem ID is unique to HP and unique to each design to allow Windows Update to be finely controlled.SOFTWARE SUPPORTperformance and support may vary depending on customer environment and backend.WEIGHTS & DIMENSIONSW x D x H:35 x 196 x 196 mm(vertical orientation)Volume: 1.34 literSystem Weight994.5g(unit with stand)Shipping Weight 2878gNOTE: All measurements are approximate; the addition of optional modules will increase the weightEXTERNAL POWER SUPPLY45W non-PFC Smart external power adapterWorldwide auto-sensing 100 - 240 VAC; nominal voltage is 120 VAC; 50 - 60 HzEnergy saving automatic power-down; surge tolerant1.8m output cableExternal power adapters are sourced from several suppliers in order to ensure adequate supply and availability is maintained. The actual dimensions of the power brick will vary by supplier.HP P/N Vendor Dimensions:L25296-001 Lite-On 94 x 40 x 26.5 mmL25296-002 Chicony 95 x 40 x 26.5 mmL25296-003 Delta 94 x 39 x 26.5 mmL25296-004 AcBel 91.4 x 44 x 26.8 mmCOMPLIANCE/CERTIFICATIONSAccessibility: Section 508 Accessibility; VPAT report available.Environmental Stewardship: Worldwide (ENERGY STAR® configurations available, EPEAT 2.0, RoHS2, ERP, TCO Certified, CECP& SEPA, HP GSE, WEEE, Low Halogen, etc.)Product Safety: Worldwide (UL, CB, GS, CCC, BSMI, etc.)Electromagnetic Compliance (EMC): Worldwide (FCC/CISPR/EN/VCCI/ICES/AS/NZS/CNS/KCC) “Class B” EMI regulations International Medical Safety Standard: EN60601-1-2 (Medical Equipment EMC)ENVIRONMENTALOperating Temperature Range: 50° to 104° F 10° to 40° CNon-operating Temperature Range: -22° to 140° F -30° to 60° CHumidity: Condensing: 20% to 80% Non-condensing: 10% to 90%NOTE: Specifications are at sea level with altitude derating of 1° C/300m (1.8° F/1000ft) to a maximum of 3 Km (10,000 ft), with no direct, sustained sunlight. Upper limit may be limited by the type and number of options installed.Basic Configuration (does not include a fiber optic NIC):Energy Consumption115 V ac, 60 Hz 230 V ac, 50 Hz 100 V ac, 60 Hz Normal Operation (Short idle) 9.35 W 9.62 W 9.43 WNormal Operation (Long idle) 8.45 W 8.62 W 8.52 WSleep 1.87 W 1.88 W 1.88 WOff 1.85 W 1.71 W 1.71 WHeat Dissipation* 115 V ac, 60 Hz 230 V ac, 50 Hz 100 V ac, 60 Hz Normal Operation (Short idle) 32 BTU/hr 33 BTU/hr 32 BTU/hr Normal Operation (Long idle) 29 BTU/hr 29 BTU/hr 29 BTU/hrSleep 6 BTU/hr 6 BTU/hr 6 BTU/hrOff 6 BTU/hr 6 BTU/hr 6 BTU/hr NOTE:Heat dissipation is calculated based on the measured watts, assuming the service level is attained for one hour.System configuration includes: HP Thin Pro 64bit operating system, 128 GB storage, 32 GB system memory, USB keyboard & mouseOptional Configuration (includes a fiber optic NIC):Energy Consumption115 V ac, 60 Hz 230 V ac, 50 Hz 100 V ac, 60 Hz Normal Operation (Short idle) 10.9 W 11.19 W 11.13 W Normal Operation (Long idle) 9.55 W 10.35 W 10.09 WSleep 2.99 W 2.98 W 3.02 WOff 2.84 W 2.81 W 2.85 WHeat Dissipation* 115 V ac, 60 Hz 230 V ac, 50 Hz 100 V ac, 60 Hz Normal Operation (Short idle) 37 BTU/hr 38 BTU/hr 38 BTU/hr Normal Operation (Long idle) 33 BTU/hr 35 BTU/hr 34 BTU/hr Sleep 10 BTU/hr 10 BTU/hr 10 BTU/hrOff 10 BTU/hr 10 BTU/hr 10 BTU/hr NOTE:Heat dissipation is calculated based on the measured watts, assuming the service level is attained for one hour.System configuration includes: Windows 10 IoT Enterprise LTSC operating system, 128 GB storage, 32 GB system memory, 100 Mbps SC Fiber Optic NIC, USB keyboard & mouseSummary of Changes© 2023 HP Development Company, L.P. The information contained herein is subject to change without notice. The only warranties for HP products and services are set forth in the express limited warranty statements accompanying such products and services. Nothing herein should be construed as constituting an additional warranty. HP shall not be liable for technical or editorial errors or omissions contained herein. AMD and Radeon are trademarks of Advanced Micro Devices, Inc. DisplayPort™and the DisplayPort™ logo are trademarks owned by the Video Electronics Standards Association (VESA®) in the United States and other countries. Amazon Web Services, the “Powered by Amazon Web Services” logo, and Amazon WorkSpaces are trademarks of , Inc. or its affiliates in the United States and/or other countries. Bluetooth® is a trademark owned by its proprietor and used by HP Inc. under license. ENERGY STAR is a registered trademark owned by the U.S. Environmental Protection Agency. Linux® is the registered trademark of Linus Torvalds in the U.S. and other countries. Microsoft and Windows are either registered trademarks or trademarks of Microsoft Corporation in the United States and/or other countries. Intel® is a trademark of Intel Corporation in the U.S and other countries. VMware Horizon and VMware Horizon View are registered trademarks or trademarks of VMware, Inc. in the United States and/or other jurisdictions. Citrix and Citrix Workspace are trademarks of Citrix Systems, Inc. and/or one more of its subsidiaries, and may be registered in the United States Patent and Trademark Office and in other countries.。
联想rd640服务器装系统,RD640操作系统安装手册.pdf
联想rd640服务器装系统,RD640操作系统安装⼿册.pdf ThinkServerOS Install User GuideRD640 OS 安装⼿册 V1.0使⽤产品前请先阅读本⼿册⽬录ThinkServer RD640 OS 安装⼿册 71 . 1 外插 LSI 92 40 - 8 I 、LSI 92 60 - 8I 、LSI9 27 0 - 8 IRAI D 卡配置(UEFI 模式) 71.1.1 WINDOWS SERVER 2008 X64 安装指南 81.1.1.1 准备⼯作 81.1.1.2 安装步骤 81.1.1.3 芯⽚组驱动的安装 81.1.1.4 ⽹卡驱动的安装 91.1.1.5 板载显卡驱动的安装 91.1.1.6 HBA 卡驱动的安装 91.1.1.7 CNA 卡驱动的安装 101.1.2 WINDOWS SERVER 2008 R2 安装指南 101.1.2.1 准备⼯作 101.1.2.2 安装步骤 101.1.2.3 芯⽚组驱动的安装 111.1.2.4 ⽹卡驱动的安装 111.1.2.5 板载显卡驱动的安装 111.1.2.6 HBA 卡驱动的安装 121.1.2.7 CNA 卡驱动的安装 121.1.3 WINDOWS SERVER 2008 R2 OEM 安装指南 121.1.3.1 准备⼯作 121.1.3.2 安装步骤 121.1.3.3 芯⽚组驱动的安装 131.1.3.4 ⽹卡驱动的安装 131.1.3.5 板载显卡驱动的安装 141.1.3.6 HBA 卡驱动的安装 141.1.3.7 CNA 卡驱动的安装 141.1.4 WINDOWS SERVER 2012 141.1.4.1 准备⼯作 141.1.4.2 安装步骤 141.1.4.3 芯⽚组驱动的安装 151.1.4.4 板载显卡驱动的安装 151.1.4.5 ⽹卡驱动的安装 151.1.4.6 HBA 卡驱动的安装 161.1.4.7 CNA 卡驱动的安装 161.1.5 WINDOWS SERVER 2012 OEM 161.1.5.1 准备⼯作 161.1.5.2 安装步骤 161.1.5.3 芯⽚组驱动的安装 171.1.5.4 板载显卡驱动的安装 171.1.5.5 ⽹卡驱动的安装 171.1.5.6 HBA 卡驱动的安装 181.1.5.7 CNA 卡驱动的安装 181.1.6 WINDOWS SERVER 2012 ESSENTIALS 18 1.1.6.1 准备⼯作 181.1.6.2 安装步骤 181.1.6.3 芯⽚组驱动的安装 19。
电脑USB接口使用指南

电脑USB接口使用指南随着科技的不断进步,电脑已经成为人们日常生活中必不可少的工具之一。
而USB接口作为电脑的重要组成部分,越来越多地应用于各个领域。
本文将为您介绍USB接口的基本知识和使用方法,帮助您更好地利用电脑的USB接口。
一、USB接口简介USB(Universal Serial Bus,通用串行总线)接口是一种用于计算机与外部设备之间传输数据的标准接口。
它具有高传输速度、热插拔功能和广泛的兼容性等特点,成为了各种设备连接电脑的主要接口之一。
二、USB接口的种类1. USB2.0接口USB 2.0接口是目前应用最广泛的USB接口,在大多数电脑和设备上都能找到。
它的传输速度最高可达480 Mbps,适用于键盘、鼠标、打印机、移动硬盘等常见设备的连接。
2. USB3.0接口USB 3.0接口是USB的升级版本,传输速度更快。
它的最高传输速度可达5 Gbps,是USB 2.0接口速度的十倍以上。
USB 3.0接口也向下兼容USB 2.0设备,因此可以与之前的设备兼容。
3. USB Type-C接口USB Type-C接口是一种新兴的USB标准接口,具有可逆插拔和更小的接口尺寸的特点。
它的最高传输速度和功率输送能力与USB 3.0类似,但插头的形状更加简洁美观。
越来越多的电脑和设备开始采用USB Type-C接口。
三、使用USB接口的注意事项1. 确认接口类型在连接设备之前,您需要确认电脑上的USB接口类型,以免发生兼容性问题。
可以通过查看电脑的规格说明书或者在操作系统中查看设备管理器来确认接口类型。
2. 注意连接方向对于USB 2.0接口,连接时需要注意插头的方向,确保正确插入。
而USB Type-C接口由于可逆插拔的特性,无需考虑方向,可以随意插入。
3. 避免过度使用尽量避免频繁插拔USB接口,以免损坏接口或设备。
在拔出USB 设备之前,应该先安全地将其从电脑中移除,以免造成数据丢失或损坏。
联想RD640说明书
Sound Pressure (operating)
44.1 dB(A)
42.91 dB(A)
Sound Pressure (idle)
44.4 dB(A)
43.8 dB(A)
Lenovo
1
2
4
34
3
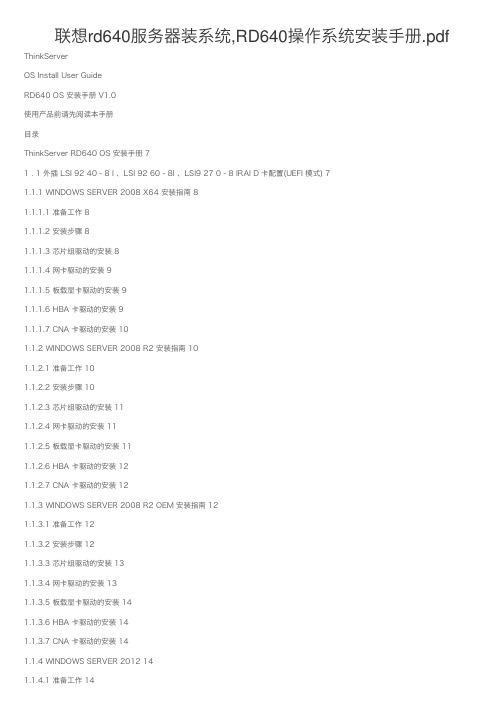
Processors and Memory DIMM Sockets (under cooling shroud)
1. CPU 1
2. 12 Memory DIMM sockets for CPU 1
3. CPU 2 (optional)
1
4. 8 Memory DIMM sockets for CPU 2 (for dual processors model)
Four USB 2.0, one serial (9-pin), two ethernet (RJ-45), one RJ-45 (dedicate/share mgmt), one analog VGA DB-15 connector
5 - PCIe x16 6 - PCIe x8
1 - PCIe x16 2 - PCIe x8
Category
Normal Configuration
Best Configuration
CPU
1
2
HDD
2x 900GB 2.5" SAS 6Gb/s
16x 900GB 2.5" SAS 6Gb/s
Memory
1x 8GB 1600MHz LVRDIMM
20x 8GB 1600MHz LVRDIMM
Temperature non operating (with package)
640说明书 中文版

4
用户手册
5
保修卡
6
合格证
数量 1 1 1 1 1 1
单位 台 个 块 份 份 份
注:收到仪器后,请及时开箱对照以上清单核对物品数目,如有物品短缺或损坏请及时与湖 南省联众科技有限公司联系。
10
Copyright © 2000 - 2010 Linkjoin
【以下情况不属免费保修范围】 1. 霍尔探头属易损件,不在免费保修范围之列。 2. 因人为不慎或错误使用导致零部件缺损, 不在免费保修范围之列; 3. 用户在未经厂家授权的情况下,自行拆卸设备或更换零部件而造成设备无法正常使用的, 不在 免费保修范围之列; 4. 因不可抗拒外力造成设备无法正常使用(如水灾、火灾及台风等自然灾害及意外事故等), 不 在免费保修范围之列; 5. 因用户运输、使用、保管不当导致设备无法正常使用(包括受潮、腐蚀霉烂、机械损伤等),不 在免费保修范围之列。
6
Copyright © 2000 - 2010 Linkjoin
用户手册
第四章、仪器操作说明
1 操作步骤
1.) 打开仪器后部的电池盖,把 9V 的电池装入仪器后的电池槽里并盖好后盖。 2.) 将霍尔探头和主机连接好。探头(4)和主机下端的接口(4)均为五芯,连接时注意两接口要吻合
三、技术参数
9 工作电压 9 显示表头 9 量程范围 9 精确度 9 最小分辨率 9 测量磁场类型 9 极性判断 9 调零方式 9 使用环境 9 外形尺寸
9V 叠层电池 3_1/2 数显 200mT,2000mT 1% 0.1mT 直流 显示屏会有 N S 极性显示 手动(电位器调节) 温度-10°C~40°C,湿度:35~75% 150×70×25mm(长×宽×高)
电脑USB接口使用指南

电脑USB接口使用指南随着科技的不断进步,电脑已经成为我们生活中不可或缺的一部分。
而作为电脑硬件的重要组成部分之一,USB接口的使用也变得越来越重要。
本文将为大家介绍一些关于电脑USB接口的使用指南,帮助读者更好地利用这一技术。
一、USB接口的基本知识USB,全称为通用串行总线(Universal Serial Bus),是一种用于连接计算机和外部设备的通信接口标准。
它的发展可以追溯到上世纪90年代,当时的计算机主板只有少数的串口和并口,而USB接口的出现解决了这个问题,使得外部设备的连接更加方便快捷。
二、USB接口的类型目前,USB接口主要分为三种类型:USB 1.0/1.1、USB 2.0和USB 3.0。
USB 1.0/1.1是最早的USB接口标准,传输速度较慢,适用于一些较为简单的外部设备。
USB 2.0则是目前使用最广泛的USB接口标准,它的传输速度更快,能够满足大多数用户的需求。
而USB 3.0则是最新的USB接口标准,传输速度更快,适用于一些对速度要求较高的设备。
三、USB接口的用途USB接口的用途非常广泛,几乎可以连接任何外部设备。
常见的用途包括连接鼠标、键盘、打印机、摄像头、音箱、移动硬盘等。
此外,USB接口还可以用于充电,如连接手机、平板电脑等设备进行充电。
四、使用USB接口的注意事项1.正确插入USB接口:在插入USB设备时,要确保插口与接口相匹配,并注意正确的插入方向。
强行插入可能会导致接口损坏。
2.避免频繁插拔:频繁插拔USB设备可能会导致接口松动或损坏,因此在使用过程中要尽量避免频繁插拔。
3.安全拔出设备:在拔出USB设备之前,要先进行安全拔出操作,以避免数据丢失或设备损坏。
4.选择合适的USB接口:根据需要选择合适的USB接口版本,以满足设备的传输速度要求。
5.保持接口清洁:定期清洁USB接口,避免灰尘或脏物进入接口,影响设备的正常使用。
五、USB接口的未来发展趋势随着科技的不断进步,USB接口也在不断发展。
泓格PCI总线数字量输入输出卡PISO-C64U快速使用手册
PISO-C64U 快 速 入 门 指 南
4
自我测试
1. 准备项目:
DN-37 (选购) 配线端子板。 外部供电设备。 此范例为 : DP-665 (选购)
2. 将 DN-37 连接至板卡的 CON1。 3. 外部供电 +24V 连接至 Ext. Power (+) DO: 0-15(+) (Pin 18)。 4. 外部供电 GND 连接至 Ext. Power GND(-) DO: 0-15(-) (Pin 1)。
N.C.
CON2
1
2
3
4
5
6
7
8
9
10
11
12
13
14
15
16
17
18
19
20
21
22
23
24
25
26
27
28
29
30
31
32
33
34
35
36
37
38
39
40
CON2 DO Externet
Power GND(-) DO 48 DO 49 DO 50 DO 51 DO 52 DO 53 DO 54 DO 55 DO 56 DO 57 DO 58 DO 59 DO 60 DO 61 DO 62 DO 63 CON2 DO Externet Power(+) N.C. N.C.
商标
手册中所涉及所有公司商标,商标名称及产品名称分别属于该商标或名称的拥有者所有。
版权
版权所有 © 1999-2012 泓格科技股份有限公司,保留所有权力。
泓格科技网页: 联络方式 (E-Mail): service@ , service.icpdas@
ThinkServer RD640 远程管理用户手册 V1.1
ThinkServerManagement Module User Guide远程管理用户手册V1.1目录第一章简介 (4)1.1 术语 (4)1.2 安全信息 (4)第二章联想远程管理模块概述 (5)2.1联想远程管理模块特性 (5)第三章配置联想远程管理模块 (6)第四章联想远程管理模块操作快速入门 (7)4.1开始之前 (7)4.2登录 (7)4.3导航 (8)4.4注销 (9)第五章远程控制台(KVM)操作 (10)5.1启动重定向控制台 (10)5.2主窗口 (10)5.3远程控制台菜单栏 (10)5.3.1远程控制台视图菜单 (10)5.3.2远程控制台宏菜单 (10)5.3.3远程控制台工具菜单 (11)5.3.4远程控制台电源菜单 (11)第六章联想远程管理模块Web控制台选项 (12)6.1属性 (12)6.2配置 (12)6.2.1网络 (12)6.2.2网络安全 (12)6.2.3安全 (12)6.2.4用户 (13)6.2.5服务 (13)6.2.6 IPMI (13)6.3会话 (14)6.4 LDAP (14)6.5更新 (14)6.6实用程序 (14)6.7服务器信息 (14)6.7.1电源 (15)6.7.2热量 (15)6.8系统事件日志 (15)6.9事件管理 (15)6.9.1平台事件 (15)6.9.2陷阱设置 (16)6.9.3电子邮件设置 (16)6.10 LAN串行 (16)6.11远程控制 (16)6.11.1远程管理 (16)6.11.2配置 (17)第七章语言 (18)附录A-常见问题 (19)第一章简介感谢你购买并使用联想远程管理模块,以下简称远程管理模块。
本用户指南讲述了如何使用远程管理模块,并简要概述了模块特性以及如何设置和操作。
本用户指南专供那些负责安装、故障排除、升级以及维修远程管理模块的系统技术人员使用。
作为系统管理员,您在熟读本指南后即可利用远程管理模块从任意位置远程访问,以便对紧急的关键事件做出即时响应。
电脑USB接口使用指南五个小技巧
电脑USB接口使用指南五个小技巧随着科技的不断进步,电脑已经成为我们日常生活中不可或缺的工具之一。
而USB接口作为电脑的重要组成部分,其使用也显得尤为重要。
本文将为您介绍电脑USB接口使用的五个小技巧,帮助您更好地利用和保护电脑的USB接口。
一、选择合适的USB接口在购买外设时,我们常常会遇到不同类型的USB接口,如USB 2.0、USB 3.0、USB Type-C等。
选择合适的USB接口能够更好地兼容您的设备,并提供更快的数据传输速度。
一般来说,如果您的设备支持USB 3.0或USB Type-C接口,那么选择这些接口将能够获得更高的传输速度和更好的兼容性。
二、正确插入USB接口在使用USB接口连接外设时,正确的插入方式十分重要。
通常,USB接口插头有一个明显的方向标识,应当与电脑USB插槽的方向相匹配。
请注意不要使用过大的力量插入,避免损坏接口。
同时,当拔出USB设备时,应先安全移除设备再拔出插头,以免造成数据丢失或设备损坏。
三、避免频繁插拔USB设备频繁插拔USB设备可能会导致接口松动或损坏,因此尽量避免这样的操作。
如果您需要频繁使用多个USB设备,可以考虑使用USB集线器或扩展坞,以减少对接口的使用次数,并方便管理多个设备。
四、保持USB接口的清洁经常清洁USB接口也是保护其使用寿命的关键。
由于使用过程中会产生灰尘和脏污,这些物质会影响接口的正常工作。
您可以使用干净的棉签蘸取少量酒精轻轻擦拭接口,但要注意不要使酒精进入电脑内部,以免引起电气短路。
五、使用USB接口安全保护措施为了保护USB接口的安全,您可以使用USB接口的保护壳或保护套。
这些保护装置可以防止灰尘、脏污和意外撞击对接口的损坏。
此外,当您长时间不使用USB设备时,及时将其拔出电脑上的接口,以避免不必要的损耗。
总结:电脑USB接口作为重要的数据传输和设备连接通道,在使用过程中需要特别注意。
正确选择合适的USB接口、插拔方式以及保护装置,定期清洁和保养接口,都能够有效地延长其使用寿命,为您提供更好的使用体验。
LGMAZAK 640 串口DNC作业手册
MAZATROL640串口通信操作说明WIN2K/XP版 LGMazak技术一部2005-09-25目录串口通信条件――――――――――――――――――――――――― 3 MAZATROL640串口通信操作过程说明机床端设置及操作过程篇―――――――――――――――――――― 5 电脑端设置过程篇―――――――――――――――――――――――18使用篇――――――――――――――――――――――――――――24附页:串口通信线的连接图―――――――――――――――――――30串口通讯条件硬件要求确认NC系统中CF21/22 插头的位置:机床出厂一般接在CMT用的插槽CF21上。
进行DNC通讯时使用的是CF22接口,所以,将CF21/22 插头更换到CF22接口上。
CF21/CF22接头接在CF21接口上,供CMT 使用。
供DNC使用的CF22接口(COM1)请将CF21/22接头转换到CF22接口上,下图为其完成图。
然后直接将DNC 连线将电脑和操作面板的串口连接(通常选电脑的COM1 口)。
CF21接口 CF21/22接头CF22接口MAZATROL640串口通信操作过程说明〔机床端设置及操作过程篇〕1、先打开WINDOWS2000系统的“网路及拨号连接”;2、〔网路及拨号连接〕中打开“建立新的连线”;3、“您目前所在位置的区码”中填入您工场所在位置的电话区号:如银川时0951,然后点击“确定”;4、点击确定;5、点击“下一步”;6、选中“直接连线到领一台电脑”,点击“下一步”;7、选中“主机”,点击“下一步”;8、在“这个连线所要使用的装置”中选择〔通讯连接口(COM1)〕,然后点击“下一步”;9、勾选〔NCUSER(NCUSER)〕,然后点击“下一步”;10、点击“完成”;11、进入〔连入连接〕12、确认〔一般〕选项卡COM1的〔内容〕中连接速度是“115200”bps,然后进入〔使用者〕选项卡13、确认“永远允许掌上型电脑直接连接装置可以不提供密码就进行连线”没有被选中;14、进入〔网络功能〕选项卡,添加“NETBUI”协议;15、设定TCP/IP,使用与将要进行连接电脑在同一段的IP,设置完成后“确定”;16、选择〔通信协定〕,点击“新增”;17、选中“NetBEUI”协议,点击“确定”;18、重新启动;19、进入〔控制台〕20、选择〔电话和数据机选项〕21、选择〔数据机〕选项卡中的〔内容〕项22、在〔一般〕选项卡中的〔连接口速度〕:选择“115200”项目,然后确定23、设置机床主机的共享目录:MC_Direct Model Programs,用来交换文件;24、设置成完全共享〔电脑端设置过程篇〕1、先打开WINDOWS2000(WIN XP系统类似)系统的“网路及拨号连接”;2、选择〔新建连接〕,点击“下一步”3、选择〔直接连接到另一台计算机〕,点击“下一步”;4、选择〔来宾〕,点击“下一步”;5、选择〔所有用户使用此连接〕,点击“下一步”;6、点击“完成”;7、选择〔直接连接〕,在用户名处输入“NCUSER”,密码处空值,勾选“保存密码”,选择〔属性〕进入属性选项卡;8、在〔常规〕选项卡中的选择设备处选择“两台计算机见的通讯电缆(COM1)”,然后选择〔配置…〕项目;9、确认最高的连接速度是“115200”bps,然后确定。