openoffice服务启用操作
openoffice安装教程

openoffice安装教程openoffice安装教程 是一套跨平台的办公室软件套件,能在Windows、Linux、MacOS X (X11)和Solaris等操作系统上执行。
它与各个主要的办公室软件套件兼容。
是自由软件,任何人都可以免费下载、使用及推广它。
以下是小编帮大家整理的openoffice安装教程,欢迎大家借鉴与参考,希望对大家有所帮助1、展开你的安装包。
OOo_2.2.1_LinuxIntel_install_wJRE_zh-cn.tar.gz# tar zxvf OOo_2.2.1_LinuxIntel_install_wJRE_zh-cn.tar.gz资料来源:请从互联网上搜索下载最新版本,或从本光盘上直接下载 OOo_2.2.1_LinuxIntel_install_wJRE_zh-cn.tar.gz注意事项:无2、安装 Java-runtime 支持包。
jre-6-linux-i586.rpm# cd OOFOOF680_m18_native_packed-1_zh-CN.9161/RPMS # rpm -ivh jre-6-linux-i586.rpm注意事项:无,这个过程可以之前就已经安装好的jre-runtime的不需要再安装。
3、安装所有 OpenOffice 组件# rpm -ivh openoffice*.rpm资料来源:注意事项:应切记千万不可单个软件包安装,否则就一定会陷入死循环的怪圈4、安装 OpenOffice 桌面控制台 desktop-integration# cd desktop-integration# rpm -ivh -redhat-menus-2.2-9153.noarch.rpm资料来源:注意事项:安装这个桌面配置环境的时候,应注意根据自己的系统选择合理的配置文件包。
如:我的系统是RHEL/5 ,所以我选择的软件包是-redhat-menus-2.2-9153.noarch.rpm。
OPENOFFICE使用技巧
OPEN OFFICE使用技巧OPEN OFFICE使用技巧001:open office制作柱状图与折线图如果把EXCEL中的图表直接用OPEN OFFICE打开,将会发现原来制作的,同时带柱状图与折线图的图表,只显示出柱状图了。
是OPEN不支持两种类型的图表同时显示吗?不是,原来,在OPEN中,要对图表指定其类型为柱状图的扩展属性,才能实现同时带柱状图与折线图。
具体操作为,点击图表,右键,图表类型,图表分类:2维;图表类型:柱;变体:组合图表:线条和柱,线条的数目设为1,即可。
002:open office建立两个Y轴刻度OPEN中的图表,有时需要体现出两个Y轴刻度,需要先对图表点击右键,编辑,然后选中要体现出另一个Y轴的序列(要选中,不然对象属性就不是针对它的),右键,对象属性,挑选最后一个页签“选项”,将“数据组对齐按照”,选择“Y 次轴”,即可建立另一个Y轴。
003:open office如何放大显示刚开始使用open office时,我想把界面放大一些,让我能够挑选两个并且在一起的点,但找不到在哪里操作。
后来,看到工具栏倒数第二个按钮,一个放大镜的图标,就是显示比例,点击后,弹出对话框,然后自由选择相应内容。
再后来,才发现菜单“视图”中也有一个“显示比例”,相应也是调出该结果。
004:open office如何修改图表的主标题插入一个图表后,想把标题给改动,选中图表,右键,编辑,然后选中“主标题”,再看“对象属性”中,居然没有改主标题的地方。
折腾了一会,才发现,如果双击“主标题”,就进入文本编辑的状态,这时就可以输入你想要的标题了。
005:open office如何修改Y轴的刻度范围自动生成的图表,刻度范围是从零开始,再到序列中的最大值,然后自动分刻度,但有时,如果序列的值很大,但相差很小,就需要修改刻度范围,应该如何操作。
同时是选中图表,右键,编辑,然后点击Y轴,这里要有些功夫,点不好,经常会点到整个图表区,如果不好点,可以先恢复普通状态,把显示比例变大,再进入图表,编辑。
OpenOffice.org3 Writer 说明书

Writer使用手冊第九章表格作業內容目錄介紹 (1)建立表格 (1)插入新表格 (1)建立巢狀表格 (2)使用自動校正建立表格 (3)由已格式化文字建立表格 (3)範例 (4)格式化表格配置 (5)預設參數 (5)改變表格大小和位置 (5)改變欄和列的大小 (6)插入列或欄 (8)合併和分割儲存格 (9)指定表格邊框 (10)選擇背景顏色或圖形 (11)顯示或隱藏表格框線 (12)格式化表格文字 (13)指定直書/橫書 (13)垂直對齊 (14)數字格式 (14)在表格儲存格中旋轉文字 (15)在表格中資料輸入和操作 (16)在儲存格間移動 (16)在表格中排序資料 (17)在表格中使用試算表函數 (18)其他表格作業 (19)加入標籤 (19)交互參照表格 (22)表格的自動格式 (23)在已建立的表格中建立一個標題列 (24)合併和分割表格 (24)刪除表格 (25)複製表格 (25)移動表格 (25)在表格之前或之後插入段落 (25)使用表格做為頁面配置工具 (25)表格功能表和工具列 (26)i表格作業介紹表格是一個很有用的方法來管理和呈現大量資料,例如:•技術、財務或統計報告。
•用來呈現說明、價格徵和產品照片的產品目錄。
•帳單或發票。
•含有地址、年紀、職業和其他資訊的名錄清單。
表格常常被使用做為試算表的替代方案,一個設定良好的表格能夠協助讀者明確瞭解您要表達的內容,一般來說,表格中可使用於文字或數字,也可放入其他物件,像是圖片等至儲存格中。
表格也能夠被使用作為頁面版面配置工具,來將文字定位於文件中的某個區域,以取代使用多Tab 字元,另一個比較好的例子為在頁首和頁尾中,將不同元素放在個別的位置中,像是頁碼、文件標題等。
建立表格在您插入表格至文件前,先評估最後呈現結果,對估計行和列的數目是有幫助的,每個參數雖然都能在後面的階段再來更改,不過,在前面先考慮清楚,可以節省之後更改表格格式的時間。
openoffice.org 使用手册 欢迎使用指南说明书

Chapter 10 Printing, Exporting,and E-mailingCopyrightThis document is Copyright © 2005–2010 by its contributors as listed in the section titled Authors. You may distribute it and/or modify it under the terms of either the GNU General Public License, version 3 or later, or the Creative Commons Attribution License, version 3.0 or later.All trademarks within this guide belong to their legitimate owners.AuthorsJean Hollis WeberAgnes BelzunceMichael KotsarinisPeter KupferRobert ScottJanet M. SwisherFeedbackPlease direct any comments or suggestions about this document to:***************************.orgPublication date and software versionPublished 4 January 2010. Based on 3.2.You can downloadan editable version of this document from/english/userguide3/published/Contents Copyright (2)Introduction (4)Quick printing (4)Controlling printing (4)Exporting to PDF (5)Quick export to PDF (5)Controlling PDF content and quality (5)General page of PDF Options dialog (6)Initial View page of PDF Options dialog (8)User Interface page of PDF Options dialog (8)Links page of PDF Options dialog (9)Security page of PDF Options dialog (10)Exporting to other formats (12)E-mailing documents (12)E-mailing a document to several recipients (13)Digital signing of documents (15)Printing, Exporting, and E-mailing3IntroductionThis chapter provides general information about printing, exporting, and e-mailing documents from OOo.Quick printingClick the Print File Directly icon to send the entire document to the default printer defined for your computer.Note You can change the action of the Print File Directly icon to send the document to the printer defined for the document instead of the default printer for the computer. Go to Tools > Options > Load/Save > General and select the Load printer settings with the document option.Controlling printingFor more control over printing, use File > Print to display the Print dialog.On the Print dialog, you can choose:•Which printer to use (if more than one are installed on your system) and the properties of the printer—for example,orientation (portrait or landscape), which paper tray to use, and what paper size to print on. The properties available depend onthe selected printer; consult the printer’s documentation fordetails.•What pages to print, how many copies to print, and in what order to print them. Use dashes to specify page ranges and commas or semicolons to separate ranges; for example: 1, 5, 11–14, 34–40.Selection is the highlighted part of a page or pages.•What items to print. Click the Options button to display the Printer Options dialog.Selections on the Printer Options dialog are different in Writer, Calc, Impress, and Draw, but in all cases they apply to this printing of this document only. For details, see the chapters on the various OOo components.To specify default printing options, see Chapter 2 (Setting up ) and the chapters on the various OOo components.4Printing, Exporting, and E-mailingFigure 1. The Print dialogExporting to PDF can export documents to PDF (Portable Document Format). This industry-standard file format is ideal for sending the file to someone else to view using Adobe Reader or other PDF viewers. The process and dialogs are the same for Writer, Calc, Impress, and Draw, with a few minor differences mentioned in this section.Quick export to PDFClick the Export Directly as PDF icon to export the entire document using your default PDF settings. You are asked to enter the file name and location for the PDF file, but you do not get a chance to choose a page range, the image compression, or other options. Controlling PDF content and qualityFor more control over the content and quality of the resulting PDF, use File > Export as PDF. The PDF Options dialog opens. This dialog has five pages (General, Initial View, User Interface, Links, and Security). Make your selections, and then click Export. Then you are asked to enter the location and file name of the PDF to be created, and click Save to export the file.Exporting to PDF5General page of PDF Options dialogOn the General page, you can choose which pages to include in the PDF, the type of compression to use for images (which affects the quality of images in the PDF), and other options.Figure 2: General page of PDF Options dialogRange section•All: Exports the entire document.•Pages: To export a range of pages, use the format 3-6 (pages 3 to6). To export single pages, use the format 7;9;11 (pages 7, 9, and11). You can also export a combination of page ranges and singlepages, by using a format like 3-6;8;10;12.•Selection: Exports whatever material is selected.Images section•Lossless compression: Images are stored without any loss of quality. Tends to make large files when used with photographs.Recommended for other kinds of images or graphics.6Printing, Exporting, and E-mailing•JPEG compression: Allows for varying degrees of quality. A setting of 90% works well with photographs (small file size, little perceptible loss of quality).•Reduce image resolution: Lower-DPI (dots per inch) images have lower quality. For viewing on a computer screen generally a resolution of 72dpi (for Windows) or 96dpi (GNU/Linux) issufficient, while for printing it is generally preferable to use at least 300 or 600 dpi, depending on the capability of the printer.Higher dpi settings greatly increase the size of the exported file.Note EPS images with embedded previews are exported only as previews. EPS images without embedded previews are exported as empty placeholders.General section•PDF/A-1: PDF/A is an ISO standard established in 2005 for long-term preservation of documents, by embedding all the piecesnecessary for faithful reproduction (such as fonts) whileforbidding other elements (including forms, security, encryption, and tagged PDF). If you select PDF/A-1, the forbidden elementsare greyed-out (not available).•Tagged PDF: Exports special tags into the corresponding PDF tags. Some tags that are exported are table of contents,hyperlinks, and controls. This option can increase file sizessignificantly.•Create PDF form - Submit format: Choose the format of submitting forms from within the PDF file. This setting overrides the control’s URL property that you set in the document. There is only one common setting valid for the whole PDF document: PDF (sends the whole document), FDF (sends the control contents),HTML, and XML. Most often you will choose the PDF format.•Export bookmarks: Exports headings in Writer documents, and page names in Impress and Draw documents, as “bookmarks” (a table of contents list displayed by some PDF readers, includingAdobe Reader).•Export comments: Exports comments in Writer and Calc documents as PDF notes. You may not want this! In Impress,exports a set of Comments pages following the set of slides.•Export automatically inserted blank pages: If selected, automatically inserted blank pages are exported to the PDF. This is best if you are printing the PDF double-sided. For example,books usually have chapters set to always start on an odd-Exporting to PDF7numbered (right-hand) page. When the previous chapter ends on an odd page, OOo inserts a blank page between the two oddpages. This option controls whether to export that blank page. Initial View page of PDF Options dialogOn the Initial View page, you can choose how the PDF opens by default in a PDF viewer. The selections should be self-explanatory.Figure 3: Initial View page of PDF Options dialogUser Interface page of PDF Options dialogOn the User Interface page (Figure 4), you can choose more settings to control how a PDF viewer displays the file. Some of these choices are particularly useful when you are creating a PDF to be used as a presentation or a kiosk-type display.Window options section•Resize window to initial page. Causes the PDF viewer window to resize to fit the first page of the PDF.•Center window on screen. Causes the PDF viewer window to be centered on the computer screen.•Open in full screen mode. Causes the PDF viewer to open full-screen instead of in a smaller window.8Printing, Exporting, and E-mailing•Display document title. Causes the PDF viewer to display the document’s title in the title bar.Figure 4: User Interface page of PDF Options dialogUser interface options section•Hide menubar. Causes the PDF viewer to hide the menu bar.•Hide toolbar. Causes the PDF viewer to hide the toolbar.•Hide window controls. Causes the PDF viewer to hide other window controls.TransitionsIn Impress, displays slide transition effects as their respective PDF effects.BookmarksSelect how many heading levels are displayed as bookmarks, ifExport bookmarks is selected on the General page.Links page of PDF Options dialogOn this page you can choose how links are exported to PDF.Export bookmarks as named destinationsIf you have defined Writer bookmarks, Impress or Draw slide names, or Calc sheet names, this option exports them as “nameddestinations” to which Web pages and PDF documents can link. Exporting to PDF9Convert document references to PDF targetsIf you have defined links to other documents with OpenDocument extensions (such as .ODT, .ODS, and .ODP), this option converts the files names to .PDF in the exported PDF document.Figure 5: Links page of PDF Options dialogExport URLs relative to file systemIf you have defined relative links in a document, this option exports those links to the PDF.Cross-document linksDefines the behavior of links clicked in PDF files.Security page of PDF Options dialogPDF export includes options to encrypt the PDF (so it cannot be opened without a password) and apply some digital rights management (DRM) features.•With an open password set, the PDF can only be opened with the password. Once opened, there are no restrictions on what theuser can do with the document (for example, print, copy, orchange it).•With a permissions password set, the PDF can be opened by anyone, but its permissions can be restricted. See Figure 6. After you set a password for permissions, the other choices on theSecurity page become available.•With both the open password and permission password set, the PDF can only be opened with the correct password, and itspermissions can be restricted.Figure 7 shows the pop-up dialog displayed when you click the Set open password button on the Security page of the PDF Options dialog.10Printing, Exporting, and E-mailingFigure 6: Security page of PDF Options dialogFigure 7: Setting a password to encrypt a PDFExporting to PDF11Note Permissions settings are effective only if the user’s PDF viewer respects the settings.Exporting to other formatsOOo uses the term “export” for some file operations involving a change of file type. If you cannot find what you want under Save As, look under Export as well. can export files to XHTML. In addition, OOo Draw and OOo Impress can export to Adobe Flash (.swf) and a range of image formats.To export to one of these formats, choose File > Export. On the Export dialog, specify a file name for the exported document, then select the required format in the File format list and click the Export button.E-mailing documentsOOo provides several ways to quickly and easily send documents as an e-mail attachment in one of three formats: OpenDocument (OOo’s default format), Microsoft Office formats, or PDF.To send the current document in OpenDocument format:1)Choose File > Send > Document as E-mail. opens the e-mail program specified in Tools > Options >Internet > E-mail. The document is attached.2)In your e-mail program, enter the recipient, subject and any textyou want to add, then send the e-mail.File > Send > E-mail as OpenDocument Text (or Spreadsheet or Presentation) has the same effect.If you choose E-mail as Microsoft [Word, Excel, or Powerpoint], OOo first creates a file in one of those formats and then opens your e-mail program with the file attached.Similarly, if you choose E-mail as PDF, OOo first creates a PDF using your default PDF settings (as when using the Export Directly as PDF toolbar button) and then opens your email program with the .PDF file attached.12Printing, Exporting, and E-mailingE-mailing a document to several recipientsTo e-mail a document to several recipients, you can use the features in your e-mail program or you can use OOo’s mail merge facilities to extract email addresses from an address book.You can use OOo’s mail merge to send e-mail in two ways:•Use the Mail Merge Wizard to create the document and send it.See Chapter 11 (Using Mail Merge) of the Writer Guide for details.•Create the document in Writer without using the Wizard, then use the Wizard to send it. This method is described here.To use the Mail Merge Wizard to send a previously-created Writer document:1)Click Tools > Mail Merge Wizard. On the first page of thewizard, select Use the current document and click Next.Figure 8: Select starting document2)On the second page, select E-mail message and click Next.Figure 9: Select document typeE-mailing documents133)On the third page, click the Select Address List button. Selectthe required address list (even if only one is shown) and then click OK. (If the address list you need is not shown here, you can click Add to find it and add it to the list.)Figure 10: Selecting an address list4)Back on the Select address list page, click Next. On the Createsalutation page, deselect This document should contain asalutation.Figure 11: Deselecting a salutation14Printing, Exporting, and E-mailing5)In the left-hand list, click 8. Save, print or send. OOo displays a“Creating documents” message and then displays the Save, print or send page of the Wizard.6)Select Send merged document as E-Mail. The lower part of thepage changes to show e-mail settings choices.Figure 12: Sending a document as an email message7)Type a subject for your email and click Send documents. OOosends the e-mails.Digital signing of documentsTo sign a document digitally, you need a personal key, the certificate. A personal key is stored on your computer as a combination of a private key, which must be kept secret, and a public key, which you add to your documents when you sign them. You can get a certificate from a certification authority, which may be a private company or a governmental institution.When you apply a digital signature to a document, a kind of checksum is computed from the document’s content plus your personal key. The checksum and your public key are stored together with the document. Digital signing of documents15When someone later opens the document on any computer with a recent version of , the program will compute the checksum again and compare it with the stored checksum. If both are the same, the program will signal that you see the original, unchanged document. In addition, the program can show you the public key information from the certificate. You can compare the public key with the public key that is published on the web site of the certificate authority.Whenever someone changes something in the document, this change breaks the digital signature.On Windows operating systems, the Windows features of validating a signature are used. On Solaris and Linux systems, files that are supplied by Thunderbird, Mozilla or Firefox are used. For a more detailed description of how to get and manage a certificate, and signature validation, see “Using Digital Signatures” in the OOo Help. To sign a document:1)Choose File > Digital Signatures.2)If you have not saved the document since the last change, amessage box appears. Click Yes to save the file.3)After saving, you see the Digital Signatures dialog. Click Add toadd a public key to the document.4)In the Select Certificate dialog, select your certificate and clickOK.5)You see again the Digital Signatures dialog, where you can addmore certificates if you want. Click OK to add the public key tothe saved file.A signed document shows an icon in the status bar. You can double-click the icon to view the certificate.16Printing, Exporting, and E-mailing。
openoffice 表格开发手册
openoffice 表格开发手册OpenOffice 是一款强大的办公软件套件,其中的表格组件是其核心功能之一。
以下是一份关于 OpenOffice 表格开发的简要手册。
一、基本操作1.打开表格:在 OpenOffice 中打开一个新的表格文档,或者打开一个已存在的表格文档。
2.创建表格:在文档中点击插入菜单,选择表格选项,然后在弹出的对话框中输入行数和列数,即可创建一个新的表格。
3.编辑表格:使用鼠标拖动选择需要编辑的单元格,然后输入数据。
可以使用方向键或者鼠标拖动来选择多个单元格。
4.格式化表格:使用工具栏或者格式菜单中的选项来调整字体、颜色、对齐方式等格式。
二、高级功能1.公式计算:在表格中可以使用公式进行计算,例如求和、平均值等。
在单元格中输入“=SUM(A1:A10)”即可对 A1 到 A10 的数据进行求和。
2.数据筛选:使用筛选功能可以快速筛选出符合特定条件的数据。
在数据菜单中选择筛选选项,然后设置筛选条件即可。
3.图表展示:可以将表格中的数据以图表的形式展示出来。
在插入菜单中选择图表选项,然后选择适合的图表类型即可。
4.样式设置:可以使用样式来快速格式化表格中的数据。
在格式菜单中选择样式选项,然后选择适合的样式即可。
三、注意事项1.保持数据完整性:在编辑表格时,要确保数据的完整性和准确性,避免出现数据丢失或者格式错误的情况。
2.定期保存文件:在使用 OpenOffice 时,要定期保存文件,避免因为意外情况导致数据丢失。
3.学习使用快捷键:使用快捷键可以提高工作效率,减少操作时间。
linux安装openoffice及解决菜单中文乱码
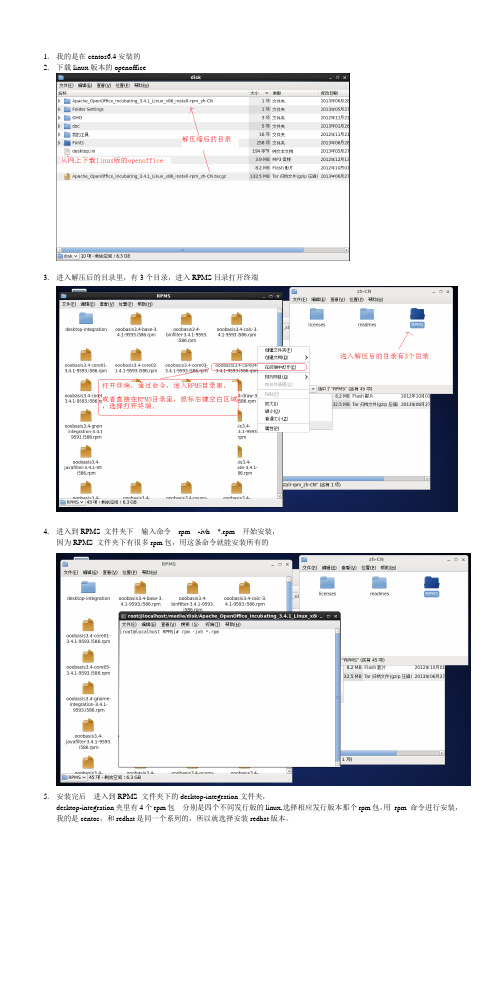
1.我的是在centos6.4安装的2.下载linux版本的openoffice3.进入解压后的目录里,有3个目录,进入RPMS目录打开终端4.进入到RPMS 文件夹下输入命令rpm -ivh *.rpm 开始安装,因为RPMS 文件夹下有很多rpm包,用这条命令就能安装所有的5.安装完后进入到RPMS 文件夹下的desktop-integration文件夹,desktop-integration夹里有4个rpm包分别是四个不同发行版的linux,选择相应发行版本那个rpm包,用rpm 命令进行安装,我的是centos,和redhat是同一个系列的,所以就选择安装redhat版本。
6.安装后,可以看到openoffice的启动:7.但是当打开openoffice文档后发现,菜单啥的是中文乱码,原来是centos系统自带的字体太少,没有openoffice需要的多。
解决方法(1)直接更改openoffice文档的字体,选择centos系统中已有的字体。
(2)直接把windows XP的所有字体,拷贝到centos系统的字体目录下,然后命令实现。
8. 这里用的是第(2)中方法,直接从windows XP的字体拷贝。
9.centos的字体目录是:/usr/share/fonts在该目录/usr/share/fonts下新建目录,目录名字随便,我的目录名字是win然后把windows XP的字体目录C:\WINDOWS\Fonts下的全部字体,拷贝到刚才新建的目录/usr/share/fonts/win10.然后回到系统桌面,右键桌面——选择在终端中打开12. 在终端中:分别执行如下命令:mkfontscale (在桌面上生成了fonts.scale文件)mkfontdir (在桌面上生成了fonts.dir文件)fc-cache13.重新打开OpenOffice,乱码消失。
14.下面是别人写的方法,仅供参考。
openoffice教程
Openoffice入门教程首先安装Apache_OpenOffice_4.0.1_Win_x86_install_zh-CN.exe或者Apache_OpenOffice_3.2.0_LinuxX86-64_install_wJRE_zh-CN.tar.gzLinux 说明1、复制Apache_OpenOffice_3.2.0_LinuxX86-64_install_wJRE_zh-CN.tar.gz到/opt目录安装,安装命令如下:tar -xzvf Apache_OpenOffice_3.2.0_LinuxX86-64_install_wJRE_zh-CN.tar.gzcd OOO320_m12_native_packed-1_zh-CN.9483/RPMSrpm -ivh *.rpm2、在/etc/rc.d/rc.local 中加入如下内容(假设openoffice安装在/opt/3):/opt/3/program/soffice"-accept=socket,host=localhost,port=8100;urp;StarOffice.ServiceManager" -nologo -headless -nofirststartwizard &3、在shell命令窗口执行命令:nohup /opt/3/program/soffice -accept="socket,host=localhost,port=8100;urp;StarOffice.ServiceManager" -nologo -headless -nofirststartwizard &4、查看启动命令ps -ef | grep openoffice6、重启oaWindow说明echo "用以下命令启动OpenOffice服务"进入目录cd C:\Program Files (x86)\OpenOffice 4\program输入启动服务soffice -headless -accept="socket,host=127.0.0.1,port=8100;urp;" -nofirststartwizardJar包说明可以直接在当前word文档下载jar包例子1commons-io-1.4.jar jodconverter-2.2.0.jar jodconverter-cli-2.2.0.jar juh-2.2.0.jar jurt-2.2.0.jar ridl-2.2.0.jar slf4j-api-1.4.0.jar slf4j-jdk14-1.4.0.jar unoil-2.2.0.jar xstream-1.2.2.jar例子2需要多家两个jar包jooconverter-2.0rc2.jarridl-2.0.jar。
Open Office 使用手册
Open Office 使用手冊與微軟辦工室的兼容性OpenOffice 與微軟辦工室的兼容是頗高的,這是什麽意思呢?即是說,OpenOffice 是可以開啓以微軟辦工室格式儲存的文件,也可以儲存成微軟辦工室文件的格式,只需要在〔檔案〕->〔另存新檔〕,在儲存類型選擇微軟的檔案格式。
好多微軟辦工室有的工能,在OpenOffice 中也可以找到,OpenOffice 支援大多數格式的文件,以下是OpenOffice 與微軟辦工室的功能對應表。
開啓微軟辦工室文件在選單中按下〔檔案〕->〔開啓舊檔〕然後選取所需要開啓的檔案。
練習將point.sxw儲存為point.doc的格式,然後再用OpenOffice開啓point.doc。
插入OpenOffice圖片庫的圖片在功能列可以找到圖示,按一下便會開啓OpenOffice圖片庫的視窗,將圖片拖拉到想要加入的地方便可。
再按一下圖示關閉圖片庫的視窗。
從檔案插入圖片在清單選擇〔插入〕->〔圖形〕->〔從檔案〕,然後選擇檔案即可。
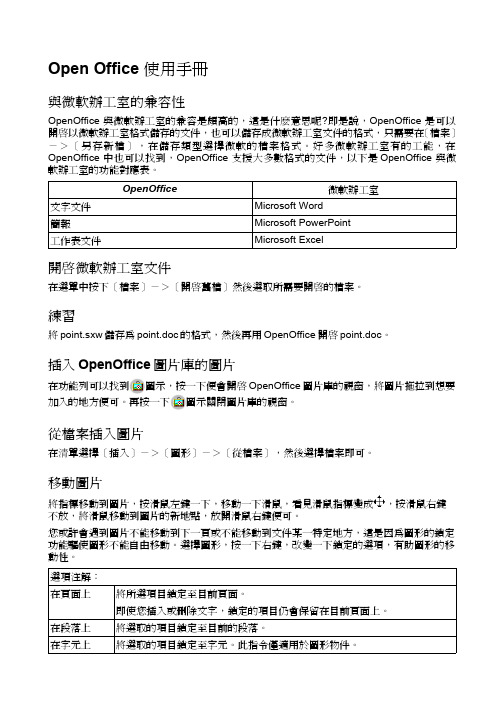
移動圖片將指標移動到圖片,按滑鼠左鍵一下,移動一下滑鼠,看見滑鼠指標變成,按滑鼠右鍵不放,將滑鼠移動到圖片的新地點,放開滑鼠右鍵便可。
您或許會遇到圖片不能移動到下一頁或不能移動到文件某一特定地方,這是因為圖形的鎖定功能驅使圖形不能自由移動。
選擇圖形,按一下右鍵,改變一下鎖定的選項,有助圖形的移動性。
圖片加上標籤將指標移動到圖片上按滑鼠左鍵一下以選擇圖片,再按滑鼠右鍵,選擇標籤,填上所需的資料,按下確定。
紅圈內的文字讓使用者預覽將要插入的文字標籤。
物件的換行功能有些物件與文字之間的,選擇了一些圖形物件後,在〔格式〕->〔換行〕有好幾個選項,以下是選項的簡介:「不換行」「換頁」「自動最適換頁」「不環繞」圖片在文字之前「置於背景」圖片在文字背後練習開啓文件picture.sxw並將文件設定如下一樣:儲存格加上公式在需要加上公式的儲存格按下〔F2〕,便會看見物件列轉換成以下的模樣子,稱為公式列。