中华h330用户使用手册
DELL PERC H330 RAID控制器用户手册说明书

3 A message box displays while the RAID group is beingcreated.When the RAID group is complete, the lower panel displays the RAID group.4The DVRAID group begins to rebuild. Double click on yourRAID group in the lower panel to see more detail such as the status of the rebuild. Wait until the rebuild is complete before sending data to the storage.Creating a custom RAID setup1After selecting Custom RAID setup in the ConfigurationTool RAID wizard, select the options to configure the new RAID group.•RAID Group Name : Assign a name to the RAID group or use the one assigned by the Configuration Tool. The name must be unique and no more than 14 characters.•RAID Group Level: Select a RAID group level from the drop-down box.•RAID Group Interleave: Select an interleave value. The default value is 128KB.2Click Next .3Select the disk devices in the top panel and drag them intothe device area in the bottom panel.4If you want the RAID group to be presented as one virtualdisk (partition), click Finish.If you want more than one virtual disk (partition): a.Click Next.b.Select one of the following:•leave as one partition •partition by count •partition by size c.Click Finish.5 A confirmation dialog box asks you to confirm theconfiguration you have chosen. Click Yes .6If you selected either RAID 4 or RAID 5 configuration, yourRAID group begins to rebuild. Double click on your RAID group in the lower panel to see more detail such as the status of the rebuild. Wait until the rebuild is complete before sending data to the storage.Additional RAID featuresRefer to the ATTO Utilities Manual for instruction on:•Creating Hot Spares•Changing RAID configurations •Enabling event notificationATTO Technology, Inc.155 CrossPoint ParkwayAmherst, New York 14068 USA Tel (716) 691-1999Fax (716) 691-9353Sales support:****************Technical support: Monday -- Friday, 8am-8pm EST*********************© 2007 ATTO Technology, Inc. All rights reserved. All brand or product names are trademarks of their respective holders.No part of this document may be reproduced in any form or by any means without the express written permission of ATTO Technology, Inc.9/2007 PRMA-0396-000ExpressSAS RAID Adapter Getting Started GuideThank you for purchasing the ATTO ExpressSAS RAID Adapter. This guide gives you the basics for installing and configuring your adapter. For more information, refer to the ExpressSAS RAID Adapter Installation and Operation Manual and the ATTO Utilities Manual . Examine the contents of your ExpressSAS packing box. If any of these items are missing, contact your ATTO authorized sales representative.•RAID adapter•ATTO ExpressSAS CD including drivers, user manuals and utilities (Installation CD)•An optional low-profile bracket and its installation procedure• A warranty and registration cardTo install and use the ATTO ExpressSAS RAID adapter you need• A computer with an available x8 or x16 PCI Express expansion slot. The ExpressSAS adapter has been optimized for x8 electrical slots. Check your computer’s documentation.•The complete ATTO ExpressSAS RAID adapter package•SAS/SATA storage, cables and connectors1Install and load driversDrivers for Windows®, Mac® OS X and Linux® are supplied on the Installation CD.The Installation CD splash screen.Windows1.1Power on your system.1.2Insert the Installation CD. The installation guide appears.If the guide does not appear, navigate to the batch file Autorun on the Installation CD and click on it.1.3Click on Windows Drivers .1.4Click on Windows x86 Drivers for 32-bit systems orWindows x64 Drivers for 64-bit systems. If you do not know which version to select, contact your system administrator or refer to your operating system manual.1.5Click on the menu item containing the words InstallDriver for the version of Windows you are using.1.6Follow the on-screen instructions to complete the driverinstallation.1.7Continue to 2 Install configuration software .OS X1.1Power on your system.1.2Insert the Installation CD.1.3After it mounts, open the ExpressSAS volume.1.4Select the Drivers folder.1.5Launch the installer.1.6Follow the on-screen instructions.1.7Continue to 2 Install configuration software .LinuxExpressSAS RAID adapters are not supported under Linux kernel 2.4.1.1Power on your system. 1.2Log in as root .1.3Verify that the kernel header files, usually included withthe Linux kernel development package, are installed.1.4Insert the Installation CD.1.5Mount the CD to your chosen mount point such as/mnt/cdrom.1.6Open your File Browser and browse to/mnt/cdrom/Linux/Drivers.1.7Click on the esasraid driver lnx_drv_esasraid_XXX.tgzand copy it to a directory such as /usr/src .1.8Open a Terminal session.rm a tio nS to ra g e to b e m a d e in to a n e w R A ID g ro u p1.9Change to the directory where you stored the esasraiddriver.1.10Extract the driver source: tar xfz lnx_drv_esasraid_XXX .tgz . The driver files will be extracted to a directory called lnx_drv_esasraid_ XXX .1.11Change the directory to lnx_drv_esasraid_ XXX .1.12Compile and install the driver using make install . Thedriver is now installed and ready to use.1.13Add the following line to /etc/modprobe.conf after installingthe driver: alias scsi_hostadapterX esasraid where X is the next available adapter number.1.14Continue to 2 Install configuration software .2Install configuration softwareThe ATTO Configuration Tool provides an effective and efficient mechanism to configure your adapter and RAID storage.You must have Java 1.5 JRE installed to use the software.The latest runtime for Windows and Linux can beobtained from /javase/downloads/index.jsp.The latest OS X build can be obtained through Software Update . Java 1.5 is only available in 10.4.1 and later.Windows2.1Using the command line prompt, verify that Java VirtualMachine (Java) version 1.5 or later is installed.2.2From the installation CD introductory screen, click onWindows Applications.2.3Click on Install ATTO Configuration Tool. 2.4Launch the installer.2.5Follow the on-screen instructions until the installationcompletes.2.6Continue to 3 Install the RAID adapter .OS X2.1Check Software update to ensure that the latest Javaupdates have been applied. 2.2Open the ExpressSAS volume.2.3Select the Configuration Tool folder.2.4Launch the Configuration Tool.2.5Follow the on-screen instructions until the installationcompletes.2.6Continue to 3 Install the RAID adapter .Linux2.1Verify in the terminal window that the installed Java VirtualMachine (Java) is from Sun by typing java -version . The GNU version JVM that is installed by default does not work with the installer.2.2In the File Browser window, browse to /mnt/cdrom/Linux/Configuration Tool .2.3Double click lnx_app_configtool_ XXX.bin.2.4Follow the on-screen instructions until the installationcompletes.2.5Continue to 3 Install the RAID adapter .3Install the RAID adapterAdditional information is available in the ExpressSAS RAID Adapter Installation and Operation Manual found on the Installation CD.3.1Power down the computer and unplug the computer from allpower sources.3.2Open the computer case.3.3Insert the ATTO ExpressSAS RAID adapter into any openx8 or x16 PCI Express expansion slot. Secure the adapter into the enclosure.If you have questions about how to install an expansion card in your system, consult your computer’s documentation.3.4Close the computer case.3.5If you have an ExpressSAS R348, continue to 4ExpressSAS R348 only ; otherwise, continue to 5 Install 4ExpressSAS R348 onlyBy default the ExpressSAS R348 is configured as a 4x internal port and a 4x external port. To use both internal ports instead of using the internal/external port combination:4.1Power on your computer.4.2Launch the ATTO Configuration Tool.4.3From the left-hand panel Device Listing , expand all theelements in the hosts tree.4.4Find the ExpressSAS adapter you are installing and click onthe Channel 1 entry in the tree.4.5 A new screen appears in the right panel. Change the PortConfiguration from 4 Intrn, 4 Extrn to 8 Internal .4.6Click on Commit .4.7Exit the Configuration Tool application.4.8Power down the computer and unplug the computer from allpower sources.4.9Continue to 5 Install SAS/SATA storage .5Install SAS/SATA storage5.1Connect your SAS/SATA storage to the ATTO ExpressSASRAID adapter•Use SFF-8088 external connectors for both models.•For SATA, use cables which are no longer than 1 meter. For SAS, use cables which are no longer than 7 meters.Consult with your storage vendor for the proper connectors and cables to interface with your storage.5.2Plug in your computer and storage and power them on.5.3Continue to 6 Create RAID groups .6Create RAID groupsThe Configuration Tool screens are similar for all operating systems.6.1Launch the ATTO Configuration Tool. The Welcome screenappears.6.2From the left-hand panel Device Listing , expand all theelements in the hosts tree.6.3Click on ExpressSAS R3XX .6.4 A new set of tabs appears in the right panel. Click on theRAID tab.6.5The application scans for drives.6.6 A list of available drives appears. Devices are displayed inthe top panel and RAID groups and Hot Spares are displayed in the bottom panel.If you have not yet defined any RAID groups, selecting the RAID tab automatically starts a RAID wizard. The wizard is displayed in the bottom panel.If the RAID wizard does not start automatically, select the RAID Management menu item at the top of the screen, then select the Create RAID Group from the menu presented.6.7Select either Setup DVRAID or Custom RAID setup.Setting up DVRAID™ automaticallyDigital Video RAID (DVRAID) provides parity redundancy for your data. DVRAID is ATTO Technology proprietary technology which supports the editing of uncompressed 10-bit High Definition (HD) video and multiple streams of real-time, uncompressed Standard Definition (SD) video.The DVRAID wizard automatically sets up DVRAID using 6, 7, 12, 14 or 24 drives. If you do not have 6, 7, 12, 14 or 24 drives attached to the ExpressSAS RAID adapter, you cannot use the DVRAID wizard.1After selecting Set up DVRAID in the Configuration ToolRAID wizard, click on OK .2The ATTO ExpressSAS adapter firmware automatically usesall unassigned disks to create a DVRAID configuration. A confirmation dialog box asks you to confirm the configuration you have chosen. Click Yes .。
H3CCRM系统操作指导手册V0

名目1 进入系统31.1 用户登录31.2 找回密码31.3 系统主页面及功能32 咨询题单创建42.1 进入新建咨询题单页面42.2 新建咨询题单43 咨询题单处理53.1 修改咨询题单53.2 受理咨询题单63.3 更新处理进展63.4 申请补充信息63.5 补充信息73.6 升级退回73.7 升级研发73.8 整理研发方案83.9 提交解决方案83.10 实施反馈83.11 咨询题单挂起9 3.12 升级93.13 关闭103.14 分析103.15 转单103.16 派单113.17 咨询题单评论114 咨询题单查询114.1 快速查询114.2 高级查找124.3 查看咨询题单125 客户治理145.1 客户信息注册145.2 客户信息查询146 CRM处理规范性要求146.1 CRM咨询题单状态定义146.2 CRM咨询题单超期规则156.3 CRM系统中各时刻点定义156.4 创建咨询题单规范176.5 咨询题处理中规范216.6 升级咨询题单规范226.7 关闭咨询题单规范23附:升级研发咨询题单的处理步骤24进入系统用户登录1、用户使用Firefox或者IE(版本8.0或更高版本)进入咨询题治理系统,首次登录输入域账号和密码;2、首次登录时,系统显示操作向导(微软提供的),如果不想下次登录再次看见此向导,可勾选“不再显示此信息”;找回密码如果遗忘密码,请联系治理员重置域密码;系统主页面及功能登录系统后,用户会看到如下主页面:窗口上部是主菜单,可切换至其他功能模块;下方是操作区域,包括:新建咨询题单运行报表:当前不可用导出至Excel:导出数据到Excel导入数据:按照模板导入数据到系统视图:默认是我负责的咨询题(未关闭),可切换:待回访:已关闭的咨询题单,待质检回访;待分析:已关闭的咨询题单,待处理人分析;所有咨询题单:系统中所有咨询题单(受当前登录人的权限限制);所有未关闭:系统中所有未关闭咨询题单(受当前登录人的权限限制);我处理的咨询题单:处理人为当前登录人的咨询题单;我的超期报警:处理人为当前登录人且马上或者已超期的咨询题单;我的已升级的咨询题单:原处理人为当前登录人,且已升级的咨询题单;其他功能讲明:选择与刷新:选择类似Excel的选择功能,可按照视图中所有列选择数据;刷新可显示最新的数据查询结果;排序:每个视图都有默认的排序规则,一样是按照咨询题状态和咨询题创建时刻,可手动点击列名排序,可在顺序和倒序间切换;咨询题单创建进入新建咨询题单页面点击“新建”,进入添加咨询题单页面;新建咨询题单1、加*字段为必填,加的字段为不可修改;输入咨询题信息,包含标题、咨询题来源、咨询题级别和咨询题描述;标题由用户所选择的产品名称+输入的信息自动生成;咨询题来源默认电话;咨询题级别默认咨询咨询题-4;选择责任人、处理人,默认为当前用户,L2/3工程师能够将责任人选择为办事处工程师,处理人可选择同级别其他用户;选择提单客户、提单人和电话,办事处工程师提单时,此处信息默认为当前用户信息,无需选择;选择产品有关信息,产品组、产品线、产品系列、产品名称和版本;其中选择产品名称后,会自动关联出产品组、产品线、产品系列、产品名称;输入条码,并关联出有关信息;如果条码中的BOM和产品匹配了,也会自动带出产品信息;操作完成后,点击储存;讲明:储存点击一次即可,如果标题栏中的咨询题标号已生成,讲明储存已完成:储存成功后,单号显示在如下位置:咨询题单处理修改咨询题单责任人和处理人能够修改咨询题单的“咨询题类型”、“咨询题级别”、“故障缘故”、“产品版本”、“维保信息”、“标题”、“描述”等,修改后点击“储存”按钮。
中华H330培训课件1

危险货物申报系统用户手册v1[1].3
![危险货物申报系统用户手册v1[1].3](https://img.taocdn.com/s3/m/4d64537d7fd5360cba1adbd7.png)
危险货物申报系统用户手册大连口岸物流网有限公司2010年8月1 产品介绍 (4)1.1 系统功能概述 (4)1.2 系统适用用户 (4)2 危险货物申报业务流程 (5)2.1 进口流程图 (5)2.2 出口流程图 (5)3 系统操作说明 (6)3.1 基本操作 (6)3.1.1 系统登录 (6)3.1.2 密码修改 (6)3.2 船舶代理用户操作说明 (7)3.2.1进港船舶载运危险货物申报 (7)3.2.2出港船舶载运危险货物申报 (12)3.2.3船舶载运危险货物状态查询及再提交 (13)3.2.4船舶载运危险货物申报单打印 (14)3.2.5船舶载运危险货物申报审批状态说明 (16)3.3货运代理用户操作说明 (17)3.3.1进港危险货物安全适运申报 (17)3.3.2出港危险货物安全适运申报 (20)3.3.3危险货物安全适运申报单状态查询及再提交 (21)3.3.4危险货物安全适运申报单打印 (21)3.3.5危险货物安全适运申报审批状态说明 (22)3.4场站用户操作说明 (24)3.4.1 集装箱装运危险货物装箱证明书申报 (24)3.4.2 集装箱装箱证明书状态查询及再提交 (28)3.4.3 集装箱装运危险货物装箱证明书打印 (29)3.5 可移动罐柜用户操作说明 (31)3.5.1可移动罐柜适运单申报 (31)3.5.2可移动罐柜适运单状态查询及再提交 (33)3.5.3 可移动罐柜适运单打印 (33)1 产品介绍1.1 系统功能概述辽宁海事局、大连市港口与口岸局、大连口岸物流网有限公司(简称DPN)合作开发的危险货物申报系统,是针对大连口岸危险品货物申报业务而开发的管理系统。
系统实现了辽宁口岸危险货物申报和审批的网上作业流程,包括与危险货物作业相关的货物、载运船舶、作业码头、作业场站的网上申报、网上审批和在线结果查询。
1.2 系统适用用户本系统主要为以下用户提供服务:辽宁海事局及下属各海事处、大连市港口与口岸局危险货物作业相关的港口企业、场站企业和充罐企业危险货物作业相关的船舶代理企业和货运代理企业2 危险货物申报业务流程2.1 进口流程图2.2 出口流程图3 系统操作说明3.1 基本操作3.1.1 系统登录用户登录网站,在主页左上角的产品选择下拉菜单中选择危险货物申报系统,输入用户名和密码,点击登录按钮,进入危险货物申报系统首页。
WBH-815BG2说明书(R4版本--主变低后备

录
概述 ..................................................................................................................................... 1 应用范围 .................................................................................................................. 1 功能配置 .................................................................................................................. 1 产品特点 .................................................................................................................. 2 基本电气参数 .......................................................................................................... 2 主要技术指标 .......................................................................................................... 3 环境条件 .................................................................................................................. 5 通信接口 .................................................................................................................. 5 零序过压告警 .......................................................................................................... 8 限时速断保护 .......................................................................................................... 8 母线充电保护 .......................................................................................................... 8 过负荷(有载调压闭锁、通风启动)保护 .......................................................... 9 PT 异常判别 ............................................................................................................. 9 测控功能 .................................................................................................................. 9 辅助功能 ................................................................................................................ 11 SV 配置信息 .......................................................................................................... 12 GOOSE 配置信息 .................................................................................................. 13 GOOSE 输出 .......................................................................................................... 16 软压板清单 ............................................................................................................ 17 定值清单 ................................................................................................................ 18 出口清单 ................................................................................................................ 21 定值整定说明 ........................................................................................................ 22 结构与安装 ............................................................................................................ 22 装置背视插件布置图 ............................................................................................ 23 保护装置端子图 .................................................................................................... 24 指示灯说明 ............................................................................................................ 26 调试接口和键盘说明 ............................................................................................ 26 命令菜单 ................................................................................................................ 28 液晶显示说明 ........................................................................................................ 30 装置操作说明 ........................................................................................................ 31
中华酷宝使用手册及其控制操作
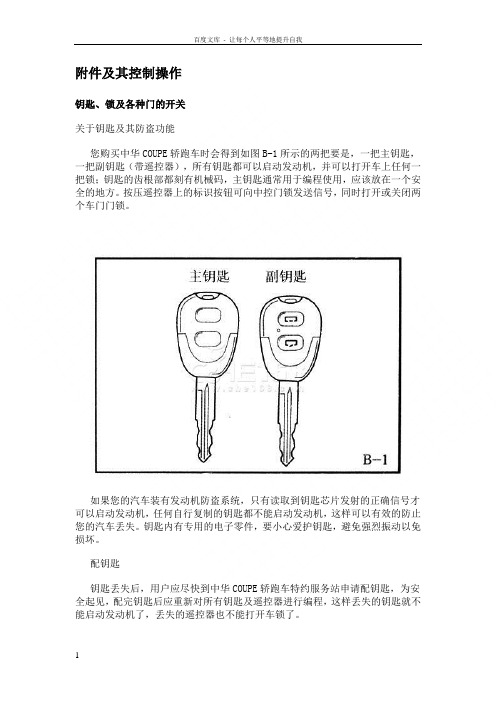
右侧组合开关
如图B—13所示
①向图示A向拨动手柄一次,使手柄处于 “▲”位置,则刮水器进行一次刮刷操作,同时手柄自动归位到“O”位置。
②手柄处于“O”档位置,则刮水器关闭。
④向图示B向拨动手柄到“Ⅰ”档位置,则刮水器进行慢速刮刷。
⑤向图示B向拨动手柄到器喷水后进行刮刷,放开后则停止喷水,雨刮器复位。
方向盘倾斜度控制杆
如果您所选择的车型装备了可倾式转向管柱,您可以按图B—14所示调整方向盘的倾斜角度,通过对它的调整,您可以调整方向盘倾斜角度(最大可调角度3°)。
>$@方向盘的调整必须在开车前进行,若是在驾驶过程中调整方向盘,会使车子失去控制甚至导致严重的事故。在调整方向盘之前,您一定要先调整好座椅,直到您感觉满意,这样才能够正确地调整方向盘。向下按压方向盘底柱下侧的方向盘倾斜度控制杆,使方向盘可以上下移动到理想位置。调好之后,您可以向上按回控制杆,方向盘就会固定在调好的位置上。调好之后上下拉一下方向盘,确认方向盘是否已经固定好。>$@
车门玻璃升降开关组
车门玻璃升降器开关组布置在右前门和左前门的门板上(如图B—19、B—20所示),各按键功能如下:
对于电动玻璃升降器,按动电动窗开关可以控制玻璃的升降,具体功能如下:
电动玻璃升降器:
左前门:
按动上升键开关,则玻璃上升;松开上升键,则玻璃停止上升。
按下降键时间小于秒,则玻璃只在秒内下降;按下降键时间大于秒,手松开后玻璃自动下降到底。
仪表与指示灯
如图B—9所示,仪表板左侧的仪表和指示灯显示您汽车当前的状态。当点火开关打到“ON”时,仪表和指示灯才可以正常工作。根据仪表和指示灯所显示的内容,来确定您的汽车是否需要进行相应的维修保养。
2020年版Hyundai车型用户指南说明书

2020 HyundaiVENUEGetting Started GuideAudio, Connectivity, and Navigationhe device (Elantra) found by your phone. 32Press the DEVICE CONNECTIONS* icon on the screen.Then press BLUETOOTH CONNECTIONS.Press ADD NEW. Select yourand press OK.Image shown may differ from actual product display.Image shown may differ from actual product display.Image shown may differ from actual product display.5The vehicle will confirm that your contacts download is complete.The vehicle will confirm that your phone has been successfully connected.• Contact list may start with First or Last Name, depending on phone models2Make sure your phone has been paired and your contacts have4To end the call, press the END CALL * button located on the steering wheel.Here are a few common voice commands to useafter your phone has been paired:“HELP” provides guidance on commands that canbe used within the current function.Say “CALL” to initiate a call followed by saying thename of the saved contact with whom you wish tospeak. For example: “CALL JOHN SMITH.”“DIAL” makes a call by dialing the spoken numbers.For example: “DIAL 1-800-633-5151.”“PHONE” provides guidance on making a call.“CONTACTS” displays the phone’s contacts screen.Note Compatibility and performance may vary based on your phone, the phone’s software, and your wireless carrier.32Enjoy using the applications displayed on your vehicle’s multimedia screen.Android Auto Apple CarPlayAndroid AutoAndroid AutoApple CarPlayApple CarPlay calling, navigation, text messaging, and playing music all from your driver’s seat.Android Auto users will be prompted to view a tutorial. Select your optionUSB data port will typically be located in or near the front in-dash console.For Apple CarPlay, you will see these screens:For Android Auto, you will see these screens:Note*USB data port will typically be located in or near the front in-dash console.4To end the call, press the END CALL* button located on the steering wheel.123The results will be listed on the screen. Say the line item number to make your selection.Example: “THREE ”After the beep, say a command. Example: “FIND COFFEE SHOP .”Press the PUSH TO TALK * button located on the steering wheel and say “CANCEL ROUTE ” after the prompt to stop navigation guidance.54123Enter the address of your destination and press when finished.Touch the SEARCH box.5Press the PUSH TO TALK * button located on the steering wheel and say “CANCEL ROUTE ” after the prompt to stop navigation guidance.4Note The system will search for addresses or destinations located within the state thevehicle is currently in. If you want to search in another state, say the name of the state first.Compatibility and performance may vary based on your phone, the phone’s Here are a few common voice commandsavailable to use:“HELP ” provides guidance on commands that can be used within the current function.Say “FIND <ADDRESS>” to search for an address and set it as a destination. For example: “300 (THREE-ZERO-ZERO) MAIN STREET, FOUNTAIN VALLEY .”“FIND <POI>” searches for the point of interest specified. For example: “FIND BANKS .”“GO HOME/TO WORK ” sets the destination to your home or work/office. Your home or work address must be set in the navigation system.“CANCEL ROUTE ” cancels the route to the set destination and exits guidance.“POLICE STATION/HOSPITAL ” displays a list of the nearest police stations and hospitals.Note Blue Link® subscription is required. To enroll, please visit your dealer or visit . All product names, trademarks, logos, and brands are property of 32 A list of nearby destinations matching your search1Press the DESTINATION SEARCH BY VOICE* button.When prompted, you can say the name of a Point ofInterest (POI), an address, or a POI in a city.Example: “FIND COFFEE SHOP IN FOUNTAIN VALLEY,CALIFORNIA.”and route guidance will begin.Initial Setup211Press the CUSTOM BUTTON .*。
4 中华酷宝使用手册-发生紧急故障时

发生紧急故障时车辆无法正常启动按《行车前应掌握的常识》一章中的步骤去启动发动机,若无法正常启动,则可以根据具体的问题进行处理。
以下是几种比较常见问题的紧急检修方法。
简单检查的方法①如果发动机不转或转速太慢,请按照如下方法进行检查,在检查之前一定要使变速器操纵杆处在空档的位置。
应先检查蓄电池的接头,保证蓄电池的接头已经拧紧、清洁,然后再启动发动机。
若仍然不能启动,可以把点火开关打到“ON”位置,打开前车灯并检查它的亮度,如果车灯光线很暗、不亮或是车灯明显变暗,说明电池将用完,利用其他的蓄电池连接充电的方法启动。
若是前车灯不变暗,请检查保险盒的情况。
如果保险盒没有问题,可能是点火开关或启动机的电路出了问题,建议由中华COUPE轿跑车特约服务站的技术人员检查一下。
②如果启动机运转正常,但发动机不能正常运转,则应按照以下的方法进行检查。
首先查看您的启动过程是否正确。
查看防盗系统各连线接头是否牢固和是否有断路处。
查看燃油是否足够,若不够请马上添加燃油。
③检查点火线圈、配电盘、火花塞等接头是否牢固。
如果发动机还是不能启动,就需要由中华COUPE轿跑车特约服务站的专业技术人员来解决。
用推车启动的方法在发动机不能正常启动的情况下,有时也可以按照下面的方法启动发动机(仅限于手动档车型):①将点火开关打到“ON”位置,换入二档。
②踏下离合器踏板,并慢慢地增加推车的速度。
当发动机未转动时,踏板的力较大。
③在车速适合的条件下,将加速器踏板踏下约一半,然后,配合启动发动机慢慢放开离合器踏板。
>$@绝对不要用汽车拖车启动,防止发动机启动后,被拖的车辆可能冲向前车,与拖车相撞。
>$@蓄电池连接充电的方法如果您汽车的蓄电池用完了,可以用一个放电蓄电池启动发动机。
这个过程看起来很简单,但如不按照正确的步骤操作,可能会对您和他人造成严重伤害,请严格按照本说明书规定的程序进行。
①注意事项:如果您不明白蓄电池本身的特点,则我们建议由专业技术人员来处理。