Spring注解详解
Spring配置定时器(注解+xml)方式—整理

Spring配置定时器(注解+xml)⽅式—整理⼀、注解⽅式1. 在Spring的配置⽂件ApplicationContext.xml,⾸先添加命名空间1 xmlns:task="/schema/task"2 /schema/task3 /schema /task/springtask3.1.xsd42. 最后是我们的task任务扫描注解1<task:annotation-driven/>3. spring扫描位置1<context:annotation-config/>2<context:component-scan base-package="com.test"/>4.写⾃⼰的定时任务1 @Component //import ponent;2public class MyTestServiceImpl implements IMyTestService {3 @Scheduled(cron="0/5 * * * * ? ") //每5秒执⾏⼀次4public void myTest(){5 System.out.println("进⼊测试");6 }7 }♦注意:定时器的任务⽅法不能有返回值(如果有返回值,spring初始化的时候会告诉你有个错误、需要设定⼀个proxytargetclass的某个值为true)⼆、XML⽅式1.在spring配置⽂件中创建bean,创建schedule1<bean id="schedule"class="org.springframework.scheduling.quartz.SchedulerFactoryBean">3<property name="triggers">4<list>5<ref bean="testTrigger"/>6</list>7</property>8</bean>2. 在spring配置⽂件中创建bean,创建你的triggers1<bean id="testTrigger"class="org.springframework.scheduling.quartz.CronTriggerBean">3<property name="jobDetail" ref="testJobDetail"/>4<property name="cronExpression" value="0 1/5 * * * ?"/>5</bean>3. 在spring配置⽂件中创建bean,指定定时器作⽤在那个类那个⽅法上⾯1<bean id="testJobDetail"class="org.springframework.scheduling.quartz.MethodInvokingJobDetailFactoryBean">3<property name="targetObject" ref="targetTestService"/>4<property name="targetMethod" value="timerTest"/>5</bean>♦注明:把定时器作⽤在targetTestService对象中的timerTest⽅法上⾯4. 当然还得把你作⽤的对象交Spring来管理,所以在spring配置⽂件中创建作⽤类的 bean1<bean id="targetTestService" class=".service.TargetTestService" scope="prototype"></bean>♦这是时间的设置规则org.springframework.scheduling.quartz.CronTriggerBean允许你更精确地控制任务的运⾏时间,只需要设置其cronExpression属性。
SpringIoC公共注解详解

SpringIoC 公共注解详解前⾔本系列全部基于 Spring 5.2.2.BUILD-SNAPSHOT 版本。
因为 Spring 整个体系太过于庞⼤,所以只会进⾏关键部分的源码解析。
什么是公共注解?公共注解就是常见的Java 注解,特别是JSR-250中的注解。
例如:@Resource 、@PostConstructor 、@PreDestroy 等等,本⽂也就主要分析这三个注解在 Spring 中是如何处理的。
正⽂@Resource 注解的处理对 @Resource 注解的处理类是 CommonAnnotationBeanPostProcessor ,它通过实现 InstantiationAwareBeanPostProcessor 接⼝,重写postProcessProperties() ⽅法实现对标注了 @Resource 注解的字段或⽅法的⾃动注⼊。
InstantiationAwareBeanPostProcessor 接⼝的详细信息可以查看。
关于 CommonAnnotationBeanPostProcessor 这个后置处理器是怎么加⼊到 beanFactory 中的,我们在 ⼀⽂中介绍过主要是通过AnnotationConfigUtils#registerAnnotationConfigProcessors() 实现的。
BeanDefinition 合并后的后置处理CommonAnnotationBeanPostProcessor#postProcessMergedBeanDefinition上⾯代码中的 findAutowiringMetadata() ⽅法就是利⽤反射遍历类的所有字段和⽅法,找到标注了 @Resource 注解的,并缓存进injectionMetadataCache 中。
注意:静态字段和静态⽅法会过滤掉。
findAutowiringMetadata() ⽅法基本和 AutowiredAnnotationBeanPostProcessor 中的⼀致,只是处理的注解不同⽽已,可以查查看⼀⽂中该⽅法的详解。
Spring注解【非单例】
Spring注解【⾮单例】花了⾄少⼀整天的时间解决了这个问题,必须记录这个纠结的过程,问题不可怕,思路很绕弯。
为了能说清楚⾃⼰的问题,我都⽤例⼦来模拟。
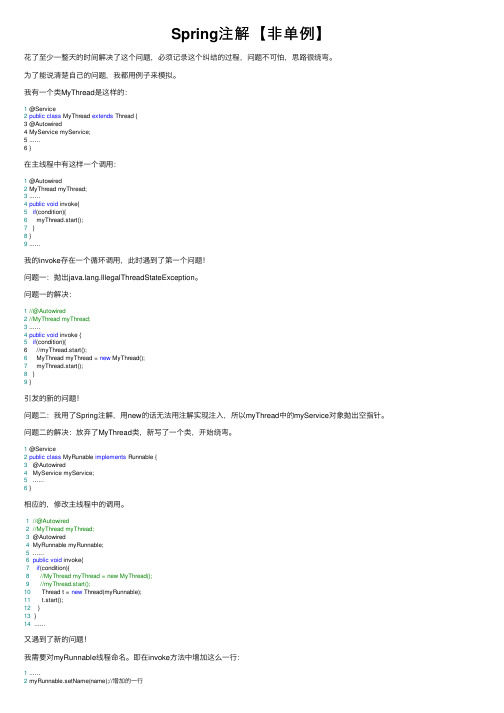
我有⼀个类MyThread是这样的:1 @Service2public class MyThread extends Thread {3 @Autowired4 MyService myService;5 ......6 }在主线程中有这样⼀个调⽤:1 @Autowired2 MyThread myThread;3 ......4public void invoke{5if(condition){6 myThread.start();7 }8 }9 ......我的invoke存在⼀个循环调⽤,此时遇到了第⼀个问题!问题⼀:抛出ng.IllegalThreadStateException。
问题⼀的解决:1//@Autowired2//MyThread myThread;3 ......4public void invoke {5if(condition){6 //myThread.start();6 MyThread myThread = new MyThread();7 myThread.start();8 }9 }引发的新的问题!问题⼆:我⽤了Spring注解,⽤new的话⽆法⽤注解实现注⼊,所以myThread中的myService对象抛出空指针。
问题⼆的解决:放弃了MyThread类,新写了⼀个类,开始绕弯。
1 @Service2public class MyRunable implements Runnable {3 @Autowired4 MyService myService;5 ......6 }相应的,修改主线程中的调⽤。
1//@Autowired2//MyThread myThread;3 @Autowired4 MyRunnable myRunnable;5 ......6public void invoke{7if(condition){8//MyThread myThread = new MyThread();9//myThread.start();10 Thread t = new Thread(myRunnable);11 t.start();12 }13 }14 ......⼜遇到了新的问题!我需要对myRunnable线程命名。
【SpringFramework】Spring入门教程(三)使用注解配置
【SpringFramework】Spring⼊门教程(三)使⽤注解配置本⽂主要介绍四个⽅⾯:(1) 注解版本IOC和DI(2) Spring纯注解(3) Spring测试(4) SpringJDBC - Spring对数据库的操作使⽤注解配置Spring⼊门说在前⾯学习基于注解的IoC配置,⼤家脑海⾥⾸先得有⼀个认知,即注解配置和xml配置要实现的功能都是⼀样的,都是要降低模块间的耦合度。
仅仅只是配置的形式不⼀样。
关于实际的开发中到底使⽤xml还是注解,每家公司有着不同的使⽤习惯。
所以这两种配置⽅式我们都需要掌握。
基于注解配置的⽅式也已经逐渐代替xml配置。
所以我们必须要掌握使⽤注解的⽅式配置Spring。
配置步骤注意:如果使⽤Eclipse需要先安装了STS插件,或者使⽤STS开发⼯具创建项⽬。
本⽂使⽤IDEA进⾏演⽰。
1.2.1. 第⼀步:拷贝必备jar包到⼯程的lib⽬录。
注意:在基于注解的配置中,我们还要多拷贝⼀个aop的jar包。
如下图:1.2.2. 第⼆步:在类的根路径下创建⼀个任意名称的xml⽂件(不能是中⽂)注意:基于注解整合时,Spring配置⽂件导⼊约束时需要多导⼊⼀个context命名空间下的约束。
<?xml version="1.0" encoding="UTF-8"?><beans xmlns="/schema/beans"xmlns:xsi="/2001/XMLSchema-instance"xmlns:context="/schema/context"xsi:schemaLocation="/schema/beans/schema/beans/spring-beans.xsd/schema/context/schema/context/spring-context.xsd"></beans>1.2.3. 第⼆步:创建⼀个服务类创建⼀个测试的服务类,并且加⼊使⽤@Component注解,声明该类允许注⼊到Spring容器package org.cjw.service;import ponent;/*使⽤注解配置时,需要将Spring框架启动就创建对象的类表⽰为组件类表⽰组件类使⽤@Component注解*/@Componentpublic class CustomerService {public void save() {System.out.println("-保存数据-");}}1.2.4. 第四步在spring的配置⽂件加⼊扫描注解<?xml version="1.0" encoding="UTF-8"?><beans xmlns="/schema/beans"xmlns:xsi="/2001/XMLSchema-instance"xmlns:context="/schema/context"xsi:schemaLocation="/schema/beans/schema/beans/spring-beans.xsd/schema/context/schema/context/spring-context.xsd"><!-- 声明扫描包及其⼦包的类,如果发现有组件注解的类,就创建对象并加⼊到容器中去 --><context:component-scan base-package="org.cjw" /></beans>1.2.5. 第五步:测试调⽤代码package org.cjw.test;import org.cjw.service.CustomerService;import org.junit.Test;import org.springframework.context.ApplicationContext;import org.springframework.context.support.ClassPathXmlApplicationContext;public class CustomerServiceTest {@Testpublic void testSave() {ApplicationContext context = new ClassPathXmlApplicationContext("applicationContext.xml");CustomerService customerService = context.getBean(CustomerService.class);customerService.save();}}--测试结果,如果可以调⽤服务⽅法,测试成功。
Spring注解方式防止重复提交原理详解
Spring注解⽅式防⽌重复提交原理详解Srping注解⽅式防⽌重复提交原理分析,供⼤家参考,具体内容如下⽅法⼀: Springmvc使⽤Token使⽤token的逻辑是,给所有的url加⼀个拦截器,在拦截器⾥⾯⽤java的UUID⽣成⼀个随机的UUID并把这个UUID放到session⾥⾯,然后在浏览器做数据提交的时候将此UUID提交到服务器。
服务器在接收到此UUID后,检查⼀下该UUID是否已经被提交,如果已经被提交,则不让逻辑继续执⾏下去…**1 ⾸先要定义⼀个annotation:⽤@Retention 和 @Target 标注接⼝@Target(ElementType.METHOD)@Retention(RetentionPolicy.RUNTIME)public @interface Token {boolean save() default false;boolean remove() default false;}2 定义拦截器TokenInterceptor:public class TokenInterceptor extends HandlerInterceptorAdapter {@Overridepublic boolean preHandle(HttpServletRequest request, HttpServletResponse response, Object handler) throws Exception {if (handler instanceof HandlerMethod) {HandlerMethod handlerMethod = (HandlerMethod) handler;Method method = handlerMethod.getMethod();Token annotation = method.getAnnotation(Token.class);if (annotation != null) {boolean needSaveSession = annotation.save();if (needSaveSession) {request.getSession(false).setAttribute("token", UUID.randomUUID().toString());}boolean needRemoveSession = annotation.remove();if (needRemoveSession) {if (isRepeatSubmit(request)) {return false;}request.getSession(false).removeAttribute("token");}}return true;} else {return super.preHandle(request, response, handler);}}private boolean isRepeatSubmit(HttpServletRequest request) {String serverToken = (String) request.getSession(false).getAttribute("token");if (serverToken == null) {return true;}String clinetToken = request.getParameter("token");if (clinetToken == null) {return true;}if (!serverToken.equals(clinetToken)) {return true;}return false;}}Spring MVC的配置⽂件⾥加⼊:<mvc:interceptors><!-- 使⽤bean定义⼀个Interceptor,直接定义在mvc:interceptors根下⾯的Interceptor将拦截所有的请求 --><mvc:interceptor><mvc:mapping path="/**"/><!-- 定义在mvc:interceptor下⾯的表⽰是对特定的请求才进⾏拦截的 --><bean class="****包名****.TokenInterceptor"/></mvc:interceptor></mvc:interceptors>@RequestMapping("/add.jspf")@Token(save=true)public String add() {//省略return TPL_BASE + "index";}@RequestMapping("/save.jspf")@Token(remove=true)public void save() {//省略}⽤法:在Controller类的⽤于定向到添加/修改操作的⽅法上增加⾃定义的注解类 @Token(save=true)在Controller类的⽤于表单提交保存的的⽅法上增加@Token(remove=true)在表单中增加⽤于存储token,每次需要报token值传⼊到后台类,⽤于从缓存对⽐是否是重复提交操作⽅法⼆:springboot中⽤注解⽅式每次操作,⽣成的key存放于缓存中,⽐如⽤google的Gruava或者Redis做缓存定义Annotation类@Target(ElementType.METHOD)@Retention(RetentionPolicy.RUNTIME)@Documented@Inheritedpublic @interface LocalLock {/*** @author fly*/String key() default "";/*** 过期时间 TODO 由于⽤的 guava 暂时就忽略这属性吧集成 redis 需要⽤到** @author fly*/int expire() default 5;}设置拦截类@Aspect@Configurationpublic class LockMethodInterceptor {private static final Cache<String, Object> CACHES = CacheBuilder.newBuilder()// 最⼤缓存 100 个.maximumSize(1000)// 设置写缓存后 5 秒钟过期.expireAfterWrite(5, TimeUnit.SECONDS).build();@Around("execution(public * *(..)) && @annotation(com.demo.testduplicate.Test1.LocalLock)")public Object interceptor(ProceedingJoinPoint pjp) {MethodSignature signature = (MethodSignature) pjp.getSignature();Method method = signature.getMethod();LocalLock localLock = method.getAnnotation(LocalLock.class);String key = getKey(localLock.key(), pjp.getArgs());if (!StringUtils.isEmpty(key)) {if (CACHES.getIfPresent(key) != null) {throw new RuntimeException("请勿重复请求");}// 如果是第⼀次请求,就将 key 当前对象压⼊缓存中CACHES.put(key, key);}try {return pjp.proceed();} catch (Throwable throwable) {throw new RuntimeException("服务器异常");} finally {// TODO 为了演⽰效果,这⾥就不调⽤ CACHES.invalidate(key); 代码了}}/*** key 的⽣成策略,如果想灵活可以写成接⼝与实现类的⽅式(TODO 后续讲解)** @param keyExpress 表达式* @param args 参数* @return ⽣成的key*/private String getKey(String keyExpress, Object[] args) {for (int i = 0; i < args.length; i++) {keyExpress = keyExpress.replace("arg[" + i + "]", args[i].toString());}return keyExpress;}}Controller类引⽤@RestController@RequestMapping("/books")public class BookController {@LocalLock(key = "book:arg[0]")@GetMappingpublic String save(@RequestParam String token) {return "success - " + token;}}以上就是本⽂的全部内容,希望对⼤家的学习有所帮助,也希望⼤家多多⽀持。
Spring常用的一些注解说明

Spring常⽤的⼀些注解说明@Configuration从Spring3.0,@Configuration⽤于定义配置类,可替换xml配置⽂件,被注解的类内部包含有⼀个或多个被@Bean注解的⽅法。
这些⽅法将会被AnnotationConfigApplicationContext或AnnotationConfigWebApplicationContext类进⾏扫描,并⽤于构建bean定义。
@Bean@Bean注解⽤于告诉⽅法,产⽣⼀个Bean对象,然后这个Bean对象交给Spring管理。
产⽣这个Bean对象的⽅法Spring只会调⽤⼀次,随后这个Spring将会将这个Bean对象放在⾃⼰的IOC容器中。
SpringIOC 容器管理⼀个或者多个bean,这些bean都需要在@Configuration注解下进⾏创建,在⼀个⽅法上使⽤@Bean注解就表明这个⽅法需要交给Spring进⾏管理。
@Autowired、@Resource@Resource和@Autowired注解都是⽤来实现依赖注⼊的。
只是@AutoWried按by type⾃动注⼊,⽽@Resource默认按byName⾃动注⼊。
♣ @Autowired@Autowired具有强契约特征,其所标注的属性或参数必须是可装配的。
如果没有Bean可以装配到@Autowired所标注的属性或参数中,⾃动装配就会失败,抛出NoSuchBeanDefinitionException.@Autowired可以对类成员变量、⽅法及构造函数进⾏标注,让 spring 完成 bean ⾃动装配的⼯作。
@Autowired 默认是按照类去匹配,配合 @Qualifier 指定按照名称去装配 bean。
♣ @Resource@Resource是JDK提供的注解,有两个重要属性,分别是name和type。
@Resource依赖注⼊时查找bean的规则既不指定name属性,也不指定type属性,则⾃动按byName⽅式进⾏查找。
Spring注解之@Primary注解
Spring注解之@Primary注解 当⼀个接⼝有多个不同实现类时,使⽤注解@Autowired时会报org.springframework.beans.factory.NoUniqueBeanDefinitionException: No qualifying bean of type [xxxx] is defined: expected single matching bean but found 2:xxx1,xxx2异常信息,意思是Spring 发现两个类型相同的bean,⽆法根据类型选择装配哪⼀个。
这时候就可以使⽤@Primary注解设置默认bean,使得项⽬启动时只装配其中⼀种bean。
@Primary:在众多相同的Bean中,优先使⽤@Primary注解的Bean。
⽅案1-@Qualifier @Qualifier注解⽤于细粒度地根据bean名称选择bean候选者,是遇到多个相同类型bean时⽐较常⽤的解决⽅案。
注解@Autowired 默认是根据类型来⾃动注⼊bean,结合 @Qualifier使⽤时,⾃动注⼊的策略就从 byType 转变成 byName 了。
⽅案2-@Primary @Primary可以理解为,装配bean的时候优先选择使⽤@Primary注解的Bean。
相同类型的bean不可以同时设置多个@Primary注解。
内部实质是设置BeanDefinition的primary属性。
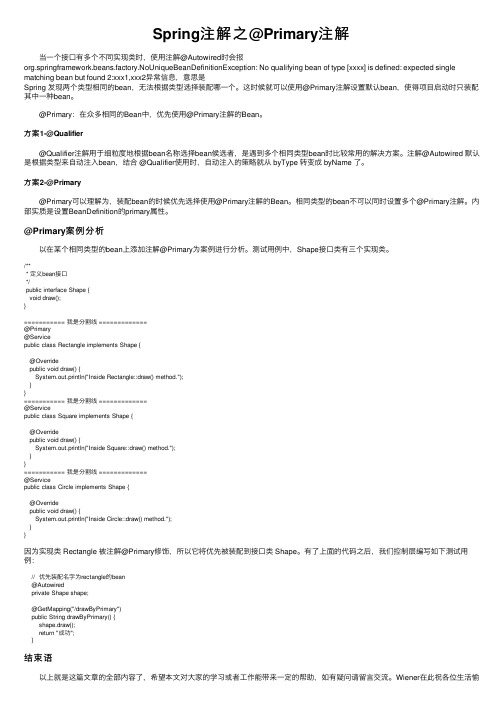
@Primary案例分析 以在某个相同类型的bean上添加注解@Primary为案例进⾏分析。
测试⽤例中,Shape接⼝类有三个实现类。
/*** 定义bean接⼝*/public interface Shape {void draw();}=========== 我是分割线 =============@Primary@Servicepublic class Rectangle implements Shape {@Overridepublic void draw() {System.out.println("Inside Rectangle::draw() method.");}}=========== 我是分割线 =============@Servicepublic class Square implements Shape {@Overridepublic void draw() {System.out.println("Inside Square::draw() method.");}}=========== 我是分割线 =============@Servicepublic class Circle implements Shape {@Overridepublic void draw() {System.out.println("Inside Circle::draw() method.");}}因为实现类 Rectangle 被注解@Primary修饰,所以它将优先被装配到接⼝类 Shape。
Spring注解之@Component详细解析
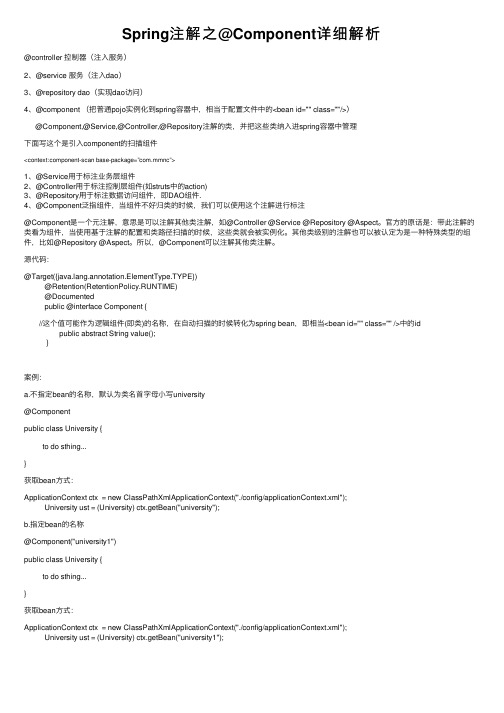
Spring注解之@Component详细解析@controller 控制器(注⼊服务)2、@service 服务(注⼊dao)3、@repository dao(实现dao访问)4、@component (把普通pojo实例化到spring容器中,相当于配置⽂件中的<bean id="" class=""/>) @Component,@Service,@Controller,@Repository注解的类,并把这些类纳⼊进spring容器中管理下⾯写这个是引⼊component的扫描组件<context:component-scan base-package=”com.mmnc”>1、@Service⽤于标注业务层组件2、@Controller⽤于标注控制层组件(如struts中的action)3、@Repository⽤于标注数据访问组件,即DAO组件.4、@Component泛指组件,当组件不好归类的时候,我们可以使⽤这个注解进⾏标注@Component是⼀个元注解,意思是可以注解其他类注解,如@Controller @Service @Repository @Aspect。
官⽅的原话是:带此注解的类看为组件,当使⽤基于注解的配置和类路径扫描的时候,这些类就会被实例化。
其他类级别的注解也可以被认定为是⼀种特殊类型的组件,⽐如@Repository @Aspect。
所以,@Component可以注解其他类注解。
源代码:@Target({ng.annotation.ElementType.TYPE})@Retention(RetentionPolicy.RUNTIME)@Documentedpublic @interface Component {//这个值可能作为逻辑组件(即类)的名称,在⾃动扫描的时候转化为spring bean,即相当<bean id="" class="" />中的idpublic abstract String value();}案例:a.不指定bean的名称,默认为类名⾸字母⼩写university@Componentpublic class University {to do sthing...}获取bean⽅式:ApplicationContext ctx = new ClassPathXmlApplicationContext("./config/applicationContext.xml");University ust = (University) ctx.getBean("university");b.指定bean的名称@Component("university1")public class University {to do sthing...}获取bean⽅式:ApplicationContext ctx = new ClassPathXmlApplicationContext("./config/applicationContext.xml");University ust = (University) ctx.getBean("university1");。
- 1、下载文档前请自行甄别文档内容的完整性,平台不提供额外的编辑、内容补充、找答案等附加服务。
- 2、"仅部分预览"的文档,不可在线预览部分如存在完整性等问题,可反馈申请退款(可完整预览的文档不适用该条件!)。
- 3、如文档侵犯您的权益,请联系客服反馈,我们会尽快为您处理(人工客服工作时间:9:00-18:30)。
Spring注解详解目录一、注解说明 (2)1.使用简化配置 (2)2.使用Bean定义注解 (2)3.Spring支持以下4种类型的过滤方式: (2)二、注解介绍 (2)1.@Controller (3)2.@Service (3)3.@Autowired (4)4.@RequestMapping (4)5.@RequestParam (5)6.@ModelAttribute (6)7.@Cacheable和@CacheFlush (7)8.@Resource (7)9.@PostConstruct和@PreDestroy (8)10.@Repository (8)11.@Component(不推荐使用) (8)12.@Scope (8)13.@SessionAttributes (9)14.@InitBinder (9)15.@Required (9)16.@Qualifier (10)一、注解说明1.使用简化配置<context:annotationconfig/>将隐式地向Spring容器注册以下4个BeanPostProcessor:AutowiredAnnotationBeanPostProcessorCommonAnnotationBeanPostProcessorPersistenceAnnotationBeanPostProcessorRequiredAnnotationBeanPostProcessor2.使用Bean定义注解如果要使注解工作,则必须配置component-scan,实际上不需要再配置annotation-config。
base-package属性指定了需要扫描的类包,类包及其递归子包中所有的类都会被处理。
还允许定义过滤器将基包下的某些类纳入或排除。
3.Spring支持以下4种类型的过滤方式:1)注解org.example.SomeAnnotation将所有使用SomeAnnotation注解的类过滤出来2)类名指定org.example.SomeClass过滤指定的类3)正则表达式com.kedacom.spring.annotation.web..*通过正则表达式过滤一些类4)AspectJ表达式org.example..*Service+通过AspectJ表达式过滤一些类二、注解介绍注解种类:1)@Controller2)@Service3)@Autowired4)@RequestMapping5)@RequestParam6)@ModelAttribute7)@Cacheable8)@CacheFlush9)@Resource10)@PostConstruct11)@PreDestroy12)@Repository13)@Component(不推荐使用)14)@Scope15)@SessionAttributes16)@InitBinder17)@Required18)@Qualifier1.@Controller例如@Controllerpublic class SoftCreateController extends SimpleBaseController{}或者@Controller("softCreateController")说明:@Controller负责注册一个bean到spring上下文中,bean的ID默认为类名称开头字母小写2.@Service例如@Servicepublic class SoftCreateServiceImpl implements ISoftCreateService{}或者@Service("softCreateServiceImpl")说明@Service负责注册一个bean到spring上下文中,bean的ID默认为类名称开头字母小写3.@Autowired例如@Autowiredprivate ISoftPMService softPMService;•或者@Autowired(required=false)private ISoftPMService softPMService=new SoftPMServiceImpl();说明@Autowired根据bean类型从spring上线文中进行查找,注册类型必须唯一,否则报异常。
与@Resource的区别在于,@Resource允许通过bean名称或bean类型两种方式进行查找@Autowired(required=false)表示,如果spring上下文中没有找到该类型的bean时,才会使用new SoftPMServiceImpl();@Autowired标注作用于Map类型时,如果Map的key为String类型,则Spring会将容器中所有类型符合Map的value对应的类型的Bean增加进来,用Bean的id或name作为Map的key。
@Autowired还有一个作用就是,如果将其标注在BeanFactory类型、ApplicationContext类型、ResourceLoader类型、ApplicationEventPublisher类型、MessageSource类型上,那么Spring会自动注入这些实现类的实例,不需要额外的操作。
4.@RequestMapping类@Controller@RequestMapping("/bbtForum.do")public class BbtForumController{@RequestMapping(params="method=listBoardTopic")public String listBoardTopic(int topicId,User user){}}方法@RequestMapping("/softpg/downSoftPg.do")@RequestMapping(value="/softpg/ajaxLoadSoftId.do",method=POST)@RequestMapping(value="/osu/product/detail.do",params={"modify=false"},meth od=POST)说明@RequestMapping可以声明到类或方法上参数绑定说明如果我们使用以下的URL请求:http://localhost/tt.do?method=listBoardTopic&topicId=1&userId=10&userName=t om topicId URL参数将绑定到topicId入参上,而userId和userName URL参数将绑定到user对象的userId和userName属性中。
和URL请求中不允许没有topicId参数不同,虽然User的userId属性的类型是基本数据类型,但如果URL中不存在userId 参数,Spring也不会报错,此时erId值为0。
如果User对象拥有一个dept.deptId的级联属性,那么它将和dept.deptId URL参数绑定。
5.@RequestParam参数绑定说明@RequestParam("id")http://localhost/tt.do?method=listBoardTopic&id=1&userId=10&userName=tom listBoardTopic(@RequestParam("id")int topicId,User user)中的topicId绑定到id这个URL 参数,那么可以通过对入参使用@RequestParam注解来达到目的@RequestParam(required=false):参数不是必须的,默认为true@RequestParam(value="id",required=false)请求处理方法入参的可选类型java基本数据类型和String默认情况下将按名称匹配的方式绑定到URL参数上,可以通过@RequestParam注解改变默认的绑定规则request/response/session既可以是Servlet API的也可以是Portlet API对应的对象,Spring会将它们绑定到Servlet和Portlet容器的相应对象上org.springframework.web.context.request.WebRequest内部包含了request对象java.util.Locale绑定到request对应的Locale对象上java.io.InputStream/java.io.Reader可以借此访问request的内容java.io.OutputStream/java.io.Writer可以借此操作response的内容任何标注了@RequestParam注解的入参被标注@RequestParam注解的入参将绑定到特定的request参数上。
java.util.Map/org.springframework.ui.ModelMap它绑定Spring MVC框架中每个请求所创建的潜在的模型对象,它们可以被Web视图对象访问(如JSP)命令/表单对象(注:一般称绑定使用HTTP GET发送的URL参数的对象为命令对象,而称绑定使用HTTP POST发送的URL参数的对象为表单对象)它们的属性将以名称匹配的规则绑定到URL参数上,同时完成类型的转换。
而类型转换的规则可以通过@InitBinder注解或通过HandlerAdapter的配置进行调整org.springframework.validation.Errors/org.springframework.validation.BindingResult 为属性列表中的命令/表单对象的校验结果,注意检验结果参数必须紧跟在命令/表单对象的后面org.springframework.web.bind.support.SessionStatus可以通过该类型status对象显式结束表单的处理,这相当于触发session清除其中的通过@SessionAttributes定义的属性请求处理方法返回值的可选类型•void此时逻辑视图名由请求处理方法对应的URL确定,如以下的方法:@RequestMapping("/welcome.do")public void welcomeHandler(){}对应的逻辑视图名为“welcome”•String此时逻辑视图名为返回的字符,如以下的方法:@RequestMapping(method=RequestMethod.GET)public String setupForm(@RequestParam("ownerId")int ownerId,ModelMap model){Owner owner=this.clinic.loadOwner(ownerId);model.addAttribute(owner);return"ownerForm";}对应的逻辑视图名为“ownerForm”•org.springframework.ui.ModelMap和返回类型为void一样,逻辑视图名取决于对应请求的URL,如下面的例子:@RequestMapping("/vets.do")public ModelMap vetsHandler(){return new ModelMap(this.clinic.getVets());}对应的逻辑视图名为“vets”,返回的ModelMap将被作为请求对应的模型对象,可以在JSP视图页面中访问到。