海康威视硬盘录像机安装教程
海康产品安装手册

8
iDS-9000HF-SH iDS-9100HF-SH 系列 . 安装手册
4.3 连接控制键盘
硬盘录像机后面的 KB 端即为键盘接口。
接线方法说明 设备提供接信号线的绿色弯针插头,接线步骤如下: 1、拨出插在硬盘录像机上 KB 的绿色弯针插头; 2、用微型十字螺丝刀拧松 KB 插头上的螺丝,将 RS-485 控制键盘的 Ta、Tb 分别放进硬盘录像机的 D+、D插头内弹簧片下沿,拧紧螺丝; 3、将接好的插头卡入相应的绿色弯针插座上。 注意:在连接使用控制键盘时,请确保控制键盘与硬盘录像机可靠接地。
iDS-9000HF-SH
16 路 4路 AC220V,47--63 HZ ≤70W -10℃--+55℃ 10%--90% 19 英寸标准 2U 机箱 450mm(宽)× 450mm(深)×95mm(高) ≤8Kg
11
iDS-9000HF-SH iDS-9100HF-SH 系列 . 安装手册
iDS-9100HF-SH 系列:
9
iDS-9000HF-SH iDS-9100HF-SH 系列 . 安装手册
5 技术参数
iDS-9000HF-SH 系列:
型号
模拟视频输入
视音频输入
网络视频输入
混合视频输入
音频输入 CVBS 输出
视音频输出
HDMI 输出
VGA 输出
视音频编码参数
音频输出 视频压缩标准 视频编码分辨率
视频帧率 视频码率 音频压缩标准 音频码率 码流类型
接线方法说明 设备提供接信号线的绿色弯针插头,接线步骤如下: 1、拨出插在硬盘录像机上 ALARM IN、ALARM OUT 的绿色弯针插头; 2、用微型十字螺丝刀拧松插头上的螺丝,将信号线放进插头内弹簧片下沿,拧紧螺丝; 3、将接好的插头卡入相应的绿色弯针插座上。
海康威视PoE套装装机说明书来啦,跟着图文步骤自己安装监控

海康威视PoE套装装机说明书来啦,跟着图文步骤自己安装监
控
大家都听过PoE套装设备安装使用简单
但是拿到设备后,是不是还是会苦恼如何安装使用呢?
没关系
下面小花给您介绍PoE套装的装机必备技能!
PoE录像机有两种添加摄像头的方式
一种是摄像头接在录像机的PoE口添加
一种是摄像头接在交换机上,交换机连接录像机LAN口添加
摄像头接PoE口
1.接线示意图
2.密码创建
密码是字母+数字,8~16位,密码不能包含admin,IPC激活密码和创建的密码保持一致,点击“确定”
3.通道管理添加设备
激活后退出向导,鼠标右键点击主菜单—通道管理,点击刷新,状态为蓝色播放键即为添加成功。
摄像头接LAN口
1.接线示意图
2.设置录像机网络参数
设置录像机的ipv4地址、子网掩码、网关,注意录像机的IP地址不能和内部网卡在同一网段
3.激活摄像头
路径:主菜单——通道管理——点击“一键激活”,设置密码:密码为字母+数字,8~16位,注意:密码不能包含admin
4.手动添加摄像头
点击通道上的“编辑”按钮,将添加方式“即插即用”改成“手动”,输入摄像头的IP、用户名和密码添加
录像设置1
1.硬盘初始化
路径:主菜单——硬盘管理,勾选硬盘,点击'初始化'
2.定时录像计划设置
路径:预览界面,鼠标右键—开启录像—定时录像,画面上有录像的图标即为配置成功。
Hikvision LH300 Series DVR 安装指南说明书

Time: 20 MinutesHand ToolsSkills - EasyBASIC INSTALLATION GUIDEBASIC SETUPSTEP 1NAVIGATION AND CONTROLSSTEP 2Time: 20 Minutes Skills - EasyBASIC INSTALLATION GUIDEThe LH300 Series DVR is designed to mount securely to the back of LCD monitors with a VESA mount. However, if desired, Setting the Date & Time1. Click (Menu) to open the Main Menu.2. Click(Setup) to open the Setup menu.3. Click Date/Time Setup and configure the following options:• Date Mode: Use the scroll wheel to select Y/M/D, D/M/Y , or M/Y/D .• Date: Use the scroll wheel to manually enter the date.• Time: Use the scroll wheel to manually enter the time.4. Click Exit/Update . The new date and time are saved; the system returns to the Setup menu.5. Right click or press (C) from the tool bar to exit until all menus are closed. The date and time will appear on the bottom-left corner of the screen.1Mouse • Left-Button: Click to select a menu option; 5Connect the Cameras (not included)Connect the BNC cameras to the BNC ports on the rear panel.Time: 20 MinutesHand ToolsSkills - EasyBASIC INSTALLATION GUIDEBASIC SETUPSTEP 1CONTINUED6Connect a Monitor (not included)Connect a VGA or DVI cable from your 10LH300 Edge, Edge +, Edge mini SeriesQuick Setup GuideFor detailed setup information, please refer to your included User’s Manual. For additionalinformation, please visit our websiteIt’s all on the WebNOTE: Test the cameras prior to selecting a permanent mountinglocation by temporarily connecting the Cameras and Cables to your System.1. ClickDVR Password to access the Using the mouse, move the cursor and click from 0~9. You cannot select the options to the left of the Password Wheel (user ID, password) —you can only select the digits. If you make a mistake, simply right-click to exit ready to use. Refer to the owner’s manual to learn how to record, search, playback, and use other advanced features and all other features available with this system.Retrieve the DVR Information SET-UP LOCAL VIEWING ON YOUR PCSTEP 3LOCAL VIEWING INSTALLATION GUIDETime: 30 Minutes Skills - IntermediateHardwarePC/Router1This step relates to local viewing over the LAN (local area network) Live Viewing using DVR Netviewer (LOCALLY):connected to the system, you can monitor and control it in real time.4. You must install the ActiveX® plug-in for DVR Netviewer to function. Click the attention bar at the top of the main page and select ActiveX Control.5. Log in with your window, click To use Live Viewing:1. Click3. Click the Channel buttons to view channels in full-screen.LOCAL LIVE SITE- 16 CHNOTE: This method works for LOCAL VIEWING ONLY. If you wish to access your system from a remote location, you must setup Easy Connect or enable DDNS.LH300 Series Quick Setup Guide - English - R1Congratulations! You have completed Step 3 successfully. You can now view, playback video on your Local Computer via LAN (local area network).Edge Series Edge + Series8LOREX EASY CONNECT INTERNET REMOTE VIEWING - BASICSTEP 3AREMOTE VIEWING INSTALLATION GUIDETime: 20 MinutesSkills - EasyHardware - PCEasy Connect SetupRouter port forwarding is not requiredDetailed instructions available in the User Manual. For advanced remote monitoring including mobile phone connectivityrefer to Step 3B.1NOTE: There is no “www” in front of the address. The system must be connected to your local network router for Yoics to automatically detect the system.A pop-up window opens and informs you that your device has been detected. Click CONTINUE in the registration screen to enable Yoics Easy Connect.2You can rename your system (e.g. myoffice). Click REGISTER NOW. After the registration, your system will be detected automatically.3Enter the System User ID andPassword and click OK to login to the system. NOTE: To log in, refer to the 4/8/16 LAN ID & P/W table for User ID’s & P/W’s.6Congratulations! Now that you have a Yoics account set up you can log in to to remotely view your cameras from anywhere in the worldusing Internet Explorer web browser (Windows operating system only).Click on the name of your device under “My Stuff” on the left side bar . Install ActiveX when Internet Explorer prompts you.5Connect to your DVRYour system now appears on the left side bar under “My Stuff”4NOTE: This service is provided free of charge. You do not have to click the Upgrade Now button to use the Remote Viewer service.ON YOUR PCSTEP 3BAuto Port Forward Wizard1The Lorex Auto Port Forwarding Wizard is a software that automates router port forwarding.1. Insert the system’s software CD, select the Lorex Easy Connect Internet Setup Wizard and follow the instructions to register, download and launch the Wizard.InstallationLOREX EASY CONNECT INTERNET REMOTE MONITORING ADVANCED (AUTO PORT FORWARD WIZARD)You must have the following before you configure the software:1. Your router’s model2. Your router’s user name3. Your Lorex device’s4. Your Lorex device’s Step 1: Populate the Router Database3The Auto Port Forwarding Wizardautomatically populates a list of current routers, and detects the number of connected routers.1. Click the Next button after the software detects your router configuration.Step 2: Enter your Router Settings1. Under the Router drop-down list, select the model of your router OR click the Search button to enter the name of your router model.2. Under Router IP , click the Detect Router IP button . The router’s IP populates in the blank field.3. Under Username and Password , enter the router’s username and password.4. Under IP , enter the IP address of your Lorex device as recorded in Step 3-1.5. Under Port , enter the port number(s) that require forwarding (Web Port: 80).6. Click Next to continue.Step 3: Update the Router Settings1. Click the Update Router button. The program begins updating the router settings. This may take 20 - 30 seconds.2. Close the update window when the update finishes.802CONTINUEDCongratulations! You have completed 3B successfully. You can now view, playbackimages on your Remote Computer via WAN (wide area network) and Remotely controlthe system on your Remote computer over the Internet (Wide Area Network).CONTINUED 6Create Account:1. For PRODUCT LICENSE select the LH300 Series option from the drop down menu.2. For PRODUCT CODE enter the Monitor’s MAC address (recorded in step 3-1).3. For URL REQUEST enter a unique URL name (e.g. tomsmith ). NOTE: URL name should not be more than 15 characters.Complete New Account Information:1237Create AccountNOTE: Remote viewing is only compatible with Internet Explorer & Safari (Safari supports Viewing only and does not support Search or PTZ controls ). Other browsers are not supported.An automated REGISTRATION CONFIRMATION EMAIL Registration Email:CONTINUED1. On your computer, open Internet Explorer (PC) or Safari (Mac)2. In the ID and Password fields, enter your network user ID and password and click LOGIN.3. You must install the ActiveX ® plug-in for DVR Netviewer to function. Click the attention bar at the top of the main page and select Install ActiveX Control. DVR Netviewer will reset.4. Log in with your LAN user name and password. From the security window, click Install .Logging into DVR Netviewer (REMOTELY):Enter DDNS Set-up on your SystemSTEP 3B STEP 3B STEP 3B Manual Port Forward (optional):4If you were unable to port-forward your router5Open your web browser (Internet Explorer by default) and enter in the address bar .DDNS (Dynamic Domain Name System) Set-up:10LOREX EASY CONNECT INTERNET REMOTE MONITORING ADVANCED LOREX EASY CONNECT INTERNET REMOTE MONITORING ADVANCED LOREX EASY CONNECT INTERNET REMOTE MONITORING ADVANCEDOPTIONALDDNSDDNSDDNS8012System80NOTE: Click the Auto Detect button if you have a Linksys or Netgear router (works with most models).ON YOUR PCON YOUR PCON YOUR PC & SYSTEMON YOUR PC9 1. Open Internet Explorer (version 6 or above - PC) or Safari (Mac) and enter the IP address of your DVR in the address bar (i.e. http://192.168.X.XXX:80). DVR Netviewer opens.2. Login using your LAN user ID and password (refer to the password table under Step 1-9).3. Click. The Setup menu opens.4. Click DDNS .NOTE: By default, your DDNS service is 5. Under the DDNS Select field, click the drop down arrow to switch from Disable to /6. In the corresponding text fields, enter your DDNS username and password.NOTE: Obtain this information from the confirmation email after registering for the free Lorex DDNS service.7. Under DDNS Domain Name , enter only the first portion of your DDNS domain from the confirmation email. For example, if your domain name is , you only need to enter tomsmith in the text field.8. Click Apply to save your settings or click Clear to exit without saving.NOTE: Once you have saved your DDNS settings, you must reset your system in order for the changes to take effect. Disconnect and reconnect the power cable from the rear panel to reset. Please allow 10-15 minutes for the DDNS servers to update with your new DDNS address.NOTE: Once you have added and connected to a DVR, you can monitor and control the system in real time.By default, DVR Netviewer launches in Live Viewing mode.To use Live Viewing:1. 1. Click(Live).2. Click, , , , to view in Quad or 16-split.3. Click the Channel buttons to view channels in full-screenREMOTE LIVE SITE- 16 CHNOTE: Ensure you select the proper model and firmware number of the router.Step 4: Test your Connection1. Click the Test Your Connection button. Your system’s default browser opens and connects to your Lorex device. NOTE: To log in, refer to the 4/8/16 LAN ID & P/W table for User ID’s & P/W’s.NOTE: Ensure that Internet Explorer is your system’s default internet browser .NOTE: You may have to manually save your router settings after the software makes the required changes to your router .9. If your settings are correct, you will see a “Setup Successful” message. Click “OK” to close the screen.Setup Information X Setup Successful.OKPROCEED TO STEP 3B-5.For Instant Mobile Connectivity using a Smart Phone, refer to the User Manual. Make sure to complete Port Forwarding Step 3B.。
海康硬盘录像机的使用说明

海康硬盘录像机的使用说明海康威视是一家专注于视频监控领域的公司,其硬盘录像机是一种常用的监控设备,可以用于存储和管理视频监控记录。
以下是海康硬盘录像机的使用说明。
一、硬盘录像机的概述硬盘录像机是一种专门用于视频存储和管理的设备,通常由硬盘录像机主机、硬盘、显示器和控制设备组成。
硬盘录像机可以通过网络连接到计算机或手机等设备,实现远程监控和回放功能。
二、硬盘录像机的安装1.选择一个合适的安装位置,确保设备能够稳定运行。
2.将硬盘录像机主机与电源线连接,然后将硬盘彩盒安装到设备上。
3.将显示器与硬盘录像机主机连接,然后连接必要的控制设备,如鼠标和键盘。
三、硬盘录像机的设置1.开启硬盘录像机主机后,进入系统设置界面,在“网络设置”中输入网络相关信息,如IP地址、子网掩码和网关。
2.在“通道设置”中,配置视频输入通道,可设置分辨率、帧率、压缩格式等参数。
3.在“存储设置”中,配置硬盘的存储参数,包括录像方式、录像时间段和存储周期等。
4.如果需要远程监控功能,可以在“远程设置”中设置相关网络参数。
四、硬盘录像机的操作1.登录硬盘录像机主机,输入用户名和密码,点击登录按钮。
2.进入主页面后,可以通过鼠标或键盘进行操作。
可以选择要查看的通道,点击预览按钮即可实时查看监控画面。
3.如果需要查看历史记录,可以点击回放按钮,选择日期和时间段,然后点击按钮。
可以选择具体的文件进行回放操作。
4.在预览或回放画面上,可以通过鼠标右键或键盘操作进行视频的放大、缩小、暂停等操作。
5.硬盘录像机还提供了一些高级功能,如报警设置、串口控制、移动侦测等,可以根据需要进行配置。
五、硬盘录像机的维护1.定期清理硬盘录像机主机的散热孔,确保设备正常运行。
2.备份重要的监控记录到其他存储设备,以防数据丢失。
3.定期检查硬盘的健康状态,如果有故障或损坏,及时更换硬盘。
4.定期升级硬盘录像机的固件和软件,以获取最新的功能和安全性。
5.保护好硬盘录像机的电源线和网线,避免受到外界干扰。
海康威视 DS-8000说明书

2 安装说明提醒:在硬盘录像机与其它设备连接前,请确认已经断开电源,务必不要带电插拔。
硬盘安装步骤1、 打开机箱。
2、 如果在一根ATA 硬盘数据线上连接两个硬盘,需要设置好硬盘的主盘与从盘。
3、 取下硬盘固定架。
4、 将硬盘放入固定架,并用螺丝将硬盘左右两侧固定。
5、 将固定架装回设备,并用螺丝固定在设备上。
6、 接上ATA 硬盘数据线。
数据线有三个接头,可分别连接主板(蓝色)、主硬盘(黑色)及从硬盘(灰色)的针式插座,连接时请务必注意数据线接头与针式插座的针数对准。
7、 接上硬盘电源线。
8、 盖好机箱,并用螺丝固定。
提醒:1、硬盘选购注意事项:请选择硬盘生产厂商推荐的、适合DVR 工作要求的硬盘,以满足长时间、大数据量的读写要求,同时请从正式渠道购买,以保证硬盘的品质。
2、硬盘安装完成后,需要对硬盘进行格式化以后才能使用,否则系统会判断为硬盘错并发出声音告警。
格式化硬盘操作参见6.4 节。
2.3 后面板物理接口说明声明:各机型的后面板物理接口的分布与类型以实物为准。
2.3.1 HC 、HT 、HF 、HTS 后面板说明 说明:图中以16 路HC为例,其中1/2/3/4 路HC 及2 路HT 设备的后面板说明参见2.3.2,HS 机型的后面板说明参见2.3.3。
2.3.2 1/2/3/4 路HC 及2 路HT 设备的后面板说明说明:图中以4 路HC 为例。
2.3.3 HS 设备的后面板说明8016HS 后面板8009HS 后面板8004HS 后面板2.4 报警线连接说明报警输出连接示例以上请注意JJ1 短接子的不同用法。
当外部接直流负载时,JJ1 两种方式均可安全使用,同时建议在12V 电压、1A 电流限制范围内使用。
当外部接交流负载时,JJ1 必须跳开,即拔掉主板上的相应短接子;为保证安全,外接交流负载时推荐使用外接继电器(具体接线方法如图)。
主板上有四个这样的短接子,每个报警输出对应一个,分别是JJ1、JJ2、JJ3、JJ4,出厂时均是短接的,当直接接交流负载时必须拔掉短接子。
海康威视硬盘录像机快速安装指南说明书
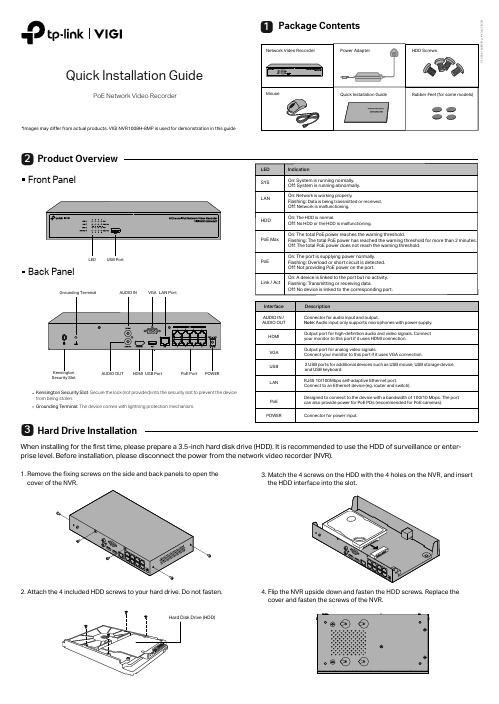
Product OverviewHard Drive InstallationQuick Installation GuidePoE Network Video RecorderPackage Contents1322. Attach the 4 included HDD screws to your hard drive. Do not fasten.1. Remove the fixing screws on the side and back panels to open the Front PanelBack PanelWhen installing for the first time, please prepare a 3.5-inch hard disk drive (HDD). It is recommended to use the HDD of surveillance or enter-prise level. Before installation, please disconnect the power from the network video recorder (NVR).3. Match the 4 screws on the HDD with the 4 holes on the NVR, and insert the HDD interface into the slot.4. Flip the NVR upside down and fasten the HDD screws. Replace the cover and fasten the screws of the NVR.*Images may differ from actual products. VIGI NVR1008H-8MP is used for demonstration in this guideSecurity SlotKensington Security Slot : Secure the lock (not provided) into the security slot to prevent the device from being stolen.Grounding T erminal: The device comes with lightning protection mechanism.Step 1. Connect your cameras to the PoE ports of the NVR or the same network as your NVR.Step 2. Follow the instructions to finish Quick Setup.1. Create a login password for the NVR and a preset password for your unset cameras.Note: Enter an email address for resetting the password of NVR or cameras.2. Click Auto Initialize and the NVR will automatically find and add the cameras inyour network.Note: If you don’t want to use Auto Initialize , click Manually Initialize and follow the Setup Wizard to add cameras in your network and complete the setup.Step 3. Right click on the Live View screen to open the Main Menu for management.(Optional) Step 4. Bind your NVR to a TP-Link ID for remote access and management.1. Right click on the Live View screen and click Settings .2. Click Cloud Services on the top, enter your TP-Link ID and password, and click Bind .Hardware ConnectionFollow the steps below to complete the hardware connection.1. Connect your monitor to the HDMI or VGA port according to the connection port it supports.2. Connect your monitor to a power source and turn it on.3. Connect the LAN port of the NVR to a network device with an Ethernet cable.4. Connect the provided USB Mouse to the USB Interface of the NVR.5. Connect the power adapter to the NVR.NVR can add and manage cameras in batches.* Here we use TP-Link cameras as an example. For other camera brands, please refer to their User Manuals to add the cameras.Configuration54(e.g. Router, Switch)More Management Methods1. Download the VIGI Security Manager on your computer at https:///support/download/vigi-security-manager/.2. Install the VIGI Security Manager and open it.3. NVR on the same network as your computer can be automatically discovered. Go to Settings > Discovered Devices , click Add , and follow the instructions to add your NVR.Method 1: Via the VIGI Se curity Manager (Windows only)You can add and manage your devices via any of the methods below.View live video and modify NVR settings on your computer.Method 3: Via a Web Brow serView live video and modify NVR settings via a web browser.Method 2: Via the TP-Lin k VIGI AppRemotely view live video, manage NVR, and get instant alerts.1. Download and install the2. Open the app and log in with your TP-Link ID. If you don’t have an account, sign up first.3. Tap the + button on the top right and follow the app instructions to add your NVR.orCautionsIf you want to turn off the NVR after installing the hard drive, right click on the Live View screen and click the Power button on Main Menu of your monitor. Do not unplug it directly.The input voltage should match the power requirements of the NVR.The buzzer on the NVR may be triggered when no hard drive is installed or the hard drive in the NVR hasn’t been initialized. Y ou can turn it off in Event-Exception Detection-Disk Exception .Note:Make sure your NVR can get access to the internet before binding.If you don’t have a TP-Link ID, sign up first.If your NVR fails to connect to the Internet, please refer to FAQ-Q3.For more instructions, please refer to the NVR’s User Guide.or Keyboard1. Find the NVR's IP address on your router’s client page.2. On your local computer, open a web browser and enter https://NVR’s IP address (https://192.168.0.240 by default).3. Select your Country/Region and Time Zone .4. Set a password to activate the NVR.Done. You can manage and change NVR settings, and add cameras on the web management page.。
海康威视 网络硬盘录像机 快速指南说明书

网络硬盘录像机快速指南版权所有©杭州海康威视数字技术股份有限公司2020。
保留一切权利。
本手册的任何部分,包括文字、图片、图形等均归属于杭州海康威视数字技术股份有限公司或其子公司(以下简称“本公司”或“海康威视”)。
未经书面许可,任何单位和个人不得以任何方式摘录、复制、翻译、修改本手册的全部或部分。
除非另有约定,本公司不对本手册提供任何明示或默示的声明或保证。
商标声明为海康威视的注册商标。
本手册涉及的其他商标由其所有人各自拥有;HDMI、HDMI高清晰度多媒体接口以及HDMI标志是HDMI Licensing Administrator, Inc.在美国和其他国家的商标或注册商标;本手册涉及的其他商标由其所有人各自拥有。
责任声明●在法律允许的最大范围内,本手册所描述的产品(含其硬件、软件、固件等)均“按照现状”提供,可能存在瑕疵、错误或故障,海康威视不提供任何形式的明示或默示保证,包括但不限于适销性、质量满意度、适合特定目的、不侵犯第三方权利等保证;亦不对使用本手册或使用本公司产品导致的任何特殊、附带、偶然或间接的损害进行赔偿,包括但不限于商业利润损失、数据或文档丢失产生的损失。
●若您将产品接入互联网需自担风险,包括但不限于产品可能遭受网络攻击、黑客攻击、病毒感染等,海康威视不对因此造成的产品工作异常、信息泄露等问题承担责任,但本公司将及时为您提供产品相关技术支持。
●使用本产品时,请您严格遵循适用的法律。
若本产品被用于侵犯第三方权利或其他不当用途,海康威视概不承担任何责任。
●如本手册内容与适用的法律相冲突,则以法律规定为准。
关于本手册●本手册描述的产品仅供中国大陆地区销售和使用。
●本手册作为指导使用。
手册中所提供照片、图形、图表和插图等,仅用于解释和说明目的,与具体产品可能存在差异,请以实物为准。
因产品版本升级或其他需要,海康威视可能对本手册进行更新,如您需要最新版手册,请您登录公司官网查阅()。
DS-9000 9100安装手册

海康威视DS-9000/9100系列硬盘录像机安装手册杭州海康威视数字技术股份有限公司技术热线:400-700-59981 安装注意事项海康威视硬盘录像机是一种专用的监控设备,请在安装使用时注意以下事项:1.硬盘录像机上不能放置盛有液体的容器(例如水杯)。
2.将硬盘录像机放置在通风良好的位置。
3.使硬盘录像机工作在允许的温度及湿度范围内。
4.硬盘录像机内电路板上的灰尘在受潮后会引起短路,请定期用软毛刷对电路板、接插件、机箱及机箱风扇进行除尘。
5.请从正规渠道购买硬盘生产厂商推荐的DVR专用硬盘,以保证硬盘的品质和使用要求。
硬盘录像机的安装若硬盘录像机安装在机架或机柜内,请使用支架固定并注意以下事项:1.安装硬盘录像机前,请先将支架安装在机架或机柜的适当位置。
2.请确保设备安全运行所必需的空气流通。
3.请确保不会因为机械负荷不均匀而造成危险。
4.请确保机柜内温度不超过55℃。
5.请确保视频、音频线缆有足够的安装空间,线缆弯曲半径应不小于5倍线缆外径。
6.请确保报警、485等线缆牢固安装,良好接触。
7.如果安装多台设备,设备的间距最好大于2cm。
8.请确保硬盘录像机可靠接地。
说明收到产品后,请打开包装盒,将设备取出并放置在适当的位置,依据盒内的装箱清单确认装箱产品及附件。
提醒:如果发现包装盒内物品有所损坏或任何配件短缺的情况,请及时与经销商联系。
2 安装硬盘提醒请使用硬盘生产厂商推荐的DVR专用SATA硬盘。
本设备最多可安装8块硬盘,在安装前,请确认已断开电源。
硬盘安装工具:十字螺丝刀一把。
硬盘安装步骤:1:拧开机箱背部的螺丝,取下盖板。
2:用螺丝将硬盘固定在硬盘支架上。
如果是将硬盘安装在下层支架,请先将上层硬盘支架卸掉。
3:将硬盘数据线一端连接在主板上,另一端连接在硬盘上。
4:将电源线连接在硬盘上。
5:盖好机箱盖板,并将盖板用螺丝固定。
3 后面板接口名称及连接说明序号 名称连接说明视频输入接口 (VIDEO IN) 连接(模拟)视频输入设备,标准BNC 接口。
- 1、下载文档前请自行甄别文档内容的完整性,平台不提供额外的编辑、内容补充、找答案等附加服务。
- 2、"仅部分预览"的文档,不可在线预览部分如存在完整性等问题,可反馈申请退款(可完整预览的文档不适用该条件!)。
- 3、如文档侵犯您的权益,请联系客服反馈,我们会尽快为您处理(人工客服工作时间:9:00-18:30)。
海康威视硬盘录像机安装教程
海康威视硬盘录像机是一款可靠稳定的安全监控设备,下面为大家介绍海康威视硬盘录像机的安装教程。
安装海康威视硬盘录像机前,首先需要准备以下材料和工具:
1. 海康威视硬盘录像机
2. 硬盘
3. 监控摄像头
4. 电源适配器
5. 视频电缆
6. BNC连接头
7. 螺丝刀
8. 网络线
9. 显示器
步骤1:确定安装位置
首先,选择合适的位置安装硬盘录像机。
确保该位置符合硬盘录像机的安装要求,例如通风良好、离电源近、不易受到干扰等。
步骤2:安装硬盘
使用螺丝刀打开硬盘录像机的外壳,将硬盘插入硬盘插槽中,并使用螺丝刀固定好硬盘。
步骤3:连接摄像头和电源
将监控摄像头的视频输出端通过视频电缆与硬盘录像机的视频输入端连接,并使用BNC连接头固定好。
然后,将电源适配
器的一个端口连接到摄像头的电源输入端,另一个端口连接到硬盘录像机的电源输入端。
步骤4:连接显示器
将显示器通过VGA或HDMI线缆与硬盘录像机的显示接口连接。
步骤5:连接网络
如果需要远程访问、管理和控制硬盘录像机,可以使用网络线将硬盘录像机与网络路由器连接。
插入网络线到硬盘录像机的网络接口和网络路由器的接口中。
步骤6:通电启动
完成以上安装连接后,将电源适配器连接到硬盘录像机和电源插座之间,并打开电源。
此时,硬盘录像机会启动,可以通过显示器观察到监控画面。
步骤7:设置相关参数
使用遥控器或硬盘录像机面板上的按钮,进入硬盘录像机的设置界面,根据实际需求进行相关参数的设置,如录像时间、录像模式、存储方式等。
总结:
以上就是海康威视硬盘录像机的安装教程。
在安装过程中,需要注意保持连接稳定可靠,并根据实际需求合理设置参数。
只有正确安装和设置好硬盘录像机,才能保证监控系统的正常运行和安全可靠的效果。