zabbix2.4.5安装
ZABBIX安装和配置

ZABBIX安装和配置本机测试环境:Admin zabbixCentOS8 192.168.8.109root zabbixSFTPBaiinfosftp 1+1=2?Yes⼀、zabbix安装⽅法如下:(⼀)、下载zabbix官⽅提供的虚拟机,环境已经配好,省事:ip addr查看配置,修改成⾃⼰的IP:vi /etc/sysconfig/network-scripts/ifcfg-eth0#修改如下内容:BOOTPROTO=none#添加如下内容:IPADDR="192.168.8.109"PREFIX="24"GATEWAY="192.168.8.1"DNS1="114.114.114.114":wq #保存退出(⼆)、SFTP创建:1、创建sftp服务数据⽬录及相关⽤户mkdir -pv /data/sftp/ #sftp数据⽬录chown root:root -R /data/sftp/ #⼀定要是root⽤户,否则⽆法chrootchmod 755 -R /data/sftp/ #权限最低需要保证普通⽤户可以进⼊groupadd sftp #sftp服务设置匹配组,单个⽤户可以忽略useradd -d /data/sftp/baiinfosftp -m -g sftp -s /sbin/nologin baiinfosftpid baiinfosftpecho "1+1=2?Yes" |passwd --stdin baiinfosftp #添加密码2、修改sshd服务配置⽂件,以组的⽅式管理sftp⽤户权限vi /etc/ssh/sshd_config #修改sftp配置⽂件,修改内容如下:注销:添加:Subsystem sftp internal-sftp #使⽤sftp服务使⽤系统⾃带的internal-sftpMatch Group sftp #匹配sftp组,多个组之间⽤逗号分割ChrootDirectory /data/sftp/%u #⽤chroot将⽤户的根⽬录指定到/data/sftp/%u,%u代表⽤户名,这样⽤户就只能在/data/sftp/%u下活动ForceCommand internal-sftp #强制执⾏内部sftp,并忽略任何~/.ssh/rc⽂件中的命令AllowTcpForwarding no #不允许转发TCP协议,默认是yes,如果⽤户可以shell访问则建议为yesX11Forwarding no #是否允许进⾏ X11 转发。
zabbix2.4安装手册
4 Installation from sourcesYou can get the very latest version of Zabbix by compiling it from the sources.A step-by-step tutorial for installing Zabbix from the sources is provided here.1 Installing Zabbix daemons1 Download the source archiveGo to the Zabbix download page and download the source archive. Once downloaded, extract the sources, by running:$ tar -zxvf zabbix-2.4.0.tar.gzEnter the correct Zabbix version in the command. It must match the name of the downloaded archive.2 Create user accountFor all of the Zabbix daemon processes, an unprivileged user is required. If a Zabbix daemon is started from an unprivileged user account, it will run as that user.However, if a daemon is started from a 'root' account, it will switch to a 'zabbix' user account, which must be present. To create such a user account (in its own group, “zabbix”) on Linux systems, run: groupadd zabbixuseradd -g zabbix zabbixA separate user account is not required for Zabbix frontend installation.If Zabbix server and agent are run on the same machine it is recommended to use a different user for running the server than for running the agent. Otherwise, if both are run as the same user, the agent can access the server configuration file and any Admin level user in Zabbix can quite easily retrieve, for example, the database password.Running Zabbix as root, bin, or any other account with special rights is a security risk.3 Create Zabbix databaseFor Zabbix server and proxy daemons, as well as Zabbix frontend, a database is required. It is not needed to run Zabbix agent.SQL scripts are provided for creating database schema and inserting the dataset. Zabbix proxy database needs only the schema while Zabbix server database requires also the dataset on top of theschema.Having created a Zabbix database, proceed to the following steps of compiling Zabbix.4 Configure the sourcesWhen configuring the sources for a Zabbix server or proxy, you must specify the database type to be used. Only one database type can be compiled with a server or proxy process at a time.To see all of the supported configuration options, inside the extracted Zabbix source directory run: ./configure --helpTo configure the sources for a Zabbix server and agent, you may run something like:./configure --enable-server --enable-agent --with-mysql --enable-ipv6 --with-net-snmp --with-libcurl --with-libxml2--with-libxml2 configuration option is required for virtual machine monitoring, supported since Zabbix 2.2.0.To configure the sources for a Zabbix server (with PostgreSQL etc.), you may run:./configure --enable-server --with-postgresql --with-net-snmpTo configure the sources for a Zabbix proxy (with SQLite etc.), you may run:./configure --prefix=/usr --enable-proxy --with-net-snmp --with-sqlite3 --with-ssh2To configure the sources for a Zabbix agent, you may run:./configure --enable-agentUse can add --enable-static flag to statically link libraries. If you plan to distribute compiled binaries among different servers, you must use this flag to make these binaries work without required libraries. Note that --enable-static does not work under Solaris.Using --enable-static option is not recommended when building server.In order to build the server statically you must have a static version of every external library needed. There is no strict check for that in configure script.Command-line utilities zabbix_get and zabbix_sender are compiled if --enable-agent option is used.Use --with-ibm-db2 flag to specify location of the CLI API.Use --with-oracle flag to specify location of the OCI API.5 Make and install everythingIf installing from SVN, it is required to run first:$ make dbschemamake installThis step should be run as a user with sufficient permissions (commonly 'root', or by using sudo). Running make install will by default install the daemon binaries (zabbix_server, zabbix_agentd, zabbix_proxy) in /usr/local/sbin and the client binaries (zabbix_get, zabbix_sender) in /usr/local/bin.To specify a different location than /usr/local, use a --prefix key in the previous step of configuring sources, for example --prefix=/home/zabbix. In this case daemon binaries will be installed under<prefix>/sbin, while utilities under <prefix>/bin. Man pages will be installed under <prefix>/share.6 Review and edit configuration filesedit the Zabbix agent configuration file /usr/local/etc/zabbix_agentd.confqYou need to configure this file for every host with zabbix_agentd installed.You must specify the Zabbix server IP address in the file. Connections from other hosts will be denied.edit the Zabbix server configuration file /usr/local/etc/zabbix_server.confqYou must specify the database name, user and password (if using any).With SQLite the full path to database file must be specified; DB user and password are not required. The rest of the parameters will suit you with their defaults if you have a small installation (up to ten monitored hosts). You should change the default parameters if you want to maximize the performance of Zabbix server (or proxy) though. See the performance tuning section for more details.if you have installed a Zabbix proxy, edit the proxy configuration fileq/usr/local/etc/zabbix_proxy.confYou must specify the server IP address and proxy hostname (must be known to the server), as well as the database name, user and password (if using any).With SQLite the full path to database file must be specified; DB user and password are not required.7 Start up the daemonsRun zabbix_server on the server side.shell> zabbix_serverMake sure that your system allows allocation of 36MB (or a bit more) of shared memory, otherwise the server may not start and you will see “Cannot allocate shared memory for <type of cache>.” in the server log file. This may happen on FreeBSD, Solaris 8.See the "See also" section at the bottom of this page to find out how to configure shared memory. Run zabbix_agentd on all the monitored machines.shell> zabbix_agentdMake sure that your system allows allocation of 2MB of shared memory, otherwise the agent may not start and you will see “Cannot allocate shared memory for collector.” in the agent log file. This may happen on Solaris 8.If you have installed Zabbix proxy, run zabbix_proxy.shell> zabbix_proxy2 Installing Zabbix web interfaceCopying PHP filesZabbix frontend is written in PHP, so to run it a PHP supported webserver is needed. Installation is done by simply copying the PHP files from frontends/php to the webserver HTML documents directory. Common locations of HTML documents directories for Apache web servers include:/usr/local/apache2/htdocs (default directory when installing Apache from source)q/srv/www/htdocs (OpenSUSE, SLES)q/var/www/html (Fedora, RHEL, CentOS)q/var/www (Debian, Ubuntu)qIt is suggested to use a subdirectory instead of the HTML root. To create a subdirectory and copy Zabbix frontend files into it, execute the following commands, replacing the actual directory:mkdir <htdocs>/zabbixcd frontends/phpcp -a . <htdocs>/zabbixIf installing from SVN and planning to use any other language than English, you must generate translation files. To do so, run:locale/make_mo.shmsgfmt utility from gettext package is required.Additionally, to use any other language than English, its locale should be installed on the web server. See the "See also" section in the “User profile” page to find out how to install it if required.Installing frontendStep 1In your browser, open Zabbix URL: http://<server_ip_or_name>/zabbixYou should see the first screen of the frontend installation wizard.Step 2Make sure that all software prerequisites are met.Pre-requisite MinimumvalueDescriptionPHP version 5.3.0PHP memory_limit option128MB In php.ini:memory_limit = 128MPHP post_max_size option16MB In php.ini:post_max_size = 16MPHP upload_max_filesize option2MB In php.ini:upload_max_filesize = 2MPHP max_execution_time option300 seconds In php.ini:max_execution_time = 300PHP max_input_time option300 seconds In php.ini:max_input_time = 300PHP session.auto_start option must bedisabledIn php.ini:session.auto_start = 0.Database support One of: IBMDB2, MySQL,Oracle,PostgreSQL,SQLiteOne of the following modules must beinstalled:ibm_db2, mysql, oci8, pgsql, sqlite3bcmath php-bcmath mbstring php-mbstringPHP mbstring.func_overload option must bedisabledIn php.ini:mbstring.func_overload = 0.PHP always_populate_raw_post_data option must be set to-1Required only for PHP versions 5.6.0 ornewer.In php.ini:always_populate_raw_post_data = -1sockets php-net-socket. Required for user script support.Pre-requisiteMinimum value Descriptiongd 2.0 or higher php-gd. PHP GD extension must support PNG images (--with-png-dir ), JPEG (--with-jpeg-dir )images and FreeType 2 (--with-freetype-dir ).libxml 2.6.15php-xml or php5-dom xmlwriter php-xmlwriter xmlreader php-xmlreader ctype php-ctype sessionphp-session gettextphp-gettextSince Zabbix 2.2.1, the PHP gettext extension is not a mandatory requirement for installing Zabbix. If gettext is not installed, the frontend will work as usual, however, the translations will not be available.Optional pre-requisites may also be present in the list. A failed optional prerequisite is displayed in orange and has a Warning status. With a failed optional pre-requisite, the setup may continue.If there is a need to change the Apache user or user group, permissions to the session folder must be verified. Otherwise Zabbix setup may be unable to continue.Step 3Enter details for connecting to the database. Zabbix database must already be created.Enter Zabbix server details.Step 5Review a summary of settings.Download the configuration file and place it under conf/.Providing the webserver user has write access to conf/ directory the configuration file would be saved automatically and it would be possible to proceed to the next step right away.Step 7Finish the installation.Step 8Zabbix frontend is ready! The default user name is Admin, password zabbix.Proceed to getting started with Zabbix.TroubleshootingSee the section on installation-specific issue troubleshooting.See also1.How to configure shared memory for Zabbix daemons2014/11/28 12:4811/11 4 Installation from sourcesZabbix Documentation 2.4 - https:///documentation/2.4/。
ZABBIX安装配置手册

ZABBIX安装配置手册1.设置用户帐户:#udogroupadd-g130zabbi某#udoueradd-u130-gzabbi某-c'Zabbi某monitoring'zabbi某2.解压zabbi某:#gunzipzabbi某-1.8.1.tar.gz&&tar-某vfzabbi某-1.8.1.tar3.在线安装依赖库#udoapt-getintalllibghc6-hql-myql-dev#udoapt-getintalllibncure5#udoapt-getintalllibncure5-dev4.安装popt#popt-1.14.tar.gz#gunzippopt-1.14.tar.gz&&tar-某vfpopt-1.14.tar#./configure#make#makeintall4.安装openipmi#gunzipOpenIPMI-2.0.19.tar.gz&&tar-某vfOpenIPMI-2.0.19.tar #./configure--prefi某=/ur/local/openipmi#make#makeintall5.安装zabbi某切换到zabbi某-2.0.0目录#./configure--prefi某=/ur/local/zabbi某--enable-erver--with-myql--with-net-nmp--with-jabber=/ur/local/ikemel--with-libcurl--with-openipmi=/ur/local/openipmi--enable-agent #make#makeintall6.配置zabbi某(1)拷贝zabbi某-erver文件到/etc/init.d文件夹下;(2)根据情况修改zabbi某-erver文件:#udovi/etc/init.d/zabbi某-erverDAEMON=zabbi某_erver文件所在目录(3)修改/ur/local/zabbi某/etc/zabbi某_erver.conf文件,保证如下几项(根据实际情况修改):DBName=zabbi某(数据库名称)DBUer=root(登录数据库用户)DBPaword=123456(数据库用户密码)(4)修改配置文件权限:#chmod400/ur/local/zabbi某/etc/zabbi某_erver.conf#chownzabbi某/ur/local/zabbi某/etc/zabbi某_erver.conf(5)重启zabb某服务:#udoervicezabbi某-ervertart(retart重启)#p-ef|grepzabbi某(查看zabbi某服务进程)7.安装myql、ngin某、php5#cd/etc/myql按下图所示,把127.0.0.1改为0.0.0.09.修改ngin某配置文件erver{liten80;erver_name192.168.182.130;#修改为zabbi某服务器IP或域名地址charetutf-8;location/{inde某inde某.phpinde某.htmlinde某.htm;}location~"\.(j|ico|gif|jpg|png|c|htm|wf|php3)$"{e某pire30d;}location~\.php${fatcgi_pa127.0.0.1:9000;fatcgi_inde某inde某.php;#fatcgi_paramSCRIPT_FILENAME/cript$fatcgi_cript_name; includefatcgi_param;}}重启加载配置文件/etc/init.d/ngin某reload10.修改php.ini文件按要求修改/etc/php5/fpm下的php.ini文件。
zabbix安装教程(centos+zabbix2.0.6)

zabbix是一个基于WEB界面的提供分布式系统监视以及网络监视功能的企业级的开源解决方案。
zabbix 由2部分构成,zabbixserver与可选组件zabbix agent。
一、Zabbix简介1.1Zabbix简介Zabbix是一个企业级的开源分布式监控解决方案,由一个国外的团队持续维护更新,软件可以自由下载使用,运作团队靠提供收费的技术支持赢利。
官方网站:官方文档:/documentation/2.0/manual/quickstart。
Zabbix通过C/S模式采集数据,通过B/S 模式在web端展示和配置。
Zabbix运行条件:Server:Zabbix Server需运行在LAMP(Linux+Apache+Mysql+PHP)环境下,对硬件要求低。
Agent:目前已有的agent基本支持市面常见的OS,包含Linux、HPUX、Solaris、Sun、windows。
SNMP:支持各类常见的网络设备1.2Zabbix功能具备常见的商业监控软件所具备的功能(主机的性能监控、网络设备性能监控、数据库性能监控、FTP 等通用协议监控、多种告警方式、详细的报表图表绘制)支持自动发现网络设备和服务器;支持分布式,能集中展示、管理分布式的监控点;扩展性强,server提供通用接口,可以自己开发完善各类监控。
1.3 优劣势优点:开源,无软件成本投入;Server对设备性能要求低(实际测试环境:虚拟机CentOS5,2GCPU 1G内存,监控5台设备,CPU使用率基本保持在10%以下,内存剩余400M以上);支持设备多;支持分布式集中管理;开放式接口,扩展性强。
缺点:中文资料较少。
二、zabbix安装CentOS5.8 上安装Zabbix 2.2环境:CentOS5.8 64 Bit Zabbix 2.2Zabbixserver ip: 10.0.215.126使用yum安装软件,首先安装yum-fastestmirror 插件,用来找到最快的源。
Zabbix部署与安装
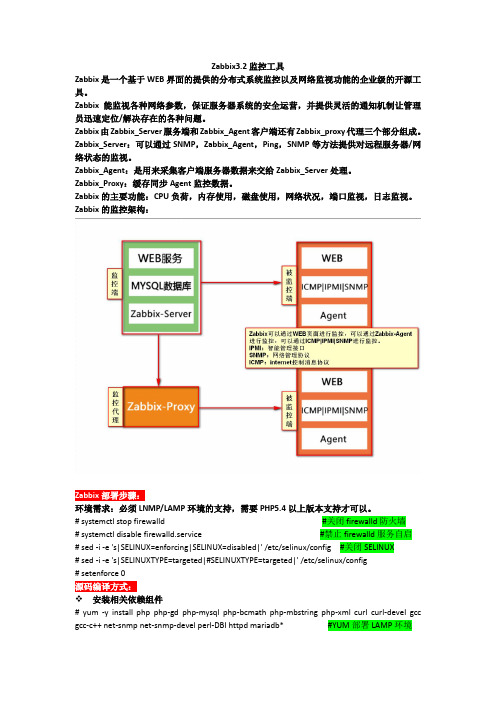
Zabbix3.2监控工具Zabbix是一个基于WEB界面的提供的分布式系统监控以及网络监视功能的企业级的开源工具。
Zabbix能监视各种网络参数,保证服务器系统的安全运营,并提供灵活的通知机制让管理员迅速定位/解决存在的各种问题。
Zabbix由Zabbix_Server服务端和Zabbix_Agent客户端还有Zabbix_proxy代理三个部分组成。
Zabbix_Server:可以通过SNMP,Zabbix_Agent,Ping,SNMP等方法提供对远程服务器/网络状态的监视。
Zabbix_Agent:是用来采集客户端服务器数据来交给Zabbix_Server处理。
Zabbix_Proxy:缓存同步Agent监控数据。
Zabbix的主要功能:CPU负荷,内存使用,磁盘使用,网络状况,端口监视,日志监视。
Zabbix的监控架构:Zabbix部署步骤:环境需求:必须LNMP/LAMP环境的支持,需要PHP5.4以上版本支持才可以。
# systemctl stop firewalld #关闭firewalld防火墙# systemctl disable firewalld.service #禁止firewalld服务自启# sed -i -e 's|SELINUX=enforcing|SELINUX=disabled|' /etc/selinux/config #关闭SELINUX# sed -i -e 's|SELINUXTYPE=targeted|#SELINUXTYPE=targeted|' /etc/selinux/config# setenforce 0源码编译方式:❖安装相关依赖组件# yum -y install php php-gd php-mysql php-bcmath php-mbstring php-xml curl curl-devel gcc gcc-c++ net-snmp net-snmp-devel perl-DBI httpd mariadb* #YUM部署LAMP环境❖解压安装包# tar xzvf zabbix-3.2.1.tar.gz# cd zabbix-3.2.1❖编译安装Zabbix➢安装Server和Agent,并支持将数据放入MYSQL数据库中:# ./configure --prefix=/usr/local/zabbix --enable-server --enable-agent --with-mysql --enable-ipv6 --with-net-snmp --with-libcurl➢仅安装Server,并支持将数据放入MYSQL数据库中:# ./configure --prefix=/usr/local/zabbix --enable-server --with-mysql --with-net-snmp --with-libcurl➢仅安装Proxy代理,并支持将数据放入MYSQL数据库中:# ./configure --prefix=/usr/local/zabbix --enable-proxy --with-net-snmp --with-mysql --with-ssh2➢仅安装Agent客户端:# ./configure --enable-agent# make && make install注:--with-libcurl:监控WEB页面响应时间,下载速度。
zabbix安装整理(修改)

Zabbix安装安装步骤:1、安装好apache、mysql、php、snmp组件apache :yum install httpd httpd-manual -ymysql : yum install mysql-server php-mysql mysql-devel -yphp : yum install php php-bcmatch php-gd php-bcmath php-mbstring –ysnmp : yum install net-snmp net-snmp-utils net-snmp-devel -y其它组件:curl : yum install curl curl-devel -ygcc : yum install gcc libgcc -ymake : yum install make –ylrzsz: yum install -y lrzszlibxml: yum install –y libxml*yum install -y php-xml*#yum install -y ntp#yum install -y ntpdate#cp /usr/share/zoneinfo/Asia/Shanghai /etc/localtime#service ntpd stop#ntpdate #date下载zabbix的最新版本zabbix-2.2.3.tar.gz通过lrzsz工具上传到服务器中,SZ上传。
复制到/home目录下tar -zxvf zabbix-2.2.3.tar.gz解压后进入目录,运行配置:./configure --prefix=/usr/local/zabbix --enable-server --enable-agent \ --with-mysql --with-net-snmp --with-libcurlmakemake install为了安全,zabbix是通过用户zabbix来执行的,所以,要新建zabbix用户groupadd zabbixuseradd zabbix -g zabbix启动mysql service mysqld start进入下载的zabbix目录,新建zabbix的数据库:输入mysqlmysql> create database zabbix character set utf8;mysql>grant all privileges on zabbix.* to zabbix@localhost identified by 'zabbix';# identified by ‘zabbix’的密码是访问数据库的密码mysql>flush privileges;quit;导入数据库文件(进入zabbix解压文件目录)mysql -uzabbix -pzabbix -hlocalhost zabbix < database/mysql/schema.sql mysql -uzabbix -pzabbix -hlocalhost zabbix < database/mysql/images.sql mysql -uzabbix -pzabbix -hlocalhost zabbix < database/mysql/data.sql修改zabbix的配置文件创建zabbix配置文件:mkdir /etc/zabbix复制zabbix下的文件:cp –r /home/zabbix-2.2.3/conf/* /etc/zabbix配置zabbix_server.conf 修改mysql的密码为zabbixVi /etc/zabbix/zabbix_server.confDBName=zabbixDBUser=zabbixDBPassword=zabbix配置zabbix服务器的本机监控修改zabbix_agentd.confVi /etc/zabbix/zabbix_agentd.confHostname=Zabbix ServerServerActive=127.0.0.1:10051为zabbix添加端口cat >>/etc/services <<EOFzabbix-agent 10050/tcp Zabbix Agentzabbix-agent 10050/udp Zabbix Agentzabbix-trapper 10051/tcp Zabbix Trapperzabbix-trapper 10051/udp Zabbix TrapperEOF拷贝zabbix服务器的frontend php 程序到 http server 的主目录下mkdir -p /var/www/html/zabbixcp –r /home/zabbix-2.2.3/frontends/php/ /var/www/html/zabbixchown -R zabbix.zabbix /var/www/html/zabbixcp –r /home/zabbix-2.2.3/misc/init.d/fedora/core5/zabbix_server /etc/init.d/ cp –r /home/zabbix-2.2.3/misc/init.d/fedora/core5/zabbix_agentd /etc/init.d/ ZABBIX_BIN="/usr/local/zabbix/sbin/zabbix_server"echo "/etc/init.d/zabbix_server start">> /etc/rc.localecho "/etc/init.d/zabbix_agentd start">> /etc/rc.localservice zabbix_server start启动zabbix服务器和客户端:/usr/local/sbin/zabbix_server/usr/local/sbin/zabbix_agentd然后在浏览器里输入IP即可验证,如果打开浏览器后发现是空白的,应该是php缺少一个数学库,安装一下即可(yum install php-bcmath)在这之前需要配置/etc/php.ini,更改成下面的参数,才能通过前期的检测。
zabbix-源码包安装
服务器IP:192.168.30.199A.关闭SELINUX#vi /etc/selinux/configSELINUX=enforcing #注释掉SELINUXTYPE=targeted #注释掉SELINUX=disabled #增加:wq #保存退出#setenforce 0#使配置立即生效B.关闭iptables#chkconfig iptables off#service iptables stopC.卸载系统自带的mysql和http服务#rpm -e --nodeps mysql httpd1.安装lnmp环境#yum install gcc gcc-c++ make mysql-server mysql-devel libcurl-devel net-snmp-devel php php-ldap php-gd php-xml php-mysql php-bcmath httpd fping php-mbstring说明:/etc/httpd/conf/httpd.conf #apache配置文件路劲/usr/sbin/apachectl #apache的运行路劲/var/www/html #web目录/usr/bin/mysql #mysql的运行路径/var/lib/mysql #mysql数据库文件的存放路径/usr/lib/mysql #mysql的安装路径/etc/php.ini #PHP配置文件路劲#rpm -ql httpd mysql php #查看安装文件都在哪#service httpd start #开启http服务#service mysqld start#开启mysql服务#chkconfig httpd on #添加开机自动启动#chkconfig mysqld on #添加开机自动启动修改MySQL 配置文件,增加如下#vi /etc/fcharacter-set-server=utf8 #设置字符集为utf8innodb_file_per_table=1 #让innodb的每个表文件单独存储2.安装Zabbix1)添加zabbix用户和组#useradd zabbix -s /sbin/nologin #创建用户zabbix,不允许登陆系统2)安装zabbixcd /opt/zabbix-2.4.5#./configure --prefix=/usr/local/zabbix --enable-server --enable-agent --with-net-snmp --with-libcurl --enable-proxy --with-mysql=/usr/bin/mysql_config#make && make install说明:--enable-server 启用zabbix-server服务--enable-agent 启用zabbix-agent客户端--with-net-snmp 支持SNMP服务--with-libcurl 支持web界面管理--enable-proxy 启用zabbix-proxy代理服务3)创建zabbix数据库,创建zabbix账号#mysql -u root -p #进入mysql控制台,密码为空create database zabbix character set utf8; #创建数据库zabbix,并且数据库编码使用utf8grant all on zabbix.* to 'zabbix'@'localhost' identified by '123456' with grant option;#创建新账号zabbix,密码为:123456。
如何在CentOS上安装Zabbix监控工具?

如何在CentOS上安装Zabbix监控工具?一、准备工作在开始安装 Zabbix 之前,我们需要确保 CentOS 系统满足一些基本要求,并完成一些必要的准备工作。
1、系统版本建议使用 CentOS 7 或更高版本,以确保更好的兼容性和稳定性。
2、网络连接确保服务器能够正常连接到互联网,以便下载所需的软件包和依赖项。
3、安装必要的依赖在终端中执行以下命令来安装所需的依赖库:```sudo yum install y curl netsnmpdevel OpenIPMIdevel```4、防火墙设置如果您的服务器启用了防火墙,需要开放相关端口,以确保 Zabbix 能够正常通信。
通常需要开放 80(HTTP)和 10051(Zabbix 服务器端口)端口。
二、安装 Zabbix 存储库接下来,我们需要添加 Zabbix 的官方存储库,以便能够获取最新的安装包。
1、导入 Zabbix GPG 密钥```sudo rpm import```2、安装 Zabbix 存储库```sudo yum install zabbixrelease-60 y```三、安装 Zabbix 服务器和代理完成存储库的设置后,我们可以开始安装 Zabbix 服务器和代理。
1、安装 Zabbix 服务器```sudo yum install zabbixservermysql y```2、安装 Zabbix 代理```sudo yum install zabbixagent y```四、安装数据库Zabbix 通常使用 MySQL 或 MariaDB 作为数据库存储监控数据。
以下以 MySQL 为例进行安装和配置。
1、安装 MySQL 服务器```sudo yum install mysqlserver y```2、启动 MySQL 服务并设置为开机自启动```sudo systemctl start mysqldsudo systemctl enable mysqld```3、为 Zabbix 创建数据库和用户登录到 MySQL 服务器,执行以下命令:```mysql u root p```输入 root 用户的密码后,执行以下命令创建数据库和用户:```CREATE DATABASE zabbix CHARACTER SET utf8 COLLATEutf8_bin;CREATE USER 'zabbix'@'localhost' IDENTIFIED BY '_____';GRANT ALL PRIVILEGES ON zabbix TO 'zabbix'@'localhost';FLUSH PRIVILEGES;```请将`_____` 替换为您设置的强密码。
- 1、下载文档前请自行甄别文档内容的完整性,平台不提供额外的编辑、内容补充、找答案等附加服务。
- 2、"仅部分预览"的文档,不可在线预览部分如存在完整性等问题,可反馈申请退款(可完整预览的文档不适用该条件!)。
- 3、如文档侵犯您的权益,请联系客服反馈,我们会尽快为您处理(人工客服工作时间:9:00-18:30)。
一.部署环境系统:CentOS 6.4x64 最小化安装Server:192.168.3.28Client:192.168.3.29二.基础软件包安装在server安装基础软件包,这里的环境使用yum安装,如果使用源码安装也是可以的。
[root@zabbix-server ~]# yum -y install wget vim tree gccgcc-c++ autoconfhttpdphpmysqlmysql-server php-mysqlhttpd-manualmod_sslmod_perlmod_auth_mysqlphp-gdphp-xml php-mbstringphp-ldapphp-pearphp-xmlrpcphp-bcmathmysql-connector-odbcmysql-devellibdbi-dbd-mysql net-snmpnet-snmp-devel curl-devel启动httpd、mysql并设置成开机自动启动[root@zabbix-server ~]# servicehttpd start[root@zabbix-server ~]# servicemysqld start[root@zabbix-server ~]# chkconfighttpd on[root@zabbix-server ~]# chkconfigmysqld on在iptables中放行80,10050,10051端口。
[root@zabbix-server ~]# iptables -I INPUT -p tcp -m multiport --destination-port 80,10050:10051 -j ACCEPT#查看防火墙结果[root@zabbix-server ~]# iptables -L -nChain INPUT (policy ACCEPT)targetprot opt source destinationACCEPT tcp -- 0.0.0.0/0 0.0.0.0/0 multiport dports80,10050:10051ACCEPT all -- 0.0.0.0/0 0.0.0.0/0 state RELATED,ESTABLISHED ACCEPT icmp-- 0.0.0.0/0 0.0.0.0/0ACCEPT all -- 0.0.0.0/0 0.0.0.0/0ACCEPT tcp -- 0.0.0.0/0 0.0.0.0/0 state NEW tcp dpt:22 REJECT all -- 0.0.0.0/0 0.0.0.0/0 reject-withicmp-host-prohibitedChain FORWARD (policy ACCEPT)targetprot opt source destinationREJECT all -- 0.0.0.0/0 0.0.0.0/0 reject-withicmp-host-prohibitedChain OUTPUT (policy ACCEPT)targetprot opt source destination#保存iptables规则[root@zabbix-server ~]# serviceiptables saveiptables: Saving firewall rules to /etc/sysconfig/iptables:[ OK ]三.配置PHP参数zabbix的运行需要特定的php参数支持,修改如下[root@zabbix-server ~]# sed -i "s@;date.timezone =@date.timezone = Asia/Shanghai@g"/etc/php.ini[root@zabbix-server ~]# sed -i "s@max_execution_time = 30@max_execution_time = 300@g" /etc/php.ini[root@zabbix-server ~]# sed -i "s@post_max_size = 8M@post_max_size = 32M@g" /etc/php.ini [root@zabbix-server ~]# sed -i "s@max_input_time = 60@max_input_time = 300@g"/etc/php.ini[root@zabbix-server ~]# sed -i "s@memory_limit = 128M@memory_limit = 128M@g"/etc/php.ini[root@zabbix-server ~]# sed -i "s@;mbstring.func_overload = 0@ambstring.func_overload =2@g" /etc/php.ini修改httpd的FQDN错误,重启httpd服务[root@zabbix-server ~]# echo "ServerName localhost:80" >>/etc/httpd/conf/httpd.conf[root@zabbix-server ~]# /etc/init.d/httpd restartStopping httpd: [ OK ]Starting httpd: [ OK ]四.下载zabbix-2.4.5.tar.gz[root@zabbix-server ~]# wget/project/zabbix/ZABBIX%20Latest%20Stable/2.4.5/zabbix-2.4.5.tar. gz五.添加zabbix用户和组[root@zabbix-server ~]# groupadd -g 201 zabbix[root@zabbix-server ~]# useradd -g zabbix -u 201 -s /sbin/nologinzabbix六.安装zabbix-server端[root@zabbix-server ~]# tar xf zabbix-2.4.5.tar.gz[root@zabbix-server ~]# cd zabbix-2.4.5[root@zabbix-server zabbix-2.4.5]# ./configure --prefix=/usr/local/zabbix --enable-server--enable-proxy --enable-agent --with-mysql=/usr/bin/mysql_config --with-net-snmp --with-libcurl [root@zabbix-server zabbix-2.4.5]# make&& make install#创建zabbix数据库以及相关表[root@zabbix-server zabbix-2.4.5]# mysql -e "create database zabbix default charset utf8;" [root@zabbix-server zabbix-2.4.5]# mysql -e "grant all on zabbix.* to zabbix@localhost identified by 'zabbix';"[root@zabbix-server zabbix-2.4.5]# mysql -uzabbix -pzabbixzabbix<./database/mysql/schema.sql [root@zabbix-server zabbix-2.4.5]# mysql -uzabbix -pzabbixzabbix<./database/mysql/images.sql [root@zabbix-server zabbix-2.4.5]# mysql -uzabbix -pzabbixzabbix<./database/mysql/data.sql#配置软连接和启动文件信息[root@zabbix-server zabbix-2.4.5]# mkdir /var/log/zabbix[root@zabbix-server zabbix-2.4.5]# chownzabbix.zabbix /var/log/zabbix[root@zabbix-server zabbix-2.4.5]# ln -s /usr/local/zabbix/etc/ /etc/zabbix[root@zabbix-server zabbix-2.4.5]# ln -s /usr/local/zabbix/bin/* /usr/bin/[root@zabbix-server zabbix-2.4.5]# ln -s /usr/local/zabbix/sbin/* /usr/sbin/[root@zabbix-server zabbix-2.4.5]# cp /root/zabbix-2.4.5/misc/init.d/fedora/core/zabbix_*/etc/init.d[root@zabbix-server zabbix-2.4.5]# chmod 755 /etc/init.d/zabbix_*#修改/etc/init.d目录下的zabbix_server和zabbix_agentd启动文件[root@zabbix-server zabbix-2.4.5]# sed -i"s@BASEDIR=/usr/local@BASEDIR=/usr/local/zabbix@g" /etc/init.d/zabbix_server[root@zabbix-server zabbix-2.4.5]# sed -i"s@BASEDIR=/usr/local@BASEDIR=/usr/local/zabbix@g" /etc/init.d/zabbix_agentd#修改/etc/zabbix/zabbix_server.conf[root@zabbix-server zabbix-2.4.5]# sed -i "s@DBUser=root@DBUser=zabbix@g"/etc/zabbix/zabbix_server.conf[root@zabbix-server zabbix-2.4.5]# sed -i "s@#DBPassword=@DBPassword=zabbix@g"/etc/zabbix/zabbix_server.conf[root@zabbix-server zabbix-2.4.5]# sed -i "s@# DBPassword=@DBPassword=zabbix@g"/etc/zabbix/zabbix_server.conf#修改/etc/zabbix/zabbix_agentd.conf,这里的IP地址写的是zabbix_server的IP地址,即192.168.3.28[root@zabbix-server zabbix-2.4.5]# sed -i"s@Server=127.0.0.1@Server=127.0.0.1,192.168.3.28@g" /etc/zabbix/zabbix_agentd.conf [root@zabbix-server zabbix-2.4.5]# sed -i"s@ServerActive=127.0.0.1@ServerActive=192.168.3.28:10051@g"/etc/zabbix/zabbix_agentd.conf[root@zabbix-server zabbix-2.4.5]# sed -i"s@tmp/zabbix_agentd.log@var/log/zabbix/zabbix_agentd.log@g"/etc/zabbix/zabbix_agentd.conf[root@zabbix-server zabbix-2.4.5]# sed -i "s@^#UnsafeUserParameters=0@UnsafeUserParameters=1\n@g" /etc/zabbix/zabbix_agentd.conf#复制zabbix站点的文件到/var/www/html目录下[root@zabbix-server zabbix-2.4.5]# cp -r /root/zabbix-2.4.5/frontends/php//var/www/html/zabbix/[root@zabbix-server zabbix-2.4.5]# chown -R apache.apache /var/www/html/zabbix/[root@zabbix-server zabbix-2.4.5]# chkconfigzabbix_server on[root@zabbix-server zabbix-2.4.5]# chkconfigzabbix_agentd on[root@zabbix-server zabbix-2.4.5]# servicezabbix_server startStarting zabbix_server: [ OK ][root@zabbix-server zabbix-2.4.5]# servicezabbix_agentd startStarting zabbix_agentd: [ OK ]七.通过web站点配置zabbix以上步骤配置完后通过http://192.168.3.28/zabbix/setup.php网页端进行后续配置1.安装界面2.PHP配置检查界面,结果是OK表示正常,如果是fail状态,请修改相关的php配置参数,并重启httpd服务3.这里的数据库相关信息,在上文中有配置,具体请查看上文4.填写zabbix的server地址,我这里填写的是本机的IP地址192.168.3.285.最后配置结果预览6.安装完成八.访问zabbix的web管理界面安装完成后,通过http://192.168.3.28/zabbix/index.php#就能直接访问web管理界面默认用户名:admin,密码:zabbix九.调整zabbix语言十.zabbix语言设置成中文后,有乱码解决如下1.从windows下控制面板->字体->选择一种中文字库例如“楷体”2.将字体上传至/var/www/html/zabbix/fonts目录下3.修改zabbix页面管理的中文字体设置[root@zabbix-server zabbix-2.4.5]# vim /var/www/html/zabbix/include/defines.inc.php #修改如下2行define('ZBX_FONT_NAME', 'simkai');define('ZBX_GRAPH_FONT_NAME', 'simkai');修改后的zabbix界面。