路由重分布配置
BGP和OSPF在路由重分发时的注意点
RGNOSv10.3(3)BGP和OSPF在路由重分发时的注意点2008-5-15福建星网锐捷网络有限公司版权所有侵权必究前言本文档介绍了RGNOS V10.3(3)中BGP和OSPF路由重发布时的一些实现特点。
由于这些特点区别于友商CISCO的BGP功能实现,在具体的项目实施过程中需要注意。
1.☹本文档仅限公司内部使用,严禁外传。
1.☺如果您在阅读中产生疑问,请与文档维护人联系。
目录1. 1OSPF重分发BGP路由1. 1.1注意点1. 这里Cisco验证的版本为c7200-adventerprisek9-mz.124-9.T1.bin2. 1.2应用实例1. 1.2.1网络拓扑四台设备之间建立EBGP/IBGP/EBGP连接。
C1为CISCO 3550、C2、C3是Cisco模拟器,R1是我司设备,实验设备为RG-S5750。
C1和R1建立EBGP连接,R1和C2建立IBGP连接,C2和C3建立EBGP连接。
其中C1和C3主要是发送路由,具体的操作在R1和C2。
2. 1.2.2配置文件C1 简化配置C1#sho running-configBuilding configuration...Current configuration : 2557 bytes!version 12.2no service padservice timestamps debug uptimeservice timestamps log uptimeno service password-encryption!hostname C1!!no aaa new-modelip subnet-zeroip routing!!!!!!no file verify autospanning-tree mode pvstspanning-tree extend system-id!vlan internal allocation policy ascending!!interface Loopback0ip address 1.1.1.1 255.255.255.255!interface FastEthernet0/1no switchportip address 192.168.16.1 255.255.255.248!interface FastEthernet0/2switchport mode dynamic desirable!interface FastEthernet0/3switchport mode dynamic desirable!...!router bgp 1no synchronizationbgp log-neighbor-changesredistribute staticneighbor 192.168.16.2 remote-as 23no auto-summary!ip classlessip route 192.168.111.0 255.255.255.0 Loopback0ip route 192.168.112.0 255.255.255.0 Loopback0ip http serverip http secure-server!!!control-plane!!line con 0line vty 0 4privilege level 15password wlogin!!endC1#C2简化配置C2#sho runnBuilding configuration...Current configuration : 1450 bytes!version 12.4service timestamps debug datetime msecservice timestamps log datetime msecno service password-encryption!hostname C2!boot-start-markerwarm-rebootboot-end-marker!!no aaa new-model!resource policy!ip cef!!!!interface Loopback0ip address 192.168.125.1 255.255.255.0 secondary ip address 192.168.126.1 255.255.255.0 secondary ip address 2.2.2.2 255.255.255.255!interface FastEthernet0/0ip address 192.168.26.2 255.255.255.248duplex full!interface Ethernet1/0no ip addressshutdownduplex half!interface Ethernet1/1no ip addressshutdownduplex half!interface Ethernet1/2no ip addressshutdownduplex half!interface Ethernet1/3ip address 192.168.23.1 255.255.255.248duplex full!router ospf 1log-adjacency-changesnetwork 2.2.2.2 0.0.0.0 area 0network 192.168.26.0 0.0.0.7 area 0!router bgp 23no synchronizationbgp log-neighbor-changesnetwork 192.168.125.0network 192.168.126.0neighbor 6.6.6.6 remote-as 23neighbor 6.6.6.6 update-source Loopback0neighbor 6.6.6.6 next-hop-selfneighbor 192.168.23.2 remote-as 3no auto-summary!no ip http serverno ip http secure-server!!...!line con 0stopbits 1line aux 0line vty 0 4privilege level 15password wlogin!!endC2#C3简化配置C3#sho runnBuilding configuration...Current configuration : 1178 bytes!version 12.4service timestamps debug datetime msecservice timestamps log datetime msecno service password-encryption!hostname C3!boot-start-markerboot-end-marker!!no aaa new-model!resource policy!ip cef!!!!!!interface Loopback0ip address 3.3.3.3 255.255.255.255!interface FastEthernet0/0no ip addressshutdownduplex full!interface Ethernet1/0no ip addressshutdownduplex half!interface Ethernet1/1no ip addressshutdownduplex half!interface Ethernet1/2no ip addressshutdownduplex half!interface Ethernet1/3ip address 192.168.23.2 255.255.255.248duplex full!router bgp 3no synchronizationbgp log-neighbor-changesredistribute staticneighbor 192.168.23.1 remote-as 23no auto-summary!ip route 192.168.131.0 255.255.255.0 Loopback0ip route 192.168.132.0 255.255.255.0 Loopback0no ip http serverno ip http secure-server!!!logging alarm informational!...!line con 0stopbits 1line aux 0line vty 0 4privilege level 15password wlogin!!endC2#R1简化配置R1#show runnBuilding configuration...Current configuration : 2080 bytes!version RGNOS 10.3.00(3), Release(38105)(Fri Apr 25 15:29:44 CST 2008 -ngcf31)hostname R1co-operate enable!!!!route-map ospf_redist permit 10match route-type external!vlan 1!!!!!interface GigabitEthernet 0/1no switchportno ip proxy-arpip address 192.168.26.1 255.255.255.248!interface GigabitEthernet 0/2!...!interface GigabitEthernet 0/23!interface GigabitEthernet 0/24no switchportno ip proxy-arpip address 192.168.16.2 255.255.255.248!interface Loopback 0ip address 6.6.6.6 255.255.255.255ip address 192.168.165.1 255.255.255.0 secondaryip address 192.168.166.1 255.255.255.0 secondary!!!!!!!!router bgp 23neighbor 2.2.2.2 remote-as 23neighbor 2.2.2.2 update-source Loopback 0neighbor 192.168.16.1 remote-as 1!address-family ipv4network 192.168.165.0network 192.168.166.0neighbor 2.2.2.2 activateneighbor 2.2.2.2 next-hop-selfneighbor 192.168.16.1 activateexit-address-family!!router ospf 1router-id 6.6.6.6network 6.6.6.6 0.0.0.0 area 0network 192.168.26.0 0.0.0.7 area 0!!!ip route 192.168.161.0 255.255.255.0 Loopback 0ip route 192.168.162.0 255.255.255.0 Loopback 0!!line con 0line vty 0 10privilege level 15loginpassword w!!end3. 1.2.3检验配置效果C2使用show ip bgp可以看到125.0/126.0是源发路由,111.0/112.0/165.0/166.0是IBGP路由,131.0/132.0是EBGP路由。
08路由重分布

注意事项( 注意事项(续)
5、因为EIGRP的度量相对复杂,所以在重分 因为EIGRP的度量相对复杂, EIGRP的度量相对复杂 布时,需要分别指定带宽、延迟、可靠性、 布时,需要分别指定带宽、延迟、可靠性、 带宽 负载以及MTU参数的值。 负载以及MTU参数的值。 以及MTU参数的值 6、EIGRP能够识别内部路由和外部路由,默 EIGRP能够识别内部路由和外部路由, 能够识别内部路由和外部路由 认情况下,内部路由的管理距离是90,外 认情况下,内部路由的管理距离是90, 90 170( 部路由的管理距离是170 部路由的管理距离是170(路由代码为 EX” ”D EX )。
3、注入默认路由
EIGRP:ip defaultEIGRP:ip default-network (D* 1.0.0.0/8) OR:redistribute static (D*EX 0.0.0.0/0) RIP:defaul defaulRIP:defaul-information originate defaultOR:ip default-network OR:redistribute static 0.0.0.0/0) (R* 0.0.0.0/0) OSPF:defaul defaulOSPF:defaul-information originate (O*E2 0.0.0.0/0)
度量
路由重分布时,必须给重分布而来的路 由指定的度量值被称为默认度量值或 由指定的度量值被称为默认度量值或种 子度量值,它是在重分布期间定义的。 子度量值,它是在重分布期间定义的。
路由协议 RIP EIGRP OSPF IS-IS BGP 默认种子度量值 无限大 无限大 BGP为1,其他为20 0 IGP的度量值
配置重分布( 配置重分布(续)
CISCO 重发布+前缀列表
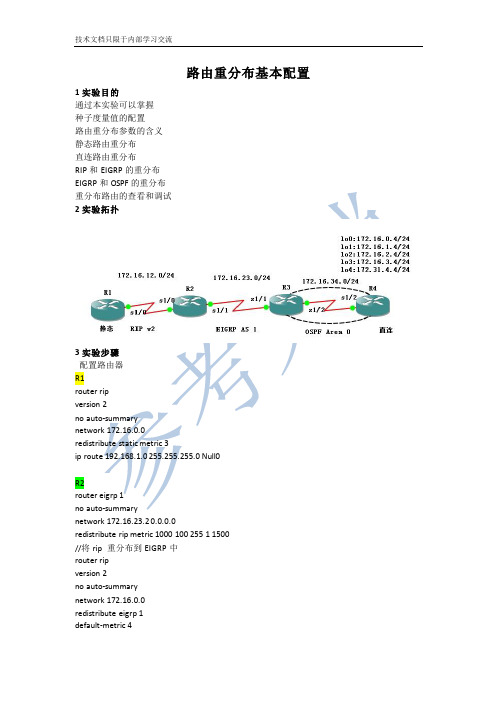
路由重分布基本配置1实验目的通过本实验可以掌握种子度量值的配置路由重分布参数的含义静态路由重分布直连路由重分布RIP和EIGRP的重分布EIGRP和OSPF的重分布重分布路由的查看和调试2实验拓扑3实验步骤配置路由器R1router ripversion 2no auto-summarynetwork 172.16.0.0redistribute static metric 3ip route 192.168.1.0 255.255.255.0 Null0R2router eigrp 1no auto-summarynetwork 172.16.23.2 0.0.0.0redistribute rip metric 1000 100 255 1 1500//将rip 重分布到EIGRP 中router ripversion 2no auto-summarynetwork 172.16.0.0redistribute eigrp 1default-metric 4//配置重分布进行RIP协议所有的默认种子度量值R3router eigrp 1no auto-summarynetwork 172.16.23.3 0.0.0.0redistribute ospf 1 metric 1000 100 255 1 1500distance eigrp 90 150//将ospf 重分布到EIGRP中router ospf 1router-id 3.3.3.3network 172.16.34.3 0.0.0.0 area 0redistribute eigrp 1 metric 30 metric-type 1 subnetsredistribute maximum-prefix 100 50R4access-list 1 permit 172.16.0.0 0.0.254.0//该ACL用于匹配172.16.X.0 X代表偶数access-list 2 permit 172.16.1.0 0.0.254.0//该ACL用于匹配172.16.X.0 X代表奇数route-map CONN permit 10 //配置路由映射表match ip address 1 //匹配ACL 1set metric 200 //匹配度量值route-map CONN permit 20match ip address 2set metric 100set metric-type type-1//设置ospf 路由类型为OE1 默认为OE2route-map CONN permit 30//以上路由映射表CONN是为在OSPF 重分布直连路由器时调用的其含义是:对于172.16开头的第三位是偶数的路由条目设置度量值为100 路由类型为OE2 (默认不用配置)对于172.16 开头的第三位是奇数的路由条目,设置度量值为200 路由类型为OE1 ,而其他路由条目采用默认即度量值为20 路由类型为OE2router ospf 1router-id 4.4.4.4network 172.16.34.4 0.0.0.0 area 0redistribute connected subnets route-map CONN//重分布时调用路由映射表4实验调试R1:前缀列表和路由映射表控制路由更新1实验目的通过本实验可以掌握前缀列表的使用和含义在路由映射表中用前缀列表匹配用路由映射表控制路由更新2实验拓扑3实验步骤R1ip prefix-list CONN1 seq 5 permit 172.16.0.0/16 ge 24 le 28ip prefix-list CONN2 seq 5 permit 172.16.0.0/16 ge 29route-map CONN permit 10match ip address prefix-list CONN1set metric 100set metric-type type-1route-map CONN permit 20match ip address prefix-list CONN2set metric 200set tag 200route-map CONN permit 30router ospf 1router-id 1.1.1.1network 172.16.12.1 0.0.0.0 area 0redistribute connected subnets route-map CONNR2router ospf 1router-id 2.2.2.2network 172.16.12.2 0.0.0.0 area 0network 172.16.23.2 0.0.0.0 area 1R3route-map TAG permit 10match tag 200router ospf 1router-id 3.3.3.3network 172.16.3.3 0.0.0.0 area 1network 172.16.23.3 0.0.0.0 area 1distribute-list route-map TAG in//R3通过分布列表在入向过滤,只把TAG为200 的路由从数据库中提取道路由表中4实验调试以上3条E1 路由条目匹配前缀列表CONN1以上2条E2 路由条目匹配前缀列表CONN2以上2条路由条目的tag 值为200从R3 的链路状态数据库中可以看出,从R1重分布直接进入ospf的5条条目都有,但是由于针对R3的seria1/1 接口的入方向的分布列表要求匹配tag值为200的路由条目所以OSPF 只把tag 值为200 的放入路由表中试验总结:首先需要依照拓扑图划分好区域,不同的区域类型配置。
华为路由重分布
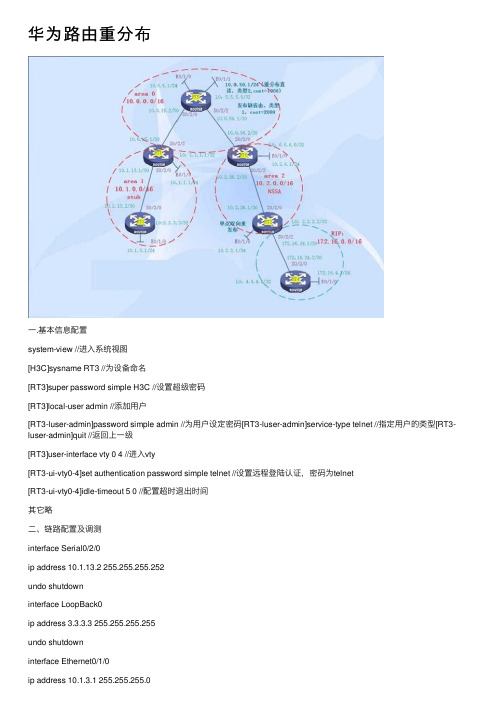
华为路由重分布⼀.基本信息配置system-view //进⼊系统视图[H3C]sysname RT3 //为设备命名[RT3]super password simple H3C //设置超级密码[RT3]local-user admin //添加⽤户[RT3-luser-admin]password simple admin //为⽤户设定密码[RT3-luser-admin]service-type telnet //指定⽤户的类型[RT3-luser-admin]quit //返回上⼀级[RT3]user-interface vty 0 4 //进⼊vty[RT3-ui-vty0-4]set authentication password simple telnet //设置远程登陆认证,密码为telnet[RT3-ui-vty0-4]idle-timeout 5 0 //配置超时退出时间其它略⼆、链路配置及调测interface Serial0/2/0ip address 10.1.13.2 255.255.255.252undo shutdowninterface LoopBack0ip address 3.3.3.3 255.255.255.255undo shutdowninterface Ethernet0/1/0ip address 10.1.3.1 255.255.255.0undo shutdown其它略三、OSPF多区域及RIP配置[RT3]ospf 1 router-id 3.3.3.3 //配置OSPF ROUTER-IDsilent-interface all //配置所有端⼝为被动接⼝undo silent-interface Serial0/2/0 //关闭此接⼝的被动接⼝undo silent-interface Serial0/2/2area 1 //OSPF区域,可以写成点分⼗进制 0.0.0.1 network 3.3.3.3 0.0.0.0 //宣告OSPF的⽹段network 10.1.13.0 0.0.0.3 network 10.1.3.0 0.0.0.255[RT1]ospf 1 router-id 1.1.1.1silent-interface allundo silent-interface Serial0/2/0undo silent-interface Serial0/2/2area 0network 10.0.15.0 0.0.0.3network 1.1.1.1 0.0.0.0area 1network 10.1.13.0 0.0.0.3network 10.1.1.0 0.0.0.255[RT5]ospf 1 router-id 5.5.5.5silent-interface allundo silent-interface Serial0/2/0undo silent-interface Serial0/2/2area 0network 5.5.5.5 0.0.0.0network 10.0.5.0 0.0.0.255 network 10.0.56.0 0.0.0.3[RT6]ospf 1 router-id 6.6.6.6silent-interface allundo silent-interface Serial0/2/0 undo silent-interface Serial0/2/2 area 0network 10.0.56.0 0.0.0.3network 6.6.6.6 0.0.0.0area 2network 10.2.6.0 0.0.0.255 network 10.2.26.0 0.0.0.3[RT2]ospf 1 router-id 2.2.2.2silent-interface allundo silent-interface Serial0/2/2 area 2network 10.2.26.0 0.0.0.3network 10.2.2.1 0.0.0.255rip //启动RIPundo summary //关闭⾃动汇总version 2 //RIPV2network 172.16.0.0 //宣告RIP的⽹段silent-interface all //配置所有接⼝为被动接⼝undo silent-interface Serial0/2/3 //将接⼝不设为被动接⼝[RT4]ripundo summaryversion 2network 172.16.0.0network 4.0.0.0silent-interface allundo silent-interface Serial0/2/1四、OSPF重分布外部路由及下发缺省路由[RT5]ospf 1area 0import-route direct cost 1000 type 2 //重分布直连路由default-route-advertise always //下发缺省路由default cost 2000 //指定缺省路由的COST为2000 default type 1 //指定下发的缺省路由为类型1 [RT2]ospf 1area 2import-route rip 1 cost 1000 //重分布RIP到OSPF ripimport-route ospf 1 cost 5 //重分布OSPF到RIP 五、OSPF特殊区域配置及路由汇总[RT3]ospf 1area 1stub //配置为STUB区域[RT1]ospf 1area 1stub no-summary //配置完全STUB区域abr-summary 10.1.0.0 255.255.0.0 //区域内汇总[RT6]ospf 1area 2nssa no-summary //配置完全NSSA区域abr-summary 10.2.0.0 255.255.0.0 //区域内汇总area 2nssa //配置NSSA区域asbr-summary 172.16.0.0 255.255.0.0 cost 1000 //外部路由汇总六、OSPF虚链路system-view[Sysname] ospf 100[Sysname-ospf-100] area 2[Sysname-ospf-100-area-0.0.0.2] vlink-peer 1.1.1.1 指定对⽅的ROUTER-ID[Sysname-ospf-100-area-0.0.0.2]vlink-peer 1.1.1.1 md5 10 cipher H3C 虚链路MD5认证vlink-peer 1.1.1.1 simple cipher H3C 虚链路明⽂认证虚链路的另⼀端也类似配置display ospf vlink //显⽰虚链路七、OSPF认证[RT1]ospf 1[RT1ospf-1]area 1[RT1-ospf-1-area-0.0.0.1]authentication-mode md5[RT1-ospf-1-area-0.0.0.1]quit[RT1-ospf-1]quit[RT1]int s0/2/0[RT1-Serial0/2/0]ospf authentication-mode md5 10 cipher H3C[RT3ospf-1]area 1[RT3-ospf-1-area-0.0.0.1]authentication-mode md5[RT3-ospf-1-area-0.0.0.1]quit[RT3-ospf-1]quit[RT3]int s0/2/0[RT3-Serial0/2/0]ospf authentication-mode md5 10 cipher H3C 或是采⽤明⽂认证,配置⽅法与上类似authentication-mode simpleospf authentication-mode simple cipher H3C⼋、OSPF调测调试命令display ospf brief //显⽰OSPF的摘要信息display ospf cumulative //OSPF的统计信息display ospf interface //显⽰OSPF的接⼝信息display ospf peer //显⽰OSPF的邻居信息display ospf lsdb //显⽰OSPF的LSDBdisplay ospf routing //显⽰OSPF的路由信息display ospf error //显⽰OSPF的错误信息reset ospf process //重启OSPF进程其它命令int e0/2/0ospf cost 1000 //修改OSPF的COST值 COST=10的8次⽅/带宽ospf network broadcast|nbma |p2mp |p2p //修改OSPF的⽹络类型ospf dr-priority 10 //修改接⼝的优先级,缺省为1九、H3C与CISCO的路由协议管理距离的区别:CISCO:H3C:。
重分布

本课程大纲:1.为什么要重分发?2.如何重分发?3.几个重要的命令:passive-interface,distribute-list,route-map,distance,D HCP路由重分布:将一种路由选择协议获悉的网络告知另一种路由选择协议,以便网络中每台工作站能到达其他的任何一台工作站,这一过程被称为重分布。
重分布原则:路由必须位于路由选择表中才能被重分发在重分发时设定种子metric协议 Seed MetricRIP 无限大必须手工指定EIGRP 无限大也必须手工指定OSPF 20 如果重分布进来的是BGP的话,Metric是1,这是个特例IS-IS 0BGP 携带原来的Metric值R1(config-router)#default-metric 1 使用此命令来设定种子metric值从无类别路由器向有类别路由器重分发协议的时候,仅在掩码相同的接口通告。
为什么要重分发?1.重分发进RIP命令:redistribute 【其他路由协议】 metric 1 R1(config-router)#redistribute static (可不加Metric,默认=1)重分布进RIP时注意,必须指定度量值,或者用default-metric命令设置种子度量值(RIP默认种子度量值无限大),只有重分布静态时不用制定metric 值。
如果同时用metric和default-metric命令指定度量值,则metric优先。
2.重分发进OSPF默认Metric值为20,默认类型是O E2,默认情况下子网不通告命令:redistribute 【其他路由协议】 subnets 3.重分发进EIGRP重分发以后的管理距离是170命令:redistribute 【其他路由协议】 metric 1000 100 255 1 1500R1(config-router)#redistribute connected (不加Metric也可)(根据直连接口的不同计算Metric)R1(config-router)#redistribute static (不加Metric也可)(根据下一跳接口计算Metric)4.重分发进IS-IS默认属于Level 2,默认Metric值为0命令:redistribute 【其他路由协议】注意:BGP重分布进IGP时会造成些问题,原则上不推荐这样做。
重分布和策略路由
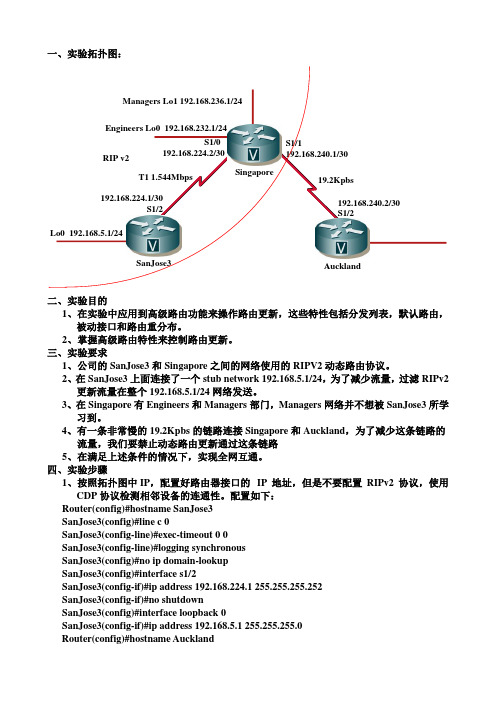
一、实验拓扑图:AucklandSanJose3Singapore 192.168.224.1/30S1/2192.168.240.2/30S1/2 S1/0192.168.224.2/30S1/1192.168.240.1/30 Engineers Lo0 192.168.232.1/24T1 1.544Mbps19.2Kpbs RIP v2Managers Lo1 192.168.236.1/24Lo0 192.168.5.1/24二、实验目的1、在实验中应用到高级路由功能来操作路由更新,这些特性包括分发列表,默认路由,被动接口和路由重分布。
2、掌握高级路由特性来控制路由更新。
三、实验要求1、公司的SanJose3和Singapore 之间的网络使用的RIPV2动态路由协议。
2、在SanJose3上面连接了一个stub network 192.168.5.1/24,为了减少流量,过滤RIPv2更新流量在整个192.168.5.1/24网络发送。
3、在Singapore 有Engineers 和Managers 部门,Managers 网络并不想被SanJose3所学习到。
4、有一条非常慢的19.2Kpbs 的链路连接Singapore 和Auckland ,为了减少这条链路的 流量,我们要禁止动态路由更新通过这条链路5、在满足上述条件的情况下,实现全网互通。
四、实验步骤1、按照拓扑图中IP ,配置好路由器接口的 IP 地址,但是不要配置RIPv2协议,使用CDP 协议检测相邻设备的连通性。
配置如下:Router(config)#hostname SanJose3SanJose3(config)#line c 0SanJose3(config-line)#exec-timeout 0 0SanJose3(config-line)#logging synchronousSanJose3(config)#no ip domain-lookupSanJose3(config)#interface s1/2SanJose3(config-if)#ip address 192.168.224.1 255.255.255.252SanJose3(config-if)#no shutdownSanJose3(config)#interface loopback 0SanJose3(config-if)#ip address 192.168.5.1 255.255.255.0Router(config)#hostname AucklandAuckland (config)#interface s1/2Auckland (config-if)#ip address 192.168.240.2 255.255.255.252Auckland (config-if)#no shutdownAuckland (config)#interface loopback 0Auckland (config-if)#ip address 192.168.248.1 255.255.255.0Router(config)#hostname SingaporeSingapore(config)#interface loopback 0Singapore(config-if)#ip address 192.168.232.1 255.255.255.0Singapore(config-if)#description EngineersSingapore(config)#interface loopback 1Singapore(config-if)#ip address 192.168.236.1 255.255.255.0Singapore(config-if)#description ManagerSingapore(config)#interface s1/0Singapore(config-if)#ip address 192.168.224.2 255.255.255.252Singapore(config-if)#no shutdownSingapore(config)#interface s1/1Singapore(config-if)#ip address 192.168.240.1 255.255.255.252Singapore(config-if)#no shutdown配置完成后使用CDP 协议检查相邻设备的连通性,如下2、在SanJose3上,配置RIPv2协议通告物理直连的网络,配置如下:SanJose3(config)#router ripSanJose3(config-router)#version 2SanJose3(config-router)#network 192.168.224.0SanJose3(config-router)#network 192.168.5.0因为192.158.5.0是一个stub network,这个网络里没有路由器或者主机需要RIPv2协议的更新。
路由重分布

方法一的缺陷
使用解决方法一的问题是:消除了多个重新分配点内在的冗余性。 当与重分布点相连的链路失效后,则不能到达与失效链路相同域的网 络。 本例中将R3的以太口down掉,则R3的路由表如下:
R3#show ip route Gateway of last resort is not set O O C 192.168.4.0/24 [110/74] via 192.168.3.1, 00:13:51, Serial0/0 192.168.5.0/24 [110/138] via 192.168.3.1, 00:13:51, Serial0/0 192.168.3.0/24 is directly connected, Serial0/0
router rip version 2 no auto-summary network 192.168.6.0 redistribute ospf 1 metric 2 distribute-list 2 in
access-list 1 permit 192.168.3.0 0.0.0.255 access-list 1 permit 192.168.4.0 0.0.0.255 access-list 2 permit 192.168.1.0 0.0.0.255 access-list 2 permit 192.168.2.0 0.0.0.255
解决方法一
R3#show ip route Gateway of last resort is not set O O R R C C 192.168.4.0/24 [110/74] via 192.168.3.1, 00:06:44, Serial0/0 192.168.5.0/24 [110/138] via 192.168.3.1, 00:06:44, Serial0/0 192.168.6.0/24 [120/1] via 192.168.2.5, 00:00:26, FastEthernet0/0 192.168.1.0/24 [120/1] via 192.168.2.5, 00:00:26, FastEthernet0/0 192.168.2.0/24 is directly connected, FastEthernet0/0 192.168.3.0/24 is directly connected, Serial0/0
RIP与静态路由重分布[整理]
![RIP与静态路由重分布[整理]](https://img.taocdn.com/s3/m/ca860496e43a580216fc700abb68a98271feace2.png)
RIP与静态路由重分布一、网络拓扑图二、设备配置R1:Router>enaRouter#conf tEnter configuration commands, one per line. End with CNTL/Z.Router(config)#hos R1R1(config)#int f 0/0R1(config-if)#ip address 192.168.1.254 255.255.255.0R1(config-if)#no shutdownR1(config-if)#exit%LINK-5-CHANGED: Interface FastEthernet0/0, changed state to up%LINEPROTO-5-UPDOWN: Line protocol on Interface FastEthernet0/0, changed state to upR1(config)#int s 2/0R1(config-if)#ip address 192.168.2.1 255.255.255.0R1(config-if)#clo ra 64000R1(config-if)#no shutdown%LINK-5-CHANGED: Interface Serial2/0, changed state to downR1(config-if)#exiR1(config)#router ripR1(config-router)#ve 2R1(config-router)#network 192.168.1.0R1(config-router)#network 192.168.2.0R1(config-router)#exiR1(config)#do wrBuilding configuration...[OK]R2:Router>Router>enaRouter#conf tEnter configuration commands, one per line. End with CNTL/Z.Router(config)#hos R2R2(config)#int s 2/0R2(config-if)#ip address 192.168.2.2 255.255.255.0R2(config-if)#no shutdown%LINK-5-CHANGED: Interface Serial2/0, changed state to upR2(config-if)#exiR2(config)#int s 3/0%LINEPROTO-5-UPDOWN: Line protocol on Interface Serial2/0, changed state to upR2(config-if)#ip address 192.168.3.1 255.255.255.0R2(config-if)#clo ra 64000R2(config-if)#no shutdown%LINK-5-CHANGED: Interface Serial3/0, changed state to downR2(config-if)#exiR2(config)#router ripR2(config-router)#ve 2R2(config-router)#network 192.168.2.0R2(config-router)#default-information originateR2(config-router)#redistribute static metric 3R2(config-router)#exiR2(config)#ip route 0.0.0.0 0.0.0.0 192.168.3.2R2(config)#ip route 192.168.4.0 255.255.255.0 192.168.3.2R2(config)#do wrBuilding configuration...[OK]R3:Router>Router>enaRouter#conf tEnter configuration commands, one per line. End with CNTL/Z.Router(config)#hos R3R3(config)#int f 0/0R3(config-if)#ip address 192.168.4.254 255.255.255.0R3(config-if)#no shutdownR3(config-if)#exit%LINK-5-CHANGED: Interface FastEthernet0/0, changed state to up%LINEPROTO-5-UPDOWN: Line protocol on Interface FastEthernet0/0, changed state to upR3(config)#int s 2/0R3(config-if)#ip address 192.168.3.2 255.255.255.0R3(config-if)#no shutdownR3(config-if)#exit%LINK-5-CHANGED: Interface Serial2/0, changed state to upR3(config)#ip route 0.0.0.0 0.0.0.0 192.168.3.1%LINEPROTO-5-UPDOWN: Line protocol on Interface Serial2/0, changed state to upR3(config)#ip route 192.168.2.0 255.255.255.0 192.168.3.1R3(config)#ip route 192.168.1.0 255.255.255.0 192.168.3.1Building configuration...[OK]测试结果:从PC0 ping PC1:。
- 1、下载文档前请自行甄别文档内容的完整性,平台不提供额外的编辑、内容补充、找答案等附加服务。
- 2、"仅部分预览"的文档,不可在线预览部分如存在完整性等问题,可反馈申请退款(可完整预览的文档不适用该条件!)。
- 3、如文档侵犯您的权益,请联系客服反馈,我们会尽快为您处理(人工客服工作时间:9:00-18:30)。
路由重分布实验实验一:静态路由、RIP或OSPF、EIGIP路由重分布【网络拓扑】【实验目的】1.静态路由重分布2.RIP和EIGRP的重分布3.EIGRP和OSPF的重分布4.重分布路由的查看和调试【实验配置1】配置路由器R1:Router>enRouter#conf tRouter(config)#host R1R1(config)#no ip domain looR1(config)#int loo1R1(config-if)#ip add 1.1.1.1 255.255.255.0R1(config-if)#no shutR1(config-if)#exitR1(config)#int loo2R1(config-if)#ip add 202.121.241.8 255.255.255.0 R1(config-if)#no shutR1(config-if)#exitR1(config)#int s2/0R1(config-if)#ip add 192.168.12.1 255.255.255.0 R1(config-if)#clock rate 64000R1(config-if)#no shutR1(config-if)#exitR1(config)#router ripR1(config-router)#ver 2R1(config-router)#no autoR1(config-router)#network 192.168.12.0R1(config-router)#exitR1(config)#ip route 0.0.0.0 0.0.0.0 loo2R1(config)#exit配置路由器R2:Router>enRouter#conf tRouter(config)#host R2R2(config)#no ip domain looR2(config)#int loo1R2(config-if)#ip add 2.2.2.2 255.255.255.0R2(config-if)#no shutR2(config-if)#exitR2(config)#int s2/0R2(config-if)#ip add 192.168.12.2 255.255.255.0 R2(config-if)#no shutR2(config-if)#exitR2(config)#int s3/0R2(config-if)#ip add 192.168.23.1 255.255.255.0 R2(config-if)#clock rate 64000R2(config-if)#exitR2(config)#router eigrp 1R2(config-router)#network 192.168.23.0R2(config-router)#no autoR2(config-router)#exitR2(config)#router ripR2(config-router)#ver 2R2(config-router)#no autoR2(config-router)#network 192.168.12.0R2(config-router)#exit配置路由器R3:Router>enRouter#conf tRouter(config)#host R3R3(config)#no ip domain looR3(config)#int loo1R3(config-if)#ip add 3.3.3.3 255.255.255.0R3(config-if)#no shutR3(config-if)#exitR3(config)#int s2/0R3(config-if)#ip add 192.168.23.2 255.255.255.0R3(config-if)#no shutR3(config-if)#exitR3(config)#int s3/0R3(config-if)#ip add 192.168.34.1 255.255.255.0R3(config-if)#clock rate 64000R3(config-if)#no shutR3(config-if)#exitR3(config)#router eigrp 1R3(config-router)#network 3.3.3.0 0.0.0.255R3(config-router)#network 192.168.23.0 0.0.0.255R3(config-router)#no autoR3(config-router)#exitR3(config)#router ospf 1R3(config-router)#router-id 3.3.3.3R3(config-router)#network 192.168.34.0 0.0.0.255 area 0 R3(config-router)#exit配置路由器R4:Router>enRouter#conf tRouter(config)#host R4R4(config)#no ip domain looR4(config)#int loo1R4(config-if)#ip add 4.4.4.4 255.255.255.0R4(config-if)#exitR4(config)#int s2/0R4(config-if)#ip add 192.168.34.2 255.255.255.0R4(config-if)#no shutR4(config-if)#exitR4(config)#router ospf 1R4(config-router)#router-id 4.4.4.4R4(config-router)#network 4.4.4.0 0.0.0.255 area 0R4(config-router)#network 192.168.34.0 0.0.0.255 area 0 R4(config-router)#exit【实验测试1】测试局部连通性:R1 ping R2R2 ping R3R3 ping R4显示路由表R1R2R3R4【实验配置2】路由重分布配置:在R1上进行静态重分布R1(config)#router ripR1(config-router)#redistribute static metric 3R1(config-router)#exit在R2将RIP重分布到EIGRP中,将EIGRP重分布到RIP中:R2(config)#router eigrp 1R2(config-router)#redistribute rip metric 10000 100 255 1 1500R2(config-router)#exitR2(config)#router ripR2(config-router)#redistribute eigrp 1 metric 10R2(config-router)#exit在R3将OSPF重分布到EIGRP中,将EIGRP重分布到OSPF中:R3(config)#router eigrp 1R3(config-router)#redistribute ospf 1 metric 10000 100 255 1 1500R3(config-router)#distance eigrp 90 150R3(config-router)#exitR3(config)#router ospf 1R3(config-router)#redistribute eigrp 1 metric 30 metric-type 1 subnetsR3(config-router)#exit【实验测试2】显示路由表:R1R2R3R4测试连通性:在R1上ping其他网段,通:实验二:路由重分布综合配置【网络拓扑】【实验目的】1.静态路由重分布2.RIP和EIGRP的重分布3.EIGRP和OSPF的重分布4.重分布路由的查看和调试【实验配置1】R1:Router>enRouter#conf tRouter(config)#host R1R1(config)#no ip domain looR1(config)#int loo0R1(config-if)#ip addr 192.168.19.1 255.255.255.0R1(config-if)#exitR1(config)#int loo1R1(config-if)#ip add 192.168.8.1 255.255.255.0R1(config-if)#exitR1(config)#int s2/0R1(config-if)#ip add 172.16.62.1 255.255.255.0R1(config-if)#clock rate 64000R1(config-if)#no shutR1(config-if)#exitR1(config)#int s3/0R1(config-if)#ip add 172.16.63.1 255.255.255.0R1(config-if)#no shutR1(config-if)#exitR1(config)#router ripR1(config-router)#ver 2R1(config-router)#network 192.168.19.0R1(config-router)#network 192.168.8.0R1(config-router)#exitR1(config)#router ospf 100R1(config-router)#network 172.16.62.0 0.0.0.255 area 0 R1(config-router)#network 172.16.63.0 0.0.0.255 area 0 R1(config-router)#exitR2:Router>enRouter#conf tRouter(config)#host R2R2(config)#no ip domain looR2(config)#int loo0R2(config-if)#ip add 192.168.16.1 255.255.255.0R2(config-if)#exitR2(config)#int loo1R2(config-if)#ip add 192.168.17.1 255.255.255.0R2(config-if)#exitR2(config)#int s3/0R2(config-if)#ip addr 172.16.64.2 255.255.255.0R2(config-if)#clock rate 64000R2(config-if)#no shutR2(config-if)#exitR2(config)#int s2/0R2(config-if)#ip add 172.16.62.2 255.255.255.0R2(config-if)#no shutR2(config-if)#exitR2(config)#router ripR2(config-router)#ver 2R2(config-router)#net 192.168.16.0R2(config-router)#net 192.168.17.0R2(config-router)#exitR2(config)#router ospf 100R2(config-router)#net 172.16.62.0 255.255.255.0 area 0 R2(config-router)#net 172.16.64.0 255.255.255.0 area 0 R2(config-router)#exitR3:Router>enRouter#conf tRouter(config)#host R3R3(config)#no ip domain looR3(config)#int s2/0R3(config-if)#ip add 172.16.64.3 255.255.255.0R3(config-if)#no shutR3(config-if)#exitR3(config)#int s3/0R3(config-if)#ip add 172.16.63.3 255.255.255.0R3(config-if)#clock rate 64000R3(config-if)#no shutR3(config-if)#exitR3(config)#int loo0R3(config-if)#ip add 192.168.24.1 255.255.255.0R3(config-if)#exitR3(config)#router ripR3(config-router)#net 192.168.24.0R3(config-router)#ver 2R3(config-router)#exitR3(config)#router ospf 100R3(config-router)#network 172.16.64.0 0.0.0.255 area 0 R3(config-router)#network 172.16.63.0 0.0.0.255 area 0 R3(config-router)#exitR3(config)#【实验测试1】显示路由表:R1:R2:R3:【重分布配置】R1:R1(config)#router ripR1(config-router)#redistribute ospf 100 match internal external 1 external 2 R1(config-router)#exitR1(config)#router ospf 100R1(config-router)#redistribute rip subnetsR1(config-router)#exitR2:R2(config)#router ripR2(config-router)#redistribute ospf 100 match internal external 1 external 2 R2(config-router)#exitR2(config)#router ospf 100R2(config-router)#redistribute rip subnetsR2(config-router)#exitR3:R3(config)#router ripR3(config-router)#redistribute ospf 100 match internal external 1 external 2 R3(config-router)#exitR3(config)#router ospf 100R3(config-router)#redistribute rip subnetsR3(config-router)#exit【实验测试2】显示路由表:R1:R2:R3:枯藤老树昏鸦,小桥流水人家,古道西风瘦马。