日立HITACHI KFR-72LW_J3 air conditioner Manual1说明书
上海日立空调维修

文档从互联网中收集,已重新修正排版,word格式支持编辑,如有帮助欢迎下载支持。
日立空调维修资料第一部分:制冷设备一:作用及分类1.作用:它是冷藏,冷冻的专用设备,冷藏温度在0-10℃之间.冷冻温度-18℃以下.2.制冷系统组成:压缩机,冷凝器,蒸发器,节流装置.3.压缩机的分类:速度型。
容积型1):全封闭式.(Q)开启式.半封闭式.(B)2):活塞式从2缸-----多缸(8个缸)3):速度型:螺杆式离心式4):所用制冷剂工质为:R22:-40.5℃ R12:-29.8℃134a-26.50℃502-45 ℃4.冷凝器作用:它主要是将高温高压气态制冷剂冷凝变成中温高压制冷剂,进入蒸发器吸热.冷凝器分为:风冷却型水冷却型风冷却型:自然冷却强制自然对流水冷却型:必需要配备冷却水塔使用.5.蒸发器的作用:1):利用制冷剂在蒸发器内吸热,使之被冷却空间温度逐渐降低.2):蒸发器分为两种:蛇型盘管型(铜管.无缝钢管)冷风机型6.节流装置的作用:作用:制冷剂流经节流装置时,在压缩机吸气的作用下,变成低压低温制冷剂在蒸发器内吸热,达到制冷吸热的目的.节流装置可分为:热力膨胀阀(内平衡.外平衡)节流毛细管电磁阀的作用:当制冷压缩机运转时电磁阀打开制冷剂流过电磁阀,当压缩机停止运转时电磁阀关闭.切断制冷剂流向防止再次开机时发生湿冲程(液击).电磁阀在制冷系统中为串联.电磁阀在电路中为并联.7.制冷系统正常工作状态:制冷剂经过压缩机压缩后从排气管路进入冷凝器进行冷凝散热进入液储器(油分离器),在经过干燥过滤器,视液镜,电磁阀,节流装置,在蒸发器内吸热,然后回到压缩机,形成制冷循环.(制冷流程)排气压力: 3.0Mpa以下(运转下)吸气压力:0-0.1Mpa(运转下)09G801二.制冷设备故障,原因,分析,排除:1.检修工具,设备:压力表,万用表,兆欧表,扳手,套筒扳手,真空泵,氮气瓶,连接管,钢瓶,焊接工具,组合工具,常用板手,胀管器,吸潮剂,割刀,专用方榫扳手.2.制冷系统故障判断及分析:1word格式支持编辑,如有帮助欢迎下载支持。
日立空调故障代码速查

⽇⽴空调故障代码速查<故障代码查询>直接点击公众号主页下⽅“便利查询——故障代码”可查询各空调品牌产品故障代码!也可输⼊品牌或品牌⾸字母简称即可快速查询:例如⽇⽴故障代码,只需要输⼊:⽇⽴或rl⽇⽴商⽤分体空调故障代码根据报警代码显⽰⽤ LED 的闪烁形式,可判定下表异常停机的理由。
(下表的○表⽰闪烁,×表⽰关灯)遥控器显⽰报警代码(报警代码显⽰⽤LED:LD4-LD3-LD2-LD1)01(×××○):室内保护装置动作浮动开关(排⽔管堵塞、接⽔盘内⽔位上升)02(××○×):室外保护装置动作⾼压切断装置(OFF:3.0MPa)03(××○○):传送异常(室内~室外间)室内外机组间操作回路配线端⼦部松动、误接线、断线等05(×○××):相检出异常(单相机除外)室外机电源配线错误引起的逆相,端⼦部松动引起的缺相08(×○○×):压缩机上温度过⾼压缩机上温度 127℃以上(制冷)、120℃以上(制热)连续10分钟,或140℃以上(制冷,制热)、120℃以上(除霜)连续5秒钟11(×○○○):吸⼊温度热敏电阻异常(室内机组)热敏电阻连接部松动、脱落、断线12(×○○○):排出温度热敏电阻异常(室内机组)热敏电阻连接部松动、脱落、断线13(×○○○):冻结温度热敏电阻异常(室内机组)热敏电阻连接部松动、脱落、断线19(×××○):室内风扇马达⽤保护器动作室内风扇电机⽤保护器20(○×××):压缩机上温度热敏电阻异常(室外机组)热敏电阻连接部松动、脱落、断线22(○×××):环境温度热敏电阻异常(室外机组)热敏电阻连接部松动、脱落、断线24(○×××):配管温度热敏电阻异常(室外机组)热敏电阻连接部松动、脱落、断线31(○××○):室内外机组组合容量错误室外容量与室内容量相差范围80%~120%以上,容量设定错误35(○×○×):室内机机号设定异常室内机机号设定重复36(○××○):P型室外机与J型室内机组合错误室外容量与室内容量相差范围80%~120%以上,容量设定错误38(○×○○):保护检出回路异常(室外机组)室外机保护检出回路故障39(○○××):过电流异常压缩机因电流值过⼤或0A在30分钟内停机3次41(××○×):制冷过负载(⾼压装置动作的可能性⼤)室外保护装置动作时压缩机上 95℃以上42(××○×):制热过负载(⾼压装置动作的可能性⼤)室内配管温度 55℃以上47(○○×○):低压压⼒过低保护动作因蒸发温度异常低下(不到-35℃),1⼩时内停⽌3次EE(○○○○):压缩机保护报警6⼩时内因压缩机引起的报警有3次遥控器的运转灯每4秒闪⼀次,表⽰室内机组与遥控器间的信号传输异常(连接部松动、脱落、断线、误接线等)。
日立空调产品介绍PPT学习教案

IVX mini系列
第36页/共65页
九)VAM mini系列
第37页/共65页
VAM mini系列
VAM mini系列 4-12HP 最多可拖 10 台室内机
第38页/共65页
RAS-112FSVN2Q
RAS-140FSVN2Q
RAS-160FSVN2Q RAS-140FSYN2Q RAS-160FSYN2Q RAS-224FSYN2Q RAS-280FSYN2Q RAS-335FSYN2Q
十)ES系列
第39页/共65页
ES系列
室外机 RAS-80HRNM2Q RAS-100HRNM2Q RAS-125HRNM2Q
ES系列变频多联中央空调
3HP、4HP、5HP,3档冷量 最多可托 4 台室内机
室内机 1)天花板内置薄型风管机 RPIZ-22~71HRN2Q(/P) 2)天花板内置薄型风管机窄型 RPIZ-22~40HRN2Q(/P)S 3)壁挂机 第40页R/共PK65-2页8/36HRN2Q
十二)商用分体系列(R22系列/N系列/ 直流变频风管机)
第44页/共65页
商用分体系列(R22系列/N系列/直流变频风管机)
R22系列
第45页/共65页
RAS-25HQ RAS-35HQ RAS-56HQ RAS-72HQ RAS-72HEQ RAS-125HQ RAS-125HEQ RAS-200H1Q RAS-250H1Q
ES产品 特点
第41页/共65页
十一)EX系列
第42页/共65页
EX系列
室外机 RAS-80HRN3Q RAS-100HRN3Q RAS-125HRN3Q
EX系列变频多联中央空调
3HP、4HP、5HP,3档冷量 最多可托 4 台室内机
15年日立空调价格更新版
5
7
普通薄天 天花板内置 薄型风管式
RPIZ-63FSVNQF/P 普通薄天 天花板内置 薄型风管式 (配水泵) RPIZ-71FSVNQF/P RPIZ-22FSVNQC/P RPIZ-25FSVNQC/P RPIZ-28FSVNQC/P RPIZ-32FSVNQC/P RPIZ-36FSVNQC/P RPIZ-40FSVNQC/P RPIZ-45FSVNQC/P 天花板内置 薄型风管式 窄型机 (标配水泵) 8 RPIZ-50FSVNQC/P RPIZ-56FSVNQC/P RPIZ-63FSVNQC/P RPIZ-71FSVNQC/P RPIZ-22FSVNQS RCI-40FSKNQ RCI-45FSKNQ RCI-50FSKNQ 四面出风 RCI-56FSKNQ RCI-63FSKNQ RCI-71FSKNQ RCI-80FSKNQ RCI-90FSKNQ RCI-100FSKNQ RCI-112FSKNQ
配件
7814 7829 8143 8286 9286 11857 14357 857
RPI-90KFNQ RPI-140KFNQ RPI-224KFNQ RPI-280KFNQ PC-ARF(QS2) PC-P2H8Q+PCLH6Q(风管双控)
857
系列)
备注
全直流室外机 涡旋压缩机
涡旋压机
1、标配水泵 2、可选配超低温 除湿功能 3、标配PCARF(Qபைடு நூலகம்2) 4、单独购买价格 650元
2
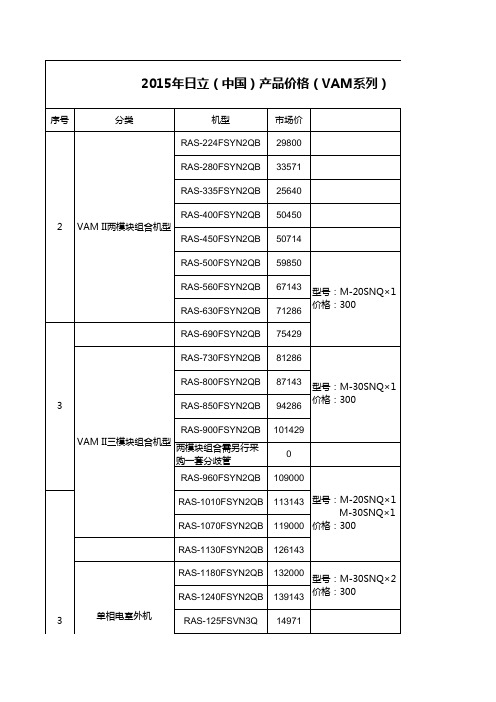
VAM II两模块组合机型
VAM II三模块组合机型
3
单相电室外机 RAS-140FSVN3Q RAS-160FSVN3Q RAS-180FSYN3Q RAS-112FSVN2Q 三相电 室外机 RAS-140FSVN2Q RAS-160FSVN2Q RAS-140FSYN2Q 15243 16171 20814 15571 16114 17071 16114 17071 27071 5400 5557 5586 5614 5900 5929 5971 6057 4643 4757 4786 4814 5029 5057 5100
上海日立家用电器有限公司空调使用说明书
使用产品前,请仔细阅读本使用、安装说明书,并请妥善保管使用安装说明书KFR-50W/BpA KFR-50W/BpAWP 适用机种型号:适用机种制品号:HITACHIRAQ-1F50EVY/RAQ-1F50EVYWP/RAC-1F50EVYRAC-1F50EVY执行标准:GB/T7725-2004GB4706.32-2004GB4343.1-2009GB17625.1-2003使用说明目 录注意事项......................................................................................................................................1产品主要技术参数........................................................................................................................3.....................................................................................................................................................9.....................................................................................................................................................10.....................................................................................................................................................11一键清洁功能.............................................................................................................................................11.....................................................................................................................................................12遥控器电池的更换法.................................................................................................................................12.............................................................................................................................13.....................................................................................................................................14故障查找......................................................................................................................................2机组介绍.....................................................................................................................................................4接收器指示说明.........................................................................................................................................4室内机部品名称.........................................................................................................................................5运转之前.....................................................................................................................................................5遥控器各部分名称和功能.........................................................................................................................6自动运转.....................................................................................................................................................8制热运转除湿运转制冷运转送风运转睡眠定时器的设定功能定时器的设定功能自动控制.. (15)安全须知......................................................................................................................................16安装所需的工具及仪器.............................................................................................................................16运输及吊装.................................................................................................................................................17室内机的安装.............................................................................................................................................17排水管的安装.....................................................................................................................................21接收器(显示接受操作系统)的安装.......................................................................................23保护和控制装置室外机的安装 制冷剂管道安装真空排气顺序电线连接试运行...............................................................................................................................................................23............................................................................................................................................24室外机冷凝水处理.....................................................................................................................................25.........................................................................................................................................25.............................................................................................................................................28.....................................................................................................................................................29.........................................................................................................................................................31附图 (32)安装说明图例意义如下注意事项•电源为单相 220V~ 电压如电压低于或高出正常电压10%以上,空调器将不能正常工作甚至烧断保险丝,易损坏空调器,建议配用220V~ 稳压器。
日立室内 室外分体空调说明书

I L G N EINDOOR UNIT/OUTDOOR UNITSPLIT TYPE AIR CONDITIONERTI N U R O O D N I T I N U R O O D T U O S H Instruction manualRAS-DX10HNK /RAC-DX10HNK RAS-DX13HNK /RAC-DX13HNK RAS-DX18HNK /RAC-DX18HNKRAS-DX10HNK RAS-DX13HNKRAC-DX10HNK RAC-DX13HNK RAC-DX18HNKRAS-DX18HNKSleep Right/Left SilentF .Wash To obtain the best performance and ensure years of trouble free usage, please read this instruction manual completely.請詳細閱讀這本使用說明書以了解正確使用方法,及使機器可長期地發揮最高性能。
PRECAUTIONS DURING SHIFTING OR MAINTENANCEW A R N I N G Should abnormal situation arises (like burning smell), please stop operatingthe unit and turn off the circuit breaker. Contact your agent. Fault, shortcircuit or fire may occur if you continue operating the unit under abnormalsituation.Please contact your agent for maintenance. Improper self maintenance may cause electric shock and fire.Please contact your agent if you need to remove and reinstall the unit.Electric shock or fire may occur if you remove and reinstall the unit by yourself improperly.PRECAUTIONS DURING OPERATIONW A R N I N GFor the sake of health, avoid facing to direct airflow for a long period of time.Do not use any conductor as fuse wire, this could cause fatal accident.During thunderstorm, disconnect and turn off the circuit breaker.If the supply cord is damaged, it must be replaced by the manufacturer,qualified persons in order to avoid a hazardits service agent or SAFETY PRECAUTIONPlease read the “Safety Precaution” carefully before operating the unit to ensure correct usage of the unit.Pay special attention to signs of“ Warning” and “ Caution”. The “Warning” section contains matters which,if not observed strictly, may cause death or serious injury. The “Caution” section contains matters which may resultin serious consequences if not observed properly. Please follow all instructions strictly to ensure safety.The signs indicate the following meanings.Make sure to connect earth line. The sign in the figure indicates prohibition.Indicates the instructions that must be followed.Please keep this manual after reading.PRECAUTIONS DURING INSTALLATIONWARNING Do not reconstruct the unit.Water leakage, fault, short circuit or fire may occur if you reconstruct the unitby yourself.Please ask your sales agent or qualified technician for the installation of your unit. Water leakage, short circuit or fire may occur if you install the unit by yourself.Please use earth line.Do not place the earth line near water or gas pipes, lightning-conductor, orthe earth line of telephone. Improper installation of earth line may causeelectric shock.CAUTIONA circuit breaker should be installed depending on the mounting site of theunit. Without a circuit breaker, the danger of electric shock occurs.Do not install in the location nearby or with flammable gas. The outdoor unit may catch fire if flammable gas leaks around it.Please ensure smooth water flow when installing the drain hose.Do not put your fingers or rods into the air outlet or suction port.If the fans of indoor and outdoor units are running at high speed, which may cause injury or malfunction.PRECAUTIONS DURING OPERATIONW A R N I N GThe product shall be operated under the manufacturer specification and notfor any other intended use.•Do not attempt to operate the unit with wet hands, this could cause fatal accident.•When operating the unit with burning equipments, regularly ventilatethe room to avoid insufficiency of oxygen.•Do not direct the cool air coming out from the air-conditioner panel to facehousehold heating apparatus as this may affect the working of apparatus such asthe electric kettle, oven etc.•Please ensure that outdoor mounting frame is always stable, firm andwithout defect. If not, the outdoor unit may collapse and cause danger.•Do not splash or pour water to the body of the unit when cleaning as this maycause short circuit.•Do not use any aerosol or hair sprays nearby the indoor unit. The chemicalcan adhere on heat exchanger fin and block the evaporation water flowing todrain pan. The water will drop on tangential fan and cause water splashing outfrom indoor unit.•Please switch off the unit and turn off the circuit breaker during cleaning, the high-speed fan inside the unit may cause danger.•Turn off the circuit breaker if the unit is not to be operated for a long period.•Do not climb on the outdoor unit or put objects on it.•Do not put water container (like vase) on the indoor unit to avoid waterdripping into the unit. Dripping water will damage the insulator inside the unitand cause short circuit.•Do not place plants directly under the air flow as it is bad for the plants.•••This appliance is not intended for use by young children or infirm persons unless they have beenYoung children should be supervised to ensure that they do not play with the appliance.adequately supervised by a responsible person to ensure that they can use this appliance safely.••This appliance is not to be used by children or persons with reduced physical, sensory ormental capabilities, or lack of experience and knowledge, unless they have been givensupervision or instruction. Children must be supervised not to play with the appliance.•When operating the unit with the door and windows opened, (the room humidity is always above80%) and with the air deflector facing down or moving automatically for a long period of time,waterwill condense on the air deflector and drip down occasionally. This will wet your furniture.Therefore,do not operate under such condition for a long time.If the amount of heat in the room is above the cooling or heating capability of the unit (for example:more people entering the room, using heating equipments and etc.), the preset room temperaturecannot be achieved.ENGLISHNAMES AND FUNCTIONS OF EACH PARTINDOOR UNIT OUTDOOR UNITAIR FILTERTo prevent dust from coming into the indoor unit. (Refer page 23)Sleep Right/Left Silent F .Wash RAS-DX10HNK RAS-DX13HNK RAS-DX18HNK780792280420215299RAC-DX10HNK/RAC-DX13HNK/RAC-DX18HNK RAS-DX10HNK/RAS-DX13HNK 1050290220RAS-DX18HNK CAUTIONTurn off the circuit breaker or pull outthe power plug if the unit is not beoperated for a long period.INDOOR UNIT INDICATORSLight indicators showing the operating condition.(Refer page 5)FRONT PANEL(Refer page 5)HORIZONTAL DEFLECTOR • VERTICALDEFLECTOR (AIR OUTLET)(Refer page 18)REMOTE CONTROLSend out operation signal to the indoor unit so as tooperate the whole unit.(Refer page 7)Condensed water will drain to outside.C ONNECTION CORDATTACHING AND REMOVING FRONT PANELRECEIVABLE INDICATOR FUNCTIONSOPERATION INDICATORTEMPORARY SWITCHWhen the remote control device is not functioning, use the t emporary s witch mode .(1)When the Temporary Switch is pressed, the unit will operate as per the previous setting. After the power source is turne d off and turn on again, the operation is done in automatic mode.(2)Press the Temporary Switch again will stop the operation of the air conditioner.TEMPORARY SWITCHOPERATION LAMP (Yellow)This lamp lights during operation.FROST WASH LAMP (Green)TEMPORARY SWITCHTIMER LAMP (Orange)This lamp lights when the timer is working.RAS-DX10HNKRAS-DX13HNK RAS-DX18HNKEN G L I S H While gripping both the left and right edges [recessed in the front ] of the front panel, lift up to open the front panel.After completion, slightly lift up the front panel and pull down to close the front panel. Ensure that the 3 sets of left, centre and right clips are fully secured.••AUTO RESTART FUNCTIONPerforms heating operation when the room temperature is below 23°C.Set the temperature to be around 23°C.Performs dehumidifying operation when the room temperature is 23~27°C.The preset temperature will be the room temperature at the start time of air conditioner operation.Performs cooling operation when the room temperature is above 27°C.Set the temperature to be around 27°C.The auto restart feature prompts the air-conditioner to restart in its previous setting right after the power failure. In case of the power failure during the use of timer mode (Sleep Timer or ON/OFF Timer), timer mode is cancelled and the air conditioner stops.Please reset the remote control to restart the unit after the power has been restored.AUTOMATIC OPERATIONHeating Dehumidifying Cooling Air Filter Claw Filter FrameC-caseAir purifying filterAttaching the air purifying filters (Accessories) to the filter frame.•Attach the air purifying filters to the designated position.•The cooling capacity is slightly weakened and the cooling speed becomes slower when the air purifying filters are used.•The air purifying filters are not washable. It is recommended to use vacuum cleaner to clean. It can be used for 1 year. When you want to replace it, please ask your sales agent.HOW TO REPLACE THE BATTERIES IN THE REMOTE CONTROL12Remove the cover as shown in the fi gure and take outthe old batteries.Push and pull to thedirection of arrowInstall the new batteries.The direction of the batteries should match the marksin the case.1.Do not mix the new and old batteries, or use differentkinds of batteries together.2.Take out the batteries when you do not use the remotecontrol for 2 or 3 months.CAUTIONAir purifying filterF-coverRAS-DX10HNKRAS-DX13HNK RAS-DX18HNKEN G L I S H NAMES AND FUNCTIONS OF REMOTE CONTROLThis controls the operation function and timer setting of the room air conditioner. The applicable range of control is about 7 meters. lf indoor lighting is controlled electronically, the range of control may be shorter.Precautions for Use•Do not put the remote control under direct sunlight or high temperature.•Do not drop it on the fl o or, and prevent from water.•If you press the MODE selector button during operation, the compressor may stop for about 3 minutes for protection before you can start it again.Signal Transmission(DEHUMIDIFY) (COOL) and cyclically.( Page 8)ECO Button Use this button to set theECO mode.( Page 17)TIMER OFF Button Select the Timer OFF.( Page 12)TIMER ON Button Select the Timer ON .( Page 12)SLEEP TIMER Button Use this button to set the sleep timer. ( Page 19)POWERFUL Button Press this button to start powerful operation.( Page 13)Transmission Sign The transmission sign blinks when a signal has been sent .ON/OFF ButtonPress this button to startoperation.Press it again to stop operation. TEMPERATURE ButtonRoom temperature setting.Value will change quicker whenkeep pressing.FAN SPEED ButtonSelect the fan speed for coolingmode.UP/DOWN (Horizontal) Button Control the angle of the horizontal air deflector. ( Page 18)RIGHT/LEFT (Vertical) ButtonControls the angle of the vertical air deflector.( Page 18)SILENT ButtonUse this button to set the SILENT mode.( Page 20)FROST WASH Button( Page 14)Sleep Right/Left Silent F .Wash MODE selector Button Use this button to select the operating mode. Every time you press this button, themode will change from (AUTO)(HEAT)(FAN)AUTOMATIC OPERATIONThe device will automatically determine the mode of operation, HEAT or COOL depending on the current room temperature. The selected mode of operation will change when the room temperature varies.-8 -HEATING OPERATIONDefrosting will be performed about once an hour when frost forms on the heat exchange of the outdoor unit , it takes about 5-10 minutes of each cycle.During defrosting operation, the operation lamp blinks in cycle of 2 seconds on and 1 second off. The maximum time for defrosting is 20 minutes.(If the piping length used is longer than usual, frost will likely to form.)●Use the unit for heating when the outdoor temperature is under 27°C.When it is too warm (over 27°C), the heating function may not work in order to protect the unit .●In order to keep reliability of the unit , please use this device above –2°C of the outdoor temperature.-9 -EN G L I S HDEHUMIDIFYING OPERATION■Dehumidifying FunctionUse the unit for dehumidifying when the room temperature is over 16°C.When it is under 15°C, the dehumidifying function will not work.● When the room temperature is higher than the temperature setting: The unit will dehumidify the room,reducing the room temperature to the preset level.When the room temperature is lower than the temperature setting: Dehumidifying will be performed at the temperature setting slightly lower than the current room temperature, regardless of the temperature setting.●The preset room temperature may not be reached depending on the number of people present in the roomor other room conditions.Set the desired room temperature with the ROOMTEMPERATURE setting button (the display indicates the setting).The range of 20°C to 26°C is recommended asthe room temperature for dehumidifying.Temperature range can be set between 16°C and32°C.Press the (ON/OFF) button. Dehumidifying operationstarts with a beep. Press the button again to stop operation.■As the settings are stored in the memory of the remote control, youonly have to press the (ON/OFF) button next time.START STOP Press the MODE selector button so that the displayindicates (DEHUMIDIFY).The fan speed is set at LOW.Press (FAN SPEED) button to select SILENT or LOW fanspeed.12Sleep Right/LeftSilent F .Wash Sleep Right/LeftSilentF .WashEN G L I S H COOLING OPERATIONPress the MODE selector button so that the display indicates(COOL).■As the settings are stored in memory in the remote control, you only have to press the (ON/OFF) button next time.123Set the desired FAN SPEED with the (FAN SPEED) button (thedisplay indicates the setting).START STOP ■During AUTO fan, the fan speed automatically changes as below:●When the difference between room temperature and setting tem-perature is large, fan starts to run at HI speed.●After room temperature reaches the preset temperature, fan speedwill be changed to lower speed to obtain optimum room temperaturecondition for natural healthy airflow .(AUTO) (HIGH) (MED)(SILENT) (LOW)Set the desired room temperature with the TEMPERATURE button(the display indicates the setting).The temperature setting and the actual room temperature may varyd epending on conditions.Temperature range can be set between 16°C and 32°C.Press the (ON/OFF) button. Cooling operation starts with abeep. Press the button again to stop operation. The cooling functiondoes not start if the temperature setting is higher than the currentroom temperature (even though the (OPERATION) lamp lights).The cooling function will start as soon as you set the temperaturebelow the current room temperature.Use the unit for cooling when the outdoor temperature is 7 to 43°C.If indoor humidity is very high (over 80%), some dew may form on the air outlet grille of the indoor unit.Sleep Right/LeftSilent F .Wash Sleep Right/Left Silent F .WashFAN OPERATIONUser can use the unit simply as an air circulator.START STOP 12Press the MODE selector button so that the display indicates(FAN).Press the (ON/OFF) button. Fan operation starts with a beep.Press the button again to stop operation.Press the (FAN SPEED) button.(HIGH) (MED) (LOW) (SILENT)Timer ReservationOFF TIME setting•Select the OFF TIME by pressing the Button.•Setting time will change according to the below sequence when you press the button.1 hour intervalTIMER RESERVATIONON Timer and OFF Timer are available.21 ON TIME setting •Select the ON TIME by pressing the Button.•Setting time will change according to the below sequence when you press the button.Timer off1 hour intervalTimer on Operation stop at setting time .Operation will start for settingtemperature at setting time.Sleep Right/LeftSilentF .Wash Right/LeftF .Wash Right/LeftF .WashSTART●The dust and dirt adhering to indoor heat exchanger is the cause of the smell. They are washed away by freezing and thawing of the heat exchanger.●●Indoor Frost Wash function can work when the outdoor temperature is 1℃ to 43℃ and indoor humidity is 30%to 70%. There are two kinds of Indoor Frost Wash operation, auto mode and manual mode.INDOOR FROST WASH OPERATION※ It depends on the conditions of the room.The process of Indoor Frost WashAbout 8 min About 20 min to 90 min.Operation such as cooling operation Freezing and thawing heat exchanger Auto StopRunning Stop The deflectors remain opened duringfan operation, freezing, thawing.●If you want to stop Indoor Frost Wash operation, press the (ON/OFF ) button twice.● lamp on the indoor unit lights up during Indoor Frost Wash operation.Indoor Frost Wash starts Indoor Frost Wash ends●When pressing the button such as cooling during Indoor Frost Wash operation, Indoor Frost Wash operation is discontinued and start the cooling operation after about 3 minutes.●When Indoor Frost Wash is stopped during Indoor Frost Wash operation, the unit automatically restart Indoor Frost Wash operation when the next operation stops.●In order to protect the unit , Indoor Frost Wash function cannot be carried out again for about 60 minutes after Indoor Frost Wash operation is completed." "Fan operation ■ Indoor Frost Wash (Auto mode)Indoor Frost Wash auto start conditions●When the outdoor temperature or indoor humidity are not suitable for Indoor Frost Wash operation, only fan operation is carried out, Indoor Frost Wash operation will be done again after the next operation stops.●Sometimes the heat exchanger may not freeze depending on the conditions of the room.●When the ON timer reaches the set time during Indoor Frost Wash operation, it will stop the Indoor Frost Wash operation and start the operation of setting mode.●If the interval of the Off to On timer is less than 2 hours, Indoor Frost Wash operation may not be completed. In that case, it will restart Indoor Frost Wash operation after the next operation stops.Once the auto mode of Indoor Frost Wash operation interval (42 hours) is reached, stop operating the air conditioner and activate Indoor Frost Wash in Auto or Manual mode.Accumulated operating hours of the air conditioner have exceeded 42 hoursAir conditioner is stopped operating for more than 30 minutes, such as coolingoperation Indoor Frost Wash startIndoor Frost Wash end About 20 min to 90 min.About 30 minutes or more Operation such as cooling operation Operation such ascooling operation Last Indoor Frost Wash Running Stop Running StopAuto StopIndoor Frost Wash Accumulated operating hours of the air conditionerhave exceeded 42 hoursFROST WASH OPERATION-15 -EN G L I SH Precautions for Use● Hissing, fizzy or squeaking noise may generate during Indoor Frost Wash operation.●After turning on the power, please wait a moment if you want to start Indoor Frost Wash.Upon completion of Indoor Frost Wash with manual mode, operation interval (42 hours) of Indoor Frost Wash with auto mode will be re-calculated.● ●Do not open windows or doors during Indoor Frost Wash operation. Water will condense on the air deflector and drips down occasionally. This will wet your furniture.●Do not open or remove the front panel during Indoor Frost Wash operation. It may cause injury or malfunction.●Indoor Frost Wash operation does not wash away all dust and dirt.●If the air conditioner is continuously running, Indoor Frost Wash function is not effective.●During Indoor Frost Wash operation, if power is turned off and then power is restored, Indoor Frost Wash function will not restart.-16 -STARTCANCELIn case the power consumption is already low,AUTO SWING OPERATIONVERTICAL SWING■To start Vertical Auto Swing■To cancel Horizontal Auto Swing●Press (UP/Down (HORIZONTAL)) button. The deflectors willis displayed on the LCD.●Press (Right/L eft (VERTICAL )) button. The defl ectors willstart to swing right and left.is displayed on the LCD.●Press (UP/Down (HORIZONTAL )) button again. The deflectorswill stop at the current position.disappeared from the LCD.●Press (Right/Left (VERTICAL)) button again. The defl ectorswill stop in the current position.disappeared from the LCD.NOTEstart to swing up and down.Sleep Right/LeftF .Wash Silent Sleep Right/Left F .Wash SilentHORIZONTAL SWING■To start Horizontal Auto Swing■To cancel Vertical Auto Swing●●During cooling and dehumidifying operation, do not keep the de fl ectors swinging or in the lower position (in the case of vertical auto swing) for a long time. It may cause dew condensation on the de fl ectors.To avoid accidents, do not adjust deflectors with your hands.EN G L I S H SLEEP TIMER OPERATIONThe timer can be set up to a duration of 7 hours.By pressing (SLEEP) button during AUTO, DEHUMIDIFYING, COOLING or FAN operation, the unit shifts the room temperature and reduces the fan speed. It results in energy saving.■To start SLEEP TIMER operationPress (SLEEP) button during operation.● “”, “”, “ ” and number of hours are displayedon the remote control display.●During SLEEP TIMER operation, fan speed will be ultra●slow.● A beep sound emitted from indoor unit and the TIMER lampon the indoor unit lights up.Pressing (SLEEP) button repeatedly, the number of hourswill change as below:●During SL EEP TIMER operation, air conditioner willcontinue operating for the designated number of hours andthen turn off.■To cancel SLEEP TIMER operation■Press (On/Off) button.●Air conditioner will switch off.Press (SLEEP) button again until “”, “”,“ ” and number of hours disappear from the remotecontrol display.1 1 H2 H3 H 7 HSLEEP TIMER offSleep Sleep Sleep SleepSleep Sleep Right/Left F .Wash SilentSILENT OPERATION●By pressing (SIL ENT) button during DEHUMIDIFYING, COOL ING or FAN operation, the fan speed will change to ultra slow.■To start SILENT operation■To cancel SILENT operation●Press (SILENT) button during operation.“ ” is displayed on the LCD. Fan speed will be ultra slow.●Press (On/Off) button.●Press (SIL ENT) button again or (FAN SPEED)button.Fan speed will return to previous fan speed before SIL ENToperation starts.SILENT operation stops , “ ” disappears from the LCD.1SilentSilentSilentSleep Right/Left F .Wash Silent NOTE●●When POWERFUL operation is selected, SILENT operation is cancelled. Fan speed wil l return to previous fan speed before SILENT operation.After auto restart, SILENT operation is cancelled. Fan speed will return to previous fan speed before SILENT operation." (SLIENT), fan speed will not change even if p ressing ●If the operation is running with fan speed " " " (SLIENT) button.THE IDEAL WAYS OF OPERATIONSuitable Room TemperatureWarningFreezing temperatureis bad for health and awaste of electric power.Install curtain or blindsI t i s p o s s i bl eto reduce heatentering the roomthrough windows.VentilationCautionDo not close the room for a long period of time. Occasionally open the door and windows to allow theentrance offresh air.Effective Usage Of Timer At night, please use the " sleep timer " mode, together with your wake up time in the morning. This will enable you to enjoy a comfortable room temperature. Please use the timer effectively.Do Not Forget T o Clean The Air Filter Dusty air filter will reduce the air volume and the cooling efficiency. To prevent from wasting electric energy, please clean the filter every 2 weeks.TemperaturenPlease Adjust Suitable TemperatureFor Baby And ChildrenPlease pay attention to the room temperatureand air flow direction when operating the unitfor baby, children and old folks who havedifficulty in movement.(The ideal temperaturedifference betweenoutdoor and indooris about f5°C).ENGLISHFOR USER’S INFORMATIONThe Air Conditioner And The Heat Source In The Room CautionIf the amount of heat in the room is above thecooling capability of the air conditioner (for example:more people entering the room, using heatingequipments and etc.), the preset room temperaturecannot be achieved.Not Operating For A Long TimeWhen the indoor unit is not to be used for a longperiod of time, please pull out the power plug. Or theindoor unit still consumes about 1W in the operationcontrol circuit even if it is in “OFF” mode.OFFWhen Lightning OccursWarningTo protect the whole unit during lightning, pleasestop operating the unit and remove the plug from thesocket.Interference From Electrical ProductsCautionTo prevent interference, place at least 1m away.TV Inverter-type fluorescent lamp.To avoid signal interference, please place the indoor unit and its remote control at least 1m away from electrical products.MAINTENANCE OF THE UNITS CAUTIONEnsure that the unit is not in operation and all power supply has been disconnected before cleaning the unit.Dust Filter ScreenDust filter screens are installed to remove the indoor dust particles hence they should be kept clean at all times. They should be cleaned at each machine operation cycle of approximately 100 hours. Excessive dust collected at the dust filter screen will block the air flow, reduce the cooling capability and could produce noise. Therefore the dust filter screen should be cleaned as per instructions given below:Cleaning Instructions(1)Removing the dust filter screen•While holding both edges of the front panel, open up and lift the front panel and push in to park at the secured position.Front panelFront cabinet•Slightly lift up the dust filter screen, release the latch clips [2 places] located at the bottom of the front cabinet and move the dust filter screen downward to remove it from the unit.(2)U se a vacuum cleaner to vacuum clean the dust accumulated at the dust filter screen. If the accumulated dustis too much to be removed by vacuum cleaning, apply mild detergent and flush the dust from the dust filter screen with water. After thorough rinsing, leave the dust filter screen at a cool shaded place to dry.(3)R e-install the dust filter screen to its original position (With “FRONT” marker facing front). Slightly lift up theopened front panel and close it by returning it to its original position.(4)E ach year before using the air conditioner, clean the heat exchanger (evaporator) with a fine soft brush or avacuum cleaner and take care to avoid damaging the evaporator fins.Front panelDust filter screenLatch clipCAUTION•Do not use hot water (40e C or above) to rinse the dust filter screen, otherwise the screen will warp and get distorted. After rinsing, shake the dust filter screen to rid off all remaining water droplets and place it at a cool shaded place to dry. Avoid placing the dust filter screen under direct sunlight, otherwise the screen will warp and get distorted.Do not operate the air conditioner unit without the dust filter screen, otherwise the ingress of dust into the air conditioner unit will cause breakdowns.E N G L I S H。
日立-水冷式柜式空调-安装,使用,维护说明书
制冷能力不足 1.检查机组的冷却水供应是否充足? 2.检查温控器之设定是否正确。 3.检查空气滤网是否堵塞。
保养工作 1.请清洗或更换空气滤网。 2.请使用中性清洁剂清洁机体外盖板。 3.请清洗露水盘及管路。 4.请清洗冷却水管路(此工作建议找有专业经
136 144 155 145 730 670 360
390
RP-16WSL
132 141 189 142 730 670
360
390
RP-20WSL
171 191 189 189 830 870
350
400
RP-25WSL1 220 186 225 189 860 840 495
405
RP-30WSL1 266 245 291 225 1030 970 495
拉引。 4. 逆相保护继电器-在于主电源为 415V(额定电压)时,请按照图示,将(A)连接线去除后,再将(B)套子(标
准附件)套在两端子上。(请参照下图) 5. 当安装冷却水塔时,需按照图 7 指示之端子之间提供连锁回路。
机体
电气箱
1 2 R S T Mp (L 1 (L 2 (L 3 (N) )))
吸入风管时的状态。若须安装吸入风管时,“D”尺寸须变为 1500mm。
3. 尺寸 C 是指 RP-25WSL1、RP-30WSL1、RP-40WSL 的滤网,
安装到机体的服务空间。若空气滤网服务空间改为左侧时,
“B”尺寸须变为 1000mm。
图 2 最大倾斜角度
型号
RP-16WS RP-16WSL RP-20WSL
主电源 电源开关
CMT
图 7 现地配线 备注: 1. 只有在三相四线的电源下才配线到 MP 端子。 2. CMT:冷却水塔用电磁接触器之辅助触点。
日立 冷暖多联式热泵式空调 安装及保养说明书 室内机
安装及保养说明书室内机本说明书为室内机专用说明书,请阅读本说明书的同时,阅读与之匹配的室外机说明书。
提 示感谢您购买热泵空调。
在使用前,请仔细阅读并理解本说明书。
阅读完毕后,请妥善保存以便日后使用。
多联式热泵空调MULTI-SPLIT AIR-CONDITIONER型号:22-71型号:80-160P00945Q尊敬的用户:您好!感谢您选择和使用本公司产品。
为了您更好的了解和使用本产品,在使用之前,务必阅读并遵守以下相关事项。
本说明书应被视为空调设备的一部分,请妥善保管。
本说明书对热泵式空调机进行了统一的说明及介绍,因此,既可用于您的空调机也适用于其它空调。
本公司致力于不断地对产品进行改进,如有变更恕不另行通知。
本公司对于空调机因在特定环境中运转而发生的偶然性损坏事故,不负任何责任。
本空调只能作为普通空调使用,不能用于干燥服装、冷冻食品、冷却或加热等其他目的。
请勿将空调安装在以下场合。
否则可能导致火灾、机器变形或者故障。
*有油飞溅的地方(包括机油)。
有易燃气体存在的场所。
*带有硫化气体或硅元素存在的场所(如温泉等)。
*海岸地带多盐性或强酸、强碱的场所,会腐蚀机体。
●●● ●●●●在标明各种危害严重程度时会使用标志性词语(危险、警告和注意)。
关于各种危害等级的定义以及它们对应的标志性词语如下所示:●●本热泵式空调机的设计温度范围如下表所示。
请在此范围内使用。
温 度(℃)不要让机器的出风口直接面对动植物,这样对动植物有不利的影响。
安装和服务工程必须符合当地的标准、法律法规。
空调内机作为“公众不易接近的器具”,要求空调内机的安装高度不应低于2.5米。
本空调安装只能由经销商或专业人员进行,如用户自行安装,可能引起漏水、触电或火灾。
若您有不明之处,请与经销商或本公司指定的服务中心联系。
为了保护环境,请勿将产品随意丢弃,本公司按照国家相关规定可提供回收服务,并按国标要求可提供可更换的部件。
●*23WB 15WB -5DB*15DB 43DB* 27DB 15WB*室内室外室内室外制冷运行制热运行最高最 低*这个温度值可能随不同的室外机而改变。
水冷螺杆机组
水冷螺杆机组
日立空调系统(上海)有限公司
企画部
日立水冷螺杆式冷水机组
1 日立水冷螺杆机组历史 2 水冷螺杆机组性能特点 3 水冷螺杆机组部分项目实例
日立空调系统(上海)有限公司
日立水冷螺杆式冷水机组的历史
年代
1943年 1959年 1966年 1972年
1982年 1998年
AC220V输入
报警输出
可以根据客 户的需求, 提供更多的 解决方案和 成套的系统 设备。
通信功能的工业控制器
3、启动电流小
日立空调系统(上海)有限公司
日立水冷螺杆机组性能特点-压缩机
超低维护费用
日立空调系统(上海)有限公司
日立水冷螺杆机组性能特点-压缩机
➢ 日立机组无备品备件、易损易耗品,原因如下: 在生产制造阶段,日立通过先进生产工艺,确保机组 内部不含水分,因此不需要干燥过滤器,同时由于机 组长期处于正压,空气、水也不会进入机组内部,不 会污染冷冻机油。
日立水冷螺杆机组维修节省费用分析
相比其它机组,日立水冷螺杆机组年运行维修节省费 用如下:
日立水冷螺杆机组无备品备件,每年可节省:
6,000元/台
日立水冷螺杆机组无需常换冷冻机油,每年可节省:
15,000元/台
每年每台机组维修费用总可节省:21,000元/台
按机组运行10年周期算,可总可节省:210,000元/台
性能比较:
离心式油分没有油过滤网产生的阻力,降低压缩机的能耗。油分离效果好; 滤网式油分离时阻力增大,压缩机克服过滤时阻力增加耗能,机组效率下降。
日立空调系统(上海)有限公司
COP比
日立水冷螺杆机组性能特点-压缩机
油分离效率的提高,从而提高机组COP
京东日立空调(京东日立空调3匹价格)
京东日立空调(京东日立空调3匹价格)
夏天来临,空调成为了人们生活中必不可少的家用电器。
在众多的空调品牌中,京东日立空调备受消费者的青睐。
其中,京东日立空调3匹价格也成为了人们关注的焦点。
京东日立空调作为日本知名空调品牌,一直以来就以高品质、高性能和高颜值著称。
在市场上,京东日立空调不仅具备着先进的技术和设计,更重要的是其价格也相对实惠,深受消费者的喜爱。
在京东上,京东日立空调3匹价格在不同的时期和不同的渠道也有所不同。
一般情况下,京东日立空调3匹价格在2万元左右,但是在京东的促销活动期间,价格也会有所下降。
因此,消费者可以通过关注京东的促销活动,以及定期的比价网站,来了解京东日立空调3匹价格的最新情况,并且选购出最适合自己的商品。
除了价格实惠之外,京东日立空调3匹还具备着许多其他优势。
首先,京东日立空调3匹的制冷效果非常好,能够在炎热的夏季为家庭带来清凉和舒适。
其次,京东日立空调3匹的节能性能也非常出色,能够有效地降低家庭的用电成本。
此外,京东日立空调3匹还具备着较长的使用寿命和完善的售后服务,能够带给消费者更加可靠和安心的使用体验。
总之,京东日立空调3匹价格虽然相对实惠,但是其质量和性能却是非常优秀的。
消费者在购买空调的时候,可以考虑选择京东日立空调3匹,为家庭带来更加清凉和舒适的体验。