B2T操作手册V1.1
TA2中文操作手册

调试说明一. 安装注意事项1.1探杆安装探杆的插入深度务必超过管道中心线25mm,见下图.1.2 接线1.2.1电气端接线步骤:a. 打开接线盒外盖(见下图)b. 将电源线通过电气接口引入接线盒;c. 将正确电源接到TB1 端子(要确认该仪表的使用电源) ;1.) 如电源为120VAC,火线接到L1 端子,零线火线接到L2/N 端子,2.) 如电源为240VAC,一根线接到L1 端子,另一根线接到L2/N 端子,3.) 如电源为24DC,正端接到+端子,负端接到- 端子d. 将4~20mA 信号线接到TB2 端子,将正端接到A+,负端接到A- 端e. 盖好接线盒2.一体化探头端接线步骤:a. 确认电源断开;b. 将PC 板端外盖打开,参考操作手册页31 图8;c. 拧松显示板的固定螺丝,拔出显示板;d. 用1/4” 内六角扳手松开探头和变送器连接出的两个内六角固定螺 丝。
此时可以取出逻辑板和电源板;3.分体式探头端接线步骤:a. 确认电源断开;b. 将PC 板端外盖打开,c. 拧松显示板的固定螺丝,拔出显示板;d. 用1/4” 内六角扳手松开探头和变送器连接出的两个内六角固定螺 丝。
此时可以取出逻辑板和电源板;e. 探头的引出的五根线将连接到探头接线盒内分体PC 板上。
看下表 五个接线端子序号 探头引出线颜色1 白色2 兰色3 黑色4 棕色5 桔黄色线 端子 探头白色 1 温度探头兰色 2 流量探头黑色 3 接地棕色 4 加热接地橙色 5 加热f. 探头接线盒内分体PC 板上八个接线端子将与变送器内TB3 板上8 个 接线端子连接,按各电路板上端子号如下接线:分体式探头内端子序号 TB3 板上接线端子号线 远传端子 TB3接线端绿/白 线1 1白/绿 线2 2兰/白 线3 3白/兰 线4 4棕/白 线5 5白/棕 线6 6橙/白 线7 7白/橙 线7 7屏蔽线 线8 84.简单参数设置由于TA2流量计已经按照客户技术规格书的要求,在出厂前进行标定后再发往客户处.如需改变原有的量程,或者用于其它安装位置必须返厂重新进行标定.TA2的操作界面是菜单式,分为主菜单和子菜单,其中主菜单大致分为以下几个窗口,通过”上”或”下”箭头切换.第一次通电后,需要等待3~5分钟,等仪表初始化后,液晶屏显示瞬时流量时,就可以修改相关参数.如需进入子菜单请按”回车”键4.1 System Config 参数设置主要可以修改流量单位;质量流量单位;温度单位;密度单位;管径单位;面积单位;其中”flow area”是自动计算的流通面积,不需要修改.4.2 I/O Config 参数修改要修改其中的参数,需要输入密码”200”.在这个子菜单内可以修改4mA,20mA对应的值.电流输出按照”体积流量”或”质量流量”输出.4.3 Adv Config(高级设置) 默认修改密码为”200”.高级设置菜单里面可能用的参数为”install Factors”.具体公式为:A+Bv+Cv~2=实际流量 A.B.C为修正系数,v为表头显示的流量 一般把公式简化为 Bv=实际流量 所以, A.C默认为0.通过修改B就可以使得表头的读数接近实际流量值.4.4 Diagnostics(诊断菜单) 默认修改密码为”200”. 该菜单用于诊断表头和探头是否工作在正常状态.4.5 Factory Config(工厂配置参数) 默认修改密码:2005 HART 通讯菜单6.检查TA2的流量特性是否在工作范围之内目的:当TA2热式质量流量计使用一段时间后,用户总会怀疑自己的流量计还准不准,由于以前需要特殊的设备来标定,才能确定精度是否满足要求.现在可以把流量计放在办公室内,进行相关测试,从而知道流量计是否在正常工作范围内.TA2测量热传感器,并且在标定的时候热传感器和质量流量建立一定的关系.检查TA2的标定情况的一种方法是检查探头的热传感器特性是否还在控制范围内.接下来的步骤是在没有流量和模拟高流量两种情况下,检查热传感器.需要的设备:热水盆或桶(容量大约为1升),水温在20~25度之间..热水盆必须非常牢固的固定,没有任何振动.步骤:先把探头原始的热传感器特性记录下来,以便将来检查它的特性.1.没有流量的情况:a.TA2通电.用干净的纸把TA2的探头缠绕包好并确认稳定.从TA2菜单中选择Diagnostics/Signal Values,记录它的读数(mW).b.这是反应零点流量信号(Zero Flow Signal),要记录下来.2.高流量的情况:a.从TA2菜单中选择Factory Config/Ctrl Parameters/Set Point.记录下看到的值.改变这个Set Point到15℃(需要输入密码”2200”).液晶板可能显示”Initializing”(初始化),这不会影响标定程序.在室温的情况下(15℃~26℃),把缠绕的纸移开,垂直的把探杆伸入热水盆中,并确保探头完全浸没在水中.这个热水盆必须保持相当的稳定没有任何振动或晃动.为最可能的降低对探头热流的对流影响,探杆保持垂直的位置是非常关键的.如果是整体式的探头,也必须完全浸没在水中,或者把管道的末端堵住,确保所有的水充满管道.每次进行标定的时候,必须注意探头上的箭头流向标志.b.从菜单中选择Diagnostics/Delta Temp,等到液晶板上Delta Temp的读数已经稳定(在正负0.3℃范围内波动).这表明了热传感器和参考传感器的温度之差.把数据记录下来.c.关键:数据记录完成后,从菜单中返回到Factory Config/Ctrl Parameters/SetPoint窗口,把Set point 改回到原来的数值(这个值在出厂的校验报告中也记录下来).检验步骤重复步骤记录Zero Flow Signal 和Delta Temp的数值.1.比较Zero Flow Signal新的数值和原来的值,两者之差应该在5mW.2.Delta Temp新的数值和初始值,两者之差应该在0.125℃.3.如果以上两个比较都在范围之内,说明探头的测量特性没有改变.4.如果以上两个比较超出规定范围之内,则需要a.清洗探头和探杆,并重新进行标定.b.检查探针有无变形.联系工厂,需要送回工厂重新进行标定.7 故障排除7.1 报错信息由于TA2具备自诊断功能,所以如有异常情况,可以在液晶屏上看到相关信息.信息 功能Usr Passwd Req’d 用户密码输入错误Prb Passwd Req’d 密码输入错误Err New Pwd Failed 此信息说明新密码输入第二次与第一次不一样No Probe Signals或者显示”Probe Hdwr Fault” 没有探杆信号,检查探杆的接线端子是否松动,再到”Diagnostics”菜单查看Probe的状态,如有异常,需要返厂维修.Initializing TA2 正在初始化 Module cal Req’d 需要重新标定 Prb Params Reset 重新输入探头校验数据Usr Params Reset 根据流量面积重新组态仪表和4~20mA 设定7.2 检查端口电阻值:a. 一体式在逻辑电路板上有J6 端口,断开电源,拔出J6,可以看到7 个引脚,其 编号为1,3,5,7,9,11,13。
FTS2中文操作手册手册中文使用fts操作手册说明书FTS中文手册2FTS2fts2
第 1 章介绍启动软件为启动应用软件:1. 在任务栏上点击Start(开始)。
2. 将光标移到Programs(程序),再移到Taylor Hobso n。
3. 点击软件名。
4. 根据提示符出现后,输入你的用户名和口令。
输入你的用户名和口令后,你就能登录到系统。
该软件是多用户系统,每一个用户必须分别用唯一的口令去登录。
该软件需要一定的服务器和接口设备,方可在后台运行。
当计算机升级时,这些接口在进行安装时会自动运行。
因此,在正常情况下,它们是透明的。
若需要,你也可以手动从Windows NT浏览器中启动和关闭该服务器和设备接口。
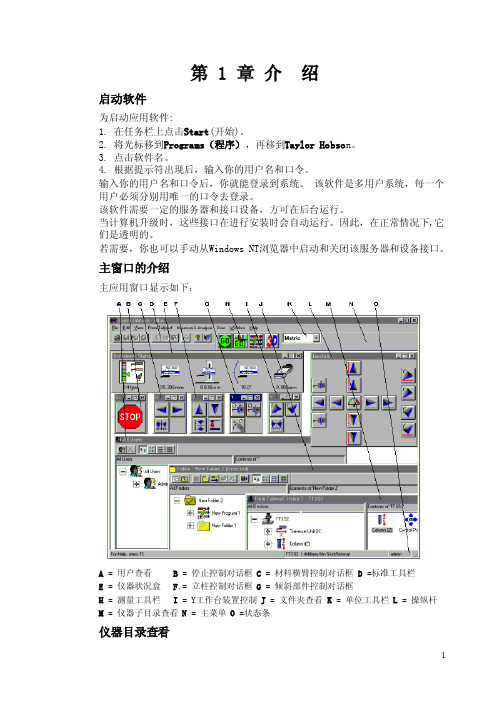
主窗口的介绍主应用窗口显示如下:A = 用户查看B = 停止控制对话框C = 材料横臂控制对话框D =标准工具栏E = 仪器状况盒F.= 立柱控制对话框G = 倾斜部件控制对话框H = 测量工具栏I = Y工作台装置控制J = 文件夹查看K = 单位工具栏L = 操纵杆M = 仪器子目录查看N = 主菜单O =状态条仪器目录查看仪器目录界面是一种主启动链,用它可寻找仪器及其设备的信息并控制该仪器。
它显示系统在一个层面上的各种部件和与其相关的设备。
它类似于Windows NT浏览器的风格。
该软件支持几种不同的仪器。
为避免你选择的需要,可能在不同时间同一台仪器上运行该软件时,你最后使用的仪器将作为下一次的默认仪器。
当第一次运行该软件时,仪器目录界面通常会自动打开,所以,当你以前以任何理由关闭软件后,你只需要明确的打开它。
为做到这一点,点击View Menu(查看菜单)→Instrument(仪器)。
工具栏移动任何工具栏都可浮动(即:在电脑上作为一个可移动的单独的块)或能浮动到主窗口的任意边缘。
所有工具栏的通常位置是直接放置在主菜单下面主窗口的顶端。
下面的插图显示了放置在顶端的工具栏和浮动的测量工具栏。
你可以停住或移动下面描述的任何工具栏。
当工作栏浮起时,你可以:■将它移到桌面上的任何地方。
TT-1B工具触摸操作手册说明书

TT-1B Tool Touch OffOperator's ManualU.S Patent #6553682Rev 2014-04-28Copyright © 2003-2014 Centroid CorporationHoward, PA 16841TT-1B Quick Start Guide1.Install MPU11 Probe cable assembly #11085 if necessary. Refer to TT-1B typicalhardware and connection diagram on page 6 and appropriate appendix data.2.Connect TT-1B cable to TT-1B and to bulkhead connector on MPU11 probe cableassembly #11085. See general description page 1.3.Set system control parameters. See “Table of Contents” to locate application specificappendix.4.Confirm machine is responding to the TT-1B inputs by running an automatic cyclewithout a tool in the spindle and manually touching the TT-1B stylus to the machine spindle. Refer to control operator's manual for automatic probing cycles. See TT-1B setup procedures page 2 and 3.5.Confirm the connection detect feature is working (if necessary) by trying to run anautomatic cycle with the TT-1B disconnected. Refer to control operator's manual for automatic probing cycles. See TT-1B setup procedures page 2 and 3.6.Review stylus travel limit on page 2, install a tool in the spindle and perform anautomatic probing cycle at reduced speed. See procedures on page 2 and 3.7.Install non stock mount option if applicable see page 5. See procedures on page 3.8.Review “Performance Characteristics” page 4 to ensure good results.9.Review Maintenance and Care page 7 to keep TT-1B in good operational condition.10.TT-1B is now ready to use.TABLE OF CONTENTSGeneral Description Page 1 Specifications Page 2 Set up procedure Page 2 Performance tips Page 4 Mounting option Installation and Removal Page 5 Typical hardware connection Page 6 Wiring diagram Page 6 Maintenance and Care Page 7 Shipping Instructions Page 7 TT-1B Kit Contents Page 7 Parts view Page 8 Appendix A – Centroid Control System Application Page 9TT-1B GENERAL DESCRIPTIONGENERAL DESCRIPTION:The TT-1B is a tool touch off device designed to implement automatic and manual tool height offset measurements and determine tool breakage and wear. A simple electrical circuit through the touch off surface (stylus), tool, spindle, machine frame and then to signal common is used to signal the control when the tool has touched the stylus. Therefore, the TT-1B is only appropriate for applications where the tools are conductive and an electrical path through the machine to signal common can be established. The TT-1B is suitable for use with any CNC control or Digital Read Out (DRO) that can be configured to utilize this simple electrical circuit.Deflection travel allowance in the Z direction avoids tool damage as the axis decelerates to a stop after the tool is measured. Mounting options include the standard magnetic base or T- nut.The TT-1B connects to the control with a supplied cable that incorporates a connection detect circuit. An additional cable with bulkhead connector P/N 11085 is available to complete installation where needed.The TT-1B has added features that improve on the original TT-1 design. Connection detect and user replaceable parts have increased the value of this product. See the parts view on page 8 to order replacement parts.Contact Centroid Technical Support at 1-814-353-9290 for a description of the return policy and assistance in determining if return is necessary. See the “Maintenance and Care” section page 9for precautions when shipping the TT-1B.Electrical connectorBodyMagnetic mountStylusVentSPECIFICATIONS:Mounting orientation AnyDeflection directions Z-Unidirectional repeatability (2 sigma) 1 micro meter (2sigma at 1 ipm feedrate )Deflection spring preload force Z* 5.75 lb +/-20%Measuring feedrate (nominal) 1 inches per minuteMounting Options Magnetic (stock) or T nutDeflection travel limit -Z0.15 inch (3.8mm)Stylus diameter0.5 inch (12.72mm)Body diameter 2 inch (50.9mm)Height* 2 inch (50.9mm)*Weight*0.35 lb (158.8g)*Dimensions and travel limit*Some variation can be expectedTT-1B SETUP PROCEDURESTEP 1:If probe cable P/N 11085 has already been installed for probe use and the TT-1B is to share the same input, this step may be skipped. If the TT-1B cable detect feature is not present in the existing cable (older systems) then install cable P/N 11085 and connect to the desired inputs. See drawing titled “TT-1B Wiring Diagram” on page 6 and the appropriate appendix. Follow the wire colors to match-up the TT-1B outputs with the correct control inputs. Double check that supply power is not being applied to the TT-1B output.STEP 2: Connect the TT-1B using the supplied 6' cord. Insert the 3.5mm plug in the TT-1B 3.5mm receptacle. The opposite cord end is keyed to prevent incorrect connection to MPU11 probe cable P/N 11085 bulkhead connector. Rotate the connector until it drops into the mating receptacle then finger tighten the securing ring to seat the connector.STEP 3:Confirm that control parameters are setup correctly for your system. The automatic tool height measuring cycles will not work and the TT-1B may be damaged if the parameters are not correctly set. See the appropriate appendix of this manual for control specific default settings. Check the operation manual for your control for compatible parameter settings. For Centroid systems press <Alt+I> to open the Centroid PLC I/O diagnostic screen. Locate the inputs entered in parameters 44 and 257. Verify that they change correctly when the TT-1B is plugged in and triggered. Trigger the TT-1B by touching the stylus to bare metal on the machine. See illustration below. Touch the stylus to a tool in the spindle and confirm the input changes.Illustration 1: Testing input trigger with metalicwrench.STEP 4: Do a slow dry run without a tool in the spindle and manually touching the TT-1B stylus to the machine frame. Confirm that the machine will respond correctly before attempting an actual automated touch off. Confirm the control is detecting the TT-1B connection by unplugging it and trying an automated touch off. No motion should occur and an error message should appear on the control screen.STEP 5: Thoroughly clean the area where the TT-1B will be mounted. Mount the TT-1B in the desired location and confirm the magnetic mount is firmly attached to the mounting surface and no wobble, deflection or rocking is possible. If another mounting option is used, be sure it is solid and will not deflect when the tool is forced against the disc. The mounting surface must be perpendicular to the measurement direction. Check this by measuring tool lengths on different areas of the stylus. All measurements will be the same if the mounting surface is perpendicular. STEP 6: Review the TT-1B travel limit in the specifications. Perform an automatic tool measurement cycle test with the feedrate override reduced to 20% to verify everything is functioning correctly. Be prepared to manually stop the machine to prevent over travel damage. STEP 7:Direct spray or splash of fluids should be avoided. If the TT-1B is permanently mounted and the 3.5mm connector is not regularly unplugged then the connector should be sealed to prevent coolant entering the electrical connector. Apply sealant around the plug while inserted in the electrical connector. Do not allow sealant in the connector or the vent. See the general description on page 1 to locate the vent.PERFORMANCE TIPSThe time it takes to measure a tool and the resultant accuracy are primarily affected by the feedrates. Typically a faster feedrate is used to approach or find the touch-off surface to save time. Care must be exercised selecting this speed, too slow wastes time and too fast may exceed the over-travel limit and damage the TT-1B. The axis must be capable of decelerating to a stop well within the over-travel limit. Any delay in processing the TT-1B signal will add error to the position recorded and will increase over-travel. Once the touch-off surface has been found the tool should be retracted a clearance amount allowing the TT-1B to return to the measuring position. A second approach to the surface at a slow speed provides very accurate position data in a small amount of time. This two step process is the basis of most probing and measurement cycles. Typical values are 30 inches per minute for the fast approach and 3 inches per minute for the slow. Designating a reference tool for the sole purpose of calibrating the TT-1B can save a lot of set-up time and money in ruined parts. After the TT-1B is calibrated using the reference tool all other tool heights can be set up to the same standard quickly and easily using the TT-1B. See your control manual to set up automated tool measurement.The stock TT-1B is equipped with a heavy spring to ensure that accurate and repeatable results are obtained when a touch probe is used as the reference tool. The probe is used to set the height of the TT-1B so it is important that the TT-1B not deflect while being probed.To prevent false reading and errors keep chips clear of the isolated tip of the TT-1B stylus.MOUNTING OPTION INSTALLATION AND REMOVALTo change the mount remove the screw in the center of the magnetic mount. Remove the magnet and any shims behind it. Thread the 8-32 end of the T-nut bolt adapter all the way into the hole that held the magnet. Thread the 1/2-13 end into a T-nut in the table slot. Be careful not to over-tighten which will pull out the 8-32 threads.TT-1B with Stock Magnetic mountTT-1B with T-nut adapterBolt Mount option P/N: 12829TT-1B Mounting OptionsComparison of Stock Magnetic Mount and Bolt Mount optionT-nut adapter thread is 1/2-13. T-nut is included in option.TT-1B typical hardware connection.MPU11 Probe Cable P/N: 11085 must be ordered separately.TT-1BTT-1B Cable with detectP/N: 12604MPU11 Probe Cable P/N: 11085Not included with TT-1B KitMAINTENANCE AND CAREDo not submerge the TT-1B. Avoid direct flow of coolant at the electrical connector. Wipe off excess liquids to prevent accumulation inside and outside the TT-1B. Do not use compressed air to clean the TT-1B as this may force contaminants into the electrical connector and inside the body. If the TT-1B is permanently mounted and the 3.5mm connector is not regularly unplugged then the connector should be sealed to prevent coolant entering the electrical connector. Apply sealant around the plug while inserted in the electrical connector. Do not allow sealant in the connector or the vent.Storage. Do not store or ship the TT-1B with the stylus pushed into the body as this will negatively effect performance.User repairs. TT-1B replacement parts are available from Centroid. Contact Centroid Technical Support at 1-814-353-9290 to locate the nearest dealer.Performance. Regularly check reference measurements to confirm that the TT-1B will repeat measurements consistently. If the TT-1B becomes unrepeatable service will be necessary. Contact Centroid Technical Support at 1-814-353-9290 to locate the nearest dealer.The user should also repeat reference measurements if the unit is dropped or receives any sudden external shock. It is good practice to periodically check measurement repeatability for quality control and to establish a base line maintenance schedule.SHIPPING INSTRUCTIONSContact Centroid Technical Support at 1-814-353-9290 for a description of the return policy and assistance in determining if return is necessary. If the TT-1B must be shipped use the original shipping materials or the equivalent. Do not ship or store the TT-1B with the stylus pushed into the body as this will negatively affect performance.TT-1B KIT CONTENTSTT-1B TOOL TOUCH OFF (ASSEMBLY 10220)TT-1B CABLE WITH DETECT P/N: 12604TT-1B CARRY CASETT-1B PARTS VIEWAPPENDIX A: CENTROID CONTROL PARAMETERSDefault parameters are given for CNC10 and CNC11 systems in SAE and Meteric units. Many useful features are available that are not configured by these default values. See: “Automatic Tool Measurement” and “Configuration” chapters in the control system manual for description and definition of the parameters listed below and available features.CNC10 systems (recommended basic SAE inch):Parameter Setting Description30Modal Tool and Height Offset Control130.020Clearance amount nominal1430Fast Probing Rate15 3Slow Probing Rate170Detector location return point430Automatic tool measurement options4414TT PLC input number710Part setup detector height257N/A TT connection detection PLC input3671TT Deceleration MultiplierCNC11 systems (recommended basic SAE inch):Parameter Setting Description30Modal Tool and Height Offset Control130.020Clearance amount nominal1430Fast Probing Rate15 3Slow Probing Rate170Detector location return point430Automatic tool measurement options4450769TT PLC input number710Part setup detector height25750772TT connection detection PLC input3671TT Deceleration MultiplierCNC10 systems (recommended basic METRIC mm):Parameter Setting Description30Modal Tool and Height Offset Control130.508Clearance amount nominal14762Fast Probing Rate15 76.2Slow Probing Rate170Detector location return point430Automatic tool measurement options4414TT PLC input number710Part setup detector height257N/A TT connection detection PLC input3671TT Deceleration MultiplierCNC11 systems (recommended basic METRIC mm):Parameter Setting Description30Modal Tool and Height Offset Control 130.508Clearance amount nominal14762Fast Probing Rate15 76.2Slow Probing Rate16127Maximum Search Distance170Detector location return point430Automatic tool measurement options4450769TT PLC input number710Part setup detector height25750772TT connection detection PLC input3671TT Deceleration Multiplier。
LMT-B使用手册
LMT-B使用说明书目录LMT-B使用说明书TD-SCDMA\RAN系统目录第1章概述................................................................................................................................ 1-11.1运行环境..................................................................................................................................................................1-11.2安装说明..................................................................................................................................................................1-11.3软件安装目录介绍.................................................................................................................................................1-21.4软件简介..................................................................................................................................................................1-3第2章LMT-B使用说明............................................................................................................ 2-42.1登录LMT-B ............................................................................................................................................................2-42.1.1离线登录LMT-B........................................................................................................................................ 2-42.1.1.1界面功能描述................................................................................................................................... 2-42.1.1.2具体操作及流程说明...................................................................................................................... 2-52.1.1.3操作结果显示................................................................................................................................... 2-52.1.2在线登录LMT-B........................................................................................................................................ 2-52.1.2.1界面功能描述................................................................................................................................... 2-52.1.2.2具体操作及流程说明...................................................................................................................... 2-62.1.2.3操作结果显示................................................................................................................................... 2-62.2系统主界面说明.....................................................................................................................................................2-72.2.1主界面概貌 ................................................................................................................................................. 2-72.2.2菜单项说明 ................................................................................................................................................. 2-92.2.3工具栏说明 ............................................................................................................................................... 2-112.2.4状态栏说明 ............................................................................................................................................... 2-112.2.5信息浏览窗口说明 .................................................................................................................................. 2-12第3章LMT-B菜单项说明 ......................................................................................................3-143.1系统维护............................................................................................................................................................... 3-143.1.1登录管理 ................................................................................................................................................... 3-153.1.1.1界面功能描述................................................................................................................................. 3-153.1.1.2具体操作方法................................................................................................................................. 3-153.1.1.3操作结果显示................................................................................................................................. 3-163.1.2用户管理 ................................................................................................................................................... 3-16- 1 -目录LMT-B使用说明书3.1.2.1界面功能描述................................................................................................................................. 3-163.1.2.2操作说明 ......................................................................................................................................... 3-173.1.2.3操作结果显示................................................................................................................................. 3-183.1.3用户切换 ................................................................................................................................................... 3-193.1.3.1界面功能描述................................................................................................................................. 3-193.1.3.2操作说明 ......................................................................................................................................... 3-193.1.3.3操作结果显示................................................................................................................................. 3-193.1.4数据一致性校验....................................................................................................................................... 3-203.1.4.1界面功能描述................................................................................................................................. 3-203.1.4.2操作说明 ......................................................................................................................................... 3-203.1.4.3操作结果显示................................................................................................................................. 3-213.1.5文件管理 ................................................................................................................................................... 3-213.1.5.1界面功能描述................................................................................................................................. 3-213.1.5.2操作说明 ......................................................................................................................................... 3-223.1.5.3操作结果显示................................................................................................................................. 3-243.1.6日志管理 ................................................................................................................................................... 3-243.1.6.1界面功能描述................................................................................................................................. 3-243.1.6.2操作说明 ......................................................................................................................................... 3-253.1.6.3操作结果显示................................................................................................................................. 3-263.1.7退出............................................................................................................................................................ 3-263.1.7.1界面功能描述................................................................................................................................. 3-263.1.7.2操作说明 ......................................................................................................................................... 3-263.1.7.3操作结果显示................................................................................................................................. 3-263.2配置管理............................................................................................................................................................... 3-263.2.1初始化参数配置使用说明...................................................................................................................... 3-273.2.1.1界面功能描述................................................................................................................................. 3-273.2.1.2各项操作及方法说明.................................................................................................................... 3-283.2.1.3操作结果显示................................................................................................................................. 3-333.2.2对象树界面使用说明 .............................................................................................................................. 3-333.2.2.1离线方式 ......................................................................................................................................... 3-333.2.2.2在线方式 ......................................................................................................................................... 3-353.2.3命令编辑器使用说明 .............................................................................................................................. 3-373.2.3.1离线方式 ......................................................................................................................................... 3-373.2.3.2在线方式 ......................................................................................................................................... 3-393.2.4命令行窗口使用说明 .............................................................................................................................. 3-403.2.4.1界面功能描述................................................................................................................................. 3-403.2.4.2各项操作及方法说明.................................................................................................................... 3-413.2.4.3操作结果显示................................................................................................................................. 3-433.2.5其它菜单项目........................................................................................................................................... 3-43 3.3故障管理............................................................................................................................................................... 3-433.3.1告警信息管理使用说明.......................................................................................................................... 3-433.3.1.1离线方式 ......................................................................................................................................... 3-433.3.1.2在线方式 ......................................................................................................................................... 3-453.3.2告警属性管理使用说明.......................................................................................................................... 3-473.3.2.1界面功能描述................................................................................................................................. 3-473.3.2.2操作方法说明................................................................................................................................. 3-483.3.2.3操作结果显示................................................................................................................................. 3-483.3.3告警过滤功能使用说明.......................................................................................................................... 3-493.3.3.1界面功能描述................................................................................................................................. 3-493.3.3.2各项操作及方法说明.................................................................................................................... 3-513.3.3.3操作结果显示................................................................................................................................. 3-52 3.4事件管理............................................................................................................................................................... 3-533.4.1事件信息管理使用说明.......................................................................................................................... 3-533.4.1.1离线方式 ......................................................................................................................................... 3-533.4.1.2在线方式 ......................................................................................................................................... 3-553.4.2事件属性管理使用说明.......................................................................................................................... 3-573.4.2.1界面功能描述................................................................................................................................. 3-573.4.2.2操作方法说明................................................................................................................................. 3-58 3.5测试管理............................................................................................................................................................... 3-58 3.6工具 ....................................................................................................................................................................... 3-593.6.1界面功能描述........................................................................................................................................... 3-593.6.2操作方法说明........................................................................................................................................... 3-593.6.3操作结果显示........................................................................................................................................... 3-59 3.7视图 ....................................................................................................................................................................... 3-603.7.1界面功能描述........................................................................................................................................... 3-603.7.2操作方法说明........................................................................................................................................... 3-603.7.3操作结果显示........................................................................................................................................... 3-60 3.8帮助 ....................................................................................................................................................................... 3-60目录LMT-B使用说明书3.8.1界面功能描述........................................................................................................................................... 3-603.8.2操作方法说明........................................................................................................................................... 3-613.8.3操作结果显示........................................................................................................................................... 3-61第4章Debug Shell使用说明................................................................................................... 4-14.1菜单项说明..............................................................................................................................................................4-14.1.1建立与目标机的连接 ................................................................................................................................ 4-14.1.1.1选择目标机所用内核文件 ............................................................................................................. 4-14.1.1.2编辑目标机列表 .............................................................................................................................. 4-34.1.1.3建立与目标机的连接...................................................................................................................... 4-44.1.2控制台命令操作......................................................................................................................................... 4-64.1.3断开与目标机的连接 ................................................................................................................................ 4-84.1.4退出系统 ................................................................................................................................................... 4-104.1.5工具参数设置........................................................................................................................................... 4-104.1.6界面功能描述........................................................................................................................................... 4-124.1.7界面输出 ................................................................................................................................................... 4-12第5章GTSM系统操作总述 (13)5.1运行与支持环境 (13)5.2安装说明 (13)5.3程序安装说明 (13)5.3.1FTP服务器的安装与配置 (13)第6章GTSM系统使用说明....................................................................... 错误!未定义书签。
WBT-821B-G2备自投技术及使用说明书_169B V1.01

WBT-821B/G2 备用电源自动投入装置
技术说明书 (Version 1.00)
许继电气股份有限公司 XJ ELECTRIC CO.,LTD.
Hale Waihona Puke WBT-821B/G2 备用电源自动投入装置
目录
1 概述.........................................................................................................................................................3 1.1 应用范围..............................................................................................................................................3 1.2 保护配置........................................................
百特数显表操作方法之欧阳学创编
百特智能数显表说明书工作状态下按SET显示LOCY→按SET输入密码18→按SET显示RAN9→按SET通过△▽选择分度号→按SET显示Poin设置小数点→按SET显示r9.00设置量程下限→按SET显示r9.FS设置量程上限工作状态下按SET→通过△▽选择COrr按SET显示old.1→按SET通过△▽修正温度值参数设定说明:Locy:菜单上锁操作入口;按SET键确认;按△▽键退出;开锁密码为18Ran9.:分度号和量程设置入口;按SET键确认;按△▽键退出010/…/y:分度号设置;按△▽键设置;按SET确认PoIn:小数点位置设置;按△▽键设置;按SET确认R9.00:量程零点设置;按△▽键设置;按SET确认R9.FS:量程满度设置;按△▽键设置;按SET确认Corr:量程迁移和滤波时间设置菜单入口;按SET键确认;按△▽键取消Old.1:修正温度值;按△▽键设置;按SET确认按键说明:△:变更参数设定时,用于增加数值SET:参数设定确认键▽:变更参数设定时,用于减少数值常见故障处理:仪表通电不亮:供电电源未接入,正确接入仪表电源;接触不良,取出表芯确认弹片接触是否良好。
LED屏显示:broy分度号选择错,选择与输入信号相符的分度号;输入信号太大,调节与输入信号保证在仪表范围内;信号短线,正确接入信号线。
H.oFL.分度号选择错,选择与输入信号相符的分度号;输入信号太大,调节与输入信号保证在仪表范围内;仪表标定错误,选择正确标定信号重新标定。
L.Ofl.:选择与输入信号相符的分度号;输入信号太小,调节与输入信号保证在仪表范围内;仪表标定错误,选择正确标定信号重新标定昌辉SWP系列智能仪表说明书控制方式:1、正确的接线仪表卡入表盘后,请参照仪表随机接线图接妥输入、输入及电源线,并请确认无误。
2、仪表的上电本仪表与电源开关,接入电源即进入工作状态。
3、仪表设备号及版本号的显示仪表在投入电源后,可立即确认仪表设备号及版本号。
TSTEP(TED)简易手册繁中 (V01)
■ 警告及注意事項警告及注意事項::■ 安全注意事項安全注意事項::在安裝、運轉、保養、點檢前,請詳閱本說明書。
另外,唯有具備專業資格的人員才可進行裝配線工作。
說明書中安全注意事項區分為「警告」與「注意」兩項。
:表示可能的危險情況,如忽略會造成人員死亡或重大損傷。
:表示可能的危險情況,如未排除會造成人員較小或輕微的損傷及機器設備的 損壞。
所以應詳閱本所以應詳閱本簡易簡易簡易說明書說明書說明書及產品技術手冊後及產品技術手冊後及產品技術手冊後,,再使用此伺服驅動器再使用此伺服驅動器。
首先,感謝您採用東元精電伺服驅動器TSTEP系列(以下簡稱TSTEP)和伺服馬達。
TSTEP可由數位面板操作器或透過PC人機程式來操作,提供多樣化的機能,使產品更能符合客戶各種不同的應用需求。
在使用TSTEP前,請先閱讀本簡易說明書及產品技術手冊,主要內容包括:伺服系統的檢查、安裝及配線步驟。
數位面板操作器的操作步驟、狀態顯示、異常警報及處理對策說明。
伺服系統控制機能、試運轉及調整步驟。
伺服驅動器所有參數一覽說明。
標準機種的額定規格。
為了方便作日常的檢查、維護及瞭解異常發生之原因及處理對策,請妥善保管本說明書在安全的地點,以便隨時參閱。
註:請將此說明書交給最終之使用者,以使伺服驅動器發揮最大效用。
目錄第一章產品檢查及安裝1-1 產品檢查 (1)1-1-1 伺服驅動器機種確認 (1)1-1-2 伺服馬達機種確認 (2)1-1-3 伺服驅動器與伺服馬達搭配對照表 (2)1-2 伺服驅動器操作模式簡介 (4)1-3 伺服驅動器安裝環境條件與方法 (5)1-3-1 安裝環境條件 (5)1-3-2 安裝方向及間隔 (5)1-4 伺服馬達安裝環境條件與方法 (6)1-4-1 安裝環境條件 (6)1-4-2 安裝方式 (6)1-4-3 其他注意事項 (7)第二章配線準備2-1 系統組成及配線 (8)2-1-1 伺服驅動器電源及週邊裝置配線圖 (8)2-1-2 伺服驅動器配線說明 (9)2-1-3 電線規格 (10)2-1-4 馬達端出線 (11)2-1-5 馬達及電源標準接線圖 (13)2-1-6 TB端子說明 (14)2-1-7 馬達附機械式剎車(BRAKE)接線說明 (14)2-2 I/O信號端子說明 (15)2-2-1 CN1控制信號端子說明 (16)2-2-2 CN2編碼器信號端子說明 (17)2-2-3 C N3/CN4通訊信號端子說明 (18)2-3 控制信號標準接線圖 ......................................................................................................... 19 2-3-1 位置控制(Pe Mode)接線圖(Line Driver) ................................................................... 19 2-3-2 位置控制(Pe Mode)接線圖(Open Collector) ............................................................. 20 2-3-3 位置控制(Pi Mode)接線圖 ......................................................................................... 21 2-3-4 速度控制(S Mode)接線圖 .......................................................................................... 22 2-3-5 轉矩控制(T Mode)接線圖 (23)第三章 面板面板及試運轉及試運轉及試運轉操作說明操作說明3-1 面板操作說明 ..................................................................................................................... 24 3-2 試運轉操作說明 .. (25)第四章 參數機能4-1 參數群組說明 .................................................................................................................... 26 4-2 參數機能表 (26)第五章 異常警報排異常警報排除除5-1異常警報說明 ...................................................................................................................... 60 5-2異常排除對策 . (61)第一章產品檢查及安裝1-1 產品檢查本伺服產品在出廠前均做過完整之功能測試,為防止產品運送過程中之疏忽導致產品不正常,拆封後請詳細檢查下列事項:檢查伺服驅動器與伺服馬達型號是否與訂購的機型相同。
B2T操作手册V1.1

东航销售平台(B2T)团队操作手册目录前言..................................................错误!未定义书签。
第一章账户...........................................错误!未定义书签。
销售账户管理流程.............................................错误!未定义书签。
机构用户线上注册审核流程..................................错误!未定义书签。
销售账户变更流程.........................................错误!未定义书签。
销售账户注销流程.........................................错误!未定义书签。
第二章团队类型及支付方式.............................错误!未定义书签。
团队类型定义.................................................错误!未定义书签。
临时团...................................................错误!未定义书签。
系列团...................................................错误!未定义书签。
系列确认团...............................................错误!未定义书签。
集散团...................................................错误!未定义书签。
支付方式.....................................................错误!未定义书签。
现金支付.................................................错误!未定义书签。
- 1、下载文档前请自行甄别文档内容的完整性,平台不提供额外的编辑、内容补充、找答案等附加服务。
- 2、"仅部分预览"的文档,不可在线预览部分如存在完整性等问题,可反馈申请退款(可完整预览的文档不适用该条件!)。
- 3、如文档侵犯您的权益,请联系客服反馈,我们会尽快为您处理(人工客服工作时间:9:00-18:30)。
东航销售平台(B2T)团队操作手册目录前言..................................................错误!未定义书签。
第一章账户...........................................错误!未定义书签。
销售账户管理流程.............................................错误!未定义书签。
机构用户线上注册审核流程..................................错误!未定义书签。
销售账户变更流程.........................................错误!未定义书签。
销售账户注销流程.........................................错误!未定义书签。
第二章团队类型及支付方式.............................错误!未定义书签。
团队类型定义.................................................错误!未定义书签。
临时团...................................................错误!未定义书签。
系列团...................................................错误!未定义书签。
系列确认团...............................................错误!未定义书签。
集散团...................................................错误!未定义书签。
支付方式.....................................................错误!未定义书签。
现金支付.................................................错误!未定义书签。
预付款分期支付...........................................错误!未定义书签。
第三章东航团卡.......................................错误!未定义书签。
团卡用户使用手册.............................................错误!未定义书签。
产品定义.................................................错误!未定义书签。
持卡人自助服务...........................................错误!未定义书签。
团卡提现.....................................................错误!未定义书签。
团卡提现安全性相关问题...................................错误!未定义书签。
团卡提现银行卡相关规定...................................错误!未定义书签。
团卡提现操作的注意事项...................................错误!未定义书签。
第四章信用评级(试行)...............................错误!未定义书签。
增值服务.....................................................错误!未定义书签。
第五章自助服务.......................................错误!未定义书签。
自助延时.....................................................错误!未定义书签。
航段数大于2段(含)的订单...............................错误!未定义书签。
航段数为1段的订单.......................................错误!未定义书签。
团队改名/换人................................................错误!未定义书签。
改名/换人的定义..........................................错误!未定义书签。
出票前的改名换人.........................................错误!未定义书签。
出票后的改名换人.........................................错误!未定义书签。
改名失败补救办法.............................................错误!未定义书签。
适用范围.................................................错误!未定义书签。
操作办法.................................................错误!未定义书签。
证件号码修改.................................................错误!未定义书签。
订单加人.....................................................错误!未定义书签。
订单减人.....................................................错误!未定义书签。
国际集散团国内段的申请及修改.................................错误!未定义书签。
第六章预付款退回.....................................错误!未定义书签。
航变 ........................................................错误!未定义书签。
航变定义.................................................错误!未定义书签。
航变操作流程.............................................错误!未定义书签。
航变预付款退回...........................................错误!未定义书签。
航变预付款退回前台提交操作示例...........................错误!未定义书签。
订单自愿改期.................................................错误!未定义书签。
价格调整.....................................................错误!未定义书签。
订单价格调整的方法.......................................错误!未定义书签。
订单价格调整的预付款退回.................................错误!未定义书签。
团队客票拒签退票规则.....................................错误!未定义书签。
团队订单拒签退预付款规则.................................错误!未定义书签。
渠道方操作失误的预付款退回...................................错误!未定义书签。
特殊事件的预付款退回.........................................错误!未定义书签。
预付款未退回的查询及补救办法.................................错误!未定义书签。
预付款退款查询流程.......................................错误!未定义书签。
预付款退回失败的补救办法.................................错误!未定义书签。
第七章支付规则及淡旺季划分...........................错误!未定义书签。
团队订单支付规则.............................................错误!未定义书签。
2017年淡旺季划分............................................错误!未定义书签。
第八章项目意向征集操作指南...........................错误!未定义书签。
项目意向征集公示.............................................错误!未定义书签。
在线填写意向.................................................错误!未定义书签。
第九章旅行折扣码.....................................错误!未定义书签。
旅行折扣码的操作流程.........................................错误!未定义书签。
旅行折扣码发起...........................................错误!未定义书签。
旅行折扣码制定...........................................错误!未定义书签。
旅行折扣码发布...........................................错误!未定义书签。
旅行折扣码短信推送.......................................错误!未定义书签。
旅行折扣码使用的注意事项.....................................错误!未定义书签。
国内团队旅行折扣码的限制条件.................................错误!未定义书签。
第十章散客置换价.....................................错误!未定义书签。
散客置换价定义...............................................错误!未定义书签。
使用方法.....................................................错误!未定义书签。
第十一章团队客票退改签规则...........................错误!未定义书签。