yr1901g说明书
G型热水工程控制仪说明书中文版
太阳能热水工程控制仪说明书蓝达牌LTY—G型工程数控仪采用高品质的元件材料及融合最新的微电脑控制技术制造而成。
本手册内容包括数控仪的安装、参数设定、异常诊断、排除及日常维护等相关事项。
为了确保正确安装及使用整个热水系统,请在装机之前,详细阅读本使用手册,并妥善保存及交由该系统的使用者。
本数控仪为精密的电力电子产品,为操作者及系统的安全,请务必交由专业的电器工程人员安装、调试,若有任何疑虑的地方请联系我们或我们的经销商,我们的专业人员会乐于为您服务。
危险!1、实施配线前请务必关闭电源。
2、切勿自行改装箱内电路。
3、箱子外壳务必正确地接地。
4、请选择安全的区域来安装数控仪,防止高温及日光直接照射,避免湿气和水滴的泼溅。
一、安装环境:△无水滴、蒸气、灰尘及油性灰尘的场所。
△无腐蚀、易燃性的气体、液体。
△坚固无振动的场所。
△使用环境温度为-30℃~40℃。
二、功能G型工程数控制仪专为太阳能或热泵(即空气源)热水系统开发、设计并制造,具以下功能:1、水位控制:能控制水位的上限水位(最高水位)和下限水位(最低水位),分五档:100%、80%、50%、30%和缺水。
在上、下限水位之间进行定温加水,即水箱水温到达设定值(如50℃)时加水,低于设定值2℃(如50-2℃)时停止加水。
2、集热循环:把水箱和集热器进行强制循环,当集热器温度高于水箱温度到设定值时(5~25℃),会自动启动集热循环,把太阳能集热器内的热水收集于水箱,在热泵系统时用于热泵的开停控制。
3、辅助电加热或其他热源(即“加热”):当太阳能不能满足需求时,可以进行辅助电加热或其他热源:可以手动进行,也可以定时进行辅助加热。
热泵系统时,当环境温度低于某一设定值时(如8℃),辅助电加热可以自动开启。
4、用水管道循环:在用水管道末端,装上温度探头,进行定温管道循,管道循环可以手动,也可以定时,在定时时间范围内,管道末端将保持设定的水温,使用户一开就有热水。
R9100双频RTK高精度定位接收机数据手册说明书

1R9100双频RTK 高精度定位接收机数据手册Apr, 2020修订记录免责声明本文档提供有关深圳市西博电子有限公司产品的信息。
本文档并未以暗示、禁止反言或其他形式转让本公司或任何第三方的专利、商标、版权或所有权或其下的任何权利或许可。
除西博在其产品的销售条款和条件中声明的责任之外,本公司概不承担任何其它责任,并且,西博对其产品的销售和/或使用不作任何明示或暗示的担保,包括对产品的特定用途适用性、适销性或对任何专利权、版权或其它知识产权的侵权责任等,均不作担保。
若不按手册要求连接或操作产生的问题,本公司免责。
西博可能随时对产品规格及产品描述作出修改,恕不另行通知。
对于本公司产品可能包含某些设计缺陷或错误,一经发现将收入勘误表,并因此可能导致产品与已出版的规格有所差异。
如客户索取,可提供最新的勘误表。
2目录1产品介绍 (4)1.1 概述 (4)1.2 关键指标 (5)2.电气特性 (6)2.1电气极大值 (6)2.2运行条件 (6)3产品功能 (7)3.1 多模卫星星座 (7)3.2 增强系统 (7)3.3 快速在线标定 (8)3.4 自由安装 (9)3.5 导航数据率 (9)3.6 MEMS传感器原始数据输出 (9)4.外形尺寸 (10)5. 传输及接口 (9)6. 订购信息 (10)31产品介绍1.1 概述R9100多模双频高精度GNSS/MEMS 组合导航接收机,是深圳市西博电子有限公司推出的基于六自由度MEMS 传感器与双频RTK 卫星导航紧密结合的组合导航系统,RTK算法与组合导航算法高效运行于片上处理器,是一款低功耗、小体积、高精度、无需接入里程计辅助、具备城市峡谷和长时间隧道,100%导航可用性的厘米级组合导航产品。
R9100采用先进的MEMS 惯性传感器与载波差分(RTK)卫星导航组合导航技术,充分利用了卫星导航的载波相位信息与惯性器件(三轴陀螺与三轴加速度计)的相对角运动与线运动测量功能,使用多维扩展卡尔曼滤波技术及其它特定算法实现了在微小器件上的三维高精度导航测姿功能。
GP1 - 水抗式双音频充电收音机手册说明书
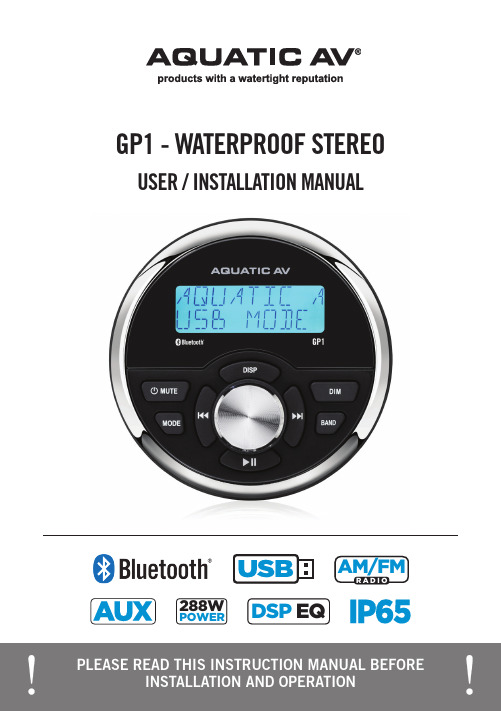
USER / INSTALLATION MANUAL GP1 - WATERPROOF STEREO1 Getting Started...............................................................................................................................................1.1 Contents..................................................................................................................................................1.2 Connections.............................................................................................................................................1.3 Connections Diagram...............................................................................................................................1.4 Installation.............................................................................................................................................1.5 Power On.................................................................................................................................................2 Controlling the Stereo.....................................................................................................................................2.1 Location of Controls.................................................................................................................................2.2 Control Functions.....................................................................................................................................3 Listening via Bluetooth...................................................................................................................................3.1 Listening via Bluetooth............................................................................................................................3.2 Pair with Bluetooth Audio Device.............................................................................................................3.3 Listening via Bluetooth Audio Device.......................................................................................................3.4 Bluetooth Multi-Link................................................................................................................................4 Listening via USB...........................................................................................................................................4.1 Listening via USB....................................................................................................................................4.2 Direct Search by Track Number.................................................................................................................4.3 Random Playback.....................................................................................................................................4.4 Repeat Playback.......................................................................................................................................4.5 Device Charging.......................................................................................................................................5 Listening to AM/FM Radio...............................................................................................................................5.1 Listening to AM/FM Radio.........................................................................................................................5.2 Manually Save AM/FM Radio Stations to Memory......................................................................................5.3 Automatically Save AM/FM Radio Stations to Memory...............................................................................5.4 Listening to Saved Radio Memory.............................................................................................................6 Audio & Settings Menus..................................................................................................................................6.1 Audio Menu..............................................................................................................................................6.1.1 EQ.....................................................................................................................................................6.1.2 Loudness...........................................................................................................................................6.2 Settings Menu.........................................................................................................................................6.2.1 Beep Tone..........................................................................................................................................6.2.2 Info/Clock..........................................................................................................................................6.2.3 Power On Volume (P-VOL)..................................................................................................................6.2.4 Area USA/Euro...................................................................................................................................6.2.5 Local On/Off......................................................................................................................................6.2.6 Stereo/Mono......................................................................................................................................7 Additional Features........................................................................................................................................7.1 Listening to Auxiliary Devices..................................................................................................................7.2 Dimmer High/Low....................................................................................................................................8 Specifications & Dimensions..........................................................................................................................8.1 Specifications..........................................................................................................................................8.2 Dimensions..............................................................................................................................................9 Warranty Information.. (333455667888889999991010101010111111111111111212121212121213131314)Table of ContentsGP1 WATERPROOF STEREO• GP1 Gauge Size Waterproof Stereo • User/Installation Manual • Wiring Harness (AQ-UNH-2)• Mounting Bracket• Two (2) Stainless Steel screws • Two (2) Stainless Steel nuts1.1 Contents1. 12-pin Watertight HarnessThe 12-pin harness supplies power and ground connections to the stereo and four (4) speaker channel output connections from the stereo.Do not cut or modify the 12-pin harness on the stereo side or warranty will be void.2. AM/FM Radio Antenna JackAllows connection of AM/FM radio antenna. For best AM/FM performance make sure the antenna is extended to the highest achievable position.3. Auxiliary OutputsAllows external amplifiers to be connected to power additional speakers.4. Auxiliary InputsAllows an additional RCA input, from a standalone unit or another stereo source.5. USB InputPlay USB thumb drives with supported audio media and charge devices when connected.1.2 Connections (see Wiring Diagram 1.3)1.3 Connections DiagramAll open wire connections should be soldered and protected against water and dust for best long-term performance.No lower than a 2 Ohm speaker load should be used or damage may occur to the stereo. Make sure the polarity ofspeakers is connected correctly.4312-pin Watertight Harness1.4 InstallationPLEASE READ THIS INSTRUCTION MANUAL BEFORE INSTALLATION AND OPERATION. Aquatic AV recommends installation of this stereo by a professional technician.Aquatic AV recommends using the ‘measure twice, cut once’ method!1. Check clearances on both sides of a planned installation area before drilling any holes.2. Drill a pilot hole at the center point and then use a circular saw to drill a hole with a 3”(76.2mm) diameter.3. Slide the GP1 stereo through the mounting hole and secure the stereo using the mountingbracket, screws and washers. If the bracket needs to be shortened this can be done byremoving the appropriate number of breakaway segments using a pair of pliars.4. Once complete make sure the outside surface is clean and clear of debris to ensurea proper water/dust seal. The GP1 stereo has an external water/dust proof gasket whichrequires a clean and flat surface for long-term environmental protection performance.DashboardMounting hole size3” (76.2mm)Break LinesMountingBracket1.5 Power OnIn a spa application the red and yellow wires should be jumped together and then connected to the +12VDC output of the power source. In this set up the GP1 will always be on, with a very low current draw when idle.In a boat, ATV or other application requiring power from a battery, the yellow wire (constant power) should be connected to the battery, and the red wire should be connected to the ignition or a switch.For detailed instructions you can check out our online video:‘How to wire your Aquatic AV stereo system’/support/videosOnce all connections are made press the POWER/MUTE button and the stereo will turn ON. Press and hold the POWER/MUTE button to turn the unit OFF.1. Power/Mute2. LCD Display3. Display4. Dimmer5. Band / File Search6. Next / Fast Forward7. Preset / Play/Pause8. Rotary Selector9. Previous / Fast Rewind10. Mode2.1 Location of Controls2.2 Control FunctionsIf your music player is connected via the Auxiliary input you will not be able to control track or receive trackinformation.Navigating past the last Settings Menu item (Restore) will automatically exit the Settings Menu and enter the Audio Menu. Press and hold Audio/Menu button to enter the Settings Menu again.3.1 Listening via BluetoothThe Bluetooth Audio menu is accessible by pressing the MODE button and is used to connect a Bluetooth Audio device or disconnect a Bluetooth Audio device that has already been paired. 3.2 Pair with Bluetooth Audio Device1. Enable Bluetooth Audio mode by pressing MODE and selecting Bluetooth.2. Switch on your Bluetooth Audio device.3. Select ‘AQUATIC AV GP1’ from the list of available devices to pair. No password should berequired however if prompted for a password use ‘0000’.4. A Bluetooth logo will illuminate on the stereo’s LCD to verify Bluetooth is connected. 3.3 Listening via Bluetooth Audio Device1. Bluetooth Audio mode will be activated once a Bluetooth Audio device is paired in anymode. Use MODE to change to Bluetooth Audio mode to listen to music from your device.2. Play the song from device and the sound will play through the stereo.3. Press PLAY/PAUSE to play or pause the song.4. Press FAST REWIND / FAST FORWARD buttons to play previous/next song file.5. Previous/next track and volume up/down can also be controlled directly from yourBluetooth Audio device.Bluetooth functions are device specific and not all devices will allow Fast Forward/Rewind or Next/Previous to work.3.4 Bluetooth Multi-linkA second Bluetooth Audio device can pair to the stereo even when music is playing from the first Bluetooth Audio device.1. Long press MODE to unlink first device.2. Pair second device by selecting ‘Aquatic AV GP1’ in the device’s Bluetooth menu.3. Once paired, playing music from device 2 will override device 1 and the stereo should begin playing from device 2.4. Should you wish to play music from the first device again, repeat steps 1, 2 & 3.4.1 Listening via USB1. Attach your USB thumb drive to the female USB connector and the music files on theUSB will play automatically.2. If your USB device is readable then USB source mode will be automatically selected andyour compatible content will begin to play.3. Press PLAY/PAUSE to play or pause the music.4. Press FAST REWIND / FAST FORWARD once play previous / next song file.5. Press and hold FAST REWIND / FAST FORWARD to fast forward / fast rewind the song file.Playback and navigation of music files via USB includes MP3 and WMA files.4.2 Direct Search by Track number1. Press BAND button and the display will show ‘NUM ****’2. Turn the Rotary Selector to select numeric value.3. Press FAST REWIND / FAST FORWARD to move to the next number in the sequence.4. Once the desired file number is selected press the Rotary Selector or allow the timer toauto select the track number being displayed.4.3 Random PlaybackPress and hold the BAND button to toggle RDM ON or RDM OFF (default).4.4 Repeat PlaybackPress and hold the DIM button to toggle RPT ONE, RPT FOLD, RPT ALL (default).4.5 Device ChargingWhen specified USB devices such as Smartphones or MP3 players are connected with a standard male-to-female USB cable the device’s battery will charge automatically. The USB connection will deliver up to 2.1A of current to charge a device battery.5.2 Manually Save AM/FM Radio Stations to Memory1. Tune to the station you would like to be saved as a preset.2. Press and hold the PLAY/PAUSE button and the stereo will display ‘SAVE CH1’.3. Turn the Rotary Selector to select the desired preset slot you would like to save the current station to.4. Press the Rotary Selector to save the preset.5. Upon successfully saving a preset the preset number that was chosen will be shown in the right corner.Presets are only for the current band you are on. Each band FM1, FM2, FM3, AM1 and AM2 has six presets for a total of 30 (18x FM & 12x AM).5.1 Listening to AM/FM Radio1. Enter radio mode by pressing MODE and selecting FM1, FM2, FM3, AM1 or AM2.2. Press BAND button to select the radio band.3. Navigate the available stations using the FAST REWIND / FAST FORWARD buttons.4. Press FAST REWIND / FAST FORWARD to seek another station.5. Press and hold FAST REWIND / FAST FORWARD for manual tuning. (Manual tuning will time out after 5 seconds of no action then will revert back to Seek/Auto).5.3 Automatically Save AM/FM Radio Stations to MemoryPress and hold the BAND button for 2 seconds to auto store stations to preset locations 1-6 of bands FM1-FM3 when in FM or AM1-AM2 when in AM.5.4 Listening to Saved Radio Memory1. Press the PLAY/PAUSE button and the stereo will display CH ‘X’.2. Turn the Rotary Selector to the desired preset channel.3. Press the Rotary Selector to start listening to the preset selected.Listening to AM/FM RadioGP1 WATERPROOF STEREOAudio & Settings Menus GP1 WATERPROOF STEREO 6.1 Audio Menu1. Press the Rotary Selector to enter the Audio menu. The available Audio options are:BASS - TREBLE - BALANCE - FADER - EQ - LOUD2. Press the Rotary Selector to navigate the menu options.3. Turn the Rotary Selector to adjust the desired Audio option.4. Press the Rotary Selector to confirm your change and continue in the Audio menu or wait5 seconds for the unit to time out to close the Audio menu.Any changes made in the Audio menu are system wide and will affect all modes.6.1.1 EQThe GP1 stereo is equipped with an audio DSP (Digital Signal Processor) to provide preset listening experiences for different music types. If you have chosen a preset equalizer setting (Classic, Rock, Pop, Flat, Off (default)) the previous Bass & Treble settings will be overridden. 6.1.2 LoudnessIncreases the sound output level by 15dB.6.2 Settings Menu1. Press and hold the Rotary Selector to enter the Settings menu. The available Settingsoptions are:BEEP - CLOCK - P-VOLUME - AREA - LOCAL - STEREO/MONO2. Press the Rotary Selector to navigate the menu options.3. Turn the Rotary Selector to adjust the desired Setting option.4. Press the Rotary Selector to confirm your change and continue with your selections in theSettings Menu or allow 5 seconds for the menu to time out.Any changes made in the Settings menu are system wide and will affect all modes.6.2.1 Beep ToneThe Beep tone plays when any button is pressed. This can be switched ON or OFF in the Settings Menu.6.2.2 Info/ClockShort press the DISP button to display either Clock or Information, or change the time as below.1. Press and hold the DISP button for 2 seconds. The hours ‘00’ will display flashing.2. Turn the Rotary Selector to change the hour and then press to confirm.3. The minutes ‘00’ will display flashing. Turn the Rotary Selector to change the minutes andpress to confirm.6.2.5 Local On/OffWhen Local is turned on the stereo seeks to only the radio channels with strong signal strength. When Local is turned off the stereo will seek to all radio channels it receives signal from.When Local setting is turned on the word ‘Local’ will appear in the upper right hand corner of the stereo’s display.6.2.6 Stereo/MonoChange the output mode between stereo and mono.6.2.4 Area USA/EuroSelect USA or European AM/FM radio frequencies.USA mode will increase and decrease the FM frequency in steps of 0.1 MHz, e.g. 88.5, 88.6,88.7 MHz. EURO mode will increase and decrease the FM frequency in steps of 0.05 MHz, e.g. 88.25, 88.30, 88.35 MHz.6.2.3 Power On Volume (P-VOLUME)Sets the maximum volume the stereo will be set when powering the unit on. If the stereo is switched off with a lower volume than the P-Vol setting then the lower volume setting will be used.Normal volume control and operation is resumed once the Rotary Selector is turned after switching the stereo on.7.1 Listening to Auxiliary Devices1. Connect your audio device to the rear RCA connectors using a stereo RCA cable.2. Press MODE on the stereo to select ‘AUX IN’ mode.3. Play the song from your auxiliary audio device and the sound will play through the stereo.4. Volume level will be determined by the auxiliary device’s audio output level.Always ensure you connect and disconnect the stereo with dry hands!7.2 Dimmer High/LowAdjust the display brightness from 100% for normal operation to 30% brightness to reduce screen glare during night time operation.Additional FeaturesSettings Operation GP1 WATERPROOF STEREO8.1 Specifications8.2 DimensionsMediaSupported Media...............................Bluetooth Audio / USB / MP3 / AM/FM / AUXDevice Charging.................................via rear USB cable (2.1A)DisplayDisplay Type.....................................Monochrome TFT with blue backlight Clock Display....................................YesVariable Screen Brightness.................100% and 30% settingsInputsBluetooth..........................................Bluetooth AudioUSB.................................................1x USB Auxiliary............................................1x stereo pair RCA OutputsPre-Out.............................................1x stereo pair RCA (2V)RadioAM/FM Tuner.....................................18x FM pre-set & 12x AM pre-set memory. US/Euro frequenciesPowerPower (max)......................................4x 45W (4 Ohms), 4x 72W (2 Ohms)Amplifier Type...................................Class A/B (2 Ohm stable)Output Voltage..................................10.5V - 14.4V DCCurrent Draw.....................................7A (max) / <3mA (standby)Multi-Environment CertificationsWaterproof / Dustproof.......................Yes - IP65Conformal PCB Coating......................YesUV Protection....................................500hrs stable, ASTM D4329 compliantSalt/Fog Protection............................500hrs stable, ASTM B117 compliantCertifications.....................................CE, RoHS, WEE, FCCStainless Steel Mountings..................YesSpecifications & DimensionsGP1 WATERPROOF STEREOWarranty Information GP1 WATERPROOF STEREOAquatic AV offers a limited warranty of our products on the following terms:Length of warranty2 years on audio systems, electronics, speakers, and accessories (receipt required).CoverageThis warranty covers only the original purchaser of an Aquatic AV product purchased from an authorized Aquatic AV dealer. In order to receive service, the purchaser must provide Aquatic AV with a copy of the receipt stating the customer name, dealer name, product purchased and date of purchase.Defective productsProducts found to be defective during the warranty period will be repaired or replaced (with a product deemed to be equivalent) at Aquatic AV’s discretion.What is not coveredDamage caused by accident, abuse, improper operations or theft. Any cost or expense related to the removal or reinstallation of product. Service performed by anyone other than an authorized Aquatic AV service center. Any product with the serial number or tamper labels defaced, altered, or removed. Subsequent damage to other components. Any product not purchased from an authorized Aquatic AV dealer.Limit on implied warrantiesAny implied warranties including warranties of fitness for use and merchantability are limitedin duration to the period of the express warranty set forth above. Some states do not allow limitations on the length of an implied warranty, so this limitation may not apply. No person is authorized to assume for Aquatic AV any other liability in connection with the sale of the product. How to obtain serviceYou must obtain a return material authorization number (RMA) to return any product to Aquatic AV. You are responsible for shipping charges of returned products to Aquatic AV.Priority Customer Support & Free Extended WarrantyIn order to receive the best customer support from Aquatic AV we recommend you register your product for a free extended warranty.Register your product for extended warranty and priority support at /register Please record the model and serial number[s] of your equipment in the space provided below as your permanent record and will assist us with your factory warranty coverage. These numbers can be found on the chassis label found on the rear of the stereo on the wire harness.FCC Statement GP1 WATERPROOF STEREO FCC ID:MADE IN CHINAFCC Statement to the UserThis equipment has been tested and found to comply with the limits for a Class B digital device, pursuant to Part 15 of the FCC Rules. These limits are designed to providereasonable protection against harmful interference in a residential installation. Thisequipment generates, uses and can radiate radio frequency energy and, if not installedand used in accordance with the instructions, may cause harmful interference to radiocommunications. However, there is no guarantee that interference will not occur in aparticular installation. If this equipment does cause harmful interference to radio ortelevision reception, which can be determined by turning the equipment off and on, the user is encouraged to try to correct the interference by one of the following measures:1. Reorient or relocate the receiving antenna.2. Connect the equipment into an outlet on a circuit different from that to which thereceiver is connected.3. Increase the separation between the equipment and receiver.4. Consult the dealer or an experienced radio/TV technician for help.FCC Caution:Any changes or modifications not expressly approved by the party responsible forcompliance could void the user’s authority to operate this equipment.This device complies with Part 15 of the FCC Rules. Operation is subject to the following two conditions: (1) This device may not cause harmful interference, and (2) this devicemust accept any interference received, including interference that may cause undesired operationProduct design and specification subject to change without notice. E&OE.Doc V1.1E-mail:******************US & Canada:187****2782International: +1 408 559 1668 Fax: +1 408 559 0125 Aquatic AV282 Kinney Drive San Jose, CA 95112, USA。
海尔大型电力风热水杯上的产品说明书
IMPORTANT:To avoid damage to your cabinets, check with your builder 194°F (90°C).codes.q Product Dimensions Page 1 of 2A.Optional backguard may be installedB.27¾" (70.5 cm) depth with control panel, see NOTE*C.35¾" (90.2 cm) cooktop height when setting on the wheelsD.36" (91.4 cm) widthE.Model/serial rating plate locationA.Optional backguard may be installedB.27¾" (70.5 cm) depth with control panel, see NOTE*C.35¾" (90.2 cm) cooktop height when setting on the wheelsD.48" (121.9 cm) widthE.Model/serial rating plate locationA.18" (45.7 cm) upper cabinet to countertopB.30" (76.2 cm) model: 30" (76.2 cm) min. upper cabinet width 36" (91.4 cm) model: 36" (91.4 cm) min. upper cabinet width 48" (121.9 cm) model: 48" (121.9 cm) min. upper cabinet widthC.13" (33 cm) max. upper cabinet depthD.For minimum clearance to top of range, see NOTE**E.30¼" (76.8 cm) on 30" (76.2 cm) models 36¼" (92.1 cm) on 36" (91.4 cm) models 48¼" (122.6 cm) on 48" (121.9 cm) modelsF.6" (15.2 cm) min. clearance from both sides of range to side wall or other combustible materialG.15" (38.1 cm)H.22" (55.9 cm) on 30" (76.2 cm) models 28" (71.1 cm) on 36" (91.4 cm) models 40" (101.6 cm) on 48" (121.9 cm) models I.1½" (3.8 cm)J.3" (7.6 cm)K.5" (12.7 cm)L.6" (15.2 cm) on 30" (76.2 cm) models 14" (35.5 cm) on 36" (91.4 cm) models 24" (61.0 cm) on 48" (121.9 cm) models M.10½" (26.7 cm)N.6" (15.2 cm)O.6" (15.2 cm), see NOTE***48" (121.9 cm) modelsNOTE:The following illustration is for dimension planning purposes only,and the locations and appearances of the features shown may not match *NOTE:When installed in a 24" (61.0 cm) base cabinet with 25" (63.5 cm)countertop; front of oven door protrudes 1⁷⁄₈" (4.8 cm) beyond 24" (61.0 cm) base cabinet.Cabinet DimensionsCabinet opening dimensions shown are for 25" (64 cm) countertop depth,24" (61 cm) base cabinet depth and 36" (91.4 cm) countertop height.Dimensions must be met in order to ensure a flush fit to backwall.IMPORTANT:If installing a range hood above the range, follow the range hood installation instructions for dimensional clearances above the cooktop *NOTE:Receptacle must be rotated 90°for Canadian installation.**NOTE: Minimum Clearances30" (76.2 cm) models: 30" (76.2 cm) minimum clearance between the top of the cooking platform and the bottom of an uncovered wood or metal cabinet.36" (91.4 cm) models: 42" (106.7 cm) minimum clearance between the top of the cooking platform and the bottom of an uncovered wood or metal cabinet.48" (121.9 cm) models: 42" (106.7 cm) minimum clearance between the top of the cooking platform and the bottom of an uncovered wood or metal cabinet.***NOTE:If backwall is constructed of a combustible material and abackguard is not installed, a 6" (15.2 cm) minimum clearance is required for all models.Page 2 of 2。
海尔 YRZ08S-CBU1 立式热饮机臻饮系列 使用说明书

使用说明书型号YD2108S-CBU1 YDZ07S - C BU1 YDZ08S - CBU1 Y D2202S- C BU1 YD2206S- C BU1 YD2208S-CBU1 YDZ22S-CBU1 YDZ26S-C BU1 YDZ28S- C BU1YD2108S-CBU1(LP)饮水机(热饮机)智能家电操控智慧场景定制智家商城购物家电报装报修YR2108S-CBU1 YRZ07S - CBU1 YRZ08S - CBU1YR2202S - C BU1 YR2206S - C BU1 YR2208S - C B U1 YRZ22S -CBU1YRZ26S- C BU1 YRZ28S-C BU1YR2108S-CBU1(LP)目录使用注意事项.......................................1产品简介............................................. 2.产品部件..........................................2.装箱清单..........................................2.技术数据..........................................3.电气原理图......................................4.产品特点..........................................4.产品功能..........................................4安装及维护..........................................6.固定说明..........................................6故障诊断及排除...................................9使用指南.............................................8环保清单...........................................11.产品中限用物质的名称及含量.........11产品中与水接触材料列表..................11保修服务............................................12.用户须知........................................12.保修说明.......................................12“1+5”成套服务 (13).温馨提示..........................................7.清洁保养..........................................7.安装方法 (6)尊敬的用户:您好!为保证使用安全,防止人身伤害及物品损坏,使用本产品前请务必仔细阅读本说明书并遵守所有注意事项。
25G Single-Double瓶饮机用户手册说明书

Parts Manual cFor Technical Assistance call: 800-227-2233, Fax: 888-329-8207 To Order Parts call: 888-227-2233, Fax: 888-329-023425G Single-Double25G-FDS-B500R7ModelSerial Number cascadecorporationPublicationsG Single-Double 6070971Installation Instructions 6130934Operator Guide6072517Service Manual6036696Driver Training Video – CD 679929Tool Catalog673964Literature Index Order FormREF QTY PART NO.DESCRIPTION6151426Base Unit16151425Frame Assembly u 116065007Frame216149356Inner Fork Carrier – LH316149355Inner Fork Carrier – RH416066540Bar52388348Capscrew, M16 x 35626069483Upper Pin Retainer746070661Retaining Ring846066832Seal946066556Bushing102209776Dowel Pin 1146068179Arm Bearingu Includes items 1-17.l See Cylinder page for parts breakdown.REF QTY PART NO.DESCRIPTION1286028433Bearing Retainer Plug1316069764Fork Stop142765352Capscrew, M8 x 30152767811Roll Pin162424115Lube Fitting1726069835Relief Fitting1826149000Bearing Assembly1926069728Cylinder l2026135491Spring Cylinder21 6066555Nut, M14224783800Nut, M20232768992Roll Pin2416148370Shim Kit nn If required for Fork tip alignment. Not included in Base Unit.Reference: Fastener Kit 6067507, SK-12762, S-12761.32GCylinder25GREF QTY PART NO.DESCRIPTION6069728Cylinder116069731Shell22663694Plug, 3316066334O-Ring u416066370Backup Ring u526066318Piston Ring u616066303Rod Seal u716066320Piston Seal u816066280Rod Wiper u916065874Retainer1016069729Piston/Rod Assembly6068008Service Kitu Included in Service Kit 6068008.Reference: S-22885.Hydraulic Group28GREF QTY PART NO.DESCRIPTION6082317Hydraulic Group 116071025Hose, 1180 mm216068578Hose, 1105 mm316046507Hose, 425 mm416072126Hose, 305 mm526043826Hose, 325 mm616081813Tube716081814Tube816068555Tube Clamp916071179Capscrew, M6 x 30 105778100Fitting111604510Plug, 61216080187Valve u132768789Capscrew, M6 x 40 144200008Cable Tie152604511Fitting, 6-6u See Valve page for parts breakdown. Reference: S-23295, Fitting Group 213099.Valve AssemblyREF QTY PART NO.DESCRIPTION6080187Valve Assembly 116080186Valve Body23778100Fitting, 6 SAE – M10 L-Series 31210266Flow Divider/Combiner 416071170Service KitFork Carrier Group25GREF QTY PART NO.DESCRIPTION6072085Fork Carrier Group 116081974Fork Carrier, RH216082077Fork Carrier, LH346066470Fork Stop48219596Capscrew, M8 x 16 Reference: Fastener Kit 6067507, SK-9720.Forks25GREF QTY PART NO.DESCRIPTION146066278Fork224769577Capscrew, M16 x 50Reference:Fastener Kit 6072117, SK-9261.Sideshift Mounting GroupREF QTY PART NO.DESCRIPTION6066607Sideshift Group (R20) s6071855Lower Hook Group (R4) t 116151472Upper Mounting Hook, RH 216070145Upper Mounting Hook, LH 316151643Anchor Bracket426127049Upper Bearing527403Grease Fitting61675548Sideshift Cylinder l71678525Clevis Pin82672726Cotter Pin91675550Restrictor Washer 1026066570Spacers Includes items 1-13 & 21-22.t Includes items 17-20.l See Sideshift Cylinder page for parts breakdown.REF QTY PART NO.DESCRIPTION111209542Key u1216131029Key u132219529Capscrew, M16 x 40 u142601676Fitting, 6-61586040801Capscrew, M16 x 60164768809Capscrew, M10 x 161726066574Lower Hook1826070833Lower Bearing194214991Capscrew, M16 x 45204667225Washer211671176Clevis Pin2216151473Capscrew, M12 x 1.75u Included with Anchor Bracket 6151644.Reference: Fastener Kit 6067507, Fitting Group 601676. Class IIIFor Technical Assistance call: 800-227-2233, Fax: 888-329-8207To Order Parts call: 888-227-2233, Fax: 888-329-0234cascade Sideshift CylinderREF QTYPART NO.DESCRIPTION 675548Cylinder Assembly 11553857Nut 21636851n Wiper 31553501Piston 41662452n Seal 51638247n Back-up Ring 61641835n Seal 71675549Shell 81553499Rod 912785n O-Ring 101615128n Back-up Ring 111553500Retainer 121553856Retaining Ring 1317202Snap Ring 553861Service KitnIncluded in Service Kit 553861.Do you have questions you need answered right now? Call your nearest Cascade Parts Department. Visit us online at Cascade CorporationU.S. Headquarters2201 NE 201stFairview, OR 97024-9718 Tel: 800-CASCADE (227-2233) FAX: 888-329-8207Cascade Canada Inc.5570 Timberlea Blvd.Mississauga, OntarioCanada L4W-4M6Tel: 905-629-7777FAX: 905-629-7785Cascade GmbHNiederwippekühl 158579 SchalksmühleGermanyTel: 02355-50900FAX: 02355-509020Cascade FinlandA. Petreliuksenkatu 301370 VantaaFinlandTel: 09-8361925FAX: 09-8361935Cascade N.V.Benelux Sales and Service Damsluisweg 56PO Box 30091300 El AlmereThe NetherlandsTel: 036-5492950FAX: 036-5492974Cascade (UK) Ltd.Unit 4, 12 O’Clock CourtAttercliffe RoadSheffield, S4 7WWEnglandTel: 0870-850-8756FAX: 0870-850-8757Sales ScotlandMacade Systems Ltd.18 Melford RoadRighead Ind. EstateBellshill ML4 3LRScotlandTel: 01698-845777FAX: 01698-845888Cascade (Africa) Pty. Ltd.PO Box 625, Isando 160060A Steel RoadSparton, Kempton ParkSouth AfricaTel: 27-11-975-9240FAX: 27-11-394-1147Cascade Scandinavia AB Hammarvägen 10PO Box 124S-56723 Vaggeryd SwedenTel: 039-336950FAX: 039-336959Cascade FranceS.A.R.L. MHP1D Rue De Charaintru BP 18,91360 Epinay-Sur-OrgeFranceTel: 01-6454-7500FAX: 01-6454-7501Cascade Hispania S.A.Carrer 5, Sector CZona Franca DuaneraPoligono de la Zona Franca08040 Barcelona, SpainTel: 93-264-07-30FAX: 93-264-07-31Cascade Italia S.R.L.Via Dell’Artigianato 137050 Vago di Lavagno (VR)ItalyTel: 39-045-8989111FAX: 39-045-8989160Sales Portugal FAG Santos LdaRua do MercadoLte 6, Loja 2-Tires 2785-630 S. Domingos De Rana PortugalTel: 214-448-083FAX: 214-458-098Sales SwitzerlandFahrzeugbedarf8810, HorgenSwitzerlandTel: 01-7279797FAX: 01-7279798Sales PolandTargowa 35/6103-728 WarszawaTel: 022-619 00 49FAX: 022-619 00 49Mobile Tel: 0501-27 29 55Sales RussiaEMCG Material HandlingEquipmentMoscowTel: 095-795-2400FAX: 095-795-2475Email:************Cascade Japan Ltd. 5-5-41,Torikai Kami Settsu, Osaka Japan, 566Tel: 81-726-53-3490 FAX: 81-726-53-3497Cascade Korea121B 9L Namdong Ind.Complex, 691-8 Gojan-DongNamdong-KuInchon, 405-310 KoreaTel: 82-32-821-2051FAX: 82-32-821-2055Cascade Australia1445 Ipswich RoadRocklea, QLD 4107AustraliaTel: 1-800-227-223FAX: 617-3373-7333Cascade New Zealand15 Ra Ora DriveEast Tamaki, AucklandNew ZealandTel: 64-9-273-9136FAX: 64-9-273-9137Cascade-XiamenNo. 668 Yangguang Rd. Xinyang Industrial Zone Haicang, Xiamen City Fujian ProvinceP.R. China 361026 Tel: 86-592-651-2500 FAX: 86-592-651-2571Sunstream IndustriesPte Ltd.No. 3 Tuas Link 12263SingaporeTel: 65-6863-3488FAX: 65-6863-1368Central LTDA(Cascade Brazil)Av. General Valdomirode Lima 43Jabaquara - Sao Paulo - S.P.Brasil CEP 04344-070Tel: 55-11-5013-2800Fax: 55-11-5013-2809cCascade Corporation 20071-2007。
艾美特 AR1901 智慧感知無線真空吸塵器 使用說明書说明书
AR1901For use in Taiwan only智慧感知無線真空吸塵器使用說明書一、產品結構及配件1、吸塵器手柄2、開關按鈕3、高低檔調速按鈕4、高低檔顯示5、自動檔顯示6、電量顯示7、集塵杯釋放按鈕8、HEPA 濾網9、集塵杯10、集塵杯中心過濾群組11、一鍵倒灰塵按鈕12、集塵杯下蓋13、吸口14、延伸管釋放按鈕15、延伸管16、地刷釋放按鈕17、地刷LED燈18、滾刷釋放按鈕19、可拆卸電池套件20、充電孔21、長扁吸嘴22、圓毛刷23、充電器1234567891011121314152021222319161718二、產品技術參數在使用此機器之前,請閱讀本手冊和機器上的所有指示和警告標記。
在使用電器時,應始終以下遵循基本預防措施:警告這些警告適用於機器,也適用於所有工具、附件、充電器或電源供應器。
減少火災、電擊或傷害的風險:1、本機不適用於身體、感官或推理能力下降或缺乏經驗和知識的兒童或體弱多病的人,除非他們得到了協助。
負責人員請講解關於機器使用的正確使用方式,以確保他們能夠安全地使用機器。
2、請勿當成玩具使用。
當兒童使用或接近兒童時,需要密切注意。
兒童應受到指導,以確保他們不將機器作為玩具玩耍。
3、請按本操作手冊所述使用。
除手冊所示外,不得自行修理、改造。
4、只適用於乾燥環境。
不要在戶外或潮濕的表面使用。
5、請勿用濕手插入或拔取插頭。
6、不要與損壞的電線或插頭一起使用。
如果電源線損壞,必須由經銷商或類似的合格人員更換,以避免發生危險。
7、如果機器無法正常運作,或受到了猛烈的撞擊、掉落、損壞、留在戶外,或者掉進水裡,請不要使用並聯繫售後維修。
8、當需要維修時,請與經銷商聯繫。
請不要擅自拆卸機器,因為不正確的重新組裝可能導致觸電或火災。
9、請握住插頭拔出電源插座,而不是握住電源線,本產品不建議使用延長線。
10、請不要用來吸水。
不要用於吸起易燃物或易燃液體,例如汽油,也不要在可能有可燃液體的地方使用。
LG WAD31UR2 直饮机 说明书

使用说明书LG电子直饮机使用说明书保管在容易找到的场所.使用前请阅读“安全注意事项”.使用说明书里包含产品保证书.本产品是家庭用,禁止商业或工业等使用。
LG牌 WAD31UG2 型 直饮机LG牌 WAD31UR2 型 直饮机P/No.: LG电子 Healthcare 直饮机的特征 ■ 卓越设计采用与众不同的流线型设计,进一步提升厨房的装修品位。
■ 清扫放心灯灯的颜色根据过滤器使用量而变化,消费者可直接确认过滤器的更换时间。
■ 连续操作按钮当你需要大量的水时,可操作一个按钮,方便的接水。
■ 锁定/解锁按钮为了安全,可锁住直饮机的功能。
2序列使用前安全注意事项 ........................................................................................................................4~12各部分名称与功能 (13)- 指示部分净水处理过程 (14)使用前确认事项 (15)各部分名称与功能 (16)- 操作部分使用指示部分功能 (17)- 清扫指示部分- 锁定/解锁指示部分使用方法 (18)- 连续1分按钮- 出水按钮安装方法 ...............................................................................................................................19~20清洗方法 ...............................................................................................................................21~22温馨提示更换过滤器的周期及方法 ..............................................................................................23~25日常检查 (26)故障申告前请确认 (27)水排管图 (28)产品规格 (29)产品包修卡 ..........................................................................................................................30~31本产品适用 220 V.电源插头必须插入220V接地的电源插座.110 V通过变压器至220 V使用的情况,存在安全隐患,千万不要使用.3为了防止使用不当造成的意外危险和损毁,请阅读下列内容正确安全使用本产品。
- 1、下载文档前请自行甄别文档内容的完整性,平台不提供额外的编辑、内容补充、找答案等附加服务。
- 2、"仅部分预览"的文档,不可在线预览部分如存在完整性等问题,可反馈申请退款(可完整预览的文档不适用该条件!)。
- 3、如文档侵犯您的权益,请联系客服反馈,我们会尽快为您处理(人工客服工作时间:9:00-18:30)。
yr1901g说明书
路由器设置大同小异。
首先你要确认是否光纤线,是否需要拨号上网。
方法步骤一:1、连接线缆:用网线连接华为荣耀路由的蓝色网口和外网(如宽带猫、光猫等)2、连上Wi-Fi:用手机连上华为荣耀路由的Wi-Fi:HUAWEI-xxxxxx(就是路下方的wifi名称)3、设置上网:手机显示已经联网了之后,浏览器访问任意网址,就能自动跳转到192.168.3.上网向导,跟随向导指引完成上网设置就行了,其实很简单的事情。
方法步骤2如果看不懂以上,可以看下面的详细指导。
方式一:通过手机配置1. 用网线连接华为荣耀路由的蓝色网口和家里的宽带上网口(光猫、宽带猫、墙上网口等),连接电源。
2. 放倒华为荣耀路由,找到它的Wi-Fi 名称。
3.搜索附近的Wi-Fi~嘿,找到了,就是它了!带5G的也是,直接连上就行,不用输入密码4. 打开手机浏览器,它会自动跳转到“192.168.3.1”配置页面,点击“马上体验“,进入上网向导,稍等一会儿。
5. 接下来就需要输入开通宽带时,电信网通联通工作人员(总之就是给你家装网的人)给你的宽带“上网账号”和“上网密码”,然后点击“下一步“。
6. 最后设置一下wifi名称(当然你也可以不改)和密码,等路由重启,一会儿就可以上网了,简单不。
方法步骤3方式二:通过电脑配置1. 接下来我说通过有线的方式来实现联网,你同样要先将家里的宽带上网口网线插入蓝色口,然后通过一根其他网线连接到台式机或笔记本上,接通电源。
2. 下面打开电脑浏览器,自动跳转到“192.168.3.1“配置界面。
点击“马上体验“,进入上网向导,华为荣耀路由开始自动检测我的上网环境。
万一无法访问打开配置界面,请将电脑IP设置为”自动获取IP 地址“或”192.168.3.2“后再试试。
设置方法这里不多说了,如果可以打开请忽略这步。
3. 接下来的操作和手机端的就一样了,输入装网的GG给你的上网账号和网密
码,然后点击下一步。
4. 设置一个自己喜欢的Wi-Fi名称和密码。
点击“完成”。