麦克风混音器使用方法
电脑麦克风回音解决办法
电脑麦克风回音解决办法1、这种情况有时是网络速度太慢造成的,如果你在语音的时候最好关掉视频。
2、不少人在使用麦克风之前,喜欢将音量控制面板中“麦克风”一栏的“静音”选项勾去掉,并且把麦克风音量调到最大。
其实这种做法是错误的,“麦克风”的“静音”选项并不是控制麦克风发声的,而是控制音响和耳机是否反馈麦克风的声音。
所以建议大家在使用麦克风时将“静音”选项选中,这样就可以消除耳机中的杂音和回音,以便得到更好的语音效果。
3、详细设置步骤如下:(1)用鼠标双击windows桌面右下角的“喇叭”形图标,打开“音量控制”窗口。
(2)点窗口主菜单项“选项”(左上角),并选“属性”,打开“属性”对话框。
(3)在“混音器”下拉列表中选择一个混音器。
大多数电脑中只有一个混音器,有的电脑中有两个混音器,一个用于设置录音,一个用于设置播放。
对于只有一个混音器的情况,在“调节音量”下的单选纽中一般有两个有效的单选钮,播放和录音,对于有两个混音器的情况,在“调节音量”下的单选钮中只有一个有效,播放或录音。
4、播放的设置(1)选中“调节音量”下的单选钮“播放”。
(2)将“显示下列音量控制“下的各项全部打勾;(3)点“确定”打开“音量控制”窗口;(4)除了“音量控制”和“波形”下的选择框外,其他选择框全部打勾(静音)。
(5)播放设置完成。
5、录音的设置点窗口主菜单项“选项”(左上角),并选“属性”,打开“属性”对话框。
(1)选中“调节音量”下的单选钮“录音”;(2)将“显示下列音量控制”下的各项全部打勾;(3)点“确定”打开“录音控制”窗口;(4)除了“麦克风”下的选择框打勾外,其他选择框全部不打勾;(5)调节麦克风的滑动条中的滑块来调节录音音量(一般最大);(6)麦克风高级属性设置;A.如果麦克风设置下,没有“高级”按钮,则点“选项” “高级”(如果为有效状态)B.点“高级”按钮,打开“麦克风的高级控制”对话框;C.如果你麦克风的录音音量很小,建议在“MICBOOST”(麦克风加强)前打勾;D.如果你麦克风的录音的杂音大,建议在“MICBOOST”(麦克风加强)前不打勾7、录音设置完成。
Shure SCM810八频道话筒混音器用户指南说明书
SCM810八頻道話筒混音器Shure SCM810 eight-channel microphone mixer user guide Version: 5.1 (2020-K)Table of ContentsSCM810 八頻道話筒混音器3重要安全事項! 3簡要說明3系統功能 4操作原則4前面板功能4後面板功能 5 DIP 開關 6在機架安裝混音器7 SCM810/E 連接 8輸出限制器設定 8等化器功能8透過自動混音器使用等化器/回饋控制器9基本混音器操作9連網多個混音器10全域/本機功能10連結纜線 11備件 11規格12服務聲明14認證14進階功能14 14邏輯連接規格 14建議的邏輯應用15內部修改20 201.2.3.4.5.6.7.8.9.10.11.12.13.14.15.16.17.18.19.20.21.SCM810八頻道話筒混音器重要安全事項!必須閱讀這些注意事項。
必須保留這些注意事項。
必須注意所有警告內容。
必須遵循所有注意事項。
不要在靠近水的地方使用本設備。
只能用幹布擦拭設備。
不要堵塞任何通風口。
留出足夠的距離,確保充分通風,並安裝在符合製造商要求的位置。
不要將本設備安裝在任何熱源(如明火、散熱器、調溫器、火爐或包括功率放大器在可的其它可能產生熱量的裝置附近。
不要將任何明火火源放置在產品上。
不要破壞帶極性或接地類型插頭的安全功能。
極性插頭帶有兩個插片,其中一個比另一個寬。
接地類型插頭帶有兩個插片和第三個接地插腳。
較寬的插片或第三個插腳是為安全目的設定的。
如果提供的插頭無法插入插座,請向電工諮詢如何更換合適的插座。
保護電源線防止被腳踩踏或被夾緊,尤其是在插頭、方便插座和機身電源線的引出處。
只能使用製造商指定的連接部件/附件。
只能使用製造商指定的或隨設備售出的手推車、支座、三角架、托架或支撐台。
如果使用手推車,在移動裝有設備的手推車時應注意安全,避免設備翻落。
在雷電天氣或長時間不使用時,應拔下設備的插頭。
MACKIE_ProFX8、ProFX12_中文说明书(简体中文版)
4. 如果使用主动式扬声器,就将其开启。否则,就将被动式扬声器 以喇叭线连接到扩大机,然后将其开启。依制造厂建议的方式来 调整主动式扬声器或扩大机音平控制器。(通常都是往上调。)
USB连接能让您从计算机播放2个音频声道,并将总混音录进 计算机中。
1. 将讯号源插入混音器,例如:
˙ 麦克风插入麦克风输入端子。于麦克风必要时使用仿真电源。 查阅麦克风使用说明来加以确认。
˙ 例如键盘、鼓机或CD播放器等的线性音平音源插入线性音平输 入端子。
˙ 吉他插入声道1,并将线性/高阻抗切换开关按到启用位置。
2. 将电线从主输出端子连接到主动式扬声器或扩大机。
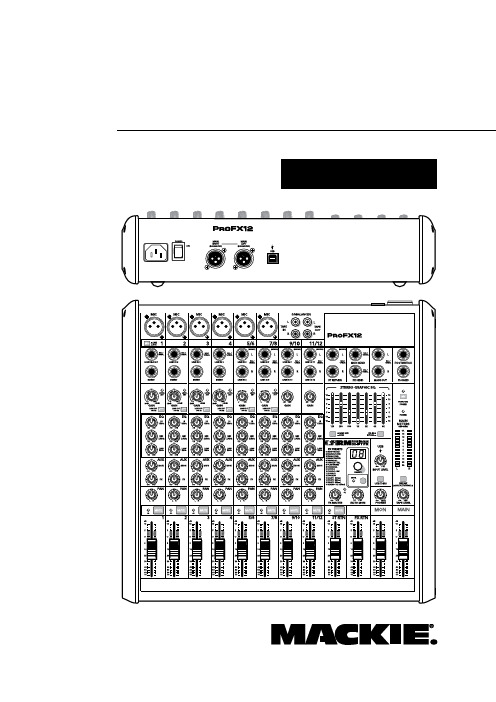
˙耳机音平控制。 ˙录音带输入音平控制。 ˙16种内建Running Man效果以及输入音平、过载LED、预 设显示、FX至监听音平以及静音/解除静音脚控切换开关 等。 ˙可用于总混音、监听混音与旁路的7段式图形式均衡器。 ˙总混音的12区段立体输出音讯表。 ˙断路开关可将除了录音带输入与USB输入之外的所有声道 静音。 ˙立体倒送推杆、FX倒送推杆、监听推杆与总推杆。 ˙USB连接能提供2声道计算机录音与2声道计算机播放。 ˙USB切换开关与输入音平。
特性 ˙ProFX8具有8声道(2个单音、2个混声、1个立体)。 ˙ProFX12具有12声道(4个单音、2个混声、2个立体)。 ˙单音声道有一个麦克风输入端子与一个单音线性音平输入端子 ,并附有用来调整麦克风与线性增益的一个增益控制器与音平 设定LED灯。 ˙混声声道有一个麦克风输入端子与一个立体线性音平输入端子 ,并附有用来调整麦克风增益的一个增益控制器与音平设定 LED灯。 ˙立体声道有立体线性音平输入端子,并附有用来调整线性增益 的增益控制器。
艾茨斯IEED TSD-MIX41 4x1 麦克风 线路混音器说明书
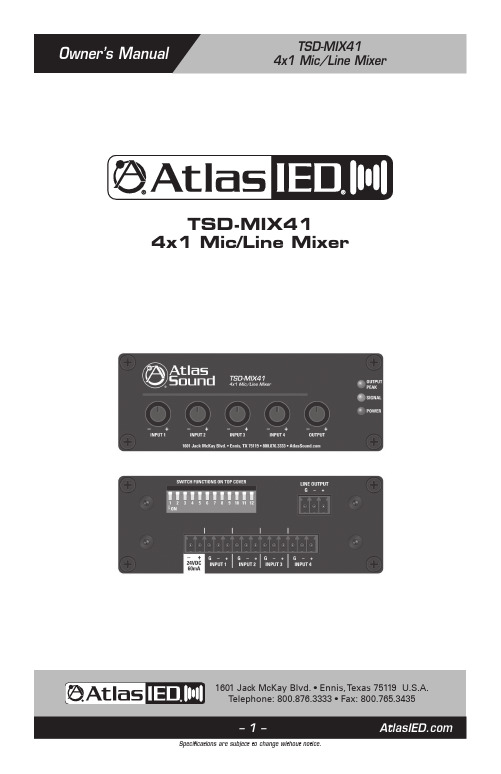
– 1 –1601 Jack McKay Blvd. • Ennis, Texas 75119 U.S.A.Telephone: 800.876.3333 • Fax: 800.765.3435TSD-MIX414x1 Mic/Line MixerDescriptionThe AtlasIED TSD-MIX41 4x1 mic/line mixer is ideal for applications where multiple mic or line sources need to be sub mixed or summed. In House of Worship applications the TSD-MIX41 is especially useful for combining similar sources such as choir microphones to a single mixer channel. The unit also works well as a stand-alone mic/line mixer that can be easily interfaced with AtlasIED amplifiers. Other applications include restaurants, conference rooms, and schools.Each input is mic/line switchable with phantom power provided for condenser microphones. The high quality, low noise internal mic preamps ensure clarity and quiet operation without unwanted coloration. A 12dB/octave high pass filter @ 125Hz also is available on each input to minimize bass rumble and low frequency feedback.The TSD-MIX41 is part of a full line of AtlasIED Time Saving Devices. These compact (1.5" x 4" x 2.75") units are designed to solve some of the common audio system problems in the easiest and in the most efficient and cost-effective way. All models are made from high quality components and include removable individual I/O connectors for quick and precise wiring, separate ground terminals for all I/Os assuring secured connections, and removable level controls that can be replaced with tamper-proof security covers. The TSDs are highly efficient and meet Energy Star™ standards as one 24V DC power supply (available separately) can power multiple Atlas Time Saving Devices.Features• Four (4) Balanced Mic/Line Inputs• Four (4) Professional Grade MicrophonePreamps with Switchable 24V PhantomPower• Up to 50dB Mic Gain Per Input• 12dB/Octave Low Cut Filter @ 125Hz • Balanced Line Output• Input Peak & Signal Indicator LEDs • High Gain Output for Driving LongBalanced Lines• Separate Ground Connections• Removable Phoenix Style I/O Connectors • Security Covers Included for All FrontPanel Controls• Meets Energy Star™ Standards• Compact Chassis Design Audio Applications • Mic Preamp• Line Preamp • Line Drive• Choirs Installation• Churches• Restaurants • Sports Bars• Schools• Industrial Facilities • House of Worship1601 Jack McKay Blvd. • Ennis, Texas 75119 U.S.A.Telephone: 800.876.3333 • Fax: 800.765.3435– 3 –1601 Jack McKay Blvd. • Ennis, Texas 75119 U.S.A.Telephone: 800.876.3333 • Fax: 800.765.3435Front Panel Description1. Inputs 1-4 Level Controls - Adjusts the gain of the independent input signals. Turn clockwise to increase the signal level and counter-clockwise to decrease it. Note: The Input Level Control knobs can be removed and replaced with a supplied security cover to prevent unauthorizedadjustment.2. Mixed Output Level Conrol - Adjust the output level of the summed signals from the four inputs.Turn clockwise to increase the signal level and counter-clockwise to decrease it. Note: The output level control knobs can be removed and replaced with supplied security covers to preventunauthorized adjustment.3.Power LED - Illuminates BLUE when 24VDC power is present.4. Output Signal LED - Illuminates Green when the input signal strength reaches 25mV to verify asignal path. Note: The LED will not illuminate if the output Level is turned Off.5. Output Peak LED - Illuminates Red when the output signal reaches 3dBV below when signal clipping will occur. Occasional flashing is normal but if this indicator is continuously On, thenreduce the input level using the input level control on the front panel.– 4 –1601 Jack McKay Blvd. • Ennis, Texas 75119 U.S.A.Telephone: 800.876.3333 • Fax: 800.765.3435Rear Panel DescriptionTSD Input/Output connections are removable for easy system wiring. The connector has a 3.5mm pitch between pins.1. DC Power Input - Each TSD that requires DC power comes with a 2 position c onnector for an external 24VDC power supply (sold separately). Because of the TSD’s low power consumption, a single external power supply may power more than one TSD. Please refer to the specifications on current requirements in milliamps to match with the appropriate power supply. Note: It isacceptable to exceed the current requirements of the TSDs but NOT safe to use a power supply that is below the current requirement of the device.2. Balanced Inputs 1-4 - Connects to balanced line or mic level sources. Your connection must be mated properly to the input connector or signal loss and/or noise may occur. For gain or source input type selection, refer to the “Dip Switch Function Identification” chart for proper input setting.Note: Unbalanced line level inputs can be inserted with proper wire configuration by connectingthe (G) and (-) terminals together.3. Balanced Line Output - Provides output when an input signal is present for connection tobalanced line level devices. Your output connections must be connected properly to theconnectors or loss and/or noise may be introduced into the signal.Note:Unbalanced line level devices can be used with proper wire configuration by connecting the (G) and (-) terminalstogether.4.Cable Management Retainer Points - Each TSD includes two cable retainer straps for securingthe included cable management retainers. Remove one of the rear panel screws, align thepanel hole with a retainer and firmly tighten the screws. – 5 –1601 Jack McKay Blvd. • Ennis, Texas 75119 U.S.A.Telephone: 800.876.3333 • Fax: 800.765.3435Dip Switch Function IdentificationSwitch Position• DIP SW # 1,2,3,4 - 24VDC Phantom Power applies power for condenser mic operation to corresponding input terminal. Down position is On.• DIP SW # 5,6,7,8 - Input Mic or Line Select for input gain selection for each of the inputs. Up position is Line, down position is Microphone.• DIP SW # 9,10, 11, 12 - Low Cut Filter engages at at 125Hz with a roll off rate of 12dB per octave. This filter operates either in the Line or Mic mode and is available on each input. Ideal for vocalmicrophones to reduce low frequency energy and to increase intelligibility. Down position is On.– 6 –1601 Jack McKay Blvd. • Ennis, Texas 75119 U.S.A.Telephone: 800.876.3333 • Fax: 800.765.3435Cable ManagementKnob and Security CoverAll front panel level controls feature a removable knob that can be replaced with an included security cover. Follow these steps to prevent potentiometer damage or unwanted changes.1. Knob Installation - Turn the potentiometer shaft fully counter-clockwise. Align the knob indicator to the lowest setting on the panel and the potentiometer shaft slot. Carefully press the knob onto the potentiometer shaft. Do not force or damage may occur to the potentiometer.2. Security Cover Installation - Remove the knob from the panel and insert the cover. Small pliers may be required to remove the knobs. Align the security cover to the level control panel hole. Push thecover into the hole until it snaps into place. Do not force or damage may occur to the potentiometer.MountingListed below are the ways to mount the TSD and the optional accessories that can be purchased.1. Velcro™ - Each unit includes two 2" x 2" pieces of industrial-grade Velcro ™ with adhesive backing to adhere to any flat surface. Clean all surfaces before applying the adhesive side of the Velcro ™.2. Multi Mount Plate - Each TSD includes a versatile multi-position mounting plate. This plateallows the TSD to be mounted to any surface; but is ideal for use with rear rack rails or side rack hat channels. Use the included M3 x 4mm screws to install the plate on the TSD. Note: Only use the included M3 x 4mm screws as other screws may be too long and will cause internal damage to the TSD. The multi-position mounting plate is a new addition being included with TSDs. If theTSD being used did not include the mounting plate, contact AtlasIED customer service at– 8 –1601 Jack McKay Blvd. • Ennis, Texas 75119 U.S.A.Telephone: 800.876.3333 • Fax: 800.765.3435Optional Mounting Accessories1. TSD-RMK 19" Width Rack Mount Kit - For 19" rack mounting, AtlasIED offers an optional rack mount kit, the TSD-RMK. This rack mount kit can support up to four TSD units. The kit includesthree blank panels designed to fill any unused slots. Use the included hardware to mount the TSD into the rack mount kit using the top mount screw holes on the TSD.2. TSD-RMKHR Half Width Rack Mount Kit - AtlasIED offers an optional rack mount kit that canbe used in half width rack applications including the AtlasIED WMA-HR and AWR-HR models. The TSD-RMKHR can support up to two TSDs. Included is an extra blank panel to fill one of thespaces if only one TSD is being used.– 9 –1601 Jack McKay Blvd. • Ennis, Texas 75119 U.S.A.Telephone: 800.876.3333 • Fax: 800.765.34353. TSD-RRMK Rear Rack Mounting Kit - For complete flexibility in mounting a TSD or TSD external power supplies the optional TSD-RRMK is available. The TSD-RRMK can support mounting of either two larger TSDs with external power supplies or up to 4 TSD models. Note:Only use theincluded M3 x 4mm screws as other screws may be too long and will cause internal damage tothe TSD.– 10 –1601 Jack McKay Blvd. • Ennis, Texas 75119 U.S.A.Telephone: 800.876.3333 • Fax: 800.765.3435SpecificationsDescription 4 x 1 Mic/Line Mixer Chassis Color Black Chassis MaterialAluminumInputs Type Qty 4, Balanced Mic or Line Selectable Connection Removable 3 Position Captive Screw 3.5mm Spacing Impedance 1.2K Ω Balanced, 600Ω Unbalanced Phantom 24VDC Defeatable Low Cut Filter 125Hz/12dB DefeatableBlock DiagramINPUT 1INPUT 2INPUT 3INPUT 4LEVELTSD-MIX41 4x1 Mic/Line Mixer1601 Jack McKay Blvd. • Ennis, Texas 75119 U.S.A.Telephone: 800.876.3333 • Fax: 800.765.3435Line Input Level 1V (0dBV) Balanced = 2V (+6dBV) Balanced Output, Maximum Input 6V (+15dBV) Mic Input Level 46dB Gain, 10mV (-40dB) Balanced = 2V (+6dBV) Balanced Output,Maximum Input 40mV (-27dBV)Outputs Type Qty 1, Balanced Line Connection Removable 3 Position Captive Screw 3.5mm Spacing Impedance 300Ω Balanced, 150Ω Unbalanced Line Output Level1V (0dBV) In = 2V (+6dBV), Maximum Output 6V (15dBV)Controls Input Level Control Qty 4, Removable Knobs with Security Covers Output Level Control Qty 1, Removable Knob with Security Cover Dip Switch Function • Phantom Power 24VDC, Qty 4 • Input Mic/Line Select, Qty 4• Input 125Hz/12dB High Pass Filter, Qty 4Indicators Output Signal Green, 25mV On Threshold Output Peak Red, -3dB Before Clip PowerBlue Electrical Frequency Response 20Hz - 20kHz (±1dB) THD .06% & 1kHz Signal to Noise Line to Line: 85dBV Mic to Line: 78dBVPower Requirements Voltage 24VDC Power Consumption 60mA Power Consumption 1.4WDimensionsH 1.5" (39mm) x W 4" (101mm) x D 2.75" (70mm)Weight6oz, .165kg Included Accessories Velcro™ Industrial-Grade Multi-Mount Plate Qty 1, Includes Two (2) M3 x 4mm Screws Cable Retainers Qty 2 Level Control Knobs Qty 5 Level Control Security CoversQty 5Optional Accessories TSD 24VDC Power Supply TSD-RMK 1 RU 19" Width Rack Mount Panel (Supports 4 TSD Units) TSD-RMKHR 1 RU Half Rack Width Panel (Supports 2 TSD Units) TSD-RRMKRear Rack Mounting Kit Safety and Certifications External Power Supply cUL, CE, RoHS, TUVTSD-MIX41 4x1 Mic/Line Mixer 1601 Jack McKay Blvd. • Ennis, Texas 75119 U.S.A.Telephone: 800.876.3333 • Fax: 800.765.3435Limited WarrantyAll products manufactured by AtlasIED are warranted to the original dealer/installer, industrial or commercial purchaser to be free from defects in material and workmanship and to be in compliance with our published specifications, if any. This warranty shall extend from the date of purchase for a period of three years on all AtlasIED products, including SOUNDOLIER brand, and ATLAS SOUND brand products except as follows: one year on electronics and control systems; one year on replacement parts; and one year on Musician Series stands and related accessories. Additionally, fuses and lamps carry no warranty. AtlasIED will solely at its discretion, replace at no charge or repair free of charge defective parts or products when the product has been applied and used in accordance with our published operation and installation instructions. We will not be responsible for defects caused by improper storage, misuse (including failure to provide reasonable and necessary maintenance), accident, abnormal atmospheres, water immersion, lightning discharge, or malfunctions when products have been modified or operated in excess of rated power, altered, serviced or installed in other than a workman like manner. The original sales invoice should be retained as evidence of purchase under the terms of this warranty. All warranty returns must comply with our returns policy set forth below. When products returned to AtlasIED do not qualify for repair or replacement under our warranty, repairs may be performed at prevailing costs for material and labor unless there is included with the returned product(s) a written request for an estimate of repair costs before any nonwarranty work is performed. In the event of replacement or upon completion of repairs, return shipment will be made with the transportation charges collect.EXCEPT TO THE EXTENT THAT APPLICABLE LAW PREVENTS THE LIMITATION OF CONSEQUENTIAL DAMAGES FOR PERSONAL INJURY, ATLASIED SHALL NOT BE LIABLE IN TORT OR CONTRACT FOR ANY DIRECT, CONSEQUENTIAL OR INCIDENTAL LOSS OR DAMAGE ARISING OUT OF THE INSTALLATION, USE OR INABILITY TO USE THE PRODUCTS. THE ABOVE WARRANTY IS IN LIEU OF ALL OTHER WARRANTIES INCLUDING BUT NOT LIMITED TO WARRANTIES OF MERCHANTABILITY AND FITNESS FOR A PARTICULAR PURPOSE.AtlasIED does not assume, or does it authorize any other person to assume or extend on its behalf, any other warranty, obligation, or liability. This warranty gives you specific legal rights and you may have other rights which vary from state to state.ServiceShould your Atlas TSD require service, please contact the AtlasIED warranty department at 1-877-689-8055, ext. 277 to obtain an RA number.AtlasIED Tech Support can be reached at 1-800-876-3333 or .Visit our website at to see other Atlas products.©2017 Atlas Sound L.P . The Atlas “Circle A”, Soundolier, and Atlas Sound are trademarks of Atlas Sound L.P . IED is a registered trademark of Innovative Electronic Designs LLC. All Rights Reserved. All other trademarks are the property of their respective owners. All specs are subject to change without notice. ATS003942 RevC 4/17。
麦克风使用方法
麦克风使用方法麦克风是一种常见的音频设备,广泛应用于演讲、演唱、录音和视频会议等场合。
正确地使用麦克风可以有效地传递声音,提高声音的清晰度和质量。
下面将介绍一些常见的麦克风使用方法,希望能对您有所帮助。
首先,正确的麦克风位置非常重要。
在使用麦克风时,应将其放置在离口腔适当距离的位置,通常建议距离嘴巴约10至15厘米的位置。
这样可以有效地捕捉声音,同时避免呼吸声和啸叫声的干扰,确保声音的清晰度和质量。
其次,要注意麦克风的指向性。
不同类型的麦克风具有不同的指向性特点,有的是全向麦克风,有的是单向或双向麦克风。
在使用时,应根据麦克风的指向性特点来调整其指向角度,确保其能够有效地捕捉声音,并减少周围环境的干扰。
另外,麦克风的灵敏度也是需要注意的。
在使用麦克风时,应根据实际情况来调整麦克风的灵敏度,避免出现声音过大或过小的问题。
通常来说,可以通过音频设备或混音器来调整麦克风的灵敏度,确保声音的合适大小。
此外,麦克风的连接也是需要注意的。
在连接麦克风时,应确保其与音频设备或混音器连接良好,避免出现松动或接触不良的情况。
同时,还应注意避免麦克风与其他电源或信号线路相互干扰,以确保声音的清晰度和稳定性。
最后,使用麦克风时,也要注意避免出现啸叫和杂音的情况。
在使用过程中,应避免将麦克风放置在扬声器附近,以免出现反馈啸叫。
同时,还应注意避免在强电磁场或其他干扰源附近使用,以确保声音的清晰度和稳定性。
总之,正确地使用麦克风可以有效地提高声音的传递效果和质量。
希望通过上述介绍,您能够更加准确地使用麦克风,提高声音的清晰度和质量,使其在各种场合发挥更好的效果。
铁三角自动混音器(自动调音台)
AT-MX351 SmartMixer Automatic Mixer Istallation and Operation四通道会议智能混音器安装和操作手册安全须知(Safety Cautions)在使用本设备之前,让我们重温一下所有的安全标记和说明。
为防止触电事故,不要将机壳打开。
机器里面没有可维修的部件。
仅应由合格的专业人员执行设备内部调整。
若有维修事宜,请向专业人员咨询。
警告:这款设备必须接地这款产品是1类安全产品。
从总电源到设备交流输入之间,必须有一条不可断开的安全地线。
当保护接地受到损伤时,立即断开电源,直到地线恢复为止。
警告:为防止火灾或猛烈撞击,请不要将设备暴露在雨中或潮湿环境中。
警告:为保护免受火灾危害,请用相同类型/等级的熔断丝替换。
警告:机器里有锋利的金属边沿,为防止受伤害,请不要打开机器盖子。
注意:线路电平选择开关你会在底面板上找到线路电平选择开关。
出厂时开关设置在预制位置。
尽管如此,在接上墙上的电源之前,还要检查一下它的位置。
如果提供的电压不同,按如下步骤调整选择开关,当然,调整之前,请先断开电源。
1.准备一个合适型号的螺丝刀。
2.选择开关调整到你所在区域的市电电压的位置。
导言请注意!本手册采用的电平系指:话筒输入电平和线路输出电平,适合大多数典型的智能混音器的应用。
但是,所有的输入和输出能够在设备内部单独切换,以达到话筒和线路-电平输入/输出的任意组合。
详见p10 .什麽是智能混音器?AT-MX-351智能混音器是一种微处理器控制的、自动切换的5通道混音器。
四个话筒输入全部采用XLRF-型平衡式连接器,在其2脚和3脚提供电容话筒所需的48V 幻想电源。
辅助(AUX)输入是一个RCA插口,接受诸如来自盒式磁带座和录像机等音源的辅助电平输入信号,不存在辅助输入信号的处理。
混音器的输出采用XLRM-型平衡非反相式连接器。
所有AT-MX351和 AT-MX341智能混音器能够经由AT8325/1.0连接电缆串联链接使用,只要简单地通过混音器后面板上专用连接器进行连接即可完成。
麦克风混音器是什么
麦克风混音器是什么麦克风混音器是什么在一些聊天唱歌的软件上,有时候可以听见主播们唱歌的声音异常好听,这其实是巧妙地使用了麦克风混音器产生出来的效果。
那么麦克风混音器怎么调呢?接下来就让我们一起来了解下吧。
麦克风混音器是什么 1什么是麦克风混音器麦克风混音器不但适合于家庭唱歌用,还可以用于舞台表演,会议室多人会议,可以多机串联使用。
如需要多支话筒同时使用,也可以选配本店的多功能混音器(12路输入,一路输出)。
强大的四合一电路设计:可以实现同时输入四组音频信号,而且各组电路互不干扰,不串音。
每路信号输入都有独立的音量调节器,其内部电路采用世界公认的音响运放IC:NE5532或JRC4558运算放大器,确保音色清晰、动听。
可以是电脑音频输出的信号(有防静电设计电路);有线麦克风信号;无线麦克风信号;CD/VCD/DVD的音频信号;收音机耳机输出的音频信号;MP3/MP4音频信号等,适用于家庭,歌舞厅,录音室。
麦克风混音器的优点1、先在选项里填写你喜欢的记录名称,比如慢歌,这时候你设置混响度的时候就可以设置大一点,如果是快歌的话那么设置混响度的时候就应该小一点。
2、增益标准的输入在913之间,根据你机器和麦的效果进行自由调节。
为了能够感受自己唱歌时候混响声音的效果,你需要把输出增益设置成和输入增益一样的数值。
3、反馈和变调都设置成零混响音量,根据个人机器和个人爱好进行调节。
最后别忘记点一下软件界面正上方打开设置左侧那个像个小软盘摸样的按扭,记录一下你的设置,这样下次用的时候就不用重新设置了。
4、点一下开始按钮麦克风混响器就可以开始工作了,这里值得注意的是在语音聊天里,如果你使用这个软件之后可能有人会说你的声音很美,你最好声明自己使用了混响效果软件,不然会被人家误会的。
麦克风有哪些种类内置型内置麦克风是指设置在数码摄像机内的麦克风,用作拍摄录音之用。
作为视频和音频的记录装置,数码摄像机的麦克风当然不能马虎。
录音系统的连接与使用
录音系统的连接与使用
一、连接录音系统
1.麦克风连接:将麦克风插入混音器的话筒插孔,或直接插入音频接
口的麦克风插孔。
注意确保插头与插孔之间的接触良好,并检查是否有杂音。
2.混音器连接:将混音器的主输出插入音频接口或录音机的输入插孔。
如果需要混音,可以将其他音频源(如电吉他、电子鼓等)插入混音器的
通道插孔。
4.耳机连接:将耳机插入混音器的耳机插孔或音频接口的耳机插孔,
以便进行实时监听和调节。
二、使用录音系统
1. 软件设置:打开音频软件(如Adobe Audition、GarageBand等),选择音频接口作为录音设备。
在软件中设置音频输入和输出,调整输入音
量和麦克风增益,以及选择录音格式和保存路径。
2.麦克风测试:点击软件中的录音按钮,用以测试麦克风的灵敏度和
录音效果。
注意不要让麦克风太靠近声源,以免产生失真或噪音。
3.调整混音器:如果需要混音,可以调整混音器的各个通道的音量、
增益、音色等参数。
通过耳机进行实时监听,以保证音频效果符合要求。
6.回放和处理:通过软件的播放功能可以回放录制的音频,并进行后
期处理,如去噪、均衡、压缩等。
根据需要可以对音频进行多轨录制、混响、延迟等处理,以实现更加丰富和专业的音效效果。
- 1、下载文档前请自行甄别文档内容的完整性,平台不提供额外的编辑、内容补充、找答案等附加服务。
- 2、"仅部分预览"的文档,不可在线预览部分如存在完整性等问题,可反馈申请退款(可完整预览的文档不适用该条件!)。
- 3、如文档侵犯您的权益,请联系客服反馈,我们会尽快为您处理(人工客服工作时间:9:00-18:30)。
麦克风混音器使用方法
经常进入聊天室的朋友都知道有一些聊友在唱歌的时候混音效果出奇的好听今天我就拿出一个不错的混音效果器与大家共同分享
这个软件应该是国人网友自己编制的无从考证我也是偶尔发现。
其软件小巧精悍只有3个文件虽然说设计实时Mic混响功能并不是什么复杂的工作但是之前却没有人能或许是愿意做这个软件。
软件资源占用小但功能很丰富里面可以选择不同的混响方式实用性非常强而且操作也非常的简单
首先点击软件的开始这样我们对着mic说话就可以听到自己说话的声音。
需要注意的是所有的录音声卡都要选择录音混和的功能每个卡的
控制台在这个叫法上各不相同有的是mixer有的是叫混合我用的是很普通的话筒在电脑上显示是STEREO MIX。
解压之后把麦克风混响效果器这个文件夹和里面的文件拷到C:/Program files目录内打开找到echoXP按右健创建快捷方式把它拷到桌面上即可。
设置方法是:
1.先在选择里填写你喜欢的记录名称比如慢歌那么你设置混响度的时候就可以设置大一点快歌则设置混响度小一点
2.输入增益标准在----9~13之间根据你机器和麦的效果自由调节。
为了能自己听见自己唱歌时候混响声音效果你需要把输出增益设置成和输入增益一样
3.反馈和变调都设置成零混响音量根据个人机器和个人爱好调节。
4.最后别忘记点一下软件界面正上方“打开设置”左侧那个像个小软盘摸样的按扭记录一下你的设置这样下次用的时候就不用再调整一次了
5. 点一下“开始”按钮这个软件就可以开始工作了
最后提醒各位在语音聊天到里使用这个软件之后可能有人说你的声音很美你得声明自己使用了混响效果软件如果欺骗网友造成了感情纠纷之类的事儿本软件的作者和推荐使用者不负任何责任
包房必备---麦克风混响效果器
经常进入聊天室的朋友都知道有一些聊友在唱歌的时候混音效果出奇的好听今天我就拿出一个不错的混音效果器与大家共同分享
大家在唱歌和娱乐时常要使用效果器才能达到一定专业水平我们平常在家和KTV唱歌功放机就带了效果功能所以唱歌很动听。
而我们的电脑麦是很简单的是不带效果的要保证达到专业效果怎么办现在使用的混响效果器就能达到好效果了。
--------------------------------------------------------------------------------------------------
现在给大家介绍一下基本操作吧。
1、软件解压缩后点击exhoxp.exe运行程序。
2、双击托盘的小喇叭在音量控制界面属性录音控制界面选择立体声混响功能每个声卡的控制台在这个叫法不相同有的是mixer有的是叫混合有的是STEREO MIX有的是叫立体声混响
3、在选择中选“Very Big Hall”模式即大厅模式。
4、将输入增益设置成62 输出增益设置成100 反馈设置成15 变调设置成0
5、将右边上面的“音量”调节到1/4 或1/5左右。
切记不要过大。
6、选中“总在最前”然后点“开始”。
现在可以了。
7、从点歌台点播一首歌曲唱歌吧。
效果如何啊一定还要结合伴奏音乐和麦声音大小调节哦
还给大家介绍一种效果吧。
试试如何
1、在选择中选“Double Echo”模式即双混响模式。
2、将输入增益设置成80 输出增益设置成100 反馈设置成30 变调设置成0
3、其他操作同上。
大家也可根据自身设备和个人喜好来制定一个自己的参数以下是一些小窍门。
1、先在选择里填写你要预设的混响参数方式名称比如慢歌一你设置混响度时就设置大一点如果是快歌就设置混响度小一点
2、输入增益参数设置在9~13之间根据你机器和麦的效果可以自由调节为了能自己听见自己唱歌时候混响声音效果你需要把输出增益设置成和输入增益一样
3、反馈参数设置在-11根据个人爱好调节变调设置成零录音控制混响音量根据个人机器和个人爱好调节。
4、最后别忘记点一下打开设置左边的小磁盘按扭保存你的设置这样下次用的时候就不用再调整一次了。
