SimpleWiFi串口WiFi模块一键配置功能说明
WIFI模块使用说明(plug)v1.2

Registered 6、 WIFI 的使用介绍: n Step 1 :
U在有 wifi 的情况下(可以连接外网的 WIFI 网络),登录 app 软件。
7
GPIO12
14
GND
eg 3、 PLUG 具体的连接介绍:
R PIN 1:接 Vcc3.3
PIN 2:接 GND
n PIN 3:接外置天线端子 U PIN 4:接 10K 上拉电阻到 VCC
PIN 5:NC
PIN 6:接 PLUG 的继电器控制端口
PIN 7:LINK 指示灯
PIN 8:接 PLUG 的外部按键。
上海华享半导体有限公司
UnRegistered
Step 7 :
在配置成功后,用户可以跳转到以下界面,用户会看到在线设备: 第-5-页共7页
上海华享半导体有限公司
tered Step 8 : UnRegis 点击在线的设备后,进入在线设备对应的界面,用户即可对设备进行控制操作。
第-6-页共7页
上海华享半导体有限公司
上海华享半导体有限公司
ESP_WIFI 的 PLUG 使用说明
1、 WIFI 模块的管脚图:
tered 2、WIFI 模块管脚功能表
PIN
1
2
is 功能
VCC GND
PIN
8
9
功能
GPIO13 GPIO15
3
ANT
10
GPIO2
4
CH_PD
串口WiFi模块使用说明
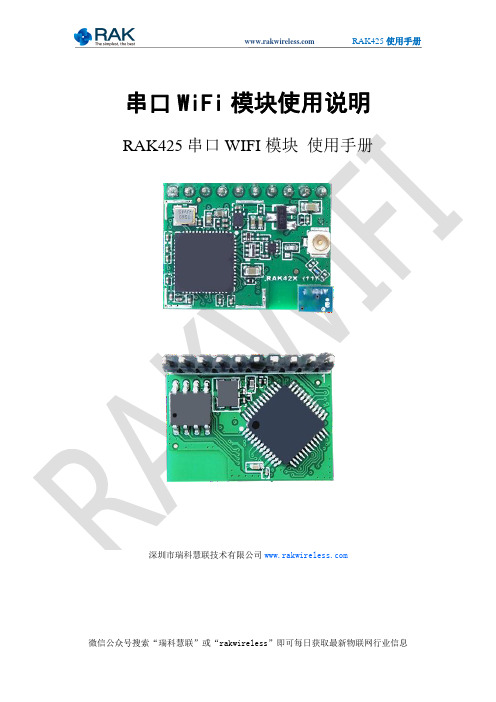
RAK425使用手册串口WiFi模块使用说明RAK425串口WIFI模块使用手册深圳市瑞科慧联技术有限公司目录RAK425串口WIFI模块 (1)使用手册V1.4 (1)1快速使用......................................................................................................... - 2 -STEP1:上电前检查................................................................................... - 3 -STEP2:上电后状态................................................................................... - 3 -STEP3:透传数据测试 ............................................................................... - 6 -2 功能特性 ....................................................................................................... - 8 -2.1 概述 ................................................................................................... - 8 -2.2 应用领域 ............................................................................................ - 8 -2.3 产品特性 ............................................................................................ - 8 -2.4 详细功能 ............................................................................................ - 9 -2.4.1 硬件接口................................................................................. - 9 -2.4.2 无线驱动................................................................................. - 9 -2.4.3 TCP/IP .................................................................................... - 9 -2.4.4 功耗 ...................................................................................... - 10 -3 硬件描述 ..................................................................................................... - 11 -3.1 模块类型 ........................................................................................... - 11 -3.2 模块高度 ........................................................................................... - 12 -3.3 参考设计 ........................................................................................... - 12 -3.4 管脚定义 .......................................................................................... - 13 -4 使用大全 ..................................................................................................... - 15 -4.1 基本流程图 ...................................................................................... - 15 -4.2 多种配置方式................................................................................... - 15 -4.3 WEB配置........................................................................................... - 16 -模式选择页面................................................................................... - 17 -AP接入点设置.................................................................................. - 17 -STA节点参数设置 ............................................................................ - 18 -IO通信参数设置 .............................................................................. - 19 -网络参数设置................................................................................... - 20 -高级管理 .......................................................................................... - 20 -固件升级 .......................................................................................... - 21 -4.4 无线配置工具................................................................................... - 22 -4.5 串口配置工具................................................................................... - 23 -4.6 双Socket应用实例 ......................................................................... - 24 -4.7 EasyConfig功能演示 ...................................................................... - 29 -5 辅助AT命令 .............................................................................................. - 31 -5.1 命令格式 .......................................................................................... - 32 -5.2 开启辅助命令................................................................................... - 32 -5.3 模块管理指令................................................................................... - 33 -5.3.1 打开ASCII显示.................................................................... - 33 -5.3.2 查询模块MAC地址 ................................................................ - 33 -5.3.3 进入透传模式 ....................................................................... - 33 -5.3.4 查询软件版本 ....................................................................... - 33 -5.3.5 复位重启模块 ....................................................................... - 34 -5.3.6 恢复出厂设置 ....................................................................... - 34 -5.4 参数配置指令................................................................................... - 34 -5.4.1 写入用户配置 ....................................................................... - 34 -5.4.2 读取用户配置 ....................................................................... - 34 -5.4.3 读取出厂配置 ....................................................................... - 35 -5.4.4 修改出厂配置 ....................................................................... - 35 -5.4.5 复制用户参数 ....................................................................... - 35 -5.5 AP SAT操作指令.............................................................................. - 36 -5.5.1 查询AP连接状态.................................................................. - 36 -5.5.2 查询STA 无线信号强度........................................................ - 36 -5.5.3 扫描无线网络 ....................................................................... - 36 -5.5.4 获取无线网络 ....................................................................... - 36 -5.5.5 一键入网命令 ....................................................................... - 37 -5.5.6 WPS配置命令 ........................................................................ - 37 -5.5.7 查询IP状态 ......................................................................... - 37 -5.5.8 pin命令................................................................................ - 38 -5.5.9 查询TCP连接状态 ................................................................ - 38 -5.5.10 AP高级设置 ........................................................................ - 39 -5.6 收发数据指令................................................................................... - 39 -5.6.1 发送数据............................................................................... - 39 -5.6.2 接收数据............................................................................... - 40 -5.7 附录 ................................................................................................. - 40 -7 版本 ............................................................................................................ - 43 -版本历程及修改内容 ............................................................................... - 43 -1快速使用感谢您选用RAK425串口透传模块,该透传模块使用极其简单方便,且功能丰富,能满足各类客户的需求。
无线WIFI模块安装说明书
Input WIFI module IP address, user name and password Main interface
IV: Software Using
After finish above settings, inverter inside WIFI module will connect to WIFI router automatically. Now user can install solar monitoring software on PC or cell phone. Software can be downloaded at: . 4.1 PC Software User Manual
signal itself as well. User can connect to this module to configure parameter after login inside website through phone or laptop. z AP+STA mode is recommended.
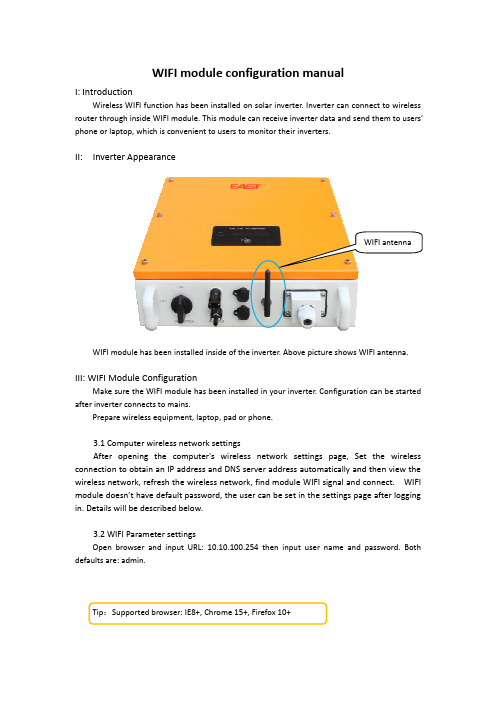
II: Inverter Appearance
WIFI antenna
WIFI module has been installed inside of the inverter. Above picture shows WIFI antenna.
无线调试神器:无线WiFi串口透传模块使用

无线调试神器:无线WiFi串口透传模块使用模块介绍模块名称:DT-06 无线模块功能:模块实现了模块串口与WiFi数据的实时透传模块实物图片模块特点TTL-WiFi 模块基于 ESP-M2 WiFi 模块研发,引出串口 TTL、EN、STATE 等引脚。
产品内置串口透传固件可完成设备TTL 端口到WiFi/云的数据实时透传,具备低功耗控制,状态指示等功能。
模块可直接取代原有的有线串口,实现嵌入式设备数据采集和控制。
•内置工业级透传固件V3.0,可靠稳定,WEB界面配置;•基于ESP-M2高性能WiFi模块,整体尺寸:34mm×17mm×4mm;•供电电压:4.5V~6.0V,TTL 电压:3.3V(可兼容5.0V);•引出管脚:STATE,TXD、RXD、EN;•平均电流:80mA;WiFi数据发送时170mA;深度睡眠模式下20μA;•支持串口AT指令;•支持可再编程,OTA固件升级;•串口与WiFi数据实时无缝透传;•内置HTTP Web Server,支持网页配置各项参数;•WiFi支持AP、STA、AP+STA三种模式;•支持WiFi STA模式下自动重连,TCP Client模式下自动重连;•串口支持设置波特率、数据位、奇偶校验、停止位、分包时间;•支持波特率(bps):300/600/1200/2400/4800/9600/19200/38400/57600/74800/115 200/•230400/460800/921600/1843200/3686400;•支持AP使能、自定义SSID/密码、自定义IP和网段等;•自动扫描周边热点,支持STA使能、DHCP、自定义IP和网段等•支持TCP Server、TCP Client、UDP Server、UDP Client和UDP局域网广播;•远程服务器地址支持DNS域名自动解析;•支持通过AT指令查看状态;•引出IO4表征WiFi状态。
无线模块使用方法
无线模块使用方法
无线模块可以用于无线通信、传输数据等方面,具体使用方法如下:
1. 准备好所需的无线模块和相关配件(如电源、天线等)。
2. 将无线模块连接到电源,确保电源与模块匹配。
3. 安装天线,确保天线与无线模块匹配。
4. 配置无线模块,包括设置无线频率、无线通信协议等。
5. 把需要传输的数据通过串口、SPI等方式发送到无线模块。
6. 接收端收到数据后进行相应的处理,可以通过串口、SPI等方式接收数据。
使用无线模块时需要注意以下事项:
1. 使用无线模块时应严格遵守无线电管理条例,遵循频率规定,避免干扰其他无线设备。
2. 安全使用无线模块,避免电源过大、天线位置不当等导致的安全事故。
3. 根据不同的应用场景,选择不同的无线模块,保证通信距离、稳定性等关键指标的满足。
AT指令说明

1.1.1.4 错误代码
值 -1 -2 -3 -4 -5 -6 -7 -10 -11 -12 -13 -100
表 6-1 错误代码 含义
无效的命令格式 命令不支持 无效的操作符 无效的参数 操作不允许 内存不足 FLASH 错误 加入网络失败 无可用 socket 无效的 socket Socket 连接失败 未定义错误
格式说明 <>:表示必须包含的部分 []:表示可选的部分
命令消息 AT+<CMD>[op][para1],[para2], [para3] ,[para4]…<CR> AT+:命令消息前缀 CMD:指令字符串 [op]:指令操作符,当命令需要带参数时,可以指定参数的操作类型,包括, =,参数/返回值前导符 =!,在设置参数类命令中,表示将修改同步至 flash =?,在设置参数类命令中,查询当前设置 <CR>:回车,ascii 字符 0x0d
1.2.2.6 AT+SKSND 功能:
通过指定的 socket 发送数据,完成后返回。此命令使用二进制格式发送数 据,用户应在接收到模块的响应消息(+OK)之后再开始发送原始数据。模块接 收完指定长度的数据后自动结束数据传输阶段,并将数据发送到网络上,多余的 数据将被丢弃。否则,模块在等待超时(1s)后,强制结束数据传输阶段并将已 经接收到的数据发送到网络上。 格式:
AT+LKSTT<CR>
+OK[=status,ip,netmask,gateway,dns]<CR><LF><CR><LF>
参数:
status: 连接状态
表 6-5 连接状态
手把手教你通过串口调试模块连接wifi

手把手教你通过串口调试模块连接wifi首先你要下载两个软件:1.sudo apt-get install vim dialog复制代码然后编写一个脚本:1.sudo vim wifi.sh复制代码脚本内容如下:1.#!/bin/sh2.3.# From wlanconfig:4.# $FreeBSD: src/usr.sbin/bsdinstall/scripts/wlanconfig,v 1.3.2.1 $5.6.#7.#Author:*****************8.#9.10.# default wlan11.iface=wlan012.# driver device13.dev=$(sysctl -n net.wlan.0.%parent)14.if ifconfig $dev >/dev/null 2>&1 ; then15.phy_iface=$dev16.else17.phy_iface=ath018.fi19.# use system wpa_supplicant.conf20.wpa_supplicant_conf=/etc/wpa_supplicant.conf21.# network id -1 non exist22.current_id=-123.# use default wpa_supplicant.confe_conf=125.age () {27.cat <<EOFage:29.$0 default30.$0 -l/list use saved configured network, do not scan. So make sure the AP exist.31.$0 stop stop wifi connection32.$0 reconfig re-configure device33.$0 newconf create new /etc/wpa_supplicant.conf34.$0 addif if not set rc.conf wlan configure; means does not exist $iface currently.35.$0 ns 127.0.0.1 set this nameserver36.$0 help/-h/--help37.EOF38.exit 039.}40.41.check_network () {42.local _ssid=$143.local _id=`wpa_cli -i $iface list_networks | awk '$2~/^'"$_ssid"'$/{print $1}' | head -1`44.if [ -z $_id ] ; then45.echo -146.else47.echo $_id48.fi49.}50.51.update_psk () {52.local _ssid=$153.local _psk=$254.if [ ${#_psk} -lt 8 ] ; then55.echo psk length max be 8..6356.exit 157.fi58.local _id=`check_network "$_ssid"`59.local _pass=`wpa_passphrase $_ssid $_psk | sed -n 's/[^#]psk=\(.*\)/\1/p'`60.wpa_cli -i $iface set_network $_id psk $_pass61.}62.63.stop_wifi () {64.ifconfig $iface down delete65.exit 066.}67.68.cfg_dev () {69.ifconfig $iface create wlandev $phy_iface70.ifconfig $iface up71./etc/rc.d/wpa_supplicant start $iface72.}73.74.recfg_dev () {75.ifconfig $iface down delete76.ifconfig $iface destroy77.ifconfig $phy_iface down78.ifconfig $phy_iface up79.ifconfig $iface create wlandev $phy_iface80.ifconfig $iface up81.}82.83.wpa_lookup () {84.# Try to reach wpa_supplicant. If it isn't running and we can modify the85.# existing system, start it. Otherwise, fail.86.# Here use the existing system script /etc/rc.d/wpa_supplicant87.(wpa_cli -i $iface ping >/dev/null 2>/dev/null || /etc/rc.d/wpa_supplicant start $iface) || \88.(dialog --backtitle "FreeBSD Wifi" --title "Error" --msgbox \89."Could not start wpa_supplicant!" 0 0; exit 1) || exit 190.91.# See if we succeeded92.wpa_cli -i $iface ping >/dev/null 2>/dev/null93.if [ $? -ne 0 ] ; then94.dialog --backtitle "FreeBSD Wifi" --title "Error" --msgbox \95."Wireless cannot be configured without making changes to the local system!" \ 0 096.exit 197.fi98.}99.100.final () {101.local nw=$1102.local nid=$2103.wpa_cli -i $iface disconnect104.ifconfig $iface ssid $nw105.wpa_cli -i $iface select_network $nid106.wpa_cli -i $iface enable_network $nid107.wpa_cli -i $iface reconnect108.wpa_cli -i $iface save_config109.dhclient -b $iface110.exit 0111.}112.113.114.case $1 in115.stop)116.stop_wifi ;;117.-l|list)118.wpa_lookup119.wpa_cli -i $iface list120.echo "Please enter the network id:"121.read current_id122.if [ $current_id -lt 0 -o $current_id -ge 64 ] ; then123.# too small or too big try again124.wpa_cli -i $iface list125.echo "Please enter the network id:"126.read current_id127.fiWORK=`wpa_cli -i $iface list | awk '{if($1=='"$current_id"'){print $2}}'`129.final $NETWORK $current_id130.;;131.reconfig)132.recfg_dev ;;133.newconf)e_conf=0 ;;135.addif)136.cfg_dev ;;137.ns)138.if [ ! -z $2 ] ; then139.if ! grep -q $2 /etc/resolv.conf ; then140.echo $2 >> /etc/resolv.conf141.fi142.fi143.;;144.-h|--help|help)age ;;146.esac147.e_wificfg () {149.if [ -f $wpa_supplicant_conf ] ; then150.if [ $use_conf = 1 ] ; then151.# using wificfg152.return 0153.else154.echo "Backup $wpa_supplicant_conf ..."155.mv $wpa_supplicant_conf ${wpa_supplicant_conf}.old 156.return 1157.fi158.else159.# can use wificfg160.return 1161.fi162.}163.164.if use_wificfg ; then165.echo "Using $wpa_supplicant_conf ."166.else167.echo -n > $wpa_supplicant_conf168.chmod 0600 $wpa_supplicant_conf169.echo "ctrl_interface=/var/run/wpa_supplicant" >> $wpa_supplicant_conf170.echo "eapol_version=2" >> $wpa_supplicant_conf171.echo "fast_reauth=1" >> $wpa_supplicant_conf172.echo "update_config=1" >> $wpa_supplicant_conf173.echo >> $wpa_supplicant_conf174.fi175.176.## progress ...177.178.wpa_lookup179.wpa_cli -i $iface ap_scan 1180.wpa_cli -i $iface scan181.dialog --backtitle "FreeBSD Wifi" --title "Scanning" --ok-label "Skip" \182.--pause "Waiting 5 seconds to scan for wireless networks..." \183.9 40 5 || exit 1184.185.SCAN_RESULTS=`wpa_cli -i $iface scan_results`WORKS=`echo "$SCAN_RESULTS" | awk -F '\t' \187.'/..:..:..:..:..:../ {if (length($5) > 0) printf("\"%s\"\t%s\n", $5, $4);}' |188.sort | uniq`189.190.if [ -z "$NETWORKS" ] ; then191.dialog --backtitle "FreeBSD Wifi" --title "Error" \192.--yesno "No wireless networks were found. Rescan?" 0 0 && \193.exec $0 $@194.exit 1195.fi196.197.exec 3>&1WORK=`sh -c "dialog --extra-button --extra-label \"Rescan\" \199.--backtitle \"FreeBSD Wifi\" --title \"Network Selection\" --menu \200.\"Select a wireless network to connect to.\" 0 0 0 \201.$(echo $NETWORKS | tr '\n' ' ')" 2>&1 1>&3`202.case $? in203.0) # OK204.;;205.1) # Cancel206.exit 1207.;;208.3) # Rescan209.exec $0 $@210.;;211.esac212.exec 3>&-214.current_id=`check_network "$NETWORK"`215.if [ $current_id -ge 0 ] ; then216.sh -c "dialog --backtitle \"FreeBSD Wifi\" --title \"Connect to Network\" --yesno \"Connect to configured network: $NETWORK ?\" 0 0"217.if [ $? -eq 0 ] ; then218.final $NETWORK $current_id219.fi220.fi221.222.ENCRYPTION=`echo "$NETWORKS" | awk -F '\t' \223."/^\"$NETWORK\"\t/ {printf(\"%s\n\", \\\$2 );}"`224.225.if echo $ENCRYPTION | grep -q 'PSK' ; then226.exec 3>&1227.PASS=`dialog --insecure --backtitle "FreeBSD Wifi" \228.--title "WPA Setup" --mixedform "" 0 0 0 \229."SSID" 1 0 "$NETWORK" 1 12 0 0 2 \230."Password" 2 0 "" 2 12 15 63 1 \231.2>&1 1>&3` \232.|| exec $0 $@233.exec 3>&-234.if [ $current_id -ge 0 ] ; then235.update_psk "$NETWORK" "$PASS"236.else237.current_id=`wpa_cli -i $iface add_network | tail -1`238.wpa_cli -i $iface set_network $current_id ssid "\"$NETWORK\""239.update_psk "$NETWORK" "$PASS"241.elif echo $ENCRYPTION | grep -q WEP ; then242.exec 3>&1243.WEPKEY=`dialog --insecure --backtitle "FreeBSD Wifi" \244.--title "WEP Setup" --mixedform "" 0 0 0 \245."SSID" 1 0 "$NETWORK" 1 12 0 0 2 \246."WEP Key 0" 2 0 "" 2 12 15 0 1 \247.2>&1 1>&3` \248.|| exec $0 $@249.if [ $current_id -ge 0 ] ; then250.wpa_cli -i $iface set_network $current_id wep_key0 "\"$WEPKEY\""251.else252.current_id=`wpa_cli -i $iface add_network | tail -1`253.wpa_cli -i $iface set_network $current_id ssid "\"$NETWORK\""254.wpa_cli -i $iface set_network $current_id key_mgmt "NONE"255.wpa_cli -i $iface set_network $current_id wep_tx_keyidx 0256.wpa_cli -i $iface set_network $current_id wep_key0 "\"$WEPKEY\""257.fi258.else # Open259.if [ $current_id -ge 0 ] ; then260.echo "Use Open Network $NETWORK"261.else262.current_id=`wpa_cli -i $iface add_network | tail -1`263.wpa_cli -i $iface set_network $current_id ssid"\"$NETWORK\""264.wpa_cli -i $iface set_network $current_id key_mgmt "NONE"265.fi266.fi267.268.final $NETWORK $current_id复制代码最后给它一个执行权限1.sudo chmod +x wifi.sh复制代码执行1../wifi.sh复制代码。
无线路由器WIFI转串口模块设置

无线路由器自带WiFi功能,可实现无线局域网内WiFi无线数据和串口232/485数据转换。
以下为基本操作设置,这里路由器的IP地址(网关)为192.168.2.1。
1、无线路由器不用插SIM卡,但要把路由器的拨号方式更换为“动态获取地址”或“静态地址”(默认设置为“3/4G拨号”,否则设备会默认每隔约5min重启一次),一般选择“动态获取地址”即可,如图1;设置成功后如图2:
图1
图2
2、1)路由器进行无线WiFi功能配置,无线模式选择“无线访问点AP”,接受其他手机或PC等客户端连接,无线“安全选项”及密码根据实际需求设置,这里略去,如图3:
图3
2)路由器进行串口功能设置,这里以“服务器”模式为例,如图4:
图4
3、电脑PC端连接无线路由器的wifi热点,路由器正确连接好网口转串口线和USB转串口线至电脑PC。
此时分别打开串口调试工具和TCP/UDP服务管理软件,进行软件数据双向传输。
如图5,6:
图5:串口助手软件做服务端
图6:TCP/UDP服务软件做客户端配置。