
PhonePass SET
Phonepass Set
考后经验
首先,第一部分读句子,最好带文曲星,发下卷子之后马上查生词,主要是人名,12个句子考八个吧。
第二,repeat. 我个人感觉自己英语还可以,但是感觉难。
句子长而且旁边有好多人一起在喊,所以一定要注意排除干扰,集中200%的精力。
第三,short answers: 大部分还行,选择疑问句还可以,有些是情境中的问题,就像前面mm的例子,比较难;另外,电话里的男音听起来比较不“脆”,而且有杂音,没办法。
第四,make sentences:这部分算简单一点的三个短语,但有些好长,比如:peter’s driving his mother and father worried day and night after his surgen。
第五,long answers:20秒钟,要不停的说,没时间构思,一共念两遍,20秒钟不停的说。
别停,尽管你已经觉得完整了,不要停下了,尽管是废话(但别偏离主题)我的三个问题是:
1 科技发达,meal served within 15m,has it changed your family life?
2 do you preferred work along or in a group?
3 do you think there is problem between disabled children and nomal children in school? why or why not
总之,个人感觉,对于第一次考的人来说,难度还是有的,应该会比大家之前想象的难一些,但是也不要怕的,考完试我想了一下,这个考试主要考你的发音、流利、句型掌握情况、词汇,前两项是我们都应该把握住的,发挥自己最好的水平;后两项要看临场发挥了,尤其是你的运气,话筒不要太杂,周围不要太吵,心情不要太紧张!自己考完了,感觉并不好,希望自己的这些能对大家有用,祝大家的宝洁之路平坦顺利。
补充(2):Phonepass SET标准样题和录音文件下载
到这里下载:Phonepass.rar
补充(3):自己听到的和别人听到的最后三个问题
1、请问你喜欢通过电话与人交流还是通过书信。
2、计算机的使用是给我们的生活带来了更多的方便还是麻烦?
3、孩子吃饭的内容应该由自己决定还是由父母?
4、科技发达,meal served within 15m,has it changed your family life?
5、Do you preferred work along or in a group?
6、Do you think there is problem between disabled children and nomal children i n school? why or why not?
7、Do you prefer to stay in city or small town? Why?
8、What quality you make friends.(??好像不准确)
9、If your family got a large amount of money, how should this money be used?
10、应该让孩子自己选择读什么书,还是让他们的家长选择?
11、夏天既适合孩子又适合老人的运动项目?为什么?
14、如果有客人来访,你会在家里做饭款待还是带客人去餐厅?
15、你喜欢写信还是发邮件与朋友联系?为什么?
16、你喜欢在家里电脑上面看电影还是喜欢到电影院和大家一起看电影?为什么?。
新托福口语测试与PhonePass英语口语能力测试系统之比较

西南民族大学学报 ( 人文社科版 )
2008 年外国语言文学与文化
www xuebao net
231
阅读一篇文章, 然后依据文章 内容进行复述。很 显然, 和原 T SE 考试相比 , 新托福口语考试对考生 的口语能力和临场应变能力要求更高。 PhoneP ass英 语口 语 能力 测 验 系统 , 全名 为 PhoneP ass Spoken Eng lish T es, t 是目前唯一一种可 测试人们英语口语能力的全自动 测试体系, 它可 在五到十分钟时间的电话交谈中测定出参试者的 英语口语实际听说能力。该测试可在任何一台电 话机上一次 性地 完成, 并由电 脑系 统自动 评分。 计分是根据被测试者在测试期间的电话交谈中实 际使用的词汇、 以及 在所运用的句子和短语中体 现出的语速、 流利程度及发音 情况来评估的。该 系统是美国 O rd in ate 公司的专利技术 , 它是建筑 在多年的研究基础之上, 包括语音识别技术、 统计 模型技术、 语言 学和测 试理论 等的 多学科 技术。 独立开展的研究表明 , 这种测试体系比如今最好 的人工评估测试体系 , 包括一对一口语能力的面 试方式 , 在操作上更加客观有 效。全球的多个学 术、 商业和政府组织都在使用。 PhoneP ass SET 测 试方案应用于多种目的 , 包括: 应用 于入学、 招工 与职位安排方面的决策 ; 评估语言课程中的进展 情况; 对求职者或已雇佣人员的外语能力的评估; 用来评估国际助教的英语能力 , 该系统的最大优 势在于仅通过电话和电脑测试系统可分散在全球 各地的一批人员进行测试。 由两者概况的比较我们不难看出 , 前者实际 上是属于一种考试的手段 , 出题者将已设计好的 各类口语题 型通过 完善的互 联网技 术传输 给考 者 , 让考者在计算机 这一辅助工具的帮助下很好 地完成考试任务然后再通过 网络传回给评分员; 而后者实际上类似通常我们 所说的计算机软件, 而该体系涵盖面广 , 可以适用于各类不同层次的 人群的英语口语能力测试要求 , 并且其评分也是 直接由电脑完成 , 而 不是像前者在测试完成后仍 然需要 2 个 以上的测 试官对 考者的 口语进 行测 评。 (二 ) IBT 口语测试部分与 PhoneP ass SET 的 题型结构 IBT 口语考试的目的在于测试那些母语非英 语但想在英语国家或地区尤其是北美地区攻读本 科或研究生 学位的 学生英语 口语表 达的熟 练程 度。与 IBT 的其他部分相同, 口语是 必考部分并 且每道题都在计算机上完成。在该 部分, 考者需 要就基于个人经历、 校园环境和学术性材料提出 的各种话题用英语表达自己的观点。该部分共 6
24K414 Set and Reset Point Pressure Switch说明书
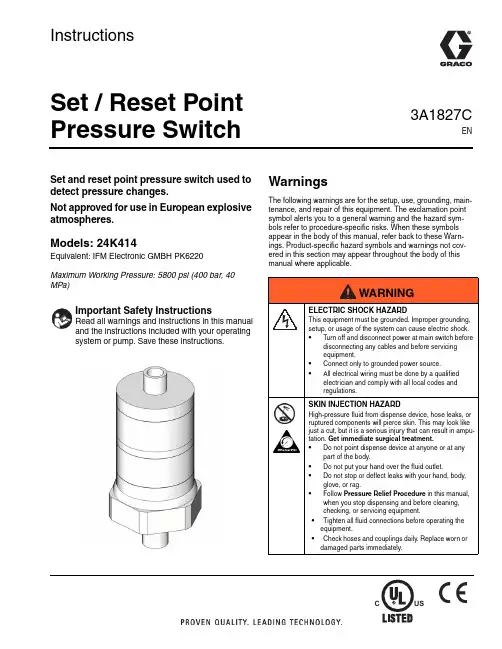
InstructionsSet / Reset Point Pressure SwitchSet and reset point pressure switch used to detect pressure changes.Not approved for use in European explosive atmospheres.Models: 24K414Equivalent: IFM Electronic GMBH PK6220Maximum Working Pressure: 5800 psi (400 bar, 40 MPa)WarningsThe following warnings are for the setup, use, grounding, main-tenance, and repair of this equipment. The exclamation point symbol alerts you to a general warning and the hazard sym-bols refer to procedure-specific risks. When these symbols appear in the body of this manual, refer back to these Warn-ings. Product-specific hazard symbols and warnings not cov-ered in this section may appear throughout the body of thismanual where applicable.system or pump. Save these instructions.3A1827CEN23A1827CPressure Relief ProcedureInstallation1.Disconnect power to pump.2.Disconnect cable from switch.3.If replacing a pressure switch on an existing installa-tion, relieve pressure.4.Locate unit where shock, vibration and ambient tem-perature fluctuations are minimal. Do not mount in ambient temperature areas exceeding 160°F (71°C).•Unit may be mounted in any position. However, if installation location results in frequent expo-sure to liquid it is recommended that the unit be mounted vertically with the pressure connection down.5.Screw switch into manifold. Always use a wrench onpressure connection wrench flats.6.Test unit before use.Adjustments1.Rotate the top portion of switch (with the lock andunlock symbols) to align the unlock symbol with the two white arrows (F IG . 1).2.Adjust set point to the desired pressure setting.2500 psi (172 bar, 17.2 MPa) is the factory default setting.3.Adjust the reset point to the desired pressure set-ting. 500 psi (35 bar, 3.5 MPa) is the factory default setting. 4.Rotate the top portion of the switch to align the locksymbol with the two white arrows (F IG . 2).5.Recheck set point and reset point and install switchaccording to installation instructions.Status LED’sRelieve pressure in the system following the procedure NOTICE•Electrical ratings must not be exceeded. Over-load on a switch can cause switch to fail on the first cycle.•Never exceed pressure limits. Unit can be oper-ated up to maximum pressure on a limited basis (i.e., set-up, testing) but continuous operation must be restricted to the designated adjustable range. Excessive cycling at maximum pressurelimits could reduce sensor life.F IG. 1F IG . 2Steady Green LEDPower is supplied to pressure switch.Y ellow LED turnsoff and onWhen you reach pressure, yellow LEDlights. When pressure drops below resetvalue, yellow LED turns off.Troubleshooting3A1827C 3TroubleshootingProblem CauseSolutionIn an injector installation only, pres-sure switch activates before all injec-tors fire Pressure switch is installed at the wrong locationVerify pressure switch is correctly installed - downstream from a bank of injectorsPressure switch is not set to a highenough reset pointVerify pressure switch is set suffi-ciently high at a level above the firing point of the injectors and within the margin for error.Another pressure switch or pressure gauge on the system reads different than the pressure switch Pressure switch is installed at the wrong locationVerify pressure switch is correctly installed - downstream from a bank of injectorsPressure switch is not set to a highenough reset point Verify pressure switch is set suffi-ciently high at a level above the firing point of the injectors and within the margin for error.After all injectors have reset, thepressure switch does not deactivate The Reset point is set too lowT urn the reset point to a higher set-ting. Then verify the system is func-tioning correctly.The pressure switch seems to be operating backwardsNormally Open and Normally Closed outputs not completing connectionCheck the Normally Open and Nor-mally Closed outputs and make surethe proper connection is made. Adjust connection as needed.Power is supplied to the pressure switch but the switch is no longer sensing pressureGrease soap has accumulated in the sensing orifice. 1.Attempt to lower the pressureswitch set point to verify the switch is not sensing any pres-sure.2.After verifing the pressure switchis not sensing pressure, remove the switch from the port.ing a non-metalic tool, cleanout the sensing orifice. 4.Reinstall the switch in the port.5.Retest.All written and visual data contained in this document reflects the latest product information available at the time of publication.Graco reserves the right to make changes at any time without notice.Original Instructions. This manual contains English. MM 3A1827Graco Headquarters: MinneapolisInternational Offices: Belgium, China, Japan, Korea GRACO INC. P.O. BOX 1441 MINNEAPOLIS, MN 55440-1441Copyright 2011, Graco Inc. is registered to ISO 90011/2012Technical DataDimensionsWiring DiagramGraco InformationTO PLACE AN ORDER, contact your Graco distributor or call to identify the nearest distributor.Phone: 612-623-6928 or Toll Free: 1-800-533-9655, Fax: 612-378-3590Electrical Design DC PNPOutputNormally open /closed complimentaryOperating Voltage9.6 - 32 VDCAmbient T emperature Range -13° to 176°F (-25° to 80°C)Storage Temperature -40° to 212°F (-40° to 100°C)Current Rating 500 mA Voltage Drop<2.0 V Current Consumption <25 mASet Point Range 290 - 5800 psi (20 - 400 bar;2.07 - 40 MPa)Reset Point Range175 - 5685 psi (12 - 392 bar;1.2 - 39 MPa)Switch point accuracy < +2.5% Full range Repeatability < + 0.5% Full rangeTermination T ype 1/4 NPTConnection M12DisplayPower IndicatorLED green Switching Status Indicator LED yellowWetted Parts stainless steel 316L/1.4404Weight 3.2 oz (0.092 kg)Enclosure(Ingression Protection) IP671.18 in. (3 mm)1.06 in. (27 mm)2.77 in. (70.4 mm)1.18 in. (3 mm)。
AudioCodes 440HD IP Phone 使用指南说明书
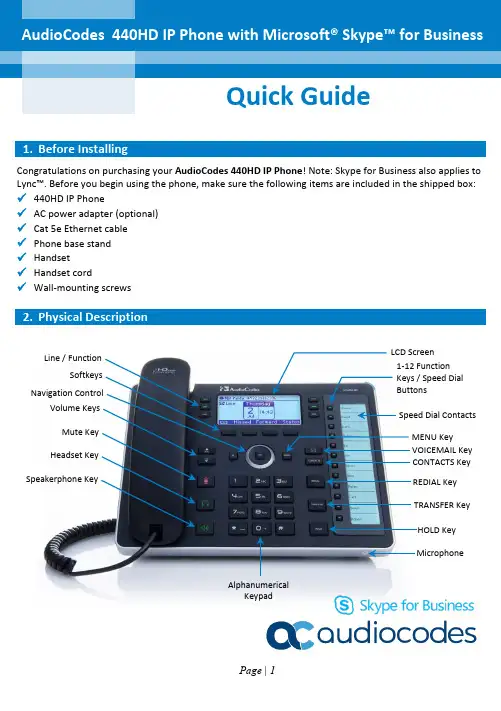
Quick Guide1. Congratulations on purchasing your AudioCodes 440HD IP Phone ! Note: Skype for Business also applies to Lync™. Before you begin using the phone, make sure the following items are included in the shipped box: ✓ 440HD IP Phone✓AC power adapter (optional) ✓Cat 5e Ethernet cable ✓ Phone base stand✓ Handset ✓ Handset cord✓ Wall-mounting screws2.LCD ScreenAlphanumericalKeypad1-12 Function Keys / Speed Dial Buttons3.Warning: Prior to connecting power, refer to the Compliancy and Regulatory Informationdocument at /library.To cable the phone:1.Connect the short, straight end of the phone cord to the handset and the longer straight end of thecord to the handset jack on the phone.2.(Optional) Connect the RJ-9 headset jack to a headset.3.Connect the RJ-45 LAN port to your LAN network (LAN port or LAN switch/router) with a CAT 5 / 5eEthernet cable.4.Connect the RJ-45 PC port to a computer with a CAT 5 / 5e straight-through Ethernet cable.5.Connect the connector tip of the AC power adapter to the phone's DC 12V power socket and connectthe two-prong AC adapter directly to the electrical wall outlet. When the phone powers up, all the LEDs momentarily light up.4.For instructions on assembling the stand, scan meor visit https:///watch?v=oGe9STB9lFE .✓ Desktop mounting: Slide stand's outer rails (A ) onto phone's outer notches (A ). ✓ Wall mounting: Slide stand's middle rails (B ) onto phone's inner notches (B ).AAB B AAB BWall MountDesk MountTo wall mount the phone:ing the mounting plate's two screw holes as a template, mark the locations on the wall whereyou want to mount the phone. The horizontal distance between the screw holes is 5.39 inches(137 mm).2.Drill a hole in the wall at the two marked locations.3.Insert an anchor (not supplied) in each hole for the 3.9mm screws.4.Insert two screws (not supplied) into the two masonary anchors. It's recommended to use tapp3.9 x 32mm (DIN 7981 C) self-tapping pan Phillips-head screws.5.Leave about 3/16 inch or 5 mm between the screw head and the wall.6.On the rear of the phone, detach the base used for desktop mounting.7.Hang the plate on the screws.8.Attach the phone to the plate.Note: Wall mounting is not supported when the Expansion Module is attached to the IP Phone.5. ☞ To sign in with the Skype for Business client: Refer to the 440HD IP Phone User's Manual .☞ To sign in with your phone number and PIN:1. Press the Sign in softkey (when the LCD is in idle mode).2. Enter your phone number and PIN (default sign-in method), andpress Sign in .☞ To sign in with your username and password:1. Press the Sign in softkey (when the LCD is in idle mode) and scroll down toselect Switch sign-in method .2. Enter your sign-in address (SIP address). Press the phone's 1 key to enter a period/fullstop. To enter@or-,****************************************Clear to edit. Press the control to scroll across. 3. Scroll down and enter your domain\username, e.g., company\mike. Repeat-press the phone's # keyto select abc, ABC, Abc, or 123. Repeat-press the phone's 1 key until \.4. Scroll down and enter your user password (get your Windows credentials from IT), and press Sign in . ☞ To sign out: Press the Status softkey when the LCD is in idle mode, and then press Sign out .☞To set Skype for Business server to automatically update your presence:Press the Status softkey (idle screen mode), and then select Reset.7.Basic Phone Operation☞To make a call: Pick up the handset, enter a phone number and then press the Dial softkey. To call a phone contact, press the softkey, select the directory contact and then press the Dial softkey.☞To redial a number: Press the REDIAL key, select a dialed number, and then press the Dial softkey.☞To answer a call: Pick up the handset, or press the speaker or headset key.☞To place a call on hold and make another call: Press the softkey, select New Call, enter a phone number and then press the Dial softkey. To return to the held call, press the down key and then the Resume softkey.☞To mute yourself: Press the mute key. To unmute yourself, press the mute key again.☞To transfer a call: During a call, press the TRANSFER key on the phone, enter the phone number to which to transfer the call, and then press the Dial softkey.☞To forward incoming calls to another phone:1.When the phone LCD is in idle mode, press the Forward softkey, scroll down and select Forward to aNumber.2.Enter the number to which you want to forward the calls, and then press the Start softkey. Todeactivate call forwarding, press the Forward softkey and then select Do not forward calls.☞To define a Speed Dial: Long-press any of the 1-12 Function Keys until the Function Key #n screen opens, enter the phone # for which to define a speed dial, and then press the Save softkey.Information contained in this document is believed to be accurate and reliable at the time of printing. However, due to ongoing product improvements and revisions, AudioCodes cannot guarantee accuracy of printed material after the Date Published nor can it accept responsibility for errors or omissions. Updates to this document can be downloaded from https:///library/technical-documents.This document is subject to change without notice.Date Published: September-30-2020Document #: LTRT-11990。
初_中级对外汉语教学口语测试方法新探_尹平平
在对外汉语教学中,听力、阅读和写作的教学与考核根据HSK(汉语水平考试)的要求,已经形成一个系统,直接和HSK挂钩。
但众所周知,语言的学习要求“听、说、读、写”四项基本技能齐头并进,对外汉语口语的教学和测试相对来说是个薄弱环节,尤其是测试。
如何使口语测试能科学公正地测试学生的口语交际能力,是汉语教学发展的需要,是汉语教师职业能力发展的需要,所以,很有必要加大力度研究。
1口语测试现状1.1游离于初、中级HSK之外,相对不受重视我国的HSK汉语口语水平的单项考试与听力、阅读和语法的水平单项考试相比起步更晚,目前还仅仅局限在高等考试,面向初、中等的考试尚未进行。
在教学中,口语测试是一个薄弱环节,虽然一般高校都很重视交际能力,开设了口语课,而且有一定的学时数。
但是HSK有初、中级和高级两个级别的考试,高级考口语,初、中级不考口语。
这就使一般高校的对外汉语教学在口语课的设置上可有可无,并不重视。
有的学校不安排口语课,有的教师甚至提出取消口语考试。
即便是以“汉语会话”或“汉语口语”为课程名称的测试,口试所占的比重甚小,甚至全无。
1.2考核方式不确定,缺少统一标准虽然有些学校对留学生预科的口语教学已经很重视,但对口语测试重视不够,预科口语测试还没有规范化,它的随意性和随机性很大。
学生和教师都不是很重视。
考核方式和考试标准各式各样。
有的采取师生对话的方式,有的采取复述故事的方式,有的看图说话,有的抽签决定话题,大多是口语教材中的一些训练科目。
从形式上讲,难以做到一人一题,即便做到了一人一题,在客观难易程度上也会有失公平。
而且从我国近年来的科教研和实践看,学生的口语测试(不论是入学分班还是结业考试时的口试)没有一个统一标准。
主考人问什么问题,为什么问,怎么问,以及如何判定受试人口语能力等级,完全凭主考教师经验和感觉来决定,随意性很强。
这样,考试的信度、效度以及区分度都是难以令人满意的。
1.3缺少可参考的文件,研究水平偏低对汉语口语成绩测试问题,虽然已经进行研究,但也还有不少迫切需要解决的理论问题和实际问题。
AudioCodes 450HD IP Phone 使用指南说明书
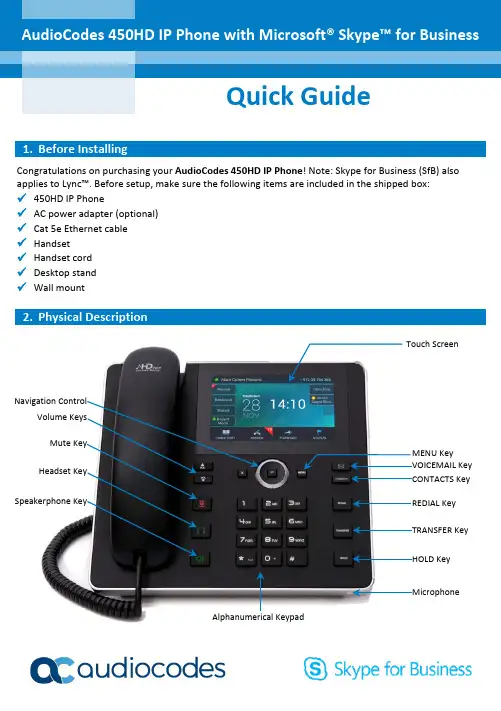
Quick Guide1. Congratulations on purchasing your AudioCodes 450HD IP Phone ! Note: Skype for Business (SfB) also applies to Lync™. Before setup, make sure the following items are included in the shipped box:✓ 450HD IP Phone✓AC power adapter (optional) ✓ Cat 5e Ethernet cable ✓ Handset✓ Handset cord✓ Desktop stand✓ Wall mount2.Alphanumerical Keypad Headset Key Navigation ControlMute KeyVolume KeysSpeakerphone KeyTouch Screen3.Warning: Prior to connecting power, refer to the Compliancy and Regulatory Informationdocument at https:///library/technical-documents.To cable the phone:1.[Refer to the illustration below] Connect the short, straight end of the phone cord to the handsetand the longer straight end of the cord to the handset jack on the phone.2.(Optional) Connect a headset to the RJ-9 headset port, or to one of the two USB ports.3.Connect the RJ-45 LAN port to your LAN network (LAN port or LAN switch/router) with a CAT 5 / 5eEthernet cable.4.Connect the RJ-45 PC port to a computer with a CAT 5 / 5e straight-through Ethernet cable.5.Connect the connector tip of the AC power adapter to the phone's DC 12V power socket andconnect the two-prong AC adapter directly to the electrical wall outlet. When the phone powers up, all the LEDs momentarily light up.✓ Desktop: Slide the L-shaped stand's short or long edge slots onto these rails.✓ Wall: Slide the wall mount fitting onto these rails.4. Signing in☞ To sign into the phone via the SfB client when using BtoE:See the 450HD IP Phone User's Manual .☞ To sign in with phone number and PIN (default method):1. Touch the SIGN IN menu (in the phone's idle screen).2. Enter your phone number and then the PIN, and touch Sign in .☞ To sign in with your username and password:1. Touch the SIGN IN menu (in the idle screen), touch Sign-in method and press the left or right rim of the navigation control to select Password .2. Enter your sign-in address (SIP address). Press the phone's 1 key to enter a period/fullstop. To enter @ or -, repeat-press 1 until the symbol is displayed. Touch the CLEAR menu to edit.3. Press the lower rim of the navigation control to scroll down, and enter your domain\username, e.g., company\alan. Repeat-press the phone's 1 key until the symbol \ is displayed.4. Scroll down and enter your user password (get your Windows credentials from IT), and touch SIGN IN .☞ To sign out: Touch the STATUSmenu when the phone is idle, and then touch SIGN OUT.Note: Some Skype for Business features are supported only when signing in with usernameand password, e.g., Calendar.Wall Mount Desk Mount5.☞ To change your presence: Touch the STATUS menu, then touch the presence option you need, and then touch the SELECT menu.☞ To set the SfB server to automatically update your presence:Touch the STATUS menu and navigate to and select Reset .6.☞ To make a call: Enter a phone number and then touch the DIAL menu. To call a phone contact,touch the DIRECTORY menu, select the directory contact and then touch the DIAL menu.☞ To redial a number: Press the REDIAL key, select a dialed number, and then touch the DIAL menu. ☞ To answer a call: Pick up the handset, or press the speaker or headset key.☞ To put a call on hold and make another call: Press the HOLD key on the phone, touch the CALLMENU and select New Call . Enter a phone number and then press DIAL . To return to the held call, navigate to the held call and uncheck the HOLD touch menu.☞ To mute yourself: Press the mute key. To unmute yourself, press the mute key again.☞ To transfer a call: During a call, press the TRANSFER key on the phone, enter a number in theTransfer to… field and then press the TRANSFER touch menu.☞ To forward incoming calls to another phone:1. When the phone is idle, touch the FORWARD menu and then touch Forward to a number .2. Enter the number to which you want to forward the calls, and then touch the START menu. To deactivate call forwarding, touch the FORWARD menu and select Do not forward calls . Information contained in this document is believed to be accurate and reliable at the time of printing. However, due to ongoing product improvements and revisions, AudioCodes cannot guarantee accuracy of printed material after the Date Published nor can it accept responsibility for errors or omissions. Updates to this document can be downloaded from https:///library/technical-documents.This document is subject to change without notice. Date Published: Mar-21-2018Document #: LTRT-12824。
KORG AXESS AX-1 音效处理器说明书

1、A.SPEEDAdjusts the rate of MODE A 2、A.DEPTHAdjusts the depth/mix of MODE A2 Independent processing modules containing atotal of 16 modulation effects Adjustable signal chain routingStore and recall up to 4 user presets Tap Tempo functionalityExpression pedal expandability Leslie style ACCELERATION pedal True stereo outputsPower SupplyUse the correct AC outlet to connect the power e a power transformer with a negative external voltageof 9V (± 10%) ≥300mA, otherwise it will cause equipment damage, fire or other problems. When unused or thunderstorms please unplug the power supply.Electrical interferenceWhen using the unit, the radio and the TV may cause interference. Use the unit away from the radio and the TV.Strongly vibrating or shakinPlace the placeDirect sunlight Magnetic fieldDusty or unclean place To prevent deformation, discoloration, and other serious damage, avoid the following:Near heat sourceHigh temperature and humidity Humidity is large ConnectionsBefore connecting the device or disconnecting it, be sure to turn off the power and other equipment, which will help to avoid malfunction and damage to other equipment. Also, make sure that all cables and power cords are disconnected before moving the unit.CleanPlease use a dry, soft cloth to clean the unit. If necessary, wipe with a slightly moist cloth. Do not use rough clean powder, alcohol, paint thinner, wax, solvent, detergent and chemical agents such as impregnated wipes.OperatingDo not use brutal forces to use switches and control elements.Do not allow paper, metal, and other objects to fall into the machine.Be careful not to fall, do not subject it to shock and excessive pressure.FCC certificationThis device complies with Part 15 of the FCC Rules. Operation is subject to the following two conditions:that may cause undesired operation.3、A.CONTROLAdjusts various effect parameters of MODE A 4、B.SPEEDAdjusts the rate of MODE B 5、B.DEPTHAdjusts the depth/mix of MODE B6、B.CONTROLAdjusts various effect parameters of MODE B 7、MODE ASelects the effect type for MODE A8、ROUTING SWITCHSelects the internal signal chain routing (see ROUTING section of this manual) 9、STOREUsed for saving presets (see USING PRESETS section of this manual)10、 Selects the effect type for MODE B11、 Displays the currently selected Preset12、 This LED will illuminate red when the PRESET FOOTSWITCH is controlling TAP TEMPO 13、Displays the current speed of the modulation rate 14、 Displays the ON/OFF status of the pedal15、Press this footswitch to scroll through presetsPress and hold this footswitch to activate/deactivate tap tempoWhen tap tempo is activated, press this footswitch multiple times to control the speed of the modulation rate16、Press this footswitch to turn the pedal on/offPress and hold this footswitch to activate effect acceleration17、DC INConnect to a 9VDC power source18、RIGHT OUTPUTConnect to the input of your amplifier using a standard 1/4” jack cable When used in stereo this output provides the Right Channel. When used in MONO this output provides DSP BYPASS19、LEFT OUTPUTConnect to the input of your amplifier using a standard 1/4” jack cable When used in stereo this output provides the Left Channel. When used in MONO this output provides TRUE BYPASS20、EXPConnect to an external expression pedal using a 1/4” TRS stereo jack cable 21、INPUTConnect to the output of your instrument using a standard 1/4” jack cableMODE BPRESET STATUS LEDTAP TEMPO LEDEFFECT SPEED LED ON/OFF LEDPRESET ON/OFFPart No:620010640MOD FACTORY PRO contains 2 independent Modulation modules (MODEA/MODE B) which can operate individually or simultaneously. The internal signal chain routing of the pedal can be adjusted using the ROUTING SWITCH.1.Serial MODE A > MODE BThe signal will first go to MODE A and then to MODE BWhen using this routing the TAP TEMPO controls the rate of MODE AA B2.Serial MODE B > MODE AThe signal will first go to MODE A and then to MODE BWhen using this routing the TAP TEMPO controls the rate of MODE BB A3. PARRALLELThe signal will first be split into 2 and then go to MODE A and MODE BsimultaneouslyThe signal will then exit both effect modules and be mixed together before reaching the outputs of the pedalWhen using Parrallel routing you can simulate a dry through WET/DRY setup by disabling one of the effect modules. To achieve this simply set either MODE A or MODE B to the ‘Off’ position.Try setting MODE A to ‘Off’ and ‘MODE B’ to Vibrato whilst in PARRALLEL routing to discover a very cool chorus type effect.MODE A OffMODE B OffMOD FACTORY PRO can store 4 presets which can be scrolled through live using the PRESET footswitch. When you save a preset the pedal will store all of your parameter value, routing and expression pedal settings.The PRESET STATUS LEDs display which preset is currently selected. When the RED LED is highlighted (on the far left) MOD FACTORY PRO is in pedal mode. This means that all parameter values will be equal to their respective controls physical position.To scroll through presets, press and release the PRESET footswitch To store a presetMake all settings you wish to savePress the STORE button once and the preset LED will begin to flashSelect the preset space where you wish to store your settings by pressing the PRESET footswitchPress the STORE button one more time to confirm or move any control on the pedal to cancel the storage procedureExpand the live performance experience of your MOD FACTORY PRO by using it with an expression pedal. The expression pedal can be set to control any one single parameter of the MOD FACTORY PRO.Connect your expression pedal to the EXP input of the MOD FACTORY PRO using a 1/4” trs stereo Jack cable.Simultaneously rotate the control knob of the parameter you wish to set to the EXP and rock the pedestal of your expression pedal back and forthNow you have successfully set the expression pedal to control a parameter of the MOD FACTORY PROSpecificationsInput: 1/4 "mono jack (impedance 1M Ohms)Output: 1/4 "mono jack x2 (impedance 100 Ohms)Sampling rate: 44.1KSampling accuracy: 24bitPower supply: 9V 300mA DC power supply (centre pin negative)Power consumption: 250mASize: 106mm (D) X96mm (W) X53mm (H)Weight: 400g* Disclaimer: Specification update is subject to change without notice.MOOER AUDIO CO.,LTD 。
AKVoice 用户指南说明书
SET UP VOICEMAIL 1. Dial *95 from the telephone handset 2. Follow the prompts to set your a. Recorded Name b. Password c. Greeting You’re just steps away from setting up your new AKVoice® system. This user guide provides you with step-by-step instructions on how to configure your phone and features. Let’s get started!Your telephone line will remain disabled until you set an e911 response location. 1. Open a web browser and go to https:// 2. Log in with your 10-digit telephone number and password.3. From the ONEplace home screen, select the Set Emergency Location link in the lower left corner of the screen.4. Verify your e911 information displayed on the screen.5. To enter a new emergency location begin typing the address in the box as indicated. Select your address when displayed, this will update the map indicating your location.6. Scroll down to verify both the map pin location and the address entered below.7. You may modify ONLY the Name and Comment boxes. Do not change any other values as this is your official emergency address.8. Scroll down to read the important notices and press the Save button. The system will process your request and notify that the address is updated.CALL WAITING Call Waiting lets you know when a call is incoming while you are on another call. A beep tone alerts you that another call is waiting.How to use:1. To answer the second call (without losing the first call), press the Flash key or Hook Switch on your phone to place the first call on hold. You are now connected to your second call.2. To return to your first call, press the Flash key or Hook Switch to place the second call on hold.3. If you hear the tone indicating that a second call is coming through, and you would like to end your current call rather than putting them on hold, simply hang up your phone, and it will ring with the second call.MAKING CALLS To make an outbound local or long distance call, simply lift the handset and dial the phone number. No access code (e.g., 9) is required. To speed up call processing, press the # key when done dialing. Example: 565 2556#EMERGENCY CALLS In an emergency, lift the handset and dial 911. Remember, you must update your e911 address through the ONEplace portal if your address changes To add a third person into a regular two-way phone call:1. Press the Flash key or Hook Switch .2. Dial the person you want to join your call.3. Press the Flash key or Hook Switch again to join all 3 parties.TRANSFERRING A CALLTo transfer a call:1. While on a call, press the Hook Switch - this places the current call on hold.2. Dial the number of the person you want to transfer the call to.3. Wait until the new call is answered and announce the call.4. Complete the transfer by hanging up.Call forwarding is available through the handset or via the ONEplace web portal. Your phone system supports several different types of call forwarding:1. Immediate Call Forwarding : All calls are forwarded to the number of your choice.2. Busy Call Forwarding : Forwards all calls received while on the phone.3. No Answer Call Forwarding : Forwards all unanswered calls.4. Selective Call Forwarding : Forwards calls from certain numbers to another number.5. Unavailable Call Forward : Redirects calls during a power outage or when your service is otherwise not operating.Enabling Call Forwarding Enable Immediate , Busy or No Answer Call Forwarding by dialing the access code for the type of call forwarding you want to enable, followed by the extension or local telephone number you wish to forward calls to.Access Codes Disabling Call ForwardingTo disable call forwarding, dial the disable code for that type of call forwarding.Enable example: To use immediate call forwarding to forward all calls to local number (907) 565-25561. Dial *7256525562. The phone system will then place a test call to the number you are forwarding calls to.3. The system will only enable call forwarding if this courtesy call is answered.When you have unheard voice messages waiting, your phone will display a flashing light (if equipped) or stutter dial tone. To listen to your messages, log in by dialing voicemail access code *95.Follow the prompts to select the preferred voicemail option.For your convenience, the most frequently used mailbox prompts are:•Press 1: To listen to your voice messages from the main menu •Press 2: To save a message •Press 3: To delete a message •Press 4: To change your mailbox settings from the main menu •Press *: To cancel the current operation or return to the previous menu •Press #: To finish entering digits, or recording an announcement Advanced features are configured through ONEplace at https:///ONEplace provides a personal portal to view and manage features including:For guidance on setting up features select the Help link on the lower right of yourONEplace user portal. Some settings, including Password Reset , are done through the ONEplace Admin Portal . Please refer to the AKVoice Administrator Setup guide.•Voicemail to email •Find Me/Follow Me •Call Forward Busy/No Answer •Anonymous Call Rejection •Selective Call Forwarding •Voicemail Preferences •Call Forward Unavailable •Speed Call Short Codes •Selective Call Rejection •Call LogsAvailable from:• Apple iTunes Store• Android Play Store•To log into the app, use your 10-digit telephone number and ONEplace password.If you require additional assistance, please open a support ticket through your AccountView portal.。
Telstra VVX 410 411 电话指南说明书
If you are required to initially configure your IP phone you will be advised of theUsername and Password. This information only needs to be entered once via the QSetup soft key.Press the QSetup soft key Press the Server User fieldEnter the Server User credentials (obtain this information from Telstra.This number will be your phone number) Press the Server Password fieldPress the Mode soft key and Press 123 (to select numbers)Enter the Server password (obtain this information from Telstra)Press Save Config to Save the Config You will now need to manually reboot the phonePress the Home buttonNavigate to Settings Select BasicNavigate to Restart Phone Press the Yes soft key (to confirm)Note 1: Restarting the phone may take a few minutesNote 2: If your phone has been preconfigured the QSetup soft key will not be visibleNote 3: This is only required for phones that are on DMS (Device Management System) platform.From the Home screen Select Settings Select Status Select Platform Select Application Select MainThe Firmware Version will be listed on the screenSome VVX 410/411 may also have a Redial icon configuredNavigate to the Page Indicator icon if there are multiple pages to move through the pagesNew Call – Navigate to New Call todisplay DiallerFrom the Dialler, you can enter a number or URL and place a callFrom the Dialler, you can access the Directory, Recent Calls and FavoritesMessages – Navigate to Messages to access your Voicemail MessagesDirectories – Directories allow you to view all the contacts in your Local Contact DirectoryFrom your Directory, you can add and search for contacts, as well as quickly access the Dialler, Recent Calls and FavoritesForward - Allows you to enable/disable your call forward always, no answer or busy settings.DND - Allows you to enable/disable Do Not Disturb. Calls cannot be received when enabled.Settings – Navigate to Settings to access features and settings to customise your phoneApplications – Navigate to Applications to view custom applications configured by your CGATo enter the HomeView main menu, pressTo return to the Line View, pressTo select a menu item, press the Home button, scroll through the icons and select the relevant option ie settings or directories by pressing the Select button in the middle of the Navigation button.Scroll through the menu items using the down arrow on the Navigation button and Press the Select soft key.To return to previous screen, Press theBacksoft keyThe VVX 410/411 has four soft keys at thebottom of the screen. The contact sensitivetabs appearing on the screen relate to therelevant soft keyDuring a call, press the to adjust the callvolumeWhile the phone is idle, to adjust the Ringervolume, press thevolume buttons.Line View is your phones’ default display.Line View displays all your phone lines,your favorites and soft key tabs.If your phone is idle you can;Press a line to access the DialerIf your phone has calls, the phone lineindicates the number of calls you have, andif they are active or heldAn active call displays a green borderA held call displays as a red borderThis view displays the name and number ofthe person you are talking with and theduration of the callFrom Active view you can, Hold, End Call,Transfer or select the More soft key foradditional optionsLift the handset and enter the requirednumber by using the phone keypadEnter a numberPress the Dial soft keyOrWith the handset on-hook, press the NewCall soft key, enter the phone number byusing the phone keypadLift the handset Or Press the Answer soft key OrPress the green flashing line buttonIf you share a line with another phone, you can answer calls as described above, or you can wait for someone else to answer the call. If you answer the call and place it on hold, anyone who shares your line canresume the held call.Hang up the handset OR Press the End Callsoft keyIf the Call Waiting feature has been turned on, while engaged in a call:Call Waiting tone indicates another call to your line.Press the Answer soft key to switch to and answer the incoming call.The initial call is automatically placed on hold.By scrolling and selecting you can toggle between the active and held calls. Press the Resume soft key to resume your conversation.You cannot receive additional calls whileboth lines are engaged.Whilst on an active call Press the Hold soft key To return to the callPress the Resume soft keyTo make another call while the original caller is on holdPress the New Call soft key, enter the required numberIf multiple calls are on holdScroll to the call on hold and select it and press the Resume soft keyTo join all three parties onto an impromptu conference callWith 2 calls in progress (1 call on hold and 1 call active)Press the More soft key and then the Joinsoft keyWhile Mute is activated, you can hear all other parties, however they cannot hear you.During a call press the mute button (The mute button is illuminated in red) To turn off mute, press the mute buttonagainBlind Transfer enables you to transfer a call to another party without announcing the call prior to transfer.During a Call press the Transfer soft key Enter the transfer destination number Press the Transfer soft key to complete the transfer.Your call will be transferred automaticallyConsult Transfer enables you to transfer a call to another party with consultation. During a Call press the Transfer soft key Enter the transfer destination number When the party answers, announce the call Press the Transfer soft key again to complete the transfer.If the party refuses the call (prior to completing the transfer)Press the Cancel soft key to be returned tothe original caller.There are 3 Call forward options which can be set from your handset using either soft keys or Feature Access Codes; CallForward Always, Call Forward No Answer,Call Forward Busy.To forward all your calls to another number. Press the Forward soft keySelect AlwaysEnter the required number to forward your calls toPress the Enable soft keyAn arrow is displayed on the phonescreen next to your phone number. Press the Forward soft key Select Always Press DisableTo forward your calls to another number if not answered after a specified number of ringsPress the Forward soft key Scroll to No Answer and select Enter the required number to which to forward your callsScroll to the Forward After Rings field and enter the required number of rings (20 rings is the default)Press the Enablesoft keyPress the Forward soft keyPress Call Forward No Answer . Scroll and select No Answer . Press the Disablesoft keyTo forward your calls to another number if you are engaged on a call Press the Forward soft key Scroll down and select Busy Enter the required number to which to forward your calls Press the Enablesoft keyPress the Forward soft key Scroll down and select Busy Press Disable soft keyCall Forwarding is not available on SharedLinesWhen you enable Do Not Disturb (DND), you prevent your phone from ringing. All incoming calls are sent directly tovoicemail. All calls received while DND is enabled, will be displayed in your Recent Calls listFrom Line ViewPress the Do Not Disturbsoft keyThe Do Not Disturb icon displays on screen when enabled. OrFrom Home View Select DND iconFrom Line ViewPress DND soft key, and DND is disabled. OrFrom Home ViewSelect DNDThe Do Not Disturb Service has beenturned off.While engaged in one call:Press the More soft key and select the Confrncn soft keyEnter the required number or extension of the second partyWhen the call connectsPress the More soft key and select the Confrncn soft keyAll parties are connected in a three-way call.To end the conference Press the End Call soft keyNote:If either of the other two parties hang up,your call with the remaining party stays intact. If you hang up, the other two parties will be disconnectedNote: There can be a maximum of 3 parties ona conference call, unless you have theExecutive service pack which has the N-Way feature which enables a total of 8 parties on a Conference call.To add a contact:Press Home and select the Directories iconSelect Contact DirectoryPress the Add Soft keyEnter first name , scroll down and enter last name . Scroll down to the contact field and enter the numbers Select Save soft key From Home ViewSelect DirectoriesSelect Contact Directory , scroll to the required contactHighlight required contactPress the Info soft key and Press the Edit soft key. Make the required changes and press the Save Soft Key.From Home view select DirectoriesSelectContact Directory. Scroll to select the contactPress the Info soft key and press theDelete soft key.The screen will display the message “areyou sure you want to delete the contact?”Press Yesor No.Your phone maintains lists of Missed, Received and Placed calls. Each list can hold up to 100 entriesMissed Calls Received Calls Placed CallsFrom Line ViewUse the Navigation button to access and view the Call List:Press the right Arrow to view placed calls Press the downward arrow to view missed callsPress the upward arrow to view favorites Press theleftarrow to view received calls Highlight the call list and select the M ore soft keyPress Clear soft keyA menu will display listing all Calls, Missed Calls, Received Calls, Placed Calls,Displayed. Scroll onto the required list and press the Select soft keyFrom Home ViewSelect theDirectories IconSelect Contact Directory Select the Contact Press the Info soft key Press the Edit soft keyScroll down to Favorite Index Press SaveTo change your ring type: From Home View Select Settings iconSelect BasicScroll down and select Ring TypeScroll to select the Ringtype option Press the Play soft key to listen to the tune Press the Select soft keyPress the Back soft key three times to return to the Home view screenFrom the Home View screen select the Settings iconSelect BasicScroll down and select Backlight Intensity Select Backlight On Intensity and choose either High, Medium or LowSelect Backlight Idle Intensity and choose either High, Medium or Low OrSelect Maximum IntensitySelect the Up or Down soft key to adjust the intensityPress the Back soft key to return to theprevious screenYou can connect an Analogue headset to your phone. When the headset button is pressed it illuminates green. All calls received will be answered through the headset. When the headset is activated, Mute and Volume will take effect on theheadset device.You set up your phone so that all incoming and outgoing calls use your headset. At any time you can switch to handset or speaker modeFrom the Home Screen Select Settings iconSelect Basic Select PreferencesScroll down and select Headset ... Select Headset memory ...Scroll down and select Enabled Press the Home button to return to the home screenTo access Headset memory mode, press theheadset key twice.The headset button will flash when enabledIf your phone is unable to perform certain tasks, a warning icon will display in the status bar. The warning icon lets you know that your phone has one or moreissues that you should know about. Contact your Customer Group Administrator toadvise them of this issue.From Line view press the voicemailicon to access voicemailOrFrom the Home view select the Messages iconand select Message Centre...Enter a passcode, when prompted; after your initial login you will need to change your passcode.It is essential your passcode be changed for security reasons. It is important to keep your new passcode private.Record your name when promptedPress the hash key (#)Follow the prompts to save the recording,or re-record your namePress the Messages button ,or dialthe Voice Portal extension.Enter your passcode followed by the hash key (#). Press 1Press 1 againPress the Messages buttonor dialthe Voice Portal extension.Press the star key (*) during the greeting.Enter your mailbox ID (your extension). Enter your passcode followed by the hashkey (#).Dial the Voice Portal phone number. Enter your mailbox ID (your extension) followed by the hash key (#).Enter your passcode followed by the hashkey (#).1... Access your Voice Mailbox2... Change your CommPilot Express profile†3... Go to the Greetings Menu4... Change your Call Forwarding options 6... Make a Call8... Change your passcode 9... Exit the Voice Portal #... Repeat this menu†... Only available if assigned.Press the Messages buttonEnter your passcode and press # Press 3 to access your Greetings menu Press 2 to change your Mailbox Busy greeting1... Record your Name2... Change your conference Greeting *... Go back to previous menu #... Repeat menuChange your mailbox No Answer greeting Press the Messages iconEnter your passcode and press # Press 1 to access your voice mailbox Press 3 to change your Mailbox No Answer greeting1... Record new No Answer Greeting2... Play current Greeting3... Revert to system default Greeting*... Return to Voice Messaging main menu #... Repeat menuYour phone may indicate you have Voicemail messages by the following: A message counter in the Home ViewA message icon in the status barIf you have more than one message, the icon will display a counter indicating the number of messagesA message icon also scrolls under the Dateand Time displayPress the Message Button (this willdirect you to your voicemail, where you will follow the prompts to retrieve your messagesOrFrom Home View select the MessageiconSelect Message Centre (this will direct you to your voicemail, where you will follow theprompts to retrieve your messages1... Listen to your messages2... Change your mailbox Busy greeting3... Change your mailbox No Answer greeting5... Compose and send a new message 7... Delete all messages8... Modify the message deposit settings for your mailbox*... Go to the CommPilot Voice Portal#... Repeat this menuNew messages flagged as urgent are played first.The message envelope for each message is played first (time and date, sender if known), followed by the message itself. Use your keypad as follows to browse your messages (you can interrupt the message or envelope to perform any function):#... Save this message7... Erase this message2... Repeat this message4... Return to previous message5... Play the message envelope6... Go to the next message8... Call back the caller9... Hear additional options *... Go back to the previous menu。
Versant Test(phonepass)考试介绍和相关信息
phonepass考试介绍和相关信息:计分是根据被测试者在测试期间的电话交谈中实际使用的词汇、以及在所运用的句子和短语中体现出的语速、流利程度及发音情况来评估的。
第一部分(Part A):按照指令阅读试卷A部分所印句子中的某些句子。
请按照要求的顺序阅读,所要求的顺序可能与试卷上所印的顺序不同。
请尽可能自然流畅地大声朗读。
第二部分(Part B):请重复你所听到的每一个句子-- 请准确地按照原句重复。
尽可能多地重复你所听到的句子中的词语。
第三部分(Part C):回答问题。
用一个单词或由两、三个单词构成的短语进行回答。
第四部分(Part D):你将听到三个词组。
请用这三个词组造一个正确的句子。
第五部分(Part E):每个问题会重复两遍。
听到提示音后,请利用两个提示音之间的20秒钟时间充分而清晰地表达自己的观点。
用清晰连贯的英语表达自己的观点和理由。
任何一种观点都是可接受的。
注意要从头到尾讲满20秒钟。
当你听到“Thank you for completing the SET-10 test.”时,整个考试结束,你就可以挂上电话了。
评分标准:SET-10 是根据你所说的每一个词、以及这些词在词组和句子中的发音、语速、流利程度而进行评分的。
请迅速、流利、大声地回答问题。
请注意有些题目的正确答案不止一个。
建议:请按下图所示手握话筒,并大声地、稳定地说话。
如果你不知道怎样回答某一问题,请保持沉默或说“I don’t know.”。
整个考试时间约12分钟左右,有61道题,每一步的做法电话里会有语音提示,请考生放松心情、正常发挥。
样本得分评估:总体分 (42)总体分表示的是考生理解英语口语的能力和就日常生活的话题以本族语者的谈话速度说英语的能力。
分数范围从20分到80分,由4个诊断性子分数经过加权组合而成。
37 - 45 考生能够应付由一般单词和简单结构构成的简短话语,但参与正常节奏的谈话有困难;发音有时不易听懂;说话缓慢并有停顿,但能够向合作的听众传达基本信息。
HOBBYWING 电机系统使用声明说明书
Attention!1. This is an extremely powerful brushless motor system. We strongly recommend removing your propellers for your own safety and the safety of those around you before performingcalibration and programming functions with this system.2. Available throttle calibration range is from 1000us to 2000us, and the difference between minimum and maximum throttle must be more than 140us (70us in bidirectional mode). If acalibration is done where the difference is less than 140us (70us), the maximum will be shifted so that the difference is 140us (70us).3. Oneshot125 mode works just the same as regular 1-2ms mode, the only difference is that all timing is divided by 8. And the same for Oneshot42, where all timing is further dividedby 3. Multshot also works similarly, except the input signal range is 5-25us.4. Dshot is supported at any rate, up to at least Dshot1200. When the input signal is Dshot, throttle calibration is disabled, and the throttle calibration values are ignored.5. Input signal rates up to at least 32kHz are supported. But please note that higher input signal rates put a heavier load on the MCU, and will reduce the maximum ERPM that the ESCcan handle.Although there are some protections, improper use may still cause permanent damage to the product.• Always disconnect and remove batteries after use, as the ESC may drive the motor to rotate and cause unpredictable danger if it`s still connected to the battery. Long-time contact willcause the battery to completely discharge and result in damage to the battery or/and the ESC. This will not be covered under warranty.• The open source ESC can only be flashed with the corresponding firmware (not any other firmware) when flashing or upgrading firmware, otherwise it may cause the ESC to stopworking or even damage the chip inside.• This user manual is based on the operation manual for BLHeli_32 ARM rev32.x and only for reference. For more detailed information, please refer to the original BLHeli manual. Due tofirmware update or other reasons, the descriptions for functions may differ, so please always take the official BLHeli manual as standard.• Please note that this product is only applicable to the multi-rotors with the diagonal wheelbase doesn’t exceed 300mm, because using it beyond the specification may cause damage tothe ESC or other issues. In that case, users need to take full responsibility for the consequences.XRotor FPV G2 ESC (4in1) - 45A45A60A No3-6S12g40x33x5mm20x20mm M31. Rampup Power:Rampup power can be set to relative values from 3% to 150%. This is the maximum power that is allowed when ramping up at low RPMs and during start-up. For low RPMs, the maximum power to themotor is limited, in order to facilitate detection of low BEMF voltages. Rampup power also affects bidirectional operation, as the parameter is used to limit the power applied during direction reversal.During startup, the actual applied power depends on throttle input, and can be lower than the maximum level set by the rampup power parameter, but the minimum level is a quarter of the maximum level.2. Temperature Protection:Temperature protection can be enabled or disabled. And the temperature threshold can be programmed. The programmable threshold is primarily meant as a support for hardware manufacturers to use,as different hardware can have different tolerances on the max temperatures of the various components used.3. Low RPM Power Protection:Power limiting for low RPMs can be enabled or disabled. Disabling it can be necessary in order to achieve full power on some low KV motors running on a low supply voltage. However, disabling itincreases the risk of sync loss, with the possibility of toasting motor or ESC.4. Low Voltage Protection:Low voltage protection can be set between 2.5V and 4.0V per LiPo cell. Or it can be disabled. When enabled, it will limit power applied to the motor if the battery voltage drops below the programmedthreshold. This feature is primarily intended for fixed wing crafts.5. Current Protection:Current protection can be enabled to limit current. If enabled, then current will be limited to maximum the programmed value. The reaction time of the current limiting is quite fast, so current will alsobe limited during accelerations.The value given for current protection, is per ESC. So if setting limit to e.g. 40A for each of the ESCs in a quad (using BLHeliSuite32), then the total current limit for the four ESCs will be 160A.6. Motor Direction:Motor direction can be set to fwd / rev / bidirectional / bidirectional rev.In bidirectional mode, center throttle is zero and above is fwd rotation and below is reverse rotation. When bidirectional operation is selected, throttle calibration is disabled.7. Demag Compensation:Demag compensation is a feature to protect from motor stalls caused by long winding demagnetization time after commutation. The typical symptom is motor stop or stutter upon quick throttleincrease, particularly when running at a low RPM. As mentioned above, setting high commutation timing normally helps, but at the cost of efficiency.Demag compensation is an alternative way of combating the issue. First of all, it detects when a demag situation occurs.-In this situation, there is no info on motor timing, and commutation proceeds blindly with a predicted timing.-In addition to this, motor power is cut off some time before the next commutation.A metric is calculated that indicates how severe the demag situation is. The more severe the situation, the more power is cut off.When demag compensation is set to off, power is never cut.When setting it to low or high, power is cut. For a high setting, power is cut more aggressively.Generally, a higher value of the compensation parameter gives better protection.If demag compensation is set too high, maximum power can be somewhat reduced for some motors.8. Motor Timing:Motor timing can be set between approximately 10 and approximately 310 in approximately 10 increments (actual accurate values here are 15/16ths of a degree).Typically a medium setting will work fine, but if the motor stutters it can be beneficial to increase timing. Some motors with high inductance can have a very long commutation demagnetization time.This can result in motor stop or stutter upon quick throttle increase, particularly when running at a low RPM. Setting timing higher will allow more time for demagnetization, and often helps.This parameter can also be set to auto. In this case the code monitors demagnetization time, and keeps timing as low as possible without having issues with demag. On well behaved motors, timing canbe low in the entire power range, and thereby max power can be reduced. On not so well behaved motors, timing is increased as needed, and thereby improves margins against sync loss.9. Maximum Acceleration:Maximum acceleration can be set between 0.1%/ms and 25.5%/ms. It can also be set to maximum, in which case acceleration is not limited. Limiting acceleration is primarily intended as a backupparameter that can be used in cases where too hard acceleration gives desyncs.When setting to e.g. 10%/ms, it means that the power applied to the motor is not allowed to increase by more than 10% per millisecond.10. Throttle Cal Enable:If disabled, throttle calibration is disabled.11. Minimum Throttle, Maximum Throttle and Center Throttle:These settings set the throttle range of the ESC. Center throttle is only used for bidirectional operation. The values given for these settings are for a normal 1000us to 2000us input signal, and for theother input signals, the values must be scaled.For Dshot input signal, these settings have no effect.12. Brake On Stop:Brake on stop can be set between 1% and 100%, or disabled. When not disabled, the given brake force will be applied when throttle is zero. For nonzero throttle, this setting has no effect. This featureis primarily intended for fixed wing crafts with folding props.On some ESCs this setting is not linearly programmable, it will just be enabled (at 100% force for any setting 1%-100%) or disabled (this applies to ESCs that have “EN/PWM” style fet drivers).13. LED Control:LEDs can be controlled on ESCs that support it. Up to 4 LEDs can be turned on or off.14. Beep Strength:Sets the strength of beeps under normal operation.15. Beacon Strength:Sets the strength of beeps when beeping beacon beeps. The ESC will start beeping beacon beeps if the throttle signal has been zero for a given time. Note that setting a high beacon strength cancause hot motors or ESCs!16. Beacon Delay:Beacon delay sets the delay before beacon beeping starts.17. PWM frequency:Motor PWM frequency can be programmed between 16kHz and 48kHz. Higher PWM frequency can run motors smoother. Programmable frequency also allows for moving of small but potentiallydisturbing bumps in the throttle response. All ESCs have these bumps, with BLHeli_32 they can be moved in the RPM range, to a place where the system has low sensitivity to them.USER MANUALMulti-RotorXRotor FPV G2 ESC (4in1)- 65A & 45ABrushless Electronic Speed Controller03Features04Specifications05User GuideAt this point throttle calibration values are stored. You may remove power from the ESC, or just continue running your ESC.Once7. Throttle up detected(arming sequence start):Once8. Zero throttle detected(arming sequence end):Whilemeasuring5. When throttle is below midstick (measuring min throttle):Once4. If throttle is above midstick for 3 seconds:This beep sequence indicates that max throttle has been storedOnce6. If throttle is below midstick for 3 seconds:This beep sequence indicates that min throttle has been stored06Programming parameters07Others• High performance 32-bit microprocessor with the running frequency of up to 120MHz for excellent performance.• The third generation BLHeli_32 code can support up to 128KHz PWM output frequency, which can be compatible with more motors.• All codes use damped light mode. Damped light does regenerative braking, causing very fast motor retardation, and inherently also does active freewheeling.• The code supports features to prevent sync loss. There are tunable parameters that can make the code run well even in the most demanding situations, although default settings will workexcellently in normal operating environments.• The code supports regular 1-2ms pulse width input, as well as Oneshot125 (125-250us), Oneshot42 (41.7-83.3us) and Multishot (5-25us).• Dshot signaling is supported at any rate up to at least Dshot1200. The input signal is automatically detected by the ESC upon power up.• The code also supports a beacon functionality, where the ESC will start beeping after a given time of zero throttle. This can be very useful for finding lost crafts.1. Thermal ProtectionThe ESC measures temperature within the MCU and limits motor power if the temperature is too high. Motor power is limited over a range:-If the temperature is above the threshold, motor power begins to be limited.-If the temperature is above the threshold plus approximately 150℃, motor power is limited to 25%.Motor power is not limited below 25%.2. Stall ProtectionIf the motor has attempted to start but not succeeded for a few seconds, it will stop attempting and wait for throttle to be zeroed before attempting again.3. Beacon---BeepsIf the ESC is armed and sees zero throttle for a given time, it beeps beacon beeps, which are approximately one beep per three seconds.4. Not activated ESC---BeepsAll ESCs shall be activated during manufacturing. If for some reason this is not done, the ESC will beep like this upon power up, before the normal operation beep sequence starts: “B, B, B… (the timeinterval shortens gradually)”. If for some reason activation has failed and the ESC is not regarded as a valid BLHeli_32 unit, the ESC will beep like this upon power up, before the normal operation beepsequence starts: “BBB, BBB, BBB…(the tone of the “BBB” changes from high to low)”. In this case the ESC will only accept 1-2ms pwm input signal.5. Other Relevant InformationBLHeli official website: https:///bitdump/BLHeliBLHeli32 official documentation download website: https:///bitdump/BLHeli/tree/master/BLHeli_32%20ARMFirmware: Hobbywing_BL32_AT421_...Definitions for Different Ports1Note: Users only need to connect the throttle control wire, 5V power wire and ground wire of theESC to the corresponding ports (on peripheral devices like receiver) when a single ESC needs tobe programmed.• NC: none output.• BAT:Battery Volt monitoring port with the battery voltage is to connect to the Battery Volt monitoring porton flight controller.• CRT:Amp monitoring port with the amperage of 11.75mv/A is to connect to the Amp monitoring port onflight controller.• GND:Ground wire.• 5V:5V Power output port . (For FC , Camera , 5V LED light and etc .)• S1-4:Throttle Signal Input Ports. Port S1 is for ESC M1, S2 is for M2, S3 is for M3, and S4 is for M4.• POWER INPUT:Power input soldering point , “-” for connecting the power wire - , “+” for connecting thepower wire +.Note: Users only need to connect the throttle control wire and ground wire of the ESC to thecorresponding ports (on peripheral devices like receiver) when a single ESC needs to be programmed.• TELEMETRY: 4ini Telemetry data port.• VCC:Battery Volt monitoring port with the battery voltage is to connect to the Battery Volt monitoring porton flight controller.• CRT:Amp monitoring port with the amperage of 11.75mv/A is to connect to the Amp monitoring port onflight controller.• GND:Ground wire.• S1-4:Throttle Signal Input Ports. Port S1 is for ESC M1, S2 is for M2, S3 is for M3, and S4 is for M4.• POWER INPUT:power input soldering point , “-” for connecting the power wire - , “+” for connecting thepower wire + .。