Android_launcher源码全面分析
Android Launcher研究

Android Launcher研究一、图文详解手把手教你在Windows环境下下载Android源码(Launcher为例)大家好,这篇文章我将教大家如何在Windows环境下下载Android源码,Android 自2007年11月5号发布以来,发展速度如此之快,和它走开源的路是分不开的。
我们在开发中有什么不明白不清楚的,直接把Android 源码下下来研究就可以了,看源代码将会让你提升很快!在这之前大家先熟悉俩个代码版本管理工具SVN,以及Git。
SVN(Windows环境下最常用的):svn(subversion)是近年来崛起的版本管理工具,是cvs的接班人。
目前,绝大多数开源软件都使用svn作为代码版本管理软件。
Git:Git 是用于Linux 内核开发的版本控制工具。
与常用的版本控制工具CVS, Subversion 等不同,它采用了分布式版本库的方式,不必服务器端软件支持,使源代码的发布和交流极其方便。
Git 的速度很快,这对于诸如Linux kernel 这样的大项目来说自然很重要。
Git 最为出色的是它的合并跟踪(merge tracing)能力。
而Google Android的项目是基于Git进行版本管理的,所以经常在Linux环境下开发的人,就不用我多说了,而大都数在Windows环境开发的人,就比较陌生了。
那下面我就手把手教你如何在Windows环境下Git Android源码。
第一步:Msysgit工具的下载(这个是Google为Windows环境下开发的Git客户端程序):/p/msysgit/ 下载地址如图:第二步:安装Msysgit软件(一直默认到底),如下图:第三步:建立一个文件夹用来存放Git下来的Android 源码(我这里以G:/Android Src)为例,如下图:第四步:右击Android Src文件夹选择Git Bash出现如下图所示:第五步:查找我们要下载源代码的地址。
android7.x Launcher3源码解析(3)---workspace和allapps加载流程
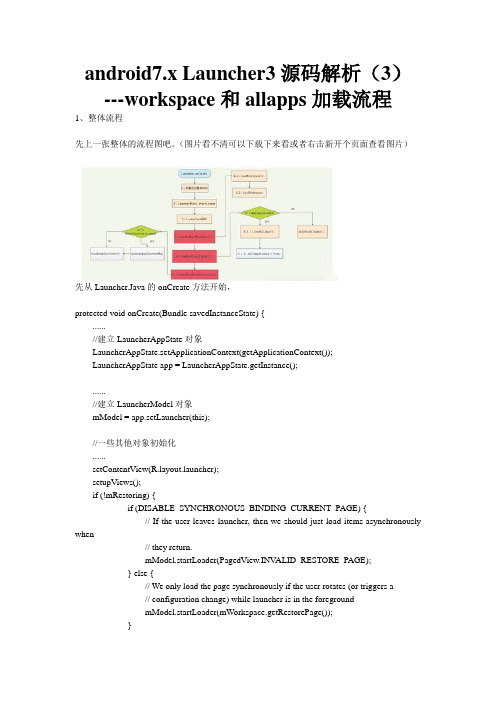
android7.x Launcher3源码解析(3)---workspace和allapps加载流程1、整体流程先上一张整体的流程图吧。
(图片看不清可以下载下来看或者右击新开个页面查看图片)先从Launcher.Java的onCreate方法开始,protected void onCreate(Bundle savedInstanceState) {......//建立LauncherAppState对象LauncherAppState.setApplicationContext(getApplicationContext());LauncherAppState app = LauncherAppState.getInstance();......//建立LauncherModel对象mModel = app.setLauncher(this);//一些其他对象初始化......setContentView(uncher);setupViews();if (!mRestoring) {if (DISABLE_SYNCHRONOUS_BINDING_CURRENT_PAGE) {// If the user leaves launcher, then we should just load items asynchronously when// they return.mModel.startLoader(PagedView.INV ALID_RESTORE_PAGE);} else {// We only load the page synchronously if the user rotates (or triggers a// configuration change) while launcher is in the foregroundmModel.startLoader(mWorkspace.getRestorePage());}}......}重点调用了LauncherModel的startLoader的方法,startLoader里面,最重要的就是启动了LoaderTask,mLoaderTask = new LoaderTask(mApp.getContext(), synchronousBindPage);我们接着分析LoaderTask的run方法。
launcher应用讲解

这个是与launcher.java中setupViews()的 dragController.setDragListener(deleteZone)相关联的, 因此跳转进入deleteZone. onDragStart(DragSource source, Object info, int dragAction)这个函数。
部分简单处理
菜单处理详见Launcher.java中的 onCreateOptionsMenu()、 onPrepareOptionsMenu()、 onOptionsItemSelected()方法 在桌面上可以摆放四种类型的对象: 1. ITEM_SHORTCUT,应用快捷方式 2. ITEM_APPWIDGET,app widget 3. ITEM_LIVE_FOLDER,文件夹 4. ITEM_WALLPAPER,墙纸 方法onActivityResult() 完成在workspace上增加shortcut, appwidge和Livefolder; 方法startActivitySafely()启动应用程序
AndroidManifest.xml分析
由Launcher中的AndroidManifest.xml可以看出整 个Launcher的代码结构。
文件简要分析
Launcher遵循MVC模式 (M:launchermodel,V:draglayer,C:launcher) AddAdapter:添加主屏幕窗口的适配器,维护了 live fold , widget , shortcut , wallpaper 4 个 ListItem , 长按桌面会显示该 列表 AllAppsList:存储桌面元素数据相关。 CellLayout: 使屏幕网格化。 Celllayout被划分为了4行4列的表 格,用Boolean类型的mOccupied二维数组来标记每个cell是否 被占用。在attrs.xml中定义了shortAxisCells和longAxisCells分 别存储x轴和y轴方向的cell个数。在Celllayout构造函数中初始 化。 修改为5*5,见修改 DeleteZone:launcher的删除区域,继承ImageView DragController:拖动控制接口。 DragLayer:继承FrameLayout,实现接口DrayController DragView :继承View,实现接口TweenCallback ,拖动显示相关
手把手教你开发安卓Launcher
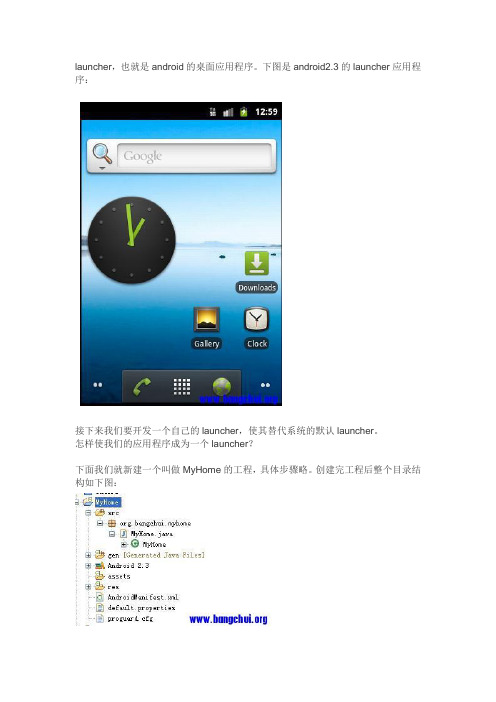
launcher,也就是android的桌面应用程序。
下图是android2.3的launcher应用程序:接下来我们要开发一个自己的launcher,使其替代系统的默认launcher。
怎样使我们的应用程序成为一个launcher?下面我们就新建一个叫做MyHome的工程,具体步骤略。
创建完工程后整个目录结构如下图:现在我们的AndroidManifest.xml文件这样的:<?xml version="1.0" encoding="utf-8"?><manifest xmlns:android="/apk/res/android"package="org.bangchui.myhome"android:versionCode="1"android:versionName="1.0"><application android:icon="@drawable/icon" android:label="@string/app_name"> <activity android:name=".MyHome"android:label="@string/app_name"><intent-filter><action android:name="android.intent.action.MAIN" /><category android:name="UNCHER" /></intent-filter></activity></application></manifest>请注意<intent-filter></intent-filter>里面的内容。
Android源码分析(九)Init启动分析
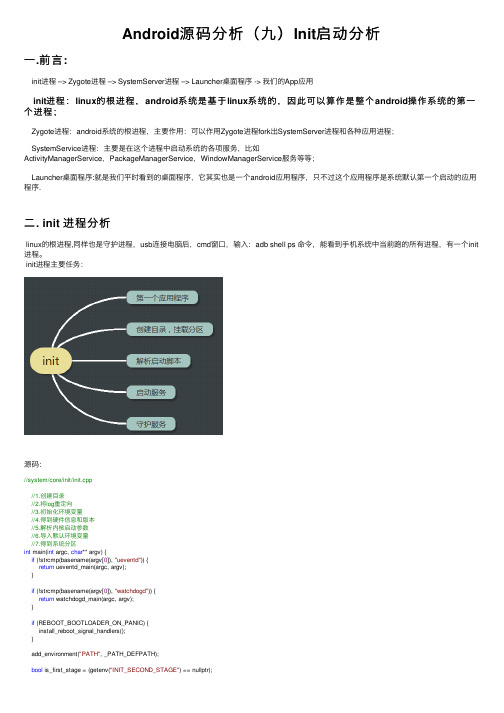
Android源码分析(九)Init启动分析⼀.前⾔:init进程 –> Zygote进程 –> SystemServer进程 –> Launcher桌⾯程序 -> 我们的App应⽤init进程:linux的根进程,android系统是基于linux系统的,因此可以算作是整个android操作系统的第⼀个进程;Zygote进程:android系统的根进程,主要作⽤:可以作⽤Zygote进程fork出SystemServer进程和各种应⽤进程;SystemService进程:主要是在这个进程中启动系统的各项服务,⽐如ActivityManagerService,PackageManagerService,WindowManagerService服务等等;Launcher桌⾯程序:就是我们平时看到的桌⾯程序,它其实也是⼀个android应⽤程序,只不过这个应⽤程序是系统默认第⼀个启动的应⽤程序.⼆. init 进程分析linux的根进程,同样也是守护进程,usb连接电脑后,cmd窗⼝,输⼊:adb shell ps 命令,能看到⼿机系统中当前跑的所有进程,有⼀个init 进程。
init进程主要任务:源码://system/core/init/init.cpp//1.创建⽬录//2.将log重定向//3.初始化环境变量//4.得到硬件信息和版本//5.解析内核启动参数//6.导⼊默认环境变量//7.得到系统分区int main(int argc, char** argv) {if (!strcmp(basename(argv[0]), "ueventd")) {return ueventd_main(argc, argv);}if (!strcmp(basename(argv[0]), "watchdogd")) {return watchdogd_main(argc, argv);}if (REBOOT_BOOTLOADER_ON_PANIC) {install_reboot_signal_handlers();}add_environment("PATH", _PATH_DEFPATH);bool is_first_stage = (getenv("INIT_SECOND_STAGE") == nullptr);if (is_first_stage) {boot_clock::time_point start_time = boot_clock::now();// Clear the umask.umask(0);// Get the basic filesystem setup we need put together in the initramdisk// on / and then we'll let the rc file figure out the rest.mount("tmpfs", "/dev", "tmpfs", MS_NOSUID, "mode=0755");mkdir("/dev/pts", 0755);mkdir("/dev/socket", 0755);mount("devpts", "/dev/pts", "devpts", 0, NULL);#define MAKE_STR(x) __STRING(x)mount("proc", "/proc", "proc", 0, "hidepid=2,gid=" MAKE_STR(AID_READPROC));// Don't expose the raw commandline to unprivileged processes.chmod("/proc/cmdline", 0440);gid_t groups[] = { AID_READPROC };setgroups(arraysize(groups), groups);mount("sysfs", "/sys", "sysfs", 0, NULL);mount("selinuxfs", "/sys/fs/selinux", "selinuxfs", 0, NULL);mknod("/dev/kmsg", S_IFCHR | 0600, makedev(1, 11));mknod("/dev/random", S_IFCHR | 0666, makedev(1, 8));mknod("/dev/urandom", S_IFCHR | 0666, makedev(1, 9));// Now that tmpfs is mounted on /dev and we have /dev/kmsg, we can actually// talk to the outside world...InitKernelLogging(argv);LOG(INFO) << "init first stage started!";if (!DoFirstStageMount()) {LOG(ERROR) << "Failed to mount required partitions early ...";panic();}SetInitAvbVersionInRecovery();// Set up SELinux, loading the SELinux policy.selinux_initialize(true);// We're in the kernel domain, so re-exec init to transition to the init domain now// that the SELinux policy has been loaded.if (restorecon("/init") == -1) {PLOG(ERROR) << "restorecon failed";security_failure();}setenv("INIT_SECOND_STAGE", "true", 1);static constexpr uint32_t kNanosecondsPerMillisecond = 1e6;uint64_t start_ms = start_time.time_since_epoch().count() / kNanosecondsPerMillisecond; setenv("INIT_STARTED_AT", StringPrintf("%" PRIu64, start_ms).c_str(), 1);char* path = argv[0];char* args[] = { path, nullptr };execv(path, args);// execv() only returns if an error happened, in which case we// panic and never fall through this conditional.PLOG(ERROR) << "execv(\"" << path << "\") failed";security_failure();}// At this point we're in the second stage of init.InitKernelLogging(argv);LOG(INFO) << "init second stage started!";// Set up a session keyring that all processes will have access to. It// will hold things like FBE encryption keys. No process should override// its session keyring.keyctl(KEYCTL_GET_KEYRING_ID, KEY_SPEC_SESSION_KEYRING, 1);// Indicate that booting is in progress to background fw loaders, etc.close(open("/dev/.booting", O_WRONLY | O_CREAT | O_CLOEXEC, 0000));property_init();// If arguments are passed both on the command line and in DT,// properties set in DT always have priority over the command-line ones.process_kernel_dt();process_kernel_cmdline();// Propagate the kernel variables to internal variables// used by init as well as the current required properties.export_kernel_boot_props();// Make the time that init started available for bootstat to log.property_set("ro.boottime.init", getenv("INIT_STARTED_AT"));property_set("ro.boottime.init.selinux", getenv("INIT_SELINUX_TOOK"));// Set libavb version for Framework-only OTA match in Treble build.const char* avb_version = getenv("INIT_AVB_VERSION");if (avb_version) property_set("ro.boot.avb_version", avb_version);// Clean up our environment.unsetenv("INIT_SECOND_STAGE");unsetenv("INIT_STARTED_AT");unsetenv("INIT_SELINUX_TOOK");unsetenv("INIT_AVB_VERSION");// Now set up SELinux for second stage.selinux_initialize(false);selinux_restore_context();epoll_fd = epoll_create1(EPOLL_CLOEXEC);if (epoll_fd == -1) {PLOG(ERROR) << "epoll_create1 failed";exit(1);}signal_handler_init();property_load_boot_defaults();export_oem_lock_status();start_property_service();set_usb_controller();const BuiltinFunctionMap function_map;Action::set_function_map(&function_map);Parser& parser = Parser::GetInstance();parser.AddSectionParser("service",std::make_unique<ServiceParser>());parser.AddSectionParser("on", std::make_unique<ActionParser>());parser.AddSectionParser("import", std::make_unique<ImportParser>());std::string bootscript = GetProperty("ro.boot.init_rc", "");if (bootscript.empty()) {parser.ParseConfig("/init.rc");parser.set_is_system_etc_init_loaded(parser.ParseConfig("/system/etc/init"));parser.set_is_vendor_etc_init_loaded(parser.ParseConfig("/vendor/etc/init"));parser.set_is_odm_etc_init_loaded(parser.ParseConfig("/odm/etc/init"));} else {parser.ParseConfig(bootscript);parser.set_is_system_etc_init_loaded(true);parser.set_is_vendor_etc_init_loaded(true);parser.set_is_odm_etc_init_loaded(true);}// Turning this on and letting the INFO logging be discarded adds 0.2s to// Nexus 9 boot time, so it's disabled by default.if (false) parser.DumpState();ActionManager& am = ActionManager::GetInstance();am.QueueEventTrigger("early-init");// Queue an action that waits for coldboot done so we know ueventd has set up all of /dev... am.QueueBuiltinAction(wait_for_coldboot_done_action, "wait_for_coldboot_done");// ... so that we can start queuing up actions that require stuff from /dev.am.QueueBuiltinAction(mix_hwrng_into_linux_rng_action, "mix_hwrng_into_linux_rng");am.QueueBuiltinAction(set_mmap_rnd_bits_action, "set_mmap_rnd_bits");am.QueueBuiltinAction(set_kptr_restrict_action, "set_kptr_restrict");am.QueueBuiltinAction(keychord_init_action, "keychord_init");am.QueueBuiltinAction(console_init_action, "console_init");// Trigger all the boot actions to get us started.am.QueueEventTrigger("init");// Repeat mix_hwrng_into_linux_rng in case /dev/hw_random or /dev/random// wasn't ready immediately after wait_for_coldboot_doneam.QueueBuiltinAction(mix_hwrng_into_linux_rng_action, "mix_hwrng_into_linux_rng");// Don't mount filesystems or start core system services in charger mode.std::string bootmode = GetProperty("ro.bootmode", "");if (bootmode == "charger") {am.QueueEventTrigger("charger");} else {am.QueueEventTrigger("late-init");}// Run all property triggers based on current state of the properties.am.QueueBuiltinAction(queue_property_triggers_action, "queue_property_triggers"); while (true) {// By default, sleep until something happens.int epoll_timeout_ms = -1;if (!(waiting_for_prop || ServiceManager::GetInstance().IsWaitingForExec())) {am.ExecuteOneCommand();}if (!(waiting_for_prop || ServiceManager::GetInstance().IsWaitingForExec())) {restart_processes();// If there's a process that needs restarting, wake up in time for that.if (process_needs_restart_at != 0) {epoll_timeout_ms = (process_needs_restart_at - time(nullptr)) * 1000;if (epoll_timeout_ms < 0) epoll_timeout_ms = 0;}// If there's more work to do, wake up again immediately.if (am.HasMoreCommands()) epoll_timeout_ms = 0;}epoll_event ev;int nr = TEMP_FAILURE_RETRY(epoll_wait(epoll_fd, &ev, 1, epoll_timeout_ms));if (nr == -1) {PLOG(ERROR) << "epoll_wait failed";} else if (nr == 1) {((void (*)()) ev.data.ptr)();}}return0;}。
Android中launcher的详细分析

Android中launcher的详细分析之前一度为如何判断当前所处的界面就是home主桌面而伤脑筋的,后来找到的方法也不是很理想,由此到现在看了launcher的分析,觉得很有帮助哈~这边给大家分享下哈~~~Linux kernel启动以后会通过app_main进程来初始化android Runtime Java运行环境,而zygote是Android的第一个进程。
所有的android的应用以及大部分系统服务都是通过zygote fork出来的子进程(我现在看到的只有native的service manager不是zygote fork出来的)。
在system server中启动的若干系统服务中与我们启动进程相关的就是Acitivity Manager。
当systerm server启动好所有服务以后,系统就进入”system ready”状态,这个时候Activity Manager就登场了。
Activity Manager光看代码行就知道是一个重量级的服务,它主要管理Activity之间的跳转,以及进程的生命周期。
当Activity Manager发现系统已经启动好以后它就会发出一个intent:java代码:1Intent intent = new Intent(mTopAction, mTopData != null ?Uri.parse(mTopData) : null);2intent.setComponent(mTopComponent);3if (mFactoryTest != SystemServer.FACTORY_TEST_LOW_LEVEL) { 4intent.addCategory(Intent.CATEGORY_HOME);5}通过这个category类型为home的intent,Activity Manager就会通过:java代码:6startActivityLocked(null, intent, null, null, 0, aInfo, null, null, 0, 0, 0, false, false);启动Home进程了。
Android应用程序安装过程源代码分析
Android系统在启动的过程中,会启动一个应用程序管理服务PackageManagerService,这个服务负责扫描系统中特定的目录,找到里面的应用程序文件,即以Apk为后缀的文件,然后对这些文件进解析,得到应用程序的相关信息,完成应用程序的安装过程,本文将详细分析这个过程。
应用程序管理服务PackageManagerService安装应用程序的过程,其实就是解析析应用程序配置文件AndroidManifest.xml的过程,并从里面得到得到应用程序的相关信息,例如得到应用程序的组件Activity、Service、Broadcast Receiver和Content Provider等信息,有了这些信息后,通过ActivityManagerService 这个服务,我们就可以在系统中正常地使用这些应用程序了。
应用程序管理服务PackageManagerService是系统启动的时候由SystemServer组件启动的,启后它就会执行应用程序安装的过程,因此,本文将从SystemServer启动PackageManagerService服务的过程开始分析系统中的应用程序安装的过程。
应用程序管理服务PackageManagerService从启动到安装应用程序的过程如下图所示:下面我们具体分析每一个步骤。
Step 1. SystemServer.main这个函数定义在frameworks/base/services/java/com/android/server/SystemServer.java文件中:view plain1.public class SystemServer2.{3. ......4.5.native public static void init1(String[] args);6.7. ......8.9.public static void main(String[] args) {10. ......11.12. init1(args);13.14. ......15. }16.17. ......18.}SystemServer组件是由Zygote进程负责启动的,启动的时候就会调用它的main函数,这个函数主要调用了JNI方法init1来做一些系统初始化的工作。
AndroidLauncher3简单分析
AndroidLauncher3简单分析Launcher 3的界⾯主要由SearchDropTargetBar、Workspace、CellLayout、PageIndicator、Hotseat组成。
如下图:Launcher 3 最主要的是⼀个Activity,基本上所有操作都集中在这个Activity上。
这个Activity⽂件为Launcher.java,他的布局⽂件为launcher.xml。
下⾯为竖屏的布局⽂件,路径为res/layout-port/launcher.xml。
1<?xml version="1.0" encoding="utf-8"?>23<!-- Full screen view projects under the status bar and contains the background -->4<uncherRootView xmlns:android="/apk/res/android"5 xmlns:launcher="/apk/res-auto"6 android:id="@+id/launcher"7 android:layout_width="match_parent"8 android:layout_height="match_parent"9 android:fitsSystemWindows="true">1011<uncher3.DragLayer12android:id="@+id/drag_layer"1314 android:layout_width="match_parent"15 android:layout_height="match_parent">1617<uncher3.FocusIndicatorView18android:id="@+id/focus_indicator"19 android:layout_width="22dp"20 android:layout_height="22dp"/>2122<!-- The workspace contains 5 screens of cells -->23<!-- DO NOT CHANGE THE ID -->24<uncher3.Workspace25android:id="@+id/workspace"26 android:layout_width="match_parent"27 android:layout_height="match_parent"28 launcher:defaultScreen="@integer/config_workspaceDefaultScreen"29 launcher:pageIndicator="@+id/page_indicator"></uncher3.Workspace>3031<!-- DO NOT CHANGE THE ID -->32<include33android:id="@+id/hotseat"34 layout="@layout/hotseat"3536 android:layout_width="match_parent"37 android:layout_height="match_parent"/>3839<include40android:id="@+id/overview_panel"41 layout="@layout/overview_panel"42 android:visibility="gone"/>4344<!-- Keep these behind the workspace so that they are not visible when45 we go into AllApps -->46<include47android:id="@+id/page_indicator"48 layout="@layout/page_indicator"49 android:layout_width="wrap_content"50 android:layout_height="wrap_content"51 android:layout_gravity="center_horizontal"/>5253<include54android:id="@+id/search_drop_target_bar"5556 layout="@layout/search_drop_target_bar"/>5758<include59android:id="@+id/widgets_view"60 layout="@layout/widgets_view"61 android:layout_width="match_parent"62 android:layout_height="match_parent"63 android:visibility="invisible"/>6465<include66android:id="@+id/apps_view"67 layout="@layout/all_apps"68 android:layout_width="match_parent"69 android:layout_height="match_parent"70 android:visibility="invisible"/>71</uncher3.DragLayer>7273<ViewStub74android:id="@+id/launcher_overlay_stub"75 android:layout_width="match_parent"76 android:layout_height="match_parent"77 android:inflatedId="@+id/launcher_overlay"78 android:layout="@layout/launcher_overlay"/>79</uncherRootView>SearchDropTargetBar屏幕最上⽅有个搜索框,在我们拖动图标的时候,搜索框会替换成“删除“Workspace就是屏幕上左右滑的好⼏屏幕的容器CellLayoutWorkspace⾥⾯可以滑动的单独⼀屏,CellLayout负责图标和⼩部件的显⽰和整齐摆放。
Android_launcher源码全面分析
-1-
========================Launcher 学习========================
一、Launcher 默认界面配置(default_workspace)
1、界面默认配置文件
最全的Android源码目录结构详解
最全的Android源码目录结构详解收藏转自/a/android/2010/0622/67.htmlAndroid 2.1|-- Makefile|-- bionic (bionic C库)|-- bootable (启动引导相关代码)|-- build (存放系统编译规则及generic等基础开发包配置)|-- cts (Android兼容性测试套件标准)|-- dalvik (dalvik JAVA虚拟机)|-- development (应用程序开发相关)|-- external (android使用的一些开源的模组)|-- frameworks (核心框架——java及C++语言)|-- hardware (部分厂家开源的硬解适配层HAL代码)|-- out (编译完成后的代码输出与此目录)|-- packages (应用程序包)|-- prebuilt (x86和arm架构下预编译的一些资源)|-- sdk (sdk及模拟器)|-- system (底层文件系统库、应用及组件——C语言)`-- vendor (厂商定制代码)bionic 目录|-- libc (C库)| |-- arch-arm (ARM架构,包含系统调用汇编实现)| |-- arch-x86 (x86架构,包含系统调用汇编实现)| |-- bionic (由C实现的功能,架构无关)| |-- docs (文档)| |-- include (头文件)| |-- inet (?inet相关,具体作用不明)| |-- kernel (Linux内核中的一些头文件)| |-- netbsd (?nesbsd系统相关,具体作用不明)| |-- private (?一些私有的头文件)| |-- stdio (stdio实现)| |-- stdlib (stdlib实现)| |-- string (string函数实现)| |-- tools (几个工具)| |-- tzcode (时区相关代码)| |-- unistd (unistd实现)| `-- zoneinfo (时区信息)|-- libdl (libdl实现,dl是动态链接,提供访问动态链接库的功能)|-- libm (libm数学库的实现,)| |-- alpha (apaha架构)| |-- amd64 (amd64架构)| |-- arm (arm架构)| |-- bsdsrc (?bsd的源码)| |-- i386 (i386架构)| |-- i387 (i387架构?)| |-- ia64 (ia64架构)| |-- include (头文件)| |-- man (数学函数,后缀名为.3,一些为freeBSD的库文件)| |-- powerpc (powerpc架构)| |-- sparc64 (sparc64架构)| `-- src (源代码)|-- libstdc++ (libstdc++ C++实现库)| |-- include (头文件)| `-- src (源码)|-- libthread_db (多线程程序的调试器库)| `-- include (头文件)`-- linker (动态链接器)`-- arch (支持arm和x86两种架构)bootable 目录.|-- bootloader (适合各种bootloader的通用代码)| `-- legacy (估计不能直接使用,可以参考)| |-- arch_armv6 (V6架构,几个简单的汇编文件)| |-- arch_msm7k (高通7k处理器架构的几个基本驱动)| |-- include (通用头文件和高通7k架构头文件)| |-- libboot (启动库,都写得很简单)| |-- libc (一些常用的c函数)| |-- nandwrite (nandwirte函数实现)| `-- usbloader (usbloader实现)|-- diskinstaller (android镜像打包器,x86可生产iso)`-- recovery (系统恢复相关)|-- edify (升级脚本使用的edify脚本语言)|-- etc (init.rc恢复脚本)|-- minui (一个简单的UI)|-- minzip (一个简单的压缩工具)|-- mtdutils (mtd工具)|-- res (资源)| `-- images (一些图片)|-- tools (工具)| `-- ota (OTA Over The Air Updates升级工具)`-- updater (升级器)build目录.|-- core (核心编译规则)|-- history (历史记录)|-- libs| `-- host (主机端库,有android “cp”功能替换)|-- target (目标机编译对象)| |-- board (开发平台)| | |-- emulator (模拟器)| | |-- generic (通用)| | |-- idea6410 (自己添加的)| | `-- sim (最简单)| `-- product (开发平台对应的编译规则)| `-- security (密钥相关)`-- tools (编译中主机使用的工具及脚本)|-- acp (Android "acp" Command)|-- apicheck (api检查工具)|-- applypatch (补丁工具)|-- apriori (预链接工具)|-- atree (tree工具)|-- bin2asm (bin转换为asm工具)|-- check_prereq (检查编译时间戳工具)|-- dexpreopt (模拟器相关工具,具体功能不明)|-- droiddoc (?作用不明,java语言,网上有人说和JDK5有关)|-- fs_config (This program takes a list of files and directories)|-- fs_get_stats (获取文件系统状态)|-- iself (判断是否ELF格式)|-- isprelinked (判断是否prelinked)|-- kcm (按键相关)|-- lsd (List symbol dependencies)|-- releasetools (生成镜像的工具及脚本)|-- rgb2565 (rgb转换为565)|-- signapk (apk签名工具)|-- soslim (strip工具)`-- zipalign (zip archive alignment tool)dalvik目录dalvik虚拟机.|-- dalvikvm (main.c的目录)|-- dexdump (dex反汇编)|-- dexlist (List all methods in all concrete classes in a DEX file.)|-- dexopt (预验证与优化)|-- docs (文档)|-- dvz (和zygote相关的一个命令)|-- dx (dx工具,将多个java转换为dex)|-- hit (?java语言写成)|-- libcore (核心库)|-- libcore-disabled (?禁用的库)|-- libdex (dex的库)|-- libnativehelper (Support functions for Android's class libraries)|-- tests (测试代码)|-- tools (工具)`-- vm (虚拟机实现)development 目录(开发者需要的一些例程及工具)|-- apps (一些核心应用程序)| |-- BluetoothDebug (蓝牙调试程序)| |-- CustomLocale (自定义区域设置)| |-- Development (开发)| |-- Fallback (和语言相关的一个程序)| |-- FontLab (字库)| |-- GestureBuilder (手势动作)| |-- NinePatchLab (?)| |-- OBJViewer (OBJ查看器)| |-- SdkSetup (SDK安装器)| |-- SpareParts (高级设置)| |-- Term (远程登录)| `-- launchperf (?)|-- build (编译脚本模板)|-- cmds (有个monkey工具)|-- data (配置数据)|-- docs (文档)|-- host (主机端USB驱动等)|-- ide (集成开发环境)|-- ndk (本地开发套件——c语言开发套件)|-- pdk (Plug Development Kit)|-- samples (例程)| |-- AliasActivity (?)| |-- ApiDemos (API演示程序)| |-- BluetoothChat (蓝牙聊天)| |-- BrowserPlugin (浏览器插件)| |-- BusinessCard (商业卡)| |-- Compass (指南针)| |-- ContactManager (联系人管理器)| |-- CubeLiveWallpaper (动态壁纸的一个简单例程)| |-- FixedGridLayout (像是布局)| |-- GlobalTime (全球时间)| |-- HelloActivity (Hello)| |-- Home (Home)| |-- JetBoy (jetBoy游戏)| |-- LunarLander (貌似又是一个游戏)| |-- MailSync (邮件同步)| |-- MultiResolution (多分辨率)| |-- MySampleRss (RSS)| |-- NotePad (记事本)| |-- RSSReader (RSS阅读器)| |-- SearchableDictionary (目录搜索)| |-- SimpleJNI (JNI例程)| |-- SkeletonApp (空壳APP)| |-- Snake (snake程序)| |-- SoftKeyboard (软键盘)| |-- Wiktionary (?维基)| `-- WiktionarySimple(?维基例程)|-- scripts (脚本)|-- sdk (sdk配置)|-- simulator (?模拟器)|-- testrunner (?测试用)`-- tools (一些工具)external 目录.|-- aes (AES加密)|-- apache-http (网页服务器)|-- astl (ASTL (Android STL) is a slimmed-down version of the regular C++ STL.)|-- bison (自动生成语法分析器,将无关文法转换成C、C++)|-- blktrace (blktrace is a block layer IO tracing mechanism)|-- bluetooth (蓝牙相关、协议栈)|-- bsdiff (diff工具)|-- bzip2 (压缩工具)|-- clearsilver (html模板系统)|-- dbus (低延时、低开销、高可用性的IPC机制)|-- dhcpcd (DHCP服务)|-- dosfstools (DOS文件系统工具)|-- dropbear (SSH2的server)|-- e2fsprogs (EXT2文件系统工具)|-- elfcopy (复制ELF的工具)|-- elfutils (ELF工具)|-- embunit (Embedded Unit Project)|-- emma (java代码覆盖率统计工具)|-- esd (Enlightened Sound Daemon,将多种音频流混合在一个设备上播放)|-- expat (Expat is a stream-oriented XML parser.)|-- fdlibm (FDLIBM (Freely Distributable LIBM))|-- freetype (字体)|-- fsck_msdos (dos文件系统检查工具)|-- gdata (google的无线数据相关)|-- genext2fs (genext2fs generates an ext2 filesystem as a normal (non-root) user)|-- giflib (gif库)|-- googleclient (google用户库)|-- grub (This is GNU GRUB, the GRand Unified Bootloader.)|-- gtest (Google C++ Testing Framework)|-- icu4c (ICU(International Component for Unicode)在C/C++下的版本)|-- ipsec-tools (This package provides a way to use the native IPsec functionality )|-- iptables (防火墙)|-- jdiff (generate a report describing the difference between two public Java APIs.)|-- jhead (jpeg头部信息工具)|-- jpeg (jpeg库)|-- junit (JUnit是一个Java语言的单元测试框架)|-- kernel-headers (内核的一些头文件)|-- libffi (libffi is a foreign function interface library.)|-- libpcap (网络数据包捕获函数)|-- libpng (png库)|-- libxml2 (xml解析库)|-- mtpd (一个命令)|-- netcat (simple Unix utility which reads and writes dataacross network connections)|-- netperf (网络性能测量工具)|-- neven (看代码和JNI相关)|-- opencore (多媒体框架)|-- openssl (SSL加密相关)|-- openvpn (VPN开源库)|-- oprofile (OProfile是Linux内核支持的一种性能分析机制。
- 1、下载文档前请自行甄别文档内容的完整性,平台不提供额外的编辑、内容补充、找答案等附加服务。
- 2、"仅部分预览"的文档,不可在线预览部分如存在完整性等问题,可反馈申请退款(可完整预览的文档不适用该条件!)。
- 3、如文档侵犯您的权益,请联系客服反馈,我们会尽快为您处理(人工客服工作时间:9:00-18:30)。
Launcher默认是有5个分屏,不过这个可以配置。同样,每行每列有多少图标也是可以配置 的。这里按我修改的是3行5列的界面排布(对应上面的效果图)。 一般配置APP的快捷方式,使用上面的属性标签就可以。
<appwidget //插件
launcher:className="de.dnsproject.clock_widget_main.Clock1AppWidgetProvider" //该应用的类 launcher:packageName="de.dnsproject.clock_widget_main" launcher:screen="1" launcher:x="2" launcher:y="3" launcher:spanY="2" /> //第1屏,0-4屏共5屏 //图标X位置,左上角第一个为0,向左递增,0-4共5个 //图标Y位置,左上角第一个为0,向下递增,0-2共3个 //在x方向上所占格数 //在y方向上所占格数 //该应用的包名
========================Launcher 学习========================
一、Launcher 默认界面配置(default_workspace) ------------------------------------------- - 2 1、界面默认配置文件 --------------------------------------------------------------------------- - 2 2、LauncherProvider.java 的 loadFavorites 分析------------------------------------------- - 3 二、Icon 修改、界面布局调整、壁纸设置 ------------------------------------------------------ - 5 1、图标大小和标题大小 ------------------------------------------------------------------------ - 5 2、Launcher 图标加入默认背景 ------------------------------------------------------------- - 5 3、更换 Launcher 默认壁纸 -------------------------------------------------------------------- - 7 4、壁纸设置过程: ------------------------------------------------------------------------------ - 8 三、Launcher 启动和初始化 ------------------------------------------------------------------------- - 9 1、Launcher 进程启动过程 -------------------------------------------------------------------- - 9 2、Launcher 初始化――LauncherApplication --------------------------------------------- 10 3、Launcher.java 初始化 ------------------------------------------------------------------------ 12 1、Callbacks 接口 -------------------------------------------------------------------------------- 15 2、数据加载流程 --------------------------------------------------------------------------------- 16 3、startLoader()------------------------------------------------------------------------------------ 16 4、LoaderTask 的 run()方法 -------------------------------------------------------------------- 16 5、workspace 加载数据 ------------------------------------------------------------------------- 17 6、workspace 绑定数据 ------------------------------------------------------------------------- 20 7、ALL APP 数据加载绑定 -------------------------------------------------------------------- 22 五、HotSeat 分析 --------------------------------------------------------------------------------------- 24 1、Hotseat 配置文件 ----------------------------------------------------------------------------- 24 2、Hotseat 构造函数 ----------------------------------------------------------------------------- 26 3、Hotseat 加载数据 ----------------------------------------------------------------------------- 26 4、Hotseat 绑定数据 ----------------------------------------------------------------------------- 27 5、Hotseat 类 -------------------------------------------------------------------------------------- 28 6、总结---------------------------------------------------------------------------------------------- 29 六、页面滑动(PagedView)---------------------------------------------------------------------------- 29 七、AllApp 全部应用列表(AppsCustomizeTabHost)------------------------------------------- 37 1、AllApp 列表配置文件 ----------------------------------------------------------------------- 37 2、AppsCustomizeTabHost 分析 -------------------------------------------------------------- 39 3、Tab 变化时执行 onTabChanged----------------------------------------------------------- 40 八、AllApp 界面拖拽元素---------------------------------------------------------------------------- 41 1、触摸拦截 --------------------------------------------------------------------------------------- 41 2、handleTouchEvent 方法 --------------------------------------------------------------------- 42 4、拖曳按钮 --------------------------------------------------------------------------------------- 43 九、Launcher 启动 APP 流程 ------------------------------------------------------------------------ 44 1、WorkSpace 触摸 ------------------------------------------------------------------------------ 44 2、CellLayout 的 onInterceptTouchEvent()方法 ------------------------------------------- 45 3、WorkSpace 的 onTouch()事件 ------------------------------------------------------------- 46 4、BubbleTextView ------------------------------------------------------------------------------ 46 5、onClick()方法---------------------------------------------------------------------------------- 48 6、总结---------------------------------------------------------------------------------------------- 49 -