APM打印管理程序手册v
睿石企业级APM指南针产品快速配置手册说明书

睿石企业级APM指南针产品快速配置手册睿石网云(北京)科技有限公司2017年07月04日声明本手册所含内容若有任何改动,恕不另行通知。
在法律法规的最大允许范围内,睿石网云(北京)科技有限公司除就本手册和产品应负的瑕疵担保责任外,无论明示或默示,不作其它任何担保,。
在法律法规的最大允许范围内,睿石网云(北京)科技有限公司对于您的使用或不能使用本产品而发生的任何损坏(包括,但不限于直接或间接的个人损害、商业利润的损失、业务中断、商业信息的遗失或任何其它损失),不负任何赔偿责任。
本手册含受版权保护的信息,未经睿石网云(北京)科技有限公司书面允许不得对本手册的任何部分进行影印、复制或翻译。
睿石网云(北京)科技有限公司章节目录目录声明 (2)1. 前言 (4)1.1. 导言 (4)1.2. 本书适用对象 (4)1.3. 本书适合的产品 (4)2. 如何开始 (4)2.1. 准备工作 (4)2.2. 配置管理方法 (4)3. 网络环境 (5)3.1. 网络拓扑 (5)3.2. 拓扑描述 (5)4. 部署步骤 (6)4.1. 配置交换机端口镜像或Flow (6)4.2. 采集配置 (6)4.3. 业务对象定义 (7)4.3.1. 主机组配置 (7)4.3.2. 自定义业务配置 (7)4.4. 配置下发 (8)4.5. 业务视图配置 (8)4.6. 完成配置 (9)5. 附录 (9)5.1. 华为交换机端口镜像配置示例 (9)5.2. Cisco路由器netflow V5开启flow配置示例 (10)5.3. 华为netstream版本5开启flow配置示例 (10)5.4. H3C开启flow配置示例 (10)6. 关于RStone睿石 (11)1.前言1.1.导言《睿石企业级APM---指南针产品快速配置手册》是睿石APM产品主要的安装调试手册。
产品简称:指南针或者Compass系统,下文中将直接引用该名称。
APM-204C_208C MCPRO2使用手册
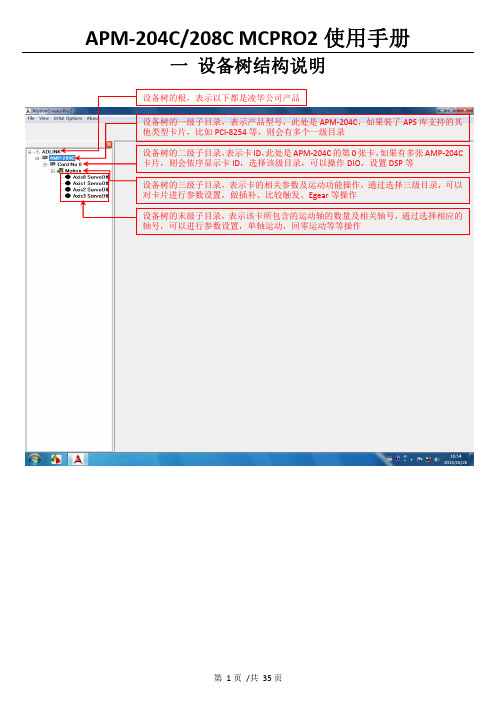
一 设备树结构说明二 设备树目录对应的菜单项及工具栏2.1 根目录及一级子目录(AMP ‐204C 子目录)2.1.1 对应菜单1、Initial Options 菜单项2、About 菜单项该菜单项用于获取MCPRO2版本信息、数据库版本信息及MCPRO2所支持的产品信息等等。
3、根目录右键菜单当选择ADLINK 根目录,右键点击,弹出保存/载入所有参数菜单,如下所示2.2 二级子目录(Card No 0子目录)2.2.1对应菜单及工具栏当选中相应的卡ID 目录(例如Card No 0),会弹出如下DIO 和DSP 操作菜单及工具栏2.2.2 右键菜单当选中相应的卡ID2.3 三级子目录(Motion 子目录)2.3.1对应工具栏2.3.2对应菜单栏2.3.3 右键菜单当选中相应卡ID 目录(例如Card No 0)下的Motion ,右击 会弹出如下右键菜单ServoOn 该卡下面的所有轴ServoOff 该卡下面的所有轴2.4 末级子目录(单轴操作子目录)2.4.1对应工具栏当选中相应的轴号时,会弹出如下工具栏2.4.2对应菜单栏2.4.3 右键菜单三 MCPRO2操作3.1 设置向导(SetupWizard )选择要操作的轴,在工具栏点击SetupWizard 按钮,弹出SetupWizard 对话框。
如下图示。
Step 1:Control Mode (控制模式)该步骤用于设置板卡控制模式及伺服更新率。
但是为防止客户误操作,控制模式设置和伺服更新率设置被移出该步骤。
如果要设置,请参考下面的设置。
1、选择要操作的轴2、点击SetupWizard按钮3、弹出SetupWizard对话框1、更改控制模式:注意:请根据每个轴使用的电机类型来设置每个轴的控制模式,控制模式一旦设定,请勿随意变更。
1、先选择Motion 子目录点击此按钮保存设置2、设置伺服更新率:以下两种方式都可以设置伺服更新率: 方式1:方式2:注意:如非必要,请勿随意更改伺服更新率。
Blueware APM用户手册V3.0

BLUEWARE APM用户手册2013年7月序言本手册为Blueware APM v2.0产品资料,主要描述了Blueware APM v2.0产品的功能,架构,配置,使用及常见的问题等知识。
帮助用户快速的学习和掌握Blueware APM产品的功能和配置方法,实现Blueware APM产品的最佳体验。
本手册版权为北京蓝海讯通科技有限公司所有。
未经本公司的书面许可,不得以任何形式或手段复制或摘录本手册内容。
目录BLUEWARE APM用户手册 (1)1.Blueware简介 (5)1.1 Blueware APM产品的作用 (5)1.2 Blueware APM产品的主要优势 (6)2.Blueware APM软件产品架构 (7)2.1 BluewareAPM Agent (7)2.2可配置的Blueware APM server用户界面 (8)3.Blueware APM Agent准备及原理 (9)3.1 Blueware APM Agent安装要求 (9)3.2 Blueware APM Agent系统资源要求 (9)3.3 Blueware APM Agent操作系统支持 (9)3.4 Blueware APM Agent JRE 要求 (9)3.5 Blueware APM Agent JRE环境变量设置 (10)3.6获得Blueware APM Agent安装介质 (10)3.7 Agent如何在首次启动获得配置 (10)3.8 Agent的配置数据存储 (11)4.Blueware Apm Agent日常管理 (12)4.1 启动BLUEWARE代理 (12)4.2 停止BLUEWARE代理 (12)4.3 重启BLUEWARE代理 (12)4.4 从Windows命令行查询Agent运行状态 (13)4.5 从UNIX平台的命令行查询Agent运行状态 (13)5.Blueware APM对于IT资源的管理架构 (15)5.1 IT资源分类 (15)5.1.1 Platform、server、service (16)5.1.2 组和应用 (17)5.2 自动发现并添加资源到资源模型库中 (21)6.管理Blueware监控设置 (24)6.1 监控总览 (24)6.2 查看更改默认收集性能指标 (24)6.3 管理性能指标数据 (25)6.4 日志跟踪 (27)6.5 配置跟踪 (31)7.使用Blueware APM用户管理选项 (34)8.警报指南 (38)8.1 Blueware APM警报主要概念 (38)8.2 建立配置通知的方式 (41)8.3 查看警报及更新警报状态 (43)9.监控、分析和报表 (45)9.1 为性能指标数据生成图表 (45)9.2 报表中心 (48)10.使用资源的控制操作 (49)10.1 概述 (49)10.2 支持管理操作 (49)10.3 在Blueware APM中执行管理操作 (49)附Blueware APM一般问题 (52)1 Blueware APM Agent对被监控系统的负载如何? (52)2 网管软件与Blueware APM的异同 (52)3 可以监控多少资源? (52)4 Blueware APM服务器可与现存的管理工具的共存? (52)5 用Blueware APM监控关键生产环境是否安全? (53)6 Blueware APM支持多用户吗? (53)7 为什么使用代理?可使用无代理方式吗? (53)8 Blueware APM对触发的警报有哪些报警方式? (54)9 Blueware APM可回溯历史数据吗?如何回溯? (54)10 历史数据保存多长时间?可以设置吗? (54)11 Agent需要以root运行吗? (55)12 如何在机器启动时启动Agent? (55)1.Blueware简介Blueware APM是由北京蓝海讯通科技有限公司研发,并于2010年获得北京市科技进步二等奖,目前Blueware APM软件也已成功应用于运营商,金融,政府等多个行业。
APM中文使用手册Word版
一、介绍ArduPilotMega 自动驾驶仪(简称APM 自驾仪)是一款非常优秀而且完全开源的自动驾驶控制器,可应用于固定翼、直升机、多旋翼、地面车辆等,同时还可以搭配多款功能强大的地面控制站使用。
地面站中可以在线升级固件、调参,使用一套全双工的无线数据传输系统在地面站与自驾仪之间建立起一条数据链,即可组成一套无人机自动控制系统,非常适合个人组建自己的无人机驾驶系统。
二、性能特点•免费的开源程序,支持多种载机。
ArduPlane 模式支持固定翼飞机,Arducoper 模式支持直升机与多旋翼(包括三轴、四轴、六轴、八轴等),ArduRover 模式支持地面车辆;•人性化的图形地面站控制软件,通过一根Micro_USB 线或者一套无线数传连接,鼠标点击操作就可以进行设置和下载程序到控制板的MCU 中,无需编程知识和下载线等其它硬件设备。
但如果你想更深入的了解APM 的代码的话,你仍旧可以使用Arduino 来手动编程下载;•地面站的任务规划器支持上百个三维航点的自主飞行设置,并且只需要通过鼠标在地图上点击操作就行;•基于强大的MAVLink 协议,支持双向遥测和实时传输命令;•多种免费地面站可选,包括Mission Planner ,HK GCS 等,还可以使用手机上的地面站软件,地面站中可实现任务规划,空中参数调整,视频显示,语音合成和查看飞行记录等;•可实现自动起飞,自动降落,航点航线飞行,自动返航等多种自驾仪性能;•完整支持Xplane 和Flight Gear 半硬件仿真三、硬件构成o核心MCU采用ATMEL的8bit ATMEGA2560o 整合三轴陀螺仪与三轴加速度的六轴MEMS传感器MPU6000 o 高度测量采用高精度数字空气压力传感器MS-5611o 板载16MB的AT45DB161D存储器o 三轴磁力计HMC5883o8路PWM控制输入o 11路模拟传感器输入o 11路PWM输出(8路电调电机+3路云台增稳)o GPS 模块可选MTK 3329及支持ublox输出的NEO-6M、7M、LEA-6H等o 可屏蔽板载PPM解码功能,外接PPM解码板或者外接PPM接收机o 可屏蔽板载罗盘通过I2C接口使用外置扩展罗盘o (可选)OSD模块,将无人机姿态、模式、速度、位置等重要数据叠加到图像上实时回传o (可选)空速传感器o (可选)电流电压传感器o (可选)超声波测距传感器o (可选)光流定点传感器o(可扩展)其它UART、I2C、SPI 设备四、硬件方框图五、飞控板概览正面图1、数传接口2、模拟传感器接口3、增稳云台输出接口4、ATMEGA2560 SPI 在线编程接口(可用于光流传感器)5、USB 接口6、遥控输入7、功能选择跳线8、GPS 接口9、I2C 外接罗盘接口10、ATMEGA32U2 SPI 在线编程接口11、多功能可配置MUX 接口(默认为OSD 输出)12、电流电压接口13、电调供电选择跳线14、电调输出接口背面图1、SPI 的MISO 电压选择2、PPM 输入选择3、MUX 接口功能选择六、硬件安装在APM 主板拿到手后,首先应明确自己的用途,并且熟悉了上述功能和接口再进行后续的硬件安装和连接。
司印用户手册

司印-云打印管理平台用户手册 V2.2博瑞凯德信息技术有限公司司印-用户手册 V2.21版权所有 2011-2013 博瑞凯德信息技术有限公司目 录第一章 欢迎使用司印 ................................................................................................................................................. 3 第二章安装和卸载驱动程序 (4)获取打印机安装包 ............................................................................................................................................................................. 4 安装司印打印机 ................................................................................................................................................................................. 5 卸载司印打印机 (7)第三章 完成打印 (9)客户端发起打印任务 ........................................................................................................................................................................ 9 标准刷卡器刷卡出纸 ...................................................................................................................................................................... 10 豪华版刷卡器刷卡出纸 .................................................................................................................................................................. 10 一体机整合版刷卡出纸 .................................................................................................................................................................. 15 打印机首选项 .. (15)第四章 控制中心操作 (16)首页 ..................................................................................................................................................................................................... 16 当前任务 ............................................................................................................................................................................................ 16 待审核任务 ........................................................................................................................................................................................ 17 历史任务 ............................................................................................................................................................................................ 18 安装打印机 ........................................................................................................................................................................................ 19 用户信息 ............................................................................................................................................................................................ 19 个人资料维护 .. (20)第五章 夏普复合机整合面板操作 (22)刷卡登录与直接登录 ...................................................................................................................................................................... 22 卡号自注册 ........................................................................................................................................................................................ 23 打印提取 ............................................................................................................................................................................................ 24 安全复印 ............................................................................................................................................................................................ 25 提取码提取 . (27)第六章 东芝复合机整合面板操作 (28)刷卡登录与直接登录 ...................................................................................................................................................................... 28 卡号自注册 ........................................................................................................................................................................................ 30 打印提取 ............................................................................................................................................................................................ 31 提取码打印 . (33)第七章 京瓷复合机整合面板操作 (35)刷卡登陆与直接登录 ...................................................................................................................................................................... 35 打印提取 .. (38)第八章 通用复印控制器面板操作 ......................................................................................................................... 39 刷卡登录 .. (39)第九章在线打印 (42)登录打印 (42)司印-用户手册 V2.2版权所有 2011-2013 博瑞凯德信息技术有限公司2提取码打印 (45)第十章 手机打印 (48)安卓设备打印 ................................................................................................................................................................................... 48 iOS 设备打印 . (56)第十一章 常见问题 (68)打印提示“您无权打印任何文档”该如何处理 ...................................................................................................................... 68 如何进行双面打印 ........................................................................................................................................................................... 68 客户端访问控制台,一直在转圈不进登录界面的解决方法 ................................................................................................ 68 XP/2003安装统一驱动包失败,提示“打印端口监视器安装失败或打印端口安装失败” .......................................... 68 XP/2003安装统一驱动包失败,提示“打印驱动程序安装失败” .. (68)司印-用户手册 V2.23版权所有 2011-2013 博瑞凯德信息技术有限公司欢迎使用司印第一章司印-用户手册 V2.2版权所有 2011-2013 博瑞凯德信息技术有限公司4安装和卸载驱动程序第二章获取打印机安装包当管理员创建用户完成后,用户会收到一封电子邮件,里面包含司印控制中心访问地址,用户名和初始密码。
惠普Photosmart 7550打印机基本操作指南说明书

7550© 版權 2002 Hewlett-Packard Company保留所有權利。
本文件之任何部份,事先未經惠普科技公司的書面同意,皆嚴禁複製、複製或翻譯成其他語言。
文件中包含的資訊若有變更恕不另行通知。
倘若資料有誤,或因提供、執行、使用本資料而導致任何意外或毀損,惠普科技恕不負責。
HP、HP 徽標與 Photosmart 為惠普科技公司之財產。
Secure Digital 徽標為 SD Association 的商標。
Microsoft 與 Windows 為 Microsoft Corporation 的註冊商標。
CompactFlash、CF 與 CF 徽標為 CompactFlash Association (CFA) 的商標。
Mac、Mac 徽標與 Macintosh 為 Apple Computer, Inc. 的註冊商標。
IBM 為 International Business Machines Corporation 的註冊商標。
其他廠牌與其產品為其各自持有者之商標或註冊商標。
本文件所含相片之版權由其原始擁有者所有。
目錄1快速入門 . . . . . . . . . . . . . . . . . . . . . . . . . . . . . . . . . . . . . . . . . . 1歡迎. . . . . . . . . . . . . . . . . . . . . . . . . . . . . . . . . . . . . . . . . . . . . . . . . . . . .1印表機零件. . . . . . . . . . . . . . . . . . . . . . . . . . . . . . . . . . . . . . . . . . . . . . . .2背面 . . . . . . . . . . . . . . . . . . . . . . . . . . . . . . . . . . . . . . . . . . . . . . . . . .2正面 . . . . . . . . . . . . . . . . . . . . . . . . . . . . . . . . . . . . . . . . . . . . . . . . . .3控制面板. . . . . . . . . . . . . . . . . . . . . . . . . . . . . . . . . . . . . . . . . . . . . . .4記憶卡插槽 . . . . . . . . . . . . . . . . . . . . . . . . . . . . . . . . . . . . . . . . . . . . .5指示燈. . . . . . . . . . . . . . . . . . . . . . . . . . . . . . . . . . . . . . . . . . . . . . . . .5紙張資訊 . . . . . . . . . . . . . . . . . . . . . . . . . . . . . . . . . . . . . . . . . . . . . . . . .6將紙張裝入進紙匣 . . . . . . . . . . . . . . . . . . . . . . . . . . . . . . . . . . . . . . . .6將相紙裝入相片匣中. . . . . . . . . . . . . . . . . . . . . . . . . . . . . . . . . . . . . . .7列印墨匣資訊 . . . . . . . . . . . . . . . . . . . . . . . . . . . . . . . . . . . . . . . . . . . . . .8使用保留模式. . . . . . . . . . . . . . . . . . . . . . . . . . . . . . . . . . . . . . . . . . . .9安裝或更換列印墨匣. . . . . . . . . . . . . . . . . . . . . . . . . . . . . . . . . . . . . . .9使用控制台. . . . . . . . . . . . . . . . . . . . . . . . . . . . . . . . . . . . . . . . . . . . . . .11使用按鈕. . . . . . . . . . . . . . . . . . . . . . . . . . . . . . . . . . . . . . . . . . . . . .11使用指示燈 . . . . . . . . . . . . . . . . . . . . . . . . . . . . . . . . . . . . . . . . . . . .12功能表圖. . . . . . . . . . . . . . . . . . . . . . . . . . . . . . . . . . . . . . . . . . . . . .13 2利用相機來使用印表機. . . . . . . . . . . . . . . . . . . . . . . . . . . . . . . 15列印在相機上選擇的相片. . . . . . . . . . . . . . . . . . . . . . . . . . . . . . . . . . . . .15選擇和列印相片 . . . . . . . . . . . . . . . . . . . . . . . . . . . . . . . . . . . . . . . . .15從記憶卡列印相片. . . . . . . . . . . . . . . . . . . . . . . . . . . . . . . . . . . . . . . . . .16支援的記憶卡. . . . . . . . . . . . . . . . . . . . . . . . . . . . . . . . . . . . . . . . . . .16插入記憶卡 . . . . . . . . . . . . . . . . . . . . . . . . . . . . . . . . . . . . . . . . . . . .17確定要列印的相片 . . . . . . . . . . . . . . . . . . . . . . . . . . . . . . . . . . . . . . .19列印控制面板中的相片 . . . . . . . . . . . . . . . . . . . . . . . . . . . . . . . . . . . .203利用電腦來使用印表機. . . . . . . . . . . . . . . . . . . . . . . . . . . . . . . 21從 Windows PC 列印. . . . . . . . . . . . . . . . . . . . . . . . . . . . . . . . . . . . . . . .21從軟體應用程式列印. . . . . . . . . . . . . . . . . . . . . . . . . . . . . . . . . . . . . .21使用 Windows PC 工作列圖示. . . . . . . . . . . . . . . . . . . . . . . . . . . . . . .22從 Macintosh 列印. . . . . . . . . . . . . . . . . . . . . . . . . . . . . . . . . . . . . . . . . .25從軟體應用程式 (OS X 或 OS9.x) 中列印. . . . . . . . . . . . . . . . . . . . . . .25 4疑難排解 . . . . . . . . . . . . . . . . . . . . . . . . . . . . . . . . . . . . . . . . . 27 Windows PC 連接問題. . . . . . . . . . . . . . . . . . . . . . . . . . . . . . . . . . . . . . .27 Macintosh 連接問題. . . . . . . . . . . . . . . . . . . . . . . . . . . . . . . . . . . . . . . . .28列印診斷頁. . . . . . . . . . . . . . . . . . . . . . . . . . . . . . . . . . . . . . . . . . . . . . .29 USB 連線問題. . . . . . . . . . . . . . . . . . . . . . . . . . . . . . . . . . . . . . . . . . . . .30印表機問題. . . . . . . . . . . . . . . . . . . . . . . . . . . . . . . . . . . . . . . . . . . . . . .35列印問題 . . . . . . . . . . . . . . . . . . . . . . . . . . . . . . . . . . . . . . . . . . . . . . . .39 5規格. . . . . . . . . . . . . . . . . . . . . . . . . . . . . . . . . . . . . . . . . . . . . 52系統需求 . . . . . . . . . . . . . . . . . . . . . . . . . . . . . . . . . . . . . . . . . . . . . . . .52規格. . . . . . . . . . . . . . . . . . . . . . . . . . . . . . . . . . . . . . . . . . . . . . . . . . . .53索引 . . . . . . . . . . . . . . . . . . . . . . . . . . . . . . . . . . . . . . . . . . . . . . . 5411快速入門歡迎非常感謝您購買 HP Photosmart 印表機!您的新印表機附有以下文件,可以幫助您由入門到精通使用印表機:•安裝指南 — HP Photosmart 《安裝指南》是印表機隨附的海報。
美国阿尔弗雷德 APM 系列软件安装指南说明书

Software Installation Guide NOTE:Read the entire Software Installation Guide before usingthe APM for Windows software.SAFETY CONSIDERATIONSInstalling and servicing heating equipment can be hazardous due togas and electrical components.Only trained and qualified servicepersonnel should install,repair,or service heating equipment.Untrained personnel can perform basic maintenance functions suchas cleaning coils,or cleaning and replacing filters.All otheroperations should be performed by trained service personnel.When working on heating equipment,observe precautions inliterature,on tags,and on labels attached to or shipped with theunit,and other safety precautions that may apply.Follow all safety codes.In the United States,follow all safetycodes including the National Fuel Gas Code(NFGC)NFPA54/ANSI Z223.1--2006.In Canada,refer to the National Standardof Canada Natural Gas and Propane Installation Codes(NSCNGPIC),CAN/CSA149.1--05.Wear safety glasses and work gloves.Have a fire extinguisheravailable during start--up,adjustment procedures,and service calls.Recognize safety information.This is the safety--alert symbolWhen you see this symbol on the furnace and in instructions ormanuals,be alert to the potential for personal injury. Understand the signal words DANGER,WARNING,CAUTION,and NOTE.The words DANGER,WARNING,and CAUTION are used with the safety--alert symbol.DANGER identifies themost serious hazards which will result in severe personal injury or death.WARNING signifies hazards which could result in personal injury or death.CAUTION is used to identify unsafe practices which would result in minor personal injury,or product and property damage.NOTE is used to highlight suggestions which will result in enhanced installation,reliability,or operation.INTRODUCTIONThe Advanced Product Monitor--APM(Furnace Version)is asoftware package that can be used for sales demonstrations, training,and to start--up and troubleshoot Variable Speed Furnaces.APM(Furnace Version)has been tested and approved for use on furnace control boards P/N HK42FZ001,HK42FZ002, CESO130004--00,HK42FZ003,HK42FZ012,HK42FZ021, HK42FZ022,HK42FZ024,HK42FZ026,and HK42FZ031. Because the Advanced Product Monitor runs on a portable laptop PC,it can be carried anywhere to provide the service technician with local access to any Variable Speed Furnace.The Advanced Product Monitor enables a service technician to perform the following tasks:S Monitor furnace parameters.S Save furnace parameters to disk.S Data Log furnace parameters.S Force the furnace into high fire.(All Boards except P/NHK42FZ021,HK42FZ022,HK42FZ024,HK42FZ026,&HK42FZ031)S Force the furnace into low fire.(Board P/N HK42FZ003&HK42FZ012only)S Review the entire furnace fault history.S Review the recent faults in furnace fault history.S Review the last fault that occurred.(Board P/N HK42FZ003, HK42FZ012,HK42FZ021,HK42FZ022,HK42FZ024,HK42FZ026,&HK42FZ031only)S Display troubleshooting information for each fault code.S Save the furnace fault history to disk.S Clear the furnace fault history.S Review the furnace statistics.S Save the furnace statistics to disk.The Advanced Product Monitor has the following NEW capabilities:S Supports new Step--Modulating furnaces.S Supports SPP gas--fired units with ABCD User Interface Connections.S Can be spliced into any ABCD User Interface Connection point. This allows furnace troubleshooting at the outdoor unit.The Advanced Product Monitor is designed for ease of operation.It utilizes menus,special function keys,plain language prompts, and standardized screen format.If you have a PC,or are considering purchasing a PC,the following general requirements should apply:S PC using Pentium233or higher microprocessor.PCs with486 to Pentium200microprocessor’s will work but the ABCDconnector to the User Interface must be disconnected.S At least16Mb(or more)of system memory.S At least6Mb(or more)of free hard drive storage space.S3.5”floppy drive or CD--ROM drive.S Windows95,98,ME,NT,2000,XP or Vista.S RS232port.Adapter required for USB only computers.S VGA display.Included with the Advanced Product Monitor is a B&B RS485 adapter and an interface cable that will connect any of the following furnace control boards P/N HK42FZ003,HK42FZ012, HK42FZ021,HK42FZ022,HK42FZ024,HK42FZ026,& HK42FZ031to a PC.This cable has3stripped and tinned leads on one end and three separate connections on the other end.The stripped leads connect to the B&B RS485adapter.The WHITE housing connects to furnace control P/N HK42FZ003or HK42FZ012at the3--pin communication connector PL--6.The GREEN ABCD PLUG housing connects to furnace control HK42FZ021,HK42FZ022,HK42FZ024,HK42FZ026or HK42FZ031at the4--pin ABCD connector PL7.The GREEN ABCD RECEPTACLE housing in combination with the GREEN ABCD PLUG housing allows you to splice in the APM at any ABCD User Interface connection point except for the one at the User Interface.This allows you to check the furnace from the outdoor unit.NOTE:You will need an APM adapter harness to connect the interface cable to first generation furnace control boards P/N HK42FZ001,HK42FZ002,or CESO130004.These adapter harnesses were distributed years ago and are no longer available. This installation guide has the following sections:I.INSTALL RS232/485ADAPTERII.INSTALLING APM SOFTWAREIII.CONNECTING FURNACE TO PCIV.RUNNING APMV.PALM PILOT APM VERSIONVI.WINDOWS MOBILE5APM VERSIONI.INSTALL RS232/485ADAPTERIn order to interface the Advanced Product Monitor to the variable speed furnace a B&B RS485adapter(B&B485SD9TB)is supplied in the APM kit.ing the B&B converterPlug the B&B RS485adapter into the serial port of your PC. NOTE:If your PC has a25pin connector,an DB25F--DB9M adapter will be required.This standard adapter is available online or at some retail outlets.NOTE:If your PC has only USB connections,a USB to RS--232 adapter will be required.These adapters are available online or at most retail outlets that also sell computers.Reference Appendix A in the APM manual installed on the CD for a list of websites that have compatible adapters.The APM manual is located in the Manual folder.You will need to install the USB serial driver that comes with your USB to RS--232adapter prior to hardware installation.The B&B RS485adapter has a terminal block with5terminals. You will need to connect the interface cable to the terminal block on the B&B RS485adapter.Follow the instructions below to connect the interface cable to the B&B RS485adapter terminal block.(See Fig.1).1.Insert the BLACK wire into the terminal labeled TD(A)onthe B&B RS485adapter and tighten the screw.2.Insert the GREEN wire into the terminal labeled TD(B)onthe B&B RS485adapter and tighten the screw.3.Insert the WHITE wire into the terminal labeled GND onthe B&B RS485adapter and tighten the screw.4.Route wire tie through holes in circuit board portion ofB&B RS485adapter and tighten around cable to providestrain relief.NOTE:The terminals labeled GND and+12V are generally not used because most PCs supply power to the serial port.In the event your PC does not supply power to the serial port you will need to supply external power to the B&B RS485adapter using a12VDC power supply or a9volt transistor battery.II.INSTALLING APM SOFTWAREIn the instructions that follow,it is assumed that the E:drive letter corresponds to the computer’s CD--ROM drive and that the A: drive letter corresponds to the computer’s floppy drive.If this is not the case,please modify the instructions accordingly for your computer’s drive letters.B.Creating Floppy Disk Install SetIf you are installing the APM software onto a computer that does not have a CD--ROM drive,you must first create the floppy disk images.The APM CD--ROM contains compressed self--extracting floppy disk images of the APM install program that need to be copied to4blank,IBM formatted,1.44Mb,3.5”floppy disks.In order to create the floppy disk images,you will need to use a computer that has both a CD--ROM drive and a floppy disk drive. To create the floppy disk images and extract them to the target computer’s hard drive,follow these steps:1.Start windows and insert the APM CD into your CD--ROMdrive.The APM installation routine should automaticallylaunch.Click Cancel to stop the installation.2.Click on the Start button at the bottom left corner and se-lect Run...from the resulting menu.Type E:\mkfloppy A:E:in the text field of the resulting Run dialog then click theOK button.3.When prompted,insert a blank,IBM--formatted,1.44Mbfloppy disk into the computer’s floppy drive and press theEnter key.When the copy has completed,eject the floppydisk and label it APM Disk1of4.4.Insert another blank,IBM--formatted,1.44Mb floppy diskinto the computer’s floppy drive and press the Enter key.When the copy has completed,eject the floppy disk and la-bel it APM Disk2of4.5.Repeat this methodology until all4disk images are created.6.To extract these files to a computer without a CD--ROMdrive insert APM Disk1of4into the A:drive and click onthe Start button at the bottom left corner and select Run...from the resulting menu.Type A:\apm.exe in the text fieldof the resulting Run dialog then click the OK button.Thesefiles will be extracted to a temporary folder namedC:\apmtemp.7.When prompted insert each APM disk until all the com-pressed files are extracted.C.Installing APMBefore you can run the APM program,you must install it.If your computer does not have a CD--ROM drive,you need to create floppy disk images and extract them to the target computer’s hard drive by following the instructions in the previous section.The following instructions apply whether you are installing from the CD--ROM or the extracted files loaded on a computer’s hard drive using floppy disk images.To install the APM software follow these steps:1.Start windows and insert the APM CD into your CD--ROMdrive.The APM installation routine should automaticallylaunch.If it does not automatically launch click on the Startbutton at the bottom left corner and select Run...from theresulting menu.Type E:\setup in the text field of theresult-ing Run dialog then click the OK button.If your computer does not have a CD--ROM and you ex-tracted the floppy disk images to computer’s hard drive thenclick on the Start button at the bottom left corner and selectRun...from the resulting menu.Type C:\apmtemp\setupin the text field of the resulting Run dialog then click theOK button.2.Click Next and follow the on--screen instructions.3.Choose a destination location for the software.The setupprogram will automatically install the APM program in thefolder shown in the window,or you may select anotherfolder.Make your selection and click Next.NOTE:When installing in Windows Vista change the default folder to C:\APM\.Windows Vista prevents programs from writing to any file located in the Program Files folder.If the APM program is installed in the default folder the APM program will not be able to data log or save any views to file.In addition you will have to select the proper COM port every time the APM program is started.4.If you would like to change any selections click on the<Back button,otherwise click on the Install button.5.Once the installation is complete,click on the Finish but-ton.6.Upon successful completion,the installation program willput two new icons on the e the APM icon tolaunch the APM application.The APM Output Files foldericon is the location in which any files created by the APMapplication are stored.III.CONNECTING FURNACE TO PCThe interface cable is connected between the furnace control and the B&B RS485adapter as shown in Fig.1.The GREEN ABCD PLUG housing connects to furnace control HK42FZ021, HK42FZ022,HK42FZ024,or HK42FZ026at the4--pin ABCD connector PL7.The GREEN ABCD RECEPTACLE housing in combination with the GREEN ABCD PLUG housing allows you to splice in the APM at any ABCD User Interface connection point except for the one at the User Interface.The WHITE housing is an alternate connector that connects to furnace control P/N HK42FZ003or HK42FZ012at the3pin communication connector PL6.NOTE:You will need an APM adapter harness to connect the interface cable to first generation furnace control boards P/N HK42FZ001,HK42FZ002,or CESO130004.These adapter harnesses were distributed years ago and are no longer available. The following steps should be performed when connecting the inter-face cable and B&B RS485adapter between the furnace control P/N HK42FZ021,HK42FZ022,HK42FZ024,or HK42FZ026and PC:1.Turn off power at main disconnect.2.Remove access doors.3.Route the interface cable to the furnace control.4.Connect GREEN ABCD PLUG housing on the interfacecable to the furnace board4--pin ABCD connector PL7justbehind the model plug on the lower left side of the furnaceboard.See Fig.1for location.If a User Interface connectionis currently connected to the4--pin ABCD connector PL7disconnect it and plug it into the GREEN ABCDRECEPTACLE housing on the interface cable and thenconnect the GREEN ABCD PLUG housing on the interfacecable to the furnace board4--pin ABCD connector PL7.5.Reinstall access panel and door.6.Connect the opposite end of the furnace cable to the B&Bconverter as shown in Fig.1.7.Turn on electrical power and wait10seconds before run-ning the APM software.CONNECT TO COMPUTER SERIAL PORTB&B RS485 ADAPTER485SD9TBD A08241Fig.1--Furnace ControlIV.RUNNING APMThis section gives you a quick tour of the Advanced Product Monitor so you can start using it right away.To run the Advanced Product Monitor follow these steps:1.Start windows.2.Double--click on the icon labeled APM on your desktop.3.If everything is connected properly the computer willprompt you to enter the serial number of the unit(1to10characters)and click the OK button.NOTE:It may take as long as30seconds before the computer prompts you to enter the serial number.When prompted at least one character must be entered.In addition a name can be given instead of a serial number.See the example shown in Fig.2,where ”thisunit”isentered:A08242 Fig.2--Serial Number ExampleIf the screen shown in Fig.3appears,check your wiring,connector orientation,and whether the board is powered.If OK change your COM port because your PC may already be using COM1for a modem.If you are still having problems you may need to power the RS485adapter.Refer to the last NOTE in SectionI.A08243 Fig.3--Communications Failure Dialog4.After entering the serial number the screen shown in Fig.4should appear when using furnace control board P/NHK42FZ021,HK42FZ022,HK42FZ024,or HK42FZ026.Similar screens will appear with oldercontrols.A08244Fig.4--Screen Image—To monitor the system,click on the System Status tab.—To review the furnace fault codes and error messages,click on the Fault History tab.—To review the furnace statistics,click on the Statisticstab.—To exit the program,select File |Exit from the menu bar.NOTE :To take full advantage of the APM software features,please refer to the APM manual installed on the CD.It is located in the Manual folder.V .PALM PILOT APM VERSIONIncluded on the APM for Windows CD is a Palm Pilot version of the plete instructions are located in the palmAPM folder.VI.WINDOWS MOBILE 5APM VERSIONIncluded on the APM for Windows CD is a Windows Mobile 5version of the plete instructions are located in the winmobileAPM folder.Copyright 2010CAC /BDP D 7310W.Morris St.D Indianapolis,IN 46231Printed in U.S.A.Edition Date:09/10Manufacturer reserves the right tochange,at any time,specifications and designs without notice and without obligations.Catalog No:IIKKGASD0301APM002Replaces:IIKKGASD0301APM001。
APM150用户手册

安全注意事项
本手册内容涉及艾默生 APM 150、APM 150P、APM 150S 集成 UPS 系统(以下简称“UPS” )的安装和使用。 安装前必须先阅读本手册。 UPS 必须由厂家或其代理商指定工程师进行调试和维护。否则可能危及人身安全和导致设备故障,由此引起的设备 损坏,不属保修范围。 UPS 只作商业和工业用途,不可用作任何生命支持设备的电源。 本产品是 C3 类 UPS,用于住宅区可能产生射频干扰。在这种情况下,要求使用者采取附加措施。
电池电压高于 400Vdc 所有电池的物理保养和维护都需使用工具或钥匙,并应由接受过相关培训的人员执行。 电池的使用需要特别小心。电池连接后,电池端电压将超过 400Vdc,人身接触会有致命的危险。 电池厂家提供了使用电池组或在其附近所应遵守的注意事项,这些注意事项在任何时候都应得到遵守。并且应特别注意关于当 地环境条件的相关建议及提供防护工作服,急救设备和消防设备的相关规定。
警告:反灌保护 UPS 提供一零电压触点闭合信号配合外部自动断路器(单独供电)一起使用,以防止电压通过静态旁路电路回馈到输入端。如 果安装人员无需使用此信号,必须在外部旁路输入开关设备上贴上标签,以示维护人员此电路与 UPS 相连。 标签可写作:请在操作此电路前将 UPS 隔离。
用户可维护器件 所有设备内部维护及保养工作都需使用工具,并且应该由接受过相关培训的人员执行。需使用工具才能打开的保护盖板后的器 件为用户不可维护器件。 UPS 完全满足使用操作区设备安规要求。UPS 内部带有危险电压,但非维护人员接触不到。由于带有危险电压的元器件只有使 用工具打开保护盖板后才能接触到,接触高压的可能性已降到最小。如果遵照一般规范并按照本书所建议的步骤进行设备的操 作,将不会存在任何危险。
- 1、下载文档前请自行甄别文档内容的完整性,平台不提供额外的编辑、内容补充、找答案等附加服务。
- 2、"仅部分预览"的文档,不可在线预览部分如存在完整性等问题,可反馈申请退款(可完整预览的文档不适用该条件!)。
- 3、如文档侵犯您的权益,请联系客服反馈,我们会尽快为您处理(人工客服工作时间:9:00-18:30)。
A P M打印管理程序手册vDocument serial number【NL89WT-NY98YT-NC8CB-NNUUT-NUT108】[A P M打印管理程序手册] Version []Revision HistoryContent1 APM 版本打印服务软件简称) 介绍 (5)改进 (5)软件版本与系统环境需求 (5)安装 (5)推荐打印机列表 (12)2 APM的使用 (13)基本参数配置 (13)获取打印许可 (13)Forms/Templates/Resource文件设置 (14)队列设置 (16)队列的添加,修改和删除 (16)队列的属性设置 (17)队列的状态检查和测试 (19)Fontlink添加 (21)smart 字体设置 (24)3 APM进阶设置 (27)卫星展厅相关设置 (27)在resource设置不同的地址 (27)队列分组管理 (27)共享打印机设置 (29)APM备份 (30)APM自带备份功能 (30)手工备份 (32)APM常见问题及解决方案 (33)Print Manager Service无法启动 (33)打印队列显示异常 (34)中文打印乱码 (34)1APM 版本打印服务软件简称) 介绍1.1改进全新形态的属性列表控件及打印机设置编辑器,可以方便的访问所有系统设置和打印机设置。
通过特殊的警报窗口来通知您许可证错误及系统问题。
导出导入功能,可方便的备份和恢复所有打印机设置。
特别的MS Outlook风格快捷方式栏,允许快速访问不同的类别设置。
提供9种不同的界面风格。
1.2软件版本与系统环境需求打印服务器必须是一台单独的电脑操作系统必须是win2000 server 或 win2003 server版本处理器奔腾III 500Mhz以上最少256兆内存10/100 Mbps网卡1G可用磁盘空间彩色显示器鼠标与键盘IP地址必须为10.*.*.248 (*为经销商被分配到的网段)1.3安装请在Footprint知识库中下载APM安装文件:选择语言:English点击Next继续License server中输入license服务器IP:Printers中输入打印机数量SYSTEMID设为0选择安装的文件夹,推荐安装在默认路径下。
点击Next继续点击Next继续点击Next继续点击Next继续APM界面1.4推荐打印机列表打印机推荐使用网络激光打印机,并准备至少5台以确保打印,出于兼容性考虑,采购时请选择我们列表内列出的几款打印机。
我们不推荐新经销商使用针式打印机。
Network Laser PrinterHP 2015nHP 2055dnHP M1522nf (All-in-ones)DotMatrix PrinterLQ-300K+IILQ-1900KII+2APM的使用2.1基本参数配置2.1.1获取打印许可左侧导航栏中选择:Licensing -> Settings右侧属性栏中输入license 服务器IP,端口,打印机数量:Server:Port:1796APM安装完成后,默认端口号为1791,请务必改为1796,否则无法获取打印许可注:打印许可的数量应以实际的打印机数量为准。
如果许可数量少于实际打印机数量,会导致个别打印机打印乱码。
如果许可数量多于实际打印机数量,会影响其他经销商正常获取打印许可。
打印许可只供正式打印机服务器使用,若贵公司有多台打印机服务器(如备用服务器),请确保除正式打印机服务器外,释放所有非正式打印机服务器上的打印许可。
2.2Forms/Templates/Resource文件设置1>在footprint知识库中下载最新的forms,templates,resource文件,并拷贝到APM安装路径下的print manager文件夹下。
2>Resource 文件中公司信息修改Resource文件夹中应包含30个文件,及若干个以公司代码命名的文件夹。
如DMS公司代码为XX,另有一个城市展厅代码为YY,则resource文件夹中应如下图所示:请将resource中的30个文件拷贝到XX及YY文件夹中,并将所有.txt文件的内容修改为相应的公司信息。
2.3队列设置2.3.1队列的添加,修改和删除左侧工具栏中选择:General -> Queues点击New,Copy,Delete快捷按钮,即可新建,拷贝,删除队列并在右侧的属性窗口中编辑该队列的属性。
2.3.2队列的属性设置以下属性请经销商根据实际情况设置,其他参数保持默认值即可:General:1〉Name:队列名称,需和版本中队列名称保持一致,否则将无法打印。
2〉Description:队列描述。
Printer:3〉Printer:选择打印服务器上已添加的打印机。
Folders:4〉根据APM的安装目录,设置kform,templates,resource的路径Resource的folder路径,只须设置到安装路径的resource文件夹即可,不需要设置到公司代码命名的子文件夹。
Report Printing:1〉Mode:激光打印机选择Existing Form针式打印机选择Direct2〉Existing Form:根据打印队列所属模块不同,按照以下规则设置:模块Portrait Form Landscape Form Landscape Column 售后132配件132销售190财务1322.3.3队列的状态检查和测试打印队列添加完成后,请检查队列状态是否为OK,并打印测试页。
1〉点击Test按钮2〉选择需要测试的队列,点击Status若Status不是“OK”,说明配置有问题,请检查许可是否获取,或队列属性配置是否正确。
3〉选择测试文档,或在Text栏内输入任意文字,点击“print”以打印测试页。
2.3.4Fontlink添加APM安装完成后,须在注册表中添加12个fontlink:打开注册表,进入以下路径:[HKEY_LOCAL_MACHINE\SOFTWARE\Microsoft\Windows NT\CurrentVersion\Fontlink\SystemLink]检查以下12个fontlink是否全部存在,若不存在,按照以下步骤添加ArialCorpoSCourier NewGulimLucida ConsoleLucida Sans UnicodeMicrosoft Sans SerifMS UI GothicPMingLiUSimSunTahomaTimes New RomanFontlink添加方法:1>在空白处鼠标右键新建2>选择多字符串值3>设置fontlink代码以Corpos为例:4>设置键值选择刚才新建的fontlink代码,鼠标右键点击修改输入键值,所有新建的fontlink代码都输入以下键值:,SimSun,PMingLiU,MS UI Gothic,Batang按照以上步骤,依次创建所有12个fontlink,并重启打印及服务器2.3.5smart 字体设置若贵公司有smart业务,请参照以下内容设置samrt单据字体,若没有smart业务,请忽略此章节。
smart单据中所有中文应当为幼圆字体。
1>首先请确保打印机服务器安装了幼圆字体。
2>检查幼圆字体所调用的字体文件名。
打开注册表,进入以下路径:[HKEY_LOCAL_MACHINE\SOFTWARE\Microsoft\Windows NT\CurrentVersion\Font]如下图所示,幼圆字体所调用的文件名为:3>为smart添加fontlink。
打开注册表,进入以下路径:[HKEY_LOCAL_MACHINE\SOFTWARE\Microsoft\WindowsNT\CurrentVersion\Fontlink\SystemLink]创建名为Smart Courier Regular的fontlink,并将键值设为贵公司打印服务器上的幼圆文件名。
(fontlink创建方法,请参考章节)如下图所示,该服务器上幼圆字体文件名为:则fontlink名为:Smart Courier Regular 键值为:,YouYuan(逗号后的YouYuan为描述)3APM进阶设置3.1卫星展厅相关设置若一台打印机服务器的APM需要支持多个卫星展厅的打印服务,且各卫星展厅有自己的公司地址,电话等信息。
可通过配置APM,分别管理各卫星展厅的队列及resource属性。
3.1.1在resource设置不同的地址Resource文件夹中创建多个子文件夹,并且命名为2位DMS公司代码。
并在子文件夹中维护该公司的resource信息。
3.1.2队列分组管理1〉将多个打印队列添加到同一个组中2〉选中该组的所有队列,并设置该组的resource文件夹路径3.2共享打印机设置共享打印机是指打印机自身没有网络接入功能,需要通过连接到PC才能共享的打印机,包含针式打印机。
因打印机是通过PC共享的,APM在调用打印机时,首先需要具有该PC的访问权限。
请按照以下步骤为APM添加该PC的管理员帐号信息:首先需要在共享PC上创建一个和打印机服务器相同的本地管理员账号,并设置相同的密码。
如登陆打印机服务器的管理员账号为Admin,密码为123。
则需要在共享PC上也创建一个管理员账号Admin,密码设为123。
进入打印机服务器:控制面板 administrative tools Services Print Manager Service进入Log On页面,选择This account,并绑定共享打印机所连接PC的管理员帐号和密码。
3.3APM备份在APM上配置完所有打印机队列,并经过测试可以成功打印后,请备份注册表信息,当APM出现问题时,可以方便的恢复。
3.3.1APM自带备份功能退出APM时,系统会有如下备份提示,请选择备份到本地文件,系统会将APM配置信息备份为注册表文件。
3.3.2手工备份3.4APM常见问题及解决方案3.4.1Print Manager Service无法启动Kprint软件由老版本的升级为后,若老版本卸载不完全,会导致在windows service列表中,kprint service(老版本)和Print Manager Service(新版本)同时存在,从而导致print manager service无法启动。
只需手动关闭kprint service服务即可。
版本版本3.4.2打印队列显示异常打印队列正常显示为黑色,若显示为红色,则说明没有获取到打印许可。