场发射扫描电子显微镜
场发射扫描电镜的样品制备和操作步骤

场发射扫描电镜的样品制备和操作步骤场发射扫描电镜(Field Emission Scanning Electron Microscopy)是一种高分辨率的电子显微镜技术,可用于观察和分析各种材料的表面形貌和微观结构。
为了获得清晰的显微图像,样品制备和操作步骤非常重要。
一、样品制备1. 样品的选择:场发射扫描电镜适用于不同种类的材料,如金属、陶瓷、聚合物等。
选择合适的样品很关键,它应具备研究对象的特性,并且能够承受电子束的辐照。
2. 样品的固定:为了保持样品的形状和结构不变,通常需要将其进行固定。
对于固态材料,可以使用金属夹片或导电胶进行固定。
对于液态材料,可以将其冷冻或凝胶化,以保持其形状。
3. 样品的切割和打磨:有时候,需要将样品切割成适当的尺寸,以便放入样品架中。
这可以通过使用金刚石切割机、电解或机械研磨仪器等设备来完成。
4. 样品的真空处理:在将样品放入场发射扫描电镜前,通常需要将其进行真空处理。
这可以通过将样品放入真空干燥器中、在低压下进行加热或冷冻干燥来完成。
真空处理有助于去除空气中的水分和气体,以减小背景干扰。
二、操作步骤1. 打开电镜系统:在开始操作前,需要将场发射扫描电镜系统打开并进行预热。
预热时间通常需要几十分钟,以保证系统内部达到稳定的工作温度。
2. 放置样品:将样品放置在样品架上,并确保其良好接触。
对于粉末状样品,可以使用导电胶将其固定在样品支架上。
对于固态样品,可以使用金属夹片固定在样品架上。
3. 调整显微镜参数:通过调整电子束能量、聚焦、工作距离等参数,来优化扫描电子显微镜的成像质量。
这些参数的选择取决于样品的特性和所需的分辨率。
4. 开始观察:一切准备就绪后,可以开始观察样品。
通过控制电子束的扫描和探测系统,可以获得样品的表面形貌和微观结构的信息。
在观察过程中,要注意避免样品表面的污染和损坏。
5. 数据分析:场发射扫描电镜获得的图像可以进一步进行数据分析。
可以通过对图像进行增强、测量尺寸和形状、进行结构分析等手段,来得到更详细的样品信息。
场发射扫描电子显微镜安全操作及保养规程

场发射扫描电子显微镜安全操作及保养规程电子显微镜是一种高精度的仪器,操作时需要遵循一定的安全规程和保养措施,以确保仪器的正常运行和使用者的安全。
下面是电子显微镜的安全操作和保养规程,供参考。
一、电子显微镜的安全操作规程:1.进入实验室前,要穿戴好实验室专用工作服,并佩戴好相应的防护用品,如手套、眼镜和口罩等。
2.在操作电子显微镜之前,应先了解设备的基本知识,熟悉仪器的使用方法和操作步骤。
3.在使用电子显微镜之前,要确保仪器的电源已经关闭,并检查仪器的相关连接线是否牢固。
4.在进行样品准备时,应使用专用工具进行操作,避免直接用手触摸样品和仪器部件。
5.在开机之前,应确认好样品装载台、真空系统和冷凝系统等设备是否运行正常。
6.在启动电子显微镜之前,要确保室内的温度和湿度适宜,尽量避免环境中的尘埃和静电干扰。
7.在启动电子显微镜后,应根据实际需要进行相关参数的调整,如电子束强度、放大倍数和对比度等。
8.在放大和观察样品时,要注意不要过度放大或观察过长时间,以免对样品和仪器造成损坏。
9.在操作电子显微镜时,要保持室内环境的安静和稳定,避免不必要的震动和干扰。
10.在关闭电子显微镜之前,要先将相关参数调整到初始位置,然后将电源关闭,并检查仪器是否有异常情况。
二、电子显微镜的保养规程:1.每天使用电子显微镜之前,要先清理设备外部的尘埃和杂物,并定期清洁仪器的内部部件,如样品台和镜筒等。
2.定期检查电子显微镜的电源线和电源插头是否有损坏或老化现象,并及时更换或维修。
3.定期检查仪器的真空系统和冷凝系统,保持其正常运行状态,如有异常情况,应及时修理或更换相关部件。
4.定期检查仪器的操作系统、数据存储系统和软件程序等,确保其正常运转和更新。
5.定期校准电子显微镜的各项参数和功能,以确保仪器的精度和准确性。
6.在仪器长时间不使用时,要将其储存在干燥、清洁和稳定的环境中,以免仪器受潮、腐蚀或受损。
7.在操作电子显微镜时,要避免使用尖锐或硬物品接触样品、仪器内部或镜筒,以免划伤或损坏仪器。
场发射扫描电子显微镜(S-4800)操作规程

场发射扫描电子显微镜(S-4800)操作规程开机1. 检查真空、循环水状态。
2. 开启“Display”电源。
3. 根据提示输入用户名和密码,启动电镜程序。
样品放置、撤出、交换1. 严格按照高度规定高样品台,制样,固定。
2. 按交换舱上“Air”键放气,蜂鸣器响后将样品台放入,旋转样品杆至“Lock”位,合上交换舱,按“Evac”键抽气,蜂鸣器响后按“Open”键打开样品舱门,推入样品台,旋转样品杆至“Unlock”位后抽出,按“Close”键。
观察与拍照1. 根据样品特性与观察要求,在操作面板上选择合适的加速电压与束流,按“On”键加高压。
2. 用滚轮将样品台定位至观察点,拧Z轴旋钮(3轴马达台)。
3. 选择合适的放大倍数,点击“Align”键,调节旋钮盘,逐步调整电子束位置、物镜光阑对中、消像散基准。
4. 在“TV”或“Fast”扫描模式下定位观察区域,在“Red”扫描模式下聚焦、消像散,在“Slow”或“Cssc”扫描模式下拍照。
5. 选择合适的图像大小与拍摄方法,按“Capture”拍照。
6. 根据要求选择照片注释内容,保存照片。
关机1. 将样品台高度调回80mm。
2. 按“Home”键使样品台回到初始状态。
3. “Home”指示灯停止闪烁后,撤出样品台,合上样品舱。
4. 退出程序,关闭“Display”电源。
注意1. 每天第一次加高压后,进行灯丝Flashing去除污染。
2. 冷场发射电镜一般不断电,如遇特殊情况需要大关机时,依次关闭主机正面的“Stage”电源、“Evac”电源,半小时后关闭离子泵开关和显示单元背面的三个空气开关,关闭循环水。
开机时顺序相反。
3. 每半个月旋开空压机底阀放水一次。
4. 待测样品需烘干处理,不能带有强磁性,不能采用铁磁性材料做衬底制样。
5.实验室温度限定在25±5℃,相对湿度小于70% 。
仪器维护1. 每月进行电镜离子泵及灯丝镜筒烘烤。
2. 每半年进行一次机械泵油维护或更新。
场发射扫描电镜工作原理

场发射扫描电镜工作原理场发射扫描电镜(Field Emission Scanning Electron Microscope,FE-SEM)是一种利用电子束扫描样品表面并通过信号与图像处理系统来重现样品表面微观结构的高分辨率电子显微技术。
FE-SEM是目前最常用、最成熟的电子显微技术之一,具有分辨率高、对样品厚度敏感度低、对材料表面信息获取能力强等优点。
FE-SEM的工作原理非常复杂,下面简要介绍其基本原理。
FE-SEM主要由以下几个部分组成:电子枪、聚焦系统、扫描系统、检测系统和成像系统。
其中电子枪和聚焦系统是电子束发射和聚焦的部分,扫描和检测系统则负责扫描样品表面并收集反射的电子信号,最后成像系统则将信号转化为图像。
电子枪通过引入高压电场和热发射,产生一个极小尺寸的电子束。
聚焦系统的作用是将电子束聚焦到样品表面上,使其成为一束高能量、小尺寸的电子束。
这个过程中,电子束会出现能量弥散,需要进行补偿,以形成更加稳定的电子束。
扫描系统的作用是将电子束在样品表面进行扫描,构建出样品表面的形貌和结构信息。
这个过程中,扫描器会通过在x和y方向上推动电子束来进行扫描,电子束与样品表面会产生相互作用,产生不同的信号。
这些信号经过检测系统的收集,可以分为两种类型:二次电子信号和背散射电子信号。
二次电子信号主要反映的是样品表面的形貌和镜像信息,而背散射电子信号则主要反映样品表面的成分和晶体结构信息。
检测系统可以通过检测这些信号并转化为图像,将样品表面的形貌和结构再现出来。
不同的检测系统可以处理的信号类型不同,有些可以处理二次电子信号,有些则只能处理背散射电子信号。
一般情况下,将这两种信号进行叠加可以获得更加完整的样品信息。
总的来说,FE-SEM的工作原理基于电子枪和聚焦系统形成高能量、小尺寸的电子束,扫描系统进行扫描和信号收集,检测系统将信号转化为图像再进行成像的整个过程。
在这个过程中,电子束与样品表面的相互作用是最核心的。
日立SU5000场发射扫描电子显微镜说明书

Fig. 1 External appearance of SU5000 FE-SEM New Schottky FE-SEM, SU5000Shigeaki Tachibana *1 William Podrazky *2Introduction1. Scanning Electron Microscopes (SEM) are used for observation and analysis in various fields. Since Field Emission SEM (FE-SEM) equipped with a field emission electron gun source provide higher resolution than those equipped with a thermionic emission electron gun source, the user base for FE-SEM has broadened significantly due to the need to observe specimen features continually decreasing in size. FE-SEMs are increasingly recognized as a tool for performing various surface analyses, however detection technologies for various signals generated from specimens have advanced beyond topographic observation alone. Typically the operator must utilize previous knowledge, training, and skill in microscopy to generate desirable results; therefore, optimal performance may vary based on experience level. For example, optimal performance may not be realized as a result of improper optical axis alignment or astigmatism correction, utilizing unsuitable accelerating voltage(s), or other parameters. Integrating an automated solution for these problems would allow the user to focus on obtaining comprehensive results under the best possible conditions at all times. Hitachi High-Technologies has developed a novel user interface which augments conventional SEM techniques to assist these problems. The “EM Wizard” user interface was developed to bring “new usability” to EM operators of various levels of experience. This Schottky FE-SEM, the SU5000, incorporated with EM Wizard interface, launched in August 2014 (Fig. 1).Fig. 2 EM Wizard, objectives selection screen.New Interface: EM Wizard2. With EM Wizard, rather than setting individual conditions such as the accelerating voltage, working distance, detector, and other parameters, the operator can select an “Observation Purpose,” such as “Surface Information” or “Elemental Information,” from a selection menu (*2). On the screen, a Radar Chart displays the type of content that will be acquired (resolution, surface information, elemental composition), and a simulated SEM image representing how a specimen will appear under each observational objective. This information provides a visual understanding of SEM image characteristics that can guide the operator in selecting these objectives (Fig. 2). When an “Observation Purpose” is selected, related system parameters are set automatically (e.g., accelerating voltage, working distance, detector), and optical axis parameters as well as astigmatism corrections are adjusted to optimal values. Simply by adjusting the brightness/contrast and focus, the operator can easily acquire high quality images at consistent resolution. In addition to an applications selection menu, what makes these functions possible are high-precision automation technologies initially developed for Critical Dimension (CD) SEM. CD-SEM are entirely automated, and must provide highly reproducible measurements, optical axis alignments, and other adjustments; EM Wizard has been designed to use these automation technologies to reproduce and maintain highly precise adjustments invariably. Because optical axis alignment and astigmatism correction values change with lens conditions over time, they cannot be maintained for long periods, even if stored in the system. However, EM Wizard includes an auto-calibration function which automatically restores parameters to optimal values responsive to long-term changes in lens conditions (*3), eliminating any need for proficiency in readjustment procedures. This feature makes it easier for the operator to obtain images in focus, maintain high reproducibility, and acquire data efficiently. Figure 3 is an example of a catalyst observed at 200,000× magnification after auto-calibration with the use of EM Wizard. Metal particles several nm in size are discernible during operation without complex adjustment.Fig. 4 Observation of lithium ion battery positive electrode. Left: Secondary electron image. Right: Backscattered electron image.Magnification: 25,000×.Fig. 3. Catalyst observation. Magnification: 200,000×Low-energy observation3. In addition to the assistance functions provided by automation as shown above, the SU5000 is equipped with optical and detection systems suitable for any variety of analysis required. The emitter used is a Schottky-type device which delivers a spatial resolution of 2.0 nm at 1 kV (*4) and high probe current (>200 nA). Figure 4 is an example of the positive electrode of a lithium-ion battery observed at a landing voltage of 0.3 kV. The positive electrode of Lithium ion batteries is comprised of an active substance consisting of conductors, binders, and other elements. However, some binder materials cannot withstand electron beam irradiation and must be observed at the lowest possible energy. The left image in Fig. 4 was produced by a secondary electron detector mounted inside the electron column, and the right image was produced by a backscattered electron detector inserted below the lens. In the secondary electron image, the binder appears dark by voltage contrast, while the backscattered electron image allows for distribution of contrast based on each material. In this example, multiple signals are used to evaluate different components of the electrode including topographic and compositional distributions. It is inferred that the enhanced voltage contrast in the secondary electron image is attributed to differences in the charge effect of each material due to the secondary electron generation efficiency when irradiated by very low-energy incident electrons.4.Concluding RemarksThe SU5000 was developed to address the various needs of SEM users in materials science, biomedicine, and many other fields. As the FE-SEM grows in popularity, Hitachi will continually place importance on functions such as EM Wizard, which are capable of providing high-resolution and optimized contrast images with high reproducibility, regardless of the user experience level.(*2)Patent No. 5416319(*3)Patent No. 5464534(*4)With use of deceleration mode (optional)ReferencesSato M., History of Technologies in high resolution SEM, Kobunshi, 9 (2014)(Japanese).Authors*1 Shigeaki Tachibana, Hitachi High-Technologies Corp., Marketing Department*2 William Podrazky, Hitachi High-Technologies America, Inc.。
S-4800场发射扫描电子显微镜培训材料

Hitach〔日立〕S-4800 型扫描电子显微镜培训材料一、留意事项:1、严禁没有操作资格的人员操作电镜;2、操作人员要严格依据操作规程进展操作,在仪器产生特别时要准时报告全部事实;3、样品制备严格依据要求进展,特别是磁性样品;4、严禁在试验室吃东西,保持试验室清洁卫生;5、不允许在试验室内使用水槽;6、制止在试验室内使用产生大量粉尘的物质;7、不得在试验室内大声喧哗、扰乱正常工作;8、留意试验室内湿度应当在60%以下,留意下水管漏水状况。
培训加考核共6个半天。
必需按时到场,认真学习,不允许半途离开。
培训考核完毕之后,每人进展操作的前两次必需有娴熟人员伴随,并要求伴随人员在使用登记表上签字。
电镜操作的第一前提是要保证人身安全,其次前提是保证仪器设备安全。
第一次培训内容:生疏S-4800的开机、进样、取样、关机等主要步骤。
1、介绍冷热场放射的扫描电镜〔附件一及附件二〕。
冷场放射电镜特点,灯丝不加热,引出电场,束流小,能量分散小,但需要高真空,有气体分子吸附。
扫描电镜的根本原理。
2、介绍S-4800 及能谱的组成局部、电源掌握。
3、先翻开循环水开关,再翻开主机Display 开关。
4、检查离子泵IP1、IP2、IP3 的数据并记录。
5、进入掌握主机桌面,双击图标进入S-4800 的掌握软件。
6、每天开头工作前做Flashing 2 一次,加电压,观看vext 数值〔例如3.8KV〕,假设跟上一次做完flashing 之后的数值〔例如3.7KV〕差异小于0.2KV,则记录此值。
假设与上次相比差异大于0.2KV〔例如本次做完flashing 后vext 数值为4.0KV〕,则需再做一次flashing2,差值应当减小到0.2KV 以内,记录此vext数值。
7、检查样品高度,样品台粘好样后,肯定要用气枪把未粘牢的样品吹掉,并确定被测样品的最高处在标准范围内,不能超出标准高度,也不能低太多;8、如何进样:(1)按交换舱上的AIR〔放气〕按钮,向交换舱充气,听到“嘀——”的声音,可以翻开交换舱。
场发射扫描电子显微镜安全操作及保养规程

场发射扫描电子显微镜安全操作及保养规程1. 引言场发射扫描电子显微镜(Field Emission Scanning Electron Microscope,FE-SEM)是现代科学研究中常用的一种实验设备。
本文档旨在说明使用FE-SEM的安全操作规程以及设备的保养方法,保障使用人员的安全并延长设备的使用寿命。
2. 安全操作规程2.1 个人安全 - 在使用FE-SEM之前,使用人员应接受相关培训,了解设备的基本操作方式和安全注意事项。
- 在操作过程中,使用人员应佩戴适当的个人防护装备,包括防护眼镜、手套和实验服等。
- 在进行样品处理和加载时,应注意避免接触有毒或腐蚀性物质,并采取适当的防护措施。
- 若出现设备故障或异常情况,应立即停止操作并向相关人员报告。
2.2 设备安全 - 在操作之前,应检查设备的电源、冷却系统和真空系统是否正常工作。
- 禁止在离设备太近的地方放置易燃、易爆物品。
- 避免使用金属工具或其他尖锐物品直接接触设备,以免损坏设备外壳或导致电气短路。
- 在操作时,确保设备周围没有杂物或其他障碍物,以免影响操作或造成伤害。
2.3 样品处理与装载 - 检查待测样品是否符合FE-SEM的尺寸和材料要求。
- 在进行样品处理和装载时,避免给样品带来静电或其他污染源,保持样品表面干净。
- 使用合适的工具和技术进行样品装载,确保样品与设备接触良好。
3. 设备保养规程3.1 日常清洁 - 定期清洁设备外壳和工作区域,避免尘埃和杂物积累。
- 使用清洁棉布或软刷,避免使用酸性、碱性或腐蚀性溶剂来清洁设备。
- 定期清理样品台和探针,确保设备在正常工作状态下进行观察。
3.2 真空系统维护 - 定期检查真空泵和真空管路的密封性能,确保系统处于正常工作状态。
- 定期更换真空泵的油封、滤芯等易损件,延长设备使用寿命。
- 注意监测真空度的稳定性,如发现异常应及时处理。
3.3 电子枪维护 - 定期检查电子枪的工作状况,清洁电子发射区域,避免灰尘和污垢的堆积。
JEOL JSM-7500FA 场发射扫描电子显微镜使用说明书
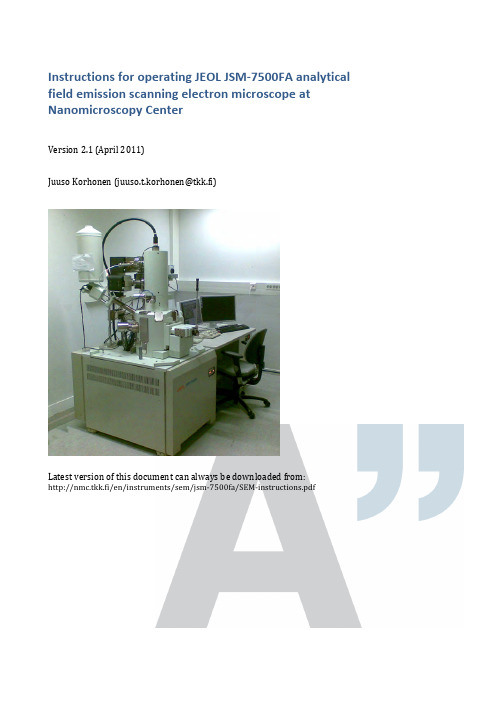
Instructions f or o perating J EOL J SM-‐7500FA a nalytical field e mission s canning e lectron m icroscope a t Nanomicroscopy C enterVersion 2.1 (April 2011)Juuso K orhonen (***********************)Latest v ersion o f t his d ocument c an a lways b e d ownloaded f rom:k.fi/en/instruments/sem/jsm-‐7500fa/SEM-‐instructions.pdfOfficial i nformationNew u ser t rainingInexperienced u sers h ave a c ouple o f o ptions, l isted b elow i n t he o rder o f preference.1.Ask f or t raining f rom t he m ost e xperienced S EM u ser o f y ourresearch g roup.2.Attend t o t he c ourses T fy-‐125.4313 a nd T fy-‐125.4314 M icroscopyof n anomaterials (5+5 c r). T hey a re l ectured e ach s pring b y P rof.Janne R uokolainen.3.Ask o ne o f t he a dministrators t o a rrange a t raining s ession.a.Small g roups o f 2-‐3 p eople a re p referred f or t he t rainings.Allow s ome t ime t o g ather e nough p eople f or t he g roup.b.Training i s d one u sing a p ractice s ample a nd p ersonalsamples a re u sually n ot i maged.Experienced u sers c an c ontact o ne o f t he a dministrators f or a s hort introduction t o t he e quipment.Every n ew u ser h as t o b e a pproved b y o ne o f t he a dministrators b efore t hey are a llowed t o u se t he S EM o n t heir o wn. T he a dministrator k eeps a s hort (15-‐30 m in) s ession w here t he e ssential s kills o f t he u ser a re c hecked. User a pplicationUser a pplication h as t o b e f illed i n o rder t o g ain r eservation a ccess t o a ny o f the N MC e quipment. T he f orm c an b e f ound f romk.fi/en/documents/nmc_user_application_form.pdf a nd i t i s returned t o o ne o f t he a dministrators f or a pproval.PricingBilling i s d one u sing t he c urrent N MC p rice l ist. C ontact P rof. J anne Ruokolainen f or t he m ost c urrent l ist. P lease n ote t hat i ndividual t raining given b y t he a dministrators w ill a lso b e c harged.Precautions – r ead c arefully•Always c heck t he l iquid n itrogen l evel a nd f ill i f n ecessary.o First u ser o f t he d ay a lways f ills t he t ank.•Keep a ll p arts c lean a nd c lean t hem i f n ecessary w ith e thanol.o Wear g loves w hen h andling h olders.•Fill t he l og b ook o n t he c omputer.o Mark a ny s trange b ehavior o r p roblems t o t he l og b ook.•If s omething i s m issing f rom t he S EM o r f rom t he s ample p reparation room (e.g. g loves, e thanol, h olders, c arbon t ape), p lease i nform o ne o fthe a dministrators (send e mail o r c all).•Use o nly f eatures y ou a re t rained t o u se. F or e xample, d o n ot u se EDS o r R BEI i f y ou d on’t k now h ow t o o perate t hem s afely.•Use o f U SB s ticks i s s trictly p rohibited d ue t o s ecurity i ssues a nd hardware i ncompatibility.•Stay c alm a nd u se y our c ommon s ense.•Contact a dministrators i f y ou a re i n d oubt. C ontact i nformation i s found o n t he l ast p age o f t hese i nstructions.Quick s tartup p rocedure1.Turn o n b oth m onitors a nd c heck t hat S EM s oftware a nd u sage l og(Excel) a re r unning. S tart t hem i f n ecessary. L og i n a s G uest (nopassword).2.Check t he l iquid n itrogen l evel a nd f ill i f n ecessary. T he f irst u serof t he d ay a lways f ills t he t ank.3.Fill t he u sage l og:a.Date, s tart t ime (and e nd t ime).b.Your n ame (and t he n ame o f y our h ost i f y ou d o n ot h avereservation p ermissions).c.Vacuum l evels b efore s tarting.d.Amount o f f illed l iquid n itrogen (write “0” i f y ou o nlychecked t he l evel).e.Write n otes a nd c omments t o t he l ast f ield i s n ecessary.f.Save t he f ile (Ctrl-‐S).4.Prepare y our s ample.5.Insert s ample i nto m icroscope:a.Press E xchange p osition.b.Press a nd h old V ENT f or c a. 1 s ec. O pen s ecuring l atch. W ait.c.Open c hamber a nd i nsert h older a long t he d irection o f t hearrows.d.Close c hamber.e.Press a nd h old E VAC f or c a. 1 s ec. W ait u ntil b linking s tops.f.Operate t he r od t o m ove t he s ample t o t he s tage. I f y ou’re n otabsolutely c ertain h ow t o d o t his, r ead t he d etailedinstructions!g.Take o ut t he r od.6.Wait u ntil v acuum l evel r eaches l ess t han 5⋅10-‐4 P a.7.Set E mission c urrent t o 10 μA.8.Select A cceleration v oltage.9.Press O bservation O N.Shutdown p rocedure1.Press O bservation O FF t o t urn o ff a cceleration v oltage.2.Press E xchange p osition.3.Take o ut h older u sing t he r od.4.Press a nd h old V ENT f or c a. 1 s ec. O pen s ecuring l atch. W ait.5.Open c hamber a nd t ake o ut t he h older.6.Close c hamber.7.Press a nd h old E VAC f or c a. 1 s ec.8.Mark e nding t ime a nd o bservations t o U sage l og a nd s ave f ile (Ctrl-‐S).9.Set S EM M onitor s oftware t o n ormal s ettings:a.Exchange p osition p ressed (green).b.Mode: S EMc.Magnification: m inimum f or b oth S EM a nd L Md.Probe c urrent: 810.Turn o ff s pecial f eatures y ou h ave u sed: I mage r otation, d ynamicfocus, e tc.11.If y ou m ade a ny c hanges i n t he O peration S ettings m enu, c hangethem t o n ormal v alues (scan s peeds, i mage f unction, e tc.).12.Clean t he h olders w ith e thanol i f n ecessary.13.Clean t ables. I f y ou w ant t o s tore y our s amples, m ark t hem w ith y ourname a nd p ut t hem o nto a s helf. T hings l eft o n t he t able a re t hrowninto t he t rash.14.Transfer y our i mages f rom t he s mall c omputer o n t he b ack t able.You c an f ind y our f iles a t t he n etwork d rive c alled H arley.e U SB s tick, S SH, e mail, o r b urn a C D.b.The f iles c annot b e t ransferred d irectly f rom t he S EMcomputer d ue t o s ecurity r easons.15.Turn o ff m onitors. D o n ot l og o ut f rom t he s oftware o r c lose t heExcel l og b ook.Changing s ample1.Press O bservation O FF t o t urn o ff a cceleration v oltage.2.Press E xchange P osition t o m ove t he s tage t o c orrect p osition.3.Take s ample o ut b y o perating t he r od.4.Press a nd h old V ENT f or c a. 1 s ec. t o f lush c hamber a nd o pen l atch.Wait.5.Open c hamber a nd t ake o ut s ample (pull a long t he a rrows, n ot u p).6.Change s ample a nd i nsert h older a long t he a rrows.7.Close c hamber a nd s ecure w ith l atch.8.Press a nd h old E VAC f or c a. 1 s ec. W ait u ntil b linking s tops.9.Insert s ample b y o perating t he r od. T ake o ut r od.10.Wait u ntil c hamber v acuum r eaches 5⋅10-‐4 P a b efore t urning o nacceleration v oltage.Special f eaturesThis i s o nly a q uick r eference. S pecial t raining i s r equired t o u se R BEI o r E DS, because o f s afety i ssues.Infrared c ameraYou c an s ee i nside t he c hamber u sing t he i nfrared c amera.1.Switch c amera o n f rom t he b utton o n t he t able.2.From S EM s oftware s elect N avigator -‐> I nfrared c amera3.Turn c amera o ff w hen u sing R BEI o r E DS.Probe c urrent m eterProbe c urrent m eter c an b e u sed t o c heck t he c urrent g oing t o t he s ample. I t is m ost i mportant i n E DS a nalysis.1.Insert t he d etector b y c hecking P CD f rom t he b ottom r ight c orner o fSEM s oftware.2.Take o ut d etector a fter y ou h ave r ead t he c urrent f rom t he S EMsoftware.Retractable b ackscattering d etector (RBEI)Backscattering d etector i s u sed t o d istinguish b etween e lements o n t he sample.1.Set w orking d istance t o 8 m m o r m ore.a.Inserting R BEI w ith l ess t han 8 m m b etween t he s ample a ndthe o bjective l ens w ill r esult i n s erious d amage.2.Turn o ff i nfrared c amera.3.Insert d etector b y c hecking R BEI f rom t he b ottom r ight c orner o f t heSEM s oftware.4.Select C OMPO o r T OPO f or i mage m ode (same m enu a s S EM a nd L M)and u ser a s low s canning s peed f or o bservation.X-‐ray a nalysis (EDS)This g uide i s n ot a dequate f or p roper o peration o f E DS, b ut i s o nly a q uick reference f or t rained u sers.1.Set w orking d istance t o e xactly 8 m m.a.Focus w ith Z h eight u sing t he r ing o f t he s croll w heel i nsteadof F OCUS.2.Insert R BEI.3.Turn o n b ias v oltage b y c licking t he l ightning i ndicator.a.Wait u ntil c ount r ate s tabilizes.4.Select A nalysis f rom t he r ight s ide o f S EM s oftware.5.Click D T (dead t ime) a nd s elect T4 f rom t he l ist.6.Adjust p robe c urrent s o D T b ecomes g reen (around 20-‐30 %) a ndcount r ate i s c a. 2000-‐3000 c ps.7.Take s pectra, l ine s can, o r m apping u sing t he a ppropriate b uttons.8.When a sked a bout s aving t o a n etwork d rive, s elect O K.9.Save t he a nalysis b efore e xiting a nalysis m ode i n o rder t o b e a ble t oreturn t o t he a nalysis l ater.a.Exporting o nly s aves t he i mage a nd y ou c annot r eturn t omake m ore a nalysis o n t he d ata.10.When y ou a re f inished w ith a nalysis, t urn o ff t he b ias v oltage a ndtake o ut R BEI.Saving E DS s pectraIf y ou w ant t o b e a ble t o p lot y our E DS s pectrum, s elect E xport a nd t hen select M SA f ile. I t w ill s ave t he s pectrum i n a c ompatible f ile f or u se i n O rigin, Excel, o r s ome o ther p lotting p rogram.Detailed i nstructionsOperating t he r od (sample e xchange m echanism)This p rocedure d escribes h ow t o u se t he s ample e xchange m echanism i norder t o e ither r emove o r i nsert a s ample h older i nto/from t he m icroscope.Read t his s ection c ompletely t hrough b efore p roceeding a nd m ake s ure t hatyou u nderstand e very s tep.Precondition: T he e xchange c hamber i s i n v acuum a nd t he d oor s eparatingit f rom t he m icroscope i s o pen. C onfirm t hat E VAC l ight i s l it a nd n otblinking. D epending o n w hether y ou a re i nserting o r t aking o ut a s ample, t heholder m ight b e i n t he e xchange c ompartment (HLDR l ight i s o ff) o r i nsidethe m icroscope (HLDR l ight i s o n).See t he v ideo o n t he c omputer d esktop f or a d emonstration. U PDATE: T hefigures a re f rom a n o ld v ersion o f r od.1.Push t he b ar i nside t he m icroscope b y f ollowing t he p rocedure:a.Lower t he r od t o h orizontal l evel, w hile l ightly h olding i tback.b.Let t he r od b e p ulled i n s lowly.c.Push t he b ar g ently a ll t he w ay i nside u ntil i t s tops (d).•There i s a l ittle r esistance a t t he f inal c ouple o fcentimeters.•The s ample s hould b e n ow e ither r eleased f romthe b ar o r a ttached t o i t (depending o n w hetheryou a re i nserting o r r emoving t he h older).•If y ou h ave n ot p ushed t he s ample a ll t he w ayinside a nd s tart t o p ull b ackwards t here i s adanger t hat t he s ample h older w ill f all t o t hebottom t he s ample c ompartment. I f t his h appens,the w hole s ample c ompartment h as t o b e o pened.Contact S EM a dministrators i n t his c ase.2.Pull t he b ar o ut f rom t he m icroscope u sing t he f ollowingprocedure:a.Pull t he b ar o ut a s f ar a s i t c omes (e).•The t wo a rrows o n t he h older s hould a lign w iththe p ipe e nd.•If y ou h ave n ot p ulled f ar e nough, t he r od m ightbe d amaged d uring t he l ift.b.Lift t he r od u pwards t o v ertical.•Now y ou s hould e ither h ave t he s ample i nside t hemicroscope o r i n t he e xchange c ompartment a ndthe e xchange c ompartment i s i n v acuum.Opening t he s ample e xchange c ompartmentThe f ollowing p rocedure d escribes h ow t o b ring t he e xchangecompartment t o a tmospheric p ressure.Precondition: T here i s n o s ample i nside t he m icroscope o r i t h as b eenbrought t o t he e xchange c ompartment, a nd t he e xchange c ompartment i sin v acuum. F irst c heck t hat H LDR l ight i s o ff o n t he s ample e xchangecompartment (i.e. t here i s n o s ample i nside t he s ample c ompartment).Figure. S ample e xchange r od1.Pressurize t he e xchange c ompartment:a.Press a nd h old (for a bout 1 s econd) t he V ENT b utton o n t heexchange c ompartment.i.The b utton s tarts t o b link a nd y ou h ear s ome s ounds.ii.In a f ew s econds, t he d oor b etween t he e xchangecompartment a nd t he s ample c ompartment c loses.You c an o bserve t his b y e ar a nd b y l ooking a t t hebottom r ight c orner o f t he S EM M onitor.2.Open t he l atch a s s oon a s y ou h ear t he c lick.3.Open t he e xchange c ompartment d oor (it s hould o pen a lmost b yitself).a.You d o n ot n eed t o w ait u ntil t he p umping h as s topped.b.The c ompartment w ill c ontinue p urging f or a f ixed a mount o ftime. Y ou d o n ot h ave t o w ait u ntil i t s tops a nd y ou c anevacuate i t a s s oon a s y ou l ike.4.Now y ou h ave t he s ample c ompartment o pen a nd r eady f orloading/unloading t he s ample h older.Inserting a s amplePrecondition: T here i s n o s ample i nside t he s pecimen c hamber a nd exchange c ompartment i s i n v acuum. F irst c heck t hat H LDR l ight i s o ff o n the e xchange c ompartment (i.e. t here i s n o s ample i nside).1.Move t he s tage t o e xchange p osition:a.Click E xchange P osition o n t he S EM M onitor.i.If b utton i s n ot v isible, c lick "Specimen" f rom t herightmost e dge o f S EM M onitor.ii.Make s ure t hat E XCH P OSN i s l it o n t he e xchangecompartment, b efore p roceeding.2.Bring t he e xchange c ompartment t o a tmospheric p ressure b yfollowing p rocedure i n s ection “Opening t he s ample e xchangecompartment”. Q uick n otes:a.Press a nd h old V ENT f or c a. 1 s ec.b.Open l atch. W ait.c.Open c hamber d oor.3.Put o n g loves i f y ou d o n ot h ave t hem a lready o n.a.Parts t hat a re i n c ontact w ith t he v acuum s hould b e k eptabsolutely c lean. I f y ou h ave t ouched s ome p art, c lean t he p artwith e thanol (not a cetone).4.Insert h older t o t he s pecimen c huck:a.Slide t he s pecimen h older i nto t he s pecimen c huck a long t hearrow d irection o n t he s pecimen h older.5.Check t hat t he O-‐ring s eal o n t he d oor i s O K a nd w ipe i t w ith a c leanglove i f n eeded t o g et r id o f a ny d ust.a.If t he r ing i s r eally d irty, w ipe i t w ith e thanol o r i sopropanol(do n ot u se a cetone o r m ethanol).6.Close t he c hamber d oor a nd s ecure i t w ith t he l atch.7.Evacuate t he c ompartment b y p ressing a nd h olding E VAC (forabout 1 s econd). T he l ight w ill s tart b linking.a.Wait u ntil t he l ight s tops b linking a nd t he d oor s eparatingthe e xchange c ompartment i s c losed. Y ou c an o bserve t hisfrom t he b ottom r ight p art o f t he S EM M onitor.8.Insert t he s ample h older i nside t he m icroscopea.Refer t o s ection “Operating t he r od” i f i n d oubt.9.A p opup w indow s hould a ppear o n t he S EM M onitor. N ow s elect t heappropriate h older a nd s et t he o ffset v alue.a.If p opup d oes n ot a ppear, t ake o ut t he h older a nd i nsert i tagain.10.Wait u ntil t he v acuum l evel r eaches 9.6·10-‐5 P a (if t hat i s n otpossible, w ait a t l east u ntil 5·10-‐4 P a).Taking o ut s amplePrecondition: T here i s a s ample i nside t he m icroscope a nd e xchange compartment i s i n v acuum. F irst c heck t hat H LDR l ight i s o n o n t he s ample exchange c ompartment (i.e. t here i s a s ample i nside) a nd E VAC l ight i s o n and n ot b linking.1.Click O bservation O FF t o t urn o ff a cceleration v oltage.2.Click E xchange P osition t o m ove t he s ample h older t o t he e xchangeposition.a.Make s ure t hat E XCH P OSN i s l it o n t he e xchangecompartment b efore p roceeding.3.Bring t he s ample t o t he e xchange c ompartment b y o perating t herod.a.Refer t o s ection “Operating t he r od” i f y ou a re n ot a bsolutelycertain h ow t o d o t his.4.Pressurize t he e xchange c ompartment:a.Press a nd h old V ENT f or c a. 1 s ec u ntil i t s tarts t o b link.b.Open s ecuring l atch. W ait.c.Open c hamber d oor.5.Now y ou h ave t he s ample c ompartment o pen a nd y ou a re r eady t akeout y our s ample. I f y ou a re d one w ith t he i maging, j ust c lose t heexchange c hamber a nd e vacuate i t o therwise c ontinue w ith i nsertinga n ew s ample. D o n ot l eave t he c hamber o pen f or a l ong p eriod o ftime, b ut e vacuate i t i f n eeded.Sample h oldersSample h olders c onsist o f a b ase p art a nd a n a dapter p art (show o n t he f igure right). T here a re t hree d ifferent a dapters f or d ifferent s pecimen s tubs s hown in t he f igure b elow (a, b , c , d ).The m ost b asic h olders a re t he 12.5 m m (b-‐1) a nd 25 m m (c-‐1) a luminum “JEOL” s tubs . T hey s hould b e u sed w henever p ossible. S tubs s hould a lways b e available a t t he s ample p reparation r oom, b ut y ou c an a lso o rder y our o wn ones e .g. f rom E MS (order n umbers 75730, a nd 75700). T he u se o f r egular holders i s i ncluded i n t he o peration p rice o f t he m icroscope.Also “mini-‐stubs” a re a vailable f or u se w ith a p rovided a dapter. T hey a re preferred f or s mall s amples. T hey c an b e o rdered f rom T ed P ella (order numbers 16180, a nd 16181).For s pecial o ccasions, a H itachi a dapter (a) c an b e u sed. S pecial c are m ust b e taken w hen u sing t hese h olders, b ecause t hey l ack s ome s afety f eatures. Ask a dministrators, i f y ou h ave s pecial r equests f or h olders. T here a re a lso different k inds o f c ross-‐section h olders a vailable. A sk t he a dministrators f or more i nformation.Attaching a dapter t o b ase p arta) Make s ure t hat p arts a re n ot d irty, c lean i f n ecessary. b) Place a dapter o n t he b ase p art.c) Tighten s crew o n t he b ase p art l ightly.Figure. A ttaching a dapter t o base p art.Figure. 12.5 m m a nd 25 m m "JEOL" stubs.Figure. "Mini-‐stubs" a nd 12.5 m m a dapter.Figure. C ross-‐section holders.Sample h eightAlign t he t op o f t he s ample w ith t he g roove i nside t he J EOL a dapter p art. U se the s crew o n b ottom t o r aise o f l ower t he s ample. W hen u sing a nother holder, m ake s ure t hat h eight f rom t able t op l evel i s e xactly 25 m m.CoatingFor n on-‐conductive s amples a c oating i s u sually n eeded f or o bservation i n SEM. T his c an b e e asily p erformed b y u sing s putter c oating o f g old, p latinum, or g old-‐palladium. T here i s a s putter c oater a t N MC, w hich c an b e u sed f or this p urpose. R esolution l imiting f actor i s t he g rain s ize, w hich i s u sually 5-‐20 nm d epending o n t he c onditions o f s puttering.Also c arbon c oating c an b e u sed t o m ake s amples c onductive. I t i s a nappealing m ethod, w hen d oing X -‐ray a nalysis. I t c reates a v ery u niform l ayer without n oticeable grains.Figure. A lign t op o f stub w ith t he g roove on t he s ample holder.Basic m icroscope o perationBasic c onceptsWorking d istance a nd Z v alueWorking d istance (WD) v alue s ets t he e ffective f ocal l ength o f t he o bjective lens.Z h eight v alue s ets t he d istance o f t he (supposed) s urface l evel o f t he s ample from t he o bjective l ens.These t wo v alues a re e qual, w hen t op o f s ample i s a ligned w ith t he t op o f the h older (ie. 25 m m h igh f rom t able l evel, s ee f igure). W D > Z, i f y our sample i s l ower t han t he c orrect l evel a nd v ice v ersa. I f W D < Z y ou n eed t o set t he S ample O ffset v alue a ccordingly.Sample o ffsetThe h eight o f t he t op l evel o f t he s ample m easured f rom t able t op l evel should b e e xactly 25 m m. T he s ample c an b e s et a lso 0-‐4 m m h igher t han t he nominal l evel, b ut t hen t he S ample O ffset v alue h as t o b e s et a fter i nserting sample. I t i s l ocated a t t he b ottom o f t he s ample h older s elect w indow, w hich pops u p a utomatically a fter h older i nsert.Acceleration v oltage, e mission c urrent, p robe c urrent…The f irst t hing t o t hink a bout w hen s tarting i maging i s t he s election o f acceleration v oltage. T he c hoice d epends o n t he t ype o f t he s ample. S ee table b elow f or s ome e xamples.Sample Observation c ondition NotesGold p articles o n conductive s urface 5-‐30 k V, p robe c urrent a t c a. 10, working d istance 1.5-‐8 m mCoated p orous polymer 1-‐5 k V, p robe c urrent 6-‐10, w orking distance 4.5-‐8 m mUncoated p olymer 0.5-‐1 k V, p robe c urrent < 8, g entlebeam m ode, w orking d istance c a. 8mmCoated b iological sample 1-‐5 k V, p robe c urrent c a. 10, w orking distance 4.5-‐25 m m d epending o n feature s izeUncoated p aper 1-‐2 k V, g entle b eam (GB-‐L) m ode,working d istance 4.5 m m, p robecurrent 6-‐10.Coated p aper 5 k V, w orking d istance 4.5-‐25 m m,probe c urrent c a. 10X-‐ray a nalysis o f conductive s ample 15-‐30 k V, w orking d istance e xactly 8mm, h igh p robe c urrentRetractable B EIdetector i nsertedX-‐ray a nalysis o f poorly c onductive sample 5 k V, w orking d istance e xactly 8 m m,probe c urrent a s h igh a s p ossibleRetractable B EIdetector i nsertedThe e mission c urrent i s t he c urrent d rawn f rom t he e mitter. S et i t a lways t o 10 μA. Figure. S ample height s hould b e exactly 25 m m measured f rom t able top l evel.Probe c urrent i s t he c urrent d irected a t t he s ample. H igher v alues g ive better s ignal t o n oise r atio, b ut c ause m ore c harging a rtefacts i n p oorly conducting s amples. V alue o f 8-‐10 i s u sually a g ood c hoice.AligningUsually t he m icroscope i s a ligned w ell e nough f or m icrometer s cale operation. I n t his c ase, o nly f ocusing i s n ecessary. F or h igher m agnification work, t he e lectron b eam n eeds t o b e a ligned a nd a stigmatism o f t he o bjective lens h as t o b e c orrected.FocusThe f irst l evel o f a ligning i s a lways f ocusing. F ocusing i s d one u sing t he FOCUS k nob o n t he o peration c onsole. C lockwise r otation i s u nder f ocus (weaker l ens) a nd c ounterclockwise i s o ver f ocus (stronger l ens).If p ossible s elect s ome f eature, w hich y ou c an u se i n t he m agnification r ange from c a. 1000 t o 20000.Start f rom a l ow m agnification a nd w hen y ou g et g ood e nough i mage m ove on t o h igher m agnification f or f ocusing. I t t he a lignments a re r eally o ff, y ou might n ot g et a c lear i mage a t a ll.Beam a lignBeam a lign i s a lways d one a t p robe c urrent 8. S elect t he c orrect p robe current v alue f rom t he s oftware.Press A LIGN o n o peration c onsole. T he i mage s tarts t o m ove o n t he s creen. Use t he X a nd Y k nobs t o m inimize t he m ovement. P ress A LIGN O FF (STIG) button w hen i mage h as s topped. R epeat f or m agnifications u p t o c a. 20000. Focus t he i mage w henever n ecessary.Astigmatism c orrectionTo c orrect t he o bjective l ens a stigmatism p ress t he S TIG b utton o n t he operation c onsole (it i s u sually a lready s elected a t t his p oint). M ove o n t o a spherical f eature, w hich y ou a re a ble t o o bserve a t m agnification 10000 o r more.Move t he F OCUS k nob s o t hat y ou g o f rom u nderfocus t o o verfocus a nd b ack several t imes. W hen y ou h ave a stigmatism, t he i mage g ets e longated i n diagonal d irections w hen m oving a round t he f ocal p oint. S elect t he f ocal point w here n o e longation o ccurs.Adjust t he X a nd Y k nobs s o t hat y ou g et t he c learest i mage p ossible. F ocus whenever n ecessary.Other c orrectionsThere a re a lso o ther a lignments, s uch a s s ource a lign, c ondenser l ens astigmator, l ow m agnification c enter, a nd s tigmator c enter c orrections. These v alues s hould n ot u sually b e c hanged a nd t heir u se i s n ot d escribed here.Problems a nd t roubleshootingAnswers t o c ommon p roblemsI w ant t o u se U SB s tick t o t ransfer m y f iles!You c an t ransfer y our f iles t o a U SB s tick f rom t he s mall c omputer a t t he b ack wall. Y ou’ll f ind y our f iles u nder t he n etwork d rive H arley.Help! T here i s n o i mage.Follow t he c hecklist t o f ind t he c ause:1.Are y our Z a nd W D v alues t he s ame? I f n ot p ress W D t o s et c orrectdistance.2.What d etector a re y ou u sing? I f W D<8 m m y ou u sually d o n ot g etimage w ith L EI d etector; a nd i f W D>8 m m S EI g ives o nly s tatic n oise.LM m ode s hould w ork f ine i n t his c ase.3.What i s y our p robe c urrent v alue? I f i t i s l ow, t ry i ncreasing i t.4.If n one o f t he a bove i s t rue, t ry r esetting a lignment. G o t o A lignmentpanel a nd c lick R eset A ll.a.In a r eally b ad c ase t he s ource a lignment h as g one b ad.Contact a n a dministrator t o a lign i t.If t here i s n o i mage w hen s tarting o perationFirst, p ress A CB (auto c ontrast & b rightness). I f y ou e ven s ee s ome s tatic noise, y ou o nly n eed t o f ind t he c orrect f ocal p oint. S ee p revious s ection.In c ase y ou h ave c ompletely b lack s creen w hen y ou s tart i maging, f ollow t he list u ntil y ou h ave i mage.1.Restart o f S EM s oftware:a.File-‐>Exit t o g o t o l ogin s creen.b.Close l ogin s creen f rom E xit b utton.c.Wait o ne m inute.d.Start S EM_Monitor s oftware.e.Log i n a s G uest.2.Restart c omputer:a.Close S EM s oftware.b.Save E xcel l og b ook a nd e xit.c.Restart W indows.d.Start S EM s oftware a nd E xcel l og b ook.3.Restart o peration c onsole:a.Read i nstructions b elow.If v acuum b reaks d uring s ample e xchangeVacuum u sually b reaks i f t he l ever i s p ushed o r t wisted d uring t he s ample insertion. T he c omputer w ill r aise a m aintenance w indow s howing e rror messages. T he m icroscope w ill a utomatically s hut d ownsome p arts a nd t he v acuum p umps h ave t o b e r estarted. B ring t he microscope b ack t o i ts n ormal c ondition b efore p roceeding. F or e xample, lift t he r od b ack t o i ts u pright p osition.1.Locate t he t wo V AC S W b uttons b elow t he t able. T here a re a lso M AINSW b uttons, b ut d o n ot t ouch t hem.2.Shut d own v acuum p umps b y p ressing V AC O FF (0=OFF, 1=ON)button. T he p umps s hould n ow s top, i f t hey w ere n ot s hut d ownalready.3.Wait a m oment a nd r estart p umps b y p ushing V AC O N b utton.a.There i s a 20 m in t imer f or s tarting t he p umps s o y ou w illhave t o w ait a t l east 20 m inutes b efore p roceeding.4.After a ll o f t he e rror m essages h ave d isappeared f rom t he d isplay,you c an c ontinue o perating.Turning o ff c omputer1.Log o ut f rom t he S EM s oftware (File-‐>Exit).2.Save t he E xcel l og b ook (File-‐>Save o r C trl-‐S).3.Close t he E xcel l og b ook.4.Select S hutdown f rom S tart m enu.Powering o n c omputer1.Start c omputer f rom t he p ower s witch.2.Log i n a s S EMUser (password: S EMUser).3.Start E xcel l og b ook b y d ouble c licking “SEM U sage L og” o n t he r ightmonitor d esktop.4.Start S EM s oftware b y d ouble c licking S EM_Monitor.5.Log i n a s G uest.Restarting o peration c onsole1.Turn o ff c omputer.2.Press O P S W O FF f rom b elow t he t able.3.Wait c a. 10 s econds.4.Press O P S W O N.5.Turn o f c omputer.6.Wait a c ouple o f m inutes b efore s tarting S EM_Monitor s oftware.。
- 1、下载文档前请自行甄别文档内容的完整性,平台不提供额外的编辑、内容补充、找答案等附加服务。
- 2、"仅部分预览"的文档,不可在线预览部分如存在完整性等问题,可反馈申请退款(可完整预览的文档不适用该条件!)。
- 3、如文档侵犯您的权益,请联系客服反馈,我们会尽快为您处理(人工客服工作时间:9:00-18:30)。
场发射扫描电子显微镜
一、场发射扫描电子显微镜大体原理
被加速的高能电子束照射到样品上(在高真空状态下),入射电子束与样品彼此作用,产生各类信号,通过不同的探测器检测各类不同的信号, 即能够取得有关样品的各类信息。
例如, 最多见的二次电子信息, 就能够直接取得样品表面的图像信息。
场发射扫描电子显微镜(与一般扫描电镜不同的是采纳高亮度场发射电子枪, 从而取得高分辨率的高质量二次电子图象)能够观看和检测非均相有机材料、无机材料及微米、纳米材料样品的表面特点。
是纳米材料粒径测试和形貌观看有效仪器。
可普遍用于生物学、医学、金属材料、高分子材料、化工原料、地质矿物、商品检测、产品生产质量操纵、宝石鉴定、考古和文物鉴定及公安刑侦物分析等。
1. 光学显微镜与扫描电子显微镜
光学显微镜是用可见光照射在样品表面,反射光通过一系列玻璃透镜放大后而呈现出样品的放大图象,由于波长和光干与限制, 极限只能观看到小至m左右的颗粒。
与光学显微镜不同,场发射扫描电子显微镜(电子束波长极短)是用电子束在样品表面扫描,电子
束轰击样品表面,释放出二次电子和反射电子等,通过二次电子探测器检测二次电子信号, 按相同扫描规律, 在荧光屏上成像。
由于二次电子信号与样品的原子系数大小和入射角有关, 而入射角因样品表面粗糙度(形貌)而转变, 故可直接取得高质量的样品表面形貌图象。
而扫描图象景深大, 取得的二次电子图象有“三维空间成效”(立体感相当好)。
目前, 高分辨率场发射扫描电子显微镜能观看到小至1nm (对一般样品一样只能观看几纳米以上的样品)左右的颗粒。
2. 电子束与样品的彼此作用
入射电子照射到样品上,其中一部份几乎不损失其能量地在样品表面被弹性散射回来,把这一部份电子称为背散射电子(BE);若是样品超级薄,那么入射电子的一部份会穿过样品,将这一部份电子称为透射电子(TE);其余电子的全数能量都在样品内消耗掉而为样品所吸收,即为吸收电子(AE);另外,入射电子会将样品表面(大约10nm)层的电子打出样品表面,发射出能量极小(<50eV)的二次电子(SE),其中也包括由于俄歇(Auger)效应而产生的具有特点能量的俄歇电子。
在产生这些电子的同时,还会产生持续x射线和特点x 射线,和阴极荧光等。
扫描电镜配以不同的检测器,就能够够取得样品的不同信息。
3. 二次电子像
扫描电镜最经常使用是利用二次电子信号成像。
由于样品表面的高低、凸凹不平,电子束照射到样品上,入射角随样品表面粗糙度(形貌)不同而转变,因此造成激发的二次电子数也不同。
总之,样品的高低、形状等与样品表面形貌有紧密地相关性,产生不同强度的二次电子信息。
电子束在样品上逐点扫描,产生不同数量(组成图象反差)的二次电子信号,依次用相同规律在荧光屏上扫描显示出亮暗(二次电子多的点越亮)点,也确实是相应的图象“象素”。
再由这些象素点组成一幅完整的二次电子图象。
二、场发射扫描电子显微镜大体构造
场发射扫描电子显微镜大致包括以下几个部份:
电子源:也称电子枪,产生持续不断的稳固的电子流。
一般扫描电镜的电子枪由阴极(灯丝)、栅极(通常也称为威耐耳特(Wennelt圆帽)和阳极组成。
阴极采纳能加热的钨丝,栅极围在阴极周围。
被加热了的钨丝释放出电子,并在阳极和阴极之间施加高压,形成加速电场,从而使电子取得能量——高速飞向(在高真空镜筒中)样品。
而场发射电子枪与一般钨丝电子枪有所不同, 阴极呈杆状, 在它的一端有个极锋利的尖点(直径<100 nm), 尖端的电场极强, 电子直接依托“隧道”穿过势垒离开阴极, 由加速电压加速产生高速电子流飞向样品。
一样来讲。
扫描电镜加速电压一样为1 ~30kV.
●电子透镜:将从钨丝发射出来的电子集聚成直径最小为1-5nm电子束。
●扫描系统:使电子束作光栅扫描运动。
●消象散装置:当电子光学系统中所形成的磁场或静电场不能知足轴对称的要求时,
便会产生象散。
干扰电子束的正常聚焦。
消象散装置的作用确实是产生一个弱的校正磁场,以抵消原透镜磁场的非轴对称性。
●检测器:,取得样品表面形貌图象信号。
●真空系统:在任何电镜中都必需幸免或减少电子与气体分子的碰撞。
这就意味着真
空度须在10-4-10-6 Torr (1Torr=1mmHg)之间。
场致发射电子枪,在电子枪中必需维持超高真空10-10 Torr以上。
●操作台:操作操纵扫描电子显微镜各个部件。
三、样品的制备
场发射扫描电子显微镜样品必需是具有必然化学、物理稳固性的干燥固体、块状、片状、纤维状及粉末。
在真空中及电子束轰击下可不能挥发或变形,无磁性、放射性和侵蚀性。
粉末样品需要1g左右, 如样品很少时几毫克也够用。
下面介绍一样纳米粉末样品的制备。
●超声波分散:纳米粉末样品第一用超声波分散, 分散液用双蒸水、乙醇等。
●放置样品:分散后的悬浊液用滴管滴到样品台上的载玻片上,注意载玻片要小于样品
台,样品不要滴到载玻片之外。
●镀膜:为避免了样品充电和提供二次电子发射率,需在样品表面喷涂一层很薄的重金
属(Au、Pt)膜。
四:扫描电镜应用:
一、可对各类有机、无机、纳米材料进行微观形态研究,取得其表面形貌
二、用于晶体材料的取向信息与结构信息分析
3、含图像处置软件,能够直接从图像中取得粒径统计信息。