很经典的ppt人物动画教程StickmanPivot.
PPT制作技巧,“蚕豆人”小人行走及背景循环(第一集)概要

PPT制作:
“蚕豆人”小人走动及循环背的制作技巧
第一集(字体制作)
李育正
QQ:995499687
请:先看效果
“蚕豆人”走动及循环背景演示PPT 制作:李育正
蚕豆人设计版权归李育正本人所有请勿模仿
QQ:995499687
第一集、字体的制作
第二集、循环背景的制作第三集、蚕豆人的制作
字体制作:
1、选择空白幻灯片,使用横向文本框,打入要写的内
容,使用文本框方便添加动画效果。
2、选中你喜欢的字体(例如:雪松文字)填充颜色。
3、添加动画效果。
4、点击标题栏的“动画”,再点击工具栏的“自定义
动画”。
5、选中你所需要的文字,再添加效果,选择要使用的
效果。
A:选中字体后再点击添加“效果”
“蚕豆人”小人行走及背景循环演示
B:点击效果下拉选项中的“强调”
C:选择“波浪型”
D:点击“播放”
E:调整播放时间
1、点击文本框
2、点击“计时”调整时间为3
秒
3、调整“计时”的时间,使自己满意为止。
4、设置完后,点击播放进行播放演示。
就可以看到效果了。
“蚕豆人”小人行走及背景循环演示
5、同样的方法,选择不同的“效果”可以得到自己想
的效果使用:进入“挥舞”效果
“蚕豆人”小人行走及背景循环演示
第一集播放完!
谢谢收看!请看第二集,循环背景的制作!
2015年3月。
教你用PPT制作变形动画效果,10秒钟做出汽车人变身特效
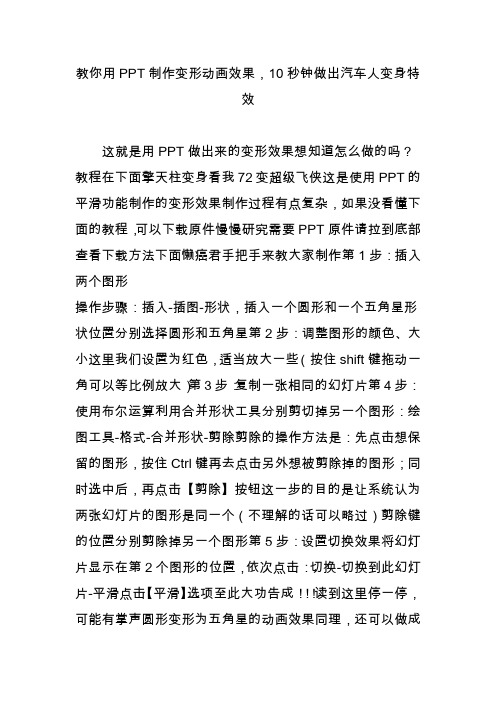
教你用PPT制作变形动画效果,10秒钟做出汽车人变身特效这就是用PPT做出来的变形效果想知道怎么做的吗?教程在下面擎天柱变身看我72变超级飞侠这是使用PPT的平滑功能制作的变形效果制作过程有点复杂,如果没看懂下面的教程,可以下载原件慢慢研究需要PPT原件请拉到底部查看下载方法下面懒癌君手把手来教大家制作第1步:插入两个图形操作步骤:插入-插图-形状,插入一个圆形和一个五角星形状位置分别选择圆形和五角星第2步:调整图形的颜色、大小这里我们设置为红色,适当放大一些(按住shift键拖动一角可以等比例放大)第3步:复制一张相同的幻灯片第4步:使用布尔运算利用合并形状工具分别剪切掉另一个图形:绘图工具-格式-合并形状-剪除剪除的操作方法是:先点击想保留的图形,按住Ctrl键再去点击另外想被剪除掉的图形;同时选中后,再点击【剪除】按钮这一步的目的是让系统认为两张幻灯片的图形是同一个(不理解的话可以略过)剪除键的位置分别剪除掉另一个图形第5步:设置切换效果将幻灯片显示在第2个图形的位置,依次点击:切换-切换到此幻灯片-平滑点击【平滑】选项至此大功告成!!!读到这里停一停,可能有掌声圆形变形为五角星的动画效果同理,还可以做成这样用PPT自带的图标做的需要注意的是:本教程只是针对简单图形的变形,如果是对图片进行变形,需要先把图片转换成图形格式,可使用【口袋动画PA】或其他辅助插件。
对职场精英来说,变形功能绝对是不可或缺的神技能两个图形的颜色越接近,效果越好图表的变形效果也可以用变形功能介绍团队成员,没找到合适的图片,就用京剧脸谱代替啦团队成员的变形效果想要以上这些会变形的PPT动画原件吗?请发私信给我只要3个字母:PPT,自动获取下载链接下载全部免费,如果你想打赏小编的话,小编我会感动到哭记得回来给个好评呦特别提醒:系统回复可能会有延迟;没有找到【发私信】按钮的请咨询平台;个别省份无法下载,原因你们知道的。
PPT制作3D小人走路的动画

如何将动画应用到其他PPT中?
导出动画
在PowerPoint中,将制作好的3D小人走路的动画导出为 视频格式,如MP4。
01
插入视频
在目标PPT中,插入导出的视频文件。
02
03
设置视频选项
在插入视频后,可以设置视频选项, 如自动播放、循环播放等,以符合需 求。
THANKS FOR WATCHING
少动画的计算量,降低卡顿风险。
如何提高动画质量?
使用高质量的素材
使用高分辨率、清晰的图片和 素材,可以让动画更加逼真。
调整动画参数
在动画设置中,可以阴影和光照效果
在动画中添加阴影和光照效果 ,可以让动画更加立体和真实 。
逐帧调整
对于复杂的动画效果,可以逐 帧进行调整和修改,以达到最
详细描述
首先,需要确定小人的基本形象,包括其外观、服装和配饰等。这可以通过手绘草图或使用设计软件来完成。在 设计时,应考虑小人的比例、细节和颜色搭配,以确保其形象生动且符合PPT的整体风格。
调整小人材质
总结词
赋予小人逼真的材质和纹理
详细描述
材质和纹理是使小人看起来更真实的关键因素。可以选择适合小人形象的材质,如皮肤、服装布料或 鞋子的皮革等。通过调整材质的反射、光泽度和纹理细节,可以增加小人的真实感,使其在PPT中更 加突出。
动画制作中,将不同的画面元素分层 放置,并在时间轴上安排它们的出现 和消失时间,以实现动画的连续播放。
运动曲线用于描述物体运动的速度和 方向变化,通过调整运动曲线的形状, 可以控制动画的节奏和动态效果。
3D动画的特点
1 2
三维空间表现
3D动画能够表现物体在三维空间中的位置、旋 转和缩放,创建更加真实和立体的视觉效果。
很经典的ppt人物动画教程_StickmanPivot
JEREMIAH presents
Disclaimer: The following tutorial is an advanced tutorial and assumes that the viewer is more or less familiar with PowerPoint Animations.
hind leg
front leg
upper body
End
That’s about it. Hope you learned a thing or two. Keep practicing, and remember:
You’ve got the Power! You just need to Point it in the right direction!
PowerPoint Heaven – The Power to Animate
Title: PowerPoint Animation Tutorial: Stickman Pivot By: Jeremiah Lee
a production by
consider what happens here
notice the movement of the center of the upper leg
that’s the motion path of his upper leg
to illustrate another example, the center of the blue object moves towards the tip of the red object by using a motion path
Regular Spin
Pivot
PPT动画效果高级教程
PPT动画效果高级教程在当今的工作和学习中,PPT 已经成为我们展示信息、传达观点的重要工具。
而一个好的 PPT 不仅需要内容充实、布局合理,还需要借助动画效果来增强其表现力和吸引力。
本教程将带你深入了解 PPT 动画效果的高级应用,让你的 PPT 更加生动精彩。
一、PPT 动画效果的基本类型在 PPT 中,动画效果大致可以分为四类:进入动画、强调动画、退出动画和路径动画。
进入动画决定了对象如何出现在幻灯片上,比如淡入、飞入、缩放等。
强调动画则用于突出显示某个对象,使其更引人注目,像脉冲、放大缩小等效果就属于此类。
退出动画与进入动画相反,它规定了对象如何从幻灯片上消失,例如淡出、飞出等。
路径动画则允许对象沿着自定义的路径移动,为演示增添更多的动态感。
二、动画效果的设置技巧1、合理选择动画效果根据 PPT 的主题和内容,选择合适的动画效果至关重要。
比如,在展示一个产品的逐步拆解过程时,使用“拆分”的进入动画效果会非常直观;而在强调某个关键数据时,“闪烁”的强调动画可能更能吸引观众的注意力。
2、控制动画的速度和时长动画速度过快或过慢都会影响效果。
一般来说,对于重要的内容,可以适当放慢动画速度,给观众足够的时间去理解和消化;而对于一些辅助性的元素,快速的动画可以使演示更加流畅。
3、设定动画的触发方式除了自动播放,还可以设置为单击鼠标或在一定时间后触发动画。
通过巧妙地设置触发方式,可以更好地控制演示的节奏,与讲解内容紧密配合。
4、组合使用多种动画效果单一的动画效果可能会显得单调,通过组合不同类型的动画,可以创造出更加丰富和独特的效果。
例如,先使用“缩放”进入,然后加上“陀螺旋”的强调动画,最后以“飞出”退出。
三、动画效果的高级应用1、利用动画刷快速复制动画当多个对象需要应用相同的动画效果时,不必逐个设置,使用动画刷可以轻松复制动画属性,大大提高工作效率。
2、制作动画路径的复杂曲线不仅可以使用直线和简单的曲线作为对象的移动路径,还可以通过编辑顶点来绘制复杂的曲线,让对象的移动更加灵活多变。
最受欢迎的PPT教程之动画系列 火柴人

where is his balance per sequence?
LANDING
STANDING
STEPPING
STEPPING
Stickman Pivot: Working Efficiently
Work Efficiency
So now you know how to pivot. That’s still not going to be enough. You need to know how to make several pivots work together. To do this, you need to use the Motion Path Emphasis in combination with your Spin Emphasis.
End
hind leg
front leg
upper body
End
That’s about it. Hope you learned a thing or two. Keep practicing, and remember:
You’ve got the Power! You just need to Point it in the right direction!
The Pivot
The Pivot is a powerful technique if you know how to use it. The basic idea is to move the center of an object to another location, allowing you to use the Spin Emphasis with a new centermer: The following tutorial is an advanced tutorial and assumes that the viewer is more or less familiar with PowerPoint Animations.
【PPT实用技巧】PPT怎么制作笑脸哭脸变换的表情动画
PPT怎么制作笑脸哭脸变换的表情动画
ppt怎么制作笑脸哭脸变换的表情动画?ppt中想要制作一个动画,就是哭脸和笑脸不停变化的动画,该怎么制作呢?下面我们就来看看详细的教程,需要的朋友可以参考下
1、首先启动ppt2013,执行插入-形状命令,选择笑脸,按住shift键绘制一形状。
2、选择形状,设置形状填充为无颜色填充,形状轮廓为黑色,粗细为6磅。
3、选择笑脸,执行ctrl+d复制一个,接着调整成哭脸的形状。
4、执行ctrl+a全选形状,执行islide-补间动画命令。
5、设置补间数量为20,勾选添加动画,设置每帧时长为0.01秒,点击应用按钮。
6、全选后,调出快速对齐命令,分别执行水平居中和垂直居中命令,播放查看动画效果。
以上就是ppt制作表情动画的教程,希望大家喜欢。
火柴人动画—绝对的高手制作—下载观看最佳 共51页
where is his balance per sequence?
LANDING
STANDING
STEPPING
STEPPING
Stickman Pivot: Working Efficiently
Work Efficiency
So now you know how to pivot. That’s still not going to be enough. You need to know how to make several pivots work together.
One of the centers also acts as the central pivot point where the stickman’s body is touching the ground—in this case, his hind foot.
The Pivot
The entire animation is divided into four sequences. Each sequence may have a different central pivot point, depending on what point is most responsible for maintaining his balance.
Regular Spin
Pivot
The Pivot
This is possible by duplicating the shape, positioning them right beside each other, and grouping them to reset the center. This center becomes the most important part of the shape.
人物动态PPT课件
• 2、站立时,重心偏移,一条腿受力多,一条受力少
• 3、单腿站立,重心只在其中的一条腿上,另外一条腿 不着地,
• 重心在腿上的动作相对稳定,尤其是平均分布在两腿上 的时候,当重心在一条腿上时,手的动作和身体的动作 幅度要大很多。
-
12
• (1)重心平均分布在两腿之间,特点:
• 两腿距离小,动作幅度小,给人娴静的感觉,动 态感小。尽量避免这种动作姿势的设计,尤其是 游戏人物。
• 两腿分开越大,动作幅度越大,姿势给人稳定时,可以先思考动作 幅度的大小,如果大,可以先设计一个大一点的 “A”状,或前或后。或弯曲或直绷。
-
13
站姿 ——重心在两腿之间
-
14
-
15
-
16
-
17
• (2)站立时重心偏移,一条腿受力多,一条受力 少
• 角色主要动态线呈“S”时,一般头、胸、 臀部体积分别朝相反方向,
• 如:头部朝后,胸部朝前,手臂会和胸部 体积相反,也是朝后,臀部体积向后,大 腿动作朝前,小腿动作朝后,身体非常有 曲线美和韵律感。
-
32
-
33
-
34
• 从动态线出发去设计动作时,
• 1)要抓住大的形体,抓住关键的动势并注 意动态的重心。
动画动作设计
• 动画角色的动作是整个动画中最重要的部 分,包括游戏原画设计也是如此。
• 能够快速而准确的表达出形态各异的动态 是每个人都梦寐以求的事情,在动态人体 速写中,如果你能注意“5线法”,并把握 三个方面:重心与重心线,平衡、动势
• 离这个目标就不远了,
-
1
-
2
-
3
• “5线法”分别为:
-
最新PPT动画效果跑动的小人教学讲义PPT课件
可以有独立地产,但没有脱离开土地 或土地使用权的房产
• 没有建筑物,即可以称 为地产;而在他人土地 上的房屋,对房屋的所 有权也可以被称为房 产——这是房屋和土地 分离的状况。但是,房 屋必须建立于土地上的 自然事实,使得房屋必 须与土地使用权结合在 一起,才能称为完整的 财产。
PPT动画效果跑动的小人
知识概要
• 首先:我们要了解小人是怎么跑动起来 的。
• 自选图形:小人的绘制 • 重点知识:自定义动画-出现与消失 • 难点知识:静态与动态的区别
问题
在我们学习之前本节课内容之前,我 们首先看几个问题,希望大家在学完本 课后能解答出来。 • 小人跑步的动态分为哪几个部分? • 我们是通过那几部画出小人的? • 静态小人与动态小人的区别是什么?
• 2、整幢房屋建筑面积
• 整幢房屋建筑面积系指房屋外墙(柱) 勒脚以上各层的外围水平投影面积之和, 包括阳台、挑廊、地下室、室外楼梯等, 且具备有上盖,结构牢固,层高2.2米以 上(含2.2米)的永久性建筑。
• 3、套内建筑面积
• 套内建筑面积系指套内使用面积、套内 墙体面积及套内阳台之和。
• 4、套内使用面积
土 房房商房地 屋地品地使 租产房产用 赁抵预转权 合押售让出 同合合合让
同同同合 同
五种登记备案制度
• 房地产开发企业及房地产中介服务机构 的设立登记制度;
• 商品房预售合同登记备案制度; • 房地产转让、抵押或变更时的房地产权
属登记制度; • 房屋租赁合同的登记备案制度; • 土地使用权、房屋所有权的取得登记制
用权。在我国,土地的所有权不可转让, 故我国的地产仅指土地使用权。另外,租 赁土地使用权、土地使用权抵押权称为土 地权益,属于广义地产的范畴。 • 房产是对房屋的所有权和其他权益。
- 1、下载文档前请自行甄别文档内容的完整性,平台不提供额外的编辑、内容补充、找答案等附加服务。
- 2、"仅部分预览"的文档,不可在线预览部分如存在完整性等问题,可反馈申请退款(可完整预览的文档不适用该条件!)。
- 3、如文档侵犯您的权益,请联系客服反馈,我们会尽快为您处理(人工客服工作时间:9:00-18:30)。
consider what happens here
notice the movement of the center of the upper leg
that’s the motion path of his upper leg
பைடு நூலகம்
to illustrate another example, the center of the blue object moves towards the tip of the red object by using a motion path
Regular Spin
Pivot
The Pivot
This is possible by duplicating the shape, positioning them right beside each other, and grouping them to reset the center. This center becomes the most important part of the shape. Then, make the other shape invisible.
PowerPoint Heaven – The Power to Animate
Title: PowerPoint Animation Tutorial: Stickman Pivot By: Jeremiah Lee
a production by
PowerPoint Animation Tutorial Stickman Pivot
heads up How did that happen in PPT? That’s what we’re here to find out!
Stickman Pivot: The Technique
let’s see it again in slo-mo
Work Efficiency
Use the Curve Tool for your Motion Paths so that you can alter the paths should you need to by using Edit Points. Always start with the central pivot point, and then move towards the pivot points directly connected to the same shape. In this case, if the hind foot is the central pivot point, the next adjoining point is the hind knee.
The Pivot
The Pivot is a powerful technique if you know how to use it. The basic idea is to move the center of an object to another location, allowing you to use the Spin Emphasis with a new center.
look at the pivots
The Pivot
Notice that each section of the stickman’s body consists of pivots. Each center plays the role of a joint in his body. One of the centers also acts as the central pivot point where the stickman’s body is touching the ground—in this case, his hind foot.
hind leg
front leg
upper body
End
That’s about it. Hope you learned a thing or two. Keep practicing, and remember:
You’ve got the Power! You just need to Point it in the right direction!
The Pivot
The entire animation is divided into four sequences. Each sequence may have a different central pivot point, depending on what point is most responsible for maintaining his balance.
JEREMIAH presents
Disclaimer: The following tutorial is an advanced tutorial and assumes that the viewer is more or less familiar with PowerPoint Animations.
End
where is his balance per sequence?
LANDING
STANDING
STEPPING
STEPPING
Stickman Pivot: Working Efficiently
Work Efficiency
So now you know how to pivot. That’s still not going to be enough. You need to know how to make several pivots work together. To do this, you need to use the Motion Path Emphasis in combination with your Spin Emphasis.