________________________0311v2_by PORO
索尼Shooting Grip与Mini Tripod说明书
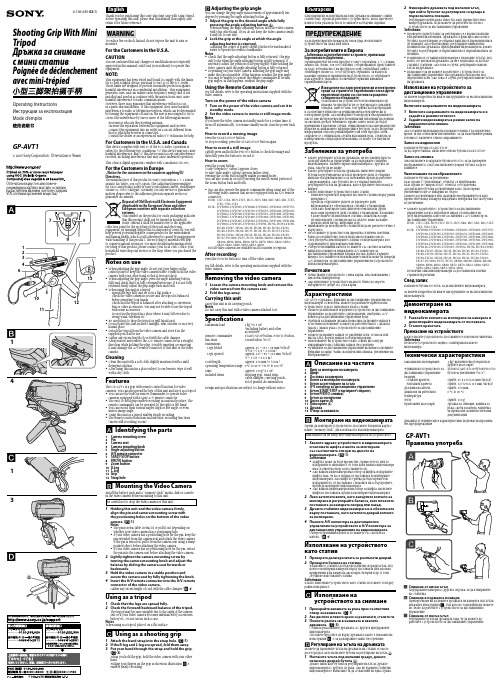
Shooting Grip With Mini TripodДръжка за снимане с мини стативPoignée de déclenchement avec mini-trépied4-146-645-02(1)GP-AVT1Operating InstructionsИнструкции за експлоатацияMode d‘emploi© 2009 Sony Corporation Отпечатано в ЧехияОтпечатано върху 70% или повечерециклирана хартия с мастило, основано на растителни мазнини, което не съдържа VOC (летливи органични вещества).Thank you for purchasing this Sony Shooting Grip with Mini Tripod.Before operating this unit, please read this manual thoroughly, and retain it for future reference.WARNINGTo reduce fire or shock hazard, do not expose the unit to rain or moisture.For the Customers in the U.S.A.CAUTIONY ou are cautioned that any changes or modifications not expressly approved in this manual could void your authority to operate this equipment.NOTE:This equipment has been tested and found to comply with the limits for a Class B digital device, pursuant to Part 15 of the FCC Rules. These limits are designed to provide reasonable protection against harmful interference in a residential installation. This equipment generates, uses, and can radiate radio frequency energy and, if not installed and used in accordance with the instructions, may cause harmful interference to radio communications.However, there is no guarantee that interference will not occur in a particular installation. If this equipment does cause harmfulinterference to radio or television reception, which can be determined by turning the equipment off and on, the user is encouraged to try to correct the interference by one or more of the following measures:Reorient or relocate the receiving antenna.Increase the separation between the equipment and receiver. Connect the equipment into an outlet on a circuit different from that to which the receiver is connected.Consult the dealer or an experienced radio/TV technician for help.For Customers in the U.S.A. and CanadaThis device complies with Part 15 of the FCC Rules. Operation is subject to the following two conditions: (1) This device may not cause harmful interference, and (2) this device must accept any interference received, including interference that may cause undesired operation.This Class B digital apparatus complies with Canadian ICES-003.For the Customers in Europe<Notice for the customers in the countries applying EU Directives>The manufacturer of this product is Sony Corporation, 1-7-1 Konan Minato-ku Tokyo, 108-0075 Japan. The Authorized Representative for EMC and product safety is Sony Deutschland GmbH, Hedelfinger Strasse 61, 70327 Stuttgart, Germany. For any service or guarantee matters please refer to the addresses given in separate service or guarantee documents.in the video camera before mounting to this unit.Be careful not to drop the video camera or this unit.1 Holding this unit and the video camera firmly, align the pin and camera mounting screw with the positioning holes on the bottom of the video camera. ( -1)NotesThe pin is retractable. Retract it or pull it out depending on whether your video camera has a positioning hole.If your video camera has a positioning hole for the pin, keep the pin extended from the camera seat and attach the video camera. If the pin is retracted, pull it from the camera seat using a sharp-pointed object before attaching the video camera.If your video camera has no positioning hole for the pin, retract the pin into the camera seat before attaching the video camera.2 Lightly tighten the camera mounting screw by turning the camera mounting knob and adjust the balance by sliding the camera seat forwards or backwards.3 Hold the video camera in a stable position andsecure the camera seat by fully tightening the knob.4 Insert the A/V remote connector into the A/V remote connector of the video camera.Gather any excess length of cord with the cable clamper. ( -4)Using as a tripod1 Check that the legs are spread fully.2 Check the forward/backward balance of the tripod.The tripod may become unstable due to the angle of the camera seat or if your video camera becomes imbalanced by accessories, battery etc. Do not use in such a case.NotesWhen using as a tripod, place it on a flat surface.Using as a shooting grip1 Attach the hand strap into the strap hole. ( -1)2 If the R-leg and L-leg are spread, fold them away.3 Put your hand through the strap and hold the grip. ( -3)When you hold the grip, hold the video camera with your other hand.Putting your fingers on the grip as shown in illustration -3 enables steady recording.Благодарим ви за покупката на тази Дръжка за снимане с мини статив Sony. Преди да работите с устройството, моля, прочетете изцяло това ръководство и го запазете за бъдещи справки.ПРЕДУПРЕЖДЕНИЕЗа да предотвратите пожар или токов удар, не излагайте устройството на дъжд или влага.За потребителите в Европа<Забележка за потребителите в страните, прилагащи Европейските Директиви >Производителят на този продукт е Sony Corporation, 1-7-1 Konan, Minato-ku, Токио, 108-0075 Япония. Оторизираният представител за ЕМС и безопасност на продукта е Sony Deutschland GmbH,Hedelfinger Strasse 61, 70327 Щутгарт, Германия. За въпроси, касаещи сервиза и гаранцията на устройството, се обръщайте към адресите, указани в съответните сервизни книжки и гаранционни карти.Изхвърляне на стари електрически и електронни уреди (за страните от Европейския съюз и други европейски страни със система за разделно събиране на отпадъците)Този символ на устройството или опаковката му показва, че продуктът не се третира като домашен отпадък. Вместо това, той трябва да бъде предаденв съответните пунктове за рециклиране на електрически иелектронни уреди. Ако изхвърлите този продукт на правилното място, вие ще предотвратите потенциални негативни последици за околната среда и човешкото здраве, които могат да бъдатпричинени в противен случай. Рециклирането на материалите ще помогне за запазването на природните ресурси. За по-подробна информация относно рециклирането на този продукт, моля, свържете се с общинската служба във вашия град, службата за изхвърляне на отпадъци или магазина, от който сте закупили продукта.Забележки за употребаКогато регулирате ъгъла на дръжката, не поставяйте пръста си върху панела за управление, за да задържите стабилно видеокамерата. Хванете здраво видеокамерата с другата си ръка, така че да не падне.Когато регулирате ъгъла на дръжката, натиснете докрай бутона за регулиране на ъгъла и проверете дали се е върнал напълно в първоначалното си положение, преди да работите с видеокамерата. Ако бутонът не се е върнал напълно,регулирайте ъгъла на дръжката, като я дръпнете леко назад и напред.Когато използвате устройството като статив:Разпънете крачетата докрай и поставете статива върху равна повърхност.Преди да отдръпнете ръцете си проверете даливидеокамерата е обезопасена и стативът е балансиран.След като монтирате допълнителен обектив или другиаксесоари проверете дали стативът е балансиран. Възможно е да не можете да използвате статива с някои аксесоари.Не използвайте статива на места, където може да падне, поради силен вятър, вибрации и др.Внимавайте да не изпуснете статива или да не разлеете течност върху него.Не оставяйте устройството на директна слънчева светлина, близо до отоплително тяло или на много влажно място.След употреба демонтирайте статива от видеокамерата и го съхранявайте в приложената чантичка.Съберете излишния кабел и го хванете със скобата за кабела. Винаги поставяйте и изваждайте А/V конектора задистанционно управление в права посока, докато държитещекера. Поставянето или изваждането насила може да повреди А/V конектора за дистанционно управление на устройството или на видеокамерата.ПочистванеПочиствайте устройството с мека кърпа, леко навлажнена с мек почистващ разтвор.Ако използвате устройството на място близо до морето, избършете го добре със суха кърпа.ХарактеристикиGP-AVT1 е дръжка с функция за дистанционно управление на видеокамери. Освен това, можете да разпънете крачетата на устройството и да го използвате и като статив.Можете да използвате вграденото устройство за дистанционно управление, за да работите с видеокамери, снабдени с А/V конектор за дистанционно управление Sony.Удобната за хващане дръжка позволява да правите записи в естествено положение. Можете да работите както с дясната,така и с лявата ръка с устройството за дистанционно управление.Можете да правите записи от различни ъгли: от висок или нисък ъгъл, дори и записи в огледален режим.Използването на устройството като статив ще осигури извършването на стабилни записи без трептене.Функциите за дистанционно управление включват основните функции за запис (запис на видеоклип/снимка, увеличение на изображението).Описание на частите1 Винт за монтиране на камерата2 Щифт3 Поставка за камерата4 Копче за монтиране на камерата5 Бутон за регулиране на ъгъла6 А/V конектор за дистанционно управление7 Бутон START/STOP (стартиране/спиране)8 Бутон PHOTO (снимка)9 Бутон за увеличение10 Дясно краче (R)11 Ляво краче (L)12 Дръжка13 Отвор за каишкатаМонтиране на видеокамератаПреди да монтирате устройството, поставете батерия и карта с памет "Memory Stick", диск или касета във видеокамерата.Внимавайте да не изпуснете видеокамерата или устройството.1 Хванете здраво устройството и видеокамератаи наложете щифта и винта за монтиране със съответните отвори на дъното на видеокамерата. ( -1)ЗабележкиЩифтът може да бъде преместен. Преместете го или го издърпайте в зависимост от това дали вашата видеокамера има съответен отвор за поставянето му.Ако вашата видеокамера има отвор за щифта, издърпайте щифта така, че да се подава от поставката и монтирайте видеокамерата. Ако щифтът трябва да бъде преместен, издърпайте го от поставката с помощта на остър предмет, преди да монтирате видеокамерата.Ако вашата видеокамера няма отвор за щифта, натиснете щифта в поставката, преди да монтирате видеокамерата.2 Леко затегнете винта, като завъртите копчето за монтиране и регулирайте баланса, като плъзнете поставката за камерата напред или назад.3 Дръжте стабилно видеокамерата и я обезопасете върху поставката, като затегнете докрай копчето за монтиране.4 Пъхнете А/V конектора за дистанционноуправление на устройството в А/V конектора за дистанционно управление на видеокамерата.Съберете излишния кабел и го хванете със скобата за кабела. ( -4)Използване на устройството като статив1 Проверете дали крачетата са разпънати докрай.2 Проверете баланса на статива.Възможно е стативът да бъде нестабилен, поради ъгъла, под който е монтирана камерата върху поставката или ако има прикрепени към камерата аксесоари, батерия и др. В този случай не използвайте статива.ЗабележкиКогато използвате устройството като статив, поставете го върху равна повърхност.Използванена устройството за снимане1 Прекарайте каишката за ръка през съответния отвор за каишката. ( -1)2 Ако дясното и лявото краче са разпънати, сгънете ги.3 Пъхнете ръката си в каишката и хванете дръжката. ( -3)С едната ръка хванете дръжката, а с другата придържайте видеокамерата.Поставете пръстите си върху дръжката, както е показано на илюстрация -3, за да направите запис без трептене.Регулиране на ъгъла на дръжкатаМожете да променяте ъгъла на дръжката на стъпки от около десет градуса, като натиснете бутона за регулиране на ъгъла .1 Нагласете ъгъла под желания градус, докато натискате докрай бутона .Докато натискате бутона за регулиране на ъгъла, дръжте видеокамерата с другата си ръка. Ако не държите стабилно видеокамерата е възможно тя да се наклони на една страна.Adjusting the grip angleY ou can change the grip angle in increments of approximately ten-degrees by pressing the angle adjusting button .1 Adjust the grip to the desired angle while fully pressing the angle adjusting button .When pressing the angle adjusting button, hold the video camera with your other hand. If you do not keep the video camera steady, it may tilt to one side.2 Lock the grip at the angle at which the angle adjusting button is returned.Adjusting the center of gravity slightly further forward makes it easier to operate the remote commander.NotesCheck that the angle adjusting button is fully returned. The grip only locks when the angle adjusting button is fully returned. If necessary, adjust the position of the grip slightly while holding the video camera until the angle adjusting button is fully returned.Depending on your video camera, adjusting the grip angle may make the tripod unstable. If this happens, readjust the grip angle.Y ou may be unable to operate the remote commander at certain grip angles. In this happens, readjust the grip angle.Using the Remote CommanderFor full details, refer to the operating instructions supplied with the video camera.Turn on the power of the video camera1 Turn on the power of the video camera and set it to standby mode.2 Set the video camera to movie or still image mode.NotesIf you leave the video camera in standby mode for a certain time, it turns off automatically. To resume standby mode, turn the power back on.How to record a moving imagePress the START/STOP button.To stop recording, press the START/STOP button again.How to record a still imageLightly press and hold the PHOTO button to check the image and then fully press the button to record it.How to zoomPress the Zoom button.T side (telephoto): Subject appears closer.W side (wide angle): Subject appears farther away.Pressing the Zoom button longer makes zooming faster.Y ou can also zoom in or out by moving the raised central portion of the zoom button back and forth.Y ou can also operate the remote commander when using any of the following video cameras that are not equipped with an A/V remote connector.HDR- CX7, CX6, HC9, HC7, HC5, HC3, SR8, SR7, SR5, SR1, UX7,UX5, UX3, UX1DCR- DVD908, DVD905, DVD808, DVD805, DVD803, DVD755,DVD708, DVD705, DVD703, DVD653, DVD608, DVD605,DVD602, DVD508, DVD506, DVD505, DVD408, DVD406, DVD405, DVD404, DVD403, DVD308, DVD306, DVD305, DVD304, DVD205, DVD203, DVD202, DVD109, DVD108, DVD106, DVD105, DVD103, DVD92, HC96, HC94, HC90, HC48, HC47, HC46, HC45, HC44, HC43, HC42, HC41, HC40, HC39, HC38, HC37, HC36, HC35, HC33, HC32, HC30, HC26, HC24, HC23, HC22, HC21, HC20, HC19, HC17, PC1000, PC55, PC53, SR300, SR290, SR200, SR190, SR100, SR90, SR82, SR80, SR72, SR70, SR62, SR60, SR52, SR50, SR42, SR40, SR33, SR32, SR30Not all video cameras are available in all countries or regions.After recordingPress the POWER button to turn off the video camera.For full details, refer to the operating instructions supplied with the video camera.Removing the video camera1 Loosen the camera mounting knob and remove the video camera from the camera seat.2 Fold the legs away.Carrying this unitCarry this unit in its carrying pouch.NotesDo not carry this unit with a video camera attached to it.Specifi cationsMaximum load 1 kg (35.3 oz)(Including battery and other accessories)Remote Commanderfunctions START/STOP button, PHOTO button, Zoom button (W/T)Dimensions Legs foldedLegs opened Approx. 45 × 132 × 68 mm (w/h/d)(1 3/4 × 5 1/4 × 2 5/8 in.)Approx. 127 × 96 × 114 mm (w/h/d)(5 × 3 7/8 × 4 1/2 in.)Cord length Approx. 250 mm (9 7/8 in.)Operating temperature range 0 °C to 40 °C (32 °F to 104 °F)Mass Approx. 114 g (4.1 oz)Included items Shooting grip, Hand strap,Cable clamper, Carrying pouch, Set of printed documentation Design and specifications are subject to change without notice.2 Фиксирайте дръжката под желания ъгъл, при който бутонът за регулиране се връща в първоначална позиция.Регулирайте центъра на тежестта, като преместите леко напред дръжката, за да можете да работите по-лесно с устройството за дистанционно управление.ЗабележкиПроверете дали бутонът за регулиране се е върнал напълно в първоначална позиция. Дръжката се фиксира само когато бутонът за регулиране се е върнал напълно в първоначалната си позиция. Ако е необходимо, регулирайте внимателнопозицията на дръжката, придържайки видеокамерата, докато бутонът за регулиране се върне напълно в първоначалната си позиция.В зависимост от вашата видеокамера е възможно ъгълът, под който сте нагласили дръжката, да не е подходящ, за да бъде стативът стабилен. Ако това се случи, регулирайте наново ъгъла на дръжката.Възможно е да не можете да работите с устройството за дистанционно управление, ако дръжката е нагласена подопределени ъгли. Ако това се случи, регулирайте наново ъгъла на дръжката.Използване на устройството задистанционно управлениеЗа повече подробности вижте инструкциите за експлоатация на видеокамерата.Включете захранването на видеокамерата1 Включете захранването на видеокамерата и я задайте в режим готовност.2 Задайте видеокамерата в режим запис на видеоклип или снимка.ЗабележкиАко оставите видеокамерата в режим готовност за определено време, тя ще се изключи автоматично. За да възобновите режим готовност, включете отново захранването.Запис на видеоклипНатиснете бутона START/STOP .За да спрете записа, натиснете отново бутона START/STOP .Запис на снимкаЛеко натиснете и задръжте бутона PHOTO, за да проверите изображението, след това натиснете докрай бутона, за да го запишете.Увеличаване на изображениетоНатиснете бутона за увеличение.Към страна T (телеснимка): Обектът се приближава.Към страна W (широк ъгъл): Обектът се отдалечава.Ако натиснете бутона за увеличение за по-дълго време, увеличението ще се извърши по-бързо.Можете да увеличавате или смалявате изображението и като преместите назад и напред издадената централна част на бутона за увеличение.Можете да работите с устройството за дистанционно управление, когато използвате някоя от описаните по-долу видеокамери, които не са снабдени с А/V конектор за дистанционно управление.HDR- CX7, CX6, HC9, HC7, HC5, HC3, SR8, SR7, SR5, SR1, UX7,UX5, UX3, UX1DCR- DVD908, DVD905, DVD808, DVD805, DVD803, DVD755,DVD708, DVD705, DVD703, DVD653, DVD608, DVD605, DVD602, DVD508, DVD506, DVD505, DVD408, DVD406, DVD405, DVD404, DVD403, DVD308, DVD306, DVD305, DVD304, DVD205, DVD203, DVD202, DVD109, DVD108, DVD106, DVD105, DVD103, DVD92, HC96, HC94, HC90, HC48, HC47, HC46, HC45, HC44, HC43, HC42, HC41, HC40, HC39, HC38, HC37, HC36, HC35, HC33, HC32, HC30, HC26, HC24, HC23, HC22, HC21, HC20, HC19, HC17, PC1000, PC55, PC53, SR300, SR290, SR200, SR190, SR100, SR90, SR82, SR80, SR72, SR70, SR62, SR60, SR52, SR50, SR42, SR40, SR33, SR32, SR30Не всички описани видеокамери са достъпни във всички страни или региони.След записНатиснете бутона POWER, за да изключите видеокамерата.За повече подробности вижте инструкциите за експлоатация на видеокамерата.Демонтиране на видеокамерата1 Разхлабете копчето за монтиране на камерата и демонтирайте видеокамерата от поставката.2 Сгънете крачетата.Пренасяне на устройствотоКогато носите устройството, поставяйте го в неговата чантичка.ЗабележкаНе носете устройството заедно с монтирана към него видеокамера.Технически характеристикиМаксимално натоварване1 kg (включително батерията и другите аксесоари)Функции на устройството за дистанционно управлениеБутон START/STOP , бутон PHOTO, бутон за увеличение (W/T)РазмериСгънати крачетаРазгънати крачета Прибл. 45 х 132 х 68 mm (ш/в/д)Прибл. 127 х 96 х 114 mm (ш/в/д)Дължина на кабелаПрибл. 250 mm Диапазон на работната температура0 °C to 40 °C ТеглоПрибл. 114 g Приложени аксесоариДръжка за снимане, каишка заръка, скоба за кабела, чантичка за пренасяне, комплект печатна документацияДизайнът и техническите характеристики подлежат на промяна без предупреждение.3GP-AVT1Правилна употребаСнимане от висок ъгълПоддържайте камерата с другата си ръка, за да я направите по-стабилна.Снимане в нормална позицияПрепоръчваме ви да хванете дръжката на камерата под ъгъла, показан в илюстрация , тъй като по този начин ще можете по-лесно да работите с устройството за дистанционно управление.Снимане от нисък ъгълРегулирайте ъгъла на дръжката така, че да можете да работите с устройството за дистанционно управление.l’e mpêcher de tomber.Lorsque vous ajustez l’angle de la poignée, appuyez à fond sur le bouton de réglage d’angle et assurez-vous qu’il ressort complètement avant d’utiliser la poignée. S’il ne ressort pascomplètement, ajustez plus précisément l’angle de la poignée vers l’arrière ou l’avant.Lorsque cet article est utilisé comme trépied:Écartez complètement les pieds et posez-le sur une surface plane. Assurez-vous que le caméscope est stable et que le trépied est équilibré avant du lâcher.Assurez-vous que le trépied est équilibré après avoir fixé un convertisseur ou un autre accessoire. Vous ne pourrez peut-être pas utiliser le trépied avec certains accessoires.N’utilisez pas le trépied à un endroit où il risque d’être renversé par un vent fort, des vibrations, etc.Veillez à ne pas laisser tomber le trépied et à ne pas répandre de liquide dessus.Ne laissez pas le trépied en plein soleil, près d’un appareil de chauffage ou à un endroit très humide.Détachez le trépied du caméscope et rangez-le dans l’étui fourni après usage.Liez le cordon avec la bride de cordon s’il est trop long.Insérez et retirez toujours le connecteur A/V à distance tout droit en le tenant par la fiche. Si vous l’insérez ou le retirez en forçant, le connecteur A/V à distance de cet article ou du caméscope peut être endommagé.NettoyageNettoyez cet article avec un chiffon doux légèrement imprégné d’une solution détergente neutre.Après avoir utilisé cet article à un endroit exposé aux embruns marins, essuyez-le bien avec un chiffon sec.CaractéristiquesLe GP-AVT1 est une poignée avec fonction télécommande conçuepour les caméscopes. Vous pouvez aussi écarter ses pieds pour l’utiliser comme trépied.Vous pouvez utiliser la télécommande intégrée pour agir sur les caméscopes pourvus d’un connecteur A/V à distance Sony.La poignée facile à tenir permet des prises de vue dans une position naturelle. La télécommande peut être actionnée par la main droite ou la main gauche.Vous pouvez faire des prises de vue sous différents angles: en position haute ou basse, ou même en position d’image miroir.L ’e mploi de cet article comme trépied permet une prise de vue plus stable.Les fonctions télécommandables sont les fonctions d’e nregistrement de base (enregistrement de films/photos, zoom).Description des éléments1 Douille de caméscope2 Axe3 Support de caméscope4 Bouton de montage de caméscope5 Bouton de réglage de l’angle6 Connecteur A/V à distance7 Bouton START/STOP8 Bouton PHOTO9 Bouton de zoom 10 Pied D 11 Pied G 12 Poignée13 Oeillet de dragonneMontage du caméscopeInstallez la batterie et un « Memory Stick », un disque ou une cassette dans le caméscope avant de monter ce produit.Veillez à ne pas laisser tomber le caméscope ou ce produit.1 Tenez fermement la poignée et le caméscope,alignez l’axe et la douille de caméscope en utilisant les orifices de positionnement sous le caméscope. ( -1)RemarquesL ’axe est rétractable. Rétractez-le ou sortez-le selon que votre caméscope a ou non un orifice de positionnement.Si votre caméscope a un orifice de positionnement pour l’axe, laissez l’axe ressortir du support de caméscope et fixez le caméscope. Si l’axe est rétracté, sortez-le du support de caméscope avec un objet pointu avant de fixer le caméscope.Si votre caméscope n’a pas d’o rifice de positionnement pour l’axe, sortez l’axe du support de caméscope avant de fixer le caméscope.2 Vissez légèrement la douille de caméscope en tournant le bouton de montage de caméscope et ajustez l’équilibre en faisant glisser le support de caméscope vers l’avant ou l’arrière.3 Tenez le caméscope en position stable etimmobilisez le support de caméscope en serrant à fond le bouton.4 Insérez le connecteur A/V à distance dans le connecteur A/V à distance du caméscope.Liez le cordon avec la bride de cordon s’il est trop long. ( -4)Utilisation comme trépied1 Assurez-vous que les pieds sont complètementécartés.中文(简)感谢您购买本 Sony 小型三脚架拍摄手柄。
ABAP中宏的使用(HR)

ABAP中宏的使⽤(HR)宏是⼀种单纯源代码复⽤技术,不存在参数传递机制,宏⽐include形式更为简单,往往只是为了增强程序的可读性。
宏可以在程序中定义,再进⾏调⽤使⽤,此宏只在本程序中可⽤。
也可以将宏定义存贮在Macros库Trmac(se11中查看)中,这样可以在任何程序中直接调⽤。
Define macro_name.End-of-definition.必须在Define和End-of-definition之间指定完整的语句,这些语句最多包含9个占位符,即&1-&9。
占位符的意义在于暂时不指定代码,调⽤的时候进⾏代码替换。
注:可以从宏中调⽤另⼀个宏,但宏不能调⽤⾃⾝宏的定义⼀定要出现在引⽤它的程序段之前⼀般Macro_name不超过20个字符1.下⾯内容为在ALV Report中常⽤的关于CATALOG的写法FORM INIT_FIELDCAT CHANGING PT_FIELDCAT TYPE SLIS_T_FIELDCAT_ALV.DATA : LS_FIELDCAT TYPE SLIS_FIELDCAT_ALV,L_INDEX LIKE SY-INDEX.CLEAR :L_INDEX, PT_FIELDCAT.* Define a macroDEFINE CATALOG.L_INDEX = L_INDEX + 1.CLEAR LS_FIELDCAT.LS_FIELDCAT-COL_POS = L_INDEX.LS_FIELDCAT-TABNAME = 'GT_LIST'.LS_FIELDCAT-DDICTXT = 'M'.LS_FIELDCAT-FIELDNAME = &1.LS_FIELDCAT-SELTEXT_M = &2.LS_FIELDCAT-OUTPUTLEN = &3.LS_FIELDCAT-KEY = &4.LS_FIELDCAT-REF_TABNAME = &5.LS_FIELDCAT-REF_FIELDNAME = &6.LS_FIELDCAT-JUST = &7.LS_FIELDCAT-QFIELDNAME = &8.LS_FIELDCAT-CURRENCY = &9.APPEND LS_FIELDCAT TO PT_FIELDCAT.END-OF-DEFINITION.* Use the macroCATALOG:'PERNR' TEXT-001 '12' '' '' '' '' '' '','ENAME' TEXT-002 '10' '' '' '' '' '' '','ZYEAR' TEXT-003 '04' '' '' '' '' '' '','BEGDA' TEXT-004 '10' '' '' '' '' '' '','ENDDA' TEXT-005 '10' '' '' '' '' '' '','PERIOD' TEXT-006 '21' '' '' '' '' '' '','ORGEH' TEXT-007 '08' '' '' '' '' '' '','ORGTX' TEXT-008 '20' '' '' '' '' '' '','RATING' TEXT-010 '10' '' '' '' '' '' '','RTEXT' TEXT-009 '08' '' '' '' '' '' '','ID' TEXT-011 '08' '' '' '' '' '' '','TSTEXT' TEXT-012 '15' '' '' '' '' '' ''.ENDFORM." INIT_FIELDCAT2.下⾯内容为HR模块中常⽤的存贮在Macros库Trmac中的宏RP-PROVIDE-FROM-FRST Pnnnn SPACE PN-BEGDA PN-ENDDA.PNP-SW-FOUND = '0'LOOP AT &1IF &2 NE SPACECHECK &1-SUBTY EQ &2ENDIFIF &1-BEGDA LE &4 AND &1-ENDDA GE&3PNP-SW-FOUND = '1'EXITENDIFENDLOOPIF PNP-SW-FOUND EQ '0'CLEAR &1ENDIFRP-PROVIDE-FROM-FRST Pnnnn SPACE PN-BEGDA PN-ENDDA.参数:&1(Pnnnn) &2(SPACE可为常量)&3(PN-BEGDA可为常量) &4(PN-ENDDA可为常量)功能:如果Pnnnn-BEGDA <= PN-ENDDAPnnnn-ENDDA >= PN-BEGDA则PNP-SW-FOUND=1,Pnnnn会存⼊符合上⾯时间条件的内表中的第⼀⾏数据,否则Pnnnn将会被清空。
MSP430_单片机_资料

MSP430_单片机_资料MSP430_单片机_资料Ulrt-lao wowep drsien wigthTexas nsItumertn s超功低微耗控制器超低功耗控微器制SM4P0Augus3t 0 0/1MSP430_单片机_资料ltUra-lwo pwored signe withMSP340发展历程性能Flsh aFalhs1.-836. VL CDD riev r. 1….-3.6 8V Bsica lCoc Tiker_A meNwROM/OPT.525 -VL DC DrvireFL TiLmrePor/ tBasc Tiierm8- bi tT/ C33xxCD120L Tmeri_ ASAUTR MPFY14xTiermB _DAC2 21US RT MPAYC mo_Ap4F4NewxF13Tixmr_Be DCA1 2UASTRC op_AmF42x3x2xCDL48 ADC41X1xUSART24F1x3x1xLCD921x1x1Cop_AF40xm***-*****20XX年20XX年0202Agustu0 0 /2UlMSP430_单片机_资料ratl-wop wor eedisgn itwhSM4P3:全新的0微制控R器N THE *****NH ,NT TOH EMIEL. ITs’ lFah MsS430 MPU redCuces pwoer cnsuompton driatiscally s, youo rabtteire surn lnogr.eMS430P的效极能.高/IO和PC U运是行用能同的不时钟PC 功U 的耗关通过开状寄态器存控的位实现制MSP430 的耗功极低. 行执时为601A u@ .81 V(Fasl)h 备用时为0.1u A(Fl sh)a MPS403极地延长大电了池寿命电SM4P0 有3业级工16 itb RISCM CU. -40 8-5 C M SP34 0编程方便,发开工具廉价DA MED1M,EMM ;2EMM=2*****+E2hTeMSP 304 runswith aatcwhcr staylat p tou4MH zitenrnalclck!ouAugst 00 /3MSP430_单片机_资料lUra-ltw powero dsiegnw ith*****Fxx :LASH F列特性系New灵活样多外的围模块RUNTH ***** N,O ONT HTEM IL.ET ’Is lash*****MCU red cuesp wore conumptions drsticaaly, so ylou rabtetiesrrun l ongre. 12b-t iAD /8( +4 通道, 转换1 0s) 61-ib timTe_r wAthi C3C /寄器存1-6bt iTime_B wirth 7/C C存器寄1 2 个-SURA接口T 件硬法器乘模拟号信比较器基本时模钟块- 由可程内部电阻控编频制率-由单一部电外控制阻率频-2 3kHz 振产晶生低频- 高晶振频产高生频可选择外部-时钟源超低功耗1.8V . ..3 6.V 供电电压范2围00 A@ 1MH,z 2.2V,活动模式0.7 A 备用模式0. 1A 保持R AM 据数 6 s备从模式唤醒用强大C的U 内P核16Bit R-IC S构结251n 指令s期周@ MHz8Auugs t00/4UMSP430_单片机_资料lrt-alw oopewr edign swtihSP4M0 系3列注1 - :可C由mopaatorrA_实现2 -可由Ti mr/Poert实现3 -有562 FLASBH 和oot BRM O 4 I-punt/utpuOt+ Otpuu外t模围块: TIMRSE: WT Db8tiT B1T _A T_BT- aWchtdgo 定时器- 8位定器时/计器数-Baic siTemr 1- Tmie_r A(x )捕/捉比较寄存器T-ime_r (Bx 捕)捉比/较寄存器URAT 件实软,或现用通同步异/接口步数MPY硬乘法器I/O件数字I/O ,O及tuputAgusut 00/ 5MSP430_单片机_资料Ulrt-aowlp wore dsegin witMhSP403F LSAH 列系NweFie vnew lFas hcofinurgtiaon avsilaable now!号型LASH 1 FB 4 KB 8 KB 1K6KB 32 B K8 K4 B60KBA/ DlSpeo loSe p2-b1t 12i-itb 12-bti1 2b-it12 bit-Tmire sA3A3 A 3 +B 33 A +3 A3B +B7 A + B3 A7 +3B 7SUART 1 12 2M2P Yvv v/IO 4 114 8 448 8 4484 8FALH 型S超低功耗Falsh 内核10,000 次写/0周期擦程存储器序段:51分2 信B存储息分器:128B段可以分擦段除或整擦除体编和擦程除电由压内产生部有代读出码护保*****101 *****1F211MS P34F031 M3FS*****FMSP 40F317 4SPM*****F *****F94Augst 00 u/6MSP430_单片机_资料低功耗的超现实:速起动和快电省模式其他MCUIUltarlo- powewrd esig nithw* / 4b8tiC UP* 电流耗大消* 唤醒慢Ic c /A45 400 ***-*****IvAgr300 5022 00tVc c=3 V1 se ccylcetime**********ctAvei odMe PML0*****LLPMIAvrg3 t例L:P3, M备模式用(*****C1) 3276xHz 振8荡活动器基。
cmake编译(编译目标)x86或x64

cmake编译(编译⽬标)x86或x64if(CMAKE_CL_64) #CMAKE的内建变量,如果是true,就说明编译器的64位的,⾃然可以编译64bit的程序set(ADDRESS_MODEL 64)set(NODE_TARGET x64)else()set(ADDRESS_MODEL 32)set(NODE_TARGET x86)endif()看以上代码,判断下就⾏了CMAKE_CL_64内建的这个变量,官⽅⽂档给出来的解释是:Using the 64 bit compiler from MicrosoftSet to true when using the 64 bit cl compiler from Microsoft.###############update####################如果是GCC编译器或者其他的诸如sun Studio之类的,可以设置CFLAGS CXXFLAGS变量,加⼊-m32 或者-m64来编译x86或者x64的程序。
如果是windows平台下VS的project⽂件的话,请使⽤VS generator,cmake -G "Visual Studio 10 Win64"就是编译为x64,cmake -G "Visual Studio 10 "就是编译为x86.如果是Mac OS X上,使⽤CMAKE_OSX_ARCHITECTURES这个CMAKE的内建变量。
cmake -DCMAKE_OSX_ARCHITECTURES=i386 /path/to/source/dir------编译为32位cmake -DCMAKE_OSX_ARCHITECTURES=x86_64 /path/to/source/dir------编译为64位cmake "-DCMAKE_OSX_ARCHITECTURES=x86_64;i386" /path/to/source/dir -------编译为通⽤8664架构和i386架构的⼆进制或者可以⽤另外⼀种⽅式,思路是这样的,其实编译为x86或者x64,本质上都是向linker传递特定的参数。
32路流水灯完美版源代码 51单片机

{
uchar i,temp=0x80;
for(i=0;i<8;i++)
{
P0=~temp; //P0右移子函数
delay(quan);
temp>>=1;
}
P0=0xff;
}
//***************************************************
0x5f,0x6f,0x77,0x7b,0x7d,0x7e,0x7f};
uchar code ledp3[]={
0x2f,0x37,0x3b,0x3d,0x3e,0x3f};
uchar code ledp4[]={
0x17,0x1b,0x1d,0x1e,0x1f};
uchar code ledp5[]={
{
uchar i,temp=0xfe;
for(i=0;i<8;i++)
{
P2=temp; //P2左扫子函数
delay(quan);
uchar code ledpl4[]={
0x78,0xb8,0xd8,0xe8,0xf0};
uchar code ledpl5[]={
0x70,0xb0,0xd0,0xe0};
uchar code ledpl6[]={
0x60,0xa0,0xc0};
uchar code ledpl7[]={
delay(quan);
temp>>=1;
}
P3=0xff;
}
//***************************************************
Magma相关问题总结

40
12.pressurize options(压力参数定义)
点选进入压力参数的设置
41
13.pressurize parameters(压力参数设置)
只有135与150两数值供输入 (135bar用于900T以下的压铸 机,150bar用于1200T以上的 压铸机).
有时设置0.03ms
不更改
新转化
多边形缩减
2.所画排气槽都要进行拔模(15°)及倒圆角处理。
3D需画出
3D无需画出
4
D:Magma模拟铝料 常用铝料对照表 A360AlSi10MgXK360
固液相线温度
S:555℃ L:595℃ S:576℃ L:578℃
413AlSi12
A380AlSi9Cu3 A383AlSi12Cu
S:479℃ L:578℃
S:529℃ L:570℃
ADC12AlSi10Mg
B390AlSi17Cu3-PAlSi18Cu4ZnFe T13AlSi12
S:555℃ L:595℃
S:492℃ L:636℃
S:576℃ L:578℃
5
E:压室总长度计算(Active length of sleeve) →L=L1+L2-X
红色交点必须在灰色区域内(说明前段的数据输入合理)
32
33
6.Shot characteristics(压射特征)
此设置参考如前所列的5速度
3b是较为理论的速 度,但实践的压铸 是很少在内浇口开 始高速能得到比较 好的成型效果
34
35
7.Venting options(排气选项)
此命令栏中有:off(关)、 on(开)
标准栏:对于动定模肉较大的产品参数可 设置的大一些,小产品一般采用3~5。
2006年AMC8试题及答案
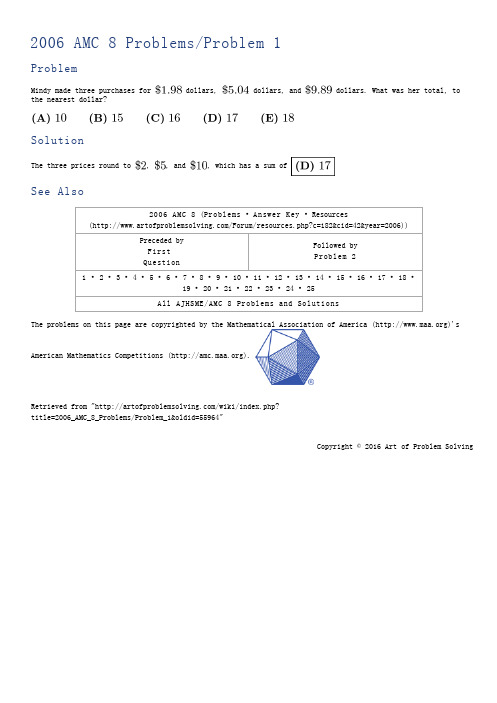
Copyright © 2016 Art of Problem Solving Mindy made three purchases for dollars, dollars, and dollars. What was her total, tothe nearest dollar?The three prices round to , , and , which has a sum of2006 AMC 8 (Problems • Answer Key • Resources(/Forum/resources.php?c=182&cid=42&year=2006))Preceded byFirstQuestion Followed by Problem 21 •2 •3 •4 •5 •6 •7 •8 •9 • 10 • 11 • 12 • 13 • 14 • 15 • 16 • 17 • 18 •19 • 20 • 21 • 22 • 23 • 24 • 25All AJHSME/AMC 8 Problems and Solutions The problems on this page are copyrighted by the Mathematical Association of America ()'sAmerican Mathematics Competitions ().Retrieved from "/wiki/index.php?title=2006_AMC_8_Problems/Problem_1&oldid=55964"SolutionSee AlsoCopyright © 2016 Art of Problem SolvingOn the AMC 8 contest Billy answers 13 questions correctly, answers 7 questions incorrectly and doesn'tanswer the last 5. What is his score?As the AMC 8 only rewards 1 point for each correct answer, everything is irrelevant except the number Billy answered correctly, .2006 AMC 8 (Problems • Answer Key • Resources(/Forum/resources.php?c=182&cid=42&year=2006))Preceded byProblem 1Followed by Problem 31 •2 •3 •4 •5 •6 •7 •8 •9 • 10 • 11 • 12 • 13 • 14 • 15 • 16 • 17 • 18 •19 • 20 • 21 • 22 • 23 • 24 • 25All AJHSME/AMC 8 Problems and Solutions The problems on this page are copyrighted by the Mathematical Association of America ()'sAmerican Mathematics Competitions ().Retrieved from "/wiki/index.php?title=2006_AMC_8_Problems/Problem_2&oldid=55965"SolutionSee AlsoCopyright © 2016 Art of Problem SolvingElisa swims laps in the pool. When she first started, she completed 10 laps in 25 minutes. Now, she canfinish 12 laps in 24 minutes. By how many minutes has she improved her lap time?When Elisa started, she finished a lap in minutes. Now, she finishes a lap is minutes.The difference is .2006 AMC 8 (Problems • Answer Key • Resources(/Forum/resources.php?c=182&cid=42&year=2006))Preceded byProblem 2Followed by Problem 41 •2 •3 •4 •5 •6 •7 •8 •9 • 10 • 11 • 12 • 13 • 14 • 15 • 16 • 17 • 18 •19 • 20 • 21 • 22 • 23 • 24 • 25All AJHSME/AMC 8 Problems and Solutions The problems on this page are copyrighted by the Mathematical Association of America ()'sAmerican Mathematics Competitions ().Retrieved from "/wiki/index.php?title=2006_AMC_8_Problems/Problem_3&oldid=55966"SolutionSee AlsoCopyright © 2016 Art of Problem Solving Initially, a spinner points west. Chenille moves it clockwise revolutions and then counterclockwiserevolutions. In what direction does the spinner point after the two moves?If the spinner goes clockwise revolutions and then counterclockwise revolutions, it ultimately goes counterclockwise which brings the spinner pointing.2006 AMC 8 (Problems • Answer Key • Resources(/Forum/resources.php?c=182&cid=42&year=2006))Preceded byProblem 3Followed by Problem 51 •2 •3 •4 •5 •6 •7 •8 •9 • 10 • 11 • 12 • 13 • 14 • 15 • 16 • 17 • 18 •19 • 20 • 21 • 22 • 23 • 24 • 25All AJHSME/AMC 8 Problems and Solutions The problems on this page are copyrighted by the Mathematical Association of America ()'sAmerican Mathematics Competitions ().Retrieved from "/wiki/index.php?title=2006_AMC_8_Problems/Problem_4&oldid=55967"SolutionSee AlsoPoints and are midpoints of the sides of the larger square. If the larger square has area 60, what is the area of the smaller square?Drawing segments and , the number of triangles outside square is the same as the number of triangles inside the square. Thus areas must be equal so the area of is half the area of thelarger square which is .If the side length of the larger square is , the side length of the smaller square is . Therefore the area of the smaller square is , half of the larger square's area, .Thus, the area of the smaller square in the picture is .Copyright © 2016 Art of Problem Solving The letter T is formed by placing twoinch rectangles next to each other, as shown. What is theperimeter of the T, in inches?If the two rectangles were seperate, the perimeter would be . It easy to see that their connection erases 2 from each of the rectangles, so the final perimeter is .2006 AMC 8 (Problems • Answer Key • Resources(/Forum/resources.php?c=182&cid=42&year=2006))Preceded byProblem 5Followed by Problem 71 •2 •3 •4 •5 •6 •7 •8 •9 • 10 • 11 • 12 • 13 • 14 • 15 • 16 • 17 • 18 •19 • 20 • 21 • 22 • 23 • 24 • 25All AJHSME/AMC 8 Problems and SolutionsThe problems on this page are copyrighted by the Mathematical Association of America ()'s American Mathematics Competitions ().Retrieved from "/wiki/index.php?title=2006_AMC_8_Problems/Problem_6&oldid=55969"SolutionSee AlsoCopyright © 2016 Art of Problem Solving Circle has a radius of . Circle has a circumference of . Circle has an area of . List thecircles in order from smallest to largest ing the formulas of circles, and , we find that circle has a radius of and circle has a radius of . Thus, the order from smallest to largest radius is.2006 AMC 8 (Problems • Answer Key • Resources(/Forum/resources.php?c=182&cid=42&year=2006))Preceded byProblem 6Followed by Problem 81 •2 •3 •4 •5 •6 •7 •8 •9 • 10 • 11 • 12 • 13 • 14 • 15 • 16 • 17 • 18 •19 • 20 • 21• 22 • 23 • 24 • 25All AJHSME/AMC 8 Problems and SolutionsThe problems on this page are copyrighted by the Mathematical Association of America ()'s American Mathematics Competitions ().Retrieved from "/wiki/index.php?title=2006_AMC_8_Problems/Problem_7&oldid=55970"SolutionSee AlsoCopyright © 2016 Art of Problem SolvingThe table shows some of the results of a survey by radiostation KAMC. What percentage of the males surveyedlisten to the station?Filling out the chart, it becomes Thus, the percentage of males surveyed that listen to the station is .2006 AMC 8 (Problems • Answer Key • Resources(/Forum/resources.php?c=182&cid=42&year=2006))Preceded byProblem 7Followed by Problem 91 •2 •3 •4 •5 •6 •7 •8 •9 • 10 • 11 • 12 • 13 • 14 • 15 • 16 • 17 • 18 •19 • 20 • 21 • 22 • 23 • 24 • 25All AJHSME/AMC 8 Problems and Solutions The problems on this page are copyrighted by the Mathematical Association of America ()'sAmerican Mathematics Competitions ().Retrieved from "/wiki/index.php?title=2006_AMC_8_Problems/Problem_8&oldid=55971"SolutionSee AlsoCopyright © 2016 Art of Problem Solving What is the product of?By telescoping, it's easy to see the sum becomes .2006 AMC 8 (Problems • Answer Key • Resources(/Forum/resources.php?c=182&cid=42&year=2006))Preceded byProblem 8Followed by Problem 101 •2 •3 •4 •5 •6 •7 •8 •9 • 10 • 11 • 12 • 13 • 14 • 15 • 16 • 17 • 18 •19 • 20 • 21 • 22 • 23 • 24 • 25All AJHSME/AMC 8 Problems and Solutions The problems on this page are copyrighted by the Mathematical Association of America ()'sAmerican Mathematics Competitions ().Retrieved from "/wiki/index.php?title=2006_AMC_8_Problems/Problem_9&oldid=55972"SolutionSee AlsoJorge's teacher asks him to plot all the ordered pairs of positive integers for which is the width and is the length of a rectangle with area 12. What should his graph look like?Copyright © 2016 Art of Problem SolvingThe length of the rectangle will relate invertly to the width, specifically using the theorem . Theonly graph that could represent a inverted relationship is . (The rest are linear graphs thatrepresent direct relationships)2006 AMC 8 (Problems • Answer Key • Resources(/Forum/resources.php?c=182&cid=42&year=2006))Preceded by Problem 9Followed by Problem 111 •2 •3 •4 •5 •6 •7 •8 •9 • 10 • 11 • 12 • 13 • 14 • 15 • 16 • 17 • 18 •19 • 20 • 21 • 22 • 23 • 24 • 25All AJHSME/AMC 8 Problems and SolutionsThe problems on this page are copyrighted by the Mathematical Association of America ()'sAmerican Mathematics Competitions ().Retrieved from "/wiki/index.php?title=2006_AMC_8_Problems/Problem_10&oldid=55973"SolutionSee AlsoCopyright © 2016 Art of Problem SolvingHow many two-digit numbers have digits whose sum is a perfect square?There is integer whose digits sum to : .There are integers whose digits sum to : .There are integers whose digits sum to : .There are integers whose digits sum to :.Two digits cannot sum toor any greater square since the greatest sum of digits of a two-digit number is.Thus, the answer is.2006 AMC 8 (Problems • Answer Key • Resources(/Forum/resources.php?c=182&cid=42&year=2006))Preceded by Problem 10Followed by Problem 121 •2 •3 •4 •5 •6 •7 •8 •9 • 10 • 11 • 12 • 13 • 14 • 15 • 16 • 17 • 18 •19 • 20 • 21 • 22 • 23 • 24 • 25All AJHSME/AMC 8 Problems and SolutionsThe problems on this page are copyrighted by the Mathematical Association of America ()'sAmerican Mathematics Competitions ().Retrieved from "/wiki/index.php?title=2006_AMC_8_Problems/Problem_11&oldid=80944"SolutionSee AlsoCopyright © 2016 Art of Problem SolvingAntonette gets on a 10-problem test, on a 20-problem test and on a 30-problem test. Ifthe three tests are combined into one 60-problem test, which percent is closest to her overall score?Adding them up gets. The overall percentage correct would be.2006 AMC 8 (Problems • Answer Key • Resources(/Forum/resources.php?c=182&cid=42&year=2006))Preceded by Problem 11Followed by Problem 131 •2 •3 •4 •5 •6 •7 •8 •9 • 10 • 11 • 12 • 13 • 14 • 15 • 16 • 17 • 18 •19 • 20 • 21 • 22 • 23 • 24 • 25All AJHSME/AMC 8 Problems and SolutionsThe problems on this page are copyrighted by the Mathematical Association of America ()'sAmerican Mathematics Competitions ().Retrieved from "/wiki/index.php?title=2006_AMC_8_Problems/Problem_12&oldid=55975"SolutionSee AlsoCopyright © 2016 Art of Problem SolvingCassie leaves Escanaba at 8:30 AM heading for Marquette on her bike. She bikes at a uniform rate of 12 miles per hour. Brian leaves Marquette at 9:00 AM heading for Escanaba on his bike. He bikes at a uniform rate of 16 miles per hour. They both bike on the same 62-mile route between Escanaba and Marquette. At what time inthe morning do they meet?If Cassie leavesan hour earlier then Brian, when Brian starts, the distance between them will be. Every hour, they will getmiles closer., so 2 hours from 9:00AM is when they meet, which is.2006 AMC 8 (Problems • Answer Key • Resources(/Forum/resources.php?c=182&cid=42&year=2006))Preceded by Problem 12Followed by Problem 141 •2 •3 •4 •5 •6 •7 •8 •9 • 10 • 11 • 12 • 13 • 14 • 15 • 16 • 17 • 18 •19 • 20 • 21 • 22 • 23 • 24 • 25All AJHSME/AMC 8 Problems and SolutionsThe problems on this page are copyrighted by the Mathematical Association of America ()'sAmerican Mathematics Competitions ().Retrieved from "/wiki/index.php?title=2006_AMC_8_Problems/Problem_13&oldid=55976"SolutionSee AlsoCopyright © 2016 Art of Problem SolvingProblems 14, 15 and 16 involve Mrs. Reed's English assignment.A Novel AssignmentThe students in Mrs. Reed's English class are reading the same -page novel. Three friends, Alice, Bob and Chandra, are in the class. Alice reads a page in 20 seconds, Bob reads a page in seconds and Chandra reads a page inseconds.If Bob and Chandra both read the whole book, Bob will spend how many more seconds reading than Chandra?The information is the same for Problems 14,15, and 16. Therefore, we shall only use the information we need. All we need for this problem is that there's 760 pages, Bob reads a page in 45 seconds and Chandrareads a page in 30 seconds. A lot of people will find how long it takes Bob to read the book, how long it takes Chandra to read the book, and then find the seconds. However, if we just set up the expression, we can find an easier way.2006 AMC 8 (Problems • Answer Key • Resources(/Forum/resources.php?c=182&cid=42&year=2006))Preceded by Problem 13Followed by Problem 151 •2 •3 •4 •5 •6 •7 •8 •9 • 10 • 11 • 12 • 13 • 14 • 15 • 16 • 17 • 18 •19 • 20 • 21 • 22 • 23 • 24 • 25All AJHSME/AMC 8 Problems and SolutionsThe problems on this page are copyrighted by the Mathematical Association of America ()'sAmerican Mathematics Competitions ().Retrieved from "/wiki/index.php?title=2006_AMC_8_Problems/Problem_14&oldid=55977"SolutionSee AlsoLet be the number of pages that Chandra reads.Distribute theAdd to both sidesDivide both sides by to make it easier to solveDivide both sides bySolution 2Bob and Chandra read at a rate of seconds per page, respectively. Simplifying that gets us Bob reads pages for every pages that Chandra reads. Therefore Chandra should read of the book. =$\boxed{\textbf{(C)} 456}See AlsoCopyright © 2016 Art of Problem SolvingProblems 14, 15 and 16 involve Mrs. Reed's English assignment.A Novel AssignmentThe students in Mrs. Reed's English class are reading the same 760-page novel. Three friends, Alice, Bob and Chandra, are in the class. Alice reads a page in 20 seconds, Bob reads a page in 45 seconds and Chandra reads a page in 30 seconds.Before Chandra and Bob start reading, Alice says she would like to team read with them. If they divide the book into three sections so that each reads for the same length of time, how many seconds will each have toread?The amount of pages Bob, Chandra, and Alice would read is in the ratio 4:6:9. Therefore, Bob, Chandra, and Alice read 160, 240, and 360 pages respectively. They would also be reading in the same amount of time because the ratio of pages read was based on the time it takes each of them to read a page. Therefore, the amount of seconds each person reads is.2006 AMC 8 (Problems • Answer Key • Resources(/Forum/resources.php?c=182&cid=42&year=2006))Preceded by Problem 15Followed by Problem 171 •2 •3 •4 •5 •6 •7 •8 •9 • 10 • 11 • 12 • 13 • 14 • 15 • 16 • 17 • 18 •19 • 20 • 21 • 22 • 23 • 24 • 25All AJHSME/AMC 8 Problems and SolutionsThe problems on this page are copyrighted by the Mathematical Association of America ()'sAmerican Mathematics Competitions ().Retrieved from "/wiki/index.php?title=2006_AMC_8_Problems/Problem_16&oldid=55979"SolutionSee AlsoCopyright © 2016 Art of Problem SolvingJeff rotates spinners ,andand adds the resulting numbers. What is the probability that his sum isan odd number?In order for Jeff to have an odd number sum, the numbers must either be Odd + Odd + Odd or Even + Even +Odd. We easily notice that we cannot obtain Odd + Odd + Odd because spinner contains only even numbers.Therefore we must work with Even + Even + Odd and spinner will give us one of our even numbers. We also see that spinner only contains odd, so spinner must give us our odd nmber. We still need one evennumber from spinner . There is only 1 even number: . Since spinning the required numbers are automatic onthe other spinners, we only have to find the probability of spinning a in spinner , which clearly is2006 AMC 8 (Problems • Answer Key • Resources(/Forum/resources.php?c=182&cid=42&year=2006))Preceded by Problem 16Followed by Problem 181 •2 •3 •4 •5 •6 •7 •8 •9 • 10 • 11 • 12 • 13 • 14 • 15 • 16 • 17 • 18 •19 • 20 • 21 • 22 • 23 • 24• 25All AJHSME/AMC 8 Problems and SolutionsThe problems on this page are copyrighted by the Mathematical Association of America ()'sAmerican Mathematics Competitions ().Retrieved from "/wiki/index.php?title=2006_AMC_8_Problems/Problem_17&oldid=55980"SolutionSee AlsoCopyright © 2016 Art of Problem SolvingA cube with 3-inch edges is made using 27 cubes with 1-inch edges. Nineteen of the smaller cubes are white and eight are black. If the eight black cubes are placed at the corners of the larger cube, what fraction of the surface area of the larger cube is white?The surface area of the cube is . Each of the eight black cubes has 3 faces on the outside,making black faces. Therefore there are white faces. To find the probability,we evaluate.2006 AMC 8 (Problems • Answer Key • Resources(/Forum/resources.php?c=182&cid=42&year=2006))Preceded by Problem 17Followed by Problem 191 •2 •3 •4 •5 •6 •7 •8 •9 • 10 • 11 • 12 • 13 • 14 • 15 • 16 • 17 • 18 •19 • 20 • 21 • 22 • 23 • 24 •25All AJHSME/AMC 8 Problems and SolutionsThe problems on this page are copyrighted by the Mathematical Association of America ()'sAmerican Mathematics Competitions ().Retrieved from "/wiki/index.php?title=2006_AMC_8_Problems/Problem_18&oldid=55981"SolutionSee AlsoCopyright © 2016 Art of Problem SolvingTriangleis an isosceles triangle with . Pointis the midpoint of bothand, and is 11 units long. Triangleis congruent to triangle . What is the length of?Since triangleis congruent to triangleand ,. Since,. Because pointis the midpoint of,.2006 AMC 8 (Problems • Answer Key • Resources(/Forum/resources.php?c=182&cid=42&year=2006))Preceded by Problem 18Followed by Problem 201 •2 •3 •4 •5 •6 •7 •8 •9 • 10 • 11 • 12 • 13 • 14 • 15 • 16 • 17 • 18 •19• 20 • 21 • 22 • 23 • 24 • 25All AJHSME/AMC 8 Problems and SolutionsThe problems on this page are copyrighted by the Mathematical Association of America ()'sAmerican Mathematics Competitions ().Retrieved from "/wiki/index.php?title=2006_AMC_8_Problems/Problem_19&oldid=55982"SolutionSee AlsoA singles tournament had six players. Each player played every other player only once, with no ties. If Helen won 4 games, Ines won 3 games, Janet won 2 games, Kendra won 2 games and Lara won 2 games, how manygames did Monica win?Since there are 6 players, a total ofgames are played. So far,games finished (one person won from each game), so Monica needs to win.2006 AMC 8 (Problems • Answer Key • Resources(/Forum/resources.php?c=182&cid=42&year=2006))Preceded byProblem 19Followed byProblem 211 •2 •3 •4 •5 •6 •7 •8 •9 • 10 • 11 • 12 • 13 • 14 • 15 • 16 • 17 • 18 •19 •20• 21 • 22 • 23 • 24 • 25All AJHSME/AMC 8 Problems and SolutionsThe problems on this page are copyrighted by the Mathematical Association of America ()'sAmerican Mathematics Competitions ().Retrieved from "/wiki/index.php?title=2006_AMC_8_Problems/Problem_20&oldid=81054"SolutionSee AlsoCopyright © 2016 Art of Problem SolvingCopyright © 2016 Art of Problem Solving An aquarium has a rectangular base that measures cm by cm and has a height ofcm. The aquarium is filled with water to a depth of cm. A rock with volume is then placed in the aquarium and completely submerged. By how many centimeters does the water level rise?The water level will rise cm for every . Since is of , the waterwill rise 2006 AMC 8 (Problems • Answer Key • Resources(/Forum/resources.php?c=182&cid=42&year=2006))Preceded byProblem 20Followed by Problem 221 •2 •3 •4 •5 •6 •7 •8 •9 • 10 • 11 • 12 • 13 • 14 • 15 • 16 • 17 • 18 •19 • 20 • 21 • 22• 23 • 24 • 25All AJHSME/AMC 8 Problems and SolutionsThe problems on this page are copyrighted by the Mathematical Association of America ()'s American Mathematics Competitions ().Retrieved from "/wiki/index.php?title=2006_AMC_8_Problems/Problem_21&oldid=55984"SolutionSee AlsoThree different one-digit positive integers are placed in the bottom row of cells. Numbers in adjacent cells are added and the sum is placed in the cell above them. In the second row, continue the same process toobtain a number in the top cell. What is the difference between the largest and smallest numbers possible inthe top cell?If the lower cells contain and , then the second row will contain and , and the top cell will contain . To obtain the smallest sum, place in the center cell and and in the outer ones. The top number will be . For the largest sum, place in the center cell and and in the outer ones. This top number will be . The difference is .2006 AMC 8 (Problems • Answer Key • Resources(/Forum/resources.php?c=182&cid=42&year=2006))Preceded byProblem 21Followed by Problem 231 •2 •3 •4 •5 •6 •7 •8 •9 • 10 • 11 • 12 • 13 • 14 • 15 • 16 • 17 • 18 •19 • 20 • 21 •22 • 23 • 24 • 25All AJHSME/AMC 8 Problems and SolutionsThe problems on this page are copyrighted by the Mathematical Association of America ()'s American Mathematics Competitions ().Retrieved from "/wiki/index.php?title=2006_AMC_8_Problems/Problem_22&oldid=55985"SolutionSee AlsoThe counting numbers that leave a remainder of 4 when divided by 6 are The counting numbers that leave a remainder of 3 when divided by 5 are So 28 isthe smallest possible number of coins that meets both conditions. Because , there areIf there were two more coins in the box, the number of coins would be divisible by both 6 and 5. The smallest number that is divisible by 6 and 5 is , so the smallest possible number of coins in the box isand the remainder when divided by 7 is .The problems on this page are copyrighted by the Mathematical Association of America ()'s American Mathematics Competitions ().Copyright © 2016 Art of Problem Solving In the multiplication problem below , , , and are different digits. What is?, so . Therefore, and , so.2006 AMC 8 (Problems • Answer Key • Resources(/Forum/resources.php?c=182&cid=42&year=2006))Preceded byProblem 23Followed by Problem 251 •2 •3 •4 •5 •6 •7 •8 •9 • 10 • 11 • 12 • 13 • 14 • 15 • 16 • 17 • 18 •19 • 20 • 21 • 22 • 23 •24 • 25All AJHSME/AMC 8 Problems and SolutionsThe problems on this page are copyrighted by the Mathematical Association of America ()'s American Mathematics Competitions ().Retrieved from "/wiki/index.php?title=2006_AMC_8_Problems/Problem_24&oldid=68712"SolutionSee AlsoCopyright © 2016 Art of Problem Solving Barry wrote 6 different numbers, one on each side of 3 cards, and laid the cards on a table, as shown. The sums of the two numbers on each of the three cards are equal. The three numbers on the hidden sides areprime numbers. What is the average of the hidden prime numbers?Notice that 44 and 38 are both even, while 59 is odd. If any odd prime is added to 59, an even number will be obtained. However, the only way to obtain this even number would be to add another even number to 44, and a different one to 38. Since there is only one even prime (2), the middle card's hidden number cannot be anodd prime, and so must be even. Therefore, the middle card's hidden number must be 2, so the constant sum is . Thus, the first card's hidden number is , and the last card's hidden number is .Since the sum of the hidden primes is, the average of the primes is.2006 AMC 8 (Problems • Answer Key • Resources(/Forum/resources.php?c=182&cid=42&year=2006))Preceded byProblem 24Followed by Last Problem1 •2 •3 •4 •5 •6 •7 •8 •9 • 10 • 11 • 12 • 13 • 14 • 15 • 16 • 17 • 18 •19 • 20 • 21 • 22 • 23 • 24 • 25All AJHSME/AMC 8 Problems and SolutionsThe problems on this page are copyrighted by the Mathematical Association of America ()'s American Mathematics Competitions ().Retrieved from "/wiki/index.php?title=2006_AMC_8_Problems/Problem_25&oldid=55988"SolutionSee Also。
Oracle递归查询sql

Oracle递归查询sqlSELECT * FROM SYS_AREABASESTART WITH areacode='433127'CONNECT BY PRIOR areacode=PARENTcode1.树结构的描述树结构的数据存放在表中,数据之间的层次关系即⽗⼦关系,通过表中的列与列间的关系来描述,如EMP表中的EMPNO和MGR。
EMPNO表⽰该雇员的编号,MGR表⽰领导该雇员的⼈的编号,即⼦节点的MGR值等于⽗节点的EMPNO值。
在表的每⼀⾏中都有⼀个表⽰⽗节点的MGR(除根节点外),通过每个节点的⽗节点,就可以确定整个树结构。
在SELECT命令中使⽤CONNECT BY 和START WITH ⼦句可以查询表中的树型结构关系。
其命令格式如下:SELECT . . .CONNECT BY {PRIOR 列名1=列名2|列名1=PRIOR 裂名2}[START WITH];其中:CONNECT BY⼦句说明每⾏数据将是按层次顺序检索,并规定将表中的数据连⼊树型结构的关系中。
PRIOR运算符必须放置在连接关系的两列中某⼀个的前⾯。
对于节点间的⽗⼦关系,PRIOR运算符在⼀侧表⽰⽗节点,在另⼀侧表⽰⼦节点,从⽽确定查找树结构是的顺序是⾃顶向下还是⾃底向上。
在连接关系中,除了可以使⽤列名外,还允许使⽤列表达式。
START WITH ⼦句为可选项,⽤来标识哪个节点作为查找树型结构的根节点。
若该⼦句被省略,则表⽰所有满⾜查询条件的⾏作为根节点。
START WITH:不但可以指定⼀个根节点,还可以指定多个根节点。
2.关于PRIOR运算符PRIOR被放置于等号前后的位置,决定着查询时的检索顺序。
PRIOR被置于CONNECT BY⼦句中等号的前⾯时,则强制从根节点到叶节点的顺序检索,即由⽗节点向⼦节点⽅向通过树结构,我们称之为⾃顶向下的⽅式。
如:CONNECT BY PRIOR EMPNO=MGRPIROR运算符被置于CONNECT BY ⼦句中等号的后⾯时,则强制从叶节点到根节点的顺序检索,即由⼦节点向⽗节点⽅向通过树结构,我们称之为⾃底向上的⽅式。
- 1、下载文档前请自行甄别文档内容的完整性,平台不提供额外的编辑、内容补充、找答案等附加服务。
- 2、"仅部分预览"的文档,不可在线预览部分如存在完整性等问题,可反馈申请退款(可完整预览的文档不适用该条件!)。
- 3、如文档侵犯您的权益,请联系客服反馈,我们会尽快为您处理(人工客服工作时间:9:00-18:30)。
目录五种车型,经销商可根据自身销售节奏,展示其中任意一或二或三种车型;序号名称尺寸单位数量洽谈区背景墙套洽谈桌件洽谈椅件捷豹立体套亚克力英文字套喷绘画面件内嵌展品柜件单车台承重主板套黑色面板套照明灯柱件参数牌件车型地贴套双车台承重主板套黑色面板套照明灯柱件参数牌件车型地贴套接待台件车台效果图背景墙立面图如需更换画面,原画面可直接移除。
如有遗留胶体,建议用酒精擦拭。
画面尺寸为:材质说明:背景墙:木质结构黑色烤漆饰面、正面安装定制立体银色、裱写真高精喷绘画面、背面内嵌黑色发光展柜,钢化玻璃带锁双开门。
家具:白色圆桌面电镀桌腿洽谈桌,白色贝壳洽谈椅。
材质说明-背景墙背景墙后立面图背景墙侧立面图材质说明材质说明::不锈钢镀烙银立体豹形组合标。
:白色亚克力立体雕刻。
材质说明背景墙背景墙及文字尺寸经销商可根据自行销售节奏安排精品或配件的放置材质说明:木质内嵌黑丝绒饰面,顶部开孔内装射灯,双开带锁玻璃门材质说明内嵌精品柜材质说明–小车台材质说明:钢架结构,面铺厘米多层承重板,外铺黑色三聚氰胺板。
白色金属材料围边。
拉丝不锈钢雕刻文字。
材质说明–大车台材质说明:钢架结构,面铺厘米多层承重板,外铺黑色三聚氰胺板。
白色金属材料围边。
拉丝不锈钢雕刻文字正面 背面侧面材质说明:木质结构,三色烤漆饰面。
机构开口,内装灯,外封白色乳白灯箱片。
材质说明 – 灯柱材质说明–接待台正面侧面材质说明:木质结构黑色烤漆柜台,带锁双开门。
接待台侧面材质说明:接待台:拉丝银双色板雕刻豹形。
材质说明–接待台材质说明–参数牌正面背面侧面材质说明:木质立板结构双色烤漆,型夹板底座。
单面内嵌亚克力。
镜钉固定。
材质说明–车型地贴地贴文字尺寸地贴材质,不易损坏。
如有污渍,建议自行擦拭。
如地面有遗留玻璃胶,建议用除胶剂清理地面。
材质说明:拉丝不锈钢激光雕刻。
车台拼装图双车台面板拼接图单车台结构拼接图单车台面板拼接图双车台结构拼接图支持经销商列表序号大区小区省份城市经销商编号经销商名称经销商店地址江苏省张家港张家港中捷汽车销售服务有限公司张家港经济开发区东区大道东侧江苏省扬州市扬州天华汽车销售服务有限公司扬州市扬子江北路国际汽车城入口处江苏省淮安市淮安宝铁龙汽车销售有限公司淮安市清河新区旺旺路号江苏省连云港市连云港润捷汽车销售有限公司连云港市新浦区岗埠农场新浦工业园浙江路号江苏省南京市江苏世贸泰信汽车贸易有限公司南京市雨花台区软件大道号江苏省南京市南京中捷汽车销售服务有限公司江宁区东麒路汽车捷豹路虎(江陵国际旁)江苏省南京市南京永达路捷汽车销售服务有限公司江苏省南京市栖霞区仙尧路号江苏省宿迁市宿迁润凯汽车销售服务有限公司宿迁市苏宿园区国际名车广场江苏省泰州市泰州宝汇汽车销售服务有限公司泰州市经济技术开发区国际汽车城鹏举路号江苏省徐州市徐州捷润汽车销售服务有限公司江苏徐州两山口南一公里江苏省盐城市盐城东昌宝达汽车服务有限公司盐城市经济技术开发区泰山南路号北京市北京市北京惠通陆华汽车服务有限公司北京朝阳区建国路号四惠桥东南角北京市北京市北京兰德陆华汽车销售有限公司北京市海淀区巨山路号北京市北京市北京德万隆经贸有限公司北京市朝阳区来广营西路号北京市北京市北京燕英捷汽车销售服务有限公司北京市朝阳区金盏乡东苇路金港汽车公园区号北京市北京市北京运通兴捷汽车销售服务有限公司北京市大兴区西红门镇中鼎路号北京市北京市北京长久世达汽车销售有限公司北京市丰台区南四环东路榴乡桥东米路北北京市北京市北京运通嘉捷汽车销售服务有限公司北京市顺义区赵全营镇牛板路板桥段号北京市北京市北京中进捷旺汽车销售服务有限公司北京市海淀区百旺绿谷汽车园地块号天津市天津市天津惠通陆华汽车销售有限公司天津市空港经济区汽车园中路号天津市天津市天津燕英捷汽车销售服务有限公司西青大寺高新技术产业园储源道号天津市天津市天津申隆汽车销售服务有限公司天津市北辰区新宜白大道与外环线交口前米左侧捷豹路虎店天津市天津市天津中进捷旺汽车销售服务有限公司天津市西青区卉康道号河北省石家庄市河北惠通陆华汽车销售服务有限公司石家庄北二环东路号汽贸园区外围东南角河北省唐山市唐山惠通陆华汽车销售服务有限公司河北省唐山市开平区开越路号捷豹路虎中心序号大区小区省份城市经销商编号经销商名称经销商店地址河北省保定市保定威神汽车销售服务有限公司保定市高开区朝阳北大街号河北省秦皇岛市秦皇岛世之捷汽车销售服务有限公司秦皇岛市经济技术开发区秦皇西大街号河北省沧州市沧州威神汽车销售服务有限公司沧州市运河区浮阳北大道小王庄路口北行公里,运河区工业园区河北省邯郸市邯郸威虎汽车销售服务有限公司邯郸市北环路号现代汽贸城河北省唐山市唐山中进捷旺汽车销售服务有限公司河北省唐山市丰南区迎宾大道与青年路交叉口西南角河北省石家庄市河北奥菱汽车销售服务有限公司河北省石家庄市西三环与新华西路交叉口西行米路北河北省廊坊市廊坊市路泽汽车销售服务有限公司廊坊市安次区经济开发区安铭道号吉林省长春市吉林陆捷汽车贸易有限公司净月大街号吉林省长春市长春陆捷汽车贸易有限公司吉林省长春市高新区硅谷大街号吉林省吉林市吉林市康顺捷路汽车销售服务有限公司吉林市船营区越山路号内蒙古呼和浩特市内蒙古惠通陆华汽车销售有限公司呼和浩特市新城区北二环路号内蒙古鄂尔多斯市鄂尔多斯市惠通陆华汽车销售服务有限公司内蒙古鄂尔多斯市东胜区铜川汽车城汽贸三路捷豹路虎店内蒙古包头市包头市路泽汽车销售服务有限公司包头市白云路南端(希望铝业东门以南米)内蒙古乌海市乌海惠通陆华汽车销售服务有限公司乌海市海勃湾区林荫大道东口路北(乌海高速路口向西米)内蒙古呼和浩特市内蒙古顺驰路捷汽车销售服务有限公司内蒙古呼和浩特市回民区海拉尔西街攸攸板村委会南内蒙古赤峰市赤峰长久世达汽车销售有限公司内蒙古赤峰市红山物流园区查干沐沦大街号辽宁省鞍山市鞍山尊荣亿方汽车贸易有限公司鞍山市千山区西环路号辽宁省大连市尊荣亿方集团有限公司大连市保税区海天路号辽宁省大连市尊荣亿方集团大连汽车贸易有限公司大连市甘井子区虹城路号黑龙江哈尔滨市黑龙江尊荣汽车贸易有限公司哈尔滨市道外区先锋路号黑龙江哈尔滨市尊荣亿方集团黑龙江汽车贸易有限公司哈尔滨市道里区机场路号黑龙江大庆市大庆康顺捷路汽车销售服务有限公司大庆市高新区祥阁汽配城新兴东街号辽宁省锦州市锦州尊荣捷路汽车销售服务有限公司辽宁省锦州市太和区南广路号辽宁省沈阳市辽宁尊荣亿方汽车销售服务有限公司辽宁省沈阳市铁西区北二西路号辽宁省沈阳市沈阳富路捷汽车贸易有限公司沈阳市沈河区东陵路号支持经销商列表序号大区小区省份城市经销商编号经销商名称经销商店地址辽宁省沈阳市沈阳中升仕豪汽车销售服务有限公司沈阳市,浑南新区浑南西路号辽宁省营口市营口中升仕豪汽车销售服务有限公司营口市老边区新营路南号(车管所南行米)山西省长治市长治市顺驰路捷汽车销售服务有限公司山西省长治市西一环路针漳村号山西省大同市大同市御东路华汽车贸易有限公司大同市开发区恒安街号河南省郑州市河南通孚祥汽车销售服务有限公司郑州市郑东新区商都路号河南省郑州市郑州永达和谐汽车销售服务有限公司郑州花园北路与连霍高速交汇向北米路东河南省郑州市河南新通孚祥汽车销售服务有限公司郑州市郑开大道与京港澳高速交汇处东公里贾鲁河桥南米路西河南省新乡市新乡通孚祥汽车销售服务有限公司新乡市金穗大道东段京珠高速东米山西省太原市山西路华汽车销售有限公司太原市小店区龙城大街东段北侧山西省太原市山西顺驰路捷汽车销售服务有限公司山西省太原市万柏林区迎泽西大街与西中环路口南侧山东省济南市济南中升仕豪汽车销售服务有限公司济南市经十西路号山东省临沂市临沂力虎汽车销售服务有限公司山东省临沂市罗庄区金九路加油站东临山东省青岛市青岛中升杰豪汽车销售服务有限公司青岛市崂山区海尔路号山东省青岛市青岛中升仕豪汽车销售服务有限公司青岛市城阳区黑龙江中路(青银高速夏庄出口西)山东省威海市威海路泽汽车销售服务有限公司山东省威海市临港经济技术开发区,金阳光汽博城山东省济南市山东省济南市路豹汽车销售服务有限公司济南市历城区工业北路号山东省东营市东营天华汽车销售服务有限公司山东省东营市东营区西四路号山东省泰安市泰安力虎汽车销售服务有限公司中国山东省泰安市泰山区博阳路中段山东省潍坊市潍坊中升仕豪汽车销售服务有限公司潍坊市潍城经济开发区北宫西街与西二环路交叉口西米路北山东省烟台市烟台润捷汽车销售服务有限公司烟台市机场路号山东省淄博市淄博宝信汽车销售服务有限公司山东省淄博市高新区金晶大道号四川省成都市四川惠通陆华汽车销售服务有限公司成都市机场路近都段号四川省成都市成都运通博捷汽车销售有限公司成都市金牛区金科南路号运通羊西汽车广场四川省成都市成都合力创汽车销售服务有限公司成都市锦江区锦江大道汽车工业园石胜路号四川省成都市成都中升仕豪汽车销售服务有限公司成都市新都区三河五龙山路号支持经销商列表序号大区小区省份城市经销商编号经销商名称经销商店地址四川省乐山市乐山南菱汽车销售服务有限公司乐山市市中区长青路号四川省绵阳市绵阳路威汽车销售有限公司绵阳市经开区绵州大道中段号四川省攀枝花市攀枝花跃鹿汽车销售服务有限公司攀枝花市仁和区弯腰树天宇路(新车管所旁)四川省泸州市泸州惠通陆华汽车销售服务有限公司四川省泸州市纳溪区蓝安路三段四川省德阳市德阳南菱港宏泰山南路三段号(汽车南站斜对面)四川省南充市南充新同舟汽车销售服务有限责任公司南充市顺庆区潆溪店片区(何家观收费站旁)甘肃省兰州市甘肃路捷汽车销售有限责任公司兰州市七里河区南滨河西路号(七里河法院西侧)西藏拉萨市西藏通孚祥汽车销售服务有限公司西藏拉萨市金珠西路191号(人和汽配汽贸城西楼一层)陕西省榆林市榆林庞大宏伟汽车销售服务有限公司榆林市榆阳区草海则生产南路庞大汽车园捷豹路虎店陕西省西安市陕西天华汽车销售服务有限公司西安市经开区凤城五路中段区陕西省西安市西安运通瑞捷汽车销售服务有限责任公司陕西省西安市高新区南三环西辅道号陕西省榆林市榆林诚泰汽车销售服务有限公司陕西省榆林市高新区博源路汽车产业园号陕西省西安市西安市创丰盛汽车销售服务有限公司西安市灞桥区东南三环交汇处月登阁桥下陕西省西安市陕西惠通陆华汽车销售有限公司西安三桥西部国际车城南门东侧陕西省西安市西安惠通陆华汽车销售有限公司西安市浐灞生态区通塬路号新疆乌鲁木齐市新疆惠通陆华汽车销售有限公司乌鲁木齐经济技术开发区喀什西路号重庆市重庆市重庆惠通陆华汽车销售服务有限公司重庆市渝北区红锦大道号重庆市重庆市重庆惠通嘉华汽车销售服务有限公司重庆市北部新区汇金路号栋(出口加工区管委会对面)重庆市重庆市重庆市路豹汽车销售服务有限公司南岸区南滨路号南滨国际商业号地面一层贵州省贵阳市贵州路豹汽车有限公司贵阳清镇市白马大道红枫顺达汽车城城贵州省贵阳市贵州亨特惠通汽车销售服务有限公司贵阳市花溪区孟关汽贸城红星路中段捷豹路虎店云南省昆明市云南路捷汽车销售有限公司昆明市经开区国际汽车城云南省昆明市云南中致远路威汽车销售服务有限公司云南省昆明市广福路号青海省西宁市青海捷路汽车销售有限公司青海省西宁市城南工业园区同安路号宁夏银川市宁夏路捷汽车贸易有限公司宁夏银川市德胜工业园区国道永胜西路路北号支持经销商列表售后须知项目总控:魏东电话:邮箱:安装及维修技术支持:杨焱电话使用须知●车台搭建位置需要经销商自供地面电源及电箱,用电量为●展具包装到店卸货时,请经销商自备叉车卸货●展具使用时,请经销商自行准备灭火器●光盘附件包含材料合格证、安装图纸,请经销商使用时自行打印。