实时荧光定量PCR—— qMan探针法及设计原则
实时定量PCR试验设计原则及应用

[12][13]merase chain reaction [J ].Am J Trop Med Hyg ,1991(45):688-694.马良,陈雅棠,刘约翰.聚合酶链反应检测粪便中微小隐孢子虫[J ].中国寄生虫学与寄生虫病杂志,1996,14(2):111-114.吴良,陈盛霞,曹建平.隐孢子虫病的流行与诊断研究进展[J ].国际医学寄生虫病杂志,2006,33(5):277-281.□收稿日期:2008-12-29作者简介:黎松庆(1982—),男,助理兽医师,主要从事畜牧兽医技术推广工作。
实时定量PCR 试验设计原则及应用黎松庆,叶朗光,黎旭宇,邓树轩(广东省东莞市大岭山镇农业技术服务中心,广东东莞523820)摘要:笔者对实时定量PCR 试验设计原则及其在医学、分子生物学、食品检测的应用上进行了概述。
关键词:实时定量PCR ;试验设计;应用中图分类号:R446.61文献标识码:A 文章顺序编号:1672-5190(2009)01-0043-02The Design and Application of The Quantitative Real-time PCRLI Song-qing,et al(Dalingshan Service Center of Agricultural Technology of Dongguan City in Guangdong Province ,Dongguan 523820,China )Abstract :The design principles and application in medicine ,molecular biology,food testing of the quantitative real-time PCR were re -viewed in this paper.Keywords :quantitative real-time PCR;design;application 普通PCR 反应能够对模板链进行指数似的拷贝,但由于反应过程中模板、反应物的限制,或焦磷酸分子产物对于DNA 聚合酶的抑制作用,以至PCR 反应最后不能够指数似的拷贝模板,所以PCR 反应终止时候的产量总是难以确定,也无法知道起始的模板的数量[1]。
实时荧光pcr法优选全文

可编辑修改精选全文完整版实时荧光pcr法实时荧光PCR法是一项重要的分子遗传学技术,能够获得准确、可靠而快速的结果。
它是一种用于监测和调节基因表达的技术,在研究生物活动和生物学过程中发挥重要作用。
本文简要介绍了实时荧光PCR的原理,其对各种生物活动的应用,同时也讨论了实时荧光PCR 未来发展的趋势。
一、实时荧光PCR的基本原理实时荧光PCR是一种高灵敏的PCR技术,它主要是利用荧光标记探针来检测模板的扩增过程,从而得出DNA片段扩增的数量和速度。
实时荧光PCR通常利用5’和3’端有荧光活性的探针对模板DNA进行检测,以高精度确定模板DNA的数量和种类。
与传统PCR技术不同,实时荧光PCR技术可以实时跟踪和检测生物序列的复制,而不需要将样本放置于催化剂,模板DNA可以通过反应体系中的荧光探针产生荧光信号,根据荧光信号的强弱进行实时调节复制过程。
二、实时荧光PCR适用的生物活动实时荧光PCR技术可应用于许多已知的生物活动,用于多种数据收集,包括但不限于:筛选细菌,鉴定病毒,检测微生物,检测基因表达,提取和组装基因组,测定突变状态,预测可变位点,鉴定病原体,杂合状态分析,发育生物学研究,柔性检测变体等。
例如,实时荧光PCR可用于研究癌症相关基因的表达和转录状态,还可用于检测家禽禽流感病毒,研究家禽的流行特性,以及检测芽胞杆菌抗性基因多态性。
三、实时荧光PCR未来发展趋势随着现代科技的发展,实时荧光PCR技术也发生了巨大变化,一系列新技术已经应用于现代实时荧光PCR技术中,大大提高了这种技术的准确性和快速性。
例如,超高通量实时荧光PCR技术,使研究者可以以更高的效率来检测和分析生物序列;多重PCR技术,可以有效提高检测敏感度和追踪多个位点的表达;实时荧光PCR技术的循环法,可以使检测更准确,但是耗时较长。
此外,基于活性水平的荧光定量PCR技术,也被广泛应用于实时荧光PCR中,可以以可视化方式监测和调节基因表达。
定量PCR Taqman探针设计要领-2

定量PCR Taqman探针设计要领-2第三步:寻找一家信赖的公司合成引物和探针,一般引物合成大家比较熟悉,而且价格也比较便宜(特别是这两年便宜了许多),而探针则相对来说贵了许多,一般Taqman探针合成在1000到5000元不等(不同的合成要求价钱不同)——而这只是标记价钱,序列合成基本上和引物合成价钱相似。
第四、五、六步:一般的定量PCR反应体系与普通PCR其实也差不了多少,只是要加入Taqman探针,另外不同就是分步法的不同。
其中需要注意的是:* 扩增酶最好选用热启动酶* 引物和探针的浓度需要进行优化,有人建议从50nM开始,在50nM—900nM之间优化,一般为200nM(注意探针需要避光保存。
* 同样Mg+和酶量也需要进行优化,酶的推荐反应浓度是1.25-1.5U(50ul)* DNA模板的添加量通常在100 ng以下,因不同种类的DNA模板中含有的靶基因的拷贝数不同,必要时可进行梯度稀释,确定最佳的DNA模板添加量。
如果欲进行2 Ste p RT-PCR反应的第二步PCR扩增反应,第一步的RT反应液作为DNA模板时的添加量不要超过PCR反应液总体积的10%。
另外循环参数虽然在引物和探针设计完之后也就确定了,但是有时也需要进行优化。
第七步:在进行数据分析的时候,通常用不同浓度的标准样品的Ct值来产生标准曲线,然后计算相对方程式。
方程式的斜度可以用来检查PCR的效率,对于100%PCR效率来说,一个理想的斜率是3.32。
最佳的标准曲线是建立在PCR的扩增效率为90%-100 %(100%意味着在每个循环之后,模板的总数将增加为前一次的2倍)的基础上。
所有标准曲线的线性回归分析需要存在一个高相关系数(R2≥0.99) ,这样才能认为实验的过程和数据是可信的。
使用这个方程式我们可以计算出未知样本的初始模板量。
大多数定量PCR仪都有这样一个软件,它可以从标准曲线中自动地计算出未知样本的初始模板量。
荧光定量PCR应用指南

荧光定量PCR应用指南荧光定量PCR(Fluorescent quantitative PCR)是依靠荧光信号的强度来定量PCR产物的一种PCR技术。
该技术通过在PCR反应体系中添加特异性荧光探针,利用荧光信号的强度来反映PCR产物的数量。
荧光定量PCR在生物医学研究、基因表达分析、致病微生物检测等领域有着广泛的应用。
下面将介绍荧光定量PCR的原理、实验步骤和一些注意事项。
一、原理:荧光定量PCR最常用的荧光探针是TaqMan探针,TaqMan探针是由两个DNA引物和一个荧光标记的探针组成。
当PCR反应进行到延伸阶段时,引物和探针结合到靶序列上形成荧光信号。
荧光信号的强度与PCR产物的数量成正比,通过检测荧光信号的强度可以定量PCR产物的数量。
二、实验步骤:1.设计引物和探针:选择特异性的引物和探针对目标序列进行扩增。
引物和探针的设计需要遵循一些原则,如避免引物和探针之间的自互补性、探针需选择合适的荧光染料等。
2.准备PCR反应体系:根据PCR反应需要,准备PCR反应体系。
一般包括模板DNA、引物、探针、聚合酶、缓冲液等。
3.荧光定量PCR反应:将PCR反应体系加入到荧光定量PCR仪中,进行PCR反应。
PCR反应的条件需要根据目标序列的特性进行优化,包括温度、延伸时间等。
4.数据分析:通过荧光定量PCR仪记录荧光信号的强度,根据荧光信号的强度可以反应PCR产物的数量。
通过数据分析软件对荧光信号进行定量计算,获得PCR产物的数量。
三、注意事项:1.引物和探针的设计需要严格控制,确保其特异性,避免与非靶序列结合。
2.PCR反应的条件需要进行优化,不同的目标序列可能需要不同的温度、延伸时间等。
3.控制实验中的阳性对照和阴性对照,确保实验结果的可靠性。
4.严格遵守无菌操作,避免PCR反应体系受到外源性污染。
5.选择合适的荧光定量PCR仪进行实验,确保获得准确的荧光信号强度数据。
6.实验过程中需严格按照操作规程进行,避免操作失误对实验结果产生影响。
实时定量PCR引物和探针设计操作步骤PrimerExpress软件

实时定量PCR引物和探针设计操作步骤Primer Express软件Primer Express 是实时定量PCR引物和探针设计的专用软件。
遵守以下三个原则有助于快速建立定量PCR反应体系:1.所有扩增按照同样的原则设计 (Primer Express);2.所有PCR反应在ABI PRISM ?7000/7900上使用同样的热循环条件;3.所有反应使用相同的PCR试剂。
引物和探针的设计原则下述原则的重要程度由上往下越来越低,请尽量满足编号靠前的条件。
它们中有的已经在Primer Expre软件中设置成缺省值,有的则需要在选择引物和探针时由设计者加以运用。
如果是设计SYBRGreen 引物,也要选择TaqMan Primer and Probe design并遵守这些规则,但是只需要合成引物就可以了。
TaqMan 探针:1. 保持G-C含量在30-80%之间。
2. 避免同一碱基重复过多。
特别是G,不可超过4个及以上。
3. 5' end不能是G。
4. 尽量使探针中的Cs多于Gs。
如果不能满足,则使用互补链上的探针。
5. 对于单探针反应,用Primer Express?软件计算出来的Tm值应当在68-70 °C 之间。
引物:1. 在探针确定以后再选择引物。
2. 引物要尽可能地接近探针,但是不要重叠。
3. 保持G-C含量在30-80%之间。
4. 避免同一碱基重复过多。
特别是G,不可超过4个及以上。
5. 用Primer Express?软件计算出来的Tm值应当在58-60 °C之间。
6. 3' end 的5个碱基中G and/or C碱基的总数不能超过2个。
实时TaqMan 引物和探针设计Begin by opening Primer Express and selecting "File", "New", and "TaqMan? Primer & Probe Design". The following screen will appear. You can close the TaqMan? Primer & Probe Data box as shown.输入或插入序列Import or paste a sequence into the window (Import shown). To paste a sequence from a Word or text file, first copy it to the clipboard. Be sure to only select the sequence (including numbers or annotations is OK); do not include extraneous information such as accession numbers etc. Next, select "Edit" and "Paste". The sequence will appear in the Sequence screen of Primer Express. Or, to Import a Sequence, click the "Import DNA File" button as shown. The software will then ask you to locate the sequence file. Select it from a folder, hard drive, disk, or desktop. Again, no annotations should be present in this sequence.A file is then imported after selecting the file location.保存输入的序列Select "File" and "Save" to give the sequence a name. This will be displayed in the File Name Box and will save the sequence in the Archive Folder.引物和探针设计参数Click the "Parameters" tab. This displays the Universal default parameters used to search for suitable TaqMan? primer & probe sets for real-time assays. It is strongly recommended that you do not adjust any of the parameters.引物和探针的排序及选择Primer Express is now ready to find Primers and Probes. Click the "Primers" tab, select "Options" and "Find Primers/Probes Now". The software will display the progress in the small window below the sequence.** Please disregard the "Optimal Primer Pairs Only" checkbox and the "Penalty" heading. By checking the Optimal Primer Pairs Only box, you will be severely limiting the range of your search, since the parameters it employs are not based on TaqMan? design guidelines. The Penalty score assigned to your Primer & Probe set is based on factors such as amplicon length. Since the default TaqMan? design parameters keep amplicons under 150 bp, this can be disregarded as well.Primer/probe sets will be listed when the search is complete. Scroll to the right to view the Probes. Click on the "Start" heading under probes to sort probes by sequence. This will group similar probes, simplifying the search.探针的选择Select a probe that is less than 30 bp in length and contains more C's than G's. The probes displayed are on the sense strand only. If the probes displayed do not have more C's than G's, then you will need to use the complement probe (as illustrated in this example). If you need to use the complement, make sure that the probe selected here does not have a C at the 3' end of the probe (otherwise, the complement will have a G at the 5' end ? which is not allowed).The probe selected meets the first criteria above, but not the second (9 G's, 5 C's). Highlight this probe.Return to the sequence by clicking the "Sequence" tab.Lock in the probe sequence by clicking the Probe Button on the Tool Bar and highlight the probe sequence. The probe will turn green and be displayed in lower case when it is locked.引物选择Find compatible primers by returning to the "Primers" tab, selecting "Options" and "Find Primers & Probes Now". This will find new primer sets that will work with the probe you have selected. You can click on "Start" under Forward Primer to sort the displayed sequences. Search for a primer from the list displayed the meets the following criteria:1.No more than 2 G's and/or C's within the last 5 bases on the 3' end of the primer; and2.No runs of identical nucleotides, especially 4 or more G's.From the list of forward primers displayed, select a primer that has no more than 2 G's and/or C's within the last 5 bases on the 3' end of the primer. Highlight one of the primers that matches this criteria. If no forward primer matches this criteria then select a primerwith 3 G's and/or C's. The example shown below matches the criteria and will serve as a suitable forward primer. Once you have selected the appropriate primer click on the "Sequence" tab to return to the Sequence window.Lock the forward primer by clicking the "Forward Primer" button on the toolbar, then highlighting the forward primer sequence. A blue arrow will be displayed under the forward primer showing that it is locked.Click on the "Primers" tab and perform a new search. Scroll to the Reverse Primers displayed and select a reverse primer following the same criteria for forward primer selection (G/C rule on the 3' end of primer).Return to the Sequence page and lock in on the Reverse Primer using the Reverse Primer Tool.This now displays the primers and probe you have selected. Return to the Primers tab and perform one final search to display your results.保存搜索结果Click on "Save List" at the bottom of the screen to save your selection in a tab delimited format. Click "Order" to generate an editable/printable text file of your sequences:互补探针的选择In the example above, you must use the complementary probe so as to insure that the probe has more C's than G's. Remember, the probe you use cannot have a G at the 5' end, thus the sense probe used for this search cannot have a C at the 3' end.In order to generate the probe complement, return to the Sequence screen. Highlight the probe sequence, select "Edit", and "Copy Complement". You will not see the complementary sequence at this point; it is copied to the clipboard:Return to the Order window and "Paste" the complement in this window, overwriting the probe displayed. You have the option of editing the primer/probe names, and adding the reporter/quencher dyes to the probe sequence.This document can now be saved and put into a Word document or attached to an e-mail message.在Results Archive中保存搜索结果Your search can also be saved in the Results Archive Folder. Click on the "Results" tab. The forward and reverse primers are displayed in their respective boxes, and the probe sequence is displayed in the "Cycle Params" box The probe sequence displayed is the original strand. To view/save the complementary strand, highlight the probe from the Sequence and select "Copy Complement". "Paste" the complement probe into the "Cycle Params". The complementary probe strand is now displayed. It is important to note that if you leave the Results page, the probe sequence will default back to the original. Each time you returnto the Results page you will need to re-paste the complementary probe strand. Note: The information displayed below the selected primer and probe sequences should be ignored when performing TaqMan Assays. The Universal TaqMan? Guidelines do not require you to perform optimizations, thus, the cycling/concentration, etc. information displayed here can be ignored. Save the Results by selecting "Save Results". A message will display showing the results were saved.打印结果 To print the Results, select "Open Results" from the "File" menu. The last (newest) results file will be the last one in the list (at the bottom of the list): Highlight and click "Open".This is the relevant information needed to order your primer/probe set. To print, click and drag, highlighting the information you want and selecting "Copy" from the "Edit" menu, placing it on the clipboard. This should be everything from the Sequence name through the TaqMan? probe annealing information.This is the relevant information needed to order your primer/probe set. To print, click and drag, highlighting the information you want and selecting "Copy" from the "Edit" menu, placing it on the clipboard. This should be everything from the Sequence name through the TaqMan? probe annealing information.You can then paste your sequence information in to a Word document; from here you can print a copy for your records.订购信息Be sure to include information on your needed synthesis scale and the corresponding part number, your reporter dye(s), your quencher (TAMRA), and your personal information (name, institution, address, phone fax etc.).。
实时荧光定量PCR的原理、操作及其应用PPT课件

THANKS FOR WATCHING
感谢您的观看
它利用荧光染料或荧光探针标记特异性引物,在PCR反应过 程中,随着DNA或RNA的扩增,荧光信号被逐渐释放,通过 检测荧光信号的强度,可以实时监测DNA或RNA的扩增量。
实时荧光定量PCR的原理概述
实时荧光定量PCR的基本原理是在PCR反应体系中加入荧光染料或荧光探针,这些荧光物质 与DNA或RNA结合后,在特定波长光的激发下产生荧光信号。
环介导等温扩增技术
在恒温条件下进行核酸扩增,具有快速、特异性强和灵敏度高等优 点。
纳米材料与PCR的结合
利用纳米材料的特性,提高PCR的检测效率和灵敏度。
提高检测灵敏度与特异性
信号放大技术
通过使用信号放大系统,提高检测信号,从而提高检测灵 敏度。
特异性引物和探针的设计
针对目标基因设计特异性引物和探针,降低非特异性扩增 和交叉污染的风险。
选择合适的内参基因
选择稳定的内参基因
01
内参基因应具有稳定的表达水平,不受实验处理的影响。
验证内参基因的稳定性
02
通过实时荧光定量PCR技术,对候选内参基因进行稳定性评估。
使用多个内参基因参基因进行数据校正。
数据解读与报告
标准化处理
对原始数据进行标准化处理,消 除不同样本间的差异。
样本处理
对样本进行破碎、离心、 提取核酸等处理,以获得 待测的DNA或RNA。
浓度和纯度测定
使用紫外分光光度计等设 备测定核酸浓度和纯度, 确保符合实验要求。
引物设计与选择
引物设计
根据目标基因序列,利用 引物设计软件进行引物设 计。
引物筛选
根据实验需求,筛选出特 异性好、扩增效率高的引 物。
实时荧光Taqman 探针设计
一、实时荧光Taqman 探针设计总原则:探针选择要保守,引物选择要保守,因此必须找一段100-200bp相对要保守的片段来设计引物与探针。
即real-time PCR的扩增片段是50bp----150bp。
当找不到150bp的保守片段时,必须确保探针的片段是保守的。
在设计探针和引物时,要同时考虑在两条链上设计引物与探针。
但要注意的是:在那条链上设计探针时,就应靠近在同一条链上设计的引物(即上游引物)。
这样,可保证在将来扩增时,即便没有完全扩增,也有荧光信号报告出来。
两者的距离最好是探针的5’端离上游引物的3’有一个碱基,但也可以重叠。
若在原序列中找不到合适的探针与引物(1主要是探针和上游引物的距离太远,而离下游引物的距离却较近时;2突变位点要求在探针的5’ 端也能检测到荧光信号,但却是在3’端),可在互补的序列中设计引物与探针。
另real-time PCR中的探针和引物的Tm值,均要高于平常PCR的引物和杂交的探针的Tm 值。
二、探针的设计探针设计的基本原则:1.保守:探针要绝对的保守,有时分型就单独依靠探针来决定。
理论上有一个碱基不配对,就可能检测不出来。
若找不到完全保守的片段,也只能选取有一个碱基不同的片段。
且这个不同的碱基最好在探针的中间,对探针与目的片段的杂交影响不大,不相同的碱基最好不要在两端,因为两端不利于探针的杂交。
且最好为A或T,而不能为G或A,因为A、T为双键,而G、A为三键。
2.探针长度Taqman探针的长度最好在25-32bp之间,且Tm值在68-72℃之间,最好为70℃,确保探针的Tm值要比引物的Tm值高出10℃,这样可保证探针在煺火时先于引物与目的片段结合。
因此探针最好是富含GC的保守片段,保证其的Tm值较高。
现在有Taqman MGB探针,在TAMER之后再标记一个MGB,可使探针的Tm值较高,即使探针片段较短,也可达到Taqman探针的Tm值要求(68-70℃)。
实时荧光定量PCR方法简介
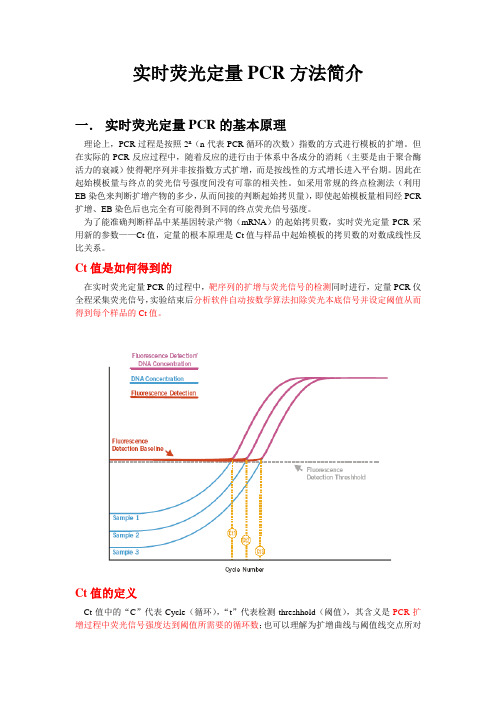
实时荧光定量PCR方法简介一.实时荧光定量PCR的基本原理理论上,PCR过程是按照2n(n代表PCR循环的次数)指数的方式进行模板的扩增。
但在实际的PCR反应过程中,随着反应的进行由于体系中各成分的消耗(主要是由于聚合酶活力的衰减)使得靶序列并非按指数方式扩增,而是按线性的方式增长进入平台期。
因此在起始模板量与终点的荧光信号强度间没有可靠的相关性。
如采用常规的终点检测法(利用EB染色来判断扩增产物的多少,从而间接的判断起始拷贝量),即使起始模板量相同经PCR 扩增、EB染色后也完全有可能得到不同的终点荧光信号强度。
为了能准确判断样品中某基因转录产物(mRNA)的起始拷贝数,实时荧光定量PCR采用新的参数——Ct值,定量的根本原理是Ct值与样品中起始模板的拷贝数的对数成线性反比关系。
Ct值是如何得到的在实时荧光定量PCR的过程中,靶序列的扩增与荧光信号的检测同时进行,定量PCR仪全程采集荧光信号,实验结束后分析软件自动按数学算法扣除荧光本底信号并设定阈值从而得到每个样品的Ct值。
Ct值的定义Ct值中的“C”代表Cycle(循环),“t”代表检测threshhold(阈值),其含义是PCR扩增过程中荧光信号强度达到阈值所需要的循环数;也可以理解为扩增曲线与阈值线交点所对应的横坐标。
Ct值与样品中模板的对应关系Ct值与样品中起始模板的拷贝数的对数成线性反比关系(y=ax+b,x代表起始模板拷贝数的对数,y代表Ct值)。
与终点法相比利用Ct值的优势由于Ct值是反映实际PCR反应过程中扩增即将进入指数期的参数,该参数几乎不受试剂消耗等因素的影响,因此利用Ct值判断的起始模板拷贝数更加精确,重复性也更好。
传统的终点检测法是在PCR扩增经历了指数扩增期进入平台期后利用EB等染料染色来判断扩增产物的多少,从而间接的判断起始拷贝量,这种方法的精确度不高、重复性也不好。
下图中是96个复孔的实时扩增曲线(完全相同的反应体系、相同的反应protocol、相同的样品起始浓度),可以看到Ct值具有很好的重复性,而终点的荧光信号强度差异达到300个单位。
- 1、下载文档前请自行甄别文档内容的完整性,平台不提供额外的编辑、内容补充、找答案等附加服务。
- 2、"仅部分预览"的文档,不可在线预览部分如存在完整性等问题,可反馈申请退款(可完整预览的文档不适用该条件!)。
- 3、如文档侵犯您的权益,请联系客服反馈,我们会尽快为您处理(人工客服工作时间:9:00-18:30)。
• 整条探针中,碱基C的含量要明显高于G的含量——G含量高会 降低反应效率,这时就应选择配对的另一条链作为探针;
• 为确保引物探针的特异性,最好将设计好的序列在blast中核实 一次,如果发现有非特异性互补区,建议重新设计引物探针。
个或4个以上的G重复出现。 • 原则上MGB探针只要有一个碱基突变,MGB探针就会检
测到(MGB探针将不会与目的片段杂交,不产生荧光信号)。
Zhejiang Provincial Key Lab of Medical Genetics
4
Zhejiang Provincial Key Lab of Medical Genetics
2
TaqMan探针设计原则
• 先选择好探针,然后设计引物使其尽可能的靠近探针;
• 探针长度应在15-45bp(最好是20-30bp),以保证结合特异性;
• 探针的DNA折叠和二级结构;尽量避开二级结构;
• Tm值在65-70℃,通常比引物TM值高5-10℃(至少要5℃), 以确保在退火过程中探针先于引物与目的片段结合,GC含量在 40%-70%;
• Tm值在55-65℃,GC含量在40%-60%;
• 引物之间的TM相差避免超过2℃;
• 引物的3’端避免使用碱基A,引物的3’端避免出现3个或3 个以上连续相同的碱基;
• 为避免基因组的扩增,引物设计最好能跨两个外显子;
• Taqman探针技术要求片段长度在50bp-150bp;• 引物末端(最后5个苷酸)不能有超过2个的G和C。
Zhejiang Provincial Key Lab of Medical Genetics
3
Taqman MGB 探针设计
• 探针的5’端避免出现G,即使探针水解为单个碱基,与报 告基团相相连的G碱基仍可淬灭基团的荧光信号。
• Tm值应为65-67℃。 • 尽量缩短Taqman MGB探针,但探针长度不少于13bp。 • 尽量避免出现重复的碱基,尤其是G碱基,应避免出现4
实时荧光定量PCR——TaqMan探针法 •
Zhejiang Provincial Key Lab of Medical Genetics
1
TaqMan技术引物设计原则
• 序列选取应在基因的保守区段;
• 避免引物自身或与引物之间形成4个或4个以上连续配对, 避免引物自身形成环状发卡结构;
• 典型的引物18到24个核苷长。引物需要足够长,保证序 列独特性,并降低序列存在于非目的序列位点的可能性。