爆米花机说明书
米花机器操作方法

米花机器操作方法
1. 首先,确保米花机器已经连接电源并打开开关。
2. 打开米花机器的顶部,把所需的玉米粒倒入机器的容器中。
注意不要倒入过多,以免溢出。
3. 关闭米花机器的顶部,确保机器密封。
4. 打开机器的控制面板,在面板上选择适当的设置。
通常,你可以选择米花的颜色(比如深色或浅色)和份量(比如大份或小份)。
5. 按下开始按钮,开始烹饪过程。
6. 当米花开始弹开且没有声音时,表示烹饪完成。
7. 打开米花机器的顶部,用一个碗或盒子接住米花弹出的部分。
8. 关闭机器的顶部,将剩余的玉米粒倒入机器的容器中,继续上述步骤,直到烹饪完所有的玉米粒为止。
9. 关闭米花机器的电源开关,并清理残留物。
请注意,以上步骤仅为一般的操作方法,不同型号的米花机器可能会有些许差异,建议在使用之前阅读产品说明书或向销售商咨询。
同时,使用米花机器时要注意安全,避免因操作不当导致事故。
Hello Kitty爆米花机使用说明书
Hello Kitty Popcorn Maker Item # APP-99209Owner’s ManualImportant Safety PrecautionsWhen using any electrical appliance, basic safety precautions should always be followed, including the following:1. READ ALL INSTRUCTIONS BEFORE USING YOUR POPCORN MACHINE.2. Do not touch hot surfaces. Always use handles or knobs to operate.3. To avoid any risk of electrical shock, do not immerse the cord or plug into water or other liquids.4. This appliance should not be used by or near children, or individuals with certain disabilities.5. MAKE SURE THAT THE MAIN POWER CORD IS NOT PLUGGED IN WHEN YOUR POPCORNMACHINE IS IN USE OR BEFORE CLEANING.6. Allow HOT parts to cool down before maneuvering and cleaning.7. Do not operate this appliance if the cord or plug is damaged or if it malfunctions. If there is any damageof any sort, send the unit to the nearest authorized service center for examination, repair or adjustment.(ONLY technicians should open up the unit.)8. The use of any accessories or attachments not recommended by the manufacturer may cause injury.9. Do not pop the kernels with a dry kettle (without oil).10. Do not immerse the kettle into water as it is popping kernels.11. The kettle’s surface can get HOT and should NOT be touched while kernels are popping or just after use.12. If not being used for a long time, unplug your unit, and allow it to cool. Once it has cooled, you shouldkeep it cleaned and covered. Store it in a dry and safe place.13. Do not let the power cord hang over the edge of a table or counter. Do not let it touch any hot surfaces.14. Do not place the unit on or near a hot gas or electric burner or in a heated oven.15. Extreme caution must be paid when moving the appliance, especially when it contains hot oil or other hotliquids.16. Turn ALL switches to the OFF position before disconnecting the power plug from a wall outlet.17. This unit is not recommended for outdoor use.18. Only use this appliance for its intended use.19. The popper will not shut off automatically. To avoid overheating, always add oil and then kernels beforeoperating.20. Extreme caution must be used when unloading popcorn. Always place the unit over a countertop so thatresidual hot oil or water running out will not cause burns.21. KEEP OUT OF THE REACH OF CHILDREN.22. DO NOT CLEAN USING ANY ABRASIVE MATERIALS.23. NEVER FORCE ANY PARTS OR BRACKETS INTO POSITION.24. CAUTION: Burns may result from the misuse of this device.25. No parts are intended for dishwashers (except the removable tray & spoons).26. A popper that is plugged into an outlet should not be left unattended.SAVE THESE INSTRUCTIONS.FOR HOUSEHOLD USE ONLY.Other Important Safety NotesThe power cord attached to your device is limited in length in order to prevent issues where it gets tangled or a person can trip over it. Longer cords or extension cables may be used as well assuming one uses proper care and caution. When using an extension cord please take the following precautions:1. Make sure that the electrical rating of the cord is at least as great as the electrical rating of theappliance.2. Longer cords should be placed carefully so that they are not unintentionally pulled or tripped over.3. If it is a grounded type appliance, the extension cord should be a grounding three wire cord.IntroductionThank you for purchasing the APP-99209 Hello Kitty Popcorn Maker. You can use this device in order to make fresh popcorn to enjoy with your family and friends. Please read this manual carefully FIRST in order to get the most out of your device.Package Contents1. Housing2. Measuring Spoons and Popcorn Scoop3. Old Maid Filter4. Kettle5. Owner’s Manual with Warranty InformationSpecificationsModel no.: APP-99209Voltage: AC120V ~60HzAssembling Your Popcorn MakerIn order to properly assemble your popcorn maker, using the parts included with your package, please follow the steps below:Making PopcornOnce your popcorn maker is properly assembled you can use it to make popcorn. Before you start, make sure to take the following precautions:-Make sure that the voltage (AC120V ~60Hz) is suitable to your home.-Clean the internal surface of the kettle with warm soapy water, rinse it out well, and then dry it with a clean cloth. Wipe down the inner and outer housing with a damp cloth. Make sure that your popcorn maker isunplugged before cleaning.You should now be ready to start making popcorn. To do so, follow the steps below:1. Make sure the power cable connected to the housing isplugged into a power outlet in your home. Also be surethat the kettle’s power plug is connected to the powersocket located inside the main housing.2. Open the lid of the kettle by lifting the lid tab. Beforepouring oil or kernels into the kettle, turn both the LIGHT &POP switches to the “ON” position. This will turn the light,heater and motor on. Let the kettle preheat for about 2 to3 minutes. Next, turn the POP switch to the “OFF” positionand add oil (1 tablespoon of vegetable, corn, peanut, orsafflower oil). Immediately add 1/3 cup of corn kernels (Note: 1/3 measuring cup included) and close the kettle’s lid. Turn the POP switch to the “ON” position again. The stirrer will begin to rotate and the heater will heat up the kettle.CAUTION: The Lid might be hot – it is recommended to use an oven mitt.3. Popcorn will start popping out through the lid of the kettle after about 2 minutes.4. When the unit is finished popping – you will no longer heat the corn popping – immediately turn thePOP switch to the “OFF” position and pull down the handle bar of the kettle to release any remaining popcorn in the kettle. This will also stop the remaining popcorn from any further cooking and avoid possible burning.5. Keep the POP switch to the “OFF” position if the unit is not continuously in use.6. Unplug your device when it is not in use.7. Repeat for continuous popping.Cleaning and Maintenance-It is strongly recommended to clean the kettle frequently to avoid burning excess oil onto the bottom of the inner pot.-After using the popcorn machine, let it cool, and use a wet cloth to clean the main body and glass. It is strongly recommended to wash and dry the tray after each use to avoid any bacteria buildup.-The light bulb can be replaced with an AC120V 10W bulb.-Any other servicing should be performed by an authorized service representative.Quick Cleaning ProcedureIn order to quickly clean your device, first make sure the “POP” switch is set to the “OFF” position. Next, pour 4 to 6 ounces of water (NO detergent is necessary) into the inner pot. Set the POP switch to the “ON” position to boil the water and let the stirrer turn in order to remove excess oil stuck on the surface. After cooling, pour out the water into a deep bowl and discard after about 1 to 2 minutes of boiling.CAUTION: THE KETTLE IS HOT.You can also remove the kettle and clean it with a scouring pad (Not included). Do not immerse the kettle or its electrical plug in water.Technical SupportFor technical support issues please visit our website at . You can find manuals, software and FAQ’s at the website. Can’t find what you are looking for? Fill out an online ticket and one of our technical support team members will answer questions or call 1-877-397-8200 in the U.S. or 0-800-917-4831 in the UK to access our technical support information on the phone.Sakar Warranty CardSakar WarrantyThis warranty covers the original consumer purchaser only and is not transferable.This warranty covers products that fail to function properly UNDER NORMAL USAGE, due to defects in material or workmanship. Your product will be repaired or replaced at no charge for parts or labor for a period of one year.What Is Not Covered by WarrantyDamages or malfunctions not resulting from defects in material or workmanship and damages ormalfunctions from other than normal use, including but limited to, repair by unauthorized parties,tampering, modification or accident.What To Do When Service Is RequiredWhen returning your defective product (postage pre-paid) for service, your package should include:1. Copy of original bill of sale2. A detailed written description of the problem.3. Your return address and telephone number (Daytime)MAIL TO ADDRESS BELOW:In the U.S. In the U.K.Sakar International Sakar UKAttention: Service Department 2D Siskin Parkway East195 Carter Drive CV3 4PE, UKEdison, NJ 08817You may also visit for further assistance if necessary or call our technical support department toll free at 1-877-397-8200 in the US, or 0-800-917-4831 in the UK.This device complies with the part 15 of the FCC rules. Operation is subject to the following two conditions:(1) this device may not cause harmful interference , and (2) this device must accept any interference received, including interference that may cause undesired operation.Caution: changes or modifications not expressly approved by the party responsible for compliance could void the user's authority to operate the equipment.NOTE: This equipment has been tested and found to comply with the limits for a Class B digital device, pursuant to Part 15 of the FCC Rules, These limits are designed to provide reasonable protection against harmful interference in a residential installation. This equipment generates. Uses and can radiate radio frequency energy and, if not installed and used in accordance with instructions. May cause harmful interference to radio or -television reception, which can bedetermined by turning the equipment off and on, the user is encouraged to try to correct the interference by one or more of the following measures:__ Reorient or relocate the receiving antenna.__ Increase the separation between the equipment and receiver.__ Connect the equipment into an outlet on a circuit different from that to which the receiver is connected.__ Consult the dealer or experienced radio/ TV technician for help.A00-070713。
爆米花机说明书
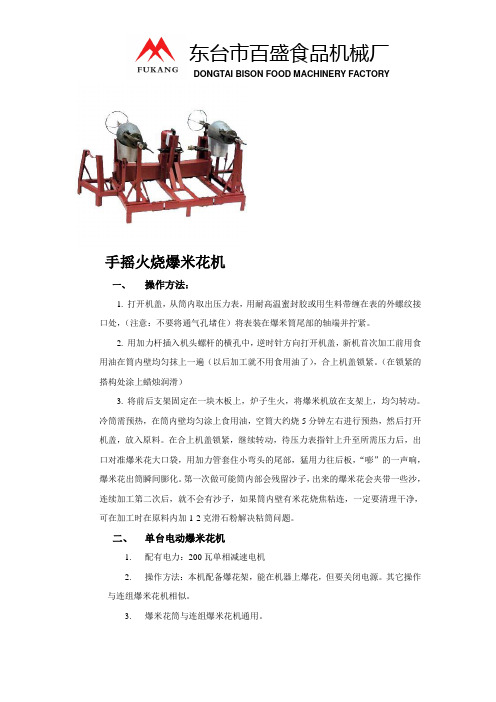
手摇火烧爆米花机一、操作方法:1.打开机盖,从筒内取出压力表,用耐高温蜜封胶或用生料带缠在表的外螺纹接口处,(注意:不要将通气孔堵住)将表装在爆米筒尾部的轴端并拧紧。
2.用加力杆插入机头螺杆的横孔中,逆时针方向打开机盖,新机首次加工前用食用油在筒内壁均匀抹上一遍(以后加工就不用食用油了),合上机盖锁紧。
(在锁紧的搭构处涂上蜡烛润滑)3.将前后支架固定在一块木板上,炉子生火,将爆米机放在支架上,均匀转动。
冷筒需预热,在筒内壁均匀涂上食用油,空筒大约烧5分钟左右进行预热,然后打开机盖,放入原料。
在合上机盖锁紧,继续转动,待压力表指针上升至所需压力后,出口对准爆米花大口袋,用加力管套住小弯头的尾部,猛用力往后板,“嘭”的一声响,爆米花出筒瞬间膨化。
第一次做可能筒内部会残留沙子,出来的爆米花会夹带一些沙,连续加工第二次后,就不会有沙子,如果筒内壁有米花烧焦粘连,一定要清理干净,可在加工时在原料内加1-2克滑石粉解决粘筒问题。
二、单台电动爆米花机1.配有电力:200瓦单相减速电机2.操作方法:本机配备爆花架,能在机器上爆花,但要关闭电源。
其它操作与连组爆米花机相似。
3.爆米花筒与连组爆米花机通用。
三、电动连组爆米花机将本产品安放在远离易燃物品的工作场地。
产品在出厂前已安装调试完毕。
1.配用动力:400瓦三相或单相减速电机2.操作方法:用户在使用前把爆米花机的爆花架安装在机架的两侧分左右,再把爆米筒安放在机架上放在前支架上(爆米花机的后端有一个开口销,把它插入后支架空心管中,让爆米花机上的伞齿轮和后支架上的伞齿轮配合)。
然后接上电源,安插好地线。
将专用的皮管把煤气灶和煤气瓶连接起来,煤气瓶和本产品至少要隔开三米以上距离,接口用铁丝扎紧以放漏气、发生危险。
本产品配备的是减速电机,启动倒顺开关就可以开始加工了。
首次加工先把爆米筒从机架上拿下来,用配备的用加力杆插入机头螺杆的横孔中,逆时针方向打开机盖,新机首次加工前用食用油在筒内壁均匀抹上一遍(以后加工就不用食用油了),合上机盖锁紧,用加力杆插入机头螺杆孔中,顺时针方向锁紧,把爆米筒装上机架。
手摇爆米花机使用说明书
手摇爆米花机使用说明书
爆米花机使用说明书
一、产品概述
玉米花是一种老幼皆宜喜欢大众食品,市场前景广阔。
加工爆米花是一个投资少、见效快的致富项目,适合在公园、车站、学校、影剧院、游乐场、商场等场所加工经营。
二、结构
1.加热系统:液化气灶盘、液化气瓶并减压阀等部件组成。
2.搅拌系统:手动搅拌。
三、安装
1.将液化气瓶、减压阀、输气管、灶盘(以上部件客户自备)按正
常顺序接到灶盘上。
四、使用方法:
首先点燃灶具预热2分钟,把奶油放入锅内搅拌至化开,然后加玉米,白砂糖,关闭盖子继续搅拌等待2分钟左右,到锅内爆裂玉米的砰砰声基本消失后,翻动手柄,将爆好的玉米花倒入盆中,并迅速翻动几次,使用之余热快速散发,玉米花不易粘结,香脆可口。
五、注意事项:
1.气路要连接安全可靠,不许有漏气现象。
2.翻动手柄时要轻拿轻放,以免烫伤,由于温度过高,防止锅底碰
击变形。
3.锅内要经常清洗,以免污垢太多影响口味。
4.火焰调节非常关键,火太大,会使玉米花小而味发苦,火小更影
响爆花率和味道,而中火最好,请客户灵活掌握。
六、配方
奶油味:白糖50克+奶油100克+玉米150克
水果味:白糖50克+果味奶油100克+玉米150克
巧克力味:白糖50克+巧克力奶油100克+玉米150克我们送的是棕榈油
可以使用椰子油起酥油无水酥油。
爆米花机怎么用爆米花机注意事项
爆米花机怎么用爆米花机注意事项爆米花机怎么用爆米花机注意事项导语:爆米花机(baomihuaji)是用于制作爆米花的专用机械,类型有老式大炮手摇爆米花机、台式手摇爆米花机、豪华商用爆米花机、电动爆米花机、单锅爆米花机、双锅爆米花机。
爆米花机怎么用1.插上电源线,打开“保温照明”开关,此时灯泡和爆谷机底下的保温管开始工作;2.打开“加热”开关,爆谷锅开始工作,第一锅请一定预热5分钟;3.打开“旋转”开关,把准备好的50克椰油放入锅内,紧接着放入100克爆裂玉米,盖上锅盖。
放糖的最佳时间是在第一颗爆裂声响起之前把准备好的50克糖投放进去。
4.通常在爆谷锅锅盖被大量的爆米花顶起的.时候就可以把“加热”开关关掉了;5.当“劈啪”的爆裂声由快变慢至每两秒钟响一次的时候就可以将“旋转”开关关掉,提起锅盖至顶部吸铁石吸住,然后左手握住爆谷锅把手往左旋转90度,使锅内爆米花慢慢倾倒至爆谷机的底端。
爆米花机注意事项经有关部门检测调查,每千克街头爆米花机生产的爆米花中含铅量在2.45~20毫克,而国家规定糕点含铅量不得超过0.5毫克/千克。
爆米花含铅量超过一般食品卫生标准几倍甚至几十倍,会严重危害人的肝脏、肾脏和脑组织。
尤其是儿童对铅的解毒功能弱,常吃含铅量高的爆米花极易发生铅中毒,造成食欲下降、腹泻、烦躁、牙龈发紫以及生长发育缓慢等现象。
随着科学的发展,健康意识的提高,这种含铅量高的爆米花机已经不能在市场上立足,慢慢的被社会淘汰,可是这爆米花中的巨大利润却是不能淘汰的,人们对爆米花的美味也是不能放下的。
如何检修:1、打开爆米花机的电源开关,查看设备短路保险丝是否断。
2、打开爆米花机加温开关,锅体不热,加温指示灯不亮,保险断,请检查是否爆米花机的锅体内加热器接线有故障,检查温控仪失灵,炉盘接线短路。
3、如果是爆米花机的加温指示灯长期不灭,温度过高,检查热敏温控器失灵,应重新调整热敏温控器角度控制在180±10℃或更换热敏温控器。
老式爆米花机使用方法-概述说明以及解释
老式爆米花机使用方法-概述说明以及解释1.引言1.1 概述老式爆米花机是一种古老而经典的厨房用具,可以在家中制作出美味的爆米花。
它的原理是通过加热底部的锅体,使得玉米粒迅速膨胀并爆发成爆米花。
这种制作爆米花的方式既简单又有趣,让人回味无穷。
在本文中,我们将介绍老式爆米花机的使用方法,包括准备工作和具体操作步骤。
通过学习本文,您将能够轻松使用老式爆米花机制作出口感鲜香的爆米花,让您的家庭聚会更加欢乐和有趣。
文章结构是指文章内容的组织结构和分布方式。
在本篇文章中,我们将按照以下结构进行展开阐述:1. 引言1.1 概述1.2 文章结构1.3 目的2. 正文2.1 老式爆米花机介绍2.2 准备工作2.3 使用方法3. 结论3.1 总结3.2 使用建议3.3 结语每个部分的内容将详细介绍相关主题,并逐步展开讲解。
通过清晰的文章结构,读者可以更好地理解和掌握老式爆米花机的使用方法,从而更好地应用于实践中。
1.3 目的:本文的目的是为读者介绍如何正确地使用老式爆米花机,并提供详细的操作步骤和注意事项。
通过本文的阐述,读者将能够了解如何准备爆米花机并正确操作,以确保健康安全地制作美味的爆米花。
同时,本文还旨在传承和保护传统的爆米花制作技术,让更多人了解和享受到使用老式爆米花机的乐趣和美味。
希望本文对读者有所帮助,让大家在家中也能轻松制作出口感十足的爆米花。
2.正文2.1 老式爆米花机介绍:老式爆米花机是一种传统的制作爆米花的设备,通常由一个金属锅和一个手动摇杆组成。
这种爆米花机操作简单,不需要电力,只需在火炉上加热即可制作出美味的爆米花。
老式爆米花机通常使用的是普通的爆米花粒,这些粒子在高温下膨胀成口感松脆的爆米花。
这种机器制作的爆米花味道浓郁,口感独特,深受人们喜爱。
在使用老式爆米花机之前,需要先了解其结构和原理。
通常,锅底部有一个小孔,可以释放排气防止爆炸。
手动摇杆用来搅拌爆米花,使其均匀受热,避免烧焦。
总的来说,老式爆米花机是一种简单实用的制作爆米花的工具,尽管它可能不如现代化的爆米花机方便,但它却传承着一种独特的制作方式和味道,是很多人喜爱的经典之选。
爆米花机操作和清洗指南
爆米花机操作和清洗指南
爆米花机操作和清洗指南
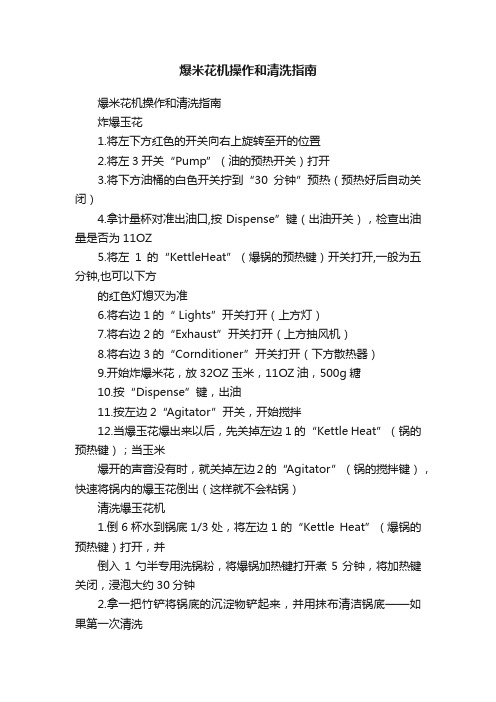
炸爆玉花
1.将左下方红色的开关向右上旋转至开的位置
2.将左3开关“Pump”(油的预热开关)打开
3.将下方油桶的白色开关拧到“30分钟”预热(预热好后自动关闭)
4.拿计量杯对准出油口,按Dispense”键(出油开关),检查出油量是否为11OZ
5.将左1的“KettleHeat”(爆锅的预热键)开关打开,一般为五分钟,也可以下方
的红色灯熄灭为准
6.将右边1的“ Lights”开关打开(上方灯)
7.将右边2的“Exhaust”开关打开(上方抽风机)
8.将右边3的“Cornditioner”开关打开(下方散热器)
9.开始炸爆米花,放32OZ玉米,11OZ油,500g糖
10.按“Dispense”键,出油
11.按左边2“Agitator”开关,开始搅拌
12.当爆玉花爆出来以后,先关掉左边1的“Kettle Heat”(锅的预热键);当玉米
爆开的声音没有时,就关掉左边2的“Agitator”(锅的搅拌键),快速将锅内的爆玉花倒出(这样就不会粘锅)
清洗爆玉花机
1.倒6杯水到锅底1/3处,将左边1的“Kettle Heat”(爆锅的预热键)打开,并
倒入1勺半专用洗锅粉,将爆锅加热键打开煮5分钟,将加热键关闭,浸泡大约30分钟
2.拿一把竹铲将锅底的沉淀物铲起来,并用抹布清洁锅底——如果第一次清洗
不彻底,请重复第1步骤,倒入洗锅粉,煮到水开为止)
3.将清洁锅上方的过滤器用清水清洗,将锅下方的过滤器用抹布擦干净,再用
清水清洗
4.将油桶的油管拆下来,将输油管中的油用量杯倒出,重新倒入桶中(以防止
油管内的油凝固)
5.将有机玻璃和帘子用抹布洗涤干净。
HP-6B爆米花机说明书
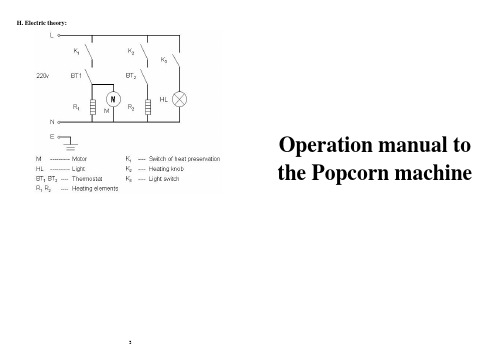
H. Electric theory:Operation manual tothe Popcorn machineA. Function and features:The popcorn machine combines all the advantages of the popcorn machines both in and abroad. It is made of aluminum alloy and toughened glass, with a sprayed inattentive interior coat. The machine also has the features of cleanliness and sanitation, easy cleaning, simple and safe operation and saving energy, which is fit for restaurants, snack bars, cinemas and so on.B. Specifications:C. Transportation and Storage:When being transported, be careful not to shake the machine violently; don’t put it outdoors or in the direct sunlight. If so, avoid rainfall; Store it in ventilated places out of erosive gases; Don’t put it up-side-down.D. Cautions:1.The machine should be laid up flat and stable.2.The machine must be used together with the suitable power source suggested by the factory, thatpower+10%(V).3.Suitable switch, fuse box and the leak electricity switch should be fixed near the machine,without piled up rubbish to make it convenient to operate.4.The ground wire and the power source wire should come from the same place, connected with asafe three-pin plug in the outlet.5.All the connection with electricity should be done by the qualified electrician.E. Operation1.Turn on the switch of heat preservation to start the heat tube and light.2.Turn the heating knob to preheat the plate for 5~6 minutes.3.Put 50ml oil, 150g corn and100g sugar into the plate, and the corn will burst open.4.Pay attention to the corn while popping in case it will be burnt. Close the door firmly so that thecorn can not come out.5.Stir the corn until it is all burst open, then pour it out from the plate.6.Repeat 1~5 to make more popcorn. It needs only 2 minutes to pop the corn continuously.7.Do not drop any oil around the plate. Otherwise it will catch fire when it is heated to a certaintemperature.Warning: Do not add any water to the plate while it is popping!F. Cleanliness and Protection:1.Cut off the electricity power and pull out the plug to avoid accidents when you clean the machine.e the wet towel with some anticorrosive detergent to clean the outside parts of the machine. Donot clean the machine directly with water. Otherwise the electric function will be damaged.3.If it is not used for a long time, you should cut off the electricity and pull out the plug.4. Do not brush the inside part of the plate with hard metal. Otherwise you will damage the coat.G. Troubleshooting guides:Appendix to the machine: 1. an operation manual2. a bulb1 2。
- 1、下载文档前请自行甄别文档内容的完整性,平台不提供额外的编辑、内容补充、找答案等附加服务。
- 2、"仅部分预览"的文档,不可在线预览部分如存在完整性等问题,可反馈申请退款(可完整预览的文档不适用该条件!)。
- 3、如文档侵犯您的权益,请联系客服反馈,我们会尽快为您处理(人工客服工作时间:9:00-18:30)。
手摇火烧爆米花机
一、操作方法:
1.打开机盖,从筒内取出压力表,用耐高温蜜封胶或用生料带缠在表的外螺纹接口处,(注意:不要将通气孔堵住)将表装在爆米筒尾部的轴端并拧紧。
2.用加力杆插入机头螺杆的横孔中,逆时针方向打开机盖,新机首次加工前用食用油在筒内壁均匀抹上一遍(以后加工就不用食用油了),合上机盖锁紧。
(在锁紧的搭构处涂上蜡烛润滑)
3.将前后支架固定在一块木板上,炉子生火,将爆米机放在支架上,均匀转动。
冷筒需预热,在筒内壁均匀涂上食用油,空筒大约烧5分钟左右进行预热,然后打开机盖,放入原料。
在合上机盖锁紧,继续转动,待压力表指针上升至所需压力后,出口对准爆米花大口袋,用加力管套住小弯头的尾部,猛用力往后板,“嘭”的一声响,爆米花出筒瞬间膨化。
第一次做可能筒内部会残留沙子,出来的爆米花会夹带一些沙,连续加工第二次后,就不会有沙子,如果筒内壁有米花烧焦粘连,一定要清理干净,可在加工时在原料内加1-2克滑石粉解决粘筒问题。
二、单台电动爆米花机
1.配有电力:200瓦单相减速电机
2.操作方法:本机配备爆花架,能在机器上爆花,但要关闭电源。
其它操作与连组爆米花机相似。
3.爆米花筒与连组爆米花机通用。
三、电动连组爆米花机
将本产品安放在远离易燃物品的工作场地。
产品在出厂前已安装调试完毕。
1.配用动力:400瓦三相或单相减速电机
2.操作方法:
用户在使用前把爆米花机的爆花架安装在机架的两侧分左右,再把爆米筒安放在机架上放在前支架上(爆米花机的后端有一个开口销,把它插入后支架空心管中,让爆米花机上的伞齿轮和后支架上的伞齿轮配合)。
然后接上电源,安插好地线。
将专用的皮管把煤气灶和煤气瓶连接起来,煤气瓶和本产品至少要隔开三米以上距离,接口用铁丝扎紧以放漏气、发生危险。
本产品配备的是减速电机,启动倒顺开关就可以开始加工了。
首次加工先把爆米筒从机架上拿下来,用配备的用加力杆插入机头螺杆的横孔中,逆时针方向打开机盖,新机首次加工前用食用油在筒内壁均匀抹上一遍(以后加工就不用食用油了),合上机盖锁紧,用加力杆插入机头螺杆孔中,顺时针方向锁紧,把爆米筒装上机架。
点燃煤气,启动倒顺开关,让空罐预热运转五分钟以后,踩下离合器小弯头,使伞齿轮复合,让爆米筒自动运转。
启动倒顺开关将筒体左右运转,(单相电机,需将电机停稳后才能反转)使筒内物流均匀受热,待压力表指针上升至所需压力后,出口对准爆米花大口袋,用加力管套住小弯头的尾部,猛用力往后板,“嘭”的一声响,爆米花出筒瞬间膨化。
第一次做可能筒内部会残留沙子,出来的爆米花会夹带一些沙,连续加工第二次后,就不会有沙子。
在使用了一段时间以后,如发现爆米机运转速度减慢,可能是皮带松了。
可以松开机架上的连接板螺丝和罩壳上的螺丝。
机架就可以向两边撑开,皮带也就张紧了,在紧固连接板和罩壳上的螺丝就可以正常生产。
五、故障排除Array六、警告
在正常生产过程中,如加热3分钟,压力表指针不上升,应立即停止生产,并检查压力
表是否损坏以及各接头连接部分是否漏气,注意安全。