Ubiquitous_QuickBoot(beta)
库柏Q9手动root教程
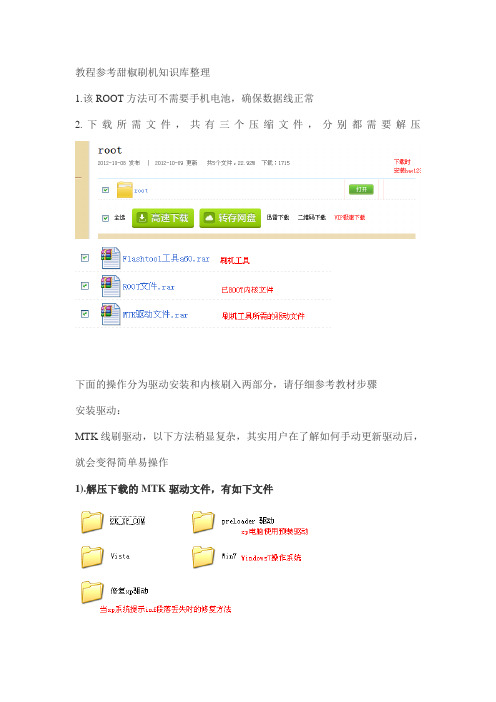
教程参考甜椒刷机知识库整理1.该ROOT方法可不需要手机电池,确保数据线正常2.下载所需文件,共有三个压缩文件,分别都需要解压下面的操作分为驱动安装和内核刷入两部分,请仔细参考教材步骤安装驱动:MTK线刷驱动,以下方法稍显复杂,其实用户在了解如何手动更新驱动后,就会变得简单易操作1).解压下载的MTK驱动文件,有如下文件2).打开电脑设备管理器右键我的电脑(计算机)--管理--设备管理器;Win7系统还可以点击开始菜单--搜索设备管理器。
此处目的在于监视和更新驱动。
3).更新驱动文件取出手机电池(不需装入),按住音量上键并插入数据线;此时电脑设备管理器中存在黄色叹号的设备,右键该项--更新驱动;部分系统也会直接提示安装驱动;如下图,从列表选择--找到下载解压后的驱动文件夹;XP系统选择preloader 驱动文件夹,WIN7系统选择Win7文件夹,期间出现任何提示均需要选择代表确认的操作。
驱动安装完成后,拔掉数据线,XP系统先不要关闭设备管理器,下面操作继续会更新驱动。
Root步骤:驱动安装完成后,使用Flashtool工具刷入已ROOT的内核1).运行刷机工具,选择配置文件进入工具文件夹Flashtool工具a60,运行刷机软件--Flash_tool.exe;点击右侧scatter-loading--新弹窗中选择ROOT文件目录中MT6575_Android_scatter.txt;配置选择后,会加载要刷入的文件,此时取消勾选前面两项,即PRELOADER 和DSP_BL,如下图2).刷入内核文件点击工具上方的DOWNLOAD,出现弹窗,选择是;此时保持按住手机音量上键并接入数据线,工具自动刷机;进度条为红色,达到100%时,会加载另一个驱动,此时不要关闭刷机工具,在设备管理器中,更新黄色叹号的驱动--选择2K_XP_COM(XP系统)进行更新,如果提示inf段落无效,则参考2K_XP_COM文件夹中的XP系统修复方法(网吧电脑、非官方系统一般会需要修复);此驱动完成后,工具继续自动刷入内核,待黄色进度条100%后,出现弹窗,提示OK,如下图甜椒刷机助手官网:/刷机rom商城/刷机教程/Q9救砖教程:/kubai/q9/175-8009.html。
uboot代码完全解析

目录
u-boot-1.1.6 之 cpu/arm920t........................................................................2 u-boot 中.lds 连接脚本文件的分析 ...................................................................................................12 分享一篇我总结的 uboot 学习笔记(转) .....................................................................................15 U-BOOT 内存布局及启动过程浅析 ...................................................................................................22 u-boot 中的命令实现 ..........................................................................................................................25 U-BOOT 环境变量实现 ........................................................................................................................28
海康威视安全控制面板快速使用指南.pdf_1704923276.8532906说明书

Network Security Control PanelQuick Start GuideUD07393BFor more, please refer to Video Security Control Panel User Manual .Quick Start GuideCOPYRIGHT ©2016 Hangzhou Hikvision Digital Technology Co., Ltd. ALL RIGHTS RESERVED.Any and all information, including, among others, wordings, pictures, graphs are the properties of Hangzhou Hikvision Digital Technology Co., Ltd. or its subsidiaries (hereinafter referred to be “Hikvision”). This user manual (hereinafter referred to be “the Manual”) cannot be reproduced, changed, translated, or distributed, partially or wholly, by any means, without the prior written permission of Hikvision. Unless otherwise stipulated, Hikvision does not make any warranties, guarantees or representations, express or implied, regarding to the Manual.About this ManualThis manual is applicable to video security control panel.The Manual includes instructions for using and managing the product. Pictures, charts, images and all other information hereinafter are for description and explanation only. The information contained in the Manual is subject to change, without notice, due to firmware updates or other reasons. Please find the latest version in the company website (/en/).Please use this user manual under the guidance of professionals.Trademarks Acknowledgementand other Hikvision’s trademarks and logos are theproperties of Hikvision in various jurisdictions. Other trademarks and logos mentioned below are the properties of their respective owners.Legal DisclaimerTO THE MAXIMUM EXTENT PERMITTED BY APPLICABLE LAW, THE PRODUCT DESCRIBED, WITH ITS HARDWARE, SOFTWARE ANDFIRMWARE, IS PROVIDED “AS IS”, WITH ALL FAULTS AND ERRORS, AND HIKVISION MAKES NO WARRANTIES, EXPRESS OR IMPLIED,INCLUDING WITHOUT LIMITATION, MERCHANTABILITY , SATISFACTORY QUALITY , FITNESS FOR A PARTICULAR PURPOSE, ANDNON-INFRINGEMENT OF THIRD PARTY. IN NO EVENT WILL HIKVISION, ITS DIRECTORS, OFFICERS, EMPLOYEES, OR AGENTS BE LIABLE TO YOU FOR ANY SPECIAL, CONSEQUENTIAL, INCIDENTAL, OR INDIRECT DAMAGES, INCLUDING, AMONG OTHERS, DAMAGES FOR LOSS OF BUSINESS PROFITS, BUSINESS INTERRUPTION, OR LOSS OF DATA OR DOCUMENTATION, IN CONNECTION WITH THE USE OF THIS PRODUCT, EVEN IF HIKVISION HAS BEEN ADVISED OF THE POSSIBILITY OF SUCH DAMAGES.REGARDING TO THE PRODUCT WITH INTERNET ACCESS, THE USE OF PRODUCT SHALL BE WHOLLY AT YOUR OWN RISKS. HIKVISION SHALL NOT TAKE ANY RESPONSIBILITES FOR ABNORMAL OPERATION, PRIVACY LEAKAGE OR OTHER DAMAGES RESULTING FROM CYBER ATTACK, HACKER ATTACK, VIRUS INSPECTION, OR OTHER INTERNET SECURITY RISKS; HOWEVER, HIKVISION WILL PROVIDE TIMELY TECHNICAL SUPPORT IF REQUIRED.SURVEILLANCE LAWS VARY BY JURISDICTION. PLEASE CHECK ALL RELEVANT LAWS IN YOUR JURISDICTION BEFORE USING THISPRODUCT IN ORDER TO ENSURE THAT YOUR USE CONFORMS THE APPLICABLE LAW. HIKVISION SHALL NOT BE LIABLE IN THE EVENT THAT THIS PRODUCT IS USED WITH ILLEGITIMATE PURPOSES.IN THE EVENT OF ANY CONFLICTS BETWEEN THIS MANUAL AND THE APPLICABLE LAW, THE LATER PREVAILSNormally Used Keypad Operation Command。
蜂鸟音效设备 Liquifier Analog Chorus 快速启动指南说明书

Liquifier Analog ChorusGuide de démarrage rapideContenu du cartonLiquifier Analog Chorus, Guide de démarrage rapide.enregistrement/sonorisation1. Entrée :Connectez un instrument passif ou actif à cetteentrée.2. Output : Permet d’envoyer le signal à un ampli depuissance externe, une console de mixage ou du matériel d’enregistrement.3. Interrupteur marche/arrêt: Permet d’activer / désactiver lapédale. La LED s’allume lorsque la pédale est activée.4. Rate:Permet de régler la vitesse du LFO.5. Depth: Permet de régler l’amplitude / l’intensité de l’effet.6. Effect Level: Permet de régler le niveau général de l’effet.7. LED d’indication de la vitesse : Cette LED clignote à lavitesse correspondant au réglage Rate.8. Embase secteur :Permet de connecter un adaptateursecteur en option.9. Pile [non fournie] : Fournit une tension de 9V nécessaireau fonctionnement de la pédale (accessible en enlevant les quatre vis sur le panneau inférieur).Description des faces avant, arrière, latérale et inférieure 1. Lisez les instructions de sécurité importantes et assurez-vous de les comprendre.2. Avant d’effectuer toute connexion, assurez-vous que tous les appareils soient hors tension. Vérifiez que le volume général, le niveau et le gain soient réglés au minimum.3. Insérez une pile 9V ou connectez l’adaptateur secteur en option. Le Liquifier Analog Chorus est compatible avec la tension indiquée sur la face arrière.4. Connectez un instrument à l’entrée de l’ampli avec un câble Jack pour instrument.5. T out en jouant de votre instrument, réglez les potentiomètres Rate, Depth et Effect Level jusqu’à obtenir le son souhaité.Mise en œuvreCaractéristiques techniquesConsultez pour...(1) ...connaître la couverture de la GARANTIE dans votre région. Merci de conserver vos factures dans un lieu sûr.(2) récupérer une version complète et imprimable du MODE D’EMPLOI (seulement anglaise) de votre produit.(3) ...ENREGISTRER votre produit.(4) ...CONTACTER le département d’assistance technique, 818-575-3600.GARANTIE ET ASSISTANCE TECHNIQUE 2018 Yamaha Guitar Group, Inc.26580 Agoura Road, Calabasas, CA 91302-1921 USA© 2019 Yamaha Guitar Group, Inc. All rights reserved. Ampeg and the Ampeg logo are trademarks or registered trademarks of Yamaha Guitar Group, Inc. in the U.S. and/or other jurisdictions. Rapport signal-bruit (Effect Level @ 12:00)82 dB Maximum Gain+0 dB (Unitaire)AlimentationInterne : Pile 9V Externe : 9V DC, ≥60mA Dimensions (H x L x P)2.2 x 2.6 x 4.5 in 56 x 66 x 114 mm Poids0.6 lb / 0.3 kg Les caractéristiques peuvent être modifiées。
Silicon Laboratories C8051T XXXDK 开发板快速启动指南说明书

(contains instructions for obtaining the 4 k limited version of the Keil toolset) Latest versions of Application Notes can be found at /products/microcontroller/applications.asp MCU Knowledgebase (available at SUPPORT) Contact an Applications Engineer using the online information request form (available at SUPPORT).
Silicon Laboratories IDE opens
Silicon Laboratories Inc. 400 West Cesar Chavez Austin, TX 78701 Tel: 1+(512) 416-8500 Fax: 1+(512) 416-9669 Toll Free: 1+(877) 444-3032 Internet:
+ Silicon Labs IDE + 8051 Evaluation Toolset + Configuration Wizard + Flash Programming Utilities + Production Programmer + CP210x VCP Driver + Keil uVision Driver + Development Kit User’s Guide + MCU Datasheet + Additional Documentation
CodeWarrior+USBTAP调试U-Boot技巧

CodeWarrior+USBTAP调试U-Boot2010-07-15 15:55:50分类:LINUX!# U-Boot 编译调试 ## 请参考Pro_&_Linux_App_Edition_Targeting_Manual.chm./ltib ## install ltib$ ./ltib -p u-boot -m prep ## get U-Boot source$ cd rpm/BUILD/u-boot-1.1.3$ vim config.mkDBGFLAGS = -g2 -gdwarf-2AFLAGS_DEBUG = -Wa,-gdwarf2OPTFLAGS = -O1$ vim u-boot-1.1.3/lib_ppc/board.c ## line624: debug => printfdebug ("Now running in RAM - U-Boot at: %08lx\n", dest_addr);=> printf ("Now running in RAM - U-Boot at: %08lx\n", dest_addr);$ make ## 编译,最好用 ./ltib -p u-boot -m scbuild注意: 用ltib 编译,要修改confing/platform/mpc8349itx/.config中CLFAGS参数编译常用(make distclean ; make MPC8349ITX_config ; make )启动linux samba服务,将u-boot目录做共享目录由windows访问在windows上访问uboot共享目录,打开后右键点击共享目录,映射为磁盘驱动器z启动CodeWarrior IDE,@ IDE: File > Open , find and open ELF file: u-boot , click OK@ IDE: Choose Debugger : CodeWarrior USB TAP , click OK按照提示选择添加缺少的文件start.S(前提是将源码完全复制),其余会自动添加,不能自动添加的,手动添加。
Realtek Linux USB PG Tool User Guide
Realtek Linux USB PG Tool User Guide1.i nstall Linux drivera.Unzip driver/PG tool by command tar –jxvBpf filename;pile the linux driver by make command, and create r8152.ko/r8153.ko file;c.Remove CDC_ETHER module if auto-load in linux system;d.Load the driver module created by step b;e.After installing the driver, un-plug and plug dongle (or reboot EUT), then check if the driver that USB NIC using iscorrect by command: ethtool -i ethxfor example:ethtool -i eth4driver: r8152version: v1.03.0 (2013/10/28)firmware-version:bus-info: usb-0000:00:14.0-9supports-statistics: nosupports-test: nosupports-eeprom-access: nosupports-register-dump: no2.M odify cfg fileEE8152b.cfg/EE8153.cfg-------configuration file for pg eeprom, when execute pg command the value will beprogrammed into eepromEE8152b.txt/ EE8153.txt -------with mac address in it, when execute pg command with /fmac parameter.EF8152b.cfg/ EF8153.cfg -------configuration file for pg efuse, when execute pg command the value will beprogrammed into efuseEF8152b.txt/ EF8153.txt -------with mac address in it, when execute pg command with /fmac parameter.The content below is captured from cfg file(take EF8152b.cfg for example):NODEID = 00 E0 4C 36 00 01 //mac address, will be increased automatically after Efuse/EEPORM programming.STARTID = 00 E0 4C 36 00 01ENDID = 00 E0 4C 36 FF FFVID = 0B DAPID = 81 52//Vendor ID and Product ID for USB LAN device//(Realtek USB driver would be failed to load if customer modify ID without approval).;Do not change following parameters without Realtek approval;; 00: disable, 01: enableLPM_BESL_EN = 00SPI_FLASH_EN = 00;EEPROM_EN for 8152BN OnlyEEPROM_EN = 00NO_REMOTE_WAKEUP = 00BOS_DESC_SUPERSPEED = 00;LED_SEL_CFG = Low-Byte High-ByteLED_SEL_CFG = A9 3C;Maximum string length allowed - 17 charactersMANUFACTURE = RealtekPRODUCT = USB 10/100 LANCharacteristics- LPM_BESL_ENRTL8152B(N) supports configuration for Link Power Management (LPM) Capability to be version 1 LPM, known as HIRD (Host Initiated Resume Duration) or advanced LPM, known as BESL (Best Efort Service Latency) - SPI_FLASH_ENIn Windows operating system, it can load Realtek windows driver from SPI Flash(but it is not needed in linux or android OS). Set PG Tool AutoInstall capability (SPI_Flash_EN) to enable if necessary,- EEPROM_ENEEPROM_EN for 8152BN OnlySet EEPROM_EN to enable if external EEPROM is using.- NO_REMOTE_WAKEUPRTL8152(N) will not support remote wake up function when NO_REMOTE_WAKE is enabled.- BOS_DESC_SUPERSPEEDRTL8152B(N) supports BOS_DESC_SUPERSPEED programming for USB-IF test. SuperSpeed USB device capability descriptor will appended to the BOS descriptor tree when BOS_DESC_SUPERSPEED is enabled.- LED_SEL_CFGLED_SEL_CFG = Low-Byte High-ByteCustomized LED configuration. Please refer to RTL8152B(N)_EEPROM_eFuse Datasheet3.ProgramThere are different execute file for different CPU:Make sure execute file and configuration file are in the same path before programing.Choose correct one to program with suitable parameter below:/efuse--- Programming EFUSEExample: /efuse/eeprom--- Programming EEPROM/r--- Read EEPROM or EFuse content to standard output/s--- Search Realtek NIC adapters/# NICnumber--- Select one of Multi_NICIf no NIC number selected, default use all NICsExample: /# 0/nodeid--- Write EEPROM or EFuse NODEID--- NIC number must selectedExapmle: /eeprom /# 0 /nodeid 00E04C360001Exapmle: /efuse /# 1 /nodeid 00E04C360001/dump--- dump Efuse, EEPROM or FLASH to log file/fmac--- Write MAC address from txt file/nchkct--- Bypass Check unknown contentExample: /efuse /r /nchkctExample: /eeprom /r /nchkctFor example1.In programming process, you can run rtunicpg-x86_64 /s first to search all Realtek NIC, if 2 USB NICs found below: root@-desktop:/home/Desktop/linuxpg/new/rtunicpg# ./rtunicpg-x86_64 /s************************************************************************** RTUNicPG - EFUSE/EEPROM/FLASH Programming Utility for* RTL8152/RTL8153 Family USB FE/GBE Network Adapter* Version : v1.0.0.15-1* Copyright (C) Realtek Semiconductor Corp. 2013. All Rights Reserved.*************************************************************************0 eth1 VID:0BDA PID:8153 bcdDevice:3000 00:E0:4C:68:00:A2 path:11 eth4 VID:0BDA PID:8152 bcdDevice:2000 00:E0:4C:36:A0:1A path:22. Then, you can program one of them by command./rtunicpg-x86_64 /# 0 /efuse3. Or read the efuse content by command. /rtunicpg-x86_64 /# 0 /efuse /rIf show un-recognized efuse content, you can read efuse by command./rtunicpg-x86_64 /# 0 /nchkct /efuse /r4. Or program MAC address only by command./rtunicpg-x86_64 /# 0 /efuse /nodeid 00E04C360001 Notes:B Ethernet cannot work fine without programing (mac address is needed at least);B Ethernet can be programmed in windows, linux and android, we provide programming tool for each of the 3 OS;3.In Linux and android operating system, CDC-ECM driver is enough for USB Ethernet to work , but Realtek driver isneeded for programing;4.If you want to program LED_SEL_CFG to efuse only, you can mask all the other line value by adding “;” in the front ofeach line except LED_SEL_CFG line;5.All commands should be executed by root user.The END。
universalbiosbackuptoolkit 备份原理 -回复
universalbiosbackuptoolkit 备份原理-回复universalbiosbackuptoolkit(以下简称UBTK)是一款用于备份电脑BIOS 的工具包。
本文将对UBTK的备份原理进行详细解析,并分步介绍其操作流程。
一、UBTK备份原理概述UBTK利用计算机中的Flash EEPROM芯片特性,通过读取和保存BIOS 数据,以实现备份的功能。
Flash EEPROM是一种非易失性存储器,它可以在断电的情况下保存数据。
BIOS(Basic Input Output System)则是计算机开机自检时首先运行的程序,负责初始化系统硬件和软件的基本设置,保证计算机能够正常启动。
二、UBTK备份流程详解1. 准备工作a. 下载安装UBTK工具包。
UBTK是一款免费、开源并且跨平台的工具,用户可以从官方网站或者其他可靠来源获取。
b. 准备一个USB闪存驱动器,用于保存备份的BIOS数据。
2. 启动计算机使用USB闪存驱动器重新启动计算机,在BIOS启动过程中按下相应的按键(通常是Del、F2、F10等键)进入BIOS设置界面。
每台计算机的按键可能不同,可以在计算机开机时仔细观察提示信息。
3. BIOS设置界面进入BIOS设置界面后,使用方向键和回车键来导航和选择选项。
找到“Save BIOS settings”或类似选项,保存当前的BIOS设置。
这是一个重要的步骤,因为备份的BIOS数据将包含这些设置。
4. 备份BIOS数据UBTK工具包在启动时会提供一系列选项,包括备份BIOS。
在UBTK菜单中选择“Backup BIOS”或相应选项,然后按照屏幕提示操作。
UBTK将读取计算机中的Flash EEPROM芯片,并将其保存到USB闪存驱动器中。
5. 完成备份备份过程可能需要一段时间,取决于计算机硬件的速度和备份的数据大小。
备份完成后,UBTK将显示成功的消息。
用户可以检查USB闪存驱动器上的文件来确认备份结果。
锤子手机卡刷方法和固件
锤子手机卡刷方法和固件如果当你手机不能正常开机,内置储存又没有刷机包的时候,可以通过这种方法安装刷机包亲测官方和第三方recovery均成功刷入adb sideload安装刷机包方法:1、将手机关机,同时按中间键+左下键+开机键进入recovery (第三方或官方),选择进入apply update from ADB (第三方recovery一般在安装zip刷机包选项里)。
2、下载adb sideload 刷机包解压,把安装包重命名为update.zip复制到<adb sideload 刷机包>文件夹,然后拉至“拖动卡刷包到此”。
等待100%完成,手机会自动刷入安装包,等待完成,选择reboot system now重启即可!(刷机过程可能比较长,请耐心等待)需要的朋友自行研究,方法来自网络,在此感谢原创!adb sideload 刷机包下载(4.4/5.1+)/s/1pKooEi3另外附上 T1 / 坚果的官方包合集(注意同版本或安装更高版本无需wipe,安装低版本需要wipe,会清除手机内所有数据包括内置储存)教程令人眼花缭乱。
为了让广大锤粉更快更方便的找到需要的教程以及官方ROM包,不必再为沉帖或者繁琐的同类帖子而感到困扰,故写下此帖,造福机友!另外,感谢顶贴的机油,你们的参与与支持是论坛发展的最大动力~免责申明:1.刷机有风险,请谨慎操作。
2.作者本人只负责友情分享固件包,由于刷机包造成的一切后果请自行承担。
3.私自刷机很可能失去保修服务,如果刷机后出现问题,建议联系官网客服或各售后网点。
第一部分:刷机前必备【锤子科技】 Smartisan T1 官方备份数据操作方法【Smartisan T1 固件降级教程】——晓波推荐【换机专刊】换手机,数据迁移的“一百”种方法T1、T2、坚果手机截屏、进入recovery、双清、强制重启方法第二部分:官方原生ROM包T2-801-版本 2.6.2-全量包:/s/1dF4o9qD(T2 官方原生ROM包首发)T2-801-版本2.6.3-全量包:/s/1jHZElh0 T2-801-版本2.6.5-全量包:/s/1hsExnpy T2-801-版本2.6.6-全量包:/s/1dE8NyLz T2-801-版本 2.6.7-全量包:/s/1dEGUWBfT2-801-版本3.0.α1-全量包:(内测阶段,暂时不提供下载)T2-801-版本3.0.α2-全量包:(内测阶段,暂时不提供下载)T2-801-版本3.0.β-全量包:(内测阶段,暂时不提供下载)T2-801-版本3.0.e1-全量包:(内测阶段,暂时不提供下载)T2-801-版本3.0.e2-全量包:(内测阶段,暂时不提供下载)T2-801-版本3.1.e1-全量包:(内测阶段,暂时不提供下载)3G-701-版本1.1.0-全量包:/s/1sjslELv 3G-701-版本 1.3.2-全量包:/s/1mg03x7y3G-701-版本1.4.2-全量包:/s/1ntFu3ln 3G-701-版本 1.5.0-全量包:/s/1o6GbdFk3G-701-版本 1.5.1-全量包:/s/1pJMIdeF3G-701-版本 2.0.0-全量包:/s/1c08rtvU (内测版)3G-701-版本 2.0.0-全量包:/s/1hqtWjRI(正式版)3G-701-版本 2.0.1-全量包:/s/1o6Dyafg3G-701-版本 2.0.2-全量包:/s/1bnjsmHh3G-701-版本 2.1.α-全量包:3G-701-版本 2.1.β-全量包:/s/1c03CoQs3G-701-版本2.1.0-全量包:/s/1dDjr5eh 3G-701-版本 2.1.1-全量包:/s/1qWte0TQ(正式版)3G-701-版本 2.5.α-全量包:/s/1c1k3VNU(内测版)3G-701-版本 2.5.α2全量包:/s/1sk0Y4Ap(内测版)3G-701-版本 2.5.β-全量包:/s/1o7rBg18(内测版)3G-701-版本 2.5.0-全量包:/s/1btv9kq(正式版)3G-701-版本 2.5.2-全量包:/s/1blrZPW(正式版)3G-701-版本 2.5.3-全量包:/s/1qXrGOP2(正式版)3G-701-版本 2.5.5-全量包:/s/1qXliX7u(正式版)3G-701-版本 2.5.8-全量包:/s/1cdVNkU(正式版)3G-701-版本 2.6.α-全量包:/s/1qXQCciS(内)3G-701-版本 2.6.β-全量包:/s/1pLMQ7NX(内)3G-701-版本 2.6.0-全量包:/s/1slj6SGH(正式版)3G-701-版本2.6.2-全量包:/s/1cJVGf0 3G-701-版本 2.6.3-全量包:3G-701-版本2.6.6-全量包:/s/1geALoIJ 3G-701-版本2.6.7-全量包:/s/1skJUqTn 3G-701-版本3.0.α-全量包:(内测阶段,暂时不提供下载)3G-701-版本3.0.β-全量包:(内测阶段,暂时不提供下载)3G-701-版本3.0.e1-全量包:(内测阶段,暂时不提供下载)3G-701-版本3.0.e2-全量包:(内测阶段,暂时不提供下载)3G-701-版本3.1.e1-全量包:(内测阶段,暂时不提供下载)4G-705-版本 1.3.0-全量包:/s/1qWmiihm4G-705-版本 1.4.0-全量包:/s/1eQpQpKu4G-705-版本1.4.2-全量包:/s/1kTxN8LT 4G-705-版本1.5.0-全量包:/s/1dD4fzsX 4G-705-版本 1.5.1-全量包:/s/1jGnarUQ4G-705-版本 2.0.0-全量包:/s/1E1jwq (内测版)4G-705-版本 2.0.0-全量包:/s/1hqjMOmC (正式版)4G-705-版本 2.1.α-全量包:/s/1c02Wukg4G-705-版本 2.1.β-全量包:/s/1kTm3eon4G-705-版本2.1.0-全量包:/s/1ntAf6zR 4G-705-版本2.1.1-全量包:/s/1sj7V71z (正式版)/s/1kUmk8HT(正式版)4G-705-版本 2.5.α-全量包:/s/1kTPWVhd(内测版)4G-705-版本 2.5.α2全量包:/s/1nuced53(内测版)4G-705-版本 2.5.β-全量包:/s/1qWQ2HDa(内测版)4G-705-版本2.5.0-全量包:/s/1dElRPuT (正式版)4G-705-版本 2.5.2-全量包:/s/1o6Xw3aU(正式版)4G-705-版本 2.5.3-全量包:/s/1genVg4r(正式版)4G-705-版本 2.5.5-全量包:/s/1qXdbs1e(正式版)4G-705-版本2.5.8-全量包:/s/1gfGvq4j (正)4G-705-版本2.6.α-全量包:/s/1cBfMlK (内)4G-705-版本 2.6.β-全量包:/s/1hr69A88(内)4G-705-版本2.6.0-全量包:/s/1hr9ry4G (正)4G-705-版本 2.6.2-全量包:/s/1qYip0Yw4G-705-版本 2.6.3-全量包:/s/1nvKVnoX4G-705-版本 2.6.6-全量包:/s/1pLfDbV9/s/1o8vohT44G-705-版本3.0.α-全量包:(内测阶段,暂时不提供下载)4G-705-版本3.0.β-全量包:(内测阶段,暂时不提供下载)4G-705-版本3.0.e1-全量包:(内测阶段,暂时不提供下载)4G-705-版本3.0.e2-全量包:(内测阶段,暂时不提供下载)4G-705-版本3.1.e1-全量包:(内测阶段,暂时不提供下载)坚果手机(YQ601):请注意区分型号跟标准版或文青版YQ-601-版本 1.5.3-标准版:/s/1kUqvuwZYQ-601-版本2.0.0-标准版:/s/1QVoaq YQ-601-版本 2.0.2-标准版:/s/1i4mvHtFYQ-601-版本 2.0.4-标准版:/s/1pJQ4LXDYQ-601-版本 2.1.β-标准版:/s/1o7ont2M(内测版)YQ-601-版本 2.1.0-标准版:/s/1eReuuhs(内测版)YQ-601-版本 2.1.1-标准版:/s/1sjXmrd7(内测版)YQ-601-版本 2.1.2-标准版:/s/1pK3KxKJ(正式版)YQ-601-版本 2.5.α-标准版:/s/1pJRkJZt(内测版)YQ-601-版本 2.5.α2标准版:/s/1dExtkEd(内测版)YQ-601-版本 2.5.β-标准版:/s/1c0T8ZLY(内测版)YQ-601-版本 2.5.0-标准版:/s/1gdSgZRH(正式版)YQ-601-版本 2.5.2-标准版:/s/1nuinR4l(正式版)YQ-601-版本 2.5.3-标准版:/s/1jHlh6DK(正式版)YQ-601-版本 2.5.5-标准版:/s/1kTQXgHL(正式版)YQ-601-版本2.5.8-标准版:/s/1i5jncJ7 YQ-601-版本 2.6.β-标准版:/s/1jIs8AN0(内)YQ-601-版本2.6.0-标准版:/s/1cBioou YQ-601-版本 2.6.2-标准版:/s/1c1Zk2YWYQ-601-版本 2.6.3-标准版:/s/1miB7pCcYQ-601-版本 2.6.4-标准版:/s/1bp1GjozYQ-601-版本 2.6.6-标准版:/s/1dFfXFDvYQ-601-版本 2.6.7-标准版:/s/1pLq2xOfYQ-601-版本2.6.α-标准版:(内测阶段,暂时不提供下载)YQ-601-版本2.6.β-标准版:(内测阶段,暂时不提供下载)YQ-601-版本3.0.e1-标准版:(内测阶段,暂时不提供下载)YQ-601-版本3.0.e2-标准版:(内测阶段,暂时不提供下载)YQ-601-版本3.1.e1-标准版:(内测阶段,暂时不提供下载)YQ-601-版本 2.1.2-文青版:/s/1skiH8dBYQ-601-版本 2.1.1-文青版:/s/1nug1YS5YQ-601-版本 2.5.1-文青版:/s/1o7rBgZCYQ-601-版本2.6.0-文青版:/s/1i54lKUx YQ-601-版本2.6.2-文青版:/s/1jIdfzU2 YQ-601-版本2.6.4-文青版:/s/1c61V9k YQ-601-版本2.6.6-文青版:/s/1i5Fbi3F YQ-601-版本 2.6.7-文青版:/s/1misAvGW坚果手机(YQ603):YQ-603-版本2.5.3-文青版:/s/1hrjjCRa YQ-603-版本 2.5.5-文青版:/s/1i4ukHu9YQ-603-版本2.6.2-文青版:/s/1gf6rJAb YQ-603-版本 2.6.4-文青版:/s/1pLMq1F9YQ-603-版本2.6.6-文青版:/s/1gf6rJAN YQ-603-版本 2.6.7-文青版:/s/1skYhzadYQ-603-版本 2.5.3-标准版:/s/1jGXNR5GYQ-603-版本2.6.2-标准版:/s/1o7UjNIi YQ-603-版本 2.6.4-标准版:/s/1kV53BiZYQ-603-版本 2.6.6-标准版:/s/1pLGkO8FYQ-603-版本2.6.7-标准版:/s/1i5x0mxf坚果手机(YQ605):移动定制版YQ-605-版本 2.6.2-标准版:/s/1nvbDv7NYQ-605-版本 2.6.4-标准版:/s/1o7UjNOeYQ-605-版本 2.6.6-标准版:/s/1pLNCwhPYQ-605-版本 2.6.7-标准版:/s/1i5g5m9BYQ-605-版本2.6.2-文青版:/s/1hsuKyiC YQ-605-版本2.6.4-文青版:/s/1i4OotkpYQ-605-版本 2.6.6-文青版:/s/1qXZ5v44YQ-605-版本2.6.7-文青版:/s/1eREldSY坚果手机(YQ607):YQ-607-版本 2.0.1-电信版:/s/1hrlvRWKYQ-607-版本 2.5.2-电信版:/s/1dDZqMS5YQ-607-版本 2.5.5-电信版:/s/1gewq3vHYQ-607-版本 2.5.2-全网通:/s/1skvSSmLYQ-607-版本 2.6.α-全网通:/s/1hr5TC6S(内)YQ-607-版本 2.6.β-全网通:/s/1jH9nvuu (内)YQ-607-版本 2.6.2-全网通:/s/1o8KW8TsYQ-607-版本 2.6.4-全网通:/s/1mik2RySYQ-607-版本 2.6.6-全网通:/s/1pLzVNZHYQ-607-版本 2.6.7-全网通:/s/1bO2AvW持续更新中......第三部分:锤友自制桌面主题(仅限T1)绿色主题:浅绿主题:红色主题:粉色主题:木纹主题:草地主题:布料主题:棕色主题:便签主题:多彩主题:小米主题:立体主题:第四部分:美化教程锤子OS界面私人定制化[已经放包了大家可以下载替换] T1开启色彩主题、自动排列桌面图标、翻转动画(非黄钻)QQ空间定制手机标识!逼格更高!无ROOT桌面美化进贴一定会被惊艳宫格桌面下拉悬停背景修改方法第五部分:使用教程刷机失败进不了系统、无限重启等情况的小伙伴往这里看碎屏了咋办?吉米分享锤子T1保修全教程Smartisan T1 的 5 个使用小 Tips更换来电铃声、短信铃声、闹钟铃声教程V4a蝰蛇音效强化HIFI音质、增大锤子音量教程延长手机电池续航掉电快的朋友请进锤子如何连接MacOS系统调试利用网页欢喜云找回遗失的Smartisan T1手机关于通过 adb sideload 安装刷机包的方法Smartisan T1快捷键组合键汇总,总有你不知道的手机端购买意外保修服务和延长保修服务成功开启Google Play完整市场并购买经历锤子手机连接苹果电脑(MAC下)操作指南继续更新中......。
Intel USB4 评估坞站更新手册说明书
Intel USB4 Evaluation Dock Update ManualINFORMATION IN THIS DOCUMENT IS PROVIDED IN CONNECTION WITH INTEL® PRODUCTS. NO LICENSE, EXPRESS OR IMPLIED, BY ESTOPPEL OR OTHERWISE, TO ANY INTELLECTUAL PROPERTY RIGHTS IS GRANTED BY THIS DOCUMENT. EXCEPT AS PROVIDED IN INTEL'S TERMS AND CONDITIONS OF SALE FOR SUCH PRODUCTS, INTEL ASSUMES NO LIABILITY WHATSOEVER, AND INTEL DISCLAIMS ANY EXPRESS OR IMPLIED WARRANTY RELATING TO SALE AND/OR USE OF INTEL PRODUCTS, INCLUDING LIABILITY OR WARRANTIES RELATING TO FITNESS FOR A PARTICULAR PURPOSE, MERCHANTABILITY, OR INFRINGEMENT OF ANY PATENT, COPYRIGHT, OR OTHER INTELLECTUAL PROPERTY RIGHT.A "Mission Critical Application" is any application in which failure of the Intel Product could result, directly or indirectly, in personal injury or death. SHOULD YOU PURCHASE OR USE INTEL'S PRODUCTS FOR ANY SUCH MISSION CRITICAL APPLICATION, YOU SHALL INDEMNIFY AND HOLD INTEL AND ITS SUBSIDIARIES, SUBCONTRACTORS AND AFFILIATES, AND THE DIRECTORS, OFFICERS, AND EMPLOYEES OF EACH, HARMLESS AGAINST ALL CLAIMS COSTS, DAMAGES, AND EXPENSES AND REASONABLE ATTORNEYS' FEES ARISING OUT OF, DIRECTLY OR INDIRECTLY, ANY CLAIM OF PRODUCT LIABILITY, PERSONAL INJURY, OR DEATH ARISING IN ANY WAY OUT OF SUCH MISSION CRITICAL APPLICATION, WHETHER OR NOT INTEL OR ITS SUBCONTRACTOR WAS NEGLIGENT IN THE DESIGN, MANUFACTURE, OR WARNING OF THE INTEL PRODUCT OR ANY OF ITS PARTS.Intel may make changes to specifications and product descriptions at any time, without notice. Designers must not rely on the absence or characteristics of any features or instructions marked "reserved" or "undefined". Intel reserves these for future definition and shall have no responsibility whatsoever for conflicts or incompatibilities arising from future changes to them. The information here is subject to change without notice. Do not finalize a design with this information.The products described in this document may contain design defects or errors known as errata which may cause the product to deviate from published specifications. Current characterized errata are available on request. Contact your local Intel sales office or your distributor to obtain the latest specifications and before placing your product order. Copies of documents which have an order number and are referenced in this document, or other Intel literature, may be obtained by calling 1-800-548-4725, or goto: /design/literature.htm.All information provided related to future Intel products and plans is preliminary and subject to change at any time, without notice.Intel and the Intel logo are trademarks or registered trademarks of Intel Corporation or its subsidiaries in the United States and other countries.* Other names and brands may be claimed as the property of others.Copyright © 2020, Intel Corporation. All rights reserved.Important: Intel USB4 Evaluation Dock should be Powered off (No Power Supply must be Connected to the Board) when updating FW1.Equipment:1.1Dediprog SF600 (used to update the following components on the Intel USB4 EvaluationDock):Goshen Ridge: U8 – GR NVMDelta Bridge: UB10 – DB NVMUSB2.0 Hub: UB6 – USB2 HUB NVMFigure 1: Dediprog SF600SF600 SPI NOR Flash Programmer-Reference Link:https:///product/SF600-Link for downloading software:https:///download?productCategory=SPI+Flash+Solution&productName=SF600+SPI+NOR+Flash+Programmer&fileType=10Figure 2: Test ClipISP Testclip (SO8) (Compatible with SF100)Model Name: ISP-TC-8ISP Testclip (SO8) (Compatible with SF100)Reference Link: https:///product/ISP-TC-81.2Cypress MiniProg4 Program and Debug Kit CY8CKIT – 005 (used for updating thefollowing components):Cypress DMC (J5)Cypress CCG5(J4).Figure 3: Cypress MiniProg4 Program and Debug Kit CY8CKIT – 005-Reference Link: https:///product-detail/en/CY8CKIT-005/428-4713-ND/10314122?utm_medium=email&utm_source=oce&utm_campaign=3103_OCE20 RT&utm_content=productdetail_US&utm_cid=457843&so=64303907&mkt_tok=ey JpIjoiTURjNVlXVTBOekV4TW1aaSIsInQiOiJabjNuUjdzczgxZ0NCdWJBbExnR2k 3czkxNjhhZUVRcEFRdjlGSEZzeVZNNzdHcDRBSnEyYzhwa1F4QUJWS1NUeTJ wcEtXV1Z6d2tlbnpQbHUxamJCU1hqUHNhd3I4c1ZBaEd0WWtBUklLc0VsZ3F5T nc2eVRsYkZubXJrTm14dyJ9-Link for downloading software (Name of software: Download PSoC Programmer3.x.x.exe):https:///documentation/software-and-drivers/psoc-programmer-archiveNote: You need to create an account to able to download softwareNote: You need buy 5 Female to Male External Jumper for connecting.Figure 4: Female To Male Jumper-Reference Link: https:///GenBasic-Female-Solderless-Breadboard-Prototyping/dp/B077N7J6C4/ref=sr_1_7?dchild=1&keywords=male+to+female+jumper+wires&qid=1600894633&sr=8-7ponent Side and Back Side of Intel USB4 Evaluation DockFigure 5: Intel USB4 Evaluation Dock Component SideGR JTAG PA (UFP)DBR JTAGGR NVMCCG5 SWD Headers DMC SWD HeadersTMU CLKOUTFigure 6: Intel USB4 Evaluation Dock Back SideUB6 –USB2 HUB NVM UB10 – DB NVM Pin 0Pin 0Intel USB4 Evaluation Dock BKC File exampleGoshen Ridge: GR_4C_A0_rev9_ GATKES_BOARD.binDelta Bridge: DBR_CDR_ON_BOARD_rev1_NOSEC_sign.binFresco Hub: UB6_RegisterOnly_AddHeader_Merged_INTEL_1U5D_FL5801_1Q1_V02Cypress PD: DMC: CY7C65219‐40LQXIT_dmc_gatkex_creek_sha_3_3_0_1746_1_3_19_120W.hex CCG5: CYPD5235‐96BZXI_gatkex_3_3_1_39_2_8_0_nb.hex3.GoshenRidge FW UpdateExample file: GR_4C_A0_rev9_ GATKES_BOARD.bin-Step 1: Plug Dediprog SF600 flasher to PC-Step 2: Open Dediprog Engineering Application:o Go to Config Menu at the Top→Select Batch Operations(Top Left)→Check the Batch Operation Options is the same as Yellow Hightlight (see Figure 7) -→everything else leave as defaultFigure 7: Batch Operation Options- Step 3: Open U8 – NVM and take out the chip inside (see Figure 8)Figure 8: Chip inside U8 NVM- Step 4: Connect the SPI flash component to flasher (chip inside U8).Note: Make sure pin 0 of the chip is at the white line of the clip (see Figure 9)Figure 9: Connect the SPI Flash component to flasher (U8)- Step 5: Detect → choose First Chip number in the Memory list. (See Figure 10)- Note: If you do not see Memory list after Detect Chip → Please check the Connection between Chip and Test Clip-→Make sure they are connected correctlyPin 0Figure 10: Choose the chip from memory listNote: Majority of the time, the first component in the list is the correct chip.-Step 6: File load Goshen Ridge FW from BKC file bin file (See Figure 11), Select OKFigure 11: Load Intel USB4 Evaluation Dock bin file-Step 7: Batch-Step 8: Wait for all stages are PASS(see Figure 12), and Operation CompletelyFigure 12: All stages are PASSNote:-All stages are PASS only if you choose the correct chip in step 5.-In case you choose the wrong chip in step 5, you will see the following messageFigure 13: Error message after Batch when we choose the wrong chip Troubleshoot:-At Step 5: Detect → choose Second Chip number(W25Q168) of component in the list -Repeat Step 6 to Step 8-If Error:Programming Fail Message still occur→ At Step 5: Detect → choose Third Chip number (W25Q16CL)-Repeat Step 6 to Step 8-Step 9: Put the chip back to U8 GR NVM. Make sure pin 0 is on arrow position of U8 GR NVM .-Figure 14: Arrow Position of U8 GR NVM. Pin0 of Chip will go here4. Delta Bridge FW UpdateExample File: DBR_CDR_ON_BOARD_rev1_NOSEC_sign.bin Delta Bridge FW will be updated into UB10 componentFigure 15: Pin 0 at UB10While Dediprog SF600 flasher connected to PC and Dediprog application open:- Step 1: Connect the SPI flash component to flasher (UB10). Make sure the white linein the test clip connect to pin 0 (see Figure 16)Figure 16: Connect the SPI flash component to UB10-Step 2: Detect → choose First Chip number in the Memory list. (See Figure 17) -Note: If you do not see Memory list after Detect Chip→ Please check Connectionbetween Chip and Test Clip → Make sure they are connected correctlyFigure 17: Choose the chip from memory listNote: For most of the time, the first component in the list is a correct chip.-Step 3: File load Delta Bridge FW from BKC file bin file (See Figure 18)Figure 18: Load Intel USB4 Evaluation Dock bin file-NOTE:You may need to hold test clip to make sure test clip and chip connected. -Step 4: Batch-Step 5: Wait for all stages are PASS (see Figure 19) and Operation Completed.Figure 19: All stages are PASSNote:-All stages are PASS only if you choose the correct chip in step 2.-In the case you choose the wrong chip in step 2, you will see the following messageFigure 20: Error message after Batch when we choose the wrong chip-Troubleshoot:-At Step 3: Detect → choose Second Chip number (W25Q80) of component in the list -Repeat Step 3 to Step 5-If Error:Programming Fail Message still occur→ At Step 2: Detect → choose Third Chip number(W25Q80BL)-Repeat Step 3 to Step 55. Fresco Hub FW UpdateExample File:UB6_RegisterOnly_AddHeader_Merged_INTEL_1U5D_FL5801_1Q1_V02 Fresco Hub FW Update into UB6 componentFigure 21: Pin 0 at UB6While Dediprog SF600 flasher connected to PC and Dediprog application open:- Step 1: Connect the SPI flash component to flasher (UB6). Make sure the white line in the clip connect to bit 0.- Step 2: Detect → choose First Chip number in the Memory list. (See Figure 22) - Note: If you do not see Memory list after Detect Chip → Please check Connectionbetween Chip and Test Clip →Make sure they are connected correctlyFigure 22: Choose the chip from memory listNote: For most of the time, the first component in the list is the correct chip.-Step 3: File load Fresco USB Hub FW from BKC file bin file (See Figure 23)Figure 23: Load Intel USB4 Evaluation Dock bin file-NOTE:You may need to hold test clip to make sure test clip and chip connected. -Step 4: Batch-Step 5: Wait for all stages are PASS (see Figure 24), and Operation CompletelyFigure 24: All stages are PASSNote:-All stages are PASS only if you choose the correct chip in step 2.-In the case you choose the wrong chip in step 2, you will see the following messageFigure 25: Error message after Batch when we choose the wrong chip -Troubleshoot:-At Step 3: Detect → choose Second Chip number(W25Q168) of component in the list -Repeat Step 3 to Step 5-If Error: Programming Fail Message still occur→ At Step 2: Detect → choose Third Chip number(W25Q16CL)-Repeat Step 3 to Step 56. Cypress DMC FW UpdateExample DMC: CY7C65219‐40LQXIT_dmc_gatkex_creek_sha_3_3_0_1746_1_3_19_120W.hex Example CCG5: CYPD5235‐96BZXI_gatkex_3_3_1_39_2_8_0_nb.hex- Step 1: Plug Cypress MiniProg4 Program and Debug Kit CY8CKIT to the PC - Step 2: Connect MiniProg4 to DMC SWD connector (J5).Note: Only flash to the top five header pins of DMC SWD-- - - -Figure 26: DMC Headers (pin 6 to pin 10)-- Note: Make sure jumper connected to SWDIO pin of Cypress MiniProg4 connect toPin 10 at DMC header Cypress Minipro4 PinIntel USB4 Evaluation Dock DMCHeader PinSWDIO Pin 10 SWCLK Pin 9-CLK XRES Pin 8-XRES GND Pin 7-GND VTARG Pin 6-VDD-Step 3: Open Cypress PSOC programmerFigure 27: Cypress PSOC programmerNote: Make sure you see MiniProg4 in Port Selection-Step 4: Load file – DMC FW hex file (It may be inside PD folder from BKC file)Figure 28: Load file-Step 5: ProgramFigure 29: Select program on PSOC Programmer-Step 6: Wait until everything is PASSFigure 30: Wait until everything is PASSNote: If you see FAIL message, you may get the connection wrong between Cypress MiniProg4 and DMC header→ Check connection again at Step 2If connection between Cypress MiniProg4 and DMC header are correct but still get FAIL message→Close PSOC Programmer application and detach/attach MiniProg4 to host and reopen PSOC Programmer.7.Cypress CCG5 FW UpdateCCG5ABCCG5CDFigure 31: CCG5 SWD (J4) ConnectorWhile Cypress MiniProg4 Program and Debug Kit CY8CKIT connected to the PCand Cypress PSOC programmer open:Update CCG5 AB:-Step 1: Connect Cypress MiniProg4 to first CCG5 AB (J4) connectorCypress Minipro4 Pin Intel USB4 Evaluation Dock DMCHeader PinSWDIO Pin 10SWCLK Pin 9XRES Pin 8GND Pin 7VTARG Pin 6--Step 2: Load file – CCG5 FW hex file-Step 3: Program-Step 4: Wait until everything is PASSUpdate CCG5 CD:-Step 1: Connect Cypress MiniProg4 to first CCG5 CD (J4) connectorCypress Minipro4 Pin Intel USB4 Evaluation Dock DMCHeader PinSWDIO Pin 1SWCLK Pin 2XRES Pin 3GND Pin 4VTARG Pin 5-Step 2: Load file – CCG5 FW hex file (the same file for CCG5 AB update)-Step 3: Program-Step 4: Wait until everything is PASSNote: There is only 1 CCG5 file for CCG5 AB and CCG5 CDNote: If you see FAIL message, you may get connection wrong between CypressMiniProg4 and DMC header→ Check connection again at Step 1If connection between Cypress MiniProg4 and DMC header are correct but still get FAIL message→Close PSOC Programmer application and detach/attach MiniProg4 to host and reopen PSOC Programmer.-Step 5: Power Intel USB4 Evaluation Dock。
- 1、下载文档前请自行甄别文档内容的完整性,平台不提供额外的编辑、内容补充、找答案等附加服务。
- 2、"仅部分预览"的文档,不可在线预览部分如存在完整性等问题,可反馈申请退款(可完整预览的文档不适用该条件!)。
- 3、如文档侵犯您的权益,请联系客服反馈,我们会尽快为您处理(人工客服工作时间:9:00-18:30)。
Company Profile
Founded in 2001 by ex-Microsoft engineers Aiming at pervasive networking with world smallest TCP/IP and derivative products Technology oriented, embedded software expertise Public company (JASDAQ NEO, since 2007) Acquired Encirq’s DeviceSQL embedded DBMS in 2008 http://www.ubiquitous.co.jp
Applications QuickBoot Snapshot shell script
Android Application Framework
Standard Lib, Device Drivers Android Lib, Dalvik
QuickBoot Snapshot Driver
QuickBoot BIOS
© 2009 Ubiquitous Corporation
6
How it works
Prioritized restoration of RAM image
Hibernation
Flash memory (process image)
Kernel
Flash memory (process image)
QuickBoot IRA
OS (Linux 2.6)
CPU
IRA: Intelligent Resource Allocator
Eco-friendly Solution
TV, STB and DVR never really turn off
– Because of long boot time
RAM
Kernel
Preferential copying of required data to the RAM
User processes (applications)
Data required for booting
© 2009 Ubiquitous Corporation
7
How it works (cont.)
© 2009 Ubiquitous Corporation
11
Ubiquitous for Android
Link protection for home net stacks OS independent
Small and Fast database engine Faster than SQLite
Boot time (seconds)
Booting is independent of memory size, enabling highspeed booting at all times.
Memory size (MB)
© 2009 Ubiquitous Corporation
9
Block Diagram w/ Android
Hibernation
RAM Image
RAM Image
© 2009 Ubiquitous Corporation
8
Memory size vs Boot time
Hibernation method
Because of simple memory data evacuation and restoration, boot time increases in proportion to memory size.
Ubiquitous Confidential
2
Product Lineup
“Small, Light and Fast “ Network Platform w/ World’s smallest TCP/IP stack Network Platform for Tiny Devices “Small, Light and Fast “ USB Host Platform Small and Fast DBMS for embedded systems Link Protection for home network
→ Ubiquitous QuickBoot ; an ultimate solution for the standby power enable 1 second cold boot
Approx. 10% of house hold power use is devoted to TV-related activity (PG&E in California)
5
DEMO : Boot Android in 1 second
Environment: Android Hardware: Armadillo-500FX CPU: Freescale i.MX31 (ARM11) RAM Image Size: 128MB (Uncompressed, no XIP)
Wireless LAN Solution Instant Boot Solution for Embedded systems
© 2009 Ubiquitous Corporation
3
Examples of Ubiquitous-enabled Products
Portable Games Recorder Car Audio
USB
Host software
4
Ubiquitous QuickBoot
Instant boot solution for embedded systems and MID Android / Linux boots in 1 second!
– And restore to application instantly
• Network access within 5 seconds
– Fast boot regardless of memory size – Unique technology
Announced on November 2009
– Launch SDK in 2010/1H
© 2009 Ubiquitous Corporation
Feb 2010
Kanji Mihara Ubiquitous Corporation
© 2010 Ubiquitous Corporation. All rights reserved.
This presentation is for informational purposes only. Ubiquitous makes no warranties, express or implied, in this summary.
© 2009 Ubiquitous Corporation
12
Kernel User processes (applications)
User processes (applications)
Returns to action after entire image is copied
RAM
Kernel User processes (applications)
TCP/IP + SSL Less than 50KB in code size, combining TCP/IP and SSL stack
Multi-channel
HDTV streaming and upload using DLNA
Fast
and small DBMS “DeviceSQL”