Zimbra 邮件系统安装手册 V1.1(鸿华锐科技)
使用说明和安装说明说明书

R e g i s t e ry o u rn e w d e v i c eo nM y B o s c h no w a n dg e t f r e e b en e f i t s:b o sc h-h o me.c o m/w e l c o m e Warming drawerBIC510N.0W BID510N.0W[en]User manual and installation instructions2 [zh]使用说明和安装说明11en Safety2Table of contentsINFORMATION FOR USE 1Safety.................................................................... 22Preventing material damage ............................... 33Environmental protection and saving en-ergy....................................................................... 34Familiarising yourself with your appliance........ 45Before using for the first time............................. 46Tableware............................................................. 47Basic operation.................................................... 58Preheating tableware........................................... 59Keeping food warm.............................................. 510Cleaning and servicing........................................ 611Troubleshooting................................................... 612How it works......................................................... 713Customer Service. (814)INSTALLATION INSTRUCTIONS (8)14.4Safe installation ...................................................91 SafetyObserve the following safety instructions.1.1 General information¡Read this instruction manual carefully.¡Keep the instruction manual and the product information safe for future refer-ence or for the next owner.¡Do not connect the appliance if it has been damaged in transit.1.2 Intended useThis appliance is designed only to be built into kitchen units. Read the special installation instructions.Only a licensed professional may connect ap-pliances without plugs. Damage caused by in-correct connection is not covered under the warranty.Only use this appliance:¡To keep food warm and to warm cookware.¡In private households and in enclosed spaces in a domestic environment.¡Up to an altitude of max. 4000 m abovesea level.Do not use the appliance:¡On boats or in vehicles.¡with an external timer or a remote control.1.3 Restriction on user groupThis appliance may be used by children aged 8 or over and by people who have reduced physical, sensory or mental abilities or inad-equate experience and/or knowledge,provided that they are supervised or have been instructed on how to use the appliance safely and have understood the resulting dangers.Do not let children play with the appliance.Children must not perform cleaning or user maintenance unless they are at least 15 years old and are being supervised.Keep children under the age of 8 years away from the appliance and power cable.1.4 Safe useWARNING ‒ Risk of fire!The inside of the appliance gets very hot and may cause flammable materials to ignite.▶Never place flammable objects or plasticcontainers in the appliance.WARNING ‒ Risk of burns!The accessories and cookware become very hot during operation.▶Always use oven gloves when removing hot accessories or cookware from the ap-pliance.The inside of the appliance becomes very hot during operation.▶Never touch the inside of the appliance while it is hot.▶Keep children away from the appliance.The appliance becomes hot during operation.▶Allow the appliance to cool down beforecleaning.WARNING ‒ Risk of electric shock!Incorrect repairs are dangerous.▶Repairs to the appliance should only be carried out by trained specialist staff.▶Only use genuine spare parts when repair-ing the appliance.▶If the power cord of this appliance is dam-aged, it must be replaced by trained spe-cialist staff.Preventing material damage en3If the insulation of the power cord is dam-aged, this is dangerous.▶Never let the power cord come into contact with hot appliance parts or heat sources.▶Never let the power cord come into contact with sharp points or edges.▶Never kink, crush or modify the power cord.An ingress of moisture can cause an electric shock.▶Do not use steam- or high-pressure clean-ers to clean the appliance.If the appliance or the power cord is dam-aged, this is dangerous.▶Never operate a damaged appliance.▶Never pull on the power cord to unplug the appliance. Always unplug the appliance at the mains.▶If the appliance or the power cord is dam-aged, immediately unplug the power cord or switch off the fuse in the fuse box.▶Call customer services. →Page 8WARNING ‒ Risk of suffocation!Children may put packaging material over their heads or wrap themselves up in it and suffocate.▶Keep packaging material away from chil-dren.▶Do not let children play with packaging ma-terial.Children may breathe in or swallow small parts, causing them to suffocate.▶Keep small parts away from children.▶Do not let children play with small parts.2 Preventing material damageATTENTION!Excessive weight may damage the appliance.▶The appliance has a maximum load capacity of 15 kg.Moisture may damage the appliance.▶Do not use the appliance to store food and drinks.The humidity of the food may cause corrosion dam-age.3 Environmental protection and saving energy3.1 Disposing of packagingThe packaging materials are environmentally compat-ible and can be recycled.▶Sort the individual components by type and dispose of them separately.en Familiarising yourself with your appliance44 Familiarising yourself with your appliance4.1 ApplianceYou can find an overview of the parts of your appliance here.4.2 ControlsYou can use the control panel to configure all functions of your appliance and to obtain information about the 5 Before using for the first timeConfigure the settings for initial start-up. Clean the ap-pliance and accessories.5.1 Cleaning and heating up the appliance before using it for the first time1.Clean the appliance.2.Remove the accessories.3.Heat up the appliance at 80 °C for one hour.a Smoke development and odour development arenormal.6 TablewareThese instructions help you to avoid damaging your tableware.6.1 Suitable tablewareThe warming drawer has a maximum load capacity of 15 kg. You can use it to preheat the place settings for 6 or 12 people, for example.Drawer – 14 cm Drawer – 29 cm 6 dinner plates 24 cm diameter 12 dinner plates 24 cm diameter 6 soup bowls 10 cm diameter 12 soup bowls 10 cm diameter 1 bowl 19 cm diameter 1 bowl 22 cm diameter 1 bowl17 cm diameter 1 bowl 19 cm diameter 1 meat platter32 cm1 bowl17 cm diameter 2 meat platters32 cmBasic operation en57 Basic operation7.1 Opening the appliance▶Press on the centre of the warming drawer.a The warming drawer pops open and can be pulledout.7.2 Closing the appliance▶Press on the centre of the warming drawer andpush it back in.7.3 Switching on the appliance▶Press .7.4 Switching off the appliance▶Press .7.5 Setting the temperature▶Set the temperature to any value between , and .8 Preheating tablewareFood does not cool down as quickly on preheated tableware. Drinks also remain warm for longer.8.1 Starting the "Preheat tableware"functionWARNING ‒ Risk of burns!Drinking vessels become very hot at high temperat-ures.▶For drinking vessels, set the settings to .1.Place an anti-slip mat at the bottom of the drawer toprevent the tableware scratching the interior surface of the drawer.2.Place the tableware in the warming drawer.‒Distribute the tableware across the entire bottom of the warming drawer to reduce the preheating time.Do not block the ventilation opening with tall items of tableware or stacks of plates. Keeping the ventila-tion opening clear ensures that hot air can circulate efficiently.3.Turn the temperature selector to set the required temperature.A setting of up to is suitable for tableware. For drinking vessels, the settings from to are suit-able.4.Switch on the appliance.a The operation indicator lights up, the applianceheats up and the fan runs.5.Close the warming drawer.Note: The preheating time depends on the material,thickness, quantity and distribution of the tableware.For place settings for 6 people, the preheating time is approx. 15-25 minutes.8.2 Ending the "Preheat cookware" functionWARNING ‒ Risk of burns!The accessories and/or cookware become very hot during operation.▶Always use oven gloves to remove accessories or cookware from the cooking compartment.1.Open the warming drawer.2.Switch off the appliance.3.Remove the cookware.9 Keeping food warmYou can use the warming drawer to keep food warm for a certain period of time.We advise against keeping food warm for longer than an hour. Suitable food includes meat, poultry, fish,sauces, vegetables, side dishes and soups.9.1 Starting the "Keep food warm" functionATTENTION!Hot cookware from the hob damages the anti-slip mat in the warming drawer.▶Never take hot pots and pans off the hob and place them directly on the anti-slip mat.1.Place an anti-slip mat at the bottom of the drawer toprevent the tableware scratching the interior surface of the drawer.The anti-slip mat is food-safe. Dry food can be heated directly on the anti-slip mat in the warming drawer. The anti-slip mat must then be cleaned.2.Place the tableware in the warming drawer.3.Turn the temperature selector to set the required temperature.4.Switch on the appliance.a The operation indicator lights up, the appliance heats up and the fan runs.5.Preheat the tableware for approx. 10 minutes.6.Place food into the preheated tableware.‒Do not completely fill the tableware with food to prevent any content from spilling out when you open and close the warming drawer.‒Cover food which dries out easily with a heat-res-istant lid or aluminium foil.7.Close the warming drawer.en Cleaning and servicing69.2 Ending the "Keep food warm" functionWARNING ‒ Risk of burns!The accessories and/or cookware become very hot during operation.▶Always use oven gloves to remove accessories or cookware from the cooking compartment.1.Open the warming drawer.2.Switch off the appliance.3.Remove the cookware.10 Cleaning and servicingTo keep your appliance working efficiently for a long time, it is important to clean and maintain it carefully.10.1 Cleaning productsYou can obtain suitable cleaning products from after-sales service or the online shop.ATTENTION!Unsuitable cleaning products may damage the sur-faces of the appliance.▶Do not use harsh or abrasive detergents.▶Do not use cleaning products with a high alcohol content.▶Do not use hard scouring pads or cleaning sponges.▶Only use glass cleaners, glass scrapers or stainless steel care products if recommended in the cleaning instructions for the relevant part.▶Wash sponge cloths thoroughly before use.10.2 Cleaning the applianceWARNING ‒ Risk of electric shock!An ingress of moisture can cause an electric shock.▶Do not use steam- or high-pressure cleaners toclean the appliance.WARNING ‒ Risk of burns!The appliance becomes hot during operation.▶Allow the appliance to cool down before cleaning.Requirement: The appliance is switched off.1.Clean the appliance with a damp cloth and a neutral cleaning agent, such as washing-up liquid and wa-ter.2.Dry with a soft cloth.10.3 Cleaning the stainless steel surfaces1.Always remove limescale, grease, starch or albuminstains immediately.Corrosion may form under such stains.2.Clean with water and some washing-up liquid.3.Dry with a soft cloth.10.4 Cleaning the glass front▶Clean the glass front using a glass cleaning productand a soft cloth.‒Do not use any abrasive sponges that may scratch or any glass scrapers.10.5 Cleaning the anti-slip mat1.Remove the anti-slip mat to clean it.2.Clean the anti-slip mat with washing-up liquid.11 TroubleshootingYou can rectify minor faults on your appliance yourself.Read the troubleshooting information before contactingafter-sales service. This will avoid unnecessary costs.WARNING ‒ Risk of injury!Improper repairs are dangerous.▶Repairs to the appliance should only be carried out by trained specialist staff.▶If the appliance is defective, call Customer Service.WARNING ‒ Risk of electric shock!Incorrect repairs are dangerous.▶Repairs to the appliance should only be carried out by trained specialist staff.▶Only use genuine spare parts when repairing the appliance.▶If the power cord of this appliance is damaged, it must be replaced by trained specialist staff.11.1 MalfunctionsFaultCause and troubleshooting The cookware or food is not heating up.There has been a power cut.▶Check whether the lighting in your kitchen or other appliances are working.The appliance is switched off.▶Switch the appliance on.The warming drawer is not completely closed.▶Close the warming drawer.How it works en7FaultCause and troubleshooting The appliance is not working.The circuit breaker is faulty.▶Check the circuit breaker in the fuse box.The cookware or food does not get warm enough.The cookware or food has not been heated for long enough.▶Heat the cookware or the food for a longer period of time.The warming drawer is not completely closed.▶Close the warming drawer.The warming drawer was open for a long time.▶Close the warming drawer.The warming drawer was not adequately preheated.▶Preheat the warming drawer sufficiently.The ventilation opening has been blocked by tableware.▶Remove tall tableware from the ventilation opening.The operation indic-ator light does not light up.The operation indicator light is defective.▶Call the after-sales service. → "Customer Service", Page 8The fuse in the fuse box has blown.The circuit breaker is faulty.▶Pull out the mains plug.▶Call the after-sales service. → "Customer Service", Page 812 How it worksHere, you can find the ideal settings for various dishes as well as the best accessories and cookware. We have tailored these recommendations to your appliance.12.1 Recommended settingsThe following settings have been specially tested for your appliance.Tableware and drinking vessels DishPreheating thePreheating tableware Level InformationDefrosting frozen foods DishPreheating the Preheating tableware LevelInformationen Customer Service 8Warming DishPreheating thePreheating tableware Level InformationmuffinsKeeping warm DishPreheating the Preheating tablewareLevel InformationMelting DishPreheating the Preheating tableware LevelInformationProving dough Dish Preheating thePreheating tableware Level Information trays13 Customer ServiceDetailed information on the warranty period and terms of warranty in your country is available from our after-sales service, your retailer or on our website.If you contact Customer Service, you will require the product number (E-Nr.) and the production number (FD) of your appliance.The contact details for Customer Service can be found in the enclosed Customer Service directory or on our website.13.1 Product number (E-Nr.) and production number (FD)You can find the product number (E-Nr.) and the pro-duction number (FD) on the appliance's rating plate.You can see the rating plate with these numbers when you open the drawer.Make a note of your appliance's details and the Cus-tomer Service telephone number to find them again quickly.14 Installation instructionsObserve this information when installing the appliance.Installation instructions en914.1 Included with the applianceAfter unpacking all parts, check for any transport dam-age and for completeness of delivery.14 cm29 cm14.2 Installation in the cabinetYou will find the dimensions of the appliance here14 cm29 cm14.3 Instructions for the electrical connectionIn order to safely connect the appliance to the elec-trical system, follow these instructions.¡The appliance must only be connected to a protect-ive contact socket that has been correctly installed.Only a qualified electrician may install a socket or replace the connecting cable, taking the appropriate regulations into account.¡The appliance must only be connected with the power cable provided. Connect the power cable to the back of the appliance.¡Connecting cables with various plug types are avail-able from after-sales service.¡No multi-plugs, multiple connectors or extension leads must be used. Overloading causes a risk of fire.¡If the plug can no longer be reached after the in-stallation, a partition must be provided in the phases in the permanent electrical installation in accord-ance with the installation regulations.Follow these safety instructions when in-stalling the appliance.WARNING ‒ Risk of suffocation!Children may put packaging material over their heads or wrap themselves up in it and suffocate.▶Keep packaging material away from chil-dren.▶Do not let children play with packaging ma-terial.WARNING ‒ Risk of electric shock!If the insulation of the power cord is dam-aged, this is dangerous.▶Never let the power cord come into contact with hot appliance parts or heat sources.▶Never let the power cord come into contact with sharp points or edges.▶Never kink, crush or modify the power cord.en Installation instructions10WARNING ‒ Risk of injury!Sharp-edged parts may be accessible during installation.▶Wear protective gloves.14.5 InstallationFitted unitsThis is where you can find information about safe in-stallation.ATTENTION!Covering the ventilation slots and air intake openings causes the appliance to overheat.▶Do not cover ventilation slots and air intake open-ings.If the appliance is installed behind a decorative panel,this may cause it to overheat.▶Do not install the appliance behind a decorative panel.The built-in unit must not have a rear panel behind the appliance.The minimum distance between the wall and the cab-inet base or back wall of the cabinet that is situated above must be complied with.Observe the installation instructions for the appliance installed above.If no intermediate floor is possible above the appliance or above the oven, install tilt protection for the appli-ance. Suitable tilt protection can be obtained from cus-tomer service, on our website or in the online shop.Installing the applianceWARNING ‒ Risk of electric shock!If the insulation of the power cord is damaged, this is dangerous.▶Never let the power cord come into contact with hot appliance parts or heat sources.▶Never let the power cord come into contact with sharp points or edges.▶Never kink, crush or modify the power cord.WARNING ‒ Risk of injury!After removing the transport lock, the drawer may open suddenly during transport.▶Transport the appliance in such a way that the drawer does not accidentally open.The high weight of the appliance may result in injury when lifted.▶Do not lift the appliance on your own.1.Insert the power cord into a protective contactsocket.The power cord must not touch the rear and base of the appliance after installation.2.Insert the appliance.3.Centre the appliance.4.5.Remove and dispose of the protective padding.安全性 zh 11目录使用说明书1安全性 (11)2避免财产损失 (12)3环境保护和节约 (12)4了解机器 (12)5首次使用前 (12)6餐具 (13)7操作基本知识 (13)8预热餐具 (13)9食物保温 (13)10清洁和保养 (14)11处理故障 (14)12工作原理 (15)13客户服务 (16)14安装说明书 (16)14.4安全安装..............................................................171 安全性请注意以下安全注意事项。
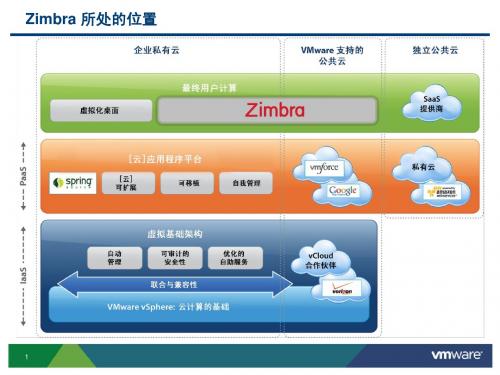
Zimbra 中文介绍
创新
开放
简化
快速的商业增长和动力
上升最快的增长轨迹:5 年半的时间内增长到 5800 万美元 目前是仅次于 Microsoft 和 IBM 的第 3 大邮件提供商
60 55 50 45 40 35 30 25 20 15 10 5 0 1 06Q 2 06Q 3 06Q 4 06Q 1 07Q 2 07Q 3 07Q 4 07Q 1 08Q 2 08Q 3 08Q 4 08Q 1 09Q 2 09Q 3 09Q 4 09Q 1 10Q 2 10Q
文件同步 • Windows、 Mac 和 Linux 中的文件同步 • Microsoft Office 的自动 保存功能
Zimbra 平台
UI 应用程序开发 个人云文件系统 共享和策略 用于移动设备、脱机状态和网络桌面的 API(REST、SOAP)
Zimbra
下一代消息传递与协作的领导者 • 跨平台企业级功能 • 目前最具创意、最先进的 Web 应用程序 用最低的总体拥有成本实现创新、开放和简化 • 创新的联机/脱机用户体验 • 能够与现有投资进行互操作的开放式技术 • 通过最灵活的部署简化管理 • 总体拥有成本比 Exchange 低 35%-50%
每季度付费用户(以百万为单位)
来源:Zimbra 2010 年第 2 季度内部数据
遍布 110 个国家/地区的 Zimbra 客户
大型企业
不动产服务
中小型企业
政府
智利
教育机构
西蒙弗雷泽大学
服务提供商
澳大利亚
南非
产品概述
Zimbra Web 客户端 SOAP Zimbra 实现分级存 储,依靠操作系统实现群 集化
• 在 Linux/Mac OS X 服务器 上运行 Zimbra
Zimbra邮件系统安装配置
1.YUM源配置由于Zimbra安装时需要依赖很多红帽子系统安装光盘的安装包,我们最好是将RHEL安装好之后,搭建本地yum源。
方便以后软件的安装。
编辑vim /etc/yum.repos.d/rhel-source.repo添加以下配置内容:[rhel-media-resource]name=RHEL Media Resourcebaseurl=file:///media/Serverenabled=1gpgcheck=1gpgkey=file:///etc/pki/rpm-gpg/RPM-GPG-KEY-redhat-beta,file:///etc/pki/rpm-gpg/RPM-GPG-KEY-redhat-release将RHEL系统安装光盘上传到服务器或是插入光驱:ISO镜像文件挂在方法:mount -o loop ISO镜像文件路径/media/通过光驱挂在系统光盘:mount /dev/cdrom /media/注意点:如果系统光盘挂载的路径不通,需要更改baseurl= file:///后面的值,Server是必须写的。
Yum源测试方法:2.DNS服务器安装配置:2.1.安装DNS:yum源仓库建立成功之后,通过yum安装DNS方法:yum install bind根据提示输入Y,确定安装或证书验证。
2.2.配置DNS由于我们没有安装bind-chroot,Bind的所有配置文件都在/etc/下面,区域文件都在/var/named下面。
2.2.1.修改DNS配置文件编辑/etc/named.conf删除以下两行:listen-on port 53 { 127.0.0.1; };listen-on-v6 port 53 { ::1; };修改以下配置:allow-query { localhost; };修改成allow-query { any; };2.2.2.添加区域配置:添加区域配置:在/etc/named.rfc1912.zones添加域名的区域配置:内容如下:zone "" IN {type master;file ".zone";};将/var/named/下的named.localhost文件复制一份,文件名更改为.zone。
Foxmail配置zimbra

2. 在弹出的对话框中输入用户邮箱和密码,然后单击击“手动设置”
3. 接收服务器类型选择“IMAP”,并输入 IMAP 和 SMTP 服务器的信息,让后单击“创建”
IMAP 服务器 : 端口:993 安全类型 :SSL/TLS(接受所有证书) SMTP 服务器 : 端口:25 安全类型 :无户手册
▬▬▬▬▬▬▬▬▬▬▬▬▬▬▬▬▬▬▬▬▬▬▬▬▬▬▬▬▬▬▬▬▬▬▬
4. 出现如下界面,说明 foxmail 已经配置完成。
Foxmail 配置 zimbra 邮箱
用户手册
▬▬▬▬▬▬▬▬▬▬▬▬▬▬▬▬▬▬▬▬▬▬▬▬▬▬▬▬▬▬▬▬▬▬▬
至此,在 Android(安卓)手机上使用 Exchange 方式配置 zimbra 邮箱完成。
foxmail配置zimbra邮箱用户手册打开foxmail客户端点击新建账号接收服务器类型选择imap并输入imap和smtp服务器的信息让后单击创建imap服务器
Foxmail 配置 zimbra 邮箱
1. 打开 Foxmail 客户端,点击“新建账号”
用户手册
▬▬▬▬▬▬▬▬▬▬▬▬▬▬▬▬▬▬▬▬▬▬▬▬▬▬▬▬▬▬▬▬▬▬▬
Yireo EmailTester 安装与用户指南说明书

Yireo EmailTesterInstallation & User GuideThis document helps you to install the Magento extension EmailTester in your Magento 2 environment. If you need any help along the way, feel free to contact us via *****************. We are happy to help out to get you started quickly.InstallationWe are assuming here that the extension has already been purchased via the Magento Marketplace, which should have added the right permissions to install this extension via composer. First of all, the composer package should be installed via the following commands:$ composer require yireo/magento2-emailtester2After this command has succeeded, a new folder vendor/yireo/magento2-emailtester2 should be present with all module files. Now you can activate this module with the following commands:$ ./bin/magento module:enable Yireo_EmailTester2$ ./bin/magento setup:upgradeIf your site is running in Production Mode, make sure to recompile the DI files and also re-run static content deployment.Preparation for usageTo use this extension, you will need to have relevant data in your Magento store. Usually, this means that you are working with a live Magento site that already contains customers, products and orders.If you are using this extension with a demo installation of Magento, make sure to install the sample data before using this extension. This extension requires existing customers, products and orders to work.$ ./bin/magento sampledata:deployUsageOnce the extension is enabled, it adds a new page in the Magento Admin Panel under the menu Marketing > Communications > Yireo EmailTester.The menu brings you to the form page.On this page, you can enter details to preview a specific Magento transactional emails or send this email to a specific inbox of your choice.Step 1: Configure a Customer, Product and OrderMake sure to select a value for:• A Customer ID• A Product ID•An Order IDBy supplying details for these entities, the EmailTester extension is able to derive all other relevant information so that transactional emails will present actual data.For each entity, a text box on the left allows you to enter a numeric value. The preview box on the right fetches the relevant information on that ID. For instance, when entering a product ID 2, the name and SKU of that product will be shown in the preview box.To make things easier, you can also use the Search button, which opens up a new modal window that allows you to search for values in a more user-friendly way. Step 2: Pick your emailIn the form, you can pick an Email Template of your choice. Please note that only transactional emails that are using the Magento email system are shown. Within the form, you can also select the relevant Store View, for instance when your store is multilingual.Step 3: Send or previewNext, two buttons bring everything into action: The button Send will actually send an email via the Magento email system to the given email address (configured in the field Mail To).Alternatively, you can open up the email in a new browser tab by using the Preview button, so you can modify the email content as a developer and preview the results quickly.Advanced: Store ConfigurationSome of the values on the form page can be prefilled by using the Store Configuration. To access these configuration values, navigate in the backend menu to Stores > Configuration > Yireo > Yireo EmailTester.The following configuration values exist:•Default Email Sender: From which email address to send the transactional email when using the Send button on the EmailTester form page.•Default Email Target: To which email address when using the Send button on the EmailTester form page.•Default Transactional Email: Which mail should be shown by default on the EmailTester form page.•Default Product: The database ID of the product to be selected by default on the EmailTester form page.•Default Customer: The database ID of the customer to be selected by default on the EmailTester form page.•Default Sales Order: The database ID of the order to be selected by default on the EmailTester form page.•Debug: Enable debugging of various things. For support purpose only.Need help?If you need any help getting started, or if you have any suggestions (like feature improvements or bugfixes), you can reach out to us via email **************.。
在Ubuntu下基于zimbra轻松建立自己公司的邮件办公系统
在Ubuntu下基于zimbra轻松建立自己公司的邮件办公系统[日期:2009-06-23] 来源:/ericden 作者:ericden1、前提条件:Ubuntu系统已经安装完毕;并未安装邮件系统;2、安装需要的软件:sudo apt-get install libc6-i686 sudo libidn11 curl fetchmail libgMP3c2 libexpat1 libgetopt-mixed-perl libxml2 libstdc++6 libpcre3 libltdl3 ssh3、获取zimbra:wget/downloads/5.0.2_GA/zcs-5.0.2_GA_1975.DEBIAN4.0.20080130234700.t gztar xvfz zcs-5.0.2_GA_1975.DEBIAN4.0.20080130234700.tgz4、开始安装./install.sh -l要同意协议Install zimbra-ldap [Y] YInstall zimbra-logger [Y] YInstall zimbra-mta [Y] YInstall zimbra-snmp [Y] YInstall zimbra-store [Y] YInstall zimbra-apache [Y] YInstall zimbra-spell [Y] YInstall zimbra-proxy [N] NThe system will be modified. Continue? [N] Y主菜单:可以按项配置1) Common Configuration:2) zimbra-ldap: Enabled3) zimbra-store: Enabled+Create Admin User: yes+Admin user to create: admin@******* +Admin Password UNSET+Enable automated spam training: yes+Spam training user: spam.m0bqyoayc@+Non-spam(Ham) training user: ham.ygch0qyz1@+Global Documents Account: wiki@+SMTP host: +Web server HTTP port: 80+Web server HTTPS port: 443+Web server mode: http+IMAP server port: 143+IMAP server SSL port: 993+POP server port: 110+POP server SSL port: 995+Use spell check server: yes+Spell server URL: :7780/aspell.php4) zimbra-mta: Enabled5) zimbra-snmp: Enabled6) zimbra-logger: Enabled7) zimbra-spell: Enabled8) Default Class of Service Configuration:r) Start servers after configuration yess) Save config to filex) Expand menuq) QuitAddress unconfigured (**) items (? - help)5、启动:zmcontrol start6、查看状态:zmcontrol status7、其它:看zimbra相关文档安装非常简单,同时配置也非常丰富、完善。
Zimbra 使用说明书

Zimbra使用说明书一、Zimbra邮箱可以用2种方式登录1.Zimbra Desktop;2.Webmail。
二、关于账号和密码1、Zimbra Desktop和Webmail的账号和密码是一致的;2、Zimbra Desktop在第一次登录账号后,下一次无需输入账号和密码就可以直接进入界面;Webmail就需要输入密码和账号;3、密码修改:只能在webmail上修改(登录webmail后,在用户界面右边可以看见自己的ID,点击下拉三角图标 后点“变更密码”,输入新密码后再点“变更密码”进行确认。
)三、Zimbra操作1、“邮箱”菜单:(1)新建邮件:A.可在“收件人”中搜索邮件ID或自己手动输入邮箱ID。
第一次输入邮件ID后邮箱的默认地址簿会自动记录该ID,下次输入该联系人会自动弹出其邮件ID(注:如果第一次输入的ID 是错误的,地址簿同样会记录下来,需要手动去默认地址簿中删除该ID)B.“抄送”:BCC功能(密抄) 该功能可以秘密抄送邮件给收件人,在邮件中不会显示密抄内收件人的名字C.“主题”:可以设置优先级D.“附加”:可以在附件中添加个人文件、联系人的通讯录和自己邮箱里面的邮件(注:附件总量最大为10M,超过10M会自动关闭附件或发送邮件时无法发送出去)E.“发送邮件”:a.直接发送b.以后发送:可以定时在某个时间段发送文件(注:该功能限制开启)F.“读信回条”:在“选项”中选择“要求提供读信回条”时,只要对方没关闭读信回条的选项,收件人收到邮件后会回发一封邮件给发件人(2)新建联系人:可以自定义邮箱联系人到邮箱地址簿中,同时可以将联系人规划到群组中(注:类似于建立一个个人名片)(3)新建联系人组:将现有的公司内部邮箱或者自己定义的外面的邮箱加入群组中(注:新建联系人组会存放在地址簿内,可以对这些组别进行不同地址簿的移动或对组别进行重新编辑或添加标签到组别上以方便搜索)内部邮箱外面邮箱(4)新建约会:可以将约会的行程(包括地址、时间、对象(必须参加与可选参加)和详细的会议内容)发送到相关人员;同时可以设置提醒时间,等到时间到了会自动提醒对方(5)新建任务:可设置私人工作任务的内容、时间、优先级及完成进度。
戴尔易安信系统管理工具和文档安装指南说明书
Dell EMC Systems Management T ools And Documentation Installation GuideVersion 9.1.2Notes, cautions, and warningsNOTE: A NOTE indicates important information that helps you make better use of your product.CAUTION: A CAUTION indicates either potential damage to hardware or loss of data and tells you how to avoid the problem.WARNING: A WARNING indicates a potential for property damage, personal injury, or death.© 2018 Dell Inc. or its subsidiaries. All rights reserved. Dell, EMC, and other trademarks are trademarks of Dell Inc. or its subsidiaries. Other trademarks may be trademarks of their respective owners.2018 - 09Rev. A001 About (4)Systems Management software (4)Managed system and management station (4)Systems Management Tools and Documentation software (5)Managed system software (5)Management station software (5)DTK Deprecation Message (7)2 Installing management station software on Microsoft Windows (8)Installing management station software on Microsoft Windows Server and Hyper-V Server (8)Installing management station software using the CLI mode (8)Uninstalling management station software using the CLI mode (9)3 Installing management station software on supported Red Hat Enterprise Linux, SUSE Linux Enterprise Server (10)Contents3About The Systems Management T ools and Documentation Installation Guide provides an overview of the management station software and installation instructions for the same. For information on installing Server Administrator, see the Dell EMC Server Administrator Installation Guide in the Dell EMC Systems Management T ools and Documentation software.Systems Management softwareThe systems management image comprises of the three software's mentioned below:•Systems Management T ools and Documentation•Server Updates•Management ConsoleYou can download the free ISO image of the software's from /support.NOTE: If you require the software DVD's, you must opt-in to purchase the software DVD's at the time of order or after point of sale.For information on systems that support systems management software, supported operating systems, and components, see Dell EMC OpenManage Systems Software Support Matrix at /openmanagemanuals.Topics:•Managed system and management station•Systems Management T ools and Documentation softwareManaged system and management stationDepending on the way you use the systems management tools, you can classify the systems as:•Managed SystemA managed system is any system that is monitored and managed using Server Administrator or Management Console. A ServerAdministrator is one of the systems management tools on the Systems Management T ools and Documentation software. You can manage systems running Server Administrator locally or remotely through a supported web browser. For more information on Server Administrator, see the Server Administrator User's Guide on the Systems Management T ools and Documentation software.•Management StationA management station is a laptop, desktop, or server that you use to remotely manage one or more managed systems from a centrallocation. You can use tools such as:–Intelligent Platform Management Interface (IPMI) Utilities–Remote Access Controller (RAC) tools–Dell OpenManage Essentials or Server Administrator Web Server1 4AboutSystems Management Tools and Documentation softwareThe Systems Management T ools and Documentation software contains the systems management software. The systems management software helps you to manage the systems by monitoring the system components, diagnosing issues, notifying through alerts, and troubleshooting remotely. Systems management software is classified into managed system software and management station software.Managed system softwareThe following applications include the managed system software:•Server AdministratorServer Administrator provides comprehensive one-to-one in-band server managements solutions to manage a server locally and remotely using a web browser-based Graphical User Interface (GUI) and Command Line Interface (CLI). Server Administrator installs server-specific Remote Access Card (RAC) and network interface management components.NOTE: When you perform a fresh installation on a system running a 64-bit operating system, a 64-bit version of the Server Administrator is used for the installation. If you want to upgrade Server Administrator, a 32-bit version of the ServerAdministrator is used for the upgrade.•Local Remote Access ControllerLocal Remote Access Controller enables the system to receive email alerts for warnings or errors related to voltage, temperature, and fan speed. Remote Access Controller also logs event data and the most recent crash screen (available only on systems running Microsoft Windows operating system) to help you diagnose the probable cause of a system crash.Management station softwareThe following applications include the management station software that you can install using the Systems Management T ools and Documentation software:•Active Directory Snap-InThe Active Directory (AD) Snap-In utility provides an extension snap-in to the Microsoft Active Directory to manage AD objects specific to products on this software.•BMC/IPMI UtilitiesBMC Management Utility (BMU) is a utility that provides remote management and configuration of systems equipped with a Baseboard Management Controller (BMC) or iDRAC using the IPMI protocol. IPMI utilities are CLI-based management station software.For more information on BMU, see the Baseboard Management Controller Utilities User's GuideNOTE: Only 32–bit installer is available.•RAC ToolsThe RAC console is a management station software designed to provide remote management capabilities for the systems. You can remotely connect to the RAC hardware and access the RAC features either by using a web browser or the RACADM Command Line Interface (CLI). RACADM CLI is the command-line user interface to the RAC.You can install RAC either on the managed system or on the management station.For information on installing RAC on the managed system, see the Server Administrator Installation Guide. For information on installing on the management station, see Installing Management Station Software on Windows. For more information on RAC, see the Remote Access Controller User's Guide.•Dell Lifecycle ControllerAbout5Dell recommends using the Embedded Management, Integrated Dell Remote Access Controller 8 (iDRAC8) with Lifecycle Controller instead of Dell Systems Build and Update Utility (SBUU). SBUU is replaced with Lifecycle Controller on Dell’s 13th generation of PowerEdge servers. iDRAC with Lifecycle Controller is an Embedded Systems Management application for operating systemdeployment and lifecycle management of PowerEdge servers. You can access Dell Lifecycle Controller by pressing <F10> during system boot up. The local GUI of iDRAC8 with Lifecycle Controller allows you to do the following in a pre-OS environment:–Hardware configuration–Operating system and hypervisor deployments–Hardware updates–Hardware diagnostics–Easy maintenance of PowerEdge serversThe Lifecycle Controller is embedded on all Dell’s 11th generation and later PowerEdge servers. No tools or downloads are required to use the capabilities of Lifecycle Controller.For more information, see the following documents available at /support/manuals:–Dell Lifecycle Controller Version <Version Number> User's Guide–Dell Lifecycle Controller Remote Services Version <Version Number> Quick Start Guide–Dell Lifecycle Controller Web Services Interface Guide–Lifecycle Controller Integration Best Practices•Dell OpenManage EssentialsDell recommends using Dell OpenManage Essentials as replacement for IT Assistant. Dell OpenManage Essentials (OME) provide improved capabilities such as:–Discovering and inventorying the systems.–Monitoring systems’ health.–Viewing and managing system alerts.–Performing system updates.–Viewing hardware inventory and compliance reports.For more information regarding Dell OpenManage Essentials, contact service provider.•iDRAC Service ModuleThe iDRAC Service Module is a lightweight optional software application that can be installed on a Dell’s 12th generation and later PowerEdge servers. Using the iDRAC Service Module you can configure the features on the supported operating system. The iDRAC Service Module provides additional Server Management data to iDRAC and presents one-to-many consoles with access to Systems Management data through OS interfaces.The iDRAC Service Module also complements the iDRAC interfaces such as the GUI, RACADM CLI, and WSMAN with additional monitoring features. For more information, see iDRAC Service Module <Version Number> Installation Guide available at / support/home.•Dell OpenManage Deployment T oolkit (DTK)The Dell OpenManage Deployment T oolkit (DTK) includes a set of utilities, sample scripts, and sample configuration files that you can use to deploy and configure the Dell systems. You can use DTK to build script-based and RPM-based installation for deploying large number of systems on a pre-operating system environment in a reliable way, without changing their current deployment processes.Using DTK you can install operating systems on Dell systems in BIOS or Unified Extensible Firmware Interface (UEFI) mode.In addition to the command-line utilities used to configure various system features, DTK also provides sample scripts and configuration files to perform common deployment tasks and documentation. These files and scripts describe the use of the DTK in Microsoft Windows Pre-installation Environment (Windows PE) and Linux environments. For more information, see the following documents available at /openmanagemanuals:–Dell OpenManage Deployment T oolkit Version <Version Number> User's Guide6About–Dell OpenManage Deployment T oolkit Version <Version Number> Command Line Interface Reference Guide–Dell OpenManage Deployment T oolkit Version <Version Number> Installation GuideDTK Deprecation MessageThe OpenManage Deployment T oolkit (DTK) along with the associated tools and capabilities will be deprecated for version 6.1 and later:•Redundant Array of Independent Disks Configuration (RAIDCFG) Utility•System Configuration (SYSCFG) Utility•ELI tool•Utility Partition (UPINIT)It is recommended to use the RACADM Command Line (CLI) as a replacement for the RAIDCFG and SYSCFG utilities. For more information on downloading RACADM, see .NOTE: DTK will continue to support any new hardware or operating system for the 14th generation of PowerEdge servers.However, support for later generations of PowerEdge servers will be deprecated. For more information about features supported by DTK, see the latest User's Guide available at /openmanagemanuals .About7Installing management station software onMicrosoft Windows1Log on with administrator privileges to the system on which you want to install the management station applications.2 Mount the Systems Management T ools and Documentation software onto the DVD drive or download the web installer.NOTE:You can download the web installer from /support/home.3 Run autorun.exe .NOTE: If you are using the DVD to install, select the management station application that you want to install, and then clickInstall.4 Follow the instructions in the Install Wizard.NOTE: You cannot install remote RAC (RAC installed on the management station) and local RAC (RAC installed on themanaged system) on the same system.Installing management station software on Microsoft Windows Server and Hyper-V ServerWindows Server or Hyper-V Server operating system does not support a graphical user interface (GUI) based installation of the softwarecomponents. Install the software in CLI mode on Server Core. For more information on Server Core, see the Microsoft website.NOTE: Log in as a built-in Administrator to install systems management software on Windows Server and Windows client operating system. For more information on built-in Administrator account, see the Windows Server Help.Installing management station software using the CLI modeNOTE: Run the Command Prompt as an administrator to successfully perform tasks using the CLI mode.To install the RAC T ools, launch the MSI file using the command:•msiexec /i RACTools_x64.msiNOTE: On the Systems Management Tools and Documentation software:•The RACT ools_x64.msi file is located at SYSMGMT\ManagementStation\windows\DRACx64•DRAC tools provide local and remote management capabilities for system equipped with iDRAC.NOTE:The DRAC tools upgrade fails when you try to upgrade to 9.1.2 from any previous versions. However, the DRAC tools upgrade to 9.1.3 is supported. Therefore, it is recommended to upgrade to 9.1.3 from any previous versions. You can also uninstall the previous version and can do a fresh install of DRAC tools 9.1.2.To install BMU, launch the MSI file using the command:msiexec /i BMC.msi28Installing management station software on Microsoft WindowsNOTE: Only 32–bit installer is available.NOTE: The BMC.msi file is located at SYSMGMT\ManagementStation\windows\BMC on the Systems Management Tools andDocumentation software.To install Active Directory Snap-In, launch the MSI file using the command:•msiexec /i ADSnapIn_x64.msiNOTE: On the Systems Management Tools and Documentation software:•The ADSnapIn_x64.msi file is located at SYSMGMT\ManagementStation\windows\ADSnapInx64To install the localized version of the management station software, at the command prompt type the following: msiexec / I<management_station_software>.msi TRANSFORMS= <languauge_transform>.mstNOTE: Replace <language_transform>.mst with the appropriate language file:•1031.mst (German)•1034.mst (Spanish)•1036.mst (French)•1041.mst (Japanese)•2052.mst (Simplified Chinese)Uninstalling management station software using the CLI mode T o uninstall management station software, run the commands as listed in the table below.T able 1. Commands to uninstall management station softwareInstalling management station software on Microsoft Windows9Installing management station software onsupported Red Hat Enterprise Linux, SUSE LinuxEnterprise ServerOnly RAC tools and BMU are supported on the Red Hat Enterprise Linux, SUSE Linux Enterprise Server, and VMware ESXi Server operating systems.On systems running Red Hat Enterprise Linux operating system, DVDs are auto-mounted with the -noexec mount option. This option does not allow you to run any executable from the DVD. You must mount the DVD-ROM manually and then run the executables.To install BMU, navigate to the SYSMGMT/ManagementStation/linux/bmc directory and install the BMU RPM specific to the operating system as follows:•For systems running Red Hat Enterprise Linux, type rpm -ivh osabmcutil*-RHEL-*.rpm •For systems running SUSE Linux Enterprise Server, type rpm -ivh osabmcutil*-SUSE-*.rpmTo install the latest version of RAC T ools:1Uninstall the existing IPMI tool:aQuery the existing IPMI tool: rpm -qa | grep ipmitool If the IPMI tool is already installed, the query returns ipmitool-x.x.xx-x.x.xx .b T o uninstall the IPMI tool:•On systems running SUSE Linux Enterprise Server and VMware ESXi Server, type rpm -e ipmitool-x.x.xx-x.x.xx •On systems running Red Hat Enterprise Linux 6.x, type rpm –e ipmitool •On systems running Red Hat Enterprise Linux 7.x, type rpm –e OpenIPMI-toolsNOTE:The settings made by the existing IPMITOOL is retained.2Browse to the SYSMGMT/ManagementStation/linux/rac/<OS> directory and then type rpm -ivh *.rpm310Installing management station software on supported Red Hat Enterprise Linux, SUSE Linux Enterprise Server。
- 1、下载文档前请自行甄别文档内容的完整性,平台不提供额外的编辑、内容补充、找答案等附加服务。
- 2、"仅部分预览"的文档,不可在线预览部分如存在完整性等问题,可反馈申请退款(可完整预览的文档不适用该条件!)。
- 3、如文档侵犯您的权益,请联系客服反馈,我们会尽快为您处理(人工客服工作时间:9:00-18:30)。
开源的全ssassin
反垃圾邮件过滤器
Amavisd-new
在 MTA 和内容过滤器之间提供接口
深圳市鸿华锐科技有限公司
第6页
Tel:0755-88855786 89806658 Fax:0755-89810769 82912756
5.1 zimbra 垃圾邮件过滤方案............................................ 19
5.1.1 zimbra 垃圾邮件过滤(1)提高本域权值,提高特定域名权值 ......................... 19 5.1.2. zimbra 垃圾邮件过滤(2)白名单,黑名单 ......................................... 20 5.1.3. zimbra 垃圾邮件过滤(3)关键字过滤............................................ 20 5.1.4. zimbra 垃圾邮件过滤(4)使用 rbl 列表配置 ...................................... 21
1.1 Zimbra 简介 ......................................................... 5 1.2 zimbra 体系结构 ..................................................... 6
1.2.1 Zimbra 包含的组件 .............................................................. 6 1.2.2 Zimbra 软件包 .................................................................. 7 1.2.3 磁盘结构 ....................................................................... 8
鸿华锐(Grandtec)您身边 IT 专家,为您缔造最优服务!
James/Sieve
用于建立电子邮件的过滤规则
Zimbra 邮件系统安装手册
1.2.2 Zimbra 软件包
ZCS 包括如下应用程序包:
Zimbra Core
包括核心的类库、实用工具、监控工具和基本的配置文件
Zimbra LDAP
ZCS 使用开源的 OpenLDAP 作为目录服务,实现用户身份验证功能。每个账号都有一个唯一的邮
应代码外其它的都是第三方的开源软件,所以不存在版权问题。例如 MTA 用的是 Postfix,相应的病
毒和过滤模块用的是 Clamav 和 Amavisd,而反垃圾用的是 DSPAM;如果想了解更多关于 Linux 邮件系
统搭建的信息可以参考:。
深圳市鸿华锐科技有限公司
箱 ID 作为账号的主要身份编号。ZCS 中使用的 OpenLDAP 已经经过定制。
ZimbraMTA
Postfix 是一个开源的 MTA 程序,通过 SMTP 协议接收邮件,并通过 LMTP 协议将邮件传递到合
适的 Zimbra 邮箱服务器中。Zimbra MTA 包中还包括防病毒软件和反垃圾邮件软件。
表列示,并且会在安装过程中被安装。所有的这些组件都已经经过测试和配置,可以和 Zimbra 工作
得很好。
名称
描述
Jetty
Zimbra 的软件运行时需要的 Web 服务器
Postfix
一个开源的邮件传输代理(MTA)
OpenLDAP
一个开源的目录服务软件,提供用户的验证服务
MySQL
数据库软件
Lucene
可选择性地安装于一台邮箱服务器上。这个组件用于 syslog 的聚合和报表。如果未安装,则无
5.11 zimbra 修改记录分享 ............................................... 30 5.12 Zimbra Server Memory Tuning ...................................... 38 5.13 改变 Zimbra WebMail 的 Default Port ................................ 39 5.14 磁盘空间警示设定 .................................................. 40 5.15 设定 POP3/IMAP PollingInterval .................................... 40 5.16 ZCS 与 CAS(Central Authentication Service)单点登录系统的集成 .... 42
第5页
Tel:0755-88855786 89806658 Fax:0755-89810769 82912756
鸿华锐(Grandtec)您身边 IT 专家,为您缔造最优服务!
Zimbra 邮件系统安装手册
1.2 zimbra 体系结构
1.2.1 Zimbra 包含的组件
Zimbra 架构中包括对使用标准协议的开源项目的整合。包括在 Zimbra 中的第三方的软件如下
深圳市鸿华锐科技有限公司
第7页
Tel:0755-88855786 89806658 Fax:0755-89810769 82912756
鸿华锐(Grandtec)您身边 IT 专家,为您缔造最优服务!
Zimbra Logger
Zimbra 邮件系统安装手册
三、安装 Zimbra............................................................15
四、配置 Zimbra............................................................19
五、FAQ ...................................................................19
5.2 ldap zimbra Ldapadmin ............................................. 22 5.3 如何更改登录页面?添加文字或修改色彩 ............................... 22 5.4 如何导出现有用户 ................................................... 22 5.5 邮件归档设置 ....................................................... 22 5.6 zimbra 的系统配置 .................................................. 23 5.7 zimbra 添加白名单 .................................................. 25 5.8 outlook 整合 zimbra,ldap 通讯录 .................................... 25 5.9 zimbra 使用 MySQL-Front 访问数据库 查询密码 ......................... 26 5.10 ZIMBRA 命令行方式常用的操作 ....................................... 26
深圳市鸿华锐科技有限公司 Zimbra 邮件系统 安 装 手 册
2011-04-05
日期
2010-12-08 2011-03-25
修订历史记录
版本
说明
V1.0 安装手册
V1.1 功能修定
作者
Freeke Freeke
文档编号:GITS-FA-20110411A003
目
录
一、
Zimbra 简介 .......................................................5
二. 安装环境 ...............................................................9
2.1、安装环境 .......................................................... 9 2.2、准备工作 .......................................................... 9 2.3、DNS 环境 .......................................................... 14 2.4 防火墙配置 ........................................................ 15
的服务器软件。那 么,Yahoo Zimbra 可以满足你的要求。Zimbra 有两种类型软件。一种是 Desktop,
可以收发邮件,管理 RSS 订阅,有完备的通讯录,完全可以和 Outlook 媲美。当然,还有一个优点,
就是完全免费。我试用了一下,界面简洁,使用方便—-特别是配置邮箱的时候。 Zimbra Desktop 能
FireFox、Safari、IE 浏览器里,并且能与网络门户、商业应用及 VoIP 等服务进行整合或混合应用。
同时 Zimbr 也是一家提供专业电子邮件的软件开发供应商,主要提供 Zimbra Desktop 邮件管理软件。
如果你是一个网络管理员,因为版权的原因,也行你在苦苦寻找一个能替代 Microsoft Exchange
自动识别大多数免费邮箱 ISP。比如对于 Gmail,你只要输入帐号和密码,它能自动配置相关的 pop、