实训名称:浮动静态路由
浮动静态路由备份链路

浮动静态路由【实验目的】通过本实验可以掌握浮动静态路由原理、配置以及备份应用。
掌握浮动静态路由的作用:用于路由的备份。
【实验要求】现在有2台路由器,R1和R2相连,R1和R2既有串口相连,也有百兆以太网口相连。
有这样的策略,不至于路由器的串口坏了,网络处于断开状态。
我们在路由器的串口上运行RIP 协议,在路由器的以太口上运行静态路由,但是我要在路由的所有接口都是好的情况下,网络上的数据包从路由器的串口上走,因为在一切都没有改动下,网络上的数据包只会走路由器的以太口,因为静态路由的优先级高于RIP 协议,所以我们要改动静态路由的默认管理距离。
本实验通过修改静态路由的管理距离为 130,使得路由器选路的时候优先选择 RIP ,而静态路由作为备份。
【实验拓扑】1).配置R1和R2各个接口的IP 地址R1(config)#int lo0R1(config-if)#ip add 1.1.1.1 255.255.255.0R1(config)#int s0/0R1(config-if)#ip add 192.168.12.1 255.255.255.0R1(config-if)#clock rate 64000R1(config-if)#no shR1(config)#int f0/0R1(config-if)#ip add 192.168.21.1 255.255.255.0R1(config-if)#no shR2 (config)#int lo0R2(config-if)#ip add 2.2.2.2 255.255.255.0R2(config)#int s0/0R2(config-if)#ip add 192.168.12.2 255.255.255.0R2(config-if)#no shR2(config)#int f0/0R2(config-if)#ip add 192.168.21.2 255.255.255.0R2(config-if)#no sh1).配置路由器 R1R1(config)#ip route 2.2.2.0 255.255.255.0 192.168.12.2 130 //将管理距离设置为 130 R1(config)#router ripR1(config-router)#version 2 S0/0 S0/0 192.168.21.0/24 F0/0 R1 R2Lo0:1.1.1.1/24 Lo0:2.2.2.2/24 F0/0 192.168.12.0/24R1(config-router)#no auto-summaryR1(config-router)#network 1.0.0.0R1(config-router)#network 192.168.21.02).配置路由器R2R2(config)#ip route 1.1.1.0 255.255.255.0 192.168.12.1 130R2(config)#router ripR2(config-router)#version 2R2(config-router)#no auto-summaryR2(config-router)#network 192.168.21.0R2(config-router)#network 2.0.0.04.实验调试(1)在R1 上查看路由表:R1#show ip routeC 192.168.12.0/24 is directly connected, Serial0/0/01.0.0.0/24 is subnetted, 1 subnetsC 1.1.1.0 is directly connected, Loopback02.0.0.0/24 is subnetted, 1 subnetsR 2.2.2.0 [120/1] via 192.168.21.2, 00:00:25, f0/0C 192.168.21.0/24 is directly connected, f0/0从以上输出可以看出,路由器将RIP 的路由放入路由表中,因为RIP 的管理距离为120,小于在静态路由中设定的130,而静态路由处于备份的地位。
华为路由器浮动静态路由及负载均衡

实验目的:浮动静态路由、负载均衡1、拓扑2、配置地址R1配置interface GigabitEthernet0/0/0ip address 200.1.1.1 255.255.255.0#interface GigabitEthernet0/0/1ip address 200.1.3.1 255.255.255.0#interface GigabitEthernet0/0/2ip address 192.168.1.254 255.255.255.0查看接口地址配置[AR1]display ip interface brief*down: administratively down^down: standby(l): loopback(s): spoofingThe number of interface that is UP in Physical is 4 The number of interface that is DOWN in Physical is 0 The number of interface that is UP in Protocol is 4 The number of interface that is DOWN in Protocol is 0Interface IP Address/Mask PhysicalProtocolGigabitEthernet0/0/0 200.1.1.1/24 up up GigabitEthernet0/0/1 200.1.3.1/24 up up GigabitEthernet0/0/2 192.168.1.254/24 up up NULL0 unassigned up up(s)R2#interface GigabitEthernet0/0/1ip address 200.1.2.2 255.255.255.0#interface GigabitEthernet0/0/0ip address 200.1.1.2 255.255.255.0R3interface GigabitEthernet0/0/1ip address 200.1.2.3 255.255.255.0interface GigabitEthernet0/0/0ip address 200.1.3.3 255.255.255.0interface GigabitEthernet0/0/ip address 192.168.2.254 255.255.255.03、配置路由[AR1]ip route-static 192.168.2.0 24 200.1.3.3[AR3]ip route-static 192.168.1.0 24 200.1.3.1[AR2]ip route-static 192.168.1.0 24 200.1.1.1 去A[AR2]ip route-static 192.168.2.0 24 200.1.2.3 去B跟踪路由4、配置浮动静态路由实现路由备份[AR1]ip route-static 192.168.1.0 24 200.1.2.2 preference 100[AR1]ip route-static 192.168.2.0 24 200.1.1.2 preference 100查看路由表没有上面的路由条目,原因优先级高才写入路由表192.168.2.0/24 Static 60 0 RD 200.1.3.3[AR1]display ip routing-table protocol staticRoute Flags: R - relay, D - download to fib------------------------------------------------------------------------------Public routing table : StaticDestinations : 1 Routes : 2 Configured Routes : 2Static routing table status : <Active>Destinations : 1 Routes : 1Destination/Mask Proto Pre Cost Flags NextHop Interface192.168.2.0/24 Static 600 RD 200.1.3.3 GigabitEthernet0/0/1Static routing table status : <Inactive>Destinations : 1 Routes : 1Destination/Mask Proto Pre Cost Flags NextHop Interface192.168.2.0/24 Static 1000 R 200.1.1.2 GigabitEthernet0/0/05、手动制造故障[AR1]interface g0/0/1[AR1-GigabitEthernet0/0/1]shutdown浮动路由写入路由表192.168.2.0/24 Stati c 100 0 200.1.1.2---------------------------------------------------------------------------------------------------------------------二、通过负载均衡实现网络优化创建等价路由:优先级、cost、目标地址、掩码相同[AR3]ip route-static 192.168.1.0 24 200.1.2.2[AR1]ip route-static 192.168.2.024 200.1.1.2[AR1]display ip routing-table protocol staticRoute Flags: R - relay, D - download to fib------------------------------------------------------------------------------Public routing table : StaticDestinations : 1 Routes : 2 Configured Routes : 2Static routing table status : <Active>Destinations : 1 Routes : 2Destination/Mask Proto Pre Cost Flags NextHop Interface192.168.2.0/24 Static 60 0 RD 200.1.3.3 GigabitEthernet0/0/1 Static 600 RD 200.1.1.2 GigabitEthernet0/0/0验证:在两条链路上抓包看有流量经过两条链路!。
浮动静态路由实验报告

静态路由实验实验要求:R1的loopback1分3次顺序ping通R8的loopback1,体现浮动路由的作用。
实验步骤:1、画出实验拓扑图,如上图所示2、根据拓扑图给每个路由器配置IP地址R1配置:R1(config)#int s0/0R1(config-if)#ip add 192.168.2.1 255.255.255.0R1(config-if)#no shR1(config-if)#int s0/1R1(config-if)#ip add 192.168.4.1 255.255.255.0R1(config-if)#no shR1(config-if)#int s0/2R1(config-if)#ip add 192.168.3.1 255.255.255.0R1(config-if)#no shR1(config-if)#int loopback 1R1(config-if)#ip add 192.168.1.1 255.255.255.0R2配置:R2(config)#int s0/0R2(config-if)#ip add 192.168.2.2 255.255.255.0R2(config-if)#no shR2(config-if)#int s0/2R2(config-if)#ip add 192.168.5.1 255.255.255.0R2(config-if)#no shR2(config-if)#int s0/3R2(config-if)#ip add 192.168.7.1 255.255.255.0R2(config-if)#no shR3配置:R3(config)#int s0/1R3(config-if)#ip add 192.168.4.2 255.255.255.0R3(config-if)#no shR3(config-if)#int s0/2R3(config-if)#ip add 192.168.5.2 255.255.255.0R3(config-if)#no shR3(config-if)#int s0/0R3(config-if)#ip add 192.168.6.1 255.255.255.0R3(config-if)#no shR4配置:R4(config)#int s0/0R4(config-if)#ip add 192.168.6.2 255.255.255.0R4(config-if)#no shR4(config-if)#int s0/2R4(config-if)#ip add 192.168.3.2 255.255.255.0R4(config-if)#no shR4(config-if)#int s0/3R4(config-if)#ip add 192.168.7.2 255.255.255.0R4(config-if)#no shR4(config-if)#int loopback 1R4(config-if)#ip add 192.168.8.1 255.255.255.03、配置静态路由R1配置:R1(config)#ip route 192.168.8.0 255.255.255.0 192.168.3.2R1(config)#ip route 192.168.8.0 255.255.255.0 192.168.6.2 20 R1(config)#ip route 192.168.8.0 255.255.255.0 192.168.7.2 50 R1(config)#ip route 192.168.6.0 255.255.255.0 192.168.5.2 20 R1(config)#ip route 192.168.7.0 255.255.255.0 192.168.5.1 50 R1(config)#ip route 192.168.5.0 255.255.255.0 192.168.2.2 20 R1(config)#ip route 192.168.5.0 255.255.255.0 192.168.4.2 50 R2配置:R2(config)#ip route 192.168.1.0 255.255.255.0 192.168.2.1 20 R2(config)#ip route 192.168.1.0 255.255.255.0 192.168.4.1 50 R2(config)#ip route 192.168.4.0 255.255.255.0 192.168.5.2 50 R2(config)#ip route 192.168.8.0 255.255.255.0 192.168.6.2 20 R2(config)#ip route 192.168.8.0 255.255.255.0 192.168.7.2 50 R2(config)#ip route 192.168.6.0 255.255.255.0 192.168.5.2 20 R3配置:R3(config)#ip route 192.168.1.0 255.255.255.0 192.168.2.1 20 R3(config)#ip route 192.168.1.0 255.255.255.0 192.168.4.1 50 R3(config)#ip route 192.168.2.0 255.255.255.0 192.168.5.1 20 R3(config)#ip route 192.168.8.0 255.255.255.0 192.168.6.2 20R3(config)#ip route 192.168.8.0 255.255.255.0 192.168.7.2 50R3(config)#ip route 192.168.7.0 255.255.255.0 192.168.5.1 50R4配置:R4(config)#ip route 192.168.1.0 255.255.255.0 192.168.3.1R4(config)#ip route 192.168.1.0 255.255.255.0 192.168.2.1 20R4(config)#ip route 192.168.1.0 255.255.255.0 192.168.4;1 50R4(config)#ip route 192.168.2.0 255.255.255.0 192.168.5.1 20R4(config)#ip route 192.168.4.0 255.255.255.0 192.168.5.2 50R4(config)#ip route 192.168.5.0 255.255.255.0 192.168.6.1 20R4(config)#ip route 192.168.5.0 255.255.255.0 192.168.7.1 503、测试R1#traceroute 192.168.8.1 source 192.168.1.1Type escape sequence to abort.Tracing the route to 192.168.8.11 192.168.3.2 96 msec 92 msec *R1选择管理距离最小的静态路由192.168.8.0/24 [1/0] via 192.168.3.2直接到达R4查看路由表:R1#show ip routeCodes: C - connected, S - static, R - RIP, M - mobile, B - BGPD - EIGRP, EX - EIGRP external, O - OSPF, IA - OSPF inter areaN1 - OSPF NSSA external type 1, N2 - OSPF NSSA external type 2E1 - OSPF external type 1, E2 - OSPF external type 2i - IS-IS, su - IS-IS summary, L1 - IS-IS level-1, L2 - IS-IS level-2ia - IS-IS inter area, * - candidate default, U - per-user static routeo - ODR, P - periodic downloaded static routeGateway of last resort is not setS 192.168.8.0/24 [1/0] via 192.168.3.2C 192.168.4.0/24 is directly connected, Serial0/1S 192.168.5.0/24 [20/0] via 192.168.2.2S 192.168.6.0/24 [20/0] via 192.168.5.2S 192.168.7.0/24 [50/0] via 192.168.5.1C 192.168.1.0/24 is directly connected, Loopback1C 192.168.2.0/24 is directly connected, Serial0/0C 192.168.3.0/24 is directly connected, Serial0/2在R1上写了7条静态路由,目前只显示了4条,说明浮动的静态路由不能永久地保存在路由选择中。
思科Cisco路由器配置——浮动静态路由配置实验详解
思科Cisco路由器配置——浮动静态路由配置实验详解本⽂实例讲述了思科Cisco浮动静态路由配置实验。
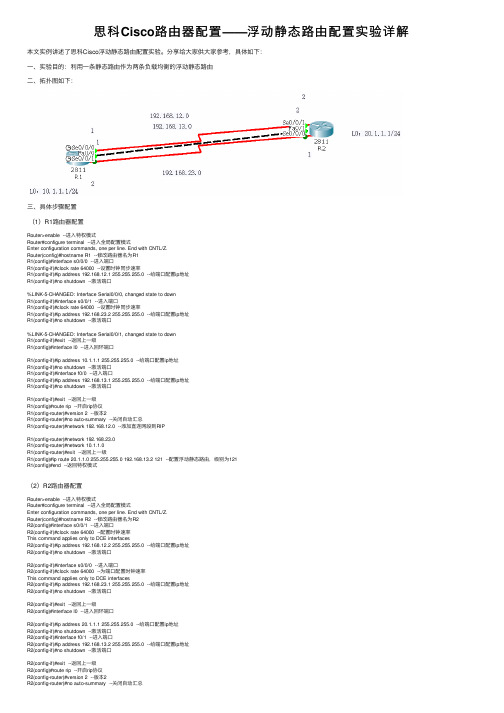
分享给⼤家供⼤家参考,具体如下:⼀、实验⽬的:利⽤⼀条静态路由作为两条负载均衡的浮动静态路由⼆、拓扑图如下:三、具体步骤配置(1)R1路由器配置Router>enable --进⼊特权模式Router#configure terminal --进⼊全局配置模式Enter configuration commands, one per line. End with CNTL/Z.Router(config)#hostname R1 --修改路由器名为R1R1(config)#interface s0/0/0 --进⼊端⼝R1(config-if)#clock rate 64000 --设置时钟同步速率R1(config-if)#ip address 192.168.12.1 255.255.255.0 --给端⼝配置ip地址R1(config-if)#no shutdown --激活端⼝%LINK-5-CHANGED: Interface Serial0/0/0, changed state to downR1(config-if)#interface s0/0/1 --进⼊端⼝R1(config-if)#clock rate 64000 --设置时钟同步速率R1(config-if)#ip address 192.168.23.2 255.255.255.0 --给端⼝配置ip地址R1(config-if)#no shutdown --激活端⼝%LINK-5-CHANGED: Interface Serial0/0/1, changed state to downR1(config-if)#exit --返回上⼀级R1(config)#interface l0 --进⼊回环端⼝R1(config-if)#ip address 10.1.1.1 255.255.255.0 --给端⼝配置ip地址R1(config-if)#no shutdown --激活端⼝R1(config-if)#interface f0/0 --进⼊端⼝R1(config-if)#ip address 192.168.13.1 255.255.255.0 --给端⼝配置ip地址R1(config-if)#no shutdown --激活端⼝R1(config-if)#exit --返回上⼀级R1(config)#route rip --开启rip协议R1(config-router)#version 2 --版本2R1(config-router)#no auto-summary --关闭⾃动汇总R1(config-router)#network 192.168.12.0 --添加直连⽹段到RIPR1(config-router)#network 192.168.23.0R1(config-router)#network 10.1.1.0R1(config-router)#exit --返回上⼀级R1(config)#ip route 20.1.1.0 255.255.255.0 192.168.13.2 121 --配置浮动静态路由,级别为121R1(config)#end --返回特权模式(2)R2路由器配置Router>enable --进⼊特权模式Router#configure terminal --进⼊全局配置模式Enter configuration commands, one per line. End with CNTL/Z.Router(config)#hostname R2 --修改路由器名为R2R2(config)#interface s0/0/1 --进⼊端⼝R2(config-if)#clock rate 64000 --配置时钟速率This command applies only to DCE interfacesR2(config-if)#ip address 192.168.12.2 255.255.255.0 --给端⼝配置ip地址R2(config-if)#no shutdown --激活端⼝R2(config-if)#interface s0/0/0 --进⼊端⼝R2(config-if)#clock rate 64000 --为端⼝配置时钟速率This command applies only to DCE interfacesR2(config-if)#ip address 192.168.23.1 255.255.255.0 --给端⼝配置ip地址R2(config-if)#no shutdown --激活端⼝R2(config-if)#exit --返回上⼀级R2(config)#interface l0 --进⼊回环端⼝R2(config-if)#ip address 20.1.1.1 255.255.255.0 --给端⼝配置ip地址R2(config-if)#no shutdown --激活端⼝R2(config-if)#interface f0/1 --进⼊端⼝R2(config-if)#ip address 192.168.13.2 255.255.255.0 --给端⼝配置ip地址R2(config-if)#no shutdown --激活端⼝R2(config-if)#exit --返回上⼀级R2(config)#route rip --开启rip协议R2(config-router)#version 2 --版本2R2(config-router)#no auto-summary --关闭⾃动汇总R2(config-router)#network 192.168.12.0 --添加直连⽹段到RIPR2(config-router)#network 192.168.23.0R2(config-router)#network 20.1.1.0R2(config-router)#exit --返回上⼀级R2(config)#ip route 10.1.1.0 255.255.255.0 192.168.13.1 121 --配置浮动静态路由,级别为121 R2(config)#end --返回特权模式四、验证1、分别查看R1与R2路由表信息(1)R1路由表信息(2)R2路由表信息2、断开两条负载均衡路径(12.0与23.0⽹段)并查看路由表信息(1)R1路由表信息(2)R2路由表信息解释:当两条负载均衡路径断掉,这条浮动的静态路由就会出现。
实验一 静态ECMP和浮动静态路由配置

实验报告
一,实验目标:
1,掌握路何在路由器上配置静态ECMP;2,掌握浮动静态路由配置。
二,实验组网图
三.实验设备
四,实验任务
(1)任务一:静态ECMP配置
(2)任务二:浮动静态路由配置
五,实验总结
在实验原理图可以看出实验一是一个简单的配置静态路由实验,由管理员手工配置,无开销,适合简单的扩普结构网络,合理配置可以减少路由表选项数量,节省路由表空间,加快路由匹配速度,缺点是无法根据网络扩扑变化而改变,网络故障必须由管理员去维护。
实验二则是配置浮动静态路由,适合于备份链路是低宽带链路的场合,当备份链路是较高宽带链路的场合时,则用动态路由来备份另
一动态路由。
浮动静态路由

浮动静态路由
提要描述:
浮动静态路由与其他的静态路由不同,在路由表中其他静态路由总是优先于浮动静态路由,仅在首选静态路由失败的时候,浮动静态路由才会出现在路由表中。
因此缺省情况下,对于到相同的目标网络,其他静态路由总是优先于浮动静态路由。
实验目标:主链路(一般静态路由)Down,备份链路(浮动静态路由)生效,主链路恢复正常,备份链路失效(在预备状态)。
实验连接图
R1的基本配置
使用本地环回地址(仅实验用)
设置主线路串口地址
备用串口地址
查看各接口地址
R2的基本配置
接口地址配置同上(略...)查看R2各接口地址
R1静态路由配置
路由后面的权值50表示指定的(管理距离),管理距离越高其路由优先权越低(权值范围在1-255之间),例如:指向下一跳地址的IPv4的静态路由的管理距离为1,而指向出站接口的静态路由的管理距离为0。
如果有两条静态路由指向相同的目标网络,一条指向下一跳地址,一条指向出站接口,那么则优选后者(管理距离越低路由优先权越高)。
查看路由表
show ip route
R2静态路由配置
查看路由表show ip route
测试
正常情况下
当主线路故障时
查看各接口信息
再次查看路由表
当主线路恢复时
通过以上对R1 S0/3/0接口的关开,可以看到3个路由表的变化(主备/链路的切换)。
提示:在每条路由条目中的括号内的数字是,例如[1/0],前者指定了管理距离为1,后者指定度量值为0(因为静态路由没有度量值)。
因此对于相同的目标网络,缺省情况下,到相同目标网络的静态路由总是优先于动态路由。
【实验报告】浮动静态路由实验(SLA)_屠双奇

浮动静态路由(SLA)V0.12012-9-3Author TELPHONE OrganizationLastUpdateSPOTO 全球培训●项目●人才1 / 5SPOTO 全球 培训 ● 项目 ● 人才2 / 5目录1拓扑与需求 ....................................................................................................................................................... 2 1.1 网络拓扑 ............................................................................................................................................... 2 1.2 需求概述 ............................................................................................................................................... 3 2实现机制 ........................................................................................................................................................... 3 2.1 设计原理 ............................................................................................................. 错误!未定义书签。
第3单元:实训-静态路由

第3单元:实训-静态路由实训:静态路由本实训要求学生掌握静态路由、默认路由、汇总路由的概念,以及静态路由、默认路由的配置方法。
1.网络拓扑首先,需要建立由交换机、路由器和PC机组成的网络,并画出拓扑图。
在拓扑图中要标记出相关接口和网络地址。
2.静态路由静态路由是手动配置路由表的一种方式,需要掌握路由表的概念和ip route命令的使用。
根据需求正确配置静态路由。
3.默认路由默认路由是指当路由表中没有匹配路由时,将数据包发送到默认网关。
需要掌握默认路由的使用场合,并能够正确配置默认路由。
实验数据记录:场景描述:学校有新旧两个校区,每个校区是一个独立的局域网,为了使新旧校区能够正常相互通讯,共享资源。
每个校区出口利用一台路由器进行连接,两台路由器间学校申请了一条2M的DDN专线进行相连,要求做适当配置实现两个校区的正常相互访问。
命令:在路由器R1上进行以下配置:conf thostname R1int fa 1/0no shutip address 192.168.1.1 255.255.255.0 exitint serial 2/0no shutip address 192.168.3.1 255.255.255.0 clock rateend在路由器R2上进行以下配置:conf thostname R2int fa 1/0no shutip address 192.168.2.1 255.255.255.0 exitint serial 2/0ip address 192.168.3.2 255.255.255.0 no shutendip route 192.168.2.0 255.255.255.0 192.168.3.2最后,检查路由表是否正确配置:show ip route表:该命令用于查看路由表,可以查看到当前路由器的路由信息,包括目的网络地址、子网掩码、下一跳地址和出接口等信息。
实验步骤:1.根据实验环境搭建网络拓扑图;2.配置路由器地址和各主机IP地址;3.进行ping测试以检查网络情况。
- 1、下载文档前请自行甄别文档内容的完整性,平台不提供额外的编辑、内容补充、找答案等附加服务。
- 2、"仅部分预览"的文档,不可在线预览部分如存在完整性等问题,可反馈申请退款(可完整预览的文档不适用该条件!)。
- 3、如文档侵犯您的权益,请联系客服反馈,我们会尽快为您处理(人工客服工作时间:9:00-18:30)。
实训名称:浮动静态路由
实训场景:某公司的总部和分部间使用专线相连,配置RIP实现公司网络的互连。
为了防止专线故障,又申请了一根拨号的备份线路提供冗余,以备在专线链路故障时,使用拨号线路。
因为拨号线路的带宽有限,使用动态路由协议,路由更新会占用部分带宽,为了不影响关键的业务流,在拨号线路上配置静态路由。
一、实训原理
1、当同一个路由器到一个网络有两种不同的路由协议时,路由器会选择管理距离小的做为路由的信息。
2、静态路由不占用链路带宽,而RIP则占用链路带宽
二、实训目的
1、了解路由的管理距离
2、了解多种路协议共存
三、实训步骤:
1、配置专线链路的IP地址与RIP动态路由
2、配置拨号链路的IP地址与静态路由
3、给PC机配置IP地址
拓扑图
具体步骤:
第一步:配置专线链路
先配R1的路由器
En //进入特权模式
Conf //进入全局配置模式
Int F0/0 //进入F0/0端口
Ip add 192.168.1.1 255.255.255.0 //给F0/0配置IP地址
No shut //打开F0/0端口
Int s0/0/0 //进入s0/0/0端口
Ip add 192.168.3.1 255.255.255.0 //给s0/0/0配置IP地址
No shut //打开s0/0/0端口
Exit //退出
Router rip //启用RIP动态路由进程
Net 192.168.1.0 //宣告直连网络1
Net 192.168.3.0 //宣告直连网络2
再配R2的路由器
En //进入特权模式
Conf //进入全局配置模式
Int F0/0 //进入F0/0端口
Ip add 192.168.2.1 255.255.255.0 //给F0/0端口配置IP地址No shut //打开F0/0端口
Int s0/0/0 //进入s0/0/0端口
Ip add 192.168.3.2 255.255.255.0 //给s0/0/0配置IP地址No shut //打开s0/0/0端口
clock rate 9600 // s0/0/0端口配置时钟频率
exit //退出
Router rip //启用RIP动态路由进程
Net 192.168.2.0 //宣告直连网络2
Net 192.168.3.0 //宣告直连网络3
第二步:配置拨号链路
配R1的路由器
Int F0/1 //进入F0/1端口
Ip add 192.168.4.1 255.255.255.0 //给F0/1端口配置IP地址No shut //打开F0/1端口
Exit //退出
Ip route 192.168.2.0 255.255.255.0 192.168.4.2 130
//配置到子公司网络的静态路由,其管理距离为130,做为备分路由
配R2的路由器
Int F0/1 //进入F0/1端口
Ip add 192.168.4.2 255.255.255.0 //给F0/1端口配置IP地址No shut //打开F0/1端口
Exit //退出
Ip route 192.168.1.0 255.255.255.0 192.168.4.1 130
//配置到总公司网络的静态路由,其管理距离为130,做为备分路由
第三步:给PC机配置IP地址
略
四、实训结果
查看路由show ip route //全局特权模式下
R1路由器的路由表
将专线链路去掉,再查看路由show ip route
R1路由器的路由表。