悬吊式椅子说明书
Invacare 抬升椅和悬挂床说明书
Invacare®Lifts and SlingsInvacare®Lifts and Slings• Battery Powered andHydraulic Lifts• Stand-Up and Heavy-Duty Lifts•Full Assortment ofSlings2Invacare®Reliant 450 Lifts The Invacare® line of Reliant lifts was conceived to help reduce the possibility of caregiver back injury and to ensure dignity in patient handling.These high quality lifts are comfortable, reliable and integral tools for staff and ing the lift for patient handling can help reduce staff injuries,save you money and reinforce safety as a priority in your health care facility. Invacare Reliant lifts support up to 450 pounds, making potentially challenging transfers smooth for the resident and caregiver.The high lift range allows easy access to tubs,chairs,commodes,floors and beds (with at least 4.5" under-bed clearance). Along with functionaland innovative lifts, Invacare also offers facility assessment plans to further aid in your safety management program.Our all-encompassing lift system also includes in-service training, videos and an ergonomic safety plan. Our goal is topartner with you in lowering costs and protecting your staff from injury.The sturdy and practical design of Reliant liftsprovides the solution you need for success in your quest to provide safe and effective health care.Invacare®Reliant 450 Hydraulic LiftModel no. RHA450-1Invacare®Reliant 450 Low-Profile Lift BasesModel no. RPL450-1 Battery-poweredModel no. RPL450-2 Battery-powered with battery power base•4.5" under-bed clearance improves accessibility•Available with battery powered baseInvacare®Reliant 450 Battery-Powered LiftModel no. RPA450-1Ask us about our injuryprevention program .•Pump mechanism allows transfersof up to 450 lb. with minimal effort•Comfortable handle placement forease of use•Wide base for maximum stability•Low maintenance•Limited warranty includes threeyears on lift, one year on pump•Removable battery easily chargesovernight on wall-mounted chargingstation•Equipped with a quiet, long-lifemotor•Wide lift range for easier transfer•Wide base for maximum stability•Limited warranty includes threeyears on lift, one year on battery3Invacare ®Reliant 450 LiftsAvailable Parts Kits for LiftsDescriptionPart no.Reliant touch-up paint1075222Reliant replacement batteries 1078276Reliant swivel bar kits1143629Extra-wide Reliant swivel bars1143630Reliant low base replacement kit (manual)1079810Reliant high base replacement kit 1079811Reliant sling holder bag (four-pack)1088911Reliant training video:Lifting with Ease1090823Lift SpecificationsPower Low Hydraulic Power Hydraulic Power Base/Pwr.Adjustable Adjustable Low Base Low Base Opening RHA450-1RPA450-1RHL450-1RPL450-1RPL450-2HeightMaximum at sling hookup 73"76"71"74"74"Minimum at sling hookup 27"26"25"24"24"Base height (clearance) 6.8" 6.8" 4.5" 4.5" 4.5"Base width Open 41"41"41"41"41"Closed 26.5"26.5"26.5"26.5"26.5"Base length 48"48"48"48"48"Casters Front 5"5"3"3"3"Rear 5"5"5"5"5"Weight capacity 450 lb.450 lb.450 lb.450 lb.450 lb.Product weight Out-of-carton 93 lb.106 lb.93 lb.106 lb.109 lb.Removable battery packOne 24-volt rechargeable sealed X X X Charger output 24-volt DC X X X Audible “low battery” alarm X X X Lifts per charge: 150-300*XXX*Varies with lift range and load.Complete instructions for lift usage and sling procedures are found in the Invacare Operating Manual. Only Invacare slings and accessories should be used on Invacare lifts. (See listing page 8.)Charging Station•One 24-volt battery on mast with quick release •Battery can be replacedimmediately with second battery in wall-mounted charger •UL listed and CSA certifiedHand Pendant•Ergonomic control with heavy-duty cord •Convenient pendant hook allows attachment and storage on multiple areas of liftRear Locking Brakes•Locking feature on 5" rear casters is standard on all modelsInvacare ®Reliant Digital ScaleModel no. RLS6•Retrofits on all Reliant 450/600lifts.Model 9805 requires Reliant swivel bar (Part no. 1064518)•Easy to operate, four-button display •Automatic shut-off feature prolongs battery life•Two-year limited warrantyManual Lowering•Manual emergency lowering feature gently and safely lowers resident in case of total power loss•Essential safety feature •Manual lowering is easy andeffortless. Simply insert the end of a ball point pen into the hole marked “emergency” or lift on the accessible ring-pullElectronics•Removable battery box is conveniently located on mast;it features an emergency OFF button and beeps when battery needs to be recharged;Requires one 24-volt battery •Quick-release battery eliminates downtime •Anti-entrapment feature stops motion if boom meets resistance while lowering •Heavy-duty hand pendant and cordfloor and high surfaces •Low friction casters significantly improve rollability and contribute to caregiver safety •Removable battery pack eliminates downtime and simplifies the charging process •Manual lowering for instant response to power loss •Safety-tested, meets CE mark requirements •Electronic system includes two 24-volt batteries: one for lift, one for battery-charging station;amanual emergency lowering device;and anti-entrapment feature if boom meets any resistance while lowering •Available with power opening base option (model no. RPS350-2)minimize wrist strain •Base legs adjust easily and lock securely into open position with the padded shifter handle or optional power option •Total pinch-point protection covers all moving parts for added safety •Padded swivel bar with 360˚rotation and six-point hookup allows use of Invacare chain-free slings as well as older style slings with chains or straps •Attractive neutral design blends well into any environment •Covered base provides protection against wear, dirt and moisture •Manufactured in an ISO13485facility4Invacare ®Reliant 350 Stand-Up Lift(With audible •Heavy-duty hand pendant and cord•Includes two batteries and a recharging stationFeatures•Innovative adjustment features adapt to a wide variety of body sizes and shapes. That means comfort at any height, width and weight range up to 350 lb.•Low friction casters significantly improve rollability and contribute to caregiver safety •Multi-function slings allow for quick toileting,stand assist or full-support seated transfer •Adjustable leg support features a soft pad with lateral contour that secures legs in three positions for comfort at any height •Wide, non-slip footplate provides stable base for transfer •Under-bed clearance of 4.5" allowsaccessibility to most nursing home,hospital and home care bed styles •Available with power opening base (RPS350-2)•Removable battery eliminates downtime •Ergonomic features make it ideal for toilet transfers, as well as for dependent and rehabilitation purposes •Features include fast,simple slingattachment that protects against accidental disengagement;wide push handle;good access for clothing removal; and comfortable slings with extended back support that prevents pressure in the axilla area •Adjustable leg strap option secures leg against knee pad for optimum positioning on footplate •Limited warranty includes three years on lift,one year on motor •Manufactured in an ISO13485 facilitySling model numbers RPS350-1RPS350-263.7"63.7"39.6"39.6"4.5" 4.5"Model no. R130 Standing sling.Model no. R134 Transfer sling.Sling SpecificationsR130 R134Width 44"34"Length16"42" Product weight Out of carton 1.1 lb. 1.3 lb.Shipping1.6 lb.1.8 lb.Shown with R130 Standing sling.Reliant 350 Stand-Up LiftModel no. RPS350-2 Stand-Up Lift.Invacare ®Reliant 440 Stand-Up Lift•Includes two batteries and a recharging stationFeatures•Innovative adjustment features adapt to a wide variety of body sizes and shapes. That means comfort at any height, width and weight range up to 440 lb.•Power-opening base operated with hand pendant allows for single-caregiver adjust-ments•Low friction casters significantly improve rollability and contribute to caregiver safety •Multi-function slings allow for quick toilet-ing, stand assist or full-support seated transfer•Adjustable leg support features a soft pad with lateral contour that secures legs in comfort•Wide, non-slip footplate provides stable base for transfer and may be removed for standing assistance•Removable battery eliminates downtime•Under-bed clearance of 5" allows accessi-bility to most nursing home, hospital and home care bed styles•Ergonomic features make it ideal for toilet transfers, as well as for dependent and rehabilitation purposes (optional WT200walking tutor attachment)•Fast, simple sling attachment that protects against accidental disengagement; wide push handle; good access for clothing removal; and comfortable slings with extended back support that prevents pressure in the axilla area•Adjustable leg strap option secures leg against knee pad for optimum positioning on footplate•Limited warranty includes three years on lift, one year on motorSling model numbers R131 and R136 are also compatible with the Reliant 350 lift. Complete instructions for lift usage and sling procedures are found in the Invacare operating manual.Only Invacare ®slings R131 R136Width 58"44"Length16"52" Product weight Out of carton 1.3 lb. 1.6 lb.Shipping2.0 lb.2.1 lb.5Invacare ®Reliant 440 Stand-Up Lift6Invacare ®Reliant 600 Heavy-Duty LiftDesigned to meet the special needs of your patients weighing up to 600 pounds, the Invacare Reliant 600 heavy-duty lift is secure and sturdy,providing a safe alternative to manual lifting.Both durable and functional, the Reliant 600 is also a reassuring andcomfortable patient lift.When answering the needs of every patient is your priority, this is your wisest choice.Model no. RPL600-2.Model no. RPL600-1 Power low base lift.Invacare ®Reliant 600 Heavy-Duty LiftFeatures•High lift range allows transfer to high surfaces •Low friction casters significantly improve rollability and contribute to caregiver safety •Designed to meet the needs of the growing bariatric population up to 600 lb.•Manual lowering for instant response to power loss •Safety tested, meets CE mark requirements •Available with power opening base (RPL600-2)•Essential device for safe patient handling in hospitals and LTC (long-term care) facilities •Unique sling fabric designed to provide the utmost in comfort and strength •Limited warranty includes three years on lift, one year on electric components •Rear locking casters are standard •Manufactured in an ISO13485 facilityLift SpecificationsPower Low Power Power Base/Pwr.AdjustableLow BaseOpeningRPA600-1RPL600-1RPL600-2HeightMaximum at sling hookup 70"68"68"Minimum at sling hookup 29.5"28"28"Base height (clearance) 6.8" 4.5" 4.5"Base width Open 41"41"49"Closed 26.5"26.5"26.5"Base length 48"48"48"CastersFront 5" 3.5" 3.5"Rear 5"5"5"Weight capacity 600 lb.600 lb.600 lb.Product weight Out of carton 112 lb.112 lb.115 lb.Shipping 138 lb.138 lb.141 lb.7Invacare®Reliant 600 Heavy-Duty Lift Invacare®Reliant Digital ScaleModel no. RLS6•Precision scale mounted on swivel baraccurately measures weights up to600 lb.•Retrofits on all Reliant 450/600 lifts.Model 9805 requires Reliant swivelbar•Easy-to-operate, four-button display•Automatic shut-off feature prolongsbattery life•Two-year limited warrantySling SpecificationsR140 R141Width45"45"Commode opening n/a7"Length55"55"Commode opening n/a13"Weight capacity600 lb.600 lb.Product weightOut of carton 2.2 lb. 2.1 lb.Shipping 2.7 lb. 2.6 lb.Model no. R140 Mesh sling.Model no. R141 Mesh sling with commode opening.Complete instructions for lift usage and slingprocedures are found in the InvacareOperating Manual. Only Invacare slings andaccessories should be used on Invacare lifts.Charging Station•One 24-volt battery on mast withquick release•Battery can be replacedimmediately with second batteryin wall-mounted charger•UL listed and CSA certified•Manual emergency loweringfeature gently and safely lowersresident in case of total powerloss•Essential safety feature•Manual lowering is easy andeffortless. Simply insert the endof a ball point pen into the holemarked “emergency”, lift on theaccessible ring-pull8Invacare ®Reliant SlingsInvacare ®Reliant Full-Body Slings with Commode Opening*Model nos. R114, R115, R116•Mesh fabric offers full head and neck support •Commode opening for toileting •Four-point hook-up•Available in three sizes: M, L, XLInvacare ®Reliant slings come in a wide array of styles to meet a variety of client needs, and the new, improved overall design makes them all easier than ever to position. Reliant slings feature a unique, fully padded fabric that forms a soft yet supportive surface. The soft, brushed lining helps prevent sliding for ultimate comfort and skin protection,and the new,stretch-resistant feature helps the slings hold their shape for superior support and ease of positioning. For clients and caregivers alike,Invacare Reliant slings are designed with comfort and safety in mind.Invacare ®Reliant Full-Body Slings*Model nos. R110, R111, R112, R113, R117•Polyester/nylon fabric and/or mesh offers full head and neck support •Four-point hook-up •Fully padded•Available in three sizes: M, L, XL*Standard slings for use with chains or straps. Note on heavy-duty and stand-up slings:R130, R131, R134 and R136 available for use on RPS350-1 and RPS440-1 stand-up lift. See pages 4 and 5.R140 and R141 available for use on RPA600-1 heavy-duty lift. See page 6 and 7.Model no.Fabric /Style Size R110mesh/full-body M R111mesh/full-body L R112solid/full-body M R113solid/full-body L R117solid/full-bodyXLModel no.Fabric /StyleSize R114mesh/full-body with commode opening M R115mesh/full-body with commode opening L R116mesh/full-body with commode openingXLComplete instructions for lift usage and sling procedures are found in the Invacare Operating Manual. Only Invacare slings and accessories should be used on Invacare lifts.Note: Reliant sling models listed are only for use with lift Model nos. 9805, Reliant 450 lifts.Sling Sizes Color/Weight ChartP M L XL XXLNavy Purple Green Blue BlackInvacare®Reliant SlingsInvacare®Reliant Divided-LegSlings with HeadrestModel nos. R100P, R100, R101, R102•New supportive back and contouredheadrest are easily inserted orremoved from wheelchair whilepatient is seated•Excellent for all transfers, especiallytoileting and bed-to-chair•Three support straps on each sidefor safety and securityInvacare®Reliant ToiletingSling with Belt*Model no. R121•Specifically designed for toiletingand hygiene functions•The large opening around the seatof the sling facilitates dressing andundressing for transfers to and fromthe toilet•Sling features padded material foradditional comfort*Toileting sling allows superb access for hygiene andclothing removal,but patient must have full head andneck control for proper use of this sling.Note: Sling size and fit can varysignificantly depending on patient weightand girth. These are general guidelines.Consult physician before sling selection.Washing instructions are on each slinglabel. Washing temperature should notexceed 180˚F. Air-dry or dry at lowtemperatures.All slings are constructed of polyester/-nylon fabrics which can be used in wet ordry environments.Sling Binding ColorsRefer to chart below.WeightinPoundsModel no.Fabric/Style SizeR100P solid/divided-leg with headrest PR100solid/divided-leg with headrest MR101solid/divided-leg with headrest LR102solid/divided-leg with headrest XLModel no.Fabric/Style SizeR121solid/toileting L•Fully padded•Available in four sizes: P, M, L, XL910Invacare ®9805 and 9805P Hydraulic LiftsFeaturesToo often, manual patient transfers lead to caregiver back injuries. The Invacare 9805 and 9805P hydraulic lifts were created to make handling situations safer and affordable for everyone involved.With their slim design, the hydraulic lifts are versatile enough to use for most any and all patient transfer. The features of the 9805 and 9805P include a padded swivel bar and push handle, a 450-pound weight capacity, durable chrome-plated construction or painted finish and 360°patient rotation without side-to-side sway.Lightweight construction and easy disassembly allow quick transport and setup. Indispensable to patients and caregivers alike, the 9805 and 9805P offer safety, comfort and stability.Most important, they offer peace of mind, which makes them valuable assets to your health care facility.•Six-point swivel bar attachment easily adapts to all sling styles and positions •Low friction casters significantly improve rollability and contribute to caregiver safety •20"-64" range allows for patient to be picked up from lying position on floor •Pump handle can rotate from side to side for convenience of attendant•Offset mast and boom style provide better lift path,maximizing full travel range •Swivel bar and pump handle are padded for comfort •Elongated handle design serves a broad range of operator heights and offers improved handling ability •Limited warrantyincludes three years on lift, one year on hydraulic pumpModel 9805 - Chrome Model 9805P - PaintedLift SpecificationsModel no. 9805, 9805P (Painted)HeightMaximum at sling hookup 64"Minimum at sling hookup 20"Base height (clearance) 6.5"Base width Open 42.25"Closed 22"Base length46.75"CastersFront 5"Rear 5"Weight capacity 450 lb.Product weight Out of carton 68 lb.Shipping 85 lb.11Invacare ®9805 and 9805P Hydraulic LiftsStandard SlingsModel no.Chain or Strap Assembly Kit (required for standard slings)9070sling strap assembly kit 9071sling chain assembly kit Model no.Fabric/StyleLength Width 9042solid polyester/without commode 40.5"29"9043solid polyester/with commode 40.5"29"9046mesh polyester/without commode 40.5"29"9047mesh polyester/with commode40.5"29"BaseModel no. 9884 Adjustable base•Completely enclosed cam moves legs of adjustable base •Offers obstruction-free operation; ideal for cleaning •Screw-in pin at mast base provides maximum stability and prevents removal of mastHydraulic pump rises from lowest to highest boom height with minimal physical effort.Standard sling.。
Sunnydaze Decor 悬挂蛋形椅子说明书
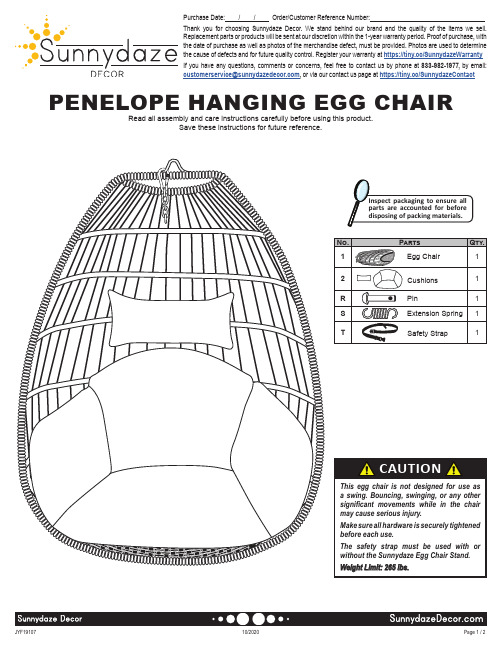
PENELOPE HANGING EGG CHAIRRead all assembly and care instructions carefully before using this product.Save these instructions for future reference.Thank you for choosing Sunnydaze Decor. We stand behind our brand and the quality of the items we sell. Replacement parts or products will be sent at our discretion within the 1-year warranty period. Proof of purchase, with the date of purchase as well as photos of the merchandise defect, must be provided. Photos are used to determine the cause of defects and for future quality control. Register your warranty at https:///SunnydazeWarranty If you have any questions, comments or concerns, feel free to contact us by phone at 833-982-1977, by email: , or via our contact us page at https:///SunnydazeContactPurchase Date: / / Order/Customer Reference Number:towards the back of the seat.cushion to the chair frame. Do not tie the cushion to the ropes.USE & CARE• HANGING: Hardware to hang this chair on a Sunnydaze Egg Chair Stand is included. If this chair is used without the Sunnydaze Egg Chair Stand, consult a professional for installation and anchoring hardware requirements.• SAFE USE: Do not swing, bounce, jump, twist, or other make other excessive movements while using this chair; doing so may cause serious injury. Do not use this chair without the safety strap; this strap helps keep the chair safely in place while getting in and out of the chair.• CHILDREN: Supervise children at all times. Do not allow children to play or sleep in hanging chairs.• INSPECTION: Check the seat, ropes, and frame for damage before each use.• CLEANING: Wipe with a damp cloth. For tougher stains, use mild detergent and a soft cloth to gently scrub. Rinse and dry thoroughly to prevent mold and mildew growth.• STORAGE: Store indoors during winter and inclement weather. Cool, dry locations are best to help prevent damage. Exposure to moisture may cause mold and mildew growth. Prolonged exposure to sunlight will cause the chair and cushions to fade.Manufacturer and seller expressly disclaim any and all liability from personal injury, property damage or loss, whether direct or indirect, or incidental, resulting from the incorrect attachment, improper use, inadequate maintenance, or neglect of this product.。
悬挂床用泡泡椅子泡泡椅子用户手册说明书

2User Manual3Safety Instructions 4General Description / Intended Use5Technical Specifications6Product Label 8Compliances and Standards 9Suspension Alternatives 9Hanger Bars for Human Care Lifts 10Compatibility 11Sling Application 12Troubleshooting 14Care Instructions 15Bruksanvisning 17Säkerhetsinstruktioner 18Allmän beskrivning/Avsedd användning 19Teknisk specifikation 20Produktetikett 22Överensstämmelse och standard 23Upphängningsalternativ 23Byglar till Human Cares lyftar 24Kompatibilitet 25Applicering av sele 26Felsökning 28Skötselinstruktioner 29Notice d’utilisation 31Consignes de sécurité 32Description générale/Utilisation conforme 33Spécification 34Étiquette du produit 36Conformités et normes 37Suspensions possibles 37Barres de suspension pour les lève-personnes de Human Care 38Compatibilité 39Application du harnais 40Résolution des problèmes 43Instructions d’entretien 43Gebrauchsanweisung 45Sicherheitshinweise 46Allgemeine Beschreibung/ Verwendungszweck 47Technische Spezifikationen 48Produkt-Etikett 50Konformitäten und Standards 51Aufhängungsalternativen 51Aufhänger für Human Care Lifte 52Kompatibilität 53Hebegurt-Anwendung 54Fehlerbehebung 57Pflegehinweise 57Gebruikshandleiding 59Veiligheidsinstructies 60Algemene beschrijving /Beoogd gebruik 61Technische Specificaties 62Productlabel 64In overeenstemming met en standaarden 65Bevestigingsmogelijkheden 65Tiljukken voor Human Care liften 66Compatibel 67Sling Applicatie 68Problemen oplossen 70Onderhoudsinstructies 71Käyttöohje 73Turvallisuusohjeet 74Yleinen kuvaus / Käyttötarkoitus 75Tekniset tiedot 76Tuotetarra 78Vaatimustenmukaisuudet ja standardit 79Ripustusvaihtoehdot 79Nostotangot Human Caren nostimiin 80Yhteensopivuus 81Liinan käyttö 82Vianmääritys 84Hoito-ohjeet 853User ManualSymbolsWARNING symbol indicates a poten-tially hazardous situation which, if not avoided, could result in serious injury to the user or damage to propertyand/or the device itself.INFORMATION symbol indicates recommendations and information for proper, trouble-free usage.WEIGHT CAPACITY symbol indicates maximum user weight for the product. Do not exceed this weight in any circumstance.CE MARKING symbol indicates product meets requirements of EU Directive 93/42/EEC (MDD) and/or EU Regulation 2017/745 (MDR).RECYCLE according to local regulations.MEDICAL DEVICE symbol indicates that the product is a medical device according to the definition of medical device in EU Directive 93/42/EEC (MDD) and/or EU Regulation 2017/745 (MDR).READ INSTRUCTIONS and ensure you fully understand them before using this product.Product modification is not per -mitted.Before use, always check that the product is not damaged or worn.Human Care’s products are continuously being developed and updated to provide our customers with the highest quality. We reserve the right to make design changes without prior notice. Always make sure that you have the most recent version of the manual which is available for downloading from our website Contact your local distributor if you have any questions about the product and its use. Notice to user/patient in case of serious incident Any serious incident that has occurred in rela-tion to the product, should be reported to the local contact, who reports to the manufacturer, and the competent authority of the country in which the user/patient is established.Safety Instructions•sling before starting to lift him/her.• Check that the lift is balanced when moving, raising and/or lowering the client. If you are using a Human Care lift with telescopic hanger bar, it is important that the bar hooks are in the same position on both sides.for indoor use with one client at a time and must only be used for transferring a person. This product is not a swing.• Make sure no sharp objects are in contact with the sling.The process of lifting and moving a person always involves risks. Therefore, you must read the user manuals for the lift and the lifting equipment carefully. Always make sure that the lifting equipment you are using is intended for use with the lift. As a care provider, you are responsible for the client’s safety and you must know whether the client will be able to cope with the lifting process. The sling must be fitted to meet the client’s specific needs. If you are in any doubt, please contact the supplier.• Carry out a careful visual inspection of the sling every time you use it.• Check that the right sling is being used for the client. The model, size and material must meet the client’s needs.• Plan the moving and lifting process so that it is as safe as possible.• Before raising the client, check that the sling is correctly attached to the lift/hanger bar once the lift straps are stretched.• It is important that the hooks of the hanger bar are in the correct position, with the opening of the hook facing upwards on both sides to securely hold the straps in place. Recheck the position of the hooks once the lift straps are stretched.• It is important to always check that the loops are at the bottom of all hooks (see pictures) and securely placed below the locking pin on all hooks.4General Description / Intended UseBasic SlingOur Basic sling is a comfortable sling without reinforcements, handles or padding in the back. The sling adapts to the client and offers good support for the entire back. The Basic sling can be used in most lifting situations, fits most clients and is a good choice if it is not establis-hed who is going to be using the sling. The Basic sling is offered in thin polyester net (25045) and our unique Soft Air Mesh fabric (25054). Both materials allow moisture and heat to transfer efficiently from the client. This allows the sling to be left in the wheel chair etc. after the trans-fer is completed. The Soft Air Mesh materialis a high friction material that reduces the risk of sliding during lifting and sitting. It also has unique flame-retardant properties.If the slings are not required to be left with the client after lifting the Basic sling in our dura-ble polyester fabric (25070) is recommended. The low friction polyester material allows easy application of the sling and is easy to clean. Basic sling has padded leg parts, except from Soft Air Mesh m. 25054. The Basic sling offers an upright sitting position that is suitable for clients with reduced trunk stability but without the need for extra head support.Low Basic Sling Polyester (25072) and Low Basic Sling Polyester net (25047)Our Low Basic Sling is a good solution for users who have torso stability and upper body con-trol. The design is similar with the Basic Sling, however it has a shorter back support. The Low Basic Sling provides support from the tailbone up under the arms and under the legs. The arms can be kept inside, but are mostly kept outside of the sling. It is a perfect sling for a more active user.The Basic sling is designed for two-, three- and four-point suspension.Sit Sling and Bath SlingOur Sit Sling is primarily designed for moving clients between a bed and a wheelchair or for similar purposes. The sling is stable and has a reinforced back support with two removable plastic slats. The client sits in an upright position which makes it easier to transfer him/her to a wheelchair, for example. The sling can be used with the Human Care waist belt 25145/25146. Our Bath Sling is like the Sit Sling. It is madeof net and is primarily designed for use in the bath or shower. The back is reinforced with two removable plastic slats. The waist belt cannot be used with this sling.High Basic Sling Polyester (25032) and High Basic Sling Polyester Net (25037) Our High Basic Sling is designed for situations requiring extra support and can even be used for lifting from a lying position on the floor. The High Basic Sling provides support from the tailbone up over the head and under the legs, which is ideal for users who need a lot of support.The Sit Sling and Bath Sling are designed for two-, three- and four-point suspension. The slings can be used with or without the removable plastic slats.56Technical SpecificationsIt is crucial to use the right size of sling for the client. To help differentiate our sizes, they are colour coded for quick identification. The colour code is found next to the sling’s label in the shape of a loop. This loop can also be used to properly store or hang the sling.Basic/Sit/Bath Sling *The weights given are only guidelines and are not a substitute for individual tests. Discrepancies canoccur, tolerances ± 1 cm, 0,3”.Low Basic Sling High Basic Sling Low Basic Sling Net High Basic Sling NetCC C CBBB BAA A A*The weights given are only guidelines and are not a substitute for individual tests. Discrepancies canoccur, tolerances ± 1 cm, 0,3”.7Product LabelThe label on the sling contains the following Array information:1. Human Care company logo2. This way up arrow and marking the centreline of the sling3. CE and Medical Device marking4. Product name and size5. Picture showing the sling in use6. Part number7. Safe Working Load8. “This way out, back” – outside of the sling,not in touch with the client9. Manufacturer10. QR-code to our webpage11. Latex free12. Read the manual before use13. Visual inspection14. Date and country of production15. Batch number16. Serial number17. Washing instructionsa. Machine Wash Temperatureb. Do Not Bleachc. Tumble Dry, Low Heatd. Do Not Dry Cleane. Never Ironf. Do Not Use Fabric Softener18. Owner name. (For example, write theclient’s name or another unique identifier)19. Indicate annual inspection20. Unique Product Code21. Barcode/EAN8Suspension Alternatives Our slings are designed with the premise that all people are different with varying lifting requirements, needs or desires.To make all our clients feel as comfortable as possible in our slings, most of them can be used with 2 or 3-point suspensions. Some slings can also be used with a 4-point suspension. Below the options are displayed.2-point suspensionSuitable for most lifting situations providing a good seating position. 2-point suspension is available with floor lifts, fixed and portable ceiling lifts.Two-point suspension with crossed leg support: Thread the strap on one leg section through the strap on the other leg section before attaching them to the hanger bar.Two-point suspension with overlapping leg support: This method is suitable for lifting clients with amputated legs, for example. Extension straps can be attached to the lifting straps to prevent the client from leaning too far back in the seated position.Two-point suspension with separate leg support: Put the client’s legs in each leg section and attach the lifting straps to the hanger bar. Note: This method increases the risk of the client sliding out of the sling An individual assessment of the client’s needs must always be carried out before choosing analternative connection method.Compliances and StandardsHuman Care is an ISO 13485:2016 certified Swedish medical device company. The Quality Management System is in compliance with US 21 CFR part 820.The product is CE marked in accordance with EU Directive 93/42/EEC (MDD) and/or EU Regula-tion 2017/745 (MDR), as class I medical device. The CE mark is on the product.This sling has been tested in accordance with ISO 10535.910Hanger Bars for Human Care Lifts3-point suspensionOffers an elongated sitting position and more even weight distribution. The 3-point suspension is suitable especially for clients carrying an increased risk of pressure sores or who need additional space for the upper body.Thread the left leg section through the loop on the right leg section. Attach the leg section lifting straps to the leg hooks and the back section lifting straps to the lift.4-point suspensionA spacious sitting position making it suitable for larger clients or when using a stretcher. 4-point suspension is available with both fixed and portable ceiling liftsor floor lifts.HeliQHeliQ Roomer S / Altair (55751 45 cm, 17,7” / 55764 55 cm, 21,7”)(7275x)(92938)CompatibilityHuman Care Group slings are designed for use with all Human Care lifts and hanger bars. The products are also compatible with products of other suppliers utilizing the same attachment method for securing slings to a hanger bar and lift. However, due to the wide range of products worldwide, Human Care cannot be responsible for any errors that may result from improper use or application of combinations of slings, hanger bars and lifts of other suppliers. The use of the combined system is at the prescriber’s own risk and liability.To ensure the safety of the client and caregiver, Human Care recommends the following mini-mum requirements:1. When using slings with lifts and hang-er bars, made by manufacturers otherthan Human Care, the combined systemneeds to be designed with the same slingattachment method for the hanger bar offloor lifts and ceiling lifts, meaning loopstyle slings are combined with a loop stylehanger bar, clip style slings are combinedwith a clip style hanger bar.2. The involved patient lifts and slings mustbe CE marked in accordance with Directive93/42/EEC or Regulation 2017/745 andcomply with standard requirements forpatient lifts as stated in EN ISO 10535. 3. The caregiver must follow the manufactu-rer’s instruction manuals and recommen-dations with respect to the use, care,client, caregiver, cleaning, and inspectionof the slings and lifts.4. Different products on the assembled liftsystem: i.e., lift, hanger bar, sling, scale andother accessories may have different max.loads. It is always the lowest maximumallowable load indicated for the respectiveproducts and the system that applies forthe entire system.Always check the markings on all individualproducts in the system.5. Individual risk assessment, including apractical test of the system and validationwith the specific combination used arerequired to affirm that the size of the slingis correct for the intended use and compa-tible to the width and design of the hangerbar. The combined system needs to bedocumented by the competent assessor. If there are any questions, please contact your local Human Care office or distributor.Sling ApplicationLifting the client from a lying position1. Stand to the side of client and turn theclient to his/her side. Position the sling sothat the centre of the sling lines up withthe client’s spine. Take note of the markingon the sling “This way out, back”. Thebottom part of the sling must be directlyunder the client’s coccyx.Lay the client on his/her back. If the bed isheight-adjustable, it is a good idea to raisethe head of the bed so that the client is ina semi-sitting position.Roll the client over onto his/her other sideand pull the sling through.Move the sling down behind the client’sback until it reaches the coccyx.2. Bend the knee and pull the leg sectionsthrough between the client’s legs. Lowerthe lift to the height of the client’s sto-mach. When a three-point suspension isused, you should thread the left leg sectionthrough the loop on the outside of theright leg section. Attach the leg sectionlifting straps to the leg hooks on the lift.Attach the back section lifting straps to thelift. Hold the lift away from the client’s facewith one hand as you raise it above theclient’s head.Alternative: The sling can also be used fortwo- or four-point suspension. In these ca-ses, the loop on the right leg section is notused. Instead the leg sections are crossed.3. Pause in this position and check that allthe lifting straps are securely attached tothe hooks.4. Continue lifting the client. It may benecessary to lower the bed slightly. Raisethe client’s legs slightly while turning him/her away from the bed. It is a good idea toput your arm around the client while youare moving him/her to create a greatersense of security.5. Put the leg sections between the client’sknees. Turn the client towards you andfold the sling in, under the client, so thatthe fabric slides towards you when youpull it out after you have turned back theclient.Lifting the client from a sitting position 1. Pull the sling down behind the client’sback. Take note of the marking on the sling“This way out, back”. The bottom edgeof the sling must be behind the client’scoccyx.2. Pull the leg sections through to the front.Pull the leg sections up between theclient’s legs. Lower the lift to the height ofthe client’s stomach. When a three-pointsuspension is used, you should thread theleft leg section through the loop on theoutside of the right leg section. Attach theleg section lifting straps to the leg hookson the lift. Attach the back section liftingstraps to the lift. Hold the lift away fromthe client’s face with one hand as you raiseit above the client’s head.Alternative: The sling can also be used fortwo- or four-point suspension. In these ca-ses the loop on the right leg section is notused. Instead the leg sections are crossed.3. Pause in this position and check that all thelifting straps are securely attached to thehooks.4. Continue lifting the client. It is a good ideato put your arm around the client whileyou are moving him/her to create a greatersense of security.5. Fold the leg sections and allow it to slideunder itself when you pull out at the out-side of the thigh. Pull the sling up behindthe client’s back.TroubleshootingNote: It is important that the right sling is used for each client and that it is individually tested to ensure that it meets the client’s need and the transfer situation.Care InstructionsCheck for wear and tearCheck the sling for wear and tear. It is important to check the fabric, the edging, the seams and the lifting straps.Damaged lifting equipment must not be used.CleaningHuman Care slings are intended for individual use. To avoid infections or transmission of bac-teria, it is important to clean the slings properly. All slings should be machine washed and dried as soon as possible. Slings should always be cleaned after use in a wet situation.Always refer to the label of the slingbefore washing.Periodic inspectionA periodic inspection must be carried out at least every 6 months. See Human Care’s peri-odic inspection log which can be found on our website Product lifetimeThe product´s expected lifetime 3 years or 150-180 times washing, if the product is used as intended and maintained according to the manufacturer´s instructions, depending on the intensity of use and maximum load applied during use. If the product label is no longer legible, the product should be discarded.Warranty and supportIf you need information or support, please contact your Human Care officeRecyclingOnce the product has reached the end of its life, it should be disposed according to your coun-try’s rules, especially for the separate collection of electrical and electronic products. Correct disposal helps prevent negative consequences for the environment and human health.Disinfection ProcedureHuman Care slings are intended to be used withone patient at a time. To avoid possible trans-mission of infectious diseases, it is important toclean the sling if it has become soiled or if it is tobe used by a different patient.1 Ref: HSG (95) 18: Hospital Laundry Arrangements for Used and Infected Linen, Department of Health, NHS (National Health Service, England)。
悬空椅的原理
悬空椅是一种特殊设计的家具,其原理基于平衡和悬挂的原理。
悬空椅通常由一个椅子和一个支架组成,支架通过悬挂方式将椅子悬空在空中。
悬空椅的原理可以解释为以下几个方面:
平衡:悬空椅的支架设计使椅子能够在悬挂状态下保持平衡。
支架的结构和材料选择保证了椅子的稳定性和平衡性,使人坐在椅子上时能够保持平稳和舒适。
悬挂:悬空椅的支架通过特定的悬挂方式将椅子悬挂在空中,使其能够自由摆动。
支架可以采用绳索、链条或其他悬挂装置,将椅子悬挂在一个或多个固定点上,从而实现悬空状态。
承重:悬空椅的支架和椅子的设计考虑到人体的重量和力的分布,确保支架能够承受人体的重量,并使椅子能够安全地悬挂在空中。
材料的选择和结构的设计都经过充分的考虑,以确保椅子能够承受正常使用条件下的荷载。
座椅维修指导书

座椅维修指导书一.产品介绍目前中国重汽卡车公司装配的座椅主要有 STR 王系列和 HOWO 系列,每个系列又可分为机械减振座椅和空气悬挂座椅两种。
1. STR 王机械减振座椅STR 王机械减振座椅(图号WG1630510003、WG1630510004)是按德国技术要求制造的,根据人体工程学原理设计的一种液压减振悬挂式座椅,该座椅将液力减振装置与弹性系统相匹配,具有最佳的减振效果。
悬架系统主要由螺旋弹簧、液力减振器、金属构件、防击穿弹性元件等组成。
可以根据路况及司机的体重通过调节弹簧的预紧力来调节调座椅的刚度,以收到更好的减振效果。
机械减振座椅主要技术参数有:0~65mm 七档可调的高度调整、0~75mm 五档可调的前后调整、-60°~41.4°的靠背角度调整、座垫倾角调整和 40 ㎏~130 ㎏的体重调整等功能。
还可根据用户要求选用气囊腰靠支撑装置、高低档控制电加热装置和座椅扶手等。
注意事项:1).在前调整时,应将手柄向上扳到位,以保证限位部件确实脱离后再进行调整。
2). 调整完毕后,各手柄回位应准确可靠,确保各部位锁止牢固可靠。
注:副驾驶椅调整机构与正驾驶椅调整机构对称,无减振装置。
2. STR 王空气悬挂座椅 STR 王空气悬挂座椅(图号AZ1630510001)是具有高新技术的新一代司机座椅。
该座椅将空气弹簧与液力减震进行优化匹配组合,设计出的减振优良的新一代座椅悬架系统。
悬架系统主要由空气弹簧、高度控制阀、液力减振器、金属构件、防击穿弹性元件等组成。
可根据人的体重及路面情况自动调节座椅刚度,大大提高了座椅的舒适性。
空气悬挂座椅主要技术参数有:1.座椅宽度:485mm 2.座椅高度:930mm 3.高度调整:0~65mm 4.前后调整:向前 75mm 向后75mm5.靠背角度调整:0°~41.4°(相对于铅垂线向后),0°~60°(相对于铅垂线向前)。
宝贝看守悬挂式婴儿摇椅说明书
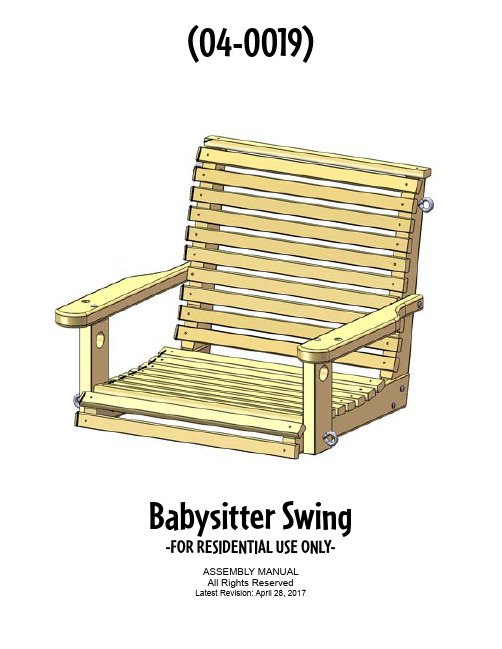
ASSEMBLY MANUAL All Rights ReservedLatest Revision: April 28, 2017Babysitter Swing -FOR RESIDENTIAL USE ONLY-(04-0019)TABLE OF CONTENTSWarranty and Safety Guidelines……………………………………….......…….....Pages 3-7 Tool List and Kit Contents…………..……………………………………….................Page 8 Dimensions, Hardware and Lumber Checklist...………………………......…......Pages 9-11 Seat to Back Assembly……………………..………...…............................................ Step 1 Armrest Assemblies……………………...………………………….................……..... Step 2 Armrest Assemblies to Seat Back...……………….…………...…............................. Step 3 Eyebolts...............................………………...…..……..……...…...................……..... Step 4 Quick Links............................................................................................................... Step 5 Chains...................................................................................................................... Step 6 Swing Hanging Methods……………..…….............................................................. Step 7PLEASE READ OWNER’S MANUAL CAREFULLYBEFORE STARTING ASSEMBLY!IMPORTANT – PLEASE READThis product is made from premium white cedar. Premium white cedar may still be slightly damp when you receive your swing. If the wood is damp lay all the parts out on a table and leave them in a covered area to air dry before staining or painting. Stain should be rated for outdoor use such as the stain used for outdoor decks and outdoor furniture. Paint should also be rated for outdoor use. Maintaining the finish will slow the natural aging process of the wood and reduce surface checking.It is important that all instructions are read before beginning construction. BE SURE TO READ THE CHAIN MANUFACTURERS WARNING/INSTALLATION CARD LOCATED IN THE CHAIN PACKAGE BEFORE BEGINNING! DO NOT HANG THE SWING WITHOUT READING AND FOLLOWING THE INSTRUCTIONS ON THIS CARD.WARNING! Be sure the chain manufacturer’s instructions are followed when installing the lag swing hangers. The lag swing hangers should only be used with a 1/4” pilot hole drilled to a depth of 1-1/2” as described in the chain manufacturer’s installation instructions. Be sure to completely tighten lag swing hangers 1/4” past the last thread by using a screwdriver through the triangular shaped top section. Applying bar soap or wax on the threads can make installation easier. Turn the lag swing hangers so that the hook swings in the same direction as the swing. INSTALL LAG SWING HANGERS SO THAT THEY ARE AS CLOSE TO PERPENDICULARTO THE SWING BEAM AS POSSIBLE. MAKE SURE THE LAG SWING HANGERS ARE INSTALLED IN A SOUND WOOD BEAM THAT WILL SUPPORT 4 TIMES ITS INTENDED LOAD CAPACITY. NEVER USE PLAIN “EYE” BOLTS FROM THE HARDWARE STORE TO SUPPORT A SWING AS THESE BOLTS DO NOT HAVE A BEARING TO REDUCE FRICTION ON THE CHAIN AS IT MOVES. USING A PLAIN “EYE” BOLT COULD CAUSE THE CHAIN TO WEAR AND FAIL CAUSING SERIOUS INJURY. THE HOOK OF THE LAG SWING HANGER SHOULD BE CLOSED SHUT AFTER THE HEIGHT OF THE SWING HAS BEEN DETERMINED.WARNING!• Inspect each loop of chain before using. Each loop should be securely wrapped around the center wire. If it is not, call the number on the chain warning tag to obtain a replacement chain.• Bolts on the swing should be checked often and tightened as needed.• Be sure both short and medium chains are seated in the bottom of the “s-hook” and that the chain is not twisted before using. If twisting is found then remove the chain from the quick link and untwist the chain; then reinstall in the quick link.• Never stand or allow children to stand in this swing! Do not allow anyone under or behind the swing when it is in motion.• Weight Capacity: 200 lbs• FOR RESIDENTIAL USE ONLY! NOT FOR USE AS A STORE DISPLAY.• When disposing swing DO NOT BURN. Dispose of in a landfill.Limited Manufacturers WarrantyThe “seller” warrants this product to be free from defects in workmanship and materials, under normal use and conditions at its original installation, for one year.Cosmetic defects or natural defects of wood (e.g., warping, seasonal checking or cracking, knots, or knot holes, etc.) that do not affect the structural integrity of the product are not covered by this warranty. Defects that develop because the product is exposed to extreme climate conditions, excessive water exposure, lumber that has been damaged by wood boring bees, or defects that develop as a result of faulty or improper installation of the product, are not covered by this warranty. Fading or discoloration or molding of any wood parts are not considered defects in material as long as they do not affect the functionality or structural integrity of the part or component.It is the owner’s responsibility to properly maintain the product. Imperfections or defects that develop because of a failure to properly maintain the play set are not covered by this warranty. The “seller” will repair or, at its discretion, replace any part within the stated warranty period that is defective in workmanship or materials. This decision is subject to verification of the defect, which, at the “seller’s” discretion, may be accomplished by submitting photographs or by delivery of the defective part to the “seller”. Any warranty claim must include proof of purchase, including the date of purchase. In addition, within the first 30 days from the date of purchase, the “seller” will replace any parts discovered to be missing from or damaged in the original packaging.This warranty is valid only if the product is used for the purpose for which it was designed and installed at a residential, single-family dwelling. This warranty is void if the product is usedin a commercial or institutional setting. This warranty does not cover (a) products that have been damaged by acts of God, negligence, misuse, or accident, or that have been modified or repaired by unauthorized persons; (b) the cost of labor; or (c) the cost of shipping the product, any part, or any replacement product or part.The “seller” DISCLAIMS ALL OTHER REPRESENTATIONS AND WARRANTIES OF ANY KIND, EXPRESS, IMPLIED, STATUTORY, OR OTHERWISE, INCLUDING THE IMPLIED WARRANTIES OF MERCHANTABILITY AND FITNESS FOR A PARTICULAR PURPOSE. PLAYNATION WILL NOT BE LIABLE FOR ANY INCIDENTAL OR CONSEQUENTIAL DAMAGES. This warranty is valid only in the United States of America, is nontransferableand does not extend to the owners of the product subsequent to the original purchaser. Some states do not allow limitations on implied warranties or exclusion of incidental or consequential damages, so these restrictions may not be applicable to you. This warranty gives you specific legal rights. You may also have other rights which vary from state to state.Important Safety GuidelinesThis product is intended for residential use only and not intended for use in any public setting. A safety surface such as mulch or recycled tire should be used under the product to prevent injury from falls.As with any home project, good judgment and respect for power tools will greatly reduce the risk of injury. We recommend you follow all tool manufacturers’ safety guidelines. Always wear eye protection and safety gloves to prevent injury. While this swing is being constructed, please keep children away until the project is complete. Bolts and screw heads should be checked regularly for tightness.The “seller” shall not be liable for incidental, indirect or consequential damages or injuries that result from the building and/or playing on this product. Adult supervision is recommended anytime this product is being used.THE WEIGHT LIMIT FOR THIS PRODUCT IS 200 LBSThe weight limit must for this swing must not be exceeded. Failure to adhere to these and other safety guidelines could result in damage to the swing and injury to the user. NOTE: Your children’s safety is our #1 concern. Observing the following statements and warnings reduces the likelihood of serious or fatal injury. Please review these safety rules regularly with your children.• On-site adult supervision is required.• Teach children not to walk close to, in front of, behind, or between moving swings or other moving playground equipment.• Teach children to sit in and never stand on swings.• Teach children not to twist the chains and ropes and not to loop them over the swing beam, since this may reduce the strength of the chain or rope.• Teach children not to jump from swings or other playground equipment in motion.• Teach children not to push empty seats. The seat may hit them and cause serious injury.• Teach children to sit in the center of the swings with their full weight on the seats.• Teach children not to use the equipment in a manner other than intended.• Parents should have children dress appropriately with well-fitting shoes. Loose clothing such as scarves and ponchos should not be worn. Always take off, tie up or tuck in cords and drawstrings on children’s clothing. These things can get caught on playground equipment and strangle a child.• Verify that any suspended climbing ropes, chains, or cables are secured at both ends.• Teach children not to attach items to the playground equipment that are not specifically designed for use with the equipment, such as, but not limited to, jump ropes, clothesline, pet leashes, cables and chain as they may cause a strangulation hazard.• Teach children to never wrap their legs around swing chain.• Teach children to never slide down the swing chain.WARNING: Children must NOT use this product until unit has been completely assembled and inspected by an adult.Important Safety Guidelines (Continued)This product should be inspected on a regular basis. If any of the following conditions are noted, they should be removed, corrected, or repaired immediately to prevent injuries:• Hardware that is loose, worn or that has protrusions or projections.• Scattered debris, litter, rocks, or tree roots.• Splinters, large cracks, and decayed wood components.• Deterioration and corrosion on structural components.• Missing or damaged equipment components.• Check all nuts and bolts frequently during the usage season and tighten as required. (But not so tight that you crack the wood)• Oil all metallic moving parts monthly during the usage period.• Check all coverings for bolts and sharp edges twice monthly during usage season to be certain they are in place. Replace when necessary. It is especially important to do this at the beginning of each new season.• Check swing seat and chains monthly during usage season for evidence of deterioration. Replacement should be made of any item if excessive wear is found. Contact the “seller” for warranted replacement parts.• Inspect wood parts monthly. The grain of the wood sometimes will lift in the dry season causing splinters to appear. Light sanding may be necessary to maintain a safe playing environment. If you are treating your product with stain regularly, it will help prevent severe checking/splitting and other weather damage.• Once or twice a year, depending on your climate conditions, you must apply some type of protection (sealant) to the wood of your product. Prior to the application of sealant, lightly sand any “rough” spots on your set. Please note this is a requirement of your warranty.• The swing area should be free from obstacles such as yard toys, etc. when in use.• The swing should have a fall zone extending a minimum of 6’ from the outer edge of the support structure on each side. A “fall zone” in front and back of the swing should extend out a minimum distance of twice the height of the swing as measured from the ground to the top of the swing support structure.Play Set Surfacing Recommendations:Below are some of the recommendations that the U.S. Consumer Product Safety Commission (CPSC) offers from its Handbook for Public Playground Safety. The guide can be downloaded in full at /s3fs-public/325.pdf1. Protective Surfacing - Since almost 60% of all injuries are caused by falls to the ground, protective surfacing under and around all playground equipment is the most critical safety factor on playgrounds.Certain manufactured synthetic surfaces also are acceptable; however, test data on shock absorbing performance should be requested from the manufacturer.Asphalt and concrete are unacceptable. They do not have any shock absorbing properties. Similarly, grass and turf should not be used. Their ability to absorb shock during a fall can be reduced considerably through wear and environmental conditions. Certain loose-fill surfacing materials are acceptable such as the types and depths shown in the table.Fall Heights and Recommended MaterialsType Of Material 6 in. depth9 in. depth12 in. depth Double-Shredded bark mulch6’ Fall Height10’ Fall Height11’ Fall Height Wood Chips6’ Fall Height7’ Fall Height12’ Fall HeightFine Sand5’ Fall Height5’ Fall Height9’ Fall Heightn/a n/a Shredded Tires*10-12’ FallHeightFine Gravel6’ Fall Height7’ Fall Height10’ Fall Height*This data is from tests conducted by independent testing laboratories on a 6-inch depth of uncompressed shredded tire samples produced by four manufacturers. The tests reported critical heights, which varied from 10 feet to greater than 12 feet. It is recommended that persons seeking to install shredded tires as a protective surface request test data from the supplier showing the critical height of the material when it was tested in accordance with ASTM F1292.It should be recognized that all injuries due to falls cannot be prevented no matter what surfacing material is used.REQUIRED TOOL LIST:___ 10mm Box End Wrench or Adjustable Wrench___ 9/16” Wrench___ 7/16” Box End Wrench or 7/16” Closed end wrench (12 point).___ Locking Pliers (Vise Grips) may be required___ Screwdriver (Flat or Phillips for holding eyebolts when tightening nuts)___ Soap, Wax or Beeswax if installing the included Lag Swing Hangers.___ 1/4” drill bit if installing the included Lag Swing Hangers.___ Cordless or electric drill if installing the included Lag Swing Hangers.___ Extension Cord if using electric drill___ Pencil if installing the included Lag Swing HangersKIT CONTENTS:Swings, Slides, Accessories:___ (Qty ) Description___ (1) Back Assembly___ (1) Seat Assembly___ (2) Chain Assemblies with s-hook and short, medium, long chains--All in a bag with (2) Lag Swing Hangers (also called ceiling hooks).___ (2) Arm Rest___ (2) Arm Rest Support___ (1) Hardware BagHardware List:see following pagesWood Components List:see following pages04-0019 Babysitter Swing Dimesions22716"221316" "49"2916 233 338"" 8 25516 711" 16 195"18916"CHAIN QUICKLINKQTY: 4QTY: 8QTY: 2EYE BOLT 1/4" PLASTIC CAP QTY: 8QTY: 23/8" PLASTIC CAP QTY: 41/4" X 3" CARRIAGE BOLT CARRIAGE BOLT QTY: 4QTY: 41/4" X 2"3/8" WASHER EYE BOLT 3/8" X 4"QTY: 83/8" LOCK NUT (STANDARD)QTY: 8QTY: 41/4" HEX NUT 1/4" WASHER 3/8" X 5"Babysitter Swing Hardware REV A: 7/21/2016 JH678914325USE THE RULER TO THE RIGHT TO MEASURE YOUR BOLTS AND SCREWS. PICTURE VIEWS 1/4" LOCKWASHERQTY: 8CHECK TIGHTNESS OF SCREWSBEFORE ASSEMBLYPICTUREDESCRIPTION QTY.(IN CHAIN BAG)(IN BAG)SEAT BACK CHAIN 112(4 HOLES IN (3 HOLES IN 2SIDES)ARMREST2SUPPORTSIDES)ARMREST ASSEMBLIES LAG SWING HANGER (CEILING HOOK)2CHECK TIGHTNESS OF SCREWSBEFORE ASSEMBLYSTEP 1: SEAT TO BACK ASSEMBLY1: LINE UP THE HOLES IN THE BACK WITH THE HOLES IN THE SEAT.2: PLACE A 1/4" X 2" CARRIAGE BOLT INTO EACH HOLE AND SET IT WITH A HAMMER.3: FASTEN THE BACK TO THE SEAT WITH 1/4" WASHERS, 1/4" LOCK WASHERS AND 1/4" NUTS. USE THE SMALL PLASTIC CAPS INCLUDED TO COVER THE EXPOSED THREADS ON THE ENDS OF THE CARRIAGE BOLTS.*IF FOR SOME REASON THE CARRIAGE BOLTS SPIN IN THE HOLES USE A PAIR OF LOCKING PLIERS (VISE GRIPS) TO HOLD THE HEAD OF THE CARRIAGE BOLT WHILE TIGHTENING THE NUTS.WASHER NUTIN EACH SIDE)PLASTIC CAP1/4"BACK(HAS FOUR HOLES IN EACH SIDE)SEAT(HAS THREE HOLES CARRIAGE BOLT1/4"1/4" X 2"1/4"LOCK WASHERSTEP 2: ARMREST ASSEMBLIES1: LINE UP THE SMALL HOLE IN EACH ARMREST WITH THE SMALL HOLE IN THE ARMREST SUPPORT.2: PLACE A 1/4" X 3" CARRIAGE BOLT INTO THE HOLE IN THE ARMREST AND SET IT WITH A HAMMER.3: FASTEN THE ARMREST TO THE ARMREST SUPPORT WITH 1/4" WASHERS, 1/4" LOCKWASHERS AND 1/4" NUTS. YOU WILL HAVE TO USE A 7/16" BOX END WRENCH IN THE BIG HOLE OF THE ARMREST SUPPORT TO TIGHTEN THE NUTS*.4: PLACE A PLASTIC CAP OVER THE END OF THE EXPOSED THREADS ON THE END OF THE CARRIAGE BOLT.* IF FOR SOME REASON THE CARRIAGE BOLTS SPIN IN THE HOLES USE A PAIR OF LOCKING PLIERS (VISE GRIPS) TO HOLD THE HEAD OF THE CARRIAGE BOLT WHILE TIGHTENING THE NUTS.BOLT1/4" LOCK WASHERARMRESTARMREST ARMRESTARMREST SUPPORT1/4" WASHER SUPPORT1/4" NUTTHIS WILL BE THE RIGHT ARMREST ASSEMBLYTHIS WILL BE THE LEFT ARMREST ASSEMBLY1/4" X 3"CARRIAGE 1/4" PLASTIC CAPBOLTRIGHT ARMREST 1/4" NUTLEFT ARMREST ASSEMBLYASSEMBLY1/4" WASHER 1/4" X 3"CARRIAGE SEAT BACK1/4" LOCK WASHER STEP 3: ARMREST ASSEMBLIES TO SEAT BACK1: LINE UP THE END HOLE IN THE ARMREST WITH THE MIDDLE HOLE IN THE SEAT BACK.2: PLACE A CARRIAGE BOLT INTO THE END HOLE OF THE ARMREST AND SET IT WITH A HAMMER.3: FASTEN THE ARMREST TO THE SEAT BACK WITH A 1/4" WASHER, A 1/4" LOCK WASHER AND A 1/4" NUT*.* IF FOR SOME REASON THE CARRIAGE BOLT SPINS IN THE HOLE USE A PAIR OF LOCKING PLIERS (VISE GRIPS) TO HOLD THE HEAD OF THE CARRIAGE BOLT WHEN TIGHTENING THE NUT.ARMREST SUPPORT3/8" BOLT CAP3/8" WASHER SEATDOWN DETAIL A SCALE 1 : 33/8" X 5" EYE BOLT3/8" LOCK NUTGAP FACES 3/8" WASHEREYE BOLTS ARE VERTICAL.STEP 4: EYEBOLTS1: PLACE A 3/8" X 4" EYE BOLT THROUGH A 3/8" WASHER AND THEN THROUGH THE HOLE IN THE UPPER PART OF THE SEAT BACK.2: MAKE SURE THE GAP IN THE EYE BOLT FACES DOWN.3: PLACE A 3/8" WASHER AND A 3/8" LOCK NUT OVER THE END OF THE EYE BOLT AND TIGHTEN. DO NOT TIGHTEN THE BOLT SO TIGHTLY THAT YOU CRACK THE WOOD.4: PLACE A 3/8" X 5" EYE BOLT THROUGH A 3/8" WASHER AND THEN THROUGH THE ARMREST SUPPORT AND THROUGH THE SEAT.5: MAKE SURE THE GAP IN THE EYE BOLT FACES DOWN.6: PLACE A 3/8" WASHER AND A 3/8" LOCK NUT OVER THE END OF THE EYE BOLT AND TIGHTEN. DO NOT TIGHTEN THE BOLT SO TIGHTLY THAT YOU CRACK THE WOOD.3/8" X 5" EYE BOLTEYE BOLT3/8" LOCK NUTGAP FACES DOWNBACKSEAT EYE BOLT3/8" X 4"EYE BOLT3/8" WASHER3/8" X 4"3/8" X 5"3/8" BOLT CAPGAP FACES DOWNA3/8" WASHERSEATSTEP 5: QUICK LINKS1: LOCATE FOUR OF THE QUICK LINKS AS SHOWN.2: LOOSEN THE NUT ON THE QUICK LINK AND ATTACH IT TO THE EYE BOLT.3: REPEAT FOR ALL OF THE EYE BOLTS.LOOSEN NUTATTACH QUICK LINK TO EYE BOLT.QUICK LINKSCALE 1 : 2DETAIL A EYE BOLTEYE BOLTEYE BOLTEYE BOLTEYE BOLTALINKDETAIL B SCALE 1 : 5MEDIUM CHAINQUICK HOLEINSERT CHAIN AND TIGHTEN NUT WITH WRENCH.DETAIL A QUICK LINKSCALE 1 : 2.5SHORT CHAININSERT CHAIN AND TIGHTEN NUT WITH WRENCH.ABS-HOOKS-HOOKLONG CHAINSHORT CHAINMEDIUM CHAINSTEP 6: CHAINS1: FASTEN THE SHORT CHAIN TO THE QUICK LINK ON THE SEAT BACK. TIGHTEN THE NUT ON THE QUICK LINK WITH A WRENCH.2: INSERT THE MEDIUM CHAIN THROUGH THE HOLE IN THE ARMREST. MAKE SURE THE CHAIN IS NOT TWISTED NEAR THE "S"-HOOK. ALSO MAKE SURE THE MEDIUM AND SHORT CHAINS ARE NOT TWISTED. CONNECT THE END OF THE MEDIUM CHAIN TO THE QUICK LINK IN THE SEAT. TIGHTEN THE NUT ON THE QUICK LINK WITH A WRENCH.3: REPEAT SUBSTEPS 1 THROUGH 2 FOR THE CHAIN ON THE OTHER SIDE OF THE SWING.In order to achieve the proper tilt to the seat leave one chain link loose at the end of each of the armrest eye-bolts.SECOND LINKFIRST LINK (LEAVE LOOSE)ARMREST SUPPORTEYE BOLTSTEP 7: SWING HANGING METHODS1: LAG SWING HANGERS ARE INCLUDED WITH THE BABYSITTER SWING. IF YOU HAVE AN EXISTING BEAM WITH NO SWING HANGERS THEN YOU MAY USE THE LAG SWING HANGERS TO HANG YOUR SWING. FOLLOW THE DIRECTIONS INCLUDED IN THE BAG WITH THE LAG SWING HANGERS TO MOUNT THEM. THE HOOKS MUST SWING IN THE SAME DIRECTION AS THE SWING TO WORK PROPERLY.THEN JUST HOOK THE CHAIN ONTO SHOWN FOR CLARITY (NOT INCLUDED!)CLIPS TO ATTACH YOUR CHAINS TO THE SWING HANGER. CONTACTHANGER ON YOUR SWING SETCLIPS.YOU HAVE THIS STYLE SWING SWING HANGER WITH HOOKS. IF THE EXISTING HOOKS.YOUR LOCAL DEALER TO OBTAIN TWO SPRING SIMPLE SWINGCLOSED LOOP SWING HANGER. IF YOU HAVE THIS STYLE SWING HANGER ON YOUR SWING SET THEN YOU MUST HAVE TWO SPRING SPRING CLIPS (NOTINCLUDED)EXISTING BEAM (NOT INCLUDED)ASCALE 1 : 4DETAIL A LAG SWING HANGERS (2 INCLUDED WITH BABYSITTER SWING)HOOK MUST SWING IN SAME DIRECTION AS THE SWING!。
LiftSeat 座椅说明书
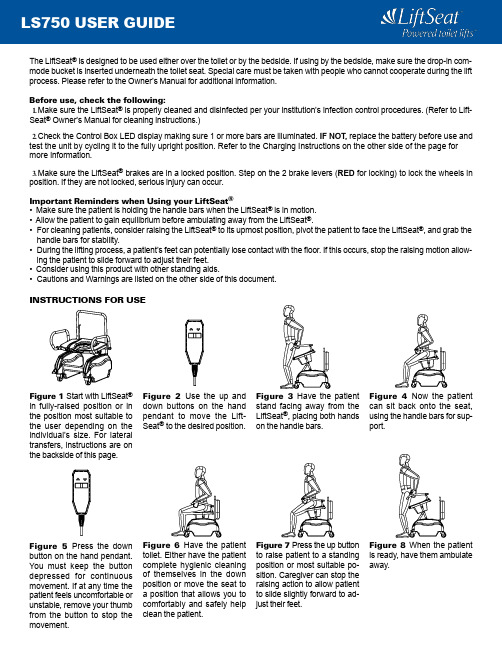
The LiftSeat ® is designed to be used either over the toilet or by the bedside. If using by the bedside, make sure the drop-in com-mode bucket is inserted underneath the toilet seat. Special care must be taken with people who cannot cooperate during the lift process. Please refer to the Owner’s Manual for additional information.Before use, check the following:1.Make sure the LiftSeat ® is properly cleaned and disinfected per your institution’s infection control procedures. (Refer to Lift-Seat ® Owner’s Manual for cleaning instructions.)2.Check the Control Box L E D display making sure 1 or more bars are illuminated. IF NOT , replace the battery before use andtest the unit by cycling it to the fully upright position. Refer to the Charging Instructions on the other side of the page for more information.3.Make sure the LiftSeat ® brakes are in a locked position. Step on the 2 brake levers (RED for locking) to lock the wheels inposition. If they are not locked, serious injury can occur.Important Reminders when Using your LiftSeat ®•Make sure the patient is holding the handle bars when the LiftSeat ® is in motion.• Allow the patient to gain equilibrium before ambulating away from the LiftSeat ®.For cleaning patients, consider raising the LiftSeat • ® to its upmost position, pivot the patient to face the LiftSeat ®, and grab the handle bars for stability.During the lifting process, a patient’s feet can potentially lose contact with the floor. If this occurs, stop the raising motion allow -•ing the patient to slide forward to adjust their feet.•Consider using this product with other standing aids.Cautions and Warnings are listed on the other side of this document.•InStRUctIonS foR USEfigure 1 Start with LiftSeat ® in fully-raised position or in the position most suitable to the user depending on the individual’s size. For lateral transfers, instructions are on the backside of this page.figure 2 Use the up and down buttons on the hand pendant to move the Lift-Seat ® to the desired position.figure 3 Have the patient stand facing away from the LiftSeat ®, placing both hands on the handle bars. figure 4 Now the patient can sit back onto the seat, using the handle bars for sup-port.figure 5 Press the down button on the hand pendant. You must keep the button depressed for continuous movement. If at any time the patient feels uncomfortable or unstable, remove your thumb from the button to stop the movement.figure 6 Have the patient toilet. Either have the patient complete hygienic cleaning of themselves in the down position or move the seat to a position that allows you to comfortably and safely help clean the patient.figure 7 Press the up button to raise patient to a standing position or most suitable po-sition. Caregiver can stop the raising action to allow patient to slide slightly forward to ad-just their feet.figure 8 When the patient is ready, have them ambulateaway.• U nlock the handle bar by depressing the push pin, then rotate the handle bar to the vertical position as shown in the illustration.BattERy chaRGInG anD MaIntEnancELift up on the handle on the • back of the battery, upwards and away from the control box, to remove from the LiftSeat ®.Place the battery onto the charging unit, make sure the battery is seated onto the charger. The LED • will illuminate when charging.When the battery is fully charged, the LED will stop illuminating.• Place the battery back onto control box as shown. Make sure there is an audible click and the LCD • display on the control box shows the battery is fully charged.Refer to the owners manual for additional information.• PERfoRMInG a LatERaL tRanSfER wIth thE LIftSEat ®The handle bars can be rotated out of the way for more clearance when laterally tranferring a patient to or from the LiftSeat ®.• Y ou are now ready to transfer a patient onto the LiftSeat ®. Use the hand pendant to raise or lower the lift as needed to aid in the transfer process.• R otate handle bar to the lowered position making sure the pin is in the locked position.InSERtInG thE coMMoDE BUckEt oR SPLaSh GUaRDcommode Bucket (PN: LS000-CB-100) – The commode bucket enables the LiftSeat ® to be used away from the toilet, bedside or in a specific room.Lift the toilet seat up and place the commode bucket in the toileting hole, then lower the toilet seat.• Dispose of matter per your hospital’s standard policy.• Splash Guard (PN: LS000-SG-100) – The splash guard helps direct waste into the toilet.Lift the toilet seat up and place the splash guard in the toileting hole, then lower the toilet seat.• Cycle the LiftSeat • ® up and down making sure there are no interference issues with the existing toilet.cont act InfoRMa tIonLiftSeat ® Customer Service 2001 Midwest Road Suite 204 Oakbrook, IL 60523(630) 424-2840email: info@ web: DOC. NO. LS 750UG 082021caUtIonS anD waRnInGScaution: Do not operate the LiftSeat ® with the toilet seat in the up position. caution: This product is not a patient transport device.caution: This product is not a shower chair.warning: Non-responsive or combative patients may not be suited for the LiftSeat ®. warning: Maximum patient weight is 750 lbs.Push PinaDjUStInG thE hEIGht of yoUR LIftSEat ®The LiftSeat ® can be adjusted to 2 different seating height positions. In order to change the seatingheight, follow the instructions listed below.• M anipulate the LiftSeat ® by using the hand pendant to about 25 or 50% percent of the lift.• P ull both pins outward (under top seating surface ). The pins are located on either side of the unit under the plastic top seat.• T he top seat assembly with handle bars should now be able to be pulled up or pushed down to thenext available position.• P ush or pull the top assembly a minimal amount, then release your outward pressure on the pins.• M ove the top seat assembly until it engages with the next set of positioning holes (there should be an audible click when engaging the next set of positioning holes).• V isually make sure the pins are properly seated (pushed in) into the holes.• T he LiftSeat ® is now ready for patient use.Pin。
爱尔高特悬挂椅用户指南说明书

StyleView Sit Stand VLPatient Room | USA: 1-800-888-8458 | Europe: +31 (0)33-45 45 600 | China: 400-120-3051 | Japan:*************************English, Español, Français, Deutsch, Nederlands, Italiano, Svenska, 日本語, 汉语User's GuideEnglishFor the latest User Installation Guide please visit: These symbols alert users of a safety condition that demands attention. All users should be able to recognize and understand the signifi cance of the fol-lowing Safety Hazards if encountered on the product or within the documentation. Children who are not able to recognize and respond appropriately to Safety Alerts should not use this product without adult supervision!Hazard Symbols ReviewSafetyImportant! You will need to adjust this product after installation is complete. Make sure all your equipment is properlyinstalled on the product before attempting adjustments. This product should move smoothly and easily through the full range of motion and stay where you set it. If movements are too easy or diffi cult or if product does not stay in desired positions, follow the adjustment instructions to create smooth and easy movements. Depending on your product and the adjustment, it may take many turns to notice a diff erence. Any time equipment is added or removed from this product, resulting in a change in the weight of the mounted load, you should repeat these adjustment steps to ensure safe and optimum operation.WARNING: Because surfaces vary widely and the ultimate mounting method is out of Ergotron’s control, it is imperative that you consult with appropriate engineering, architectural or construction professional to ensure that your Ergotron mounting solution is mountedproperly to handle applied loads.CAUTION: Make sure the wall mount bracket is level, fl ush and snug to the wall surface. DO NOT OVERTIGHTEN THE BOLTS.ComponentsTools NeededMounting Height for Ergonomic WorkstationThis mounting height is a recommendation for an ergonomic workstation that accommodates user heights of 5’10”-5’11” (178-180cm).If user heights are diff erent than this, you should change mounting height to accommodate user heights. (Change mounting height one inch for every one inch diff erence in user heights).Mounting height assumes there is a 6” (152 mm) distance between the center of your monitormounting holes and the top of the screen. If your distance is smaller, you should increase mounting height accordingly, if your distance is larger, you should decrease your mounting height accordingly.3 Mounting Optionsc3-1/8”80mm7/32”5.5mm3/8”3-1/8”80mmAnchors that are not fully set in solid concrete will not support the applied load resulting in an unstable, unsafe condition which could lead to personal injury and/or property damage. Consult a construction professional if you have any doubt about what this means in regard toyour particular situation.inserted into solid concrete!d6a4x11 of 13888-61-043-G-01 rev. F • 01/19b 9Adjustment Stepproperly installed on the product before attempting adjustments. This product should move smoothly and easily through the full range of motion and stay where you set it. If movements are too easy or diffi cult or if product does not stay in desired positions, follow the adjustment instructions to create smooth and easy movements. Depending on your product and the adjustment, it may take many turns to notice a diff erence. Any time equipment is added or removed from this product, resulting in a change in the weight of the mounted load, you should repeat these adjustment steps to ensure safe and optimum operation.1/2" 1/2"1/2"c d e f Adjustment StepIncrease FrictionIf this product moves too easily, thenyou'll need to increase friction:Decrease FrictionIf this product is too diffi cult to move,then you'll need to decrease friction:Increase FrictionIf this product moves too easily, thenyou'll need to increase friction:Decrease FrictionIf this product is too diffi cult to move,then you'll need to decrease friction:Increase FrictionIf this product moves too easily, thenyou'll need to increase friction:Decrease FrictionIf this product is too diffi cult to move,then you'll need to decrease friction:12 of 13888-61-043-G-01 rev. F • 01/1913 of 13888-61-043-G-01 rev. F • 01/19© 2016 Ergotron, Inc. All rights reserved. | USA: 1-800-888-8458 | Europe: +31 (0)33-45 45 600 | China: 400-120-3051 | Japan:*************************Learn more about ergonomic computer use at:Set Your Workstation to Work For YOU!Height Position top of screen slightly below eye level.Position keyboard at about elbow height with wrists fl at.Distance Position screen an arm's length from face—at least 20” (508mm).Position keyboard close enough to create a 90˚ angle in elbow.Angle Tilt screen to eliminate glare. Tilt the keyboard back 10° so that your wrists remain fl at.To Reduce FatigueBreathe - Breathe deeply through your nose.Blink - Blink often to avoid dry eyes.Break • 2 to 3 minutes every 20 minutes • 15 to 20 minutes every 2 hours.For local customer care phone numbers visit: For Service visit: For Warranty visit: /warranty。
- 1、下载文档前请自行甄别文档内容的完整性,平台不提供额外的编辑、内容补充、找答案等附加服务。
- 2、"仅部分预览"的文档,不可在线预览部分如存在完整性等问题,可反馈申请退款(可完整预览的文档不适用该条件!)。
- 3、如文档侵犯您的权益,请联系客服反馈,我们会尽快为您处理(人工客服工作时间:9:00-18:30)。
悬吊式折叠椅
技术领域
本发明为一种悬吊式折叠椅。
具体的说,是将座椅的置放方式做成悬吊式,将折叠椅水平可转变为床,下翻可转变为人体训练装置,属于家具技术领域。
背景技术
当前的座椅大都是地面支撑和功能单一的荡椅,加工复杂,制造费时、费力,不能
适应人体身高差异,长久使用不舒适。
本发明悬吊式折叠椅,为了克服现有技术中的不足,将各种落地结构的座椅,改变
为悬吊式。
该发明是以刚性材料作支撑体,折叠椅用柔性带通过弹簧悬吊在支撑体上,可调节折叠椅高度,支撑架加工和折叠椅制造过程简单快捷,折叠椅及扶手可根据人体身高调节角度和高度。
发明内容
钢管支撑结构,折叠椅用柔性带通过弹簧悬吊和高度调节,椅背、坐面、腿挡板可
以调节角度和长度,水平翻成平面,扶手可以旋转和调整角度、高度。
本发明具有以下特征:
1. 由两组四根弯制弧形钢管通过套管和上下横梁、斜支撑梁用螺栓紧固连接组成
支撑结构,整体弹性好,加工工艺简单。
2. 折叠椅用柔性带通过弹簧悬吊在支撑结构上,根据人体身高自由调节高度。
3. 椅背、坐面、腿挡板可以调节角度和长度,水平翻成平面,可以平躺休息;下翻
可以进行人体锻炼。
4.扶手可以旋转和调整角度、高度和长度,胳膊舒展自如。
附图说明
图1、悬吊式折叠椅悬吊固定示意图
图2、刚性结构支撑架示意图
图3、三通间接件结构示意图
图4、折叠椅展开示意图
图5、扶手调节装置示意图
附图说明如下:
1. 悬吊折叠椅悬吊固定如图1 所示:刚性结构支撑架1,座椅前部柔性吊带2,座
椅后部柔性吊带3。
2. 刚性结构支撑架如图2 所示:地平面弯管4,三通连接件组5,支撑弯管6,上部
弯管7。
3. 三通连接件结构如图3 所示:紧固定位槽8。
4. 折叠椅展开如图4 所示:坐面9,挡腿板连接套10,挡腿板连接轴11,座椅前部
柔性吊带2,挡腿板12,挡腿板连接轴13,挡腿板柔性吊带14,柔性吊带固定装置15,扶手
16,座椅后部柔性吊带3,椅背连接套17,椅背连接轴18,椅背柔性吊带19,连接轴20,椅背
21。
5. 扶手调节装置如图5 所示:坐面9,旋转移动套22,旋转移动轴23,支架连接轴
24,27,伸缩杆25,伸缩套26,扶手16,扶手连接轴28,伸缩轴29。
间LED广告牌效果的任何结构变动、等同替换和改进等均属于本发明专利的保护范围。
注事项。