SobeyDoc2.6_用户手册
索贝使用说明书(E1)
目录目录 (1)前言 (6)第一章Editma1软件介绍 (7)1) 设备准备 (7)2) 系统设臵 (8)3) 主要功能模块介绍 (10)4) 基本编辑流程 (22)第二章素材采集 (30)1. 素材采集窗口简介 (30)2. 采集参数设臵 (32)3. 采集方式 (33)1) 手动直接采集 (33)2) 三点编辑采集 (33)3) 批采集 (34)第三章素材管理 (36)1. 素材库窗口简介 (37)2. 引入素材 (38)3. 删除素材 (39)4. 查看素材信息 (39)第1 页共97 页5. 素材库窗口中的右键操作 (40)第四章素材编辑 (41)1. 素材编辑窗口简介 (41)2. 定义素材入出点 (43)3. 素材转场 (44)4. 素材上线 (44)1) 覆盖到入出点加特技 (44)2) 覆盖到入出点 (45)3) 覆盖到游标 (45)4) 插入到游标 (45)5) 替换选中素材 (45)第五章编辑时间线 (47)1. 时间线编辑窗口/节目编辑窗口简介 (48)2. 节目编辑窗口的操作 (51)1) 切换显示模式 (51)2) 时间线同期录音 (51)3. 时间线素材的操作 (52)1) 素材选取 (52)2) 素材拖动 (53)3) 素材删除 (53)4) 素材成组解组 (54)5) 素材复制 (54)6) 素材对齐操作 (54)第2 页共97 页7) 素材剪切 (55)4. 时间线窗口的操作 (55)1) 时间线的移动 (55)2) 时间线的缩放 (55)3) 轨道的可预览性操作 (55)4) 轨道锁定操作 (55)5) 改变上线目标轨道的操作 (56)6) 定义关键点 (56)5. 时间线上右键的操作 (56)6. 时间线实时预监输出 (57)第六章特技编辑操作 (59)1. 特技编辑窗口 (59)2. 在特技编辑窗口制作特技 (61)1) 添加特技 (61)2) 删除特技 (62)3. 使用特技库添加特技 (62)4. 入出点间添加特技 (63)5. V轨过渡特技 (63)6. 自定义特技库 (64)7. 时间线上右键中的特技操作 (64)8. 软特技 (65)第七章音频操作 (69)1. 设臵音频过渡方式 (69)第3 页共97 页2. 音量调节 (70)3. 调音台 (70)4. 音频输出设臵 (71)1) 单声 (72)2) 立体声1 (73)3) 立体声2 (73)第八章字幕制作 (75)1. 唱词制作 (75)1) 文本区编辑区的使用 (76)2) 模板调用 (77)3) 唱词字幕的使用 (77)2. 通告制作 (79)3. 文字对象 (80)4. 滚屏字幕制作 (81)1) 滚屏字幕的制作 (82)2) 滚屏文件的修改 (82)5. 底行游动字幕制作 (85)6. 几何图形制作 (86)7. 符号图形制作 (87)8. 引入图片 (87)9. 引入动画 (88)10. 引入字幕工程 (89)11. 字幕清屏 (90)第4 页共97 页12. 综合页 (90)第九章节目生成 (91)1. 时间线上快速生成 (91)2. 生成多种格式的AVI文件 (92)3. 片断导出 (93)第十章节目下载 (95)1. 文件下载 (95)2. 节目下载 (96)第5 页共97 页前言感谢您使用索贝公司的Editmax1非线性编辑系统。
MSV_555EX_用户手册
MSV 555EX精彩回放服务器版本:V2.0用户手册索贝数码科技股份有限公司高新区新加坡工业园新园南二路2号四川,成都中国声明版权所有© 2009 Sobey Corporation. 保留所有权利。
未经本公司书面许可,任何个人和单位不得摘抄或者复制本手册内容的部分或者全部,并不得以任何形式进行传播。
由于产品版本升级或其它原因,本手册内容会不定期更新,恕不另行通知。
本手册仅作为使用指导,本手册中的内容不构成任何明示或暗示的担保。
本手册所包含的商标都属各自所有人所有。
关于本手册本手册适用于MSV 555EX精彩回放服务器的用户,并作为用户使用该产品的标准指导手册。
全面介绍了各项功能及其使用方法,提供了由易到难的面向用户的任务向导型描述。
本手册不包含生产、安装调试等内容。
目录第1章概述 (1)1.1产品简介 (1)第2章常见应用场景 (2)2.1赛事精彩片段回放 (2)2.2演播室节目回采 (2)2.3现场背景大屏幕播出 (3)2.4垫片播出 (3)第3章快速入门 (5)3.1设备连接 (5)3.2设备开机 (5)3.3采集素材 (5)3.4边采边编 (6)3.5挑选精彩片段素材 (6)3.6编辑节目 (7)3.7回放精彩集锦 (8)3.8设备关机 (9)第4章使用指南 (10)4.1界面布局 (10)4.2收录 (11)4.2.1 收录界面 (11)4.2.2 手工收录 (13)4.2.3 定时收录 (14)4.2.4 暂停收录 (14)4.2.5 打点送播 (14)4.2.6 打点送编 (14)4.2.7 标记点编目 (14)4.3素材管理 (16)4.3.1 素材管理界面 (16)4.3.2 导入/导出本地素材 (18)4.3.3 挑选素材 (20)4.3.4 连接网络素材库 (20)4.4编辑 (22)4.4.1 编辑界面 (23)4.4.2 添加片段 (24)4.4.3 调整顺序 (24)4.4.4 保存入库 (24)4.4.5 送播 (24)4.4.6 加背景音送播 (24)4.5播出 (25)4.5.1 播出界面 (26)4.5.2 普通播出 (27)4.5.3 联播 (27)4.5.4 循环播 (28)4.5.5 导入/导出节目单 (28)第5章设备维护 (29)5.1定期维护 (29)5.2参数配置 (29)5.3查询日志 (30)附录1 规格 (31)附录2 键盘快捷键 (32)第1章概述内容概要本章介绍MSV 555EX精彩回放服务器(简称MSV 555EX)的功能、特点及组成。
NetManager_V2.3_用户手册sobey公司内部版本

NetManager 网络管理软件 版本:V2.3用户手册更新日期:2008620索贝数码科技股份有限公司高新区新加坡工业园新园南二路 2 号四川,成都中国声明版权所有 © 2008 Sobey Corporation. 保留所有权利。
未经本公司书面许可,任何个人和单位不得摘抄或者复制本手册内容的部分或者全部,并不得以任 何形式进行传播。
由于产品版本升级或其它原因,本手册内容会不定期更新,恕不另行通知。
本手册仅作为使用指导, 本手册中的内容不构成任何明示或暗示的担保。
本手册所包含的商标都属各自所有人所有。
关于本手册本手册适用于所有 NetManager 网络管理软件的用户,并作为用户使用此软件的标准指导手册。
本 手册作为 NetManager 网络管理软件的组成部分,全面介绍了网络管理软件的各项功能及其使用方 法,提供了由易到难的面向用户的任务向导型描述。
目录第 1章 概述 (5)第 2章 快速指南 (6)1.1 运行与退出 (6)2.1.2 运行 (6)2.1.3 退出 (7)2.2 创建基础信息 (7)2.2.1 新建部门 (7)2.2.2 新建用户 (8)2.2.3 新建权限 (8)2.2.4 新建角色 (9)2.2.5 新建栏目 (10)2.3 初始化设置 (11)2.3.1 用户授权 (11)2.3.2 用户空间管理 (13)2.3.3 非编用户参数定义 (15)2.3.4 非编站点编辑 (16)第 3章 使用指南 (17)3.1 常用介绍 (18)3.1.1 常见按钮说明: (18)3.1.2 常用操作介绍: (19)3.2 部门帐号管理 (20)3.2.1 部门管理 (20)3.2.2 用户帐号管理 (21)3.2.3 系统参数设置 (23)3.2.4 栏目管理 (25)3.3 非编参数管理 (27)3.3.1 栏目策略管理 (27)3.3.2 非编用户参数定义 (29)3.3.3 非编用户参数设置 (31)3.3.4 用户空间管理 (32)3.3.5 非编站点编辑 (34)3.3.6 终端站点编辑 (35)3.3.7 用户终端编辑 (36)3.3.8 用户参数编辑 (37)3.4 权限管理 (38)3.4.1 权限分类 (38)3.4.2 角色管理 (40)3.4.3 用户授权 (41)3.5 文稿基础数据 (45)3.5.1 文稿段落 (45)3.5.2 片花 (47)3.5.3 播出方式 (48)3.5.4 稿件来源 (49)3.5.5 地方电视台 (50)3.5.6 广电中心 (51)3.5.7 新闻线索来源 (52)3.5.8 收录类型 (53)3.5.9 基础数据 (54)3.5.10 字幕模板 (55)3.6 在线状态 (56)附录 1 系统参数设置表 (56)附录 2 资源管理策略说明 (65)第1章 概述随广播电视制作单位的发展,视音频素材和相关文稿资料量越来越大、品种越来越多,数据间 相互关系也越来越复杂,基于传统磁带介质的存储方式在检索和传输上存在一定的弊端;加之技术 设备更新换代快,早期的磁带资料有可能无法再利用,如此种种将对音视频资料及其相关的文稿的 无形价值造成不必要的损耗。
Steritest Symbio软件指南说明书
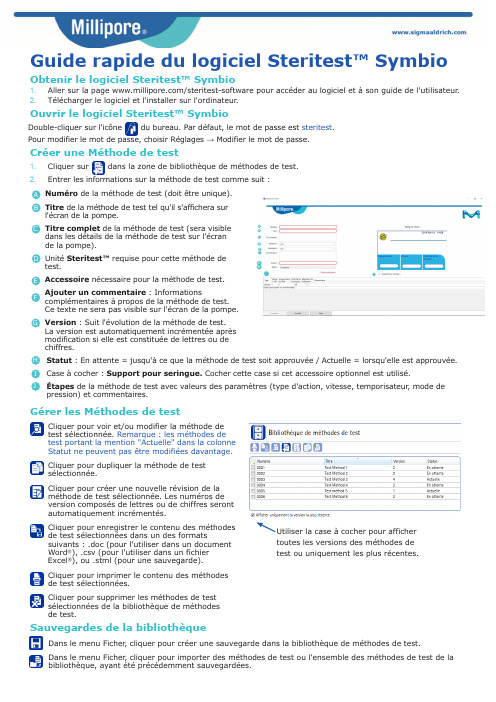
Guide rapide du logiciel Steritest™ Symbio1.Aller sur la page /steritest-software pour accéder au logiciel et à son guide de l'utilisateur .2.Télécharger le logiciel et l'installer sur l'ordinateur .Obtenir le logiciel Steritest™ SymbioDouble-cliquer sur l'icônedu bureau. Par défaut, le mot de passe est steritest .Pour modifier le mot de passe, choisir Réglages → Modifier le mot de passe.Ouvrir le logiciel Steritest™ SymbioCréer une Méthode de testNuméro de la méthode de test (doit être unique).Titre de la méthode de test tel qu'il s'affichera sur l'écran de la pompe.Titre complet de la méthode de test (sera visible dans les détails de la méthode de test sur l'écran de la pompe).Unité Steritest™ requise pour cette méthode de test.Accessoire nécessaire pour la méthode de test.Ajouter un commentaire : Informationscomplémentaires à propos de la méthode de test. Ce texte ne sera pas visible sur l'écran de la pompe.Version : Suit l'évolution de la méthode de test. La version est automatiquement incrémentée après modification si elle est constituée de lettres ou de chiffres.1.Cliquer sur dans la zone de bibliothèque de méthodes de test.2.Entrer les informations sur la méthode de test comme suit :Gérer les Méthodes de testDans le menu Ficher , cliquer pour créer une sauvegarde dans la bibliothèque de méthodes de test.Dans le menu Ficher , cliquer pour importer des méthodes de test ou l'ensemble des méthodes de test de la bibliothèque, ayant été précédemment sauvegardées.Sauvegardes de la bibliothèquetoutes les versions des méthodes de test ou uniquement les plus récentes.Statut : En attente = jusqu'à ce que la méthode de test soit approuvée / Actuelle = lorsqu'elle est approuvée.Case à cocher : Support pour seringue. Cocher cette case si cet accessoire optionnel est utilisé.Étapes de la méthode de test avec valeurs des paramètres (type d'action, vitesse, temporisateur , mode de pression) et commentaires.A B CD E F GH I JCliquer pour voir et/ou modifier la méthode de test sélectionnée. Remarque : les méthodes de test portant la mention "Actuelle" dans la colonne Statut ne peuvent pas être modifiées davantage.Cliquer pour dupliquer la méthode de test sélectionnée.Cliquer pour créer une nouvelle révision de la méthode de test sélectionnée. Les numéros de version composés de lettres ou de chiffres seront automatiquement incrémentés.Cliquer pour enregistrer le contenu des méthodes de test sélectionnées dans un des formatssuivants : .doc (pour l'utiliser dans un document Word ®), .csv (pour l'utiliser dans un fichier Excel ®), ou .stml (pour une sauvegarde).Cliquer pour imprimer le contenu des méthodesde test sélectionnées.Cliquer pour supprimer les méthodes de testsélectionnées de la bibliothèque de méthodesde test.DE FG HCréer un nouveau fichier de transfert1.Cliquer surdans la zone fichier de transfert.2.Saisir le nom du nouveau fichier de transfert.3.Sélectionner les méthodes de test à partir de la bibliothèque de méthodes de test.4.Copier les méthodes de test sélectionnées dans le fichier de transfert sélectionné en utilisant le symboleou en les déplaçant par un glisser-déposer .Modifier un fichier de transfert existantCliquer pour transférer les méthodes de testsélectionnées de la bibliothèque de méthodes de test vers le fichier de transfert.Cliquer pour supprimer les méthodes de test sélectionnées du fichier de transfert.Cliquer pour supprimer le fichier de transfert sélectionné.Cliquer pour ajouter une image au fichier de transfert sélectionné pour personnaliser l'écran de la pompe.Cliquer pour imprimer le contenu du fichier de transfert sélectionné.Cliquer pour enregistrer le contenu du fichier de transfert sélectionné dans un des formats suivants : .doc (pour l'utiliser dans un document Word ®), .csv (pour l'utiliser dans un fichier Excel ®), ou .stml (pour une sauvegarde).de test est différente de celle stockée dansla Bibliothèque de méthodes de test. Cliquer sur cette icône pour actualiser le contenu des méthodes de test présentes dans le fichier de transfert sélectionné.Sélectionner un fichier de transfert dans la liste déroulante.Charger les méthodes de test dans la pompe Steritest™ SymbioEn utilisant une clé USB1.S'assurer que la configuration du réseau et les connexions physiques sont correctes pour permettre une bonne communication entre l'ordinateur et la pompe.S'adresser à son administrateur réseau.2.S'assurer que la pompe est :•Soit hors tension avec le hub de communication sous tension•Soit sous tension avec son écran actif :Configuration → Transfert de méthode →Réseau → Écran pour le transfert de fichier .3.Cliquer sur en bas de la fenêtre principale du logiciel pour connecter le logiciel à la pompe. Sélectionner la connexion réseau et sélectionner une pompe dans la liste déroulante.La fenêtre du fichier de transfert s'affiche.Remarque : Le fait de transférer des méthodes de test vers la pompe écrase son contenu actuel.4.Dans la zone de fichier de transfert, sélectionner le fichier de transfert à transférer vers la pompe.5.Cliquer sur pour démarrer le transfert versla pompe.1.S'assurer que la clé USB est bien connectée àl'ordinateur .2.Cliquer sur en bas de la fenêtre principale du logiciel pour connecter le logiciel à la clé USB.Sélectionner le port USB et sélectionner la clé USB Steritest™ Symbio dans la liste dé fenêtre du fichier de transfert s'affiche.3.Dans la zone de fichier de transfert, sélectionner les fichiers de transfert à transférer vers la cléUSB.4.Cliquer sur pour démarrer le transfert versla clé USB.5.Une fois les fichiers de transfert transférés,déconnecter la clé USB et la connecter au hub de communication.6.Mettre la pompe sous tension. À partir de l'écran principal, sélectionner Configuration → Transfert de méthode →Clé USB.Remarque : Le fait de transférer des méthodes de test vers la pompe écrase son contenu actuel.7.Tourner le bouton de contrôle pour sélectionnerEn utilisant le réseau de l'entreprise ou une connexion directe entre un ordinateur et la pompe© 2019 Merck KGaA, Darmstadt, Allemagne et/ou ses sociétés affiliées. Tous droits réservés.Merck , Steritest, Sigma-Aldrich et Millipore sont des marques de Merck KGaA, Darmstadt, Allemagne, ou d'une société affiliée. Toutes les autres marques citées appartiennent à leurs propriétaires respectifs.Des informations détaillées sur les marques sont disponibles via des ressources accessibles au public. PF16603FR Version 3.0 01/2019L'activité Life Science de Merck KGaA, Darmstadt, Allemagne opère sous le nom de MilliporeSigma aux États-Unis et au Canada.。
BESV TRS 2 XC 快速組裝手冊说明书

快速組裝手冊BESV TRS 2 XCV. 0.0, 20190304內容1.整車箱內容 (2)1.1主內容物 (2)1.2附件箱內容物 (2)2.安裝步驟 (3)2.1龍頭把手 (3)2.2前輪 (4)2.3踏板 (5)2.4座墊座桿 (6)2.5腳架 (6)2.6前燈 (7)2.7前土除 (8)2.8後貨架/土除 (9)2.9伸縮座桿(選配) (10)3.檢查 (14)1.整車箱內容1.1主內容物1.整車車架(含後輪)2.前輪3.附件箱1.2附件箱內容物1. BESV成車說明書-日本(含保固書)2. BESV說明書防竊盜險3. BESV日本保證卡4. 緩衝材5. 緩衝材7. Charger Box(含Charger, Power cord, 充電轉接座)8. 踏板9. 輪輻反光片10. 鈴鐺11. 後反光片/支架12. 儀表14. Shimano說明書2.安裝步驟2.1龍頭, 把手2.1.1調整把手置中後, 角度後掠上揚, 將龍頭與把手依序輪流交互鎖緊至5Nm (龍頭蓋上下間隙需均等)把手角度向後掠上揚間隙均等2.2前輪2.2.1前輪置入前叉後, 插入一快拆輪軸, 轉動螺帽使螺帽外張, 調整快拆把扣緊力道, 確實鎖緊.輪軸螺帽需外張2.2.2調整煞車卡鉗, 使碟盤轉動時, 無受煞車片磨擦d2.3 踏板2.3.1 裝配.“R ” 踏板裝配右側, 以順時針方向確實旋緊“L ” 踏板裝配左側, 以逆時針方向確實旋緊RL2.4座墊座桿2.4.1將座墊依續前後輪流交替鎖緊至6Nm, 鎖緊後, 座墊成水平或前後鎖塊間隙均等狀態.前後間隙均等2.4.2座桿插入部位可抹矽油, 降低磨擦產生異音. 依身高與實際騎乘狀況, 調整座墊高度.取出座桿, 量測插入深度是否足100mm. 否則須更換較長座桿.2.5腳架2.5.1將後腳架上端的鐵片, 放置於車架內側安裝平面平貼, 螺絲由外側穿過車架與腳架鐵片,在車架內側使用尼帽, 將腳架鎖緊(6Nm)Bolts2.6前燈2.6.1移除龍頭前蓋, 更換具有支架鎖點的前蓋, 如圖將龍頭前蓋, Y支架, 前燈鎖固..2.6.2調整前燈角度與位置, 並整理好週圍煞車, 變速, 儀表線.2.6.3連接下管前燈線. 注意白色虛線需與紅線相接2.7前土除2.7.1將土除與土除腳, 用螺絲, 尼帽鎖在一起(M5螺絲8F.7RA38.100, 尼帽8G.12101.851,扭力5Nm)2.7.2將土除腳鎖固在前叉上(M5螺絲8F.7RA38.100, 墊片8H.22201.812, 扭力5Nm)2.7.3將土除鎖固在前叉上橋(M6螺絲8F.8RA6A.100, 墊片8H.22201.A15, 扭力5Nm)2.8後土除2.8後貨架/泥除/反光片2.8.1將反光片與貨架, 用自攻螺絲(反光片配件包)鎖固, (扭力:4Nm)2.8.2使用螺絲(8F.7RY38.100), 墊片(8H.12101.810), 尼帽(8G.12101.851), 將貨架鎖固(扭力:5Nm)) 2.8.3使用螺絲(8F.7RY38.160), 墊片(8H.12101.810), 尼帽(8G.12101.851), 將貨架鎖固(扭力:5Nm) 2.8.4使用螺絲(8F.7RA3A.300), 彈簧墊片(8H.22201.A15), 墊片(8H.12201.A10), 將貨架鎖固在車架勾爪鎖孔上(扭力:6Nm)2.8.5. 使用螺絲(8F.9X138.160), 墊片(8H.12101.810), 配合圓柱墊塊(30.Y28SC.001), 將泥除鎖固在車架上叉橋上(扭力:5Nm)2.8.6.使用螺絲(8F.9X138.160), 墊片(8H.12101.810), 將泥除鎖固在車架下叉橋上(扭力:5Nm)2.9伸縮座桿(選配) (同AM車款裝配方式)2.9.1.購買如下圖之伸縮座桿. 線控機構與上方座桿頭相連接(不可使用底部連接樣式)並準備如下工具2.9.2.將車首入線止栓之固定件取下.2.9.3.將2m的導引線, 由上管後端入線孔穿入在車首左端入線孔, 以LED照入孔內, 車首右端入線孔, 以磁鐵, 鎳子, 將導引線拉出右側入線孔由側面看, 導引線會由上管內部的孔洞, 穿出到下管內,再將導印線從右側入線孔拉出2.9.4.接著將伸縮座桿的黑色外管線, 同樣由上管後端入線孔, 藉由導引線穿入車架內,慢慢的將外管推入車架, 並由車首右側入線孔穿出2.9.5.將導引線抽出車架, 僅留黑色外管在車架內勿移出, 接著將伸縮座桿之內線,同樣由上管後端入線孔, 穿入黑色外管, 一樣由車首右側入線孔穿出.2.9.6.將撥桿鎖固在把手左側, 調整好座桿高度後, 將內線與撥桿, 座桿與座墊鎖緊3.檢察3.1胎壓檢查.3.2煞車, 變速, 鍊條, 功能檢查, 是否連接牢固3.3檢查貨架, 土除, 是否穩固, 並且無歪斜, 以防騎乘危險.3.4插入鑰匙後, 將電池置入, 按下管右側啟動按鈕, 切換左把手之助力模式, 試踩確認馬達運作正常。
洋浦电子办公平台用户手册

洋浦电子办公平台用户手册名目引言 (2)第1章公文拟稿 (3)第2章公文库 (11)第3章待办工作 (12)3.1办理待办发文 (13)3.2办理待办收文 (15)3.3查阅待阅公文 (16)3.4公文查询及快捷通道 (19)第4章我的公文 (20)第5章收文登记 (23)5.1收文登记 (24)5.2已删文件 (27)5.3来文单位 (28)第6章发文登记 (30)6.1发文登记 (30)6.2删除和查询 (32)第7章公文治理 (33)引言公文处理模块由公文库、待办工作、我的公文、公文拟稿、收文登记、发文登记、公文治理等等子模块组成。
简单的说明各模块的作用:●公文拟稿:该模块是依照用户实际的工作流程而编制的流程表单,个人依照自己的工作需求,启动相应的流程,启动流程的同时也是拟稿的开始;●公文库:存放着所有完成流转的收文和发文;●待办工作:用户能够在那个地点看到所有待办的工作,包括待办发文,待办收文和待阅公文;●我的公文:用户在那个地点查看所有涉及到本人的公文;●收文登记:作收文登记用的;●发文登记:将办理终止的公文登记;●公文治理:治理用户关于公文处理模块的权限其中任何用户都能够使用待办工作、我的公文和公文拟稿这三个子模块,其他的子模块需要在公文治理子模块中给予相关的权限才能够使用,假如未赋权限,那么点击该模块的功能栏按钮,系统弹出对话框:〝对不起,您没有****的权限〞,按〝确定〞后返回到首页。
现简单地将各个权限对应的可使用的功能列出如下:✓单位领导:能够进入公文库,查看公文库中的所有发文〔办理终止同时已登记的〕和收文;✓部门治理:能够进入公文治理,为本部门用户给予除单位领导和部门治理以外的其他权限;✓收文登记:能够进入收文登记,进行收文的登记等操作;可进入公文库,查看与本部门相关的收文;✓修改收文登记:能够进入收文登记,修改收文;✓办文员:对收文进行转办;✓发文登记和修改发文登记类似收文登记和修改收文登记。
SOG PowerAssist 用户指南说明书
User’s Guide ForPowerAssist ™Congratulations on becoming aPowerAssist owner. The you initiate the one-handed at tools the same way again!Compound Leverage™ Factoid:SOG’s patented compound leverage generates more plier gripping, wire cutting, and wire crimping power than all other designs. This is accomplished with multiple pivot points that generate greater handle travel in relation to plier movement (most tools have the handles and plier head locked together). A leverage advantage of approximately twice that of similar tools is generated.1. Opening/Closing Your ToolTo open, pull the handles apart and completely rotate them to use the pliers. This can easily be achieved with one hand using a variety of techniques (i.e. gently throwing one handle out as you hold the other one, spreading the handles with index finger and thumb, etc.). A breaking-in period might be required to minimize any rotational stiffness. Be careful not to pinch your hands when opening and closing the plier. To close, simply rotate the handles in the reverse direction.NEVER USE THE PLIERS WITHOUT FIRST CLOSING ALL OF THE COMPONENTS.2. Opening/Closing the Knife BladesWe recommend keeping the blade safety in the on/locked position when the knife blades are not in use. Off/unlocked is down towards the plier end of the tool, and locked is towards the back of the tool (see diagram below).To deploy a knife blade, firmly grip PowerAssist, making sure that the safety is in the unlocked position for the knife blade you are opening. Place your thumb on the thumbstud of the blade and slowly apply pressure in an outward motion until S.A.T. activates and fully deploys the blade into the open position (at this point you may also use the safety to double lock the blade in the open position).When closing the blade make sure the safety is in the off position, then holding the blade with one hand, slide the unlock button all the way to the bottom of the slot with the thumb/nail on your opposite hand. When blade is unlocked rotate the blade back into the handle. If the blade does not want to seat all the way in the handle, make sure the safety is not in the locked position. Once closed return the safety to the locked position for storage.NOTE: NEVER OPEN BOTH BLAdES AT ONE TIME OR dEPLOy THE BLAdES WHILE TOOL IS IN THE OPEN POSITION. THIS COULd RESULT IN dAMAGE TO TOOL ANd/OR INJURy.3. Using the Blasting Cap CrimperTo use the Blasting Cap Crimper, rotate the PowerAssist into an open position. Place blasting cap between handles, just below Compound Leverage Gears. Apply pressure to handles until blasting cap is secured.into the handle. When Once the component is locked, close the handle cover and bring the handles back together. When using the tool component, prevent accidental release by avoiding pressing on the PianoLock.WARNING: All tool components, especially the knives,awl, and saw, are extremely sharp and should be handled with caution when opening, closing, and while in use. Only open one tool/blade at a time and always keep the handles closed together while using any component.5. Closing the Tool ComponentsOpen the tool and handle cover as in Step 2. Unlock the tool component by pressing the PianoLock and rotating the tool component back into the handle.WARNING: Always use caution and keep fingers clearwhen closing components into the handles.6. Using the ¼ Inch DriveThe foldable drive for ¼ inch sockets and adapters is easily usable in the diagonal of any socket as shown above. Use our optional socket adapterfor universal hex drive ($5.95) accessory with all hex drives. See replacement parts section for ordering info.GearsCover¼" driver socket Press Here to CloseHandle Cover。
Playout_V2.2_用户手册
Playout 节目演播系统 版本:V2.2用户手册更新日期:200806索贝数码科技股份有限公司高新区新加坡工业园新园南二路 2 号 四川,成都中国声明版权所有 © 2008 Sobey Corporation. 保留所有权利。
未经本公司书面许可,任何个人和单位不得摘抄或者复制本手册内容的部分或者全部,并不得以任 何形式进行传播。
由于产品版本升级或其它原因,本手册内容会不定期更新,恕不另行通知。
本手册仅作为使用指导, 本手册中的内容不构成任何明示或暗示的担保。
本手册所包含的商标都属各自所有人所有。
关于本手册本手册作为用户操作手册适用于 Playout 节目演播系统的终端用户。
同时作为 Playout 节目演播系统 的组成部分,全面介绍了系统的各项功能用法和相关设置,提供了由易到难的、面向用户的任务向 导型操作提示。
目 录第1章 概述 (2)第2章 快速指南 (4)2.1 新闻播控 (4)2.1.1 运行软件 (4)2.1.2 检查状态 (5)2.1.3 打开新闻串联单 (5)2.1.4 编辑新闻串联单 (5)2.1.5 发送新闻串联单 (6)2.1.6 播出控制 (6)2.2 节目播控 (10)2.2.1 运行软件 (10)2.2.2 查询节目 (10)2.2.3 编辑播出列表 (10)2.2.4 播出控制 (11)2.3 垫播 (12)2.3.1 提取串联单 (13)2.3.2 播出控制 (13)2.4 回看 (13)第3章 常见问题 (14)第1章 概述内容概要n本章主要是介绍Playout节目演播系统的功能、特点及组成。
感谢您选用Sobey公司的Playout节目演播系统。
Sobey Playout节目演播系统是索贝专门为电视台演播室提供的网络化节目播出解决方案。
该系统以节目制作系 统为依托,以节目制作流程为支撑,可以提供新闻节目播出、体育赛事播出、访谈类节目播出,更可以提供紧急事 件快速垫播播出以及延时播出等服务。
贝奥音箱级别用户指南说明书
E N G L I S HPD OW N LOA D B A N G&O LU F SE N A P ArrayTo set up your product, download the Bang & Olufsen App from the Google Play Store or Apple App Store. From this app you can set up and get the most out of your Beosound Level.When you first start the Bang & Olufsen App, you will be asked to create a user account.To set up your speaker, click to add a new product. If you already have an account this can be found under settings.2DA I LY U S EThe touch surface on top of your Beosound Level will light up when you approach, ready for you to control your music.Tap to play or pauseTap on the arrows to switch tracks or your MyStationsSwipe along the line, tap the plus and minusbuttons, or tap the dots to control volumeTap the Bluetooth button to switch it on or offYou can turn your Beosound Level on and offusing the power button.3FAVO U R I T E SBeosound Level has four favourite buttons, where you can save your favourite listening experiences or preferred Google commands for easy access.GOOGLE VOICETo save a favourite command, like “play some music” or “what’s the latest news?”, long press your chosen favourite button and speak the command.Access your favourite command anytime with a short press of the button.RADIOOn your product page, head down to Radio and then Search to pick a station.Tap the More icon to assign it to a favourite.Press the favourite button the next time you want to hear the station quickly.SPOTIFY CONNECTUse Spotify Connect on the Spotify music streaming app to connect to your Beosound Level.Play a favourite radio station or playlist, like “Jazz” or your “Discover Weekly” to the speaker via Spotify Connect and long press your chosen favourite button to assign it.Access your favourite again anytime with a short press of the button.4O R I E N TAT I O NWhen you move Beosound Level, it will automatically detect its new orientation and provide optimal sound experience for any placement.Laying downStanding upHanging on the wall5M U LT I R O O MConnect your favourite music app to your Beosound Level using Apple AirPlay 2, Chromecast or Bluetooth and play wirelessly.Use Airplay 2 or Chromecast to seamlessly connect your different wireless speakers into one system, allowing you to control speakers in tandam or individually.Long press the Bluetooth key to enable or cancel Bluetooth pairing.6C H A R G I N GConnect the USB-C charging cable to the adaptor and magnetic aluminium plug.Place the aluminium plug in the socket on the back of your Beosound Level to power on and charge.7B AT T E RY L I F EBeosound Level has up to 16 hours of playtime on battery power at moderate listening.The battery indicator flashes orange when charging and turns green when the battery is fully charged. The battery indicator will turn orange for 5 minutes at 40% battery level to give an early warning.At 20% battery level the battery indicator will turn red and a sound prompt is heard.At 10% battery level the indicator will be flashing red.8M I C R O P H O N ETo disconnect your microphones rather than temporarily mute them, toggle the microphone switch at the top of the speaker near the power button.9CO N N E C T I O N SYou can find the connection panel underneath the rubber cover for the aluminium charging plug.If you wish to connect an Ethernet cable or Line-in, simply remove the cover.You can also connect through the USB-C port.10L I G H T I N D I C ATO RThe light indicator shows the status of the product. Action MeaningWhiteSolid Connected to network, ready for use Flashing slowly Starting upFlashing quickly Room compensation in progress BlueSolid (5 sec)Connected/pairedPulsing Open for pairingRedSolid Static error, please call service Flashing Transient error, i.e. overheating AmberSolid No network connection, connectionlostFlashing Ready for network setupPulse Connecting to networkGreenPulsing Software update in progress11FAC TO RY R E S E TYou can restore factory settings by pressing and holding the next and previous buttons on the top plate at the same time. You can let go when the status LED flashes red.Your speaker will begin the reset process and after approximately one minute, your Beosound Level will be ready for first-time set-up again.12。
SimplifyYourLife 260BK 用户手册说明书
#SimplifyYourLifeManual de usuario260BKManual de usuario260BK Instrucciones de usoFavor lea cuidadosamente todas las instruccionesComenzandoRetire la unidad de la cajaRetire del producto cualquier envoltorioColoque los envoltorios dentro de la caja y mantengapara futuro almacenamientoContenidos de la cajaParlante Bluetooth mini LED RGBCable Micro de carga USBManual de instruccionesCaracterísticas• Reproduce música de modo inalámbrico• Conexión Bluetooth inalámbrica funcional• Cuerpo translúcido con colores cambiantesen el interior• Batería recargable incorporada• Ajuste de volumen• Soporta reproducción con tarjeta TFInstrucciones de seguridad• Mantenga la unidad lejos de fuentes de calor, luz solardirecta, humedad, agua y cualquier otro líquido• No use la unidad si se ha caído o dañado de cualquier otromodo• Las reparaciones de este equipo eléctrico sólo deben serefectuadas por un electricista autorizado. Las reparacionesindebidas pueden colocar en serio riesgo al usuario• No coloque objetos en ninguna de las salidas de audio• Mantenga la unidad libre de polvo y pelusas, etc.• No utilice esta unidad para nada distinto a lo que ha sidoconcebida• Mantenga la unidad fuera del alcance de los niños• Este producto no es un juguete• No use detergentes abrasivos para limpiarlo• Para evitar la posibilidad de la una descarga eléctrica nooperar la unidad en condiciones húmedas, tales comolluvia o entornos húmedos• No opere la unidad en cercanía al agua (por ejemplo,baños, piscinas, etc.)• No exponga la unidad a calor excesivo, tal como luz solardirecta, llamas, etc.• Jamás sumerja la unidad en agua o en cualquier otrolíquido para limpiarlaPosición de la tarjeta TFINSTRUCCIONES DE USOCargando el parlanteLa unidad cuenta con una batería incorporada recargable.Antes de usarla por primera vez, recomendamos usar elcable USB para cargar completamente la batería.Conecte el Cable USB a un puerto USB o a un cargador depared USB (no incluido) y conecte el otro lado a la ranura decarga USB del parlante. La luz roja LED del indicador decarga se enciende mientras se está cargando el parlante.Cuando la batería está completamente cargada, la luz rojaLED se apaga.Emparejando su dispositivo con el parlanteBluetoothSe empareja con dispositivos Bluetooth (teléfonos oreproductores de música)Presione el botón ON para encender el parlante y pasaráautomáticamente a modo Bluetooth. Usted escuchará unaseñal sonora y la luz LED del parlante comenzará a destellar.Coloque el parlante Bluetooth y el dispositivo (teléfono oreproductor de música) de tal modo que no estén separadospor no más 6 metros (20 pies).Active la función Bluetooth en su dispositivo (teléfono oreproductor de música). Remítase a las instrucciones delfabricante para habilitar la función Bluetooth en su dispositivo.Una vez que se haya activado el Bluetooth en su dispositivo,seleccione el nombre de emparejamiento “260BK” de entrela lista de dispositivos Bluetooth disponibles. Si es requerido,ingrese el código “0000” para con rmar el emparejamiento.Si el emparejamiento ha sido exitoso, usted escuchará una vozque lo indicará. Ahora puede usted empezar a usar el parlante.Una vez que usted haya emparejado el parlante con undispositivo dado, el parlante recordará ese dispositivo y seemparejará automáticamente cuando se active el Bluetooth deldispositivo dentro del rango de alcance. Usted no necesita reemparejar un dispositivo previamente conectado.Diamond LED Wireless SpeakerParlante inalámbrico Diamond LED。
- 1、下载文档前请自行甄别文档内容的完整性,平台不提供额外的编辑、内容补充、找答案等附加服务。
- 2、"仅部分预览"的文档,不可在线预览部分如存在完整性等问题,可反馈申请退款(可完整预览的文档不适用该条件!)。
- 3、如文档侵犯您的权益,请联系客服反馈,我们会尽快为您处理(人工客服工作时间:9:00-18:30)。
文稿软件版本号:v2.6.1 CSUser Guide 用户手册索贝数码科技股份有限公司高新区新加坡工业园新元大道南二路 2号四川·成都中国更新日期:20071207© 20022007 Sobey Corporation. 保留所有权利目 录1 概述 (1)编写目的 (1)产品特点 (1)版本说明 (1)2 快速起步 (3)登 录 (3)常用按钮说明 (3)如何制作文稿及串联单 (5)如何进行文稿评分 (13)如何管理采访设备 (15)3 详细操作指南 (18)我的文件夹 (18)待审信息 (19)新闻线索 (21)选题管理 (22)文稿管理 (24)串联单管理 (28)考核管理 (32)设备管理 (34)外出管理 (35)采访设备管理 (36)地方新闻管理 (38)外来信息 (38)用户工具 (40)帮 助 (44)4 系统参数设置 (45)1 概述编写目的本手册主要描述的是索贝媒体资产系统——新闻文稿系统的功能与操作方法。
适用于索贝媒体资产管 理系统的新闻文稿操作人员。
索贝新闻文稿系统在多家大型电视台得到成熟的应用, 例如中央电视台, 广东电视台。
索贝结合多年的电视台系统集成经验,设计的文稿系统能够非常贴近电视台的流程和使 用习惯,并能够按照用户的需求进行相应的定制开发。
索贝文稿系统能够和视音频编辑进行无缝结合,更加方便用户的使用。
在这个信息时代,社会的节奏 是越来越快,而对新闻工作者在信息的快速、正确、准确方面也就有了更高的要求。
如果整个新闻的 流程只靠人工来完成,工作量相当大,出错也难免。
但是通过这套新闻文稿系统,让你的工作与计算 机结合起来,完善的功能,给新闻工作带来了方便、快捷的操作,帮助你轻松的完成工作任务。
本系统统一的界面风格、方便的快捷按钮给操作带来了便利,相信,您的智慧再加上本系统的强大功 能,将会给您的工作锦上添花。
产品特点索贝新闻节目制作系统是一个具有新闻共享、制作、播出、交换能力,全数字环境的智能化新闻节目 制播网络系统。
它能支持电视台新闻业务的运作,并承担电视台大部分新闻节目生产任务。
系统实现 收录和自采新闻节目素材的全台共享,充分利用计算机多媒体技术和网络技术,全面提高电视台新闻 节目的制作水平和效率。
该系统是一个用于电视台日常新闻节目制作的办公自动化系统,集合了非线性视频编辑网络和新闻文 稿系统的优点。
系统中,一个新闻节目再不是以独立的视频节目或文稿来流动,而是以电视台新闻部 门熟知的“稿件”方式来管理。
对于本系统来说,“稿件”是一个多媒体素材的“包”,它包含一篇文稿, 一条节目,以及所对应的素材索引。
新闻文稿系统很好的把握了电视台新闻文稿的制作流程,贯穿文稿编写、修改、提交、审查以及制作 串联单,地方台稿件,外来稿件等整个流程,操作界面简洁,使用也非常便捷。
版本说明该版本的文稿系统秉承了传统文稿的设计理念,在保留传统优势的同时又根据实际运用中客户的反馈 优化并新增了部分功能,使得其支持范围更加广泛、支持力度更加强大,成为 SobeyNet 系统中至关重 要的一部分。
新功能一览:· 支持“大采访部”业务;· 支持文稿评分功能,包括简单评分、复杂评分、专业评分;· 支持对采访设备的管理,包括采访计划方式管理、派机派车方式管理;· 支持文稿分镜头编辑和显示;· 支持文稿的维、哈、柯文及藏文输入;· 支持手动输入节目的长度以及智能识别节目长度;· 支持选题、采访计划、文稿等统一使用同一种新闻类型等。
2 快速起步在此将从初学者的角度出发,展示文稿系统的基本操作以及典型流程,便于初学者快速掌握文稿系统 的使用方法。
登 录文稿系统安装完成后,在桌面上双击 (SobeyDoc.exe)图标。
在用户名处输入用户名及密码,点击 【确 定】按钮后将进入新闻文稿操作系统。
注意:需要对登录的用户作确认,以保证用户工作的正确性。
确认内容包括用户的权限、所属栏目、角色、工作流程等,网管中有相应的设置。
常用按钮说明图片 功能 功能详解【新增】 进入新增信息模式,输入需要新增的资料后,点击此【新增】按钮可以将所 输入资料保存到信息库中【新建】 与【新增】按钮的功能基本一致,主要是新增功能【修改】 选中一条资料,选择此【修改】按钮将进入到修改信息模式中,修改完成保 存即可更新资料【保存】 做完新增或修改资料后,点击此【保存】按钮可以将新的信息资料保存【取消】 新增或修改信息未保存前,如果并不想保存所作的修正,可以点此【取消】 按钮不执行修改或新增操作【删除】 选中某信息后点击此【删除】按钮即可进行删除操作。
删除信息时一般都会 有提示确认是否删除的窗口出现【刷新】 刷新信息的作用。
在查看资料时,输入各项查找条件后,点击此【刷新】按 钮可以刷新页面资料,查看到相应条件下的所有信息资料【查找】 点击此【查找】按钮可以定位查找相关信息【流程】 点击此【流程】按钮可以查看信息的操作记录【关闭】 点击此【关闭】按钮,离开对当前打开界面的操作【导出】 点击此【导出】按钮,所选信息导出生成一份 word 或 excel 文件文稿状态指示正在写稿文稿状态等待初审指示文稿状态等待终审指示文稿状态终审通过指示报播状态未报播指示报播状态等待初审报播指示报播状态等待终审报播指示报播状态终审报播通过指示节目视频节目初编完成状态节目视频该文稿没有对应节目状态节目 视频该文稿有对应节目,并处于编辑状态 状态节目视频节目被退回状态节目视频节目已下载合成状态节目视频节目已经提交审片合成状态节目视频节目正在合成状态节目视频节目合成完毕状态节目视频低码率合成完成状态节目视频节目内容审查通过状态节目视频技术审查通过状态节目视频节目退回配音,需重新进行配音状态节目视频合成失败状态节目视频节目退回到初审状态状态节目视频节目退到记者编辑状态状态图1 常用按钮说明如何制作栏目文稿及串联单图 2 栏目新闻制作的典型流程注意:实线流程为栏目新闻稿制作的主要流程,虚线流程为其辅助流程。
流程说明:l新闻线索:收集的所有线索都可以存放到新闻线索库中,需要时通过检索可查找到需要的线 索。
同一条线索可以对应不同的选题。
如下图在<新闻线索>的<线索录入>里或者在线索查询时点击【新建】按钮,线索录入人员可 录入来自电话、传真、Internet、信函、国家机关的工作计划、地方台宣传规划等其它媒体的 线索。
填写线索的标题,关键词、发生地点,并选择发生时间以及线索来源,并在空白文本 处输入线索主要内容,点击【保存】按钮即完成线索录入。
为了规范录入段落的格式,系统 支持设置段落标志语句,用户可根据实际需要设置一些段落标志词语,统一录入风格。
图 3 新闻线索录入l选题:选题可以直接新建,也可以通过新闻线索来新建。
选题是为了更加明确新闻文稿的编 制方向而建立的一个标题。
一个好的选题,可以给新闻增添吸引力,也可以给新闻文稿编写 人员提供面对不同对象的写稿方向。
为了规范录入段落的格式, 系统支持设置段落标志语句, 用户可根据实际需要设置一些段落标志词语,统一录入风格。
下图为认领线索后形成的选题,选题的标题直接继承为线索的标题,之后输入关键字,发生 时间,发生地点; 选择执行部门、执行人、保密类型、选题方向、起始终止日期、拟播栏目、 拟播日期等信息,点击【保存】按钮,成功新建一个选题。
注意:选题仅在提交审查之后才能被拥有权限的他人所见。
图 4 线索认领形成选题l文稿:文稿可以直接新建,也可以通过选题来新建。
有了文稿,便可以制作对应的视、音频 节目,制作串联单等。
如下图,在文稿管理中点击【新建】按钮新建一篇文稿。
输入文稿标题、关键词、还可选择 执行记者、来源、机密类型 ,在 <文稿内容输入区>单击右键,在弹出的菜单中可选择文稿 段落,如:配音、导语、正文、同期等。
确定输入资料无误,即可点击【保存】按钮将新增 文稿保存。
之后可点击【送审】按钮将该新建文稿提交审查。
其他编辑按钮的详细功能介绍 请参见本手册<详细操作指南>中的<文稿管理>部分。
注意:文稿仅在提交审查或者报播之后才能被拥有权限的他人所见。
图 7 新建文稿l快速报题:快速报题是当记者来不及写选题时,可直接通过快速报题建立报播稿件,建立快 速报播稿件的方法同新建文稿,只是快速报题稿件不需要选择选题号而已。
l文稿报播: 在栏目新闻文稿制作流程中, 文稿的报播将未被提交审查的文稿设置为可见状态,以便适应紧急情况下的串联单制作。
文稿,却无权修改该稿件。
l串联单:根据文稿资料制作成串联单,以用作播出工作站进行播出。
串联单模版根据情况可以选用或者不使用。
串联单中的文稿主要引用之前建立好的报播稿件,在紧急情况下也可临 时新建。
如下图,在<串联单管理>的<串联单模版>中点击【新增】按钮,弹出新增模板界面,输入标 题后,在下拉列中可以选择栏目及相应的版次,新增片花后点击【保存】按钮,可成功新建一个栏目下对应的串联单模版。
图 8 新建串联单模版在<新建串联单>中,点击【新增】按钮,在列表中会显示出属于该栏目、版次的串联单模板,选择模 板后进入即可按模板建立串联单。
选中该界面左侧<报播>栏、<垫播>栏或者<串联单>栏的稿件,单击 鼠标左键拖动到右侧正在新增的串联单稿件列表中,就可以将该文稿加入到自己的串联单中来。
其他编辑按钮的详细功能介绍请参见本手册<详细操作指南>中的<串联单管理>部分。
图 9 新建串联单图 10 串联单一览如何制作并运用采访稿件在采访部模式下,稿件被分为两大部分:其一为采访稿件,其二为播出文稿。
记者完成采访稿的编,采访稿统属于采访部,没)写,并将采访稿件放置于采访栏目中进行统一管理(稿件进入“稿件池”有栏目属性,不属于具体某个栏目的播出稿件。
而栏目编辑则需要根据栏目特色,筛选“稿件池”中 的采访稿,并通过报播的方式将采访稿复制到自己的栏目。
进入栏目以后的文稿称为播出文稿,栏目 编辑可以对其进行编辑,栏目主编或者制片人可以对其进行审查和简单修改编辑,编辑完成后可以根 据栏目文稿制作串联单并最终播出,对于每个栏目修改的播出稿件不会影响到采访稿件的内容。
各个 电视台可以根据自己的需要进行定制采访稿件的审查级数和播出稿件的审查级数。
注意:实线流程为栏目新闻稿制作的主要流程,虚线流程为其辅助流程。
流程说明:l采访稿编写: 记者认领选题后外出采访, 采访结束后根据选题和采访情况将拍摄的素材上载, 撰写采访稿。