安装oracle11g RAC
rhel6.6-oracle11R2的RAC安装文档

Rhel6.6_Oracle11gR2(ASM,UDEV)的RAC搭建安装本次演示是在Rhel6.6环境下Oracle11gR2的RAC搭建安装环境:VM + Rhel6.6 + GI + Oracle11gR2基本信息1)安装包Rhel6 : rhel-server-6.6-x86_64-dvd.isoOracle11gR2:p1*******_112040_Linux-x86-64_1of7.zipp1*******_112040_Linux-x86-64_2of7.zipGrid Infrastructure(GI):p1*******_112040_Linux-x86-64_3of7.zip2)服务器环境1、两台虚拟机信息:hostname:RAC1 , ip:hostname:RAC2 , ip:72、心跳IP信息:RAC1的心跳IP:192.168.1.106RAC2的心跳IP:192.168.1.1073、VIP/SCANIP信息RAC1的VIP:RAC1的VIP:7ScanIP:8附:关于以上rac的各种ip的详细介绍:3)共享磁盘设置5块2G磁盘,表决磁盘3块5G磁盘,存放数据文件附:虚拟机设置共享磁盘方式:一:安装linux1)linux安装时的选项•Base System > Base•Base System > Client management tools•Base System > Compatibility libraries•Base System > Hardware monitoring utilities•Base System > Large Systems Performance•Base System > Network file system client•Base System > Performance Tools•Base System > Perl Support•Servers > Server Platform•Servers > System administration tools•Desktops > Desktop•Desktops > Desktop Platform•Desktops > Fonts•Desktops > General Purpose Desktop•Desktops > Graphical Administration Tools•Desktops > Input Methods•Desktops > X Window System•Development > Additional Development•Development > Development Tools•Applications > Internet Browser2)linux需要安装的包需要添加以下的包,以确保Oracle的正常安装(暂时不添加也可以,在安装Oracle时会详细提示缺少哪个包的)rpm -Uvh binutils-2.*rpm -Uvh compat-libstdc++-33*rpm -Uvh elfutils-libelf-0.*rpm -Uvh elfutils-libelf-devel-*rpm -Uvh gcc-4.*rpm -Uvh gcc-c++-4.*rpm -Uvh glibc-2.*rpm -Uvh glibc-common-2.*rpm -Uvh glibc-devel-2.*rpm -Uvh glibc-headers-2.*rpm -Uvh pdksh-5*rpm -Uvh libaio-0.*rpm -Uvh libaio-devel-0.*rpm -Uvh libgcc-4.*rpm -Uvh libstdc++-4.*rpm -Uvh libstdc++-devel-4.*rpm -Uvh make-3.*rpm -Uvh sysstat-7.*rpm -Uvh unixODBC-2.*rpm -Uvh unixODBC-devel-2.*二:安装准备注:以下的安装准备都要需要在RAC1和RAC2两个服务器设置。
VirtualBox安装3节点oracle11GRAC(超级详细)

使用vbox创建oracle11GR2 --3节点rac操作系统cenos6.5数据库版本11.2.0.4修改服务器的配置文件:配置网卡cd /etc/sysconfig/network-scripts/关闭防火墙chkconfig iptables offiptables –Fiptables –L关闭内核防火墙:vi /etc/sysconfig/selinux修改hosts内容:192.168.1.110 rac1 192.168.1.111 rac2 192.168.1.112 rac3 #virtual192.168.1.120 rac1-vip 192.168.1.121 rac2-vip 192.168.1.122 rac3-vip #eth1 private18.1.30.50 rac1-priv 18.1.30.51 rac2-priv 18.1.30.52 rac3-priv #scan192.168.1.130 rac-scan给系统打补丁包:之后给系统打包(这个应该先做后调网络)binutils-2.17.50.0.6compat-libstdc++-33-3.2.3compat-libstdc++-33-3.2.3 (32 bit)elfutils-libelf-0.125elfutils-libelf-devel-0.125gcc-4.1.2gcc-c++-4.1.2glibc-2.5-24glibc-2.5-24 (32 bit)glibc-common-2.5glibc-devel-2.5glibc-devel-2.5 (32 bit)libaio-0.3.106libaio-0.3.106 (32 bit)libaio-devel-0.3.106libaio-devel-0.3.106 (32 bit)libgcc-4.1.2libgcc-4.1.2 (32 bit)libstdc++-4.1.2libstdc++-4.1.2 (32 bit)libstdc++-devel 4.1.2make-3.81sysstat-7.0.2yum install XXXXX所有节点执行:[root@rac1 ~]# vi /etc/sysconfig/networkNETWORKING=yesNETWORKING_IPV6=noHOSTNAME=rac1建两个用户和组groupadd oinstallgroupadd dbauseradd -g oinstall -G dba griduseradd -g oinstall -G dba oracleecho -n yangbo|passwd --stdin gridecho -n yangbo|passwd --stdin oraclemkdir -p /u02/app/11.2.0/gridmkdir -p /u02/app/gridmkdir -p /u02/app/oraclechown grid:oinstall /u02/app/11.2.0/gridchown grid:oinstall /u02/app/gridchown -R oracle:oinstall /u02/app/oraclechmod -R 775 /u02/chown -R grid:oinstall /u02修改系统参数sed -i 's/kernel.shmmax/#kernel.shmmax/g' /etc/sysctl.conf sed -i 's/kernel.shmall/#kernel.shmall/g' /etc/sysctl.confcat >> /etc/sysctl.conf << EOFfs.aio-max-nr = 1048576fs.file-max = 6815744kernel.shmall = 2097152kernel.shmmax = 1073741824kernel.shmmni = 4096kernel.sem = 250 32000 100 128net.ipv4.ip_local_port_range = 9000 65500net.core.rmem_default = 262144net.core.rmem_max = 4194304net.core.wmem_default = 262144net.core.wmem_max = 1048586EOF配置/etc/security/limits.confcat >> /etc/security/limits.conf << EOForacle soft nproc 2047oracle hard nproc 16384oracle soft nofile 1024oracle hard nofile 65536oracle soft stack 10240grid soft nproc 2047grid hard nproc 16384grid soft nofile 1024grid hard nofile 65536grid soft stack 10240EOF用户环境变量Oracle:(vi ~/bash_profiel)umask 022unset ORA_NLS10export ORACLE_BASE=/u02/app/oracleexport ORACLE_HOME=$ORACLE_BASE/product/11.2.0/dbhome_1export ORACLE_SID=base1export NLS_LANG=american_america.zhs16gbkexport NLS_DATE_FORMAT="yyyy-mm-dd hh24:mi:ss"export PATH=.:${PATH}:$HOME/bin:$ORACLE_HOME/binexport PATH=${PATH}:/usr/bin:/bin:/usr/bin/X11:/usr/local/binexport PATH=${PATH}:$ORACLE_BASE/common/oracle/binexportORACLE_PATH=${PATH}:$ORACLE_BASE/common/oracle/sql:.:$ORACLE_HOME/rdbms/admin export ORACLE_TERM=xtermexport TNS_ADMIN=$ORACLE_HOME/network/adminexport LD_LIBRARY_PATH=$ORACLE_HOME/libexport LD_LIBRARY_PATH=${LD_LIBRARY_PATH}:$ORACLE_HOME/oracm/libexport LD_LIBRARY_PATH=${LD_LIBRARY_PATH}:/lib:/usr/lib:/usr/local/libexport CLASSPATH=$ORACLE_HOME/JREexport CLASSPATH=${CLASSPATH}:$ORACLE_HOME/jlibexport CLASSPATH=${CLASSPATH}:$ORACLE_HOME/rdbms/jlibexport CLASSPATH=${CLASSPATH}:$ORACLE_HOME/network/jlib#export ORA_NLS10=$ORACLE_HOME/nls/dataexport THREADS_FLAG=nativeexport TEMP=/tmpexport TMPDIR=/tmpgrid用户的变量(vi ~/bash_profiel)umask 022unset ORA_NLS10export ORACLE_BASE=/u02/app/gridexport ORACLE_HOME=/u02/app/11.2/gridexport ORACLE_SID=+ASM1export NLS_LANG=american_america.zhs16gbkexport NLS_DATE_FORMAT="yyyy-mm-dd hh24:mi:ss"export PATH=.:${PATH}:$HOME/bin:$ORACLE_HOME/binexport PATH=${PATH}:/usr/bin:/bin:/usr/bin/X11:/usr/local/binexport PATH=${PATH}:$ORACLE_BASE/common/oracle/binexportORACLE_PATH=${PATH}:$ORACLE_BASE/common/oracle/sql:.:$ORACLE_HOME/rdbms/admin export ORACLE_TERM=xtermexport TNS_ADMIN=$ORACLE_HOME/network/admin#export ORA_NLS10=$ORACLE_HOME/nls/dataexport LD_LIBRARY_PATH=$ORACLE_HOME/libexport LD_LIBRARY_PATH=${LD_LIBRARY_PATH}:$ORACLE_HOME/oracm/libexport LD_LIBRARY_PATH=${LD_LIBRARY_PATH}:/lib:/usr/lib:/usr/local/libexport CLASSPATH=$ORACLE_HOME/JREexport CLASSPATH=${CLASSPATH}:$ORACLE_HOME/jlibexport CLASSPATH=${CLASSPATH}:$ORACLE_HOME/rdbms/jlibexport CLASSPATH=${CLASSPATH}:$ORACLE_HOME/network/jlibexport THREADS_FLAG=nativeexport TEMP=/tmpexport TMPDIR=/tmp八.配置NTP服务8.1节点1sed -i 's/OPTIONS/#OPTIONS/g' /etc/sysconfig/ntpdB.cat >> /etc/sysconfig/ntpd << EOFOPTIONS="-x -u ntp:ntp -p /var/run/ntpd.pid"EOFC.mv /etc/ntp.conf /etc/ntp.confbakD.cat > /etc/ntp.conf << EOFrestrict 0.0.0.0 mask 0.0.0.0 nomodifyserver 127.127.1.0fudge 127.127.1.0 stratum 10driftfile /var/lib/ntp/driftbroadcastdelay 0.008authenticate nokeys /etc/ntp/keysEOF8.2节点2A.sed -i 's/OPTIONS/#OPTIONS/g' /etc/sysconfig/ntpdB.cat >> /etc/sysconfig/ntpd << EOFOPTIONS="-x -u ntp:ntp -p /var/run/ntpd.pid"EOFC.mv /etc/ntp.conf /etc/ntp.confbakD.cat >> /etc/ntp.conf << XLrestrict default kod nomodify notrap nopeer noquery restrict 192.168.1.0 mask 255.255.255.0 nomodify notrap restrict 127.0.0.1server 192.168.8.199server 127.127.1.0 # local clockfudge 127.127.1.0 stratum 10driftfile /var/lib/ntp/driftbroadcastdelay 0.008authenticate nokeys /etc/ntp/keysXL8.3启动服务(双节点执行)#service ntpd restart8.4系统启动自动加载(双节点执行)#chkconfig ntpd on 关闭虚拟机:添加磁盘控制器;创建共享磁盘修改共享磁盘属性为可共享:调整RAC2的控制器:修改其他两个节点的网络配置和主机名配置oracle、grid用户的ssh对等性Oracle用户ssh对等性配置Oracle对等性配置Rac1节点[root@rac1 ~]# su - oraclerac1-> clearrac1-> mkdir ~/.sshrac1-> chmod 755 ~/.ssh/rac1-> ssh-keygen -t rsaGenerating public/private rsa key pair.Enter file in which to save the key (/home/oracle/.ssh/id_rsa): Enter passphrase (empty for no passphrase):Enter same passphrase again:Your identification has been saved in /home/oracle/.ssh/id_rsa. Your public key has been saved in /home/oracle/.ssh/id_rsa.pub. The key fingerprint is:26:c6:8a:60:1b:78:c3:6d:09:b0:c0:f3:a3:e5:ff:ce oracle@rac1 The key's randomart image is:+--[ RSA 2048]----+|+ ||.= ||. + ||.. * o ||ooB = + S ||.+o= o o || .. o || .. || oE |+-----------------+rac1-> ssh-keygen -t dsaGenerating public/private dsa key pair.Enter file in which to save the key (/home/oracle/.ssh/id_dsa): Enter passphrase (empty for no passphrase):Enter same passphrase again:Your identification has been saved in /home/oracle/.ssh/id_dsa. Your public key has been saved in /home/oracle/.ssh/id_dsa.pub. The key fingerprint is:d0:05:5d:0c:5b:72:42:87:f8:e8:04:66:e4:b5:bd:8c oracle@rac1 The key's randomart image is:+--[ DSA 1024]----+| .. o=*== || .+o.+oB. || oo.ooo || .oo.. || oE o || . || || || |+-----------------+rac1-> cat ~/.ssh/id_rsa.pub >> .ssh/authorized_keysrac1-> cat ~/.ssh/id_dsa.pub >> .ssh/authorized_keysrac1-> ssh rac2 cat ~/.ssh/id_rsa.pub >> ~/.ssh/authorized_keysoracle@rac2's password:rac1-> ssh rac2 cat ~/.ssh/id_dsa.pub >> ~/.ssh/authorized_keysoracle@rac2's password:rac1-> scp ~/.ssh/authorized_keys rac2:~/.ssh/authorized_keysoracle@rac2's password:authorized_keys 100% 1992 2.0KB/s 00:00rac1-> ssh rac3 cat ~/.ssh/id_rsa.pub >> ~/.ssh/authorized_keysoracle@rac3's password:rac1-> ssh rac3 cat ~/.ssh/id_dsa.pub >> ~/.ssh/authorized_keysoracle@rac2's password:rac1-> scp ~/.ssh/authorized_keys rac3:~/.ssh/authorized_keysoracle@rac3's password:authorized_keys 100% 1992 2.0KB/s 00:00Rac2节点[root@rac2 ~]# su - oraclerac2-> mkdir ~/.sshrac2-> chmod 755 .ssh/rac2-> ssh-keygen -t rsaGenerating public/private rsa key pair.Enter file in which to save the key (/home/oracle/.ssh/id_rsa):Enter passphrase (empty for no passphrase):Enter same passphrase again:Your identification has been saved in /home/oracle/.ssh/id_rsa.Your public key has been saved in /home/oracle/.ssh/id_rsa.pub.The key fingerprint is:92:05:4d:35:d2:c9:da:21:b4:06:43:bb:ef:4c:6e:45 oracle@rac2The key's randomart image is:+--[ RSA 2048]----+| .=+++o. || =oo=. || . ++ . || =. E || + S. || o . || o. || =. || .+ |+-----------------+rac2-> ssh-keygen -t dsaGenerating public/private dsa key pair.Enter file in which to save the key (/home/oracle/.ssh/id_dsa):Enter passphrase (empty for no passphrase):Enter same passphrase again:Your identification has been saved in /home/oracle/.ssh/id_dsa.Your public key has been saved in /home/oracle/.ssh/id_dsa.pub.The key fingerprint is:99:00:7e:00:b1:a9:d8:45:68:03:4c:ce:ce:ef:30:0d oracle@rac2The key's randomart image is:+--[ DSA 1024]----+|+oo++ ||o.+= o || +o.o o ||+o . . . o ||oE. S || + || o o || + || . |+-----------------+rac2-> cat ~/.ssh/id_rsa.pub >> .ssh/authorized_keysrac2-> cat ~/.ssh/id_dsa.pub >> .ssh/authorized_keysrac2-> ssh rac1 cat ~/.ssh/id_rsa.pub >> ~/.ssh/authorized_keysThe authenticity of host 'rac1 (192.168.37.21)' can't be established.RSA key fingerprint is 53:b8:a1:de:30:e3:d4:80:17:d3:7f:f5:b2:9d:11:45.Are you sure you want to continue connecting (yes/no)? yesWarning: Permanently added 'rac1,192.168.37.21' (RSA) to the list of known hosts.rac2-> ssh rac1 cat ~/.ssh/id_dsa.pub >> ~/.ssh/authorized_keysrac2-> scp ~/.ssh/authorized_keys rac1:~/.ssh/authorized_keysauthorized_keys 100% 2988 2.9KB/s 00:00rac1-> ssh rac3 cat ~/.ssh/id_rsa.pub >> ~/.ssh/authorized_keysoracle@rac3's password:rac1-> ssh rac3 cat ~/.ssh/id_dsa.pub >> ~/.ssh/authorized_keysoracle@rac2's password:rac1-> scp ~/.ssh/authorized_keys rac3:~/.ssh/authorized_keysoracle@rac3's password:authorized_keys 100% 1992 2.0KB/s 00:00Rac3节点[root@rac2 ~]# su - oraclerac2-> mkdir ~/.sshrac2-> chmod 755 .ssh/rac2-> ssh-keygen -t rsaGenerating public/private rsa key pair.Enter file in which to save the key (/home/oracle/.ssh/id_rsa):Enter passphrase (empty for no passphrase):Enter same passphrase again:Your identification has been saved in /home/oracle/.ssh/id_rsa.Your public key has been saved in /home/oracle/.ssh/id_rsa.pub.The key fingerprint is:92:05:4d:35:d2:c9:da:21:b4:06:43:bb:ef:4c:6e:45 oracle@rac2The key's randomart image is:+--[ RSA 2048]----+| .=+++o. || =oo=. || . ++ . || =. E || + S. || o . || o. || =. || .+ |+-----------------+rac2-> ssh-keygen -t dsaGenerating public/private dsa key pair.Enter file in which to save the key (/home/oracle/.ssh/id_dsa):Enter passphrase (empty for no passphrase):Enter same passphrase again:Your identification has been saved in /home/oracle/.ssh/id_dsa.Your public key has been saved in /home/oracle/.ssh/id_dsa.pub.The key fingerprint is:99:00:7e:00:b1:a9:d8:45:68:03:4c:ce:ce:ef:30:0d oracle@rac2The key's randomart image is:+--[ DSA 1024]----+|+oo++ ||o.+= o || +o.o o ||+o . . . o ||oE. S || + || o o || + || . |+-----------------+rac2-> cat ~/.ssh/id_rsa.pub >> .ssh/authorized_keysrac2-> cat ~/.ssh/id_dsa.pub >> .ssh/authorized_keysrac2-> ssh rac1 cat ~/.ssh/id_rsa.pub >> ~/.ssh/authorized_keysThe authenticity of host 'rac1 (192.168.37.21)' can't be established.RSA key fingerprint is 53:b8:a1:de:30:e3:d4:80:17:d3:7f:f5:b2:9d:11:45.Are you sure you want to continue connecting (yes/no)? yesWarning: Permanently added 'rac1,192.168.37.21' (RSA) to the list of known hosts.rac2-> ssh rac1 cat ~/.ssh/id_dsa.pub >> ~/.ssh/authorized_keysrac2-> scp ~/.ssh/authorized_keys rac1:~/.ssh/authorized_keysauthorized_keys 100% 2988 2.9KB/s 00:00rac1-> ssh rac2 cat ~/.ssh/id_rsa.pub >> ~/.ssh/authorized_keysoracle@rac2's password:rac1-> ssh rac2 cat ~/.ssh/id_dsa.pub >> ~/.ssh/authorized_keysoracle@rac2's password:rac1-> scp ~/.ssh/authorized_keys rac2:~/.ssh/authorized_keysoracle@rac3's password:authorized_keys 100% 1992 2.0KB/s 00:00 Oracle用户对等性检测Rac1节点rac1-> ssh rac2 dateTue Jun 17 12:35:32 CST 2014rac1-> ssh rac3 dateTue Jun 17 12:35:32 CST 2014rac1-> ssh rac1 dateThe authenticity of host 'rac1 (192.168.37.21)' can't be established.RSA key fingerprint is 53:b8:a1:de:30:e3:d4:80:17:d3:7f:f5:b2:9d:11:45.Are you sure you want to continue connecting (yes/no)? yesWarning: Permanently added 'rac1,192.168.37.21' (RSA) to the list of known hosts. Tue Jun 17 12:35:39 CST 2014rac1-> ssh rac1 dateTue Jun 17 12:35:42 CST 2014rac1-> ssh rac1-priv dateThe authenticity of host 'rac1-priv (172.16.1.1)' can't be established.RSA key fingerprint is 53:b8:a1:de:30:e3:d4:80:17:d3:7f:f5:b2:9d:11:45.Are you sure you want to continue connecting (yes/no)? yesWarning: Permanently added 'rac1-priv,172.16.1.1' (RSA) to the list of known hosts. Tue Jun 17 12:42:40 CST 2014rac1-> ssh rac1-priv dateTue Jun 17 12:42:43 CST 2014rac1-> ssh rac2-priv dateThe authenticity of host 'rac2-priv (172.16.1.2)' can't be established.RSA key fingerprint is c3:1c:e5:62:f2:35:87:4b:51:55:40:41:29:c7:bb:b1.Are you sure you want to continue connecting (yes/no)? yesWarning: Permanently added 'rac2-priv,172.16.1.2' (RSA) to the list of known hosts. Tue Jun 17 12:42:48 CST 2014rac1-> ssh rac2-priv dateTue Jun 17 12:42:50 CST 2014rac1-> ssh rac3-priv dateThe authenticity of host 'rac2-priv (172.16.1.2)' can't be established.RSA key fingerprint is c3:1c:e5:62:f2:35:87:4b:51:55:40:41:29:c7:bb:b1.Are you sure you want to continue connecting (yes/no)? yesWarning: Permanently added 'rac2-priv,172.16.1.2' (RSA) to the list of known hosts. Tue Jun 17 12:42:48 CST 2014rac1-> ssh rac3-priv dateTue Jun 17 12:42:50 CST 2014成功!!!Rac2节点rac2-> ssh rac1 dateTue Jun 17 12:43:06 CST 2014rac2-> ssh rac2 dateThe authenticity of host 'rac2 (192.168.37.22)' can't be established.RSA key fingerprint is c3:1c:e5:62:f2:35:87:4b:51:55:40:41:29:c7:bb:b1.Are you sure you want to continue connecting (yes/no)? yesWarning: Permanently added 'rac2,192.168.37.22' (RSA) to the list of known hosts. Tue Jun 17 12:43:11 CST 2014rac2-> ssh rac2 dateTue Jun 17 12:43:14 CST 2014rac2-> ssh rac3 dateThe authenticity of host 'rac2 (192.168.37.22)' can't be established.RSA key fingerprint is c3:1c:e5:62:f2:35:87:4b:51:55:40:41:29:c7:bb:b1.Are you sure you want to continue connecting (yes/no)? yesWarning: Permanently added 'rac2,192.168.37.22' (RSA) to the list of known hosts. Tue Jun 17 12:43:11 CST 2014rac2-> ssh rac3 dateTue Jun 17 12:43:14 CST 2014rac2-> ssh rac1-priv dateThe authenticity of host 'rac1-priv (172.16.1.1)' can't be established.RSA key fingerprint is 53:b8:a1:de:30:e3:d4:80:17:d3:7f:f5:b2:9d:11:45.Are you sure you want to continue connecting (yes/no)? yesWarning: Permanently added 'rac1-priv,172.16.1.1' (RSA) to the list of known hosts. Tue Jun 17 12:43:22 CST 2014rac2-> ssh rac1-priv dateTue Jun 17 12:43:24 CST 2014rac2-> ssh rac3-priv dateThe authenticity of host 'rac1-priv (172.16.1.1)' can't be established.RSA key fingerprint is 53:b8:a1:de:30:e3:d4:80:17:d3:7f:f5:b2:9d:11:45.Are you sure you want to continue connecting (yes/no)? yesWarning: Permanently added 'rac1-priv,172.16.1.1' (RSA) to the list of known hosts. Tue Jun 17 12:43:22 CST 2014rac2-> ssh rac3-priv dateTue Jun 17 12:43:24 CST 2014rac2-> ssh rac2-priv dateThe authenticity of host 'rac2-priv (172.16.1.2)' can't be established.RSA key fingerprint is c3:1c:e5:62:f2:35:87:4b:51:55:40:41:29:c7:bb:b1.Are you sure you want to continue connecting (yes/no)? yesWarning: Permanently added 'rac2-priv,172.16.1.2' (RSA) to the list of known hosts. Tue Jun 17 12:43:28 CST 2014rac2-> ssh rac2-priv dateTue Jun 17 12:43:31 CST 2014成功!!!Rac3节点rac2-> ssh rac1 dateTue Jun 17 12:43:06 CST 2014rac2-> ssh rac2 dateTue Jun 17 12:43:14 CST 2014rac2-> ssh rac3 dateThe authenticity of host 'rac2 (192.168.37.22)' can't be established.RSA key fingerprint is c3:1c:e5:62:f2:35:87:4b:51:55:40:41:29:c7:bb:b1.Are you sure you want to continue connecting (yes/no)? yesWarning: Permanently added 'rac2,192.168.37.22' (RSA) to the list of known hosts. Tue Jun 17 12:43:11 CST 2014rac2-> ssh rac3 dateTue Jun 17 12:43:14 CST 2014rac2-> ssh rac1-priv dateThe authenticity of host 'rac1-priv (172.16.1.1)' can't be established.RSA key fingerprint is 53:b8:a1:de:30:e3:d4:80:17:d3:7f:f5:b2:9d:11:45.Are you sure you want to continue connecting (yes/no)? yesWarning: Permanently added 'rac1-priv,172.16.1.1' (RSA) to the list of known hosts. Tue Jun 17 12:43:22 CST 2014rac2-> ssh rac1-priv dateTue Jun 17 12:43:24 CST 2014rac2-> ssh rac2-priv dateThe authenticity of host 'rac1-priv (172.16.1.1)' can't be established.RSA key fingerprint is 53:b8:a1:de:30:e3:d4:80:17:d3:7f:f5:b2:9d:11:45.Are you sure you want to continue connecting (yes/no)? yesWarning: Permanently added 'rac1-priv,172.16.1.1' (RSA) to the list of known hosts. Tue Jun 17 12:43:22 CST 2014rac2-> ssh rac2-priv dateTue Jun 17 12:43:24 CST 2014rac2-> ssh rac3-priv dateThe authenticity of host 'rac2-priv (172.16.1.2)' can't be established.RSA key fingerprint is c3:1c:e5:62:f2:35:87:4b:51:55:40:41:29:c7:bb:b1.Are you sure you want to continue connecting (yes/no)? yesWarning: Permanently added 'rac2-priv,172.16.1.2' (RSA) to the list of known hosts. Tue Jun 17 12:43:28 CST 2014rac2-> ssh rac3-priv dateTue Jun 17 12:43:31 CST 2014成功!!!Grid用户ssh对等性配置Grid用户对等性配置Rac1节点[root@rac1 ~]# su - gridrac1-> mkdir ~/.sshrac1-> chmod 755 ~/.ssh/rac1-> ssh-keygen -t rsaGenerating public/private rsa key pair.Enter file in which to save the key (/home/grid/.ssh/id_rsa): Enter passphrase (empty for no passphrase):Enter same passphrase again:Your identification has been saved in /home/grid/.ssh/id_rsa.Your public key has been saved in /home/grid/.ssh/id_rsa.pub.The key fingerprint is:99:cd:f4:44:a9:f1:23:16:40:d6:a9:b7:99:a0:e7:76 grid@rac1The key's randomart image is:+--[ RSA 2048]----+| .+o ... || . =.. || ..=. || o*=oo || .S+o=.. || . . + || o || o E || . . |+-----------------+rac1-> ssh-keygen -t dsaGenerating public/private dsa key pair.Enter file in which to save the key (/home/grid/.ssh/id_dsa):Enter passphrase (empty for no passphrase):Enter same passphrase again:Your identification has been saved in /home/grid/.ssh/id_dsa.Your public key has been saved in /home/grid/.ssh/id_dsa.pub.The key fingerprint is:03:60:03:14:2e:c1:77:ee:d2:55:46:00:4b:ac:bb:68 grid@rac1The key's randomart image is:+--[ DSA 1024]----+|o.+o=o..o. || + o.=. o ||. o +.. o || . . . o || + . S || o o . || . o || E . ||. |+-----------------+rac1-> cat ~/.ssh/id_rsa.pub >> .ssh/authorized_keysrac1-> cat ~/.ssh/id_dsa.pub >> .ssh/authorized_keysrac1-> ssh rac2 cat ~/.ssh/id_rsa.pub >> ~/.ssh/authorized_keysThe authenticity of host 'rac2 (192.168.37.22)' can't be established.RSA key fingerprint is c3:1c:e5:62:f2:35:87:4b:51:55:40:41:29:c7:bb:b1.Are you sure you want to continue connecting (yes/no)? yesWarning: Permanently added 'rac2,192.168.37.22' (RSA) to the list of known hosts.grid@rac2's password:rac1-> ssh rac2 cat ~/.ssh/id_dsa.pub >> ~/.ssh/authorized_keysgrid@rac2's password:rac1-> scp ~/.ssh/authorized_keys rac2:~/.ssh/authorized_keysgrid@rac2's password:authorized_keys 100% 1984 1.9KB/s 00:00rac1-> ssh rac3 cat ~/.ssh/id_rsa.pub >> ~/.ssh/authorized_keysThe authenticity of host 'rac2 (192.168.37.22)' can't be established.RSA key fingerprint is c3:1c:e5:62:f2:35:87:4b:51:55:40:41:29:c7:bb:b1.Are you sure you want to continue connecting (yes/no)? yesWarning: Permanently added 'rac2,192.168.37.22' (RSA) to the list of known hosts.grid@rac2's password:rac1-> ssh rac3 cat ~/.ssh/id_dsa.pub >> ~/.ssh/authorized_keysgrid@rac2's password:rac1-> scp ~/.ssh/authorized_keys rac3:~/.ssh/authorized_keysgrid@rac2's password:authorized_keys 100% 1984 1.9KB/s 00:00 Rac2节点[root@rac2 ~]# su - gridrac2-> mkdir ~/.sshrac2-> chmod 755 ~/.ssh/rac2-> ssh-keygen -t rsaGenerating public/private rsa key pair.Enter file in which to save the key (/home/grid/.ssh/id_rsa): Enter passphrase (empty for no passphrase):Enter same passphrase again:Your identification has been saved in /home/grid/.ssh/id_rsa.Your public key has been saved in /home/grid/.ssh/id_rsa.pub.The key fingerprint is:ae:87:bc:30:60:98:98:d4:36:bb:60:d6:dd:df:3d:54 grid@rac2The key's randomart image is:+--[ RSA 2048]----+| || . || . + E ||o+o + . . ||=+oo . .S . ||o.... .. . o || .o. ... . o || oo.. . || oo |+-----------------+rac2-> ssh-keygen -t dsaGenerating public/private dsa key pair.Enter file in which to save the key (/home/grid/.ssh/id_dsa):Enter passphrase (empty for no passphrase):Enter same passphrase again:Your identification has been saved in /home/grid/.ssh/id_dsa.Your public key has been saved in /home/grid/.ssh/id_dsa.pub.The key fingerprint is:63:49:2d:9b:55:54:8a:52:d8:5e:4a:c0:fc:ff:ff:91 grid@rac2The key's randomart image is:+--[ DSA 1024]----+| o.+..o.. || +ooo.. || +++o. || . B+ || S . || . . . .|| . E || . .|| .+|+-----------------+rac2-> cat ~/.ssh/id_rsa.pub >> .ssh/authorized_keysrac2-> cat ~/.ssh/id_dsa.pub >> .ssh/authorized_keysrac2-> ssh rac1 cat ~/.ssh/id_rsa.pub >> ~/.ssh/authorized_keysThe authenticity of host 'rac1 (192.168.37.21)' can't be established.RSA key fingerprint is 53:b8:a1:de:30:e3:d4:80:17:d3:7f:f5:b2:9d:11:45.Are you sure you want to continue connecting (yes/no)? yesWarning: Permanently added 'rac1,192.168.37.21' (RSA) to the list of known hosts.rac2-> ssh rac1 cat ~/.ssh/id_dsa.pub >> ~/.ssh/authorized_keysrac2-> scp ~/.ssh/authorized_keys rac1:~/.ssh/authorized_keysauthorized_keys 100% 2976 2.9KB/s 00:00rac2-> ssh rac3 cat ~/.ssh/id_rsa.pub >> ~/.ssh/authorized_keysThe authenticity of host 'rac1 (192.168.37.21)' can't be established.RSA key fingerprint is 53:b8:a1:de:30:e3:d4:80:17:d3:7f:f5:b2:9d:11:45.Are you sure you want to continue connecting (yes/no)? yesWarning: Permanently added 'rac1,192.168.37.21' (RSA) to the list of known hosts.rac2-> ssh rac3 cat ~/.ssh/id_dsa.pub >> ~/.ssh/authorized_keysrac2-> scp ~/.ssh/authorized_keys rac3:~/.ssh/authorized_keysauthorized_keys 100% 2976 2.9KB/s 00:00Rac3节点[root@rac2 ~]# su - gridrac2-> mkdir ~/.sshrac2-> chmod 755 ~/.ssh/rac2-> ssh-keygen -t rsaGenerating public/private rsa key pair.Enter file in which to save the key (/home/grid/.ssh/id_rsa): Enter passphrase (empty for no passphrase):Enter same passphrase again:Your identification has been saved in /home/grid/.ssh/id_rsa.Your public key has been saved in /home/grid/.ssh/id_rsa.pub.The key fingerprint is:ae:87:bc:30:60:98:98:d4:36:bb:60:d6:dd:df:3d:54 grid@rac2The key's randomart image is:+--[ RSA 2048]----+| || . || . + E ||o+o + . . ||=+oo . .S . ||o.... .. . o || .o. ... . o || oo.. . || oo |+-----------------+rac2-> ssh-keygen -t dsaGenerating public/private dsa key pair.Enter file in which to save the key (/home/grid/.ssh/id_dsa):Enter passphrase (empty for no passphrase):Enter same passphrase again:Your identification has been saved in /home/grid/.ssh/id_dsa.Your public key has been saved in /home/grid/.ssh/id_dsa.pub.The key fingerprint is:63:49:2d:9b:55:54:8a:52:d8:5e:4a:c0:fc:ff:ff:91 grid@rac2The key's randomart image is:+--[ DSA 1024]----+| o.+..o.. || +ooo.. || +++o. || . B+ || S . || . . . .|| . E || . .|| .+|+-----------------+rac2-> cat ~/.ssh/id_rsa.pub >> .ssh/authorized_keysrac2-> cat ~/.ssh/id_dsa.pub >> .ssh/authorized_keysrac2-> ssh rac1 cat ~/.ssh/id_rsa.pub >> ~/.ssh/authorized_keysThe authenticity of host 'rac1 (192.168.37.21)' can't be established.RSA key fingerprint is 53:b8:a1:de:30:e3:d4:80:17:d3:7f:f5:b2:9d:11:45.Are you sure you want to continue connecting (yes/no)? yesWarning: Permanently added 'rac1,192.168.37.21' (RSA) to the list of known hosts.rac2-> ssh rac1 cat ~/.ssh/id_dsa.pub >> ~/.ssh/authorized_keysrac2-> scp ~/.ssh/authorized_keys rac1:~/.ssh/authorized_keysauthorized_keys 100% 2976 2.9KB/s 00:00rac2-> ssh rac2 cat ~/.ssh/id_rsa.pub >> ~/.ssh/authorized_keysThe authenticity of host 'rac1 (192.168.37.21)' can't be established.RSA key fingerprint is 53:b8:a1:de:30:e3:d4:80:17:d3:7f:f5:b2:9d:11:45.Are you sure you want to continue connecting (yes/no)? yesWarning: Permanently added 'rac1,192.168.37.21' (RSA) to the list of known hosts.rac2-> ssh rac2 cat ~/.ssh/id_dsa.pub >> ~/.ssh/authorized_keysrac2-> scp ~/.ssh/authorized_keys rac2:~/.ssh/authorized_keysauthorized_keys 100% 2976 2.9KB/s 00:00Oracle用户对等性检测Rac1节点rac1-> iduid=1100(grid) gid=1000(oinstall) groups=1000(oinstall),1200(asmadmin),1201(asmdba),1202(asmoper)context=unconfined_u:unconfined_r:unconfined_t:s0-s0:c0.c1023rac1-> ssh rac1 dateThe authenticity of host 'rac1 (192.168.37.21)' can't be established.RSA key fingerprint is 53:b8:a1:de:30:e3:d4:80:17:d3:7f:f5:b2:9d:11:45.Are you sure you want to continue connecting (yes/no)? yesWarning: Permanently added 'rac1,192.168.37.21' (RSA) to the list of known hosts.Tue Jun 17 13:10:05 CST 2014rac1-> ssh rac1 dateTue Jun 17 13:10:08 CST 2014rac1-> ssh rac2 dateTue Jun 17 13:10:12 CST 2014rac1-> ssh rac3 dateTue Jun 17 13:10:12 CST 2014rac1-> ssh rac1-priv dateThe authenticity of host 'rac1-priv (172.16.1.1)' can't be established.RSA key fingerprint is 53:b8:a1:de:30:e3:d4:80:17:d3:7f:f5:b2:9d:11:45.Are you sure you want to continue connecting (yes/no)? yesWarning: Permanently added 'rac1-priv,172.16.1.1' (RSA) to the list of known hosts.Tue Jun 17 13:10:36 CST 2014rac1-> ssh rac1-priv dateTue Jun 17 13:10:37 CST 2014rac1-> ssh rac2-priv dateThe authenticity of host 'rac2-priv (172.16.1.2)' can't be established.RSA key fingerprint is c3:1c:e5:62:f2:35:87:4b:51:55:40:41:29:c7:bb:b1.Are you sure you want to continue connecting (yes/no)? yesWarning: Permanently added 'rac2-priv,172.16.1.2' (RSA) to the list of known hosts.Tue Jun 17 13:10:42 CST 2014rac1-> ssh rac2-priv dateTue Jun 17 13:10:45 CST 2014rac1-> ssh rac3-priv dateThe authenticity of host 'rac2-priv (172.16.1.2)' can't be established.。
oracle 11gr2图文安装rac版

Oracle 11G R2 RAC实施过程图文版(本文仅限于11G R2 on redhatlinux 6.x系列)内容目录1 实施准备 (2)1.1 调研与方案制定 (2)1.2 存储划分方案(参考) (3)1.3 介质 (4)2 设置系统 (4)2.1 系统检查 (4)2.1.1 cpu信息 (4)2.1.1 确认内存大小 (5)2.1.2 检查文件系统 (5)2.1.3 检查网络设置 (6)2.2 设置操作系统 (7)2.2.1 主机正名 (7)2.2.2 配置本地主机名解析hosts文件 (7)2.2.3 修改内核参数 (7)2.2.4 关闭防火墙服务 (8)2.2.5 关闭selinux (8)2.2.6 配置时钟同步 (9)2.3 设置软件安装/运行用户 (9)2.3.1 创建用户 (9)2.3.2 设置初始密码 (10)2.3.3 设置用户进程资源配额 (10)2.4 设置存储 (10)2.4.1 多路径软件配置 (10)2.4.2 udev绑定参考 (11)3 安装软件 (12)3.1 准备安装介质 (12)3.1.1 准备目录和权限(所有节点) (12)3.1.2 上传zip包(推荐ftp方式) (12)3.1.3 使用grid用户解包 (13)3.2 安装集群软件 (13)3.2.1 运行安装程序runInstaller (13)3.2.2 设置grid用户环境变量 (37)3.2.3 验证资源和服务状态,确定成功安装 (37)3.2.4 验证缺省监听 (38)3.2.5 查看scan_listener (39)3.3 安装数据库软件 (39)3.3.1 运行交互式安装程序runInstaller (39)3.3.2 为oracle用户的添加软件环境变量 (47)4 创建数据库 (47)4.1 创建asm diskgroup (47)4.1.1 以grid用户运行asmca工具 (47)4.2 创建数据库zbwshx(在1节点操作) (49)5 应用累计补丁更新PSU (69)5.1 升级补丁工具opatch (69)5.2 补丁1节点软件 (69)5.3 补丁2节点软件 (71)5.4 升级数据库(1节点操作) (71)6 附加脚本(可选) (72)6.1 调整数据库一些缺省设置 (72)6.2 管理集群服务 (73)7 初始化业务环境(举例) (73)1 实施准备1.1 调研与方案制定1.2 存储划分方案(参考)存储要1T1T分配,超过2T会有问题1.3 介质2 设置系统2.1 系统检查2.1.1 cpu信息1 查看物理cpu数shell(root)>cat /proc/cpuinfo |grep physical\ id|sort|uniq2 查看单个cpu coresshell(root)>cat /proc/cpuinfo |grepcpu\ cores|uniq3 查看单个是否超线程shell(root)>cat /proc/cpuinfo |grepcpu\ cores|uniq4 合计cpu coresshell(root)>cat /proc/cpuinfo | grep name | cut -f2 -d: | uniq -c shell(root)>mpstat 12.1.1 确认内存大小物理内存是256Gswap取值算法为物理内存的一倍,当物理内存超过64G,建议>=物理内存,这里32G符合最小2.1.2 检查文件系统/var和/tmp空间至少2G,建议10G/dev/shm共享空间设为物理内存/2 2.1.3 检查网络设置检查1节点public网卡设置检查2节点public网卡设置检查1节点private网卡地址(第一组)检查2节点private网卡设置(第一组)检查1节点 private网卡(第二组)检查2节点private网卡(第二组)2.2 设置操作系统2.1.1 主机正名1节点(全部小写最好了)2节点注意:重新登陆确认改变生效2.1.2 配置本地主机名解析hosts文件shell(root)>vi /etc/hosts#public address192.168.9.101 zbwshx01192.168.9.102 zbwshx02#public vip address192.168.9.103 zbwshx01-vip192.168.9.104 zbwshx02-vip192.168.9.105 zbwshx-cluster-scan(建议3个,用DNS解析)#private group #110.10.11.11 zbwshx01-priv110.10.11.12 zbwshx02-priv1#private group #210.10.12.11 zbwshx01-priv210.10.12.12 zbwshx02-priv2#NTP服务器192.168.5.11 ntpserver2.1.3 修改内核参数1.编辑sysctl.confshell(root)>vi /etc/sysctl.conf#ORACLE SETTINGfs.aio-max-nr = 1048576fs.file-max = 6815744#{shmall}单位pages,命令"echo $((物理内存/$(getconf PAGESIZE)))"(计算:物理内存/4096)kernel.shmall = 67108864#{shmmax},单位bytes,为物理内存一半,echo $((256*1024*1024*1024/2))kernel.shmmax = 137438953472(物理内存/2)kernel.shmmni = 4096kernel.sem = 250 32000 100 128net.ipv4.ip_local_port_range = 9000 65500net.core.rmem_default = 262144net.core.rmem_max = 4194304net.core.wmem_default = 262144net.core.wmem_max = 1048586net.ipv4.ipfrag_high_thresh=524288net.ipv4.ipfrag_low_thresh=393216net.ipv4.tcp_rmem=4096 524288 16777216net.ipv4.tcp_wmem=4096 524288 16777216net.ipv4.tcp_timestamps=0net.ipv4.tcp_sack=0net.ipv4.tcp_window_scaling=1net.core.optmem_max=524287dev_max_backlog=2500sunrpc.tcp_slot_table_entries=128sunrpc.udp_slot_table_entries=128net.ipv4.tcp_mem=16384 16384 16384#多心跳网卡时需要多播技术net.ipv4.conf.default.rp_filter = 0#多播设备eth2,eth4net.ipv4.conf.eth2.rp_filter = 0net.ipv4.conf.eth4.rp_filter = 02.生效shell(root)>modprobesunrpcshell(root)>sysctl -p2.1.4 关闭防火墙服务shell(root)>chkconfig --level 2345 iptables offshell(root)>chkconfig --level 2345 ip6tables offshell(root)>service iptables stopshell(root)>service ip6tables stop2.1.5 关闭selinuxshell(root)>setenforce 0shell(root)>vi /etc/selinux/configSELINUX=disabled2.1.6 配置时钟同步∙配置NTP服务器<非数据库内容,略>∙配置ntp客户端shell(root)>vi /etc/ntp.conf注释掉其他restrict和server条目,增加如下serverntpserverrestrictntpserver mask 255.255.255.255nomodifynotrapnoquery ∙修改ntpd配置文件shell(root)>vi /etc/sysconfig/ntpdSYNC_HWCLOCK=yesOPTIONS="-x -u ntp:ntp -p /var/run/ntpd.pid"∙重启ntpd进程shell(root)>chkconfig --level 2345 ntpd onshell(root)>service ntpd start∙确认握手成功shell(root)>ntpq -p(初次同步需要一定时间)∙检查状态shell(root)>ntpstat2.2 设置软件安装/运行用户2.2.1 创建用户shell(root)>groupadd -g 10501 oinstallshell(root)>groupadd -g 10502 asmadminshell(root)>groupadd -g 10503 asmdbashell(root)>groupadd -g 10504 asmopershell(root)>groupadd -g 10505 dbashell(root)>groupadd -g 10506 opershell(root)>useradd -m -u 10501 -g oinstall -G asmadmin,asmdba,asmoper,dba -d /home/grid -s /bin/bash -c "Grid Infrastructure Owner" gridshell(root)>useradd -m -u 10502 -g oinstall -G dba,oper,asmdba -d /home/oracle -s /bin/bash -c "Oracle Software Owner" oracle2.2.2 设置初始密码shell(root)>password gridshell(root)>password oracle2.2.3 设置用户进程资源配额shell(root)>vi /etc/security/limits.conf#ORACLE SETTINGroot soft nproc 2047root hard nproc 16384root soft nofile 1024root hard nofile 65536root soft stack 10240root hard stack 32768grid soft nproc 2047grid hard nproc 16384grid soft nofile 1024grid hard nofile 65536grid soft stack 10240grid hard stack 32768oracle soft nproc 2047oracle hard nproc 16384oracle soft nofile 1024oracle hard nofile 65536oracle soft stack 10240oracle hard stack 327682.3 设置存储要求:✓同一个lun/vdisk在每个节点上设备名一致✓根据方案,通过scsi_id确认每一个lun/vdisk从存储上划分正确的✓共享模式要求在lun/vdisk在每个节点能同时读写✓RAC安装,lun/vdisk在操作系统上的设备名的属主是grid,组主是asmadmin,权限6602.3.1 多路径软件配置<非数据库内容,略>redhatlinux自带多路径软件multipath的参考文档官方文档:https:///documentation/zh-CN/Red_Hat_Enterprise_Linux/6/html/DM_Multipath/index.html百度搜索文档:/i6241962348353946114/绑定用户组案例:/2014/01/multipath实现设备用户组设置.html2.3.2 udev绑定参考注意:∙如果多路径软件已经实现了设备名绑定、属(组)主设置、权限设置,则不需要再配置udev∙udev不具有多路径failover能力∙本例为scsi磁盘∙∙1.shell(root)>fdisk -l|grep Disk\ /dev/sd根据系统人员告知,设备sda是本地操作系统宿主硬盘,不能使用,剩下的是共享磁盘2.查看scsi_idshell(root)>scsi_id -gvu /dev/sdN3.新建或编辑udev的rule文件shell(root)>vi /etc/udev/rules.d/99-oracle.rules(必须是99)KERNEL=="sd*", SUBSYSTEM=="block", ENV{DEVTYPE}=="disk",ENV{ID_SERIAL}=="36006016010402600126dd2e653ebe511", NAME+="crs_01", OWNER="grid", GROUP="asmadmin", MODE="0660"KERNEL=="sd*", SUBSYSTEM=="block", ENV{DEVTYPE}=="disk",ENV{ID_SERIAL}=="360060160104026004eb5b3db53ebe511", NAME+="crs_02", OWNER="grid", GROUP="asmadmin", MODE="0660"KERNEL=="sd*", SUBSYSTEM=="block", ENV{DEVTYPE}=="disk",ENV{ID_SERIAL}=="360060160104026006edcb7d153ebe511", NAME+="crs_03", OWNER="grid", GROUP="asmadmin", MODE="0660"KERNEL=="sd*", SUBSYSTEM=="block", ENV{DEVTYPE}=="disk",ENV{ID_SERIAL}=="36006016010402600f0b413ee53ebe511", NAME+="fra_data_01", OWNER="grid", GROUP="asmadmin", MODE="0660"KERNEL=="sd*", SUBSYSTEM=="block", ENV{DEVTYPE}=="disk",ENV{ID_SERIAL}=="36006016010402600162f6d1254ebe511", NAME+="zbwshx_data_01", OWNER="grid", GROUP="asmadmin", MODE="0660"4.启动udevshell(root)>udevadm control reload-rulesshell(root)>start_udev3 安装软件3.1 准备安装介质(介质上传到/u01/media/oracle/linux_x64目录)3.1.1 准备目录和权限(所有节点)shell(root)>mkdir -p /u01/media/oracle/linux_x64shell(root)>chown -R grid:oinstall /u01shell(root)>chmod -R g+w /u013.1.2 上传zip包(推荐ftp方式)✓用grid用户上传✓上传grid安装包,database安装包,补丁包,补丁工具✓上传后介质属主grid,组主oinstall3.1.3 使用grid用户解包shell(grid)>cd /u01/media/oracle/linux_x64shell(grid)>unzip p1*******_112040_Linux-x86-64_1of7.zipshell(grid)>unzip p1*******_112040_Linux-x86-64_2of7.zipshell(grid)>unzip p1*******_112040_Linux-x86-64_3of7.zip3.2 安装集群软件3.2.1 运行安装程序runInstallershell(grid)>cd gridshell(grid)>./runInstaller提示:为了把x-windows程序的界面投射到windows终端上,需要执行2个步骤1.在windows上启动本地X11Forward程序,推荐x-manager中的xpassive(端口默认6000,注意firewall)2.在服务器上设定shell环境变量:export DISPLAY=YourIP:0.03.执行xclock测试在DHCP+DNS的环境,需要激活GNS,这里关闭本方案只有一个SCAN IP,使用/etc/hosts解析(也就是说需要将SCAN IP写入到/etc/hosts 下)建立主机之间ssh互信,这样可以免密码互相登陆,oracle安装过程中会把1节点的软件自动复制到2节点。
Enterprise_Linux_64_X86安装Oracle11gR2_RAC详细
安装文档11g R2R A C[A S M]f o r O E L6.4V1.02013年09月9日文档信息文档修订记录一环境准备31.1 操作系统41.2 解决虚拟机安装RAC的几个问题41.2.1 共享存储41.2.2 安装过程中总死机重启151.3修改/etc/hosts 文件(所有节点)151.4添加组和用户(所有节点)161.5建目录(所有节点)171.6修改系统参数(所有节点)181.7禁用防火墙和SELNUX(所有节点)221.8配置时间同步(所有节点)241.9检查安装包(所有节点)251.10配置用户环境变量(所有节点)261.10.1 Grid 用户261.10.2 Oracle用户281.11 配置用户等效性301.11.1 Grid用户:301.11.2 Oracle用户:341.12配置ASM391.12.1 安装ASM支持包(两个节点)391.12.2 配置ASM(两个节点)391.12.3 创建ASM磁盘401.13安装cvuqdisk包并验证(两个节点)411.14验证安装前的检查:41二安装CRS512.1 安装Grid infrastructure512.2 检查CRS状态622.2.1 资源组状态:622.2.2 检查集群节点:632.2.3 检查 Oracle 集群注册表 (OCR):632.2.4 检查表决磁盘:642.2.5 检查CRS状态642.3 为数据和快速恢复区创建 ASM 磁盘组:asmca65三安装Oracle 软件(不建库)65四创建数据库694.1安装数据库694.2查看数据库进程694.3连接数据库72一环境准备安装环境:本机32位VMware Workstation 。
操作系统Oracle Enterprise Linux Release 6 Update 4 for x86 (32 Bit)。
安装介质:IP分配:安装目录:1.1 操作系统本安装文档,操作系统为Oracle Enterprise Linux Release 6 Update 4 for x86 (32 Bit)。
oracle11G R2安装与卸载详细图解
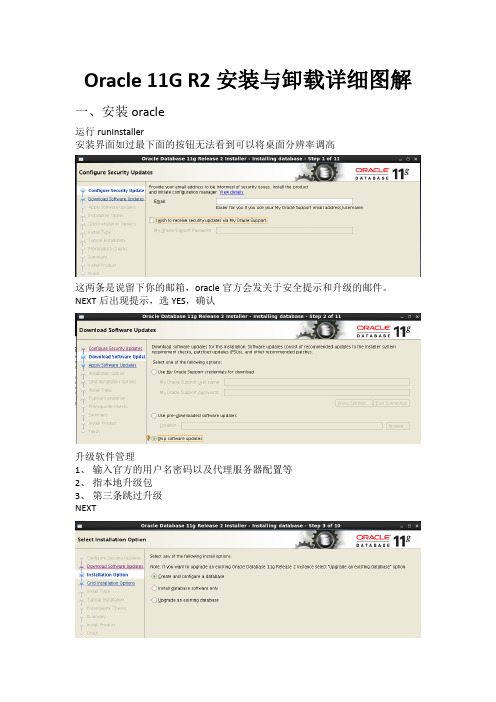
Oracle 11G R2安装与卸载详细图解一、安装oracle运行runInstaller安装界面如过最下面的按钮无法看到可以将桌面分辨率调高这两条是说留下你的邮箱,oracle官方会发关于安全提示和升级的邮件。
NEXT后出现提示,选YES,确认升级软件管理1、输入官方的用户名密码以及代理服务器配置等2、指本地升级包3、第三条跳过升级NEXT选择安装配置1、创建并配置数据库2、指安装数据库软件3、升级数据库NEXT1、桌面级别,最简化配置2、服务器级别,完整配置NEXT1、安装独立数据库2、安装RAC。
3、安装RAC单个节点。
NEXT1、典型配置方式,只配置部分必须,很多采用默认的2、高级配置方式,需要配置众多信息NEXT提前将系统参数配置好后这里会自动读取到系统参数注意global database name,输入密码NEXT默认不需要改动NEXT选右上角ignore all 忽略所有,实际测试,tmp空间一定要大,不然安装报错NEXTNEXT提示执行2个脚本文件第一个生成/etc/oraInst.loc文件第二个在目录/usr/local/bin/下生成三个文件coraenv dbhome oraenv安装完成在整个安装过程中,在检测此步时如发现大量提示错误OS Kernel类错误,请参照文档在linux系统内修改配置文件,swap分区空间不够可以安装,但是tmp目录空间不足则无法安装。
二、卸载oracle1.关闭数据库服务,停止监听SQL> connect / as sysdbaSQL> shutdown [immediate]SQL> exitlsnrctl stopservice httpd stopchkconfig --del dbora2.删除安装目录rm –rf /u01/app/oracle3.删除系统oracle用户和系统文件userdel –r oraclerm /usr/local/bin/dbhomerm /usr/local/bin/oraenv rm /usr/local/bin/coraenv rm /etc/oratab。
Oracle11gRAC for AIX安装步骤

Oracle 11g RAC for AIX安装步骤目录一、安操作系统检查3二、安装装备工作42.1.创建Grid Infrastructure和oracle用户和组42.2.创建Grid 集群如阿健和Oracle Database目录52.3.检查硬件条件52.4.IP地址分配52.5.调整操作系统参数62.6.配置ntp服务(服务端、客户端)82.7.配置SSH92.8.配置 SSH LoginGraceTime 参数102.9.配置GI用户环境102.10.配置ORACLE环境变量112.11.准备ASM磁盘11三、Grid Infrastructure安装过程153.1.检查root 用户umask为022153.2.检查grid 用户umask为022153.3.检查oracle 用户umask为022153.4./etc/hosts准备153.5.检查ifconfig值153.6.清理socket文件153.7.开始安装GI16四、安装Oracle Database 11gR2(不建库)29五、安装最新的OPatch33六、Oracle GI & RDBMS 安装PSU3补丁(18706472)34七、调整GI资源35八、调整ASM参数35九、安装ONE-OFF补丁35十、创建数据库36十一、加载one-off 补丁SQL 语句41十二、调整数据库参数41十三、调整11g 默认 profile42十四、Oracle11g RAC常用命令4214.1.数据库集群源状态查看4214.2.Oracle11g GI 启停命令4314.3.维护注意点43一、安操作系统检查1.检查软件条件二、安装装备工作2.1.创建Grid Infrastructure和oracle用户和组创建/oracle目录,大小为80G[2个节点]mkgroup -'A' id='1000' adms='root' oinstallmkgroup -'A' id='1100' adms='root' asmadminmkgroup -'A' id='1200' adms='root' dbamkgroup -'A' id='1300' adms='root' asmdbamkgroup -'A' id='1301' adms='root' asmopermkgroup -'A' id='1302' adms='root' operuseradd -u '1100' -g 'oinstall' -G 'asmadmin,asmdba,asmoper' -m griduseradd -u '1101' -g 'oinstall' -G 'dba,asmdba,oper' -m oraclepasswd gridpasswd oracle说明:并需要使用该用户重新登录一次。
aix6.1+oracle 11g+rac安装配置手册
aix6.1+grid+rac+oracle 11g安装配置手册系统架构摘要aix 6100-004+oracle grid 11gr2+oracle rac+oracle database hostname oradb1 oradb2IP address:10.1.1.71 oradb210.1.1.73 oradb2vip192.168.101.71 oradb2priv10.1.1.70 oradb1192.168.101.70 oradb1priv10.1.1.72 oradb1vip10.1.1.74 oracrs用户:root/rootgrid/gridoracle/oracle安装前准备工作/usr/sbin/lsattr -E -l sys0 -a realmem/usr/sbin/lsps -alsattr -El rhdisk3 -a size_mb编辑/etc/hostsvi /etc/hosts加入:10.1.1.71 oradb210.1.1.73 oradb2vip192.168.101.71 oradb2priv10.1.1.70 oradb1192.168.101.70 oradb1priv10.1.1.72 oradb1vip10.1.1.74 oracrs----安装SSH的软件包及配置在AIX Toolbox for Linux Applications盘上,安装SSH的前提包openssl-0.9.7gopenssl-devel-0.9.7gopenssl-doc-0.9.7g在扩展盘上openssh.baseopenssh.licenseopenssh.man.en_USFIXPACKIZ39665IZ29348IZ55160调整用户的SHELL Limit修改/etc/security/limits文件中root oracle用户相关部分如下:root:fsize = -1core = -1cpu = -1data = -1rss = -1stack = -1nofiles = -1oracle:fsize = -1core = -1cpu = -1data = -1rss = -1stack = -1nofiles = -1调整系统参数lsattr -E -l sys0 -a maxuproc/usr/sbin/chdev -l sys0 -a maxuproc=16384/usr/sbin/no -r -o ipqmaxlen=512/usr/sbin/no -p -o udp_sendspace=65536/usr/sbin/no -p -o udp_recvspace=655360/usr/sbin/no -p -o tcp_sendspace=65536/usr/sbin/no -p -o tcp_recvspace=65536/usr/sbin/no -p -o rfc1323=1/usr/sbin/no -p -o sb_max=1301720创建oinstall、dbamkgroup -A id=1000 oinstallmkgroup -A id=1200 dbamkuser id=1100 pgrp=oinstall groups=dba home='/home/grid' gridmkuser id=1101 pgrp=oinstall groups=dba home='/home/oracle' oraclemkdir -p /oracle/gridchown -R grid:oinstall /oraclemkdir /oracle/appchown oracle:oinstall /oracle/appchmod -R 775 /oracle/passwd gridpasswd oraclelsuser -a capabilities gridchuser capabilities=CAP_NUMA_ATTACH,CAP_BYPASS_RAC_VMM,CAP_PROPAGA TE grid验证oracle用户# id oracleuid=500(oracle) gid=202(oinstall) groups=203(dba)保证各节点都一样,并设置密码passwd oracleGrid安装配置1.设置ASM设备/usr/sbin/chdev -l hdisk2 -a pv=clear/usr/sbin/chdev -l hdisk3 -a pv=clear/usr/sbin/chdev -l hdisk4 -a pv=clear/usr/sbin/chdev -l hdisk5 -a pv=clearchdev -l hdisk2 -a pv=yeschdev -l hdisk3 -a pv=yeschdev -l hdisk4 -a pv=yeschdev -l hdisk5 -a pv=yes准备asm磁盘chown grid:oinstall /dev/rhdisk3chmod 660 /dev/rhdisk3chdev -l hdisk3 -a reserve_policy=no_reserve2.用户配置文件vi .profilePATH=/usr/bin:/etc:/usr/sbin:/usr/ucb:$HOME/bin:/usr/bin/X11:/sbin:.if [ -s "$MAIL" ] # This is at Shell startup. In normalthen echo "$MAILMSG" # operation, the Shell checksfi # periodically.export ORACLE_BASE=/oracle/appexport ORACLE_HOME=/oracle/gridumask 022PATH=$PATH:/oracle/grid/binexport PATHexport TEMP=/tmpexport TMPDIR=/tmp3.分别在两台主机上运行如下命令配置grid用户的ssh互信,注意只能一条条运行,不能一次全部复制运行mkdir ~/.sshchmod 700 ~/.ssh/usr/bin/ssh-keygen -t rsa/usr/bin/ssh-keygen -t dsa在oradb1上,一条条分别依次执行。
ORACLE 11G RAC 安装部署及测试方案
ORACLE 11G RAC 安装部署及测试方案BY:JM.CAO一、系统要求1.1硬件环境要求Oracle11gR2 RAC 最低安装要求:内存:安装 grid infrastructure 最少需要 1.5GB 的内存,安装grid infrastructure 和 RAC 最少需要 2.5GB 的内存swap:最少需要 1.5GB,推荐等于实际物理内存temp:最少 1GB /tmp安装目录:grid infrastructure最少需要 15GB空间,oracle database 至少15GB ,建议为安装目录创建单独的文件系统,如: /u01。
操作系统:aix 6.1,并且需要安装如下软件包:lslpp -l bos.adt.base bos.adt.lib \bos.adt.libm bos.perf.libperfstat\bos.perf.perfstat bos.perf.proctools rsct.basic.rte \ pat.clients.rte xlC.aix61.rte1.2 网络环境要求1.2.1、IP 地址要求Oracle 11gR2 RAC 中对网络的要求与 10g 稍有些不同,除 Public IP、Private IP、VIP外,在Oracle 11gR2RAC 中还引入了 SCAN IP的概念。
SCAN 全称是 Single Client Access Name ,它是 Oracle RAC 11gR2 版本的一个新特性。
它为需要访问Oracle 集群数据的客户端提供一个简单名字。
1.2.2、DNS 服务器在 Oracle 11gR2 RAC 中引入了 SCAN 的概念,而 ORACLE 推荐使用DNS 解析的方法来实现 SCAN,这就要求网络中有一台 DNS 服务器用来解析SCAN 地址。
如果你网络中没有专用的 DNS 服务器,那么也可以使用hosts文件进行解析。
oracle11grac安装图解
oracle11grac安装图解(1)安装和配置集群的⽹络基本结构(2)选择⾼级安装(3)将中⽂添加到右侧边框,添加中⽂可避免在使⽤ em 时乱码(4)填写集群名称和scan的解析名称及端⼝,点击next(5)在弹出界⾯,点击add,填写节点2的信息(6)接⼝⽤法,公⽤专⽤(7)为OCR和表决盘选择 ASM 存储⽅式(8)选择crsvol,并填写磁盘组名称,点击下⼀步(9)填写密码(10)不配置IPMI(11)默认组(12)指定安装位置与环境变量中⽬录相同(13)产品清单与环境变量中⽬录相同(14)开始安装(15)执⾏脚本顺序不能错[root@rac1 ~]# /oracle/app/oraInventory/orainstRoot.sh[root@rac2 ~]# /oracle/app/oraInventory/orainstRoot.sh[root@rac1 ~]# /oracle/app/11.2.0/grid/product/db_1/root.sh[root@rac2 ~]# /oracle/app/11.2.0/grid/product/db_1/root.shINS-20802 实⽤程序失败,可忽略创建asm磁盘组在grid ⽤户下,执⾏ asmca,启动 asm 磁盘组创建向导点击create 按钮,在弹出的创建界⾯中填写磁盘组名称,选择外边存储⽅,并勾选成员,选择完毕后点击 ok 选项为外部显⽰符合项。
创建数据库(1)仅安装数据库软件(2)选择全部节点,点击 next(3)将简体中⽂添加到安装选项(4)选择企业版,点击 next(5)保持默认的⽬录,点击 next 应该与环境变量设置相同(6)保持默认的属组信息,点击 next(7)安装过程⾃动进⾏安装检查创建集群数据库实例[oracle@rac1 database]$ dbca(1)选中oracle real application cluters database,下⼀步:(2)创建数据库(3)定制数据库(4)填写全局数据库名和SID,全选节点(5)默认(6)⼝令管理(7)默认(8)指定ASM⼝令(9)⼀直默认,知道字符集选UTF8完成。
Oracle11g搭建RAC步骤
一、网卡绑定1、修改配置文件/etc/modprobe.confalias bond0 bondingalias bond1 bonding/etc/sysconfig/network-scripts/ifcfg-bond0DEVICE=bond0BOOTPROTO=staticONBOOT=yesUSERCTL=noIPADDR=192.168.56.101BROADCAST=192.168.56.255NETWORK=192.168.56.0NETMASK=255.255.255.0TYPE=EthernetBONDING_OPTS="mode=1 miimon=100"/etc/sysconfig/network-scripts/ifcfg-bond1DEVICE=bond1BOOTPROTO=staticONBOOT=yesUSERCTL=noIPADDR=192.168.136.101BROADCAST=192.168.136.255NETWORK=192.168.136.0NETMASK=255.255.255.0TYPE=EthernetBONDING_OPTS="mode=1 miimon=100"/etc/sysconfig/network-scripts/ifcfg-eth0# Advanced Micro Devices [AMD] 79c970 [PCnet32 LANCE] DEVICE=eth0BOOTPROTO=noneONBOOT=yesUSERCTL=noHWADDR=00:0c:29:9e:87:44MASTER=bond0SLAVE=yes/etc/sysconfig/network-scripts/ifcfg-eth1# Advanced Micro Devices [AMD] 79c970 [PCnet32 LANCE] DEVICE=eth1BOOTPROTO=noneONBOOT=yesHWADDR=00:0c:29:9e:87:4eMASTER=bond0SLAVE=yes/etc/sysconfig/network-scripts/ifcfg-eth2# Advanced Micro Devices [AMD] 79c970 [PCnet32 LANCE] DEVICE=eth2BOOTPROTO=noneONBOOT=yesUSERCTL=noHWADDR=00:0c:29:9e:87:58MASTER=bond1SLAVE=yes/etc/sysconfig/network-scripts/ifcfg-eth3# Advanced Micro Devices [AMD] 79c970 [PCnet32 LANCE] DEVICE=eth3BOOTPROTO=noneONBOOT=yesHWADDR=00:0c:29:9e:87:62USERCTL=noMASTER=bond1SLAVE=yes命令:ifensalve bond0 eth0 eth1ifensalve bond1 eth2 eth3service network restart2、检查配置cat /proc/net/bonding/bond0Ethernet Channel Bonding Driver: v3.6.0 (September 26, 2009)Bonding Mode: fault-tolerance (active-backup)Primary Slave: NoneCurrently Active Slave: eth0MII Status: upMII Polling Interval (ms): 100Up Delay (ms): 0Down Delay (ms): 0Slave Interface: eth0MII Status: upLink Failure Count: 0Permanent HW addr: 00:0c:29:9e:87:44Slave queue ID: 0Slave Interface: eth1MII Status: upLink Failure Count: 0Permanent HW addr: 00:0c:29:9e:87:4eSlave queue ID: 0cat /proc/net/bonding/bond1Ethernet Channel Bonding Driver: v3.6.0 (September 26, 2009)Bonding Mode: fault-tolerance (active-backup)Primary Slave: NoneCurrently Active Slave: eth2MII Status: upMII Polling Interval (ms): 100Up Delay (ms): 0Down Delay (ms): 0Slave Interface: eth2MII Status: upLink Failure Count: 0Permanent HW addr: 00:0c:29:9e:87:58Slave queue ID: 0Slave Interface: eth3MII Status: upLink Failure Count: 0Permanent HW addr: 00:0c:29:9e:87:62Slave queue ID: 03、测试自动切换在vmware workstation界面上将相应的网卡(cat /proc/met/bonding/bondN)disconnect,依次测试。
- 1、下载文档前请自行甄别文档内容的完整性,平台不提供额外的编辑、内容补充、找答案等附加服务。
- 2、"仅部分预览"的文档,不可在线预览部分如存在完整性等问题,可反馈申请退款(可完整预览的文档不适用该条件!)。
- 3、如文档侵犯您的权益,请联系客服反馈,我们会尽快为您处理(人工客服工作时间:9:00-18:30)。
RAC for AIX目录1 主机规划 (2)1.1 硬件环境 (2)1.2 软件环境 (2)1.3 RAC (3)1.4 网络规划 (3)1.4.1 IP地址要求 (3)1.4.2 DNS服务器(可选) (3)1.5 安装目录规划 (4)1.5.1 grid、ASM安装目录 (4)1.5.2 Clusterware安装目录 (4)1.5.3 OCR、VOTE存储规划 (4)1.5.4 数据库数据文件存储规划 (4)2 安装准备 (5)2.1 系统硬件环境检查 (5)2.1.1 Oracle11gR2 RAC最低安装要求: (5)2.1.2 验证方法: (5)2.1.2.1 确认内存大小 (5)2.1.2.2 确认SW AP空间,最少4G。
(5)2.1.2.3 确认/tmp大于1.5GB和/oracle目录空间15GB (5)2.1.2.4 确认系统结构 (6)2.1.2.5 确认系统CPU个数和主频: (6)2.2 安装操作系统软件包 (6)2.2.1 安装FILESETS (6)2.2.2 安装PA TCHES (6)2.3 配置IP地址 (7)2.4 修改/etc/hosts文件 (7)2.5 文件系统准备 (7)2.5.1 方法1:使用命令创建 (8)2.5.2 方法2:使用smit创建 (8)2.6 调整系统参数 (9)2.6.1 打开异步IO (9)2.6.2 调整虚拟内存管理 (9)2.6.3 调整maxuproc(系统最大进程数)和ncargs(系统块大小)参数 (10)2.6.4 调整SHELL限制 (10)2.6.5 确认网络配置参数 (10)2.7 创建用户、组 (11)2.7.1 要求 (11)2.7.2 创建命令: (11)2.7.3 修改用户属性 (11)2.7.3.1 grid用户 (11)2.7.3.2 oracle用户 (12)2.7.3.3 root用户 (12)2.8 用户环境变量设置 (12)2.8.1 grid用户 (12)2.8.2 oracle用户 (13)2.9 用户shell限制 (14)2.10 创建安装目录并修改权限 (15)2.11 SSH信任关系设置(可选) (15)2.12配置磁盘设备 (15)2.12.1设置磁盘属性 (15)2.12.2修改用于数据库存储的PV的属主 (15)2.12.3 修改用于数据库存储的PV的权限 (16)2.13 配置NTP服务(可选) (16)3 安装Grid (16)3.1 Grid安装前检查 (16)3.2 执行rootpre.sh (16)3.3 安装grid (16)3.4 Clusterware安装校验 (28)4 安装Database (30)5 创建ASM磁盘组 (36)6 DBCA创建数据库 (38)7 安装完成 (45)1主机规划1.1硬件环境服务器:IBM P55A P520存储:一台DS4000存储;1.2软件环境数据库:11gR2_database集群件(11G中的clusterware):11gR2_grid这三个包操作系统:AIX6.1版本6100-04-04-10141.3R A C1.4网络规划1.4.1I P地址要求●每个节点一个public IP●每个节点一个public VIP●每个节点一个private IP●一个用于集群的SCAN名称和一到三个和public IP同网段的IP,本处用一个●public IP,VIP和private IP写入/etc/hosts文件,scan名配置好固定IP(public),ORACLE的私有IP(priv),和VIP,尤其要注意的是:两台机器需配置对应关系一致的IP与网卡。
如:ASM规划1.4.2D N S服务器(可选)前面说到在Oracle 11gR2 RAC中引入了SCAN的概念,而ORACLE推荐使用DNS解析的方法来实现SCAN,这就要求网络中有一台DNS服务器用来解析SCAN地址。
如果你网络中没有专用的DNS服务器,那么也可以用现有的数据库服务器兼作DNS服务器,但是不推荐这样做,因为一旦这台机器当机了,DNS就无法解析,可以导致监听的异步常。
这里使用/etc/hosts来解析scan1.5安装目录规划安装目录规划原则:建立/u01文件系统用来安装grid、datbase程序。
程序都安装在/u01/app 下面,对于grid与database分别建立不同的目录,分配不同的权限。
其中grid的ORACLE_BASE和ORACLE_HOME建议安装在不同的目录下,具体规划如下:U01 40G新建文件系统,挂载点:/u01grid base目录:/u01/app/gridgrid asm安装目录:/u01/app/11.2/gridOracle base目录:/u01/app/oracle注:Grid用户的ORACLE_BASE、ORACLE_HOME都需要手工创建。
存储规划1.5.1g r i d、A S M安装目录在Oracle 11gR2中grid和ASM是安装在同一目录下的,我们将grid和ASM安装在/u01/app/11.2/grid目录下,为JFS2文件系统,大小建立为30GB以上。
1.5.2C l u s t e r w a r e安装目录我们将Clusterware安装在/u01/app/oracle目录下。
1.5.3O C R、V O T E存储规划在我们的方案中规划如下:OCR hdisk2 容量:3GVOTE hdisk3 容量:3GDATA hdisk4、5、6 容量:50G、50G、30G1.5.4数据库数据文件存储规划规划使用2个50GB和一个30G的阵列盘用来存放数据库数据文件文件,2块盘存放OCR VOTE 在ASM中做成external磁盘组。
2安装准备2.1系统硬件环境检查2.1.1O r a c l e11g R2R A C最低安装要求:内存:安装grid 最少需要2GB的内存,安装grid 和RAC最少需要1.5GB的内存swap:最少需要4GB。
temp:推荐5G以上。
安装目录:grid+ASM最少需要30GB操作系统:AIX 6.1 TL 01 SP1 ("6100-01-01), 64-bit kernel6100-04-04-10142.1.2验证方法:2.1.2.1 确认内存大小# lsattr -El sys0 -a realmemrealmem 4194304 Amount of usable physical memory in Kbytes False2.1.2.2 确认SWAP空间,最少4G。
#lsps -a# chps -s 20 hd62.1.2.3 确认/tmp大于1.5GB和/oracle目录空间15GB推荐oracle安装目录在30GB左右,grid +ASM安装在/u01/app/11.2/grid目录下,其中Oracle11g Clusterware安装在/u01/app/oracle/db目录下.2.1.2.4 确认系统结构# getconf HARDWARE_BITMODE642.1.2.5 确认系统CPU个数和主频:# lsdev -C | grep procproc0 Available 00-00 Processorproc1 Available 00-01 Processor# lsattr -El proc0frequency 1002000000 Processor Speed False smt_enabled false Processor SMT enabled False smt_threads 1 Processor SMT threads False state enable Processor state False type PowerPC_POWER4 Processor type False2.2安装操作系统软件包2.2.1安装F I L E S E T SAIX 6.1需要安装如下软件包:bos.adt.libmbos.perf.libperfstat 6.1.2.1 or laterbos.perf.perfstatbos.perf.proctoolsrsct.basic.rtepat.clients.rte2.2.2安装P A T C H E SAIX版本要求如下AIX 6.1 TL 02 SP1 ("6100-02-01), 64-bit kernel或以上版本检查方法:# oslevel -r6100-04其它单个补丁的要求如下:AIX 6L installations All AIX 6L 6.1 installations Authorized Problem Analysis Reports (APARs) for AIX 5L v. 5.3 ML06, and the following AIXfixes:IZ41855IZ51456IZ52319Instfix –I –k “IZ41855 IZ51456 IZ52319”验证:/usr/sbin/instfix -i -k IZ418552.3配置I P地址根据前面的规划先配置要两台机器的IP地址,就是ibmdb1、ibmdb1-priv和ibmdb2、ibmdb2-priv这四个IP地址。
同样配置几块网卡的IP地址,基中服务地址要配置网关,网关地址为:192.168.17.254。
2.4修改/e t c/h o s t s文件修改每个节点上的/etc/hosts文件。
127.0.0.1 loopback localhost # loopback (lo0) name/address 192.168.17.237 ibmdb1192.168.17.236 ibmdb1-vip10.10.10.237 ibmdb1-priv192.168.17.239 ibmdb2192.168.17.238 ibmdb2-vip10.10.10.239 ibmdb2-priv192.168.17.229 scan2.5文件系统准备创建/u01文件系统2.5.1方法1:使用命令创建1、mkdir /u012、建立一个lv mklv –t jfs2 –y u01lv rootvg 240 #200个pps,可视需要而定3、建立一个文件系统crfs –v jfs2 -d /dev/u01lv -m /u014、mount文件系统mount /u015、使用smit chfs,修改/u01启动自动mount。