90m0#支架计算书
90nm芯片长宽 -回复

90nm芯片长宽-回复90nm芯片长宽——揭秘当代半导体技术进展摘要:本文将深入探讨90纳米(nm)芯片的长宽,以帮助读者更好地了解当代半导体技术的进展。
本文将从芯片尺寸的定义开始,一步一步回答读者的疑问,并解释90nm芯片的长宽对半导体行业的重要性。
引言随着当代科技的不断进步,电子设备的性能不断提高。
其中,半导体技术被认为是推动科技革命的核心。
而90nm芯片作为当代半导体技术的重要组成部分之一,其尺寸的长宽对芯片的性能与功耗有着直接影响。
本文将在以下几个方面详细阐述90nm芯片长宽的重要性。
一、芯片尺寸的定义要了解90nm芯片的长宽,首先需要了解芯片尺寸的定义。
芯片尺寸是指芯片上电路元件的尺寸。
芯片尺寸通常由工艺节点来决定,而90nm指的是芯片上电路元件之间的距离约为90纳米。
其中,纳米是十亿分之一米的单位,90nm可以说是非常微小的尺度。
二、为什么90nm芯片的尺寸非常重要?90nm芯片的尺寸非常重要,因为这决定了芯片的集成度与性能。
芯片的集成度指芯片上能够集成的电路元件的多少,而性能则包括运行速度、功耗等。
90nm芯片的尺寸相较于更早期的工艺节点,更紧密地集成了更多的电路元件,从而提高了半导体芯片的性能和集成度。
三、90nm芯片长宽对半导体行业的影响1. 性能提升:由于90nm芯片的尺寸更小,电路元件的间距更近,因此信号的传输速度更快。
这使得电子设备在处理大数据、高清视频等资源密集型任务时能够更高效地工作,提供更好的用户体验。
2. 功耗降低:90nm芯片的尺寸减小,这使得电路元件之间的电流路径缩短,从而降低了能耗。
同时,由于电路尺寸减小,载流子的运动距离也变短,导致了更小的能量损耗。
这对于电子设备的续航时间和发热问题都有积极的影响。
3. 成本降低:90nm芯片的尺寸变小,相同面积上能够集成更多的电路元件。
这在生产价值上具有重要意义,可以使得相同尺寸的芯片生产成本更低,封装更多的处理能力。
这对半导体制造商来说是一个利好消息。
芯海科技 ARM M M0-based MCU 输出手册说明书

输出手册版本历史版本号说明日期1.0 初版2019-6-171.1 1. LRC频率:min(30->27),max(50->62)2. ADC特性更新: fADC-40℃≤ Trange ≤ 85℃,fADC≤14MHz,支持电压范围2.65≤ VDDA ≤5.5V;-40℃≤ Trange ≤ 105℃,fADC≤14MHz,支持电压范围2.7≤ VDDA ≤5.5V;-40℃≤ Trange ≤ 105℃,fADC≤12MHz,支持电压范围2.4≤ VDDA ≤5.5V;进入校准模式,fADC≤12MHz。
进入正常转换模式,fADC≤14MHz。
支持:-40℃≤ Trange ≤ 105℃和电压范围2.4≤ VDDA ≤5.5V;3. ADC特性更新:VDDA=2.4V时,Offset和ERR Gain更新2020-6-31.2 1.增加G6U6版本相关信息2020-6-191.3 1.更新温度传感器线性度参数,区分不同温度范围2020-8-262/56文件编号:CS-QR-YF-054A02目录输出手册版本历史 (2)目录 (3)1介绍 (5)2功能 (6)3器件一览 (8)4引脚描述 (10)4.1LQFP48 (10)4.2LQFP32 (10)4.3QFN28L (11)4.4TSSOP20 (11)4.5引脚描述 (12)5I/O 复用 (15)5.1PA口复用功能 (15)5.2PB口复用功能 (16)6存储器 (17)7功能描述 (21)7.1ARM®C ORTEX®-M0内核 (21)7.2存储器 (21)7.3时钟 (21)7.4工作环境 (23)7.4.1工作电压 (23)7.5启动模式 (23)7.6电源管理 (23)7.6.1低功耗模式 (23)7.6.2RTC和备用寄存器的电源电压VBAT (23)7.6.3上电复位/掉电复位(POR/PDR) (23)7.6.4低电压复位模块(LVD) (24)7.7通用输入输出端口(I/O) (24)7.8模数转换器(ADC) (24)7.8.1温度传感器(TS) (24)7.8.2内部参考电压 (24)7.8.3VBAT监测 (25)7.9定时器 (25)7.9.1高级定时器 (TIM1) (25)7.9.2通用定时器 (TIM3, 14, 15,16, 17) (25)7.9.3基本定时器(TIM6) (26)7.9.4独立看门狗定时器(FWDT) (26)7.9.5窗看门狗定时器(WWDT) (26)7.9.6滴答定时器(SysTick) (26)7.10直接内存存取(DMA) (26)3/56文件编号:CS-QR-YF-054A027.11中断和事件 (26)7.12实时时钟(RTC)和备用寄存器 (26)7.13串行外设总线(SPI)/集成电路内置音频总线(I2S) (27)7.14通用同步异步收发器(USART) (27)7.15内置集成电路接口(I2C) (29)7.16循环冗余校验 (29)7.17串行调试端口(SWD-DP) (29)8电气特性 (30)8.1说明 (30)8.2绝对最大额定值 (31)8.3工作条件 (31)8.4I/O端口特性 (32)8.5低功耗模式唤醒时间 (33)8.6RC振荡特性 (33)8.7晶振特性 (34)8.8外部时钟特性 (36)8.9PLL特性 (36)8.10功耗 (37)8.11内部参考电压特性 (38)8.12ADC特性 (38)8.13温度传感器特性 (39)8.14VBAT监测器特性 (39)8.15F LASH 特性 (39)8.16定时器特性 (40)8.17SPI/I2S特性 (40)8.18I2C特性 (44)8.19ESD特性 (44)9封装信息 (46)9.1LQFP48 (46)9.2LQFP32 (48)9.3QFN28L (49)9.4TSSOP20 (51)10订货信息 (52)11勘误表 (53)12缩略语 (54)13销售和服务 (56)4/56文件编号:CS-QR-YF-054A021介绍CS32F030系列微控制器采用高性能的32位ARM® Cortex®-M0 内核,嵌入高达64Kbytes flash和8Kbytes SRAM,最高工作频率48MHz。
90欧姆最佳线宽线距

90欧姆最佳线宽线距【最新版】目录1.90 欧姆最佳线宽线距的定义与重要性2.90 欧姆最佳线宽线距的计算方法3.90 欧姆最佳线宽线距在电子工程中的应用4.遵循 90 欧姆最佳线宽线距的优点正文【90 欧姆最佳线宽线距的定义与重要性】在电子工程领域,尤其是在印刷电路板(PCB)设计和制造过程中,90 欧姆最佳线宽线距是一个关键的概念。
线宽和线距是指导印刷电路板布线过程中,线条宽度和线条之间距离的参数。
其中,线宽是指导信号线的宽度,而线距是指信号线之间的距离。
90 欧姆最佳线宽线距是指在特定频率下,信号线的宽度和线间距的最佳数值,以实现信号传输质量和信号完整性。
90 欧姆最佳线宽线距的重要性在于,当信号线宽度和线间距接近该数值时,信号传输的损耗最小,信号完整性得到保障。
此外,遵循 90 欧姆最佳线宽线距可以降低信号反射、串扰和信号衰减等问题,从而提高整个电子系统的稳定性和可靠性。
【90 欧姆最佳线宽线距的计算方法】计算 90 欧姆最佳线宽线距的方法通常基于经验公式,其中最常用的公式是:线宽(W)= 0.09 * 频率(F)线距(D)= 0.12 * 频率(F)其中,线宽和线距的单位为英寸,频率的单位为 MHz。
需要注意的是,该公式适用于一般情况,但在实际应用中,需要根据具体电路特性、传输速率和信号频率等因素进行调整。
【90 欧姆最佳线宽线距在电子工程中的应用】在实际电子工程项目中,90 欧姆最佳线宽线距广泛应用于以下场景:1.高速数字信号传输:例如,LVDS(低电压差分信号)技术在高速数字信号传输中,需要严格遵循 90 欧姆最佳线宽线距,以确保信号的完整性和稳定性。
2.射频信号传输:在射频信号传输系统中,遵循 90 欧姆最佳线宽线距可以降低信号反射和串扰,从而提高信号传输质量。
3.电源完整性:在电源系统设计中,遵循 90 欧姆最佳线宽线距有助于降低电源损耗,提高电源转换效率。
【遵循 90 欧姆最佳线宽线距的优点】遵循 90 欧姆最佳线宽线距可以带来以下优点:1.降低信号损耗:通过优化线宽和线距,可以减少信号在传输过程中的损耗,提高信号质量。
OMB-DBK90 56通道热电偶输入模块说明书

H-2
)UHHSKRQH _ ,QWHUQDWLRQDO _ )D[ _ 6DOHV#RPHJDFRXN
ZZZRPHJDFRXN
81,7(' 67$7(6 ZZZRPHJDFRP 7&20(*$
Each OMB-DBK90 has a built-in auto-zero channel and a CJC channel. The OMB-DBK90 can measure one TC channel in 3 ms, 14 TC channels in 16 ms, and all 56 TC channels in 61 ms. An OMB-DBK90 based system of 896 channels can be measured in 976 ms. This speed is slower than other OMB-DBK modules to ensure that the TC measurements are accurate, low noise, and stable. Typical measurement accuracies are better than 0.7°C, with channelto-channel variation typically less than 0.5°C.
三菱系统代码
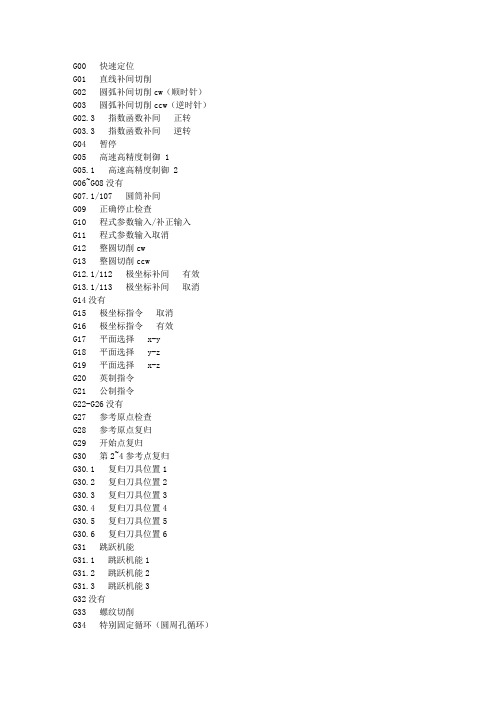
G00 快速定位G01 直线补间切削G02 圆弧补间切削cw(顺时针)G03 圆弧补间切削ccw(逆时针)G02.3 指数函数补间正转G03.3 指数函数补间逆转G04 暂停G05 高速高精度制御 1G05.1 高速高精度制御 2G06~G08没有G07.1/107 圆筒补间G09 正确停止检查G10 程式参数输入/补正输入G11 程式参数输入取消G12 整圆切削cwG13 整圆切削ccwG12.1/112 极坐标补间有效G13.1/113 极坐标补间取消G14没有G15 极坐标指令取消G16 极坐标指令有效G17 平面选择 x-yG18 平面选择 y-zG19 平面选择 x-zG20 英制指令G21 公制指令G22-G26没有G27 参考原点检查G28 参考原点复归G29 开始点复归G30 第2~4参考点复归G30.1 复归刀具位置1G30.2 复归刀具位置2G30.3 复归刀具位置3G30.4 复归刀具位置4G30.5 复归刀具位置5G30.6 复归刀具位置6G31 跳跃机能G31.1 跳跃机能1G31.2 跳跃机能2G31.3 跳跃机能3G32没有G33 螺纹切削G34 特别固定循环(圆周孔循环)G35 特别固定循环(角度直线孔循环)G36 特别固定循环(圆弧)G37 自动刀具长测定G37.1 特别固定循环(棋盘孔循环)G38 刀具径补正向量指定G39 刀具径补正转角圆弧补正G40 刀具径补正取消G41 刀具径补正左G42 刀具径补正右G40.1 法线制御取消G41.1 法线制御左有效G42.1 法线制御右有效G43 刀具长设定(+)G44 刀具长设定(—)G43.1 第1主轴制御有效G44.1 第2主轴制御有效G45 刀具位置设定(扩张)G46 刀具位置设定(缩小)G47 刀具位置设定(二倍)G48 刀具位置设定(减半)G47.1 2主轴同时制御有效G49 刀具长设定取消G50 比例缩放取消G51 比例缩放有效G50.1 G指令镜象取消G51.1 G指令镜象有效G52 局部坐标系设定G53 机械坐标系选择G54 工件坐标系选择1G55 工件坐标系选择2G56 工件坐标系选择3G57 工件坐标系选择4G58 工件坐标系选择5G59 工件坐标系选择6G54.1 工件坐标系选择扩张48组G60 单方向定位G61 正确停止检查模式G61.1 高精度制御G62 自动转角进给率调整G63 攻牙模式G63.1 同期攻牙模式(正攻牙)G63.2 同期攻牙模式(逆攻牙)G64 切削模式G65 使用者巨集单一呼叫G66 使用者巨集状态呼叫aG66.1 使用者巨集状态呼叫bG67 使用者巨集状态呼叫取消G68 坐标回转有效G69 坐标回转取消G70 使用者固定循环G71 使用者固定循环G72 使用者固定循环G73 固定循环(步进循环)G74 固定循环(反向攻牙)G75 使用者固定循环G76 固定循环(精搪孔)G77 使用者固定循环G78 使用者固定循环G79 使用者固定循环G80 固定循环取消G81 固定循环(钻孔/铅孔)G82 固定循环(钻孔/计数式搪孔)G83 固定循环(深钻孔)G84 固定循环(攻牙)G85 固定循环(搪孔)G86 固定循环(搪孔)G87 固定循环(反搪孔)G88 固定循环(搪孔)G89 固定循环(搪孔)G90 绝对值指令G91 增量值指令G92 机械坐标系设定G93 逆时间进给G94 非同期进给(每分进给)G95 同期进给(每回转进给)G96 周速一定制御有效G97周速一定至于取消G98 固定循环起始点复归G99 固定循环 r点复归G114.1 主轴同期制御G100~225 使用者巨集(G码呼叫)最大10个↑~~~~~~~~~~~~~~~~~~~~~~~~~~~~~~↑~~~~~~~~~~~~~~~~~~~~~~~~~~~~~~~~~~~~~~ 希望这套G指令能对大家的学习有用,能对机械事业的发展有用,能对中国的繁荣富强有用.这是作为一个中国人,一个热爱机械的人的心声~~~!扯扯2006年6月18日上午10点30毕于重庆在这里,兄弟要给大家道个歉,时隔半年才在今天把三菱加工中心滴M代码发上来~如果有兄弟要扔砖头甩炸弹滴尽管往兄弟我这里扔~~~嘿嘿···!!!M00 程式停止(暂停)M01 程式选择性停止/选择性套用M02 程序结束M03 主轴正转M04 主轴反转M05 主轴停止M06 自动刀具交换M07 吹气启动M08 切削液启动M09 切削液关闭M10 吹气关闭→M09也能关吹气M11《斗笠式》主轴夹刀M12 主轴松刀M13 主轴正转+切削液启动M14 主轴反转+切削液启动M15 主轴停止+切削液关闭M16— M18没有M19 主轴定位M20 ——没有M21 x轴镜象启动M22 y轴镜象启动M23 镜象取消M24 第四轴镜象启动M25 第四轴夹紧M26 第四轴松开M27 分度盘功能M28 没有M29 刚性攻牙M30 程式结束/自动断电M31 —— M47 没有M48 深钻孔启动M49 —— M51 没有M52 刀库右移M53 刀库左移M54 —— M69 没有M70 自动刀具建立M71 刀套向下M72 换刀臂60°M73 主轴松刀M74 换刀臂180°M75 主轴夹刀M76 换刀臂0°M77 刀臂向上M78 —— M80 没有M81 工作台交换确认M82 工作台上M83 工作台下M84 工作台伸出M85 工作台缩回M86 工作台门开M87 工作台门关M88 —— M97 没有M98 调用子程序M99 子程序结束不对滴地方,希望高手指正不明滴地方,希望大家讨论。
MD90(麦道90)

MD-90
8491 25.3 1509 -5.0 10000 20.3
MD-90
12.8%
16.1%
MD-90
42000 400 400 1000 2000 5 60 60 55175 10000 65175
MD-90
飞机座位 MD-90
.驾驶舱座位
驾驶舱座位3个,正、副驾驶、观察员座位各1个。 .安全员座位及机组休息座位 .安全员座位1个:4C (27B以前是安全员座位) .机组休息座位2个:4D、4E 标准机组人数为8人
客舱座位数F12Y145
MD-90
头等舱
F12 1-3 A B C D
普通舱 Y145 4-27 28-32 33-34
MD-90
平衡图绘制
• (10) 从在燃油指数标尺上水平线的末端引垂直 线与表下方的代表起飞重量的水平线相交,该点 为起飞重量和重心。起飞重心值从“%MAC”斜线 中读出。重心值填入起飞重量相邻栏内。
MD-90
练习
• • • • • • B-2250 CZ6302 CAN-PEK DOW:42000KG/DOI:450 PAX:F5Y120 C:4500kg B:1000kg 起飞油量:11000kg/航程耗油:5500kg
平衡图绘制
MD-90
• (4)在平衡图上部操作指数标尺(OPERATION INDEX)上找到相对与修正后指数单位(QIU) 的一点。以此作为计算起点向下引一条垂线与第 一个显示重量的指数栏标尺的斜线中的一条相交。 • (5)在指数标尺上,按箭头指示的方向,水平向 右或向左移动垂直线。其移动的格数与记录的重 量或旅客数所折合的单位数相等。 (6) 继续用 此方法直到最后的客舱绘制完毕 • (7)向下引垂直线到图下方的重心位置区域,直 到此直线与该区域内代表无油重量的水平线相交, 该交电既为无油重量和重心。无油重心值从 “%MAC”斜线中读出。
2024届广东省高三一模英语试卷(含答案)
®¯°±²$ ³`XH´J ,& '& -& .µ¶ep,eg·¸ep% !
/01234053/6789:;<;90=* >? 5@9=AB9C0$ D0E11B?132F 5@04G=50;90=3H2<11?B4:0;= <?C 132<593? I;0H9J0=&K?3D9?A5@0=0@01I=G3B LB92F1G132<50<?C <220==G3B;C0=9;0C :33F=& "#$$%&'()*+
><4 <:1053=0?C G3B <M0;GA33C I@353A;<I@ 5<F0? ;020?51G&>0?213=0<=@3;5 :93A;<I@92<1<223B?5D@92@ 4GIB:19=@0;=B=0H3;IB:19295GIB;I3=0=$ <?C =3402<=B<1 ;0M90D=&'93A;<I@90=B=B<11G:0A9? 532340<13?APB=5<:3B55@05940<D;950;@<=?343;0 53=<G$ <?C >C3?35H0015@<55940@<=G0523405340&
9*):7;
"4$$)56748
,7(*#*< ,45#6748
,4#89)*74=
- '1<?F. -9;2B1<59?A-31102593? $?C H133;$ (;C H133;$ <?C %5@ H133; $"]C<G13<?
Omega OM-90系列胶囊温度与湿度数据记录仪用户指南说明书
e-mail:**************For latest product manuals: OM-90 SERIESPortable Temperature andShop online at User’s Gui d e***********************Servicing North America:U.S.A. Omega Engineering, Inc.Headquarters: Toll-Free: 1-800-826-6342 (USA & Canada only)Customer Service: 1-800-622-2378 (USA & Canada only)Engineering Service: 1-800-872-9436 (USA & Canada only)Tel: (203) 359-1660 Fax: (203) 359-7700e-mail:**************For Other Locations Visit /worldwideUser GuideContents1. Document Overview (3)2. Product Overview (4)3. Technical Specifications (6)4. Buttons and LED Indicators (7)5. Packaging List (8)6. Installation of the Software (9)7. Using the Software (10)7.1. Front Page (10)7.2. Main Page (11)7.3. Configuration of a Data Logger (Start on Disconnection) (12)7.4. Saving a Configuration File (14)7.5. Loading a Configuration from File (15)7.6. Retrieving Logged Data (16)7.7. Viewing Logged Data from File (17)7.8. Configuration of a Data Logger (Start at Specified Time) (19)7.9. Configuration of a Data Logger (Start using Button Press) (20)7.10. Configuration of a Data Logger (Real Time Logging) (21)8. Mounting Guidelines (22)9. Battery Replacement (22)10. Technical Support (22)1.Document OverviewThis guide is provided to distribute the following information:∙the main features of data logger∙how to install the software for the logger∙how to use the software for configuration, data extraction and data viewing ∙how to mount your data logger∙how to replace the battery for the data logger∙contact information should you have further technical questions2.Product OverviewThe OM-90 Series are compact temperature / humidity data loggers measuring just 35mm x 60mm x15mm. These data loggers are commonly used in transport applications including but not limited to transport of:∙sensitive/fragile items∙food∙animal/livestock∙plants∙chemicals∙medicines or organsThe OM-90 Series comes in two versions; OM-91 is a temperature only version and OM-92 is a temperature and humidity logger. This document applies for both versions.Figure 1: Introducing the OM-90 Series Data Loggers and softwareSuppose for example you would like to transport some delicate or fragile cargo from one location to another. By attachment of a data logger one can record temperature and humidity conditions during the journey. At the destination you can then extract the logged data using very simple software and see graphically or in raw data format the changes in environment over time.When you would like to guarantee that items are transported within particular environmental limits then one can also set operating ranges above or below which light indicators will be activated so that the user can become aware that the desired transportation conditions have been exceeded.Figure 2: Data Logger IndicatorsThe data logger offers accurate and repeatable logging for temperature and relative humidity. Temperature is measured to an accuracy of +0.3o C over the range +5o C to +60o C. Over the full range -30o C to +80o C the accuracy is +2.0o C. Relative humidity is measured to an accuracy of +2.0% over 20% to 80% humidity range and +3.0% over 0% to 100%. Both temperature and relative humidity are logged at a user configurable logging rate which can be set in software.The data logger is equipped with the largest logging memory when compared with comparable portable logging devices currently available. The data logger has provision for an impressive 65520 records, each of which is a time-stamped recording of temperature and humidity.-30o C to +80o C (-22o F to 176o F)+0.3o C (+5o C to +60o C)+0.5o F (41o F to 140o F)see accuracy curve in figure 30.01o C (0.2o F)0% to 100%+2.0% (20% to 80%)see accuracy curve in figure 30.01%CR2540 coin cellup to 4 years while logging 35mm x 60mm x 15mm16 characters3.Technical Specifications∙Temperature range∙Temperature accuracy (limited range)∙Temperature accuracy (-30o C to +80o C)∙Temperature resolution∙Humidity range (only on OM-92)∙Relative humidity accuracy (limited range)∙Relative humidity accuracy (0% to 100%)∙Relative humidity resolution∙Temperature alarms (minimum & maximum)∙Relative humidity alarms (minimum & maximum)∙Battery ∙Battery life ∙Physical size∙Software available on Windows XP, Vista, Windows 7, 8 & 10 (coming soon to Linux & MacOs)∙Logger identifier∙Logging space (includes time plus temperature & humidity) 65520 pointsFigure 3: Temperature and Humidity Accuracy4.Buttons and LED IndicatorsThe data logger includes one button located on the side of the logger. It is possible by configuration in the software to use this button as a way to start and stop logging. See section 7.9 Configuration of a Data Logger (Start using Button Press)Figure 4: Data Logger Start/Stop ButtonThe logger contains two LED indicators - LED left and LED right with the following functionality:Status LED∙When the logger starts logging then this LED pulses green once for 1 second.∙When logging this LED pulses green for 7 milliseconds and off for 6 seconds.∙When the logger stops then this LED pulses red for 1 second then off forever.Alarm LED∙When a temperature or humidity alarm is triggered this LED pulses red for 7 milliseconds and off for 6 seconds.Figure 5: Data Logger LED indicators5.Packaging ListYour data logger comes standard with the following items.∙One Data Logger unit (either OM-91 or OM-92)Figure 6: Data Logger Unit∙One CR2450 coin cell batteryFigure 7: CR2450 Coin Cell Battery and Install CD∙One USB cable – type A to micro-USB type BFigure 8: USB CableOne installation CD (Software is also available for download on the OM-90 web page)6.Installation of the SoftwareInstallation of the software is very simple. The data logger needs no special drivers since it is a USB HIDdevice and such devices can make use of the standard drivers that come with Windows. Simply install the software from the CDOR download and install the software from Omega's OM-90 web page. (look for the software icon). included with the data logger.In order to use this software consult the next section – Section 7 "Using the Software".ing the Software7.1.Front PageWhen the software is started the welcome screen appears and gives a brief introduction to the data loggers and what they can be used for.∙Click on the Configuration Wizard Button to start configuration of the logger.∙Click on the Graph Button if you want to view data graphically.∙Click on the Raw Data Button if you want to view logger data as a table.Figure 9: OM-90 Series Data Logger Software7.2.Main PageThe main page of the software consists of a configuration pane, a graphical pane and a spreadsheet pane. It is possible to have any of these enabled or disabled by the buttons located top left in the window. The panes will automatically start in an enabled or disabled view depending on the viewing mode select from the front page.Figure 10: Software Main PageButtons are also included for saving/loading configuration and logged data to and from file.There is also a button for selection between Celsius or Fahrenheit temperature scales.A connection indication on the right hand side becomes blue when your application is connected to a data logger and is greyed-out otherwise.Finally a home icon provides a link back to the front page.7.3.Configuration of a Data Logger (Start on Disconnection)Configuration of the data logger starts by specifying the device name. Up to 16 characters is allowed in the name.Figure 11: Configuration Step (Start on Disconnection)Next select the logger start to On Disconnection. There are other options (At Specified Time, Button Press and Real Time Logging) which will be discussed in later sections of this manual.Select the logging interval (this is the time between samples).For temperature logging then one needs to enable or disable the logging. In the case the temperature logging is enabled then one can also set alarm thresholds for which the alarm indication will signify that temperature limits have been exceeded.Similarly for humidity one needs to enable or disable the logging and configure the alarm limits.Finally to save the configuration setup to the data logger, press the Configure Button.Figure 12: Write Configuration to the LoggerOnce configured the software will show the logger time will be synchronized to the PC time. The logger firmware revision will also appear in the application.Once you disconnect the logger from the PC, logging will start automatically and at the configured logging interval. A green light will flash every 6 seconds to indicate that the unit is logging. The red light will flash also in the case that the temperature or humidity goes outside of the allowed limits and triggers the alarms.If the logger becomes full then all lights will stop flashing.7.4.Saving a Configuration FileConfigurations can be saved to file so that you can use the configuration next time or if you have multiple devices with the same configuration.Saving a configuration file is just a matter of selecting the save icon and filling out the file name. If the logger contains no logged data then it will only save the configuration settings. Configuration and logged data is stored in Comma Separated Value (CSV) format.Figure 13: Saving a Configuration to File7.5.Loading a Configuration from FileLoading a configuration file from disk is just a matter of selecting the open icon and selecting the configuration file name. This upload presents a simple way to configure multiple loggers with the same configuration. This ensures a common configuration and saves time/effort when configuring multiple devices.Figure 14: Loading a Configuration from FileRemember to press the configuration button if you want the configuration data held in the software to be written to your data logger.7.6.Retrieving Logged DataData can be retrieved from the logger by connecting to the logger and then pressing the read button at the bottom left of the software.Both the device configuration and logged data will immediately become uploaded and viewable in the configuration, graphical and spreadsheet views.Zooming in and out of the graphs can be achieved by the following controls:∙To Zoom In - Drag the left mouse button∙To Zoom Out - Click the right mouse button∙When zoomed in you can move around using the key-board arrows or the mouse scroll wheel To write data and configuration to file, press the save icon. Data and configuration is then stored in Comma Separated Value (CSV) format which can be edited by third party software such as Microsoft Excel or read back into the data logger software at a later point.Figure 15: Saving Logged Data to File7.7.Viewing Logged Data from FileIt is a simple matter to read back data from file (CSV format) into the software and view previous logs graphically or using the spreadsheet views. Simply press the open icon and then select the file which you would like to view.Figure 16: Retrieving Logged Data from FileFigure 17: Retrieving Logged Data from File (complete)7.8.Configuration of a Data Logger (Start at Specified Time)You can configure a device so that it starts at a specific time. Configure as per section 7.3 but select At Specified Time. Fill in the exact month, day, hour, minute and seconds when you want the logging to start.Remember to write the setup to the logger by pressing the Configure Button.When you have disconnected the logger and the time reaches the desired start time for the logging then the logger will begin to log. This is a perfect way to have multiple loggers start logging at exactly the same time.Figure 18: Configuration Step (Start at Specified Time)7.9.Configuration of a Data Logger (Start using Button Press)You can also configure the device so that it starts logging on a button press. Configure as per section 7.3 but select Button Press.Remember to write the setup to the logger by pressing the Configure Button.When you have disconnected the logger you can start logging by a simple button press. You will then see it is logging because the green light starts flashing every 6 seconds. You can also stop it using a button press – and all lights will stop flashing.Figure 19: Configuration Step (Start using Button Press)7.10.Configuration of a Data Logger (Real Time Logging)You may also use your data logger in Real Time Logging mode. Select the start logging to Real Time Logging with the appropriate logging interval. Next press start. You will then see the software take samples from the logger directly and display them on the table and graphs. This is a way to monitor temperature and humidity conditions directly from your PC instead of using the remote logging.Figure 20: Configuration Step (Real Time Logging)8.Mounting GuidelinesThere is no particular limitation with regard to transporting your data logger. The logger may be fastened to a transportation container or loosely packed.It is recommended however to keep some air space around the ventilation slots on the logger or else the logger may take longer to track humidity and temperature changes.9.Battery ReplacementYour data logger uses a CR2450 3V Lithium-Ion battery.In order to replace the battery:∙First un-mount the logger.∙Next the cover needs to unscrewed and removed.∙The old battery should then be removed and a new battery inserted. Please try not to touch any exposed electronics in the process.∙Finally attach the cover again with screws.10.Technical SupportFor technical support questions please contact Omega at:1-800-USA-WHEN (1-800-872-9436)*************************OMEGA’s policy is to make running changes, not model changes, whenever an improvement is possible. T his affords our customers the latest in technology and engineering.OMEGA is a registered trademark of OMEGA ENGINEERING, INC.© Copyright 2017 OMEGA ENGINEERING, INC. All rights reserved. T his document may not be copied, photocopied, FOR WARRANTY RETURNS, please have the following information available BEFORE contacting OMEGA:1. P urchase Order number under which the product was PURCHASED,2. M odel and serial number of the product under warranty, and3. Repair instructions and/or specific problems relative to the product.FOR NON-WARRANTY REPAIRS, consult OMEGA for current repair charges. Have the following information available BEFORE contacting OMEGA:1. Purchase Order number to cover the COST of the repair,2. Model and serial number of the product, and 3. Repair instructions and/or specific problems relative to the product.RETURN REQUESTS/INQUIRIESDirect all warranty and repair requests/inquiries to the OMEGA Customer Service Department. BEFORE RET URNING ANY PRODUCT (S) T O OMEGA, PURCHASER MUST OBT AIN AN AUT HORIZED RET URN (AR) NUMBER FROM OMEGA’S CUST OMER SERVICE DEPART MENT (IN ORDER T O AVOID PROCESSING DELAYS). The assigned AR number should then be marked on the outside of the return package and on any correspondence.T he purchaser is responsible for shipping charges, freight, insurance and proper packaging to preventbreakage in transit.WARRANTY/DISCLAIMEROMEGA ENGINEERING, INC. warrants this unit to be free of defects in materials and workmanship for a period of 13 months from date of purchase. OMEGA’s WARRANTY adds an additional one (1) month grace period to the normal one (1) year product warranty to cover handling and shipping time. This ensures that OMEGA’s customers receive maximum coverage on each product.If the unit malfunctions, it must be returned to the factory for evaluation. OMEGA’s Customer Service Department will issue an Authorized Return (AR) number immediately upon phone or written request. Upon examination by OMEGA, if the unit is found to be defective, it will be repaired or replaced at no charge. OMEGA’s WARRANT Y does not apply to defects resulting from any action of the purchaser, including but not limited to mishandling, improper interfacing, operation outside of design limits, improper repair, or unauthorized modification. T his WARRANT Y is VOID if the unit shows evidence of having been tampered with or shows evidence of having been damaged as a result of excessive corrosion; or current, heat, moisture or vibration; improper specification; misapplication; misuse or other operating conditions outside of OMEGA’s control. Components in which wear is not warranted, include but are not limited to contact points, fuses, and triacs.OMEGA is pleased to offer suggestions on the use of its various products. However, OMEGA neither assumes responsibility for any omissions or errors nor assumes liability for any damages that result from the use of its products in accordance with information provided by OMEGA, either verbal or written. OMEGA warrants only that the parts manufactured by the company will be as specified and free of defects. OMEGA MAKES NO OTHER WARRANTIES OR REPRESENTATIONS OF ANY KIND WHATSOEVER, EXPRESSED OR IMPLIED, EXCEPT THAT OF TITLE, AND ALL IMPLIED W ARRANTIES INCLUDING ANY W ARRANTY OF MERCHANTABILITY AND FITNESS FOR A PARTICULAR PURPOSE ARE HEREBY DISCLAIMED. LIMITATION OF LIABILITY: The remedies of purchaser set forth herein are exclusive, and the total liability of OMEGA with respect to this order, whether based on contract, warranty, negligence, indemnification, strict liability or otherwise, shall not exceed the purchase price of the component upon which liability is based. In no event shall OMEGA be liable for consequential, incidental or special damages.CONDITIONS: Equipment sold by OMEGA is not intended to be used, nor shall it be used: (1) as a “Basic Component” under 10 CFR 21 (NRC), used in or with any nuclear installation or activity; or (2) in medical applications or used on humans. Should any Product(s) be used in or with any nuclear installation or activity, medical application, used on humans, or misused in any way, OMEGA assumes no responsibility as set forth in our basic WARRANT Y /DISCLAIMER language, and, additionally, purchaser will indemnify OMEGA and hold OMEGA harmless from any liability or damage whatsoever arising out of the use of theProduct(s) in such a manner.Where Do I Find Everything I Need for Process Measurement and Control?OMEGA…Of Course!Shop online at TEMPERATUREM U Thermocouple, RTD & Thermistor Probes, Connectors,Panels & AssembliesM U Wire: Thermocouple, RTD & ThermistorM U Calibrators & Ice Point ReferencesM U Recorders, Controllers & Process MonitorsM U Infrared PyrometersPRESSURE, STRAIN AND FORCEM U Transducers & Strain GagesM U Load Cells & Pressure GagesM U Displacement TransducersM U Instrumentation & AccessoriesFLOW/LEVELM U Rotameters, Gas Mass Flowmeters & Flow ComputersM U Air Velocity IndicatorsM U Turbine/Paddlewheel SystemsM U Totalizers & Batch ControllerspH/CONDUCTIVITYM U pH Electrodes, Testers & AccessoriesM U Benchtop/Laboratory MetersM U Controllers, Calibrators, Simulators & PumpsM U Industrial pH & Conductivity EquipmentDATA ACQUISITIONM U Communications-Based Acquisition SystemsM U Data Logging SystemsM U Wireless Sensors, Transmitters, & ReceiversM U Signal ConditionersM U Data Acquisition SoftwareHEATERSM U Heating CableM U Cartridge & Strip HeatersM U Immersion & Band HeatersM U Flexible HeatersM U Laboratory HeatersENVIRONMENTALMONITORING AND CONTROLM U Metering & Control InstrumentationM U RefractometersM U Pumps & TubingM U Air, Soil & Water MonitorsM U Industrial Water & Wastewater TreatmentM U pH, Conductivity & Dissolved Oxygen Instruments。
Omega OM-90 系列数据记录仪简要引用指南说明书
OM-90 SERIESPortable Temperature and Humidity Data Loggerse-mail:**************For latest product manuals: Shop online atFor complete product manual:/manuals/manualpdf/M5440.pdfOM‐90 Series Data LoggersQuick Reference Guide(Models OM‐91 & OM‐92)Description Array The OM‐90 Series are portable, battery operated, temperatureand humidity data loggers able to store 65,520 samples of bothtemperature and humidity along with a time stamp. The datalogger runs off of a CR2450 coin cell battery that enables it torun for over 4 years.This Quick Reference Guide gets you started with the loggerwith the most basic functions to have you up and running withyour logger in a matter of minutes.The OM‐90 Series today comes in two versions; OM‐91 is atemperature only version and OM‐92 is a temperature andhumidity logger. This quick reference guide applies for bothversions.Battery InstallationThe data logger runs from a standard coin cell battery. We recommend a CR2450 620mAH Coin cell battery. There are different manufacturers but a good one is Panasonic CR‐2450/G1AN. You can find it easily on the web from different places such as and . The key thing is to choose a CR2450 battery with high capacity since this will translate into a longer logger battery life.First remove the data logger cover by unscrewing the two fastener screws (#1 Philips) at the rear of the logger.Then remove the circuit board from the box (use soft tool or fingernail to remove)Insert a new battery as shown being careful not to touch and exposed electronics in the process.Finally re‐attach the cover and tighten the fastener screws again (be careful not to over tighten).Connecting to a Data LoggerTo configure or retrieve data from a logger you will need a Windows PC running Windows XP, Windows Vista, Windows 7 or Windows 8. Connect the data logger to your PC using the provided USB cable. Any USB port on the PC can be used.Configuring a Data LoggerInstallation of the Omega OM‐90 Series Data Logger Software is very simple. The data logger needs no special drivers since it is a USB HID device and such devices can make use of the standard drivers that come with Windows.In the Windows Start Menu launch the Omega PC Application.The front page of the GUI is an overview of the logger. Press the Configuration button to get to the next page.Connect the logger and you will see the connected indication changes to blue.Next fill out the configuration settings. For example:‐∙o C or o F∙logging start to "On Disconnection"∙logging interval to say 10 seconds∙temperature alarm enabled and thresholds set∙humidity alarms enabled and thresholds setPress the “Configure Button” so that the settings are updated in your logger. Please wait until the software has finished updating the logger.Disconnect the logger. You should see that logging will start automatically indicated by a 1 second green light. The green light will then flash every 6 seconds to indicate that the unit is logging. The red light will flash also in the case that the temperature or humidity goes outside of the allowed limits and triggers the alarms.If the logger becomes full then all lights will stop flashing.Retrieving DataConnect your data logger. The logger red light will illuminate for 1 second indicating logging is stopping. Start the OM‐90 Series Data Logger Software and navigate to the Configuration page.Press "Read Logger Configuration/Data" to retrieve the configuration and data from the connected logger. Wait until all information is retrieved from the logger.The graph and spread sheet will be filled with the logged data.Zooming in and out of the graphs can be achieved by the following controls:•to Zoom In ‐ drag the left mouse button•to Zoom Out ‐ click the right mouse button•when zoomed in you can move around using the key‐board arrows or the mouse scroll wheelTo write data and configuration to file, press the save icon.More Advanced TopicsThis document has shown the most basic way to configure the data logger in order for you to get started very quickly.There are for example other logger start modes such as button press, start at a defined time and real time logging. For a more exhaustive description of all features of the logger then please consult the full OM‐90 Series User Guide included on the CD. The software is also available on the OM-90 web page for download.Product SupportFor technical support questions please contact Omega at:1‐800‐USA‐WHEN (1‐800‐872‐9436)or via email to *************WARRANTY/DISCLAIMEROMEGA ENGINEERING, INC. warrants this unit to be free of defects in materials and workmanship for a period of 13 months from date of purchase. OMEGA’s WARRANTY adds an additional one (1) month grace period to the normal one (1) year product warranty to cover handling and shipping time. This ensures that OMEGA’s customers receive maximum coverage on each product.If the unit malfunctions, it must be returned to the factory for evaluation. OMEGA’s Customer Service Department will issue an Authorized Return (AR) number immediately upon phone or written request. Upon examination by OMEGA, if the unit is found to be defective, it will be repaired or replaced at no charge. OMEGA’s WARRANTY does not apply to defects resulting from any action of the purchaser, including but not limited to mishandling, improper interfacing, operation outside of design limits, improper repair, or unauthorized modification. This WARRANTY is VOID if the unit shows evidence of having been tampered with or shows evidence of having been damaged as a result of excessive corrosion; or current, heat, moisture or vibration; improper specifica-tion; misapplication; misuse or other operating conditions outside of OMEGA’s control. Components in which wear is not war-ranted, include but are not limited to contact points, fuses, and triacs.OMEGA is pleased to offer suggestions on the use of its various products. However, OMEGA neither assumes respon-sibility for any omissions or errors nor assumes liability for any damages that result from the use of its products in accordance with information provided by OMEGA, either verbal or written. OMEGA warrants only that the parts manufactured by the company will be as specified and free of defects. OMEGA MAKES NO OTHER W ARRANTIES OR REPRESENTATIONS OF ANY KIND W HATSOEVER, EXPRESSED OR IMPLIED, EXCEPT THAT OF TITLE, AND ALL IMPLIED W ARRANTIES INCLUDING ANY W ARRANTY OF MERCHANTABILITY AND FITNESS FOR A PARTICULAR PURPOSE ARE HEREBY DISCLAIMED. LIMITATION OF LIABILITY: The remedies of purchaser set forth herein are exclusive, and the total liability of OMEGA with respect to this order, whether based on contract, warranty, negli-gence, indemnification, strict liability or otherwise, shall not exceed the purchase price of the component upon which liability is based. In no event shall OMEGA be liable for consequential, incidental or special damages.CONDITIONS: Equipment sold by OMEGA is not intended to be used, nor shall it be used: (1) as a “Basic Component” under 10 CFR 21 (NRC), used in or with any nuclear installation or activity; or (2) in medical applications or used on humans. Should any Product(s) be used in or with any nuclear installation or activity, medical application, used on humans, or misused in any way, OMEGA assumes no responsibility as set forth in our basic WARRANTY / DISCLAIMER language, and, additionally, purchaser will indemnify OMEGA and hold OMEGA harmless from any liability or damage whatsoever arising out of the use of the Product(s) insuch a manner.FOR WARRANTY RETURNS, please have the following infor-mation available BEFORE contacting OMEGA:1. P urchase Order number under which the product was PURCHASED,2. M odel and serial number of the product under warranty, and 3. R epair instructions and/or specific problems relative to the product.FOR NON-WARRANTY REPAIRS, consult OMEGA for current repair charges. Have the following information available BEFORE contacting OMEGA:1. Purchase Order number to cover the COST of the repair,2. Model and serial number of the product, and3. R epair instructions and/or specific problems relative to the product.OMEGA’s policy is to make running changes, not model changes, whenever an improvement is possible. T his affords our customers the latest in technology and engineering. OMEGA is a registered trademark of OMEGA ENGINEERING, INC.© Copyright 2017 OMEGA ENGINEERING, INC. All rights reserved. This document may not be copied, photocopied, reproduced, translated, or reduced to any electronic RETURN REQUESTS / INQUIRIESDirect all warranty and repair requests/inquiries to the OMEGA Customer Service Department. BEFORE RET URNING ANY PRODUCT (S) T O OMEGA, PURCHASER MUST OBT AIN AN AUT HORIZED RET URN (AR) NUMBER FROM OMEGA’S CUST OMER SERVICE DEPARTMENT (IN ORDER TO AVOID PROCESSING DELAYS). The assigned AR number should then be marked on the outside of the return package and on any correspondence.The purchaser is responsible for shipping charges, freight, insurance and proper packaging to prevent breakage in transit.Servicing North America:U.S.A.Omega Engineering, Inc.Headquarters:Toll-Free: 1-800-826-6342 (USA & Canada only)Customer Service: 1-800-622-2378 (USA & Canada only) Engineering Service: 1-800-872-9436 (USA & Canada only) Tel: (203) 359-1660 Fax: (203) 359-7700 e-mail:**************For Other Locations Visit /worldwide***********************The information contained in this document is believed to be correct, but OMEGA accepts no liability for any errors it contains, and reserves theright to alter specifications without notice.。
自由感应衰减信号
射频脉冲停止→横向磁化矢量MXY在X-Y平面以拉莫频率自由旋进 → 相位相干逐渐消失 → MXY迅速衰减
对磁化的质子施加适当频率的射频脉冲后,质子趋向同相运动。在射频脉冲存在期间
,磁化向量在快速绕z轴进动的同时,慢慢地绕x轴旋转(90°或180°);当射频场消 失后,质子的相位相干现象逐渐消失,磁化向量慢慢地回到主磁场的方向。磁化向量 的这种衰减过程叫做自由感应衰减(FID)。
检测信号就是从自由衰减过程中提取。
首先要明确质子的三个运动状态:
无外磁场时,自旋,磁矩随机指向; 有外磁场时,进动,磁矩指南或指北,净 磁化矢量M0; 核磁共振时,共振(同相进动),净磁化 矢量M0偏离z轴以共振频率绕z轴旋转,可 以分解为垂直矢量Mz和横向矢量Mxy;
激励共振的两个射频脉冲:
能提供能量使M0旋转90o的射频脉冲称为90o脉冲; 能提供能量使M0旋转180o的射频脉冲称为180o脉冲。
M z M 0 (1 et / T1 )
一般说来,纵向弛豫时间远大于横向弛豫时间。而且,不同的组织 与器官的弛豫时间显著不同,从而对软组织及器官有特殊的分辨能 力。在主磁场为0.4~2T时,人体组织T1~103ms,T2~102ms。
自由衰减速信号包含了,T1,T2信息。
不同时刻测得的信号各因素起的作用(权重)不一样。
射频电磁波对样品的激励
如图:在射频电磁波 旋转磁场的作用下, 磁化强度矢量或宏观 磁矩矢量沿着如图所 示的曲线变化,从而 改变了宏观磁矩的大 小和方向。(在磁共 振中主要是改变方向 。)
当外施交变磁场经过时间t后,磁化矢量M处于 M xy M sin 。此时在 x-y平面上有分量 B1t
- 1、下载文档前请自行甄别文档内容的完整性,平台不提供额外的编辑、内容补充、找答案等附加服务。
- 2、"仅部分预览"的文档,不可在线预览部分如存在完整性等问题,可反馈申请退款(可完整预览的文档不适用该条件!)。
- 3、如文档侵犯您的权益,请联系客服反馈,我们会尽快为您处理(人工客服工作时间:9:00-18:30)。
目录
1 计算依据 (1)
2 工程概况 (1)
3 支架设计 (2)
3.1设计思路 (2)
3.2主要设计参数 (2)
4 材料主要参数及截面特性 (2)
5 支架计算 (3)
5.1建立计算模型 (3)
5.2强度计算 (3)
5.2.1 I22a工字钢纵梁 (3)
5.2.2 双I45a工字钢横梁 (4)
5.3刚度计算 (4)
6 模板支架计算 (5)
6.1侧模拉杆 (5)
6.2底模钢管 (6)
7 结论 (6)
滨江大道(54+90+54)m悬灌梁
0#段现浇支架计算书
1 计算依据
(1)《滨江大道(54+90+54)m跨0#段支架设计图》;
(2)《公路钢筋混凝土及预应力混凝土桥涵设计规范》(JTJ D62--2004);
(3)《公路桥涵设计通用规范》(JTJ D60 --2004);
(4)《公路桥涵施工技术规范》(JTG/T F50-2011);
(5)《城市桥梁工程施工与质量验收规范》(CJJ2-2008);
(6)《钢结构-原理与设计》(清华版);
(7)《路桥施工计算手册》(人交版);
(8)《结构力学》、《材料力学》(高教版);
(9)《结构设计原理》(人交版)。
2 工程概况
南京市浦口区江北滨江大道桥梁工程跨越城南河、轨道十号线、纬七路隧道和七里河,起止桩号为:K9+078.346~K10+164.1,全长1106.2m。
本桥具体孔跨布置为:(3×43)+(66+120+66)+(3×43)+(54+90+54)+(2×47)+(3×55)+(3×43),共分为7联,其中第二、四联为变高度预应力砼连续箱梁,其余均为等高度预应力砼连续箱梁。
跨纬七路隧道大桥(54+90+54)m连续梁采用变高度预应力连续箱梁,斜腹板单箱双室截面。
0#节段长1200cm,中支点处梁高660cm,梁底曲线按二次抛物线变化。
单幅箱梁顶宽为1889cm,支点处箱底宽691cm,跨中箱底宽979cm。
箱梁外侧悬臂长357cm,端部厚20cm,根部厚55cm。
箱梁顶板厚25cm,底板厚由30cm变厚至70cm。
腹板由中支点至跨中分三段变化,厚度变化为65~40cm。
主桥箱梁在中支点处设有横梁,厚300cm。
箱梁采用C50混凝土。
3 支架设计
3.1 设计思路
0#段支撑模板体系利用Φ1m墩梁临时固结钢管砼支墩,在其上预埋型钢牛腿,牛腿上设置设置2I45a的双工字钢作为横梁,纵梁采用I22a。
图3.1-1 0#块支架图
3.2 主要设计参数
(1)0#段砼自重:混凝土容重按26.5KN/m3计算;
(2)《荷载规范》,恒载系数为1.2;
(3)型钢自重:按标准容重78.5KN/m3计。
4 材料主要参数及截面特性
(1)Q235钢弹性模量E=2.1×10¹¹Pa,剪切模量G=0.81×10⁵MPa,密度ρ=7850kg/m3;
(2)Q235钢轴向容许应力[σ]=140MPa,弯曲容许应力[σw]=145MPa,剪切容许应力[]τσ=85MPa;
(3)10×12cm方木材质为东北落叶松,其弹性模量E=1.1×10⁴MPa,剪切模量G=5×10²MPa,密度ρ=500kg/m3,顺纹容许弯曲应力=
[σ14.5MPa;
]
(4)支架受载后挠曲的杆件,其容许挠度为相应结构长度的1/400。
5 支架计算
5.1 建立计算模型
采用Midas Civil 建立跨纬七路隧道大桥90m跨主墩0#块支架整体模型,对支架整体结构受力情况进行分析。
0#块支架整体计算模型如下图5.1-1:
图5.1-1 0#块支架计算模型(Midas 6.71PJ)
5.2 强度计算
5.2.1 I22a工字钢纵梁
I22a工字钢纵梁最大弯曲应力如下图5.2-1。
图5.2-1 纵梁弯应力图
纵梁最大组合应力为66.4MPa ,小于Q235钢材弯曲容许应力[σw]=145MPa ;满足要求。
5.2.2 双I45a 工字钢横梁
双I45a 工字钢主横梁最大弯曲应力如下图5.2-2。
图5.2-2 横梁弯应力图
横梁最大弯应力为131.1MPa ,小于Q235钢材弯容许应力[σw]=145MPa ,满足要求。
5.3 刚度计算
支架整体位移如下图5.3-1,最大挠度=∆ 4.5mm<400
L =10mm ,满足要求。
图5.3-1 支架整体位移图
6 模板支架计算
6.1 侧模拉杆
混凝土作用于模板的侧压力,根据测定,随混凝土的浇筑高度而增加,当浇筑高度达到某一临界值时,侧压力就不再增加,此时的侧压力即为新浇筑混凝土的最大侧压力。
侧压力达到最大值的浇筑高度称为混凝土的有效压头。
通过理论推导和试验,国内外提出过很多混凝土最大侧压力的计算公式,现选取我国《混凝土结构工程施工及验收规范》GB50204-2002(2011年版)中提出的新浇混凝土作用在模板上的最大侧压力计算公式如下:
采用内部振捣器时,新浇筑的混凝土作用于模板的最大侧压力,可按下列二式计算,并取二式中的较小值:
2
121022.0V t F c ββγ=…………………………………………………………(1-1) H F c γ=………………………………………………………………………(1-2) 式中 F —新浇筑混凝土对模板的最大侧压力(kN/m 2);
c γ—混凝土的重力密度(kN/m 3)
; 0t —新浇混凝土的初凝时间(h ),可按实测确定。
当缺乏试验资料时,可采用15
200+=T t 计算; T —混凝土的温度(℃);
V —混凝土的浇灌速度(m/h );
H —混凝土侧压力计算位置处至新浇筑混凝土顶面的总高度(m );
1β—外加剂影响修正系数,不掺外加剂时取1.0;掺缓凝剂时取1.2;
2β—混凝土的坍落度影响修正系数,当坍落度小于30mm 时,取0.85;50~90mm 时,取1.0;110~150mm 时,取1.15。
混凝土的高度H=6.6m ,掺加外加剂,则1β=1.2,坍落度取150mm ,则2β=1.15,混凝土的重力密度c γ=26.5kN/m 3,浇筑速度V=1m/h ,浇筑入模温度T=22℃,将以上数据代入(1-1)式得F=43.4kN/m 2,代入(1-2)式得F=174.9kN/m 2,
取较小值,故最大侧压力为43.4kN/m 2。
侧模底部拉杆形式采用Φ20丝杆与梁体主体钢筋Φ16双面焊接,侧模外用槽钢作为垫梁,用扭力扳手拧紧螺栓,并施加稍许预应力。
底部拉杆受力最大,以此作为最不利位置计算,每平方拉杆为4个,故每个拉杆受力为43.4×1×1÷4=10.85kN ,拉应力σ=10.85×10³÷201.1=54MPa <允许拉应力[σ]=140MPa ,安全系数n=2.6。
6.2 底模钢管
0#段中腹板悬臂段中跨位置变形最大,以此作为最不利位置计算,中腹板每平方压力为5.3×0.65×2.65×9.8=89.5kN ,每平方有4根Φ48*3mm 立杆,分配给每个立杆的力为89.5÷4=22.375kN ,压应力σ=22.375×10³÷424.1=52.8MPa <允许压应力
[σ]=140MPa ,安全系数n=2.7。
7 结论
综合以上检算,支架设计满足结构稳定及安全需要。