lip2000说明书
Liquiport 2000自动抽样器用户指南说明书

TI00084R/09/en No. 51002728Technical InformationLiquiport 2000Automatic sampler for liquid mediaApplicationMunicipal and industrial sewage treatment plants:•Self-monitoring •Process monitoring•Monitoring of indirect dischargers •Manhole monitoringAuthorities and Water Conservancy Boards:•Water protection and water quality•Monitoring of indirect/direct dischargers •Labs and hydrological institutes •Sampling of liquid media Your benefitsSimple and user-friendly:•Menu-guided operation with "Quick-Setup" for rapid commissioning•Parts conveying media can be mounted easily and without tools, for easy cleaning and maintenance •Sampler compartment can be sealed and carried separately, for easy and safe sample transportation Communicative:•Integrated data logger for recording measured values and sample statistics•RS232 interface for configuring and for data transmission•Multi-parameter probes can be connected (optional)Safe:•Lockable sample base prevents sample manipulation •ATEX II2G certification (optional) for safe operation in Ex areas, Zone 1Function and system designMeasuring principle The Liquiport 2000 is a portable sampler for fully automated sampling and distribution of liquid media. Sampling principleThe functional principle of the peristaltic pump involves squeezing a flexible pump hose at one or several pointsand moving the squeezed point in the desired direction of fluid delivery. Moving the squeezed point isimplemented by a pump rotor with rotor rollers on its circumference. The medium detection system controlsthe electronic volume calculation.The medium detection system is a new system developed by Endress+Hauser. A pressure sensor is at the heartof the system. The pressure sensor detects the difference between a full and empty pump tube.The advantages of the Endress+Hauser system:•Intelligent: the suction height is automatically detected and does not have to be configured•Maintenance-free: ceramic membraneSampling takes place in three steps:❑Rinsing the suction line: the sampling liquid is sucked in until the medium detection system is triggered.Then the pump runs backwards and pushes the liquid back to the sampling point. The rinsing process canbe repeated up to three times.❑Sucking the sampling liquid: the sampling liquid is sucked from the sampling point to the sampler and thesample volume is calculated electronically.❑Emptying the suction line: after sampling, the liquid left over in the suction line is pumped back to thesampling point.23Sampling methodsThe timer function in the control system makes sampling at defined times possible.Depending on the measured flow, samples can be taken in proportion with the quantity or flow.Sampling can also be triggered by an external signal, for event pacing at alarm values.Sample distributionThe sampling liquid is distributed into the individual bottles by using a rotating distributing arm. In addition to a 20 litre PE composite container, various bottle configurations are available:The distribution version can be changed easily without the need of tools. The Liquiport 2000 allows flexible configuration of the sample distribution. Individual bottles and bottle groups can be free defined for the main, switching and event programmes.Sample preservationThe sample bottles are located in the lower compartment of the sampler. They can be cooled with crushed ice. The bottle base can be sealed with a cover and transported separately from the upper sampler section.Time based:A constant sample volume is taken at constant time intervals.Flow based:A constant sample volume is taken at variable time intervals.Flow / time based:A variable sample volume is taken at the same time intervals.DosingSample volume20 to 9999 ml, programmable in ml incrementsDosing accuracy±5 ml or ±5% of the set volumeIntake velocity>0.5 m/s, to EN 25667!Note!In peristaltic systems the conveying velocity is highly dependent on the used suction hose, the hose diameter,the suction lift and the hose length. Ambient temperature and battery status have additional influence. Anincreasing suction lift leads to a reduction of the conveying velocity e.g. with a provided fabric tube ID 10 mm,hose length and suction lift with 4 m as well as a connected buffer charger, conveying velocities of >0.5 m/scan be reached.Suction lift 6 metres; 8 metres (optional)Intake lenght30 metresInputs and outputsC09- RPT20XZW- 04- 00- 08- xx- 001. epsElectrical connections of the device– A = Connection socket for the digital interface RS232– B = Connection socket for the signal cable– C = Connection socket for the charger (not on Liquiport 2000 Ex)– D = Optional: Connection socket for the multi-parameter probe (not on Liquiport 2000 Ex)45Signal cable connection, Liquiport 2000 (item B):Signal cable connection, Liquiport 2000 Ex (item B):Multi-parameter probe connection (optional for standard sampler; item D):As an added option, the Liquiport 2000 has an additional connection socket for a multi-parameter probe. The following multi-parameter probes can be connected to this connection socket:•Multi-parameter probe "MultiSens C600" from Endress+Hauser •YSI 600R, YSI 600 XL, YSI 600 XLM, YSI 6920, YSI 6820, YSI 6600!Note!All explosion protection data are given in a separate documentation which is available upon request (see "Documentation").6Power supplySupply voltageSampler: internal 12 V DC , 12 Ah lead gel battery!Note!The sampler cannot be operated without the battery. The battery must be installed before operation.Charger for Liquiport 2000:!Note!Buffer charging operation means that the sampler is in operation during the charging process.Charger for Liquiport 2000 Ex:!Note!The unit can only be charged outside Ex-areas. In the case of Liquiport 2000 Ex, you must remove the battery for connecting to the charger.Power consumption Max. 29 WCapacity of battery94 hours (at a sampling interval of 15 minutes, a sampling volume of 100 ml and a suction height of 4 metres) ≈376 samples.Installation conditionsInstallation instructionsStandard IP20230 V AC ; charge current 2.7 A; only suitable for charging operation Field-suitable IP65230 V AC ; charge current 3.0 A; also suitable for buffer charging operationWide range IP30110 V AC to 230 V AC ; charge current 2.0 A; also suitable for buffer charging operationStandard IP20230 V AC ; charge current 2.7 AWide range IP30110 V AC to 230 V AC ; charge current 2.0 AThe suction line must be routed downhillcontinuously to the sampling source, this helps to drain the line during purges and avoids siphoning!C09-RPT200ZW-11-07-07-en-001.eps7EnvironmentAmbient temperature range0 °C to +40 °CDo not install the sampler in areas with high temperature and direct sunlight!Storage temperature -20 °C to +60 °CDegree of protectionElectromagnetic compatibility (EMC)To EN 61 326ProcessMedium temperature range 0 °C to +50 °C Operating pressure range No pressureSampling mediaThe sampling media must be free of abrasive substances. Pay particular attention to the material resistances of the device parts conveying media!Mechanical constructionDesign, dimensionsFig.: Liquiport 2000, Liquiport 2000 ExWeightSampler:IP65Charger:Standard:IP20Option:IP65Liquiport 2000Liquiport 2000 ATEX II2G Empty weight15 kg 21.5 kg Overall weight incl. battery,with 24 x 1 l bottles19 kg 25.5 kg Upper compartment with battery 10 kg 16.5 kg Lower compartment with 8 x 1.8 l glass bottles15.2 kg 15.2 kg Lower compartment with 24 x 1 l bottles9 kg9 kg8MaterialsHuman interfaceDisplay elements Liquid crystal display: illuminated (only for Liquiport 2000 Standard), 128X64 dot; 32 characters, 8 lines.Operating elementsMenu-guided operation using 4 keys on the device. Picklists and short operating menu (“Quick-Setup”) for easy commissioning.Remote operation Interface/PC software ReadWin ® 2000Liquiport 2000Liquiport 2000 ATEX II2GHousing PE (polyethylene)PE (polyethylene) with graphite mixtureHousing partsPE (polyethylene)PE (polyethylene) with graphite mixture; stainless steel 1.4301 (AISI 304)Bottles PE (polyethylene)glass (optional)PE (polyethylene)glass (optional)Distributor arm PE (polyethylene)PE (polyethylene)Sensor housing PP (polypropylene)PP (polypropylene)Pump tubing SiliconeSiliconeIt is especially easy to configure the Liquiport 2000 (and other E+H instruments) with the PC softwareReadWin ® 2000. Programmes can be created on the PC and transmitted by means of the RS232 interface.Benefits for the user:❑Uniform user interface at the PC under Windows ❑Device settings saved in a database ❑Instantaneous value display ❑Device settings read out❑Internal memory read out with measured flow rate, sample quantity taken, etc.C09-RPT20ZW-20-00-00-en-001.tifCertificates and approvalsCE-Mark The sampler system fulfils the requirements demanded by the EU regulations. Endress+Hauser acknowledgessuccessful unit testing by adding the CE mark.Ex approval Liquiport 2000 is optionally available with the ATEX II2G EEx dem[ib] IIC T4 certificate for operation inEx-areas, Zone 1.Ordering informationProduct structure Detailed ordering information is available from the following sources:•In the Product Configurator on the Endress+Hauser website: -> Select country-> Instruments -> Select device -> Product page function: Configure this product•From your Endress+Hauser Sales Center: /worldwide!Note!Product Configurator - the tool for individual product configuration•Up-to-the-minute configuration data•Depending on the device: Direct input of measuring point-specific information such as measuring rangeor operating language•Automatic verification of exclusion criteria•Automatic creation of the order code and its breakdown in PDF or Excel output format•Ability to order directly in the Endress+Hauser Online shopAccessoriesLiquiport 2000 and Liquiport2000 Ex accessories!Note!Currently available accessories and spare parts for your product can be found online at:/spareparts_consumablesLiquiport 2000: RPT20Liquiport 2000 Ex: RPT22Order code Accessory51004744 2 x Spare pump hose ZP6M51004745 2 x Spare pump hose ZP8M51002425Suction filter cpl., for use with 10 mm line50053928Suction line, PVC meshed, clear, ID 10 mm50070341Suction line, NBR, black, ID 10 mm51003971Line connection nipple kit51003198Suction strainer V2A, 500 mm51003193Distributer arm with locking screwsRPT20A-RA Composite container conversion kit 20 l, PE51003410Composite container 20 l with cap9Liquiport 2000 accessories Liquiport 2000 Ex accessories Order code Accessory51003199Battery 12 V 12 Ah51003191Suspension harness kitRPT20A-FA Bottles PE 12 x 2 l with capRPT20A-FB Bottles PE 24 x 1 l with capRPT20A-FC Bottles glass 8 x 1.8 l with capRPT20A-FD Bottle PE 2 l with capRPT20A-FE Bottle PE 1 l with capRPT20A-FF Bottle glass 1.8 l with capRPT20A-FG Bottle glass 0.7 l with capRPT20A-FH Composite container 5.0 l, glass with capRPT20A-LA Charger 230V, 12V/2.7A, IP20 (not adapted for buffer charging operationRPT20A-LB Charger 230V, 12V/3A, IP65 (adapted for buffer charging operation)RPT20A-LC Charger (wide range) 100 to 240 V, 12 V/2.0 A, IP30 (adapted for buffer charging operation) RPT20A-LL Cable adapter charger-accumulatorRPT20A-LK Spare accumulator with charger adapter cableRPT20A-RB12 bottles PE conversion kitRPT20A-RC24 bottles PE conversion kitRPT20A-RD8 bottles glass conversion kit (from software V3.03)RPT20A-RE12 bottles glass conversion kitRPT20A-RF Composite container conversion kit 5 l, glassOrder code AccessoryRPT22A-LA Charger 12 V/ 2.7 A IP20 for Ex batteryRPT22A-LC Charger (wide range) 100 to 240 V, 12 V/2.0 A, IP30, for Ex batteryRPT22A-LK Ex battery 12 V 12 Ah lead gelRPT22A-LL Ex battery cable adapter - standard charger RPT20RPT22A-FA Bottles PE 12 x 2 l with capRPT22A-FB Bottles PE 24 x 1 l with capRPT22A-FC Bottles glass 8 x 1.8 l with capRPT22A-FD Bottle PE 2 l with capRPT22A-FE Bottle PE 1 l with capRPT22A-FF Bottle glass 1.8 l with capRPT22A-FG Bottle glass 0.7 l with capRPT22A-FH Composite container 5.0 l, glass with capRPT22A-RB12 bottles PE conversion kitRPT22A-RC24 bottles PE conversion kitRPT22A-RD8 bottles glass conversion kit (from software V3.03)RPT22A-RE12 bottles glass conversion kitRPT22A-RF Composite container conversion kit 5 l, glass10Documentation❑Sampler brochure (FA013C/09/en)❑"Liquiport 2000" Operating Instructions (BA116R/09)❑"Liquiport 2000 Ex" Operating Instructions (BA165R/09)❑Technical Information "MultiSens C600" multi-parameter probe (TI371C/07/en)❑ATEX safety instructions (XA037R/09/a3)11Instruments International Endress+HauserInstruments International AG Kaegenstrasse 24153 ReinachSwitzerlandTel.+41 61 715 81 00Fax+41 61 715 25 00***************.comTI00084R/09/en/01.1151002728FM9.0。
腕表 Philips 2000 系列无线耳机说明书

Philips 2000 series In-ear true wireless headphones6mm drivers/ closed-backBluetooth ®TAT2205WTAlways ready to goIs there anything more useful than true wireless headphones with a charging case that fits in the pocket of your slim-fit jeans? These splash- and sweat-resistant in-ear headphones give you great sound and up to 12 hours play time.Extremely convenient, super-small charging case •IPX4 splash- and sweat-resistant•Super-small charging case for up to 12 hours play time •4 hrs per charge. 15-min charge for 1 hr play time •6 mm neodymium drivers. Clear sound, punchy bass Snug, lightweight design •Secure, comfortable fit•Soft ear-tip covers in small, medium, and largeEasy pairing. Voice control.•Smart pairing. Automatically find your Bluetooth device •Earbud switches to control music and calls •Easily wake your smartphone's voice assistant•Switch from music to phone calls with built-in microphoneIssue date 2022-05-30Version: 7.4.412 NC: 8670 001 68004EAN: 48 95229 10993 3© 2022 Koninklijke Philips N.V.All Rights reserved.Specifications are subject to change without notice. Trademarks are the property of Koninklijke Philips N.V. or their respective SpecificationsIn-ear true wireless headphones6mm drivers/ closed-back Bluetooth®HighlightsIPX4The small charging case couldn't be moreconvenient, and these true wireless headphones are also resistant to splashing from any direction. They won't mind a little sweat, and you don't need to worry about getting caught out in the rain.Super-small charging caseHit the road with multiple charges in your pocket. You get up to 4 hours play time from a single charge, plus 8 extra hours from a fully charged case. A short 15-minute charge in the case gives you an hour of play time. A full charge of the case takes 2 hours via USB-C.Secure, comfortable fitYou get great sound from the 6 mm neodymium drivers and you can rock your tunes in real comfort thanks to the snug, lightweight design. Soft, interchangeable ear-tip covers help you find a comfortable in-ear fit.Earbud switchesA button on each earbud makes it easy to control your listening. Skip or pause tracks, take or reject calls and more.Voice assistantWake your phone's voice assistant without touching your phone. Ask smartphone¡¯s voice assistant to play music, get directions and check informations, and more.Smart Bluetooth pairing.These earphones are ready to pair the instant you take them out of their charging case. Once they're paired, the earphones remember the last device they were paired with.Connectivity•Microphone: Built-in microphone•Bluetooth profiles: A2DP, HFP, HSP, AVRCP •Bluetooth version: 5.1•Maximum range: Up to10 mDesign•Color:WhiteAccessories•Quick Start Guide•USB cable: USB (Type-A to Type-C) cable •Ear caps:3SizesConvenience•Call Management: Answer/End Call, Reject Call, Switch between 2 callsPower•Battery type: Lithium-Ion •Music play time: 4+8 hr •Standby time: 50 hr •Talk time:3hr •RechargeableSound •Acoustic system: Closed •Diaphragm: PET •Magnet type: NdFeB •Speaker diameter: 6mm•Frequency response: 20 - 20 000 Hz •Impedance:16Ohm •Sensitivity: 90 dBInner Carton•Gross weight:0.5 kg•GTIN: 2 48 95229 10993 7•Inner carton (L x W x H): 18.7 x 12.8 x 10.4 cm •Nett weight: 0.096 kg•Number of consumer packagings: 3•Tare weight: 0.404 kgOuter Carton•Gross weight: 4.25 kg•GTIN: 1 48 95229 10993 0•Outer carton (L x W x H): 37.5 x 27.5 x 24.5 cm •Nett weight: 0.768 kg•Number of consumer packagings: 24•Tare weight: 3.482 kgPackaging dimensions•Packaging dimensions (W x H x D): 9.5 x 18 x 4 cm•EAN: 48 95229 10993 3•Gross weight: 0.153 kg •Nett weight: 0.032 kg•Number of products included: 1•Tare weight: 0.121 kgProduct dimensions•Product dimensions (W x H x D): 5.5 x 2.9 x 3.7 cm •Weight: 0.032 kgUPC•UPC: 8 40063 20127 9。
Philips 空气湿器系列2000 产品说明说明书

Series 2000Up to 38 m2Spreads 99% less bacteria*Quiet for good sleepHU4811/60Hygienic humidificationNanoCloud technologyBreathe easier with the assistance of the Philips Humidifier Series 2000. NanoCloud evaporative technology spreads 99% less bacteria* vs. leading ultrasonic humidifiers and prevents wet spots and white dust*.NanoCloud technologySpreads 99% less bacteriaNo hot waterNatural evaporation processPrevents wet spots and white dust*Easy to maintainEasy-clean designEasy-to-fill tankSmart controls2 fan speedsMinimalist design gives you best-in-class cleanabilityAuto turn offHighlightsSpreads 99% less bacteriaThe water vapour molecules are so small meaning they are less able to carry bacteria into the air. Our laboratory testing confirms that NanoCloud technology spreads 99% less bacteria than leading ultrasonic humidifiers*.No hot waterThis humidifier, with NanoCloud technology,does not heat the water, therefore, prevents risk of burns from hot water or steam.Natural evaporation processHygienic and natural evaporation process to ensure optimised performance. Dry air passes through the humidifier. Water vapour is added and more humid air exits the humidifier into the surrounding air. NanoCloud technology uses a natural evaporation process that draws dry air in, adds water molecules to the air, and emits humidified air into the room.No wet spots and white dustWith its 360° design, the humidifier distributes the humidified air evenly throughout the room,preventing wet spots on the floor or surfaces.The NanoCloud technology also reduces the risk of spreading minerals into the air, thereby preventing white dust on furniture and surfaces.Easy-clean designA round and minimalist design makes cleaning easy. This humidifier does not have a heating plate, so descaling is not required.Easy-to-fill tankFill with a jar or bring the water tank to the tap.The 'max' indicator clearly shows how far to fill the tank.2 fan speedsThe Philips Humidifier has 2 fan speeds and a humidification rate of 250 ml/h on the highest setting. It is perfect for medium-sized rooms in the house, up to 38 m2.*Best-in-class cleanabilityCleaning humidifiers inside and out –especially the water tank – has never been easier.Auto turn offThe humidifier will shut down automatically when it runs out of water to reduce any safetyconcerns.Philips Green LogoPhilips Green Products can reduce costs,energy consumption and CO2 emissions. How?They offer a significant environmentalimprovement in one or more of the Philips Green Focal Areas — Energy efficiency,Packaging, Hazardous substances, Weight,Recycling and disposal and Lifetime reliability.SpecificationsDesign and finishingColour of control panel: White Control panel type: Knob Material of main body: Plastic Colour(s): White, champagne PerformanceHumidification rate: 250 ml/h Technical specificationsCord length: 1.8 mEffective area: 38 m²Sound level: 34 dB(A)Voltage: 230 VWater tank capacity: 2 lCountry of originCountry of origin: ChinaReplacementHumidification wick: Replace Humidificationfilter once every 3 working monthsService2 year warrantySustainabilityPackaging: > 90% recycled materialsUser manual: 100% recycled paperWeight and dimensionsDimensions of product (LxWxH): 249 x 249 x339 mm* Results are based on emission of the bacteriumPseudomonas fragi from clean units and filters, after 1.6and 24 hours of continuous use, varying in waterconsumption from 30-120 ml/hr, using sterilised waterspiked with said bacterium, conducted in a 1 m3 (35 ft3)chamber refreshed at 560 L/min (148 gpm)* Prevents wet spots and white dust: Independent third-party test Determination of deposition of minerals fromliquid droplets on furniture according to DIN 44973,IUTA e.V. To determine mineral deposits onto furniturefrom airborne liquid droplets over a period of 3 hours.* Room size is calculated based on humidification ratetested by third party lab, following AHAM HU-1-2006(R2011)© 2020 Koninklijke Philips N.V.All Rights reserved.Specifications are subject to change without notice. Trademarks are the property of Koninklijke Philips N.V. or their respective owners.Issue date 2020‑04‑19 Version: 3.0.1EAN: 08 71010 38332 15 。
lip3000转染说明书

Lip3000转染说明书一、引言本说明书旨在提供关于使用Lip3000进行转染实验的详细步骤和操作注意事项。
Lip3000是一种常用的基因转染试剂,适用于各种细胞类型的转染,无论是质粒DNA转染还是RNA干扰实验。
本转染试剂的使用方法简单且高效,能够快速将外源基因导入到细胞内。
在进行Lip3000转染实验之前,请阅读本说明书并仔细按照步骤进行操作。
二、实验材料•Lip3000转染试剂•承载目标基因的质粒DNA(或RNA)•细胞培养基•细胞培养器具(离心管、无菌培养皿等)•离心机•PCR仪(或其他适用于转染验证的仪器)三、实验步骤1. 细胞预处理在进行转染之前,首先需要对待转染细胞进行预处理。
以下是一般的细胞预处理步骤:1.将细胞培养在含有适宜培养基的培养皿中,以确保细胞处于最佳状态。
2.细胞密度应达到80%~90%的收缩。
注意不要使细胞超过90%的收缩,否则会影响转染效率。
3.在转染前,将培养皿中的培养基抽去,并用预暖的PBS洗涤细胞,以确保细胞表面不含有培养基或其他干扰物。
2. 转染操作请按照以下步骤进行转染操作:1.将Lip3000转染试剂放在室温下静置10分钟,使其回到室温并充分混匀。
2.在一个无菌离心管中,将转染试剂按照以下比例混合:–将500μl Opti-MEM培养基加入离心管中;–加入2.5μl Lip3000试剂,轻轻混匀;–静置20分钟,使转染试剂和培养基充分结合。
3.将预处理后的细胞培养皿中的PBS抽去,加入稀释后的Lip3000转染试剂。
注意:转染试剂的添加量需根据细胞的情况进行优化,典型的转染试剂与细胞的最佳比例为2:1。
4.搅拌培养皿或转动培养皿,使转染试剂均匀分布在培养皿上的细胞中。
5.保持培养皿平放,在37°C的细胞培养箱中孵育转染混合液4至6小时。
细菌转染时间的长短根据细胞的特性和转染效果进行调整。
3. 转染验证与后续处理待转染时间到达后,即可以进行转染效果的验证。
优利德MSO UPO2000系列单页 说明书
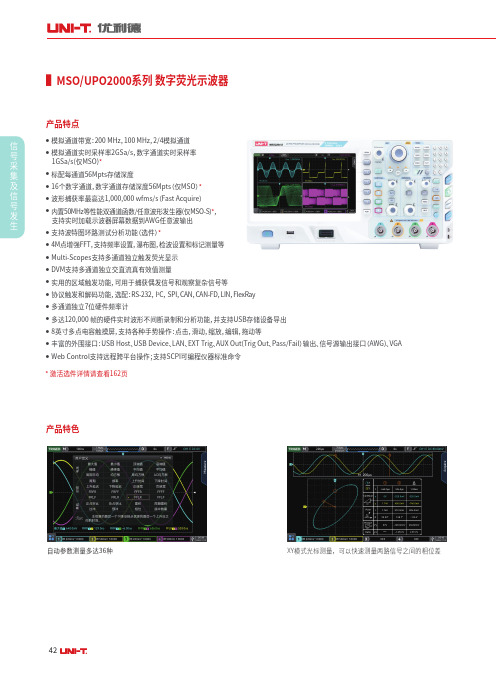
42▌MSO/UPO2000系列 数字荧光示波器●模拟通道带宽:200 MHz,100 MHz,2/4模拟通道● 模拟通道实时采样率2GSa/s,数字通道实时采样率 1GSa/s(仅MSO)*● 标配每通道56Mpts存储深度● 16个数字通道,数字通道存储深度56Mpts (仅MSO)*● 波形捕获率最高达1,000,000 wfms/s (Fast Acquire)●内置50MHz等性能双通道函数/任意波形发生器(仅MSO-S)*, 支持实时加载示波器屏幕数据到AWG任意波输出● 支持波特图环路测试分析功能(选件)*● 4M点增强FFT,支持频率设置,瀑布图,检波设置和标记测量等● Multi-Scopes支持多通道独立触发荧光显示● DVM支持多通道独立交直流真有效值测量● 实用的区域触发功能,可用于捕获偶发信号和观察复杂信号等● 协议触发和解码功能,选配:RS-232, I 2C, SPI,CAN,CAN-FD,LIN,FlexRay● 多通道独立7位硬件频率计● 多达120,000 帧的硬件实时波形不间断录制和分析功能,并支持USB存储设备导出● 8英寸多点电容触摸屏,支持各种手势操作:点击,滑动,缩放,编辑,拖动等● 丰富的外围接口:USB Host、USB Device、LAN、EXT Trig、AUX Out(Trig Out、Pass/Fail)输出、信号源输出接口(AWG)、VGA●Web Control支持远程跨平台操作;支持SCPI可编程仪器标准命令产品特点产品特色自动参数测量多达36种XY模式光标测量,可以快速测量两路信号之间的相位差* 激活选件详情请查看162页信号采集及信号发生200,000 wfms/s - 捕获更快的波形(Fast Acquire模式可达1,000,000 wfms/s)Ultra Phosphor 2.0显示技术,256级灰度显示Muti-Scopes2.0支持独立触发,相当于四台单通独立荧光示波器,支持多种分屏显示丰富的高级触发及总线触发功能区域触发轻松完成偶发、复杂特征信号的捕获每通道56Mpts存储深度,观测信号的同时还可以分析波形细节全内存硬件解码,0.2s可完成56M数据解码,解码速度大幅提升内置等性能双通道50MHz函数/任意波形发生器4344技术指标环路分析,对频率响应(增益和相位与频率)的关键测量并行总线,协议解码和时序测量平均值顺序模式模拟通道数字道数AWG 采样方式采集模式模拟通道:2GSa/s(交织模式),1GSa/s(非交织模式) ;数字通道(仅MSO型号):1GSa/s采样、峰值检测、包络、高分辨率、平均实时采样实时采样率存储深度波形捕获率垂直系统(模拟通道)数字通道(仅MSO)硬件实时波形录制和回放输入耦合垂直分辨率垂直档位直流增益精确度模拟通道/数字通道(仅MSO):56Mpts/CH所有通道同时达到N次采样后,N 次数可在2、4、8、16、32、64、128、256、512、1024、2048、4096、8192 之间选择200,000wfms/s (正常采集);1,000,000wfms/s (Fast Acquire)120,000帧直流、交流、接地8-bit500μV/div 至20V/div (1 MΩ)<5mV:±3%,≥5mV:±2%UPO2102UPO2104UPO2202UPO2204MSO2102MSO2104MSO2202MSO2204MSO2202-S MSO2204-SMSO2102-S MSO2104-S 带宽100MHz 100MHz 200MHz 200MHz 200MHz 100MHz UPO/MSO2XX2:2通道 UPO/MSO2XX4:4通道16路数字通道双通道50MHz函数/任意波形发生器选配-上升时间≤3.5ns≤3.5ns≤1.8ns≤1.8ns≤1.8ns≤3.5ns单位W、A、V 和U,默认为:V阈值8个通道1组的可调阈值 2ns1bit ±100nsTTL (1.4 V)5.0 V CMOS (+2.5 V),3.3 V CMOS (+1.65 V) 2.5 V CMOS (+1.25 V),1.8 V CMOS (+0.9 V)ECL (-1.3 V) PECL (+3.7 V) LVDS (+1.2 V)0 V 用户自定义阈值选择最小可侦测脉宽垂直分辨率通道间延迟可调通道隔离度直流至最大带宽:>40 dB45信号采集及信号发生技术指标基本参数水平系统(模拟通道)触发解码1 ns/div 至1000 s/div≤± (50 + 2 × 使用年限)ppmY-T,X-Y ,Roll支持每通道独立显示,且时基独立可调内部:距屏幕中心± 5 格自动、普通、单次80 ns 至10 s串行1个,并行2个选配:RS-232/UART、I2C、SPI、CAN、CAN-FD、LIN、FlexRay边沿、脉宽、欠幅、超幅、N边沿、延迟、超时、持续时间、建立保持、斜率、视频、码型、选配:RS-232/UART、I²C、SPI、CAN、CAN-FD、LIN、FlexRay时基档位时基精度时基模式Multi-Scopes触发电平范围触发模式触发类型解码个数解码类型释抑范围一般规格显示标准/选配接口电源电压及频率配件符合所在国标准的电源线、USB 数据线、2/4 套无源探头、LA连接线缆(仅MSO)、使用手册(电子档官网下载)尺寸(W×H×D)重量USB-Host、USB-Device、LAN、EXT Trig、AUX Out(Trig Out\Pass/Fail)输出、信号源输出接口(仅MSO-S型号)、VGA100V~240VACrms;50Hz/60Hz8英寸多点电容触摸屏370mm×185mm×115mm4.5 kg顺序模式光标间电压差(△V)光标间时间差(△T)△T 的倒数(Hz)(1/△T)光标自动测量频率计数学运算信号源(仅MSO-S)测量波形计算通道数量采样率模拟通道:最大值、最小值、顶端值、底端值、中间值、峰峰值、幅值、平均值、周期平均值、均方根、周期均方根、AC均方根、面积、周期面积、过冲、预冲、频率、周期、上升时间、下降时间、正脉宽、负脉宽、正占空比、负占空比、上升延迟、下降延迟、相位、FRFR、 FRFF、 FFFR、 FFFF、 FRLF、 FRLR、FFLR、FFLF,正脉冲数,共36种测量参数;数字通道: 频率、周期、正脉宽、负脉宽、正占空比、负占空比、上升延迟A→B、下降延迟A→B、相位A→B、相位B→AA+B、A-B、A×B、A/B、FFT、数字滤波、可编辑高级运算、逻辑运算7位硬件频率计2250MSa/sUPO2104UPO2204MSO2104MSO2204MSO2204-SMSO2104-S垂直分辨率16 bits内建波形Sinc、指数上升、指数下降、心电图、高斯、洛伦兹、半正矢等 200种正弦波、方波、脉冲、锯齿波、噪声、直流最高频率标准波形50 MHz标准包装配件USB数据线国标电源线BNC-BNC 直通线(仅 MSO-S)BNC-红黑鳄鱼夹连接线(仅 MSO-S)无源探头(100MHz)无源探头(200MHz)逻辑分析仪探头(仅 MSO)。
CPL 2000 + 适配器 PLP2000 快速启动指南说明书

DémarragerapideAdaptateur CPL 2000 + prise supplémentaire Modèle PLP2000 (2 x PLP2000)Contenu de la boîteDans certaines régions, un CD est inclus avec votre produit.Pour bien démarrerLes adaptateurs CPL permettent d'augmenter la portée de votre réseau à l'aide de votre câblage électrique existant. Branchez deux adaptateurs CPL ou plus dans des prises murales pour créer une connexion réseau filaire. Vous pouvez ajouter jusqu'à 16 adaptateurs pour augmenter la portée de votre réseau.Présentation de l'adaptateurAvant d'installer votre adaptateur, familiarisez-vous avec ses voyants, sesboutons et ses ports.Ports Ethernet Bouton de sécurité/deréinitialisationVoyantd'alimentationVoyant Ethernet Voyant Pick APlugVoyant d'alimentationVert continu . L'appareil est allumé.Lent clignotement vert (clignotement toutes les trois secondes). L'adaptateur est en mode économie d'énergie.Clignotement vert (clignotement chaque seconde). L'adaptateur configure les dispositifs de sécurité.Éteint . L'adaptateur n'est pas alimenté.Voyant EthernetVert continu . Le port Ethernet est connecté.Éteint . Aucune connexion Ethernet détectée.Voyant Pick A Plug La fonction Pick A Plug (Trouver la meilleure prise) vous permet de choisir la prise électrique ayant le débit de connexion le plus important, repérable par la couleur duvoyant :Rouge . Débit de connexion < 50 Mbits/s (bonne connexion).Orange . Débit de connexion > 50 et < 80 Mbits/s (trèsbonne connexion).Vert . Débit de connexion > 80 Mbits/s (excellenteconnexion).Éteint . L'adaptateur n'a pas trouvé d'autres appareils CPL compatibles utilisant la même clé de chiffrement.Bouton de sécurité/de réinitialisation Maintenez le bouton de sécurité/de réinitialisation enfoncé pendant une à trois secondes, puis relâchez-le pour créer un réseau CPL sécurisé.Maintenez le bouton de sécurité/de réinitialisation enfoncé pendant huit à dix secondes, puis relâchez-le pour réinitialiser les paramètres d'origine de l'adaptateur CPL.Ports Ethernet Deux ports GbE. Utilisez des câbles Ethernet pour brancherles appareils filaires, comme les ordinateurs, les routeurs WiFiou les consoles de jeu vidéo, à votre adaptateur CPL.Pour en savoir plus au sujet des normes auxquelles répond votre adaptateur, reportez-vous au guide d’utilisation.Installer les adaptateurs Pièce 1Pièce 2Sécuriser le réseauLa configuration de la sécurité est facultative, mais fortement recommandée.¾Pour créer un réseau sécurisé :1. Branchez les nouveaux adaptateurs.2. Attendez que les voyants Pick A Plug s'allument.3. Appuyez sur le bouton de sécurité/de réinitialisation de l'un desadaptateurs pendant 2 secondes, puis appuyez pendant 2 secondes sur le bouton de sécurité/de réinitialisation d'un autre adaptateur de votre réseau actuel.Vous devez appuyer sur les deux boutons dans les deux minutes.Une fois l’association sécurisée complétée, les voyants d’alimentation et Pick A Plug s’allument et l’adaptateur peut accéder à Internet.4. Si vous installez des adaptateurs supplémentaires, répétez l'étape 3 avecl'un des adaptateurs sécurisés et l'un des adaptateurs non encore sécurisés. Remarque : Le bouton de sécurité/de réinitialisation ne fonctionne pas en mode d'économie d'énergie (voir la section Conseils de dépannage à la page 10).AVERTISSEMENT : Avant d’appuyer sur le bouton de sécurité, attendez que l’installation de l’adaptateur soit terminée et que les adaptateurs communiquent entre eux (voyant d’alimentation clignotant). En appuyant trop tôt sur ce bouton, vous risquez de désactiver temporairement la communication CPL. Le cas échéant, maintenez enfoncé le bouton de sécurité/de réinitialisation pendant huit à dix secondes pour réinitialiser les paramètres d'origine deAjouter des adaptateursPour brancher des adaptateurs avant d'avoir configuré la fonction deréinitialisation de sécurité, branchez-les simplement et connectez-les à vos appareils.¾Pour ajouter des adaptateurs au réseau CPL après avoir configuré la fonction de sécurité, vous devez suivre cette procédure :1. Branchez et connectez les nouveaux adaptateurs.2. Maintenez enfoncé le bouton de sécurité/de réinitialisation d'undes adaptateurs qui fait déjà partie du réseau sécurisé pendant deux secondes.3. Sur le nouvel adaptateur, maintenez le bouton de sécurité/deréinitialisation enfoncé pendant deux secondes.Vous devez appuyer sur les deux boutons dans les deux minutes.Conseils de dépannageLe voyantd'alimentation est éteint.Assurez-vous que la prise électrique est bien sous tension et que les appareils CPL ne sont pas branchés à une rallonge électrique, un bloc multiprise ou un dispositif de protection contre les surtensions.Le voyantd'alimentation clignote lentement en vert.Le mode d’économie d'énergie est activé lorsque le voyant Ethernet est éteint. Cette situation peut se produire dans les circonstances suivantes :• le câble Ethernet est débranché;• l'appareil branché au moyen du câble Ethernet est éteint;• l'adaptateur est inactif pendant 10 minutes.Il revient au mode normal dans un délai de2 secondes après l'activation du lien Ethernet.Le voyant Pick A Plug est éteint.• Si vous avez configuré la sécurité du réseau, assurez-vous que tous les appareils CPL utilisent la même clé de chiffrement. Reportez-vous au guide d'utilisation en ligne pour les détails.• Maintenez le bouton de sécurité/deréinitialisation enfoncé pendant huit à dixsecondes pour réinitialiser les paramètres d'origine de l'adaptateur CPL.Le voyant Pick A Plug est orange ou rouge.De l'interférence perturbe la communication entre les adaptateurs. Pour résoudre ce problème, effectuez les actions suivantes :• Branchez l'adaptateur dans une autre prise.• Débranchez les appareils qui pourraient causer de l'interférence, comme les limiteurs de surtensionet les appareils à moteur.Le voyant Ethernet est éteint.• Assurez-vous que les câbles Ethernet sont branchés aux appareils et fonctionnentcorrectement.• Maintenez enfoncé le bouton de sécurité/ de réinitialisation de chaque adaptateur CPLpendant huit secondes pour rétablir les paramètres par défaut de l'appareil.11Novembre 2017NETGEAR, Inc. 350 East Plumeria DriveSan Jose, CA 95134, USA SoutienNous vous remercions d'avoir acheté ce produit NETGEAR. Vous pouvez visiter le /support pour enregistrer votre produit, obtenir de l'aide, accéder aux plus récents téléchargements et guides d'utilisation, et vous joindre à notre communauté. Nous vous recommandons d'utiliser uniquement les ressources d'assistance officielles NETGEAR.Marques de commerce© NETGEAR, Inc., NETGEAR et le logo NETGEAR sont des marques de commerce de NETGEAR, Inc. Toutes les autres marques de commerce sont utilisées à titre de référence uniquement.ConformitéPour obtenir la déclaration de conformité actuelle pour l'UE, visitez le /app/answers/detail/a_id/11621.Pour obtenir des renseignements sur la conformité, visitez le /about/regulatory/.Consultez le document relatif à la conformité réglementaire avant de brancher l'appareil.。
飞利浦2000系列耳机TAT2206 用户手册说明书
Headphones2000SeriesTAT2206User manual Register your product and get support at /supportContents1 Important safety instructions 2Hearing Safety 2 General information 2 2 Your True wirelessearphones 4 What's in the box 4 Other devices 4 Overview of your True wirelessearphones 5 3 Get started 6Charge the battery 6 Pair the earphones with yourBluetooth device for the rst time 6 Pair the earphones with anotherBluetooth device 7 4 Use your headphones 8Connect the earphones to yourBluetooth device 8 Power on/o 8 Manage your calls and music 8 LED indicator status 9 Voice Assistant 95 Reset the earphones 106 Technical data 117 Notice 12Declaration of conformity 12 Disposal of your old productand battery 12 Remove the integrated battery 12 Compliance with EMF 13 Environmental information 13 Notice of compliance 138 Trademarks 159 Frequently asked questions 161 Importantsafetyinstructions Hearing safetyBe sure to observe the following guidelines when using your headphones.• Listen at reasonable volumes for reasonable periods of time.• Be careful not to adjust the volume continuously upwards as yourhearing adapts.• Do not turn up the volume so high that you can't hear what's aroundyou.• You should use caution ortemporarily discontinue use inpotentially hazardous situations.• Excessive sound pressure from earpieces and headphones cancause hearing loss.• Using headphones with both ears covered while driving is notrecommended and may be illegal in some areas.• For your safety, avoid distractions from music or phone calls while intra c or other potentially dangerous environments.General informationTo avoid damage or malfunction:Caution• Do not expose headphones to excessive heat.• Do not drop your headphones.• Headphones shall not be exposed to dripping or splashing. (Refer to the IP rating of speci c product)• Do not allow your headphones to besubmerged in water.• Do not charge your headphones when theconnector or socket is wet.• Do not use any cleaning agents containingalcohol, ammonia, benzene, or abrasives.• Use a clean, damp cloth to clean yourheadphones - especially the sound conduitsand the microphone holes - regularly andavoid buildup of substances such as sweat or earwax.• If any sweat or water droplets are left in thesound conduits, air holes or microphoneholes, the sound level will temporarily drop or cut out entirely. This is not a malfunction. Usea soft, damp cloth to dry the headphonesthoroughly. Alternatively, remove the earbudtips, turn the sound conduits downward andgently tap the headphones about ve timeson a dry cloth or similar to remove any watercollected inside.• Be sure the headphones are completely drybefore charging and using. Avoid usingdisposable alcohol pads or other substancesfor cleaning.• The integrated battery shall not be exposedto excessive heat such as sunshine, re or the like.• Danger of explosion if battery is incorrectlyreplaced. Replace only with the same orequivalent type.• To achieve the speci c IP rating, the chargingslot cover must be closed.•Disposal of a battery into re or a hot oven, or mechanically crushing or cutting a battery,can result in an explosion.•Leaving a battery in an extremely hightemperature surrounding environment canresult in an explosion or the leakage ofammable liquid or gas.• A battery subjected to extremely low airpressure may result in an explosion or theleakage of ammable liquid or gas.•Replacement of a battery with an incorrecttype risks severely damaging the headphones and the battery (for example, in the case ofsome lithium battery types).•If the headset is not used for a long time, therechargeable battery will begin to lose itscharge. To avoid this loss, please fully chargethe battery at least once every three months.•To avoid risk of re, the equipment is suppliedonly by external power source which outputshall comply with PS1 (with output capacityless than 15W).Operating and storage temperaturesand humidity• Store in a place where thetemperature is between -20°C (-4°F)and 50°C (122 °F) with up to 90%relative humidity.• Operate in a place where thetemperature is between 0°C (32°F)and 45°C (113 °F) with up to 90%relative humidity.• Battery life may be shorter in high orlow temperature conditions.EN 32 Your True wireless earphonesWhat's in the boxPhilips True wireless earphones Philips TAT2206Replaceable rubber ear caps x 3 pairsQuick start guideOther devicesA mobile phone or device (e.g.notebook, tablet, Bluetooth adapters, MP3 players etc) which supports Bluetooth and is compatible to the earphones (see 'Technical data' on page 11).Congratulations on your purchase, and welcome to Philips! To fully bene t from the support that Philips o ers, register your product at /welcome.With this Philips True wireless earphones, you can:• enjoy convenient wireless handsfree calls;• enjoy and control wireless music;• switch between calls and music.Global WarrantySafety lea et4 ENUSB-C charging cable (for charging only)Overview of your True wireless earphones① LED indicator (Earphones)② Multi-function button ③ Microphone④ LED indicator (charging box)⑤USB-C charging slot5 EN3 Get startedCharge the batteryChargingNote• Before you use your earphones for the rst time, place the earphones in the charging box and charge the battery for 2 hours for optimum battery capacity and lifetime.• Use only the original USB-C charging cable to avoid any damage.• Finish your call before charging theearphones, as connecting the earphones for charging will power the earphones o .Connect one end of the USB cable into the charging box, and another end into the power source.• Charging process is veri ed by theLED light on the front panel.• When the charging box is fullycharged, the light goes o .Tip• The charging box serves as a portable backup battery for charging the earphones. When the charging box is fully charged, it supports 2 times full recharge cycle for the earphones.• Normally, a full charge takes 2 hours (for the earphones or charging box) by USB cable.The LED on both earphones ash in white & blue alternately. The charging box starts charging.Pair the earphones with your Bluetooth device for the rst time Open the top cover from charging box.Make sure that the earphones is fully charged.Note• After powering on, if the earphones cannot nd any previously connected Bluetooth device, it will automatically switch to pairing mode.The earphones are now in pairing mode and is ready to pair with a Bluetooth device (e.g. a mobile phone)Turn on the Bluetooth function of your Bluetooth device.Pair the earphones with yourBluetooth device. Refer to the usermanual of your Bluetooth device.6 EN1234Single earpiece (Mono mode)Take either right or Left earpiece out from charging box for Mono use. The earpiece will power on automatically. There will be a voice “Power on” from earpiece.NoteNote• Take the second earpiece from the charging box and they will pair each other automatically.• The earphones store 4 device in the memory. If you try to pair more than 4 devices, the earliest paired device is replaced by the new one.Pair the earphones with another Bluetooth deviceTurn on the Bluetooth function of your Bluetooth device, select Philips TAT2206.The following example shows you how to pair the earphones with your Bluetooth device.If you have another Bluetooth device that you want to pair with theearphones, make sure the Bluetooth function in any other previously paired or connected devices are turned o .Press and hold over 5 seconds both left & right side simultaneously with earpiece on ear, release when Pairing voice prompt is heard.Enter the earphones password “0000” (4 zeros) if prompted. For those Bluetooth devices featuring Bluetooth 3.0 or higher, no need to enter a password.Philips TAT22067 EN12TipNote• The earphones cannot connect to more than 1 device at the same time. If you have two paired Bluetooth devices, only turn on the Bluetooth function of the device that you want to connect.• If you turn on the Bluetooth function of your Bluetooth device after turning on theearphones, you have to go to the Bluetooth menu of the device and connect the earphones to the device manually.• If the earphones fail to connect to anyBluetooth device within 3 minutes, it will turn o automatically to save the battery life.• In some Bluetooth devices, connection may not be automatic. In this case, you have to go to the Bluetooth menu of your device and connect the earphones to the Bluetooth device manually.The blue LED ashes.The earphones will search the last connected Bluetooth device and reconnect to itautomatically. If the last connected device is notavailable, the earphones will enter pairing mode.4 Use your headphonesTurn on the Bluetooth function of your Bluetooth device.TaskTurn the earphones onOpen charging case's lid Earpiece put back to charging box and close the lidTurn the earphones oOpen the top cover from charging box.Connect the earphones to your Bluetooth device Power on/oMultifunc tion buttonOperationMusic control Play orpause music Skip forward Right / Left earpiece Right / Left earpieceDouble tapsSkipbackward Triple taps Adjustvolume +/-Via mobile phone controlRight / Left earpieceSingle tap Manage your calls and musicTaskMultifunc tion buttonOperation 8 EN12Switch call during 3-way callRight / Left earpiece triple taps Call control Pick up/ Hang up Call Reject an incoming call Right / Left earpieceTap and holdRight / Left earpiece single tap TaskMultifunc tion buttonOperationLED indicator statusThe earphones are connected to a Bluetooth deviceThe earphones are ready for pairing The earphones are on but not connected to a Bluetooth device Low battery level (earphones)Blue LED blink 2x every 5s The blue & white LED ash alternatelyWhite LED blink every 1s (auto turn o after 3min)Blue LED ashesHeadphones statusIndicatorBattery is fully charged(charging box)9 ENLED will be oTask ButtonOperation Right / Left earpiece Trigger voice (Siri/Google) assistantTap and hold 2 secondsVoice AssistantWhen charging Indicator Battery lowRelative adequate batteryO Amber LED light upBattery low Relativelyadequate batteryWhite LED light upAmber LED light upIn use and cover is open Indicator5 Reset the earphonesTAT2206Press once on both earphones, and then press and hold for 5 seconds.Follow steps in “Use yourearphones-Connect the earphones to your Bluetooth device.”Pair the earphones with your Bluetooth device, select Philips TAT2206.512310 EN6 Technical dataMusic time: 6 hoursTalk time: 6 hoursStandby time 200 hoursCharging time: 2 hoursLithium-ion battery 55 mAh on eachearpiece, Lithium-ion battery350mAh on charging boxBluetooth version: 5.0Compatible Bluetooth pro les:• HFP (Hands-Free Pro le)• A2DP (Advanced AudioDistribution Pro le)• AVRCP (Audio Video RemoteControl Pro le)Supported audio codec: SBCFrequency range: 2.402-2.480GHzTransmitter power: < 10 dBmOperating range: Up to 10 meters (33feet)Auto power oUSB-C port for chargingLow battery warning: availableNoteSpeci cations are subject to change withoutnotice.11 EN7 NoticeDeclaration of conformityDisposal of your old product and batteryYour product is designed and manufactured with high qualitymaterials and components, which can be recycled and reused.This symbol on a product means that the product is covered by European Directive 2012/19/EU.This symbol means that the product contains a built-in rechargeable battery covered by European Directive2013/56/EU which cannot be disposed of with normal household waste. We strongly advise you to take your product to an o cial collection point or a Philips service centre to have a professional remove the rechargeable battery.Inform yourself about the local separate collection system for electrical and electronic products and rechargeable batteries. Follow local rules and never dispose of the product and rechargeable batteries with normal household waste. Correct disposal of old products and rechargeable batteries helps prevent negative consequences for the environment and human health.Remove the integrated batteryIf there is no collection/recycling system for electronic products in your country, you can protect the environment by removing and recycling the battery before disposing the headphones.• Make sure the earphones isdisconnected from the charging box before removing the battery.• Make sure the charging box isdisconnected from the USBcharging cable before removing thebattery.Hereby, MMD Hong Kong Holding Limiteddeclares that the product is in compliance with the essential requirements and other relevant provisions of RED Directive 2014/53/EU and UK Radio Equipment Regulations SI 2017 No 1206. You can nd the Declaration of Conformity on /support.12 ENCompliance with EMFThis product complies with all applicable standards and regulations regarding exposure to electromagnetic elds.Environmental information All unnecessary packaging has been omitted. We have tried to make the packaging easy to separate into three materials: cardboard (box), polystyrene foam (bu er) and polyethylene (bags, protective foam sheet.)Your system consists of materials which can be recycled and reused if disassembled by a specialized company. Please observe the local regulations regarding the disposal of packaging materials, exhausted batteries and old equipment. Notice of complianceThe device complies with the FCC rules, Part 15. Operation is subject to the following two conditions:1. This device may not cause harmfulinterference, and2. This device must accept anyinterference received, includinginterference that may causeundesired operation.FCC rulesThis equipment has been tested and found to comply with the limits for a Class B digital device, pursuant to part 15 of the FCC Rules. These limits are designed to provide reasonable protection against harmful interference in a residential installation. This equipment generates, uses and can radiate radio frequency energy and, if not installedand used in accordance with the instruction manual, may cause harmful interference to radio communications. However, there is no guarantee that interference will not occur in a particular installation. If this equipment doescause harmful interference to radio or television reception, which can be determined by turning the equipmento and on, the user is encouraged to tryto correct the interference by one ormore of the following measures:Reorient or relocate the receiving antenna. Increase the separation between equipment and receiverConnect the equipment into an outleton a circuit di erent from that to which the receiver is connected.Consult the dealer or an experienced radio/TV technician for help.FCC Radiation Exposure Statement:This equipment complies with FCC radiation exposure limits set forth for an uncontrolled environment.This transmitter must not be co-locatedor operating in conjunction with anyother antenna or transmitter.Canada:This device contains licence-exempt transmitter(s)/receiver(s) that comply with Innovation, Science and Economic Development Canada’s licence-exemptRSS(s). Operation is subject to the followingtwo conditions: (1)This device may not cause interference. (2)This device must accept any interference, including interference that may cause undesired operation of the device. Caution: The user is cautioned that changes or modi cations not expressly approved by the party responsible for compliance could void the user'sauthority to operate the equipment.13 ENL’émetteur/récepteur exempt de licence contenu dans le présent appareil est conforme aux CNR d’Innovation, Sciences et Développement économique Canada applicables aux appareils radio exempts de licence.L’exploitation est autorisée aux deux conditions suivantes : (1) L’appareil ne doit pas produire de brouillage; (2) L’appareil doit accepter tout brouillage radioélectrique subi, même si le brouillage est susceptible d’en compromettre le fonctionnement.CAN ICES-003(B)/NMB-003(B)IC Radiation Exposure Statement:This equipment complies with Canada radiation exposure limits set forth for uncontrolled environments.This transmitter must not be co-located or operating in conjunction with any other antenna or transmitter.14 EN8 TrademarksBluetoothThe Bluetooth® word mark and logosare registered trademarks owned byBluetooth SIG, Inc. and any use of suchmarks by MMD Hong Kong HoldingLimited is under license. Othertrademarks and trade names are thoseof their respective owners.SiriSiri is a trademark of Apple Inc.,registered in the U.S. and othercountries.GoogleGoogle and Google Play are trademarksof Google LLC.15 EN9 FrequentlyaskedquestionsMy Bluetooth earphones do not turn on. The battery level is low. Charge the earphones.I cannot pair my Bluetooth earphones with my Bluetooth device.The Bluetooth is disabled. Enable the Bluetooth feature on your Bluetooth device and turn on the Bluetooth device before you turn on the earphones.Pairing does not work.• Put both earphones into charging box.• Make sure you have disabled the Bluetooth function of any previouslyconnected Bluetooth devices.• On your Bluetooth device, delete“Philips TAT2206” from the Bluetoothlist.• Pair your earphones (see ‘Pair theearphones with your Bluetooth device for the rst time’ on page 6).The Bluetooth device cannot nd the earphones.• The earphones may be connected to a previously paired device. Turn o theconnected device or move it out ofrange.• Pairing may have been reset or theearphones have been previously paired with another device. Pair the earphones with the Bluetooth device again asdescribed in the user manual. (see‘Pair the earphones with your Bluetooth device for the rst time’ on page 6).My Bluetooth earphones are connected to a Bluetooth stereo enabled mobile phone, but music only plays on the mobile phone speaker.Refer to the user manual of your mobile phone. Select to listen to music through the earphones.The audio quality is poor and crackling noise can be heard.• The Bluetooth device is out of range. Reduce the distance between yourearphones and Bluetooth device, or remove obstacles between them.• Charge your earphones.The audio quality is poor when streaming from the mobile phone is very slow, or audio streaming does not work at all. Make sure your mobile phone not only supports (mono) HSP/HFP but also supports A2DP and is BT4.0x (or higher) compatible (see ‘Technical data’ on page 11).My Bluetooth earphones won't pair and won't respond.• Put earphones into the charging box.• Reset your earphones. See "Reset the earphones" on page 10.16 ENClean your headphones regularly.• Use a clean, damp cloth to cleanyour headphones - especially thesound conduits and the microphoneholes - regularly and avoid buildupof substances such as sweat orearwax.• If any sweat or water droplets areleft in the sound conduits, air holesor microphone holes, the soundlevel will temporarily drop or cut outentirely. This is not a malfunction.Use a soft, damp cloth to dry theheadphones thoroughly.Alternatively, remove the earbudtips, turn the sound conduitsdownward and gently tap theheadphones about ve times on adry cloth or similar to remove anywater collected inside.• Be sure the headphones arecompletely dry before charging andusing. Avoid using disposablealcohol pads or other substances forcleaning.Charge your headphones regularly.If the headset is not used for a longtime, the rechargeable battery willbegin to lose its charge. To avoid thisloss, please fully charge the battery atleast once every three months.17 ENPhilips and the Philips Shield Emblem are registered trademarks of Koninklijke Philips N.V. and are used under license. This product has been manufactured by and is sold under the responsibility of MMD Hong Kong Holding Limited or one of its a liates, and MMD Hong Kong Holding Limited is the warrantor in relation to this product.UM_TAT2206_00_EN_V3.0。
锂电池型号为2000或2500BP的商品说明书
PARTS LIST CHARGER 2000, 2500 BP CHARGER 2000, 2500 BP VSBASE - PAD ASSISTITEM PART NO.DESCRIPTION QTY. 1016491113CONTROL FRAME WELDMENT1 102912139011/32 I.D. X 11/16 O.D. X .051/.080 THICK SAE FLAT WASHER (5/16)2 10391214505/16-18 HEX NUT WITH NY-LOK INSERT2 1046490783BASE ASSEMBLY1 105912139011/32 I.D. X 11/16 O.D. X .051/.080 THICK SAE FLAT WASHER (5/16)2 10691215205/16 SPLIT LOCK WASHER2 10791216405/16-18 X 3/4 HEX BOLT2 10891210001/4-20 X 5/8 TRUSS HEAD PHILLIPS MACHINE SCREW2 10991209701/4 EXTERNAL STAR LOCK WASHER2 1102392911HOSE / WIRE TIE DOWN2 1116490701CATCH ASSEMBLY1 11291216405/16-18 X 3/4 HEX BOLT4 11391215205/16 SPLIT LOCK WASHER4 114912139011/32 I.D. X 11/16 O.D. X .051/.080 THICK SAE FLAT WASHER (5/16)4 1154495343LEFT SUPPORT BRACKET1 1164495333RIGHT SUPPORT BRACKET1 1176492061RED 4 INCH CASTER1 4490391CASTER WHEEL WITH BEARING1 118912218013/32 I.D. X 13/16 O.D. X .051/.080 THICK SAE FLAT WASHER (3/8)4 11991222603/8-16 X 1 HEX BOLT4 1204495203FRAME ASSEMBLY1 1216490201SHAFT COLLAR LEG SUPPORT2 12291225401/2-13 X 1 1/4 HEX BOLT2 12391224201/2 SPLIT LOCK WASHER2 124912245017/32 I.D. X 1 1/16 O.D. X .074/.121 THICK SAE FLAT WASHER (1/2)2 1256490691LIFT ARM2 1264495146LIFT ARM SPACER2 127912245017/32 I.D. X 1 1/16 O.D. X .074/.121 THICK SAE FLAT WASHER (1/2)2 12891224201/2 SPLIT LOCK WASHER2 12991225401/2-13 X 1 1/4 HEX BOLT2 1304492791BUSHING, PIVOT2 131********/8-16 X 1 HEX BOLT2 132********/8 SPLIT LOCK WASHER2 133912218013/32 I.D. X 13/16 O.D. X .051/.080 THICK SAE FLAT WASHER (3/8)2 1344490511WHEEL - 8"2 4490481WHEEL BEARING1 1354492921WHEEL SPACER2 1364492546AXLE1 137********/2-13 THIN HEX NUT WITH NY-LOK INSERT2 1384492791BUSHING, PIVOT2 1394495163PIVOT WELDMENT1 14091225401/2-13 X 1 1/4 HEX BOLT2 141912245017/32 I.D. X 1 1/16 O.D. X .074/.121 THICK SAE FLAT WASHER (1/2)2 14291214705/16-18 X 1 FLAT HEAD PHILLIPS MACHINE SCREW2 14391214505/16-18 HEX NUT WITH NY-LOK INSERT2 144912139011/32 I.D. X 11/16 O.D. X .051/.080 THICK SAE FLAT WASHER (5/16)2 14591214705/16-18 X 1 FLAT HEAD PHILLIPS MACHINE SCREW2BASE - PAD ASSISTBASE - VARIABLE SPEEDITEM PART NO.DESCRIPTION QTY. 2016491113CONTROL FRAME WELDMENT1 202912139011/32 I.D. X 11/16 O.D. X .051/.080 THICK SAE FLAT WASHER (5/16)2 20391214505/16-18 HEX NUT WITH NY-LOK INSERT2 2046491523WHEEL DRIVE BASE ASSEMBLY1 205912139011/32 I.D. X 11/16 O.D. X .051/.080 THICK SAE FLAT WASHER (5/16)2 20691215205/16 SPLIT LOCK WASHER2 20791216405/16-18 X 3/4 HEX BOLT2 20891210001/4-20 X 5/8 TRUSS HEAD PHILLIPS MACHINE SCREW2 20991209701/4 EXTERNAL STAR LOCK WASHER2 2102392911HOSE / WIRE TIE DOWN4 2116490701CATCH ASSEMBLY1 21291216005/16-18 X 5/8 HEX BOLT4 21391215205/16 SPLIT LOCK WASHER4 214912139011/32 I.D. X 11/16 O.D. X .051/.080 THICK SAE FLAT WASHER (5/16)4 2154495343LEFT SUPPORT BRACKET1 2164495333RIGHT SUPPORT BRACKET1 2176492061RED 4 INCH CASTER1 4490391CASTER WHEEL WITH BEARING1 218912218013/32 I.D. X 13/16 O.D. X .051/.080 THICK WROUGHT WASHER (3/8)4 21991222603/8-16 X 1 HEX BOLT4 2206490201SHAFT COLLAR LEG SUPPORT2 2216491513FRAME ASSEMBLY, WHEEL DRIVE1 22291225401/2-13 X 1 1/4 HEX BOLT2 22349910913/4 I.D. X 1 1/4 O.D. X .031 THICK FLAT WASHER - PLASTIC2 22491224201/2 SPLIT LOCK WASHER2 225912245017/32 I.D. X 1 1/16 O.D. X .074/.121 THICK SAE FLAT WASHER2 2266490691LIFT ARM2 2274495141LIFT ARM SPACER2 228912245017/32 I.D. X 1 1/16 O.D. X .074/.121 THICK SAE FLAT WASHER2 22991224201/2 SPLIT LOCK WASHER2 23091225401/2-13 X 1 1/4 HEX BOLT2 2314492791BUSHING, PIVOT2 23291222603/8-16 X 1 HEX BOLT2 23391221003/8 SPLIT LOCK WASHER2 234912218013/32 I.D. X 13/16 O.D. X .051/.080 THICK WROUGHT WASHER (3/8)2 23549910813/4 I.D. X 1 1/4 O.D. X .031 THICK FLAT WASHER2 2364991609DRIVE WHEEL ASSEMBLY2 4990341BEARING, WHEEL CLUTCH44990946BUSHING, WHEEL2 23749910813/4 I.D. X 1 1/4 O.D. X .031 THICK FLAT WASHER2 2386491721ZERK GREASE FITTING2 2396490151DRAWN CUP BEARING4 2406490061WHEEL BEARING SLEEVE2 6490069WHEEL BEARING SLEEVE ASSEMBLY (INCLUDES 238, 239)1 2416490231DRIVEN SPROCKET 3536 3/4" BORE1 2426490141PLAIN BRONZE BEARING2 2435490171FULLY INSULATED MALE TERMINAL 14-16 GAGE2 24491224951/2-13 HEX NUT WITH NY-LOK INSERT - THIN2 24591221003/8 SPLIT LOCK WASHER2 24691222603/8-16 X 1 HEX BOLT2 24791208253/16 SQUARE X 7/8 LONG KEY - STEEL1 2486490071DRIVE AXLE1 24949910913/4 I.D. X 1 1/4 O.D. X .031 THICK FLAT WASHER - PLASTIC2 2506490201SHAFT COLLAR LEG SUPPORT2 251912311013/16 I.D. X 1 1/8 O.D. X .13 THICK 1 WAVE SPRING WASHER (3/4)2 25249910913/4 I.D. X 1 1/4 O.D. X .031 THICK FLAT WASHER - PLASTIC2 25349910913/4 I.D. X 1 1/4 O.D. X .031 THICK FLAT WASHER - PLASTIC2 25491212101/4-20 X 5/8 HEX BOLT4 25591208801/4 SPLIT LOCK WASHER4 25691209309/32 I.D. X 5/8 O.D. X .051/.080 THICK SAE FLAT WASHER (1/4)1 25791210601/4-20 X 1 1/4 HEX BOLT1 2586491551CHAIN TENSIONER1 2596491591DRIVE MOTOR 36 VOLT1 26091200131/8 SQUARE X 1/2 LONG WOODRUFF KEY - STEEL1 2616491561DRIVE SPROCKET H3516 1/2" BORE1 2626491571#35 ROLLER CHAIN 59 LINKS NO MASTER1 4990751LINK - MASTER #35 CHAIN1 2634495163PIVOT WELDMENT1 26491225401/2-13 X 1 1/4 HEX BOLT2 265912245017/32 I.D. X 1 1/16 O.D. X .074/.121 THICK SAE FLAT WASHER (1/2)2 26691214705/16-18 X 1 FLAT HEAD PHILLIPS MACHINE SCREW2 26791214505/16-18 HEX NUT WITH NY-LOK INSERT2 268912139011/32 I.D. X 11/16 O.D. X .051/.080 THICK SAE FLAT WASHER (5/16)2 26991214705/16-18 X 1 FLAT HEAD PHILLIPS MACHINE SCREW2 2704492791BUSHING, PIVOT2BASE - VARIABLE SPEEDSHIELD AND PAD DRIVERITEM PART NO.DESCRIPTION QTY. 3016492051STUD TERMINAL BOOT - RUBBER2 3024491001MOTOR 36 VOLT - 2000 BP1 6490681MOTOR 36 VOLT - 2500 BP1 30391215205/16 SPLIT LOCK WASHER – NON VS6 30491214305/16-18 THIN HEX NUT WITH NY-LOK INSERT6 30591214003/8 I.D. X 7/8 O.D. X .064/.104 THICK WROUGHT WASHER4 3064492663MOTOR MOUNT1 30791216805/16-18 X 1 HEX BOLT - NON VS4 3086492163FORK1 309912139011/32 I.D. X 11/16 O.D. X .051/.080 THICK SAE FLAT WASHER (5/16)3 31091215205/16 SPLIT LOCK WASHER3 31191216405/16-18 X 3/4 HEX BOLT3 3124495163PIVOT WELDMENT1 3136490732BUMPER STRAP1 314912035010-24 HEX NUT WITH NY-LOK INSERT1 3154495531END CUFF - 2"1 3164495541HOSE, 2" DIAMETER X 3 FEET LONG1 3174495441HOSE CLAMP, 1 9/16" - 2 1/2" DIAMETER1 318912045010-24 X 1 ROUND HEAD PHILLIPS MACHINE SCREW1 3196490191BUMPER / BRUSH1 3206490729CW-FLEXIWALL SHIELD ASSEMBLY1 32191208153/16 SQUARE X 1/2 LONG KEY - STEEL1 3226492568DRIVER, PAD - 20” ASSEMBLED & BALANCED1 323912198513/32 I.D. X 1 O.D. X .12 THICK FLAT WASHER (11 GAGE)1 32491215205/16 SPLIT LOCK WASHER1 32591214905/16-24 X 7/8 HEX BOLT1 326912081010 X 1/2 PAN HEAD PHILLIPS SHEET METAL SCREW3 3275990721SPRING CLIP PAD HOLDER SET1 328649200120" LUST LITE BURNISH PAD - CASE (5)1 32991209801/4-20 X 1 SOCKET HEAD CAP SCREW3 33091208801/4 SPLIT LOCK WASHER3 33191209501/4 X 1 1/4 FENDER WASHER3 3325796101PAPER BAG - 5 PACK1 33391220203/8 DIAMETER X 3/8 LONG SOCKET HEAD SHOULDER BOLT (5/16-18)2 (QTY. 6 ON VS)33491214003/8 I.D. X 7/8 O.D. X .064/.104 THICK WROUGHT WASHER2 3352691181PIVOT SPACER2SHIELD AND PAD DRIVERCONTROL FRAME - PAD ASSISTITEM PART NO.DESCRIPTION QTY. 4014490521LOAD ADJUST KNOB (INCLUDES SET SCREW)1 402912245017/32 I.D. X 1 1/16 O.D. X .074/.121 THICK SAE FLAT WASHER (1/2)2 40391227051/2 I.D. X 3/4 O.D. X .01 THICK 1 WAVE SPRING WASHER (1/2)1 4046490611ADJUSTMENT ROD1 4056490621ADJUSTMENT ROD COLLAR1 406912218013/32 I.D. X 13/16 O.D. X .051/.080 THICK SAE FLAT WASHER (3/8)1 4074490561INSULATED STANDOFF1 40891209711/4 EXTERNAL STAR LOCK WASHER1 40991212101/4-20 X 5/8 HEX BOLT1 4104491011SOLENOID, 36 VOLT1 41191209309/32 I.D. X 5/8 O.D. X .051/.080 THICK SAE FLAT WASHER (1/4)2 41291208801/4 SPLIT LOCK WASHER2 41391211701/4-20 X 1/2 HEX BOLT2 41491212871/4-20 X 2 1/2 HEX BOLT - STEEL1 4152791281BUSHING SPACER2 4162791281BUSHING SPACER2 41791209309/32 I.D. X 5/8 O.D. X .051/.080 THICK SAE FLAT WASHER (1/4)2 41891209001/4-20 HEX NUT WITH NY-LOK INSERT2 4196490601ADJUSTMENT BRACKET1 4204495326SWITCH BRACKET1 42191203707/32 I.D. X 1/2 O.D. X .032/.065 THICK SAE FLAT WASHER (10)2 422912032010 SPLIT LOCK WASHER2 423912046010-24 X 1 1/4 ROUND HEAD PHILLIPS MACHINE SCREW2 4244491071SNAP SWITCH1 4259120130 6 EXTERNAL STAR LOCK WASHER2 42691200906-32 X 7/8 PAN HEAD PHILLIPS MACHINE SCREW2 42791209001/4-20 HEX NUT WITH NY-LOK INSERT2 4284490601KNOB, RAISE / LOWER ROD1 4296490101LATCH HANDLE1 4306490093LATCH ASSEMBLY1 4314490631COMPRESSION SPRING1 432912245017/32 I.D. X 1 1/16 O.D. X .074/.121 THICK SAE FLAT WASHER (1/2)2 43391212701/4-20 X 1 HEX BOLT4 43491208801/4 SPLIT LOCK WASHER4 4354495351SPACER GUIDE4 436912032010 SPLIT LOCK WASHER2 437912041010-24 X 1/2 ROUND HEAD PHILLIPS MACHINE SCREW2 4386490701CATCH ASSEMBLY1 4396490783BASE ASSEMBLY1 44091215205/16 SPLIT LOCK WASHER2 44191216405/16-18 X 3/4 HEX BOLT2 442912139011/32 I.D. X 11/16 O.D. X .051/.080 THICK SAE FLAT WASHER (5/16)2 4434491031SHUNT1 44491209711/4 EXTERNAL STAR LOCK WASHER2 44591209201/4-20 HEX NUT2 44691230051/8 X 5 1/2 WIRE TIE4 4476491113CONTROL FRAME WELDMENT1 44891209711/4 EXTERNAL STAR LOCK WASHER2 44991212701/4-20 X 1 HEX BOLT2 4504492803TOP SUPPORT BRACKET1 45191216405/16-18 X 3/4 HEX BOLT2 45291215205/16 SPLIT LOCK WASHER2 453912139011/32 I.D. X 11/16 O.D. X .051/.080 THICK SAE FLAT WASHER (5/16)2 45491214003/8 I.D. X 7/8 O.D. X .064/.104 THICK WROUGHT WASHER (5/16)2 45591214805/16-18 X 1 ROUND HEAD PHILLIPS MACHINE SCREW2 45691211601/4-20 X 3/8 HEX BOLT1 45791208801/4 SPLIT LOCK WASHER4 45891203101/8 X 3/4 COTTER PIN3 459-----------10-32 X 1/2 SET SCREW1CONTROL FRAME - PAD ASSISTCONTROL FRAME - VARIABLE SPEEDITEM PART NO.DESCRIPTION QTY. 5014490521LOAD ADJUST KNOB (INCLUDES SET SCREW)1 502912245017/32 I.D. X 1 1/16 O.D. X .074/.121 THICK SAE FLAT WASHER2 50391227051/2 I.D. X 3/4 O.D. X .01 THICK 1 WAVE SPRING WASHER (1/2)1 5046490611ADJUSTMENT ROD1 5056490621ADJUSTMENT ROD COLLAR1 506912218013/32 I.D. X 13/16 O.D. X .051/.080 THICK WROUGHT WASHER1 5074490561INSULATED STANDOFF1 50891209711/4 EXTERNAL STAR LOCK WASHER1 50991212101/4-20 X 5/8 HEX BOLT1 5104491011SOLENOID, 36 VOLT1 51191209309/32 I.D. X 5/8 O.D. X .051/.080 THICK SAE FLAT WASHER (1/4)2 51291208801/4 SPLIT LOCK WASHER2 51391211701/4-20 X 1/2 HEX BOLT2 51491212871/4-20 X 2 1/2 HEX HEAD BOLT - STEEL1 5152791281BUSHING SPACER2 5162791281BUSHING SPACER2 51791209309/32 I.D. X 5/8 O.D. X .051/.080 THICK SAE FLAT WASHER (1/4)2 51891209001/4-20 HEX NUT WITH NY-LOK INSERT2 5196490601ADJUSTMENT BRACKET WELDMENT1 5204495326SWITCH BRACKET1 52191203707/32 I.D. X 1/2 O.D. X .032/.065 THICK SAE FLAT WASHER (#10)2 522912032010 SPLIT LOCK WASHER2 523912046010-24 X 1 1/4 ROUND HEAD PHILLIPS MACHINE SCREW2 5244491071SNAP SWITCH1 5259120130 6 EXTERNAL STAR LOCK WASHER2 52691200906-32 X 7/8 PAN HEAD PHILLIPS MACHINE SCREW2 5274490601KNOB,RAISE / LOWER ROD1 5286490101LATCH HANDLE1 5296490093LATCH ASSEMBLY1 5304490631COMPRESSION SPRING1 531912245017/32 I.D. X 1 1/16 O.D. X .074/.121 THICK SAE FLAT WASHER1 53291212701/4-20 X 1 HEX BOLT4 53391208801/4 SPLIT LOCK WASHER4 5344495351SPACER GUIDE4 53591209001/4-20 HEX NUT WITH NY-LOK INSERT1 53691208801/4 SPLIT LOCK WASHER2 53791211701/4-20 X 1/2 HEX BOLT2 53891201908-32 HEX NUT WITH STAR LOCK WASHER2 539912032010 SPLIT LOCK WASHER2 5406492473SPEED CONTROL MOUNTING BRACKET1 5412791281BUSHING SPACER2 5422690021SPEED CONTROL, CURTIS1 54391202608-32 X 3/4 ROUND HEAD PHILLIPS MACHINE SCREW2 544912041010-24 X 1/2 ROUND HEAD PHILLIPS MACHINE SCREW2 5456490701CATCH ASSEMBLY1 5466491523BASE ASSEMBLY1 54791215205/16 SPLIT LOCK WASHER2 54891216405/16-18 X 3/4 HEX BOLT2 549912139011/32 I.D. X 11/16 O.D. X .051/.080 THICK SAE FLAT WASHER (5/16)2 5504491031SHUNT1 55191209711/4 EXTERNAL STAR LOCK WASHER2 55291209201/4-20 HEX NUT2 55391200906-32 X 7/8 PAN HEAD PHILLIPS MACHINE SCREW2 5549120130 6 EXTERNAL STAR LOCK WASHER2 5554491071SNAP SWITCH1 55691230051/8 X 5 1/2 WIRE TIE4 5576491113CONTROL FRAME WELDMENT1 5584492803TOP SUPPORT BRACKET1 55991209711/4 EXTERNAL STAR LOCK WASHER2 56091212701/4-20 X 1 HEX BOLT2 56191216405/16-18 X 3/4 HEX BOLT2 56291215205/16 SPLIT LOCK WASHER2 563912139011/32 I.D. X 11/16 O.D. X .051/.080 THICK SAE FLAT WASHER (5/16)2 56491214003/8 I.D. X 7/8 O.D. X .064/.104 THICK WROUGHT WASHER (5/16)2 56591214805/16-18 X 1 ROUND HEAD PHILLIPS MACHINE SCREW2 56691211701/4-20 X 1/2 HEX BOLT1 56791208801/4 SPLIT LOCK WASHER1 56891203101/8 X 3/4 COTTER PIN3 569-----------10-32 X 1/2 SET SCREW1CONTROL FRAME - VARIABLE SPEEDHOUSING - PAD ASSISTITEM PART NO.DESCRIPTION QTY. 6014495541HOSE 2" DIAMETER X 3 FEET LONG1 6026492921BATTERY WARNING LABEL1 6036491171SOFT DRAW LATCH WITH CONCEALED KEEPER1 6046492481DECAL, SIDE SHORT - 2000 BP2 6492841DECAL, SIDE SHORT - 2500 BP2 60591214003/8 I.D. X 7/8 O.D. X .064/.104 THICK WROUGHT WASHER (5/16)2 60691214805/16-18 X 1 ROUND HEAD PHILLIPS MACHINE SCREW2 607-----------10-32 X 1/2 SET SCREW1 6084490521LOAD ADJUST KNOB (INCLUDES SET SCREW)1 6094491041RPM METER WITH HARDWARE1 6106491131SLIDE RAIL, RIGHT1 6114491091INDICATOR LIGHT - RED LENS/48VDC1 6124491101TOGGLE SWITCH, MOTOR1 6139122465.516 I.D. X .813 O.D. X .027/.030 THICK FLAT WASHER1 61406918511/2 INTERNAL STAR LOCK WASHER1 61507988215/8 HEX NUT1 6166492801DASH PANEL DECAL1 6174492901SWITCH PLATE - RIGHT1 61891212701/4-20 X 1 HEX BOLT2 6194492881SWITCH PLATE - LEFT1 620912218013/32 I.D. X 13/16 O.D. X .051/.080 THICK SAE FLAT WASHER (3/8)2 6214491051BATTERY METER 36 VOLT1 6224491071SNAP SWITCH1 6239120040 6 INTERNAL STAR LOCK WASHER2 62491200906-32 X 7/8 PAN HEAD PHILLIPS MACHINE SCREW2 6252791281BUSHING SPACER2 62691221203/8 I.D. X 5/8 O.D. X .031 THICK 1 WAVE SPRING WASHER (3/8)4 62791209001/4-20 HEX NUT WITH NY-LOK INSERT2 62891209309/32 I.D. X 5/8 O.D. X .051/.080 THICK SAE FLAT WASHER (1/4)2 629912051010-24 X 1/2 TRUSS HEAD PHILLIPS MACHINE SCREW4 6304493046HANDLE1 631912036010-24 HEX NUT WITH STAR LOCK WASHER1 63291203707/32 I.D. X 1/2 O.D. X .032/.065 THICK SAE FLAT WASHER (10)1 633912048010-24 X 1 3/4 ROUND HEAD PHILLIPS MACHINE SCREW1 63491200906-32 X 7/8 PAN HEAD PHILLIPS MACHINE SCREW2 6354491901CHARGER PLUG ONLY - GRAY 36 VOLT1 6490821WIRE ASSEMBLY, ANDERSON TO SOL./STANDOFF 36 VOLT1 636912079010 X 5/8 PAN HEAD PHILLIPS SHEET METAL SCREW8 6376492891LABEL PAD POSITION1 6384490641EXTENSION SPRING1 639912035010-24 HEX NUT WITH NY-LOK INSERT1 6404490701CIRCUIT BREAKER - 70 AMP/ETA1 64191200206-32 HEX NUT WITH STAR LOCK WASHER2 6426492931WIRING DIAGRAM DECAL1 64364909511/4 MIPT PLUG2 6446490273REAR COVER PANEL1 6456490011HOUSING WITH SLIDE RAILS1 6466492851SIDE DECAL - LONG2 64791210371/4-20 X 5/8 FLAT HEAD PHILLIPS HEAD PHILLIPS MACHINE SCREW6 6486491211TAPPING PLATE2 6496491171SOFT DRAW LATCH WITH CONCEALED KEEPER1 6506491193HOOD STOP / SUPPORT BRACKET2 65191209309/32 I.D. X 5/8 O.D. X .051/.080 THICK SAE FLAT WASHER (1/4)4 65291208801/4 SPLIT LOCK WASHER4 65391212701/4-20 X 1 HEX BOLT4 6544495531END CUFF - 2"1 6556492261RUBBER MOTOR COVER1 65691209309/32 I.D. X 5/8 O.D. X .051/.080 THICK SAE FLAT WASHER (1/4)6 65791209001/4-20 HEX NUT WITH NY-LOK INSERT6 65891201855/32 I.D. X 1/2 O.D. WASHER - STEEL - ZINC PLATE4 6595796101PAPER BAG - 5 PACK1 5791661CLOTH FILTER BAG (OPTIONAL)1 66091203175/32 X 5/8 DOME HEAD POP RIVET - STEEL4 6616492871HOOD DECAL1 66291203175/32 X 5/8 DOME HEAD POP RIVET - STEEL4 66391201855/32 I.D. X 1/2 O.D. WASHER - STEEL - ZINC PLATE4 6646490741HOUSING, HOOD ONLY1 6656491141SLIDE RAIL, LEFT1 66691209201/4-20 HEX NUT4 66791210391/4-20 X 1 1/2 ELEVATOR BOLT - ZINC PLATED4HOUSING - PAD ASSISTHOUSING - VARIABLE SPEEDITEM PART NO.DESCRIPTION QTY. 7016492261RUBBER MOTOR COVER1 7024495541HOSE, 2" DIAMETER X 3 FEET LONG1 7036492921BATTERY WARNING LABEL1 7046491171SOFT DRAW LATCH WITH CONCEALED KEEPER1 7056492481DECAL, SIDE SHORT - 2000 BP2 6492841SIDE DECAL - 2500 BP2 70691214003/8 I.D. X 7/8 O.D. X .064/.104 THICK WROUGHT WASHER (5/16)2 70791214805/16-18 X 1 ROUND HEAD PHILLIPS MACHINE SCREW2 708-----------10-32 X 1/2 SET SCREW1 7094490521LOAD ADJUST KNOB (INCLUDES SET SCREW)1 7106491131SLIDE RAIL, RIGHT1 7112694131POTENTIOMETER, CURTIS SPEED CONTROL1 7125490131KNOB - WITH SET SCREW1 7134491041RPM METER WITH HARDWARE1 7144491091INDICATOR LIGHT-RED LENS/48VDC1 7152792041SWITCH, TOGGLE VAC1 7169122465.516 I.D. X .813 O.D. X .027/.030 THICK FLAT WASHER2 71791200906-32 X 7/8 PAN HEAD PHILLIPS MACHINE SCREW2 7189120040 6 INTERNAL STAR LOCK WASHER2 7194991271LIMIT SWITCH1 72006918511/2 INTERNAL STARLOCK WASHER1 72107988215/8 HEX NUT1 7224491051BATTERY METER WITH HARDWARE1 72391209001/4-20 HEX NUT WITH NY-LOK INSERT2 72491209309/32 I.D. X 5/8 O.D. X .051/.080 THICK SAE FLAT WASHER (1/4)2 72591221203/8 I.D. X 5/8 O.D. X .031 THICK 1 WAVE SPRING WASHER (3/8)4 7262791281BUSHING SPACER2 727912218013/32 I.D. X 13/16 O.D. X .051/080 THICK WROUGHT WASHER (3/8)2 7284492881SWITCH PLATE - LEFT1 7296492501DASH PANEL DECAL - VS1 73091212701/4-20 X 1 HEX BOLT2 7314492901SWITCH PLATE - RIGHT1 732912051010-24 X 1/2 TRUSS HEAD PHILLIPS MACHINE SCREW4 7334493046HANDLE1 734912036010-24 HEX NUT WITH STAR LOCK WASHER1 73591203707/32 I.D X 1/2 O.D X .032/.065 THICK (#10) SAE FLAT WASHER1 736912048010-24 X 1 3/4 ROUND HEAD PHILLIPS MACHINE SCREW1 73791200906-32 X 7/8 PAN HEAD PHILLIPS MACHINE SCREW2 7384491901CHARGER PLUG ONLY - GRAY 36V1 6490821WIRE ASSEMBLY - ANDERSON / STANDOFF1 739912079010 X 5/8 PAN HEAD PHILLIPS MACHINE SCREW8 7406492901LABEL PAD POSITION1 7416490273REAR COVER PANEL1 7426492491WIRING DIAGRAM DECAL VS1 74364909511/4 MIPT PLUG2 7446491711CIRCUIT BREAKER 8 AMP1 74591200206-32 HEX NUT WITH STAR LOCK WASHER2 7464490701CIRCUIT BREAKER - 70 AMP/ETA - 2500 BP1 747912035010-24 HEX NUT WITH NY-LOK INSERT1 7484490641EXTENSION SPRING1 7496490011HOUSING WITH SLIDE RAILS1 7506492851SIDE DECAL - LONG2 75191210371/4-20 X 5/8 FLAT HEAD PHILLIPS MACHINE SCREW6 7526491211TAPPING PLATE2 7536491171SOFT DRAW LATCH WITH CONCEALED KEEPER1 7546491193HOOD STOP / SUPPORT BRACKET2 75591209309/32 I.D. X 5/8 O.D. X .051/.080 THICK (1/4) SAE FLAT WASHER4 75691208801/4 SPLIT LOCK WASHER4 75791212701/4-20 X 1 HEX BOLT4 7584495531END CUFF - 2"1 7595796101PAPER BAG - 5 PACK1 5791661CLOTH FILTER BAG (OPTIONAL)1 76091201855/32 I.D. X 1/2 O.D. WASHER - STEEL - ZINC PLATE4 76191203175/32 X 5/8 DOME HEAD POP RIVET - STEEL4 7626492871HOOD DECAL1 7636492431DECAL, VS1 76491203175/32 X 5/8 DOME HEAD POP RIVET - STEEL4 76591201855/32 I.D. X 1/2 O.D. WASHER - STEEL - ZINC PLATE4 7666490741HOUSING, HOOD ONLY1 7676491141SLIDE RAIL, LEFT1 76891209201/4-20 HEX NUT4 76991210391/4-20 X 1 1/2 ELEVATOR BOLT - ZINC PLATED4 77091209001/4-20 HEX NUT WITH NY-LOK INSERT6 77191209309/32 I.D. X 5/8 O.D. X .051/.080 THICK (1/4) SAE FLAT WASHER6HOUSING - VARIABLE SPEEDWIRING DIAGRAM - PAD ASSISTITEM PART NO.DESCRIPTION QTY. 16490801WIRE ASSEMBLY, BREAKER TO SHUNT1 26490811WIRE ASSEMBLY, SOLENOID TO BREAKER1 36490821WIRE ASSEMBLY, ANDERSON TO SOLENOID / STANDOFF1 46490831WIRE ASSEMBLY, SHUNT TO MOTOR1 56490841WIRE ASSEMBLY, MOTOR TO STANDOFF1 66490851WIRE ASSEMBLY, SOLENOID TO MAIN SWITCH1 76490861WIRE ASSEMBLY, SOLENOID / LIGHT / VOLT METER TO STANDOFF1 86490871WIRE ASSM. SAFETY SWITCH TO VOLT METER / MAIN SWITCH TO LIGHT1 96490881WIRE ASSEMBLY, HANDLE SWITCH TO SAFETY SWITCH1 106490891WIRE ASSEMBLY, SOLENOID TO HANDLE SWITCH1 116491821WIRE ASSEMBLY, ANDERSON TO POSITIVE / NEGATIVE BATTERY1 176491831WIRE ASSEMBLY, ANDERSON TO SOLENOID / STANDOFF1 972391981BATTERY JUMPER 3/8" RING #972 -91230051/8 X 5 1/2 WIRE TIE6 -2397361HOUR METER1 -4490561INSULATED STANDOFF1 -4490701CIRCUIT BREAKER - 70 AMP/ETA1 -4491001MOTOR, 36 VOLT – 2000 RPM1 -4491011SOLENOID, 36 VOLT1 -4491031SHUNT1 -4491041RPM METER WITH HARDWARE1 -4491051BATTERY METER 36 VOLT WITH HARDWARE1 -4491061BATTERY, 185 AMP/HR, 12 VOLT3 -4491071SNAP SWITCH2 -4491091INDICATOR LIGHT - RED LENS / 48 VOLT DC1 -4491101TOGGLE SWITCH, MOTOR1 -4491901CHARGER PLUG ONLY - GRAY 36 VOLT1 -6490681MOTOR 36 VOLT – 2500 RPM1 -6491841175 AMP ANDERSON WITH CONTACTS GRAY 36 VOLT2WIRING DIAGRAM - PAD ASSISTWIRING DIAGRAM - VARIABLE SPEEDITEM PART NO.DESCRIPTION QTY. 16490801WIRE ASSEMBLY, BREAKER TO SHUNT1 26491681WIRE ASSEMBLY, SOLENOID TO BREAKER1 36491671WIRE ASSEMBLY, ANDERSON TO SOLENOID / STANDOFF1 46490831WIRE ASSEMBLY, SHUNT TO MOTOR1 56490841WIRE ASSEMBLY, MOTOR TO STANDOFF1 66490851WIRE ASSEMBLY, SOLENOID TO MAIN SWITCH1 76490861WIRE ASSEMBLY, SOLENOID / LIGHT / VOLT METER TO STANDOFF1 86490871WIRE ASSEMBLY SAFETY SWITCH TO V METER/SWITCH TO LIGHT1 96490881WIRE ASSEMBLY, HANDLE SWITCH TO SAFETY SWITCH1 106490891WIRE ASSEMBLY, SOLENOID TO HANDLE SWITCH1 116491821WIRE ASSEMBLY, ANDERSON - POS. / NEG. BATTERY 36 VOLT1 126491601WIRE HANDLE SWITCH - DRIVE SAFETY SWITCH1 136492461WIRING HARNESS, SPEED CONTROL1 146492441WIRE, SPEED CONTROL - CIRCUIT BREAKER1 156492451WIRE, SPEED CONTROL - DRIVE MOTOR1 166491641WIRE BATTERY METER - HANDLE SWITCH1 176491831WIRE ASSEMBLY, ANDERSON - SOLENOID / STANDOFF 36 VOLT1 186491651WIRE DRIVE CIRCUIT BREAKER - DRIVE MOTOR (+)1 972391981BATTERY JUMPER 3/8" RING #972—2690021SPEED CONTROL, CURTIS1—2694131POTENTIOMETER, CURTIS CONTROL1—2792041SWITCH, TOGGLE VAC1—91230051/8 X 5 1/2 WIRE TIE6—4490561INSULATED STANDOFF1—4490701CIRCUIT BREAKER - 70 AMP/ETA (BRUSH)1—4491001MOTOR, 36 VOLT - 2000 RPM1—4491011SOLENOID, 36 VOLT1—4491031SHUNT1—4491041RPM METER W/HARDWARE1—4491051BATTERY METER WITH HARDWARE1—4491061BATTERY, 185 AMP/HR, 12 VOLT3—4491071SNAP SWITCH (SAFETY)2—4491091INDICATOR LIGHT - RED LENS/48VDC1—4491901CHARGER PLUG ONLY - GRAY 36VOLT1—4991271LIMIT SWITCH (HANDLE)1—6490681MOTOR 36 VOLT - 2500 BP1—6491591DRIVE MOTOR 36 VOLT1—6491711CIRCUIT BREAKER - 8 AMP (DRIVE)1—6491841175 AMP ANDERSON WITH CONTACTS GRAY 36 VOLT2WIRING DIAGRAM - VARIABLE SPEEDMOTOR CHARGER 2000, 2500 BP +VS W/HW ORIG. 11-01 9096441。
LED 视频处理器 LVP-3000、LVP-2000 用户手册说明书
LED视频处理器LED Video Processor用户手册User manualModelLVP-3000、、LVP-2000Model::LVP-3000目录LVP系列处理器说明 (2)声明 (2)关于本手册 (2)商标信用 (3)安全防范措施 (4)附件 (5)功能介绍 (7)端口和技术规格说明 (9)安装 (11)LED发送卡的安装 (12)按键面板说明 (13)菜单说明 (14)默认菜单 (15)主菜单 (16)主菜单结构 (17)功能说明 (18)输出分辨率设置 (18)拼接功能 (19)信号连接 (19)不等分拼接功能的设置 (19)等分拼接功能的设置 (20)PIP功能 (22)PIP模式 (22)抠像模式 (24)无缝切换功能 (24)内部测试画面 (25)预设模式的保存和调用 (25)多机互联 (25)多机通信连接 (26)信号预切功能 (27)故障排除 (29)LVP系列处理器说明本手册适用于LVP-3000和LVP-2000,其主要区别在于:型号区别项LVP-3000LVP-2000端口有“SDI”、“SDI LOOP”端口无“V3”、“V4”端口无“SDI”、“SDI LOOP”端口有“V3”、“V4”端口按键面板有“BLACK”键有“SDI”键无“V3”、“V4”键无“BLACK”键无“SDI”键有“V3”、“V4”键在下面的手册说明中,带“*”字符的为有区别功能,用户在使用本手册时,请加以区分。
声明未经本公司书面许可,任何单位或个人不得擅自仿制、复制或抄译本手册部分内容或全部内容。
不得将本手册以任何形式(电子、机械、影印、录制或其它可能的方式)进行商品传播或用于任何商业、营利目的。
本手册所提到的产品规格和资讯仅供参考,如有内容更新,恕不另行通知。
除非有特别约定,本手册仅作为使用指导,所有陈述、信息等均不构成任何形式的担保。
关于本手册�在使用本设备前,请认真阅读本手册�针对需要选购本设备附件的人士�本手册同时提供了如何使用本设备附件的说明�如果本手册提供了如何使用本设备某附件的说明,则相应地提供了该产品的名称�请将本手册与附带的关于其附件的说明一起阅读商标信用VGA和XGA是IBM公司的注册商标。
[说明]转染详细步骤大攻略
[说明]转染详细步骤大攻略转染详细步骤大攻略范例----真核重组表达质粒pDsRed-N1-NS1在A549细胞中表达按上海索莱宝生物科技有限公司去内毒素质粒小提试剂盒说明书方法进行质粒抽提,测得质粒浓度为410.32ng/µl。
将培养的A549细胞铺板,待细胞密度长到90%左右时,按lipo2000说明书转染A549细胞,36h后于荧光显微镜下观察DsRed-NS1融合蛋白的表达情况。
具体操作步骤如下: 1)质粒准备按上海索莱宝生物科技有限公司去内毒素质粒小提试剂盒说明书方法进行质粒抽提,具体步骤如下:(1) 取1-5ml细菌培养物,12000rpm离心1 min,尽量吸除上清(菌液较多时可以通过多次离心将菌体沉淀收集到一个离心管中)。
(2) 向留有菌体沉淀的离心管中加入200µl溶液P1(请先检查是否已加入RNaseA),使用移液器或涡旋振荡器彻底悬浮细菌细胞沉淀。
(注:如果菌块未彻底混匀,会影响裂解导致质粒提取量和纯度偏低)(3)向离心管中加入200µl溶液P2,温和地上下翻转6-8次使菌体充分裂解。
(注:混匀一定要温和,以免污染基因组DNA,此时菌液应变得清亮粘稠,所用时间不应超过5min,以免质粒受到破坏)(4)向离心管中加入250µl溶液P3,立即温和地上下翻转6-8次,充分混匀,此时会出现白色絮状沉淀。
12000rpm 离心10min,用移液器小心地将上清转移到另一个干净的离心管中,尽量不要吸出沉淀。
(注:溶液P3加入后应立即混合,避免产生局部沉淀。
如果上清中还有微小白色沉淀,可再次离心后取上清)(5)加入1/5体积冰预冷的去内毒素清除剂,振荡混匀,溶液变浑浊,冰浴2min至溶液变清亮。
(6)37?水浴5 min,不时振荡,溶液又变浑浊。
12000rpm室温离心5min,溶液应分为两相,上层水相含质粒DNA,下层油状相含内毒素。
(7)将质粒DNA上层水相转移至新管,弃下层油状相,注意不要吸入油状相,重复抽提三次,即重复步骤5-7三次。
- 1、下载文档前请自行甄别文档内容的完整性,平台不提供额外的编辑、内容补充、找答案等附加服务。
- 2、"仅部分预览"的文档,不可在线预览部分如存在完整性等问题,可反馈申请退款(可完整预览的文档不适用该条件!)。
- 3、如文档侵犯您的权益,请联系客服反馈,我们会尽快为您处理(人工客服工作时间:9:00-18:30)。
TOP
Scaling Up or Down Transfections
To transfect cells in different tissue culture formats, vary the amounts of Lipofectamine® 2000, nucleic acid, cells, and medium used in proportion to the relative surface area, as shown in the table. With automated, high-throughput systems, a complexing volume of 50 µl is recommended for transfections in 96-well plates. Note: You may perform rapid 96-well plate transfections by plating cells directly into the transfection mix. Prepare complexes in the plate and directly add cells at twice the cell density as in the basic protocol in a 100 µl volume. Cells will adhere as usual in the presence of complexes.
TOP
Plasmid DNA Transfection
Use the following procedure to transfect DNA into mammalian cells in a 24-well format. For other formats, see Scaling Up or Down Transfections. All amounts and volumes are given on a per well basis. Prepare complexes using a DNA (μg) to Lipofectamine® 2000 (μl) ratio of 1:2 to 1:3 for most cell lines. Transfect cells at high cell density for high efficiency, high expression levels, and to minimize cytotoxicity. Optimization may be necessary (see Optimizing Plasmid DNA Transfection).
TOPBiblioteka Optimizing Stealth™ RNAi or siRNA Transfection
To obtain the highest transfection efficiency and low non-specific effects, optimize transfection conditions by varying RNA and Lipofectamine® 2000 concentrations. Test 10-50 pmol RNA and 0.5-1.5 μl Lipofectamine® 2000 for 24- well format. Depending on the nature of the target gene, transfecting cells at higher densities may also be considered when optimizing conditions.
Stealth™ RNAi or siRNA Transfection
Use this brief procedure to transfect Stealth™ RNAi or siRNA into mammalian cells in a 24-well format. For other formats, see Scaling Up or Down Transfections. All amounts and volumes are given on a per well basis. Use this procedure as a starting point; optimize transfections as described in Optimizing St ealth™ RNAi or siRNA Transfection, especially if you are transfecting a mammalian cell line for the first time.
Optimizing Plasmid DNA Transfection
To obtain the highest transfection efficiency and low cytotoxicity, optimize transfection conditions by varying cell density as well as DNA and Lipofectamine® 2000 concentrations. Make sure that cells are greater than 90% confluent and vary DNA (μg): Lipofectamine® 2000 (μl) ratios from 1:0.5 to 1:5.
1. One day before transfection, plate cells in 500 μl of growth medium without antibiotics such that they will be 30 -50% confluent at the time of transfection. Note: Transfecting cells at a lower density allows a longer interval between transfection and assay time, and minimizes the loss of cell viability due to cell overgrowth. 2. For each transfection sample, prepare oligomer-Lipofectamine® 2000 complexes as follows: a. Dilute 20 pmol Stealth™ RNAi or siRNA oligomer in 50 μl Opti-MEM® I Reduced Serum Medium without serum (final concentration of RNA when added to the cells is 33 nM). Mix gently. b. Mix Lipofectamine® 2000 gently before use, then dilute 1 μl in 50 μl Opti- MEM® I Reduced Serum Medium. Mix gently and incubate for 5 minutes at room temperature. Note: Proceed to Step c within 25 minutes. c. After the 5-minute incubation, combine the diluted oligomer with the diluted Lipofectamine® 2000. Mix gently and incubate for 20 minutes at room temperature (solution may appear cloudy). 3. Add the oligomer-Lipofectamine® 2000 complexes to each well containing cells and medium. Mix gently by rocking the plate back and forth. Incubate the cells at 37° C in a CO2 incubator for 24-96 hours until you are ready to assay for gene knockdown. Medium may be changed after 4-6 hours.
1. Adherent cells: One day before transfection, plate 0.5-2 x 10⁵ cells in 500 μl of growth medium without antibiotics so that cells will be 70-90% confluent at the time of transfection. Suspension cells: Just prior to preparing complexes, plate 4-8 x 10⁵ cells in 500 μl of growth medium without antibiotics. 2. For each transfection sample, prepare complexes as follows: a. Dilute DNA in 50 μl of Opti-MEM® I Reduced Serum Medium without serum (or other medium without serum). Mix gently. b. Mix Lipofectamine® 2000 gently before use, then dilute the appropriate amount in 50 μl of Opti -MEM® I Medium. Incubate for 5 minutes at room temperature. Note: Proceed to Step c within 25 minutes. c. After the 5 minute incubation, combine the diluted DNA with diluted Lipofectamine® 2000 (total volume = 100 μl). Mix gently and incubate for 20 minutes at room temperature (solution may appear cloudy). Note: Complexes are stable for 6 hours at room temperature. 3. Add the 100 μl of complexes to each well containing cells and medium. Mix gently by rocking the plate back and forth. 4. Incubate cells at 37° C in a CO2 incubator for 18-48 hours prior to testing for transgene expression. Medium may be changed after 4-6 hours. 5. For stable cell lines: Passage cells at a 1:10 (or higher dilution) into fresh growth medium 24 hours after transfection. Add selective medium (if desired) the following day.